Have you ever tried to wrap text around a shape or image in Photoshopbut felt lost in the countless tutorials and guides?
Simplifying this artistic technique is easier than you think.
In this article, we’ll explore the simple steps to master wrap text in Photoshop, transforming your projects from basic to brilliant with just a few clicks.
Whether you’re a newbie or looking for a quick refresher, get ready to unleash your creativity and give your texts a stunning twist!
Table of Contents
How to Resize and Wrap Text in Photoshop
Resizing and wrapping text in Photoshop and Lightroom are essential for creating dynamic visual content.
These methods allow you to manipulate text layers and integrate text seamlessly into your designs.
Step-by-Step Guide to Wrapping Text
Wrapping text around a graphic or adding a shape in Adobe Photoshop enhances the composition of your project, making it more engaging and professional-looking.
Here’s how you can achieve this effect using the wrap text tool:
Open your project in Adobe Photoshop and select the Text Tool from the toolbox.
Click on the canvas and type your desired text.
If not selected, choose your text layer by clicking on it in the Layers Panel.
With the text layer selected, navigate to the Options Bar at the top of the screen and select the Text Wrap Feature.
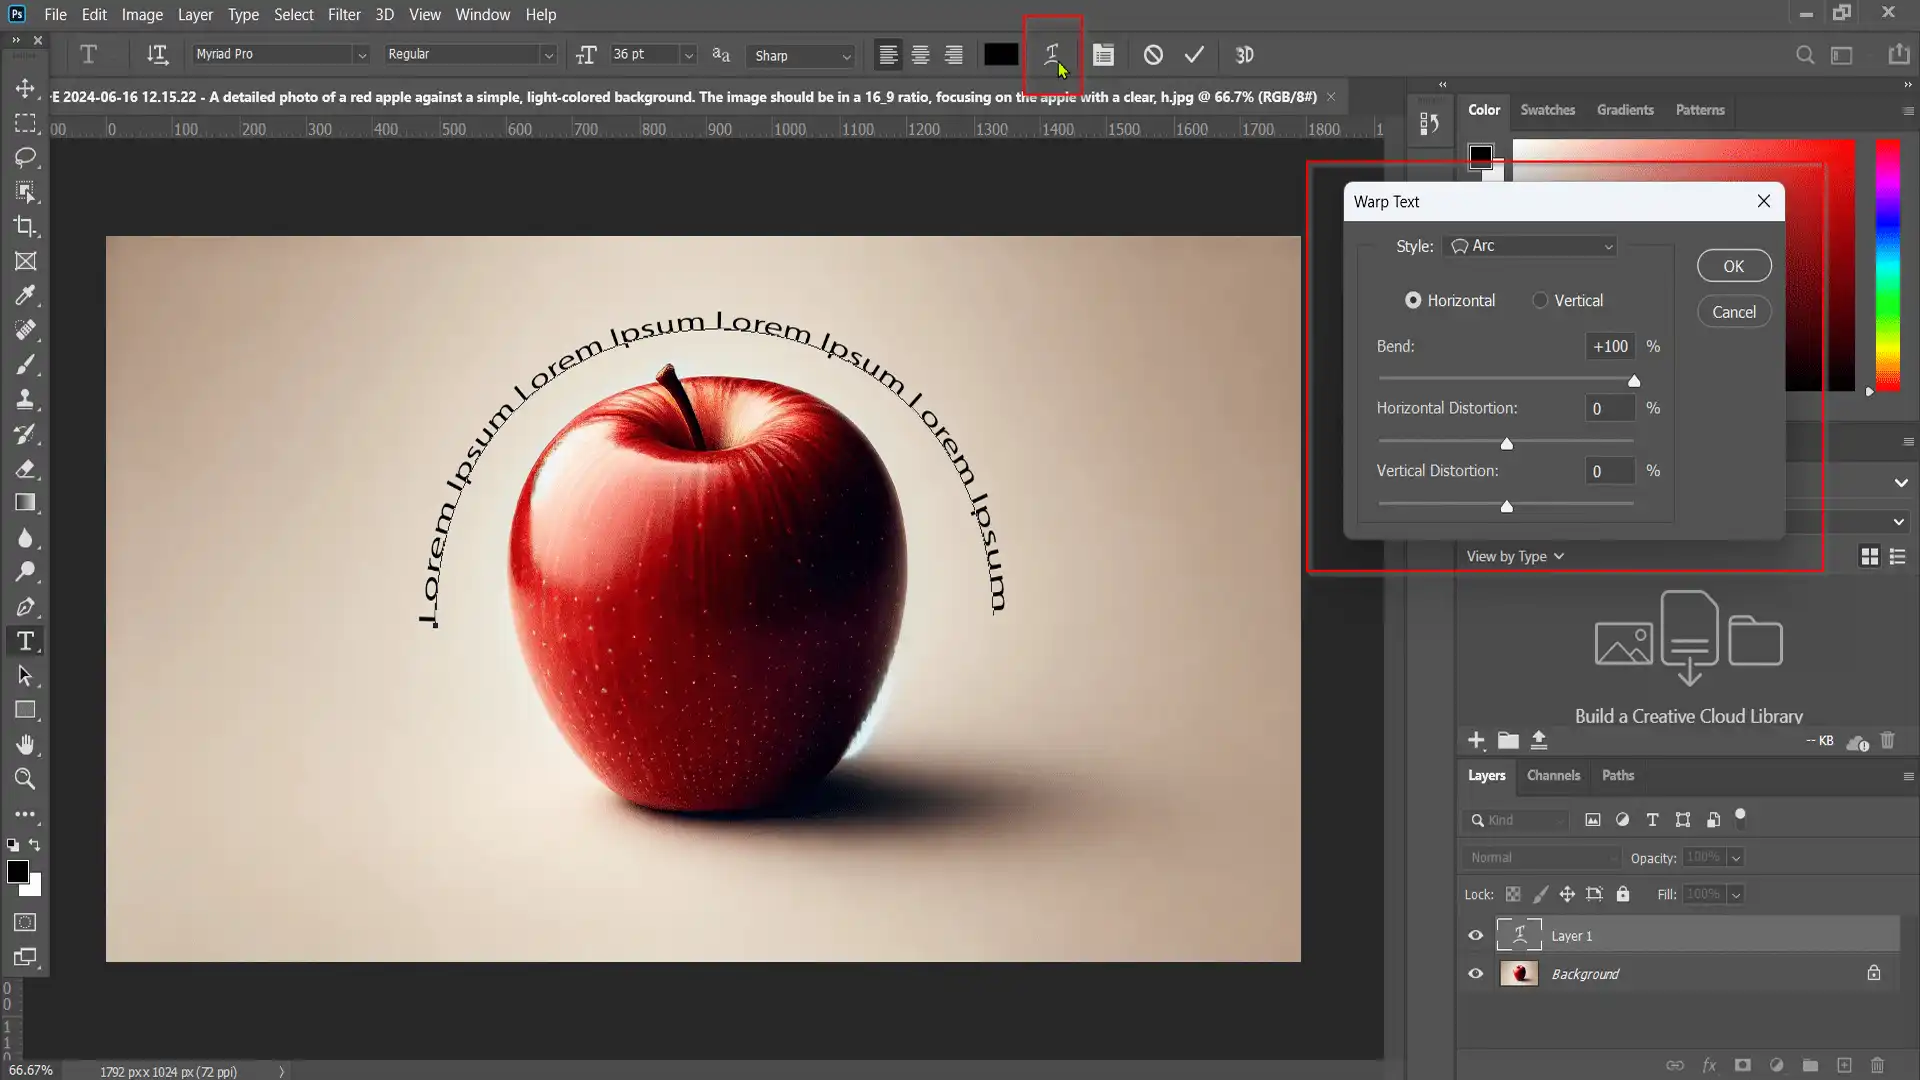
You can apply a specific warp style to your text by choosing from various styles, such as Arc, Bulge, or Wave.
This method allows you to explore different ways of integrating text with objects, improving readability and aesthetic appeal.
Adjusting Text Size for Better Wrapping
To effectively wrap text around an object, adjusting the font size is crucial for maintaining its visual impact and clarity:
Select your text layer, then hover over the bounding box until you see a two-sided arrow.
You can drag the corners of this box to increase or decrease the font size dynamically; this will help you better control the flow around shapes or images.
Alternatively, adjust font size via Character Panel: find the "Font Size" field and input the desired value.
Adjusting these facets ensures that your wrapped text maintains legibility while conforming aesthetically to other design elements.
Using Text Warp Tool Options
The Text Warptool provides diverse options for curving, bending, or shaping letters distinctively:
Select the layer containing all the text. Return to “Type” on the menu bar -> Warp Text -> opens a dialog box showing multiple warping options, such as Flag, Fish, Inflate, etc.
Experiment with different styles; click 'OK'once satisfied with the setting visible in the preview area.
Leveraging these tools within Adobe Photoshop allows enhanced creativity by transforming plain, flat words into eye-capturing formations that hug curves or angles as needed.
Each step incorporates practical actions linked closely with theoretical knowledge about working paths utilized during editing phases.
This underscores the versatility found only inside comprehensive digital environments, like Adobe Photoshop’s suite of utilities, which is dedicated to expansive manipulative capacities across texts and images alike!
The steps involve aligning text and making spacing adjustments, ensuring that all elements on your canvas are visually harmonious.
Alignment Techniques
After resizing your image, the text is essential to keep the aesthetics intact. Use the Horizontal Type Tool or the Type Tool from the toolbar to select all the text.
Look for visual guides or use the innovative art guides feature in Photoshop.
Aligning your text left, right, centre, or justified will depend on the original design layout and how elements shift post-resize.
In some cases, introducing new text boxes becomes necessary when existing ones no longer fit their contents appropriately after scaling. Ensure that each line maintains adequate breathing, which keeps your design clean and legible.
Here are some steps you can follow:
Select the Type Tool.
Click inside the affected text box.
Access alignment options through either the top menu or the options bar.
Adjust accordingly based on visual feedback.
This adjustment ensures that your message remains clear and well–organized despite changes in image dimensions.
Use the path selection tool for precise alignment techniques in Photoshop. This tool helps you position text and objects accurately along paths, enhancing your design’s overall balance.
Spacing Adjustments for Aesthetic Appeal
Proper spacing is pivotal in enhancing readability and adding a stylistic touch to your visuals post-resizing.
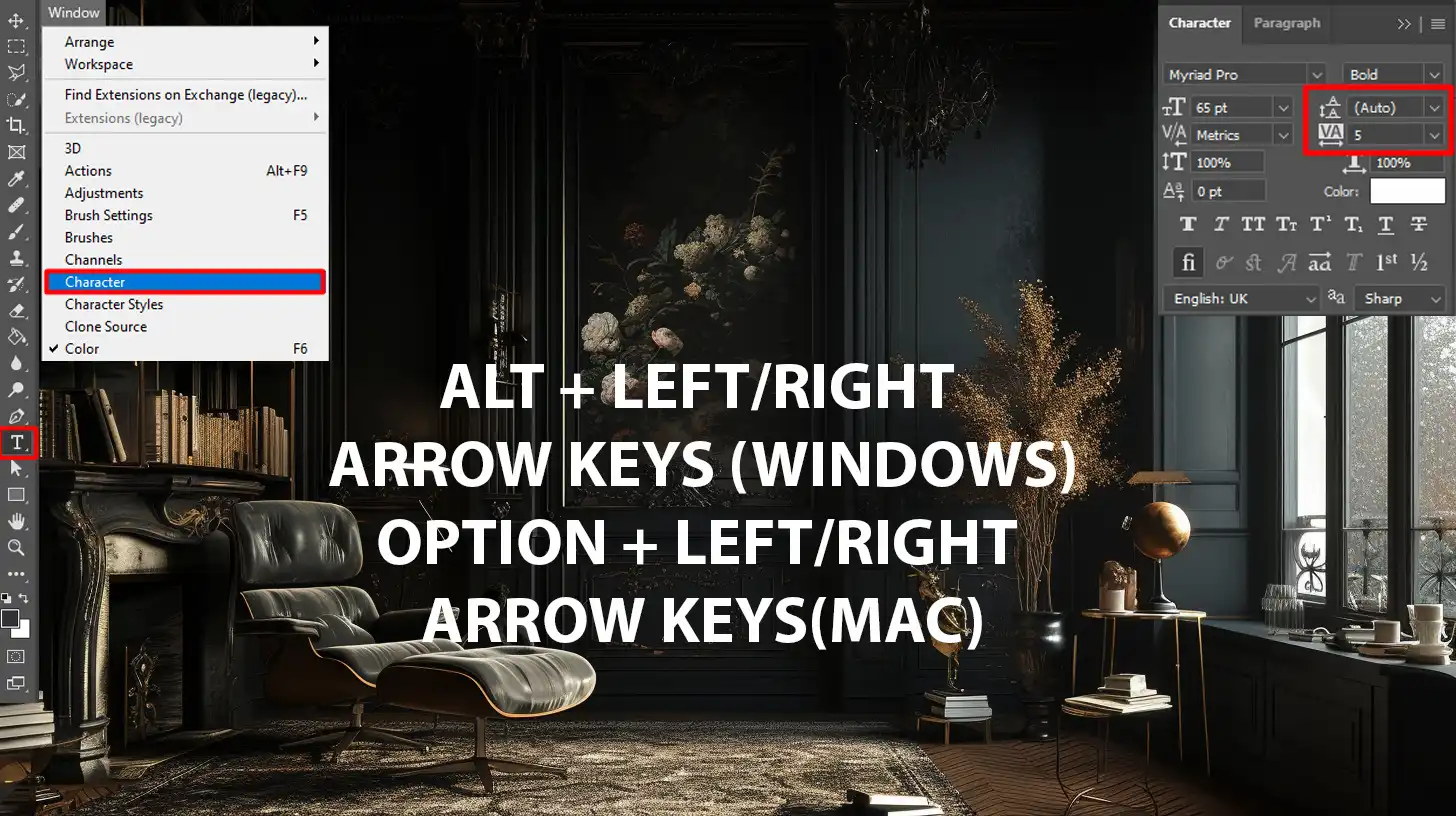
Beyond aligning text correctly, consider using features like character panel adjustments, which allow you to manipulate kerning (space between characters) and leading (line spacing).
Action
Steps
Open Character Panel
Navigate through Windows > Character.
Adjust Kerning
Place cursor between two letters where adjustment is needed; use Alt/Option + left/right arrow keys for precise control.
Modify Leading
Click on the auto-leading button or manually adjust values for customized spacing.
Fine-tuning these parameters might seem minute, but it can dramatically impact your design elements’ hierarchical structure and flow around resized images.
By adopting these approaches in Adobe Photoshop, every design element looks visually appealing and functionally coherent with optimal user experience at its core.
Mastering Text Wrap with the Options Bar and Shapes
In Photoshop, using the OptionsBar to wrap text around various shapes is essential for dynamic design. To create the perfect wrap effect, start by selecting the text layer and utilizing the OptionsBar. With your mouse button, you can create different shapes and manipulate the text inside those shapes.
The cursor will help you adjust and refine the wrap, ensuring the text flows seamlessly around your chosen shape.
To master this technique, it’s crucial to understand how to create and adjust shapes with the OptionsBar, your mouse button, and the cursor.
Experiment with different shapes and see how they influence the text inside. By mastering these elements, you’ll be able to wrap text more effectively and enhance your design projects.
Creating Flexible Text Wraps for Various Image Sizes
Mastering the art of text wrapdesign is essential for creating visually appealing and readable layouts.
Whether working in Adobe Photoshop or another platform, understanding how to wrap text around various image sizes effectively enhances the functionality and aesthetics of your projects.
Adapting Text to Fit New Dimensions
When resizing images in a document, like a newborn photograph, it’s crucial to adapt your text wrap strategies accordingly.
The dynamic nature of digital content requires flexibility. Images may change shape and size, but your text must remain aligned and readable regardless of these adjustments.
Firstly, consider using the rectangle tool or ellipse tool to create a vector that matches your new image dimensions. If you need to incorporate curved line, the ellipse tool can help with rounded shapes, while the rectangle tool is ideal for straight lines and angles. The rectangle tool can be used to create clean, geometric backgrounds or elements to complement your design. This method ensures that your text wrapscleanly around the contours of any graphic, maintaining a smooth flow and avoiding awkward gaps or overlaps.
Secondly, use Photoshop’s smart guides and alignment options within the options bar.
These tools help position your text optimally relative to the image, ensuring it adapts fluidly without manual adjustment each time an image is resized.
Understanding the Pen Tool in Photoshop
The Pen Tool in Adobe Photoshopis a powerful feature that allows you to create precise paths and shape tools.
Whether outlining an image, creating custom shapes, or designing complex curves, the Pen Tool gives you complete control over your design elements.
Dynamic Wrapping Techniques
Dynamic wrapping techniques rely heavily on utilizing advanced features like the pen tool to draw custom shapes directly beneath images:
Open your project in Adobe Photoshop and select the pen tool from the toolbox.
Draw a custom path around your image where you want the text to flow.
Once your path is created, right-click it and choose 'Make Text Path' to convert it into a text path.
Now, use the Text Tool to add your desired copy along this line, meticulously following every curve or corner.
This technique allows for greater creativity and precision in how text interacts with various elements within the design composite, delivering sophistication that is not achievable through basic methods.
Moreover,
By manipulating anchor points created with the pen tool,
Adjusting layer properties,
Incorporating different types of curves or angles (using commands such as modify paths),
designers can create highly customized text wraps that enhance readability and design aesthetics beyond conventional rectangular or circular wraps.
Remember, practice makes perfect when honing skills like dynamic wrapping.
The more often you experiment with different paths or tools (e.g., the path toolbar), the more intuitive it will become to adjust text alongside fluctuating image dimensions!
Creating Text Path
To create text path in Photoshop, start by selecting the Path Tool and using the Cursor to draw your desired shape. Once you have your path, Paste your text onto it and use the Cursor to drag the text along the path.
You can then edit the font and adjust its size while continuing to drag the text to fit perfectly along the path.
Refine the font placement and make any final adjustments to the text alignment.
Adjust the Font and settings to align your text along the path, whether it’s a straight Line or complex shape.
By fine-tuning the Paragraph settings and Points on the path, you can achieve a precise and dynamic text layout.
Working with Layer Masks for Text Wrapping
Utilizing layer masks in Adobe Photoshop offers unparalleled control when blending text with images.
This technique enriches design aesthetics and enhances message clarity.
Integrating Text and Images Seamless
For instance, the text wrap feature can allow text to flow organically around graphic elements.
Start by Creating a New Layer: Begin your project by adding a new layer to your workspace, ensuring that all changes are non-destructive.
Apply a Background Layer: Place your chosen image as a background layer, setting the stage for your text.
Draw Paths Around Objects: Use tools like the ellipse tool or rectangle tool to draw paths around the elements you want to surround with text.
Add Your Text: Using the text tool, add your desired content near the drawn path. Adjust font size and style to match the visual hierarchy of your design.
Wrap Text Around Path: Activate the wrap-around object feature, which allows your words to curve elegantly along the previously drawn outlines.
By attentively aligning the textual elements with image contours, designers achieve an engaging visual narrative that guides viewers’ eyes through artful compositions.
Layer Mask Tips for Text Manipulation
Layer masks are pivotal for editing visibility zones on layers without erasing data permanently, making them excellent for nuanced text manipulation:
Utilize Feather Effects on Masks: Softening edges through feather effects in masks helps blend text into backgrounds smoothly without hard lines that interrupt transitions.
Adjust Opacity Settings": Tweaking a mask's opacity lets designers fine-tune how much underlying content should peek through, ideal for subtler details or ghosted words over images.
Work Path Flexibility: Harness work paths within masks for defining which parts of an overlay should remain hidden or revealed while adapting to any shape alterations engaged during creative updates."
Use Clipping Paths: Fine-tune your masking by clipping specifics without any overlap between texts and visited, efficiently using Photoshop tools such as curves or pen tool adjustments."
Employing these strategies allows for more dynamic layouts in which written content actively interacts with imagery rather than merely lying atop surfaces unconnectedly,
It evolves into part of an integrated whole visual storytelling amplified with Photoshop layer masking!
Designers extensively enhance their canvas functionality while significantly elevating artwork impacts viewed across differing platforms and content, an essential skill set honed within every proficient Photoshop user’s repertoire!
Advanced Text Wrapping: Curving Text Around Objects
In Adobe Photoshop, manipulating text to follow the natural outline of shapes and objects opens many creative possibilities.
Perfecting this skill can enhance the visual harmony of your designs, allowing text to flow around everything from simple circles to complex landscapes.
The text portrait effect in Photoshop is a great way to integrate text with images, including curving text around objects. This technique ensures your text follows the contours of your design, enhancing visual appeal.
Using the Path Tool with Text
When you aim to wrap text around a specific shape or object, utilizing the Path toolin Photoshop is indispensable. The tool allows precise control by creating a work path that text can follow.
To start, select the Pen tool or any shape tool like the Ellipse tool if you are dealing with rounded objects.
For more precise control over your shapes, particularly when working with circles or ovals, the Ellipse tool can be especially useful.
Carefully draw the desired path where you want your text to curve along.
Once your path is complete, switch to the Text tool, click on the drawn path, and start typing. Your text will magically follow the contour of the path created.
Utilizing paths for text wrapping enhances aesthetic appeal and increases readability when integrating text with intricate imagery.
Conforming Text to Complex Shapes
Sometimes, your design might involve more complex shapes than regular advanced manipulation using text warp options, and direct adjustments on anchor points are necessary for these scenarios.
Begin by typing out your text, usually near the shape you wish it to conform to. Enter free transform mode by using Ctrl+T (or Cmd+T on Mode).
Right-clicking on the transformed box reveals warp modes, including arc, bulge, shell, and flag, which are helpful for standard curves.
For more intricate matching, like wrapping text within an irregular landform, manually adjust individual anchor points.
Select the direct selection tool (A key), then click and drag each point until your text perfectly mimics every nuance of your underlying shape.
Wrapping up! These methods enable functional communication through designs and ensure that aesthetics don’t take a backseat.
Unlock creative Photoshop text effects by learning how to apply them along a curved line. Mastering these techniques enhances text wrapping and styling, making your designs more dynamic.
Editing and Dragging Font Along a Line
To edit and drag font along a line in Photoshop, first create a path with the Linetool. Then, drag the text along this path. Use the text settings to edit the font as needed. Adjust and refine the font while dragging it to ensure it aligns perfectly with the line.
Frequently Asked Questions
Is there text wrap in Photoshop?
Yes, Adobe Photoshop allows for text wrap mainly through its work with paths and shapes.
Use the Pen toolor any Shape toolsto create a path and then add text to follow it, wrapping text around objects for a creative effect.
How do I freely warp text in Photoshop?
To warp text freely in Photoshop, select the text layer you want to manipulate, click on the “Edit” menu, then choose “Transform,” and optionally select ”Warp.”
From here, you can adjust the text using various warp styles from the Options bar to achieve the desired effect.
How to do wrapping in Photoshop?
Wrapping in Photoshop often involves clipping masks or text on a path to wrap text around images or shapes.
Create a layer with your desired shape and use it as a guide to flow your text around it, achieving a wrap effect.
How to wrap a text box around an image?
To wrap text around an image in Photoshop, place the image on your canvas and create a path to define where the text will flow.
Use the Pentool to create a path around the image and a text tool to add your text along the path for a wrapping effect.
As a passionate graphic designer, mastering text wrapping in Photoshop has elevated my projects to a professional level. I remember working on a magazine layout where wrapping text around intricate images was initially overwhelming.
By following the techniques discussed, my designs transformed significantly. This hands-on experience taught me the value of patience and practice.
Enhance your design skills further with our specialized courses. Explore our comprehensive Photoshop course and Lightroom course to take your creativity to the next level! Enroll today and start creating stunning, professional-quality designs!
If this article has helped you, then Like and Share it with your friends
$2,061.00Original price was: $2,061.00.$1,061.00Current price is: $1,061.00. 27584
Download Your Free Guide Now!
Discover the secrets of photography with our printable guide! Master essential techniques like aperture, shutter speed, and ISO to create stunning images. Get your free printable PDF now and start turning your snapshots into masterpieces!