Upscaling images in Photoshop is the answer to everything.
This method enhances details while preserving quality, letting you turn smaller pictures into large vibrant prints.
Whether for personal photos or professional graphics, mastering image upscaling can transform their appearance.
Let’s explore some simple steps to efficiently upgrade your digital artwork with Photoshop.
Table of Contents
Step by Step Guide to Photoshop Upscale Image
To begin, familiarize yourself with the process of resizing an image and resizing a layer. Properly adjusting these elements lays the groundwork for successful upscaling.
1. Selecting the Right Image for Upscaling Images In Photoshop
Start by choosing a digital image that is most suitable for upscaling.
A high resolution image already has a good amount of details, which makes it ideal over low resolution images.
Focus on selecting original images with less noise and more defined borders to ensure better final results.
Pro Tip: You can always add noise to a picture if needed.
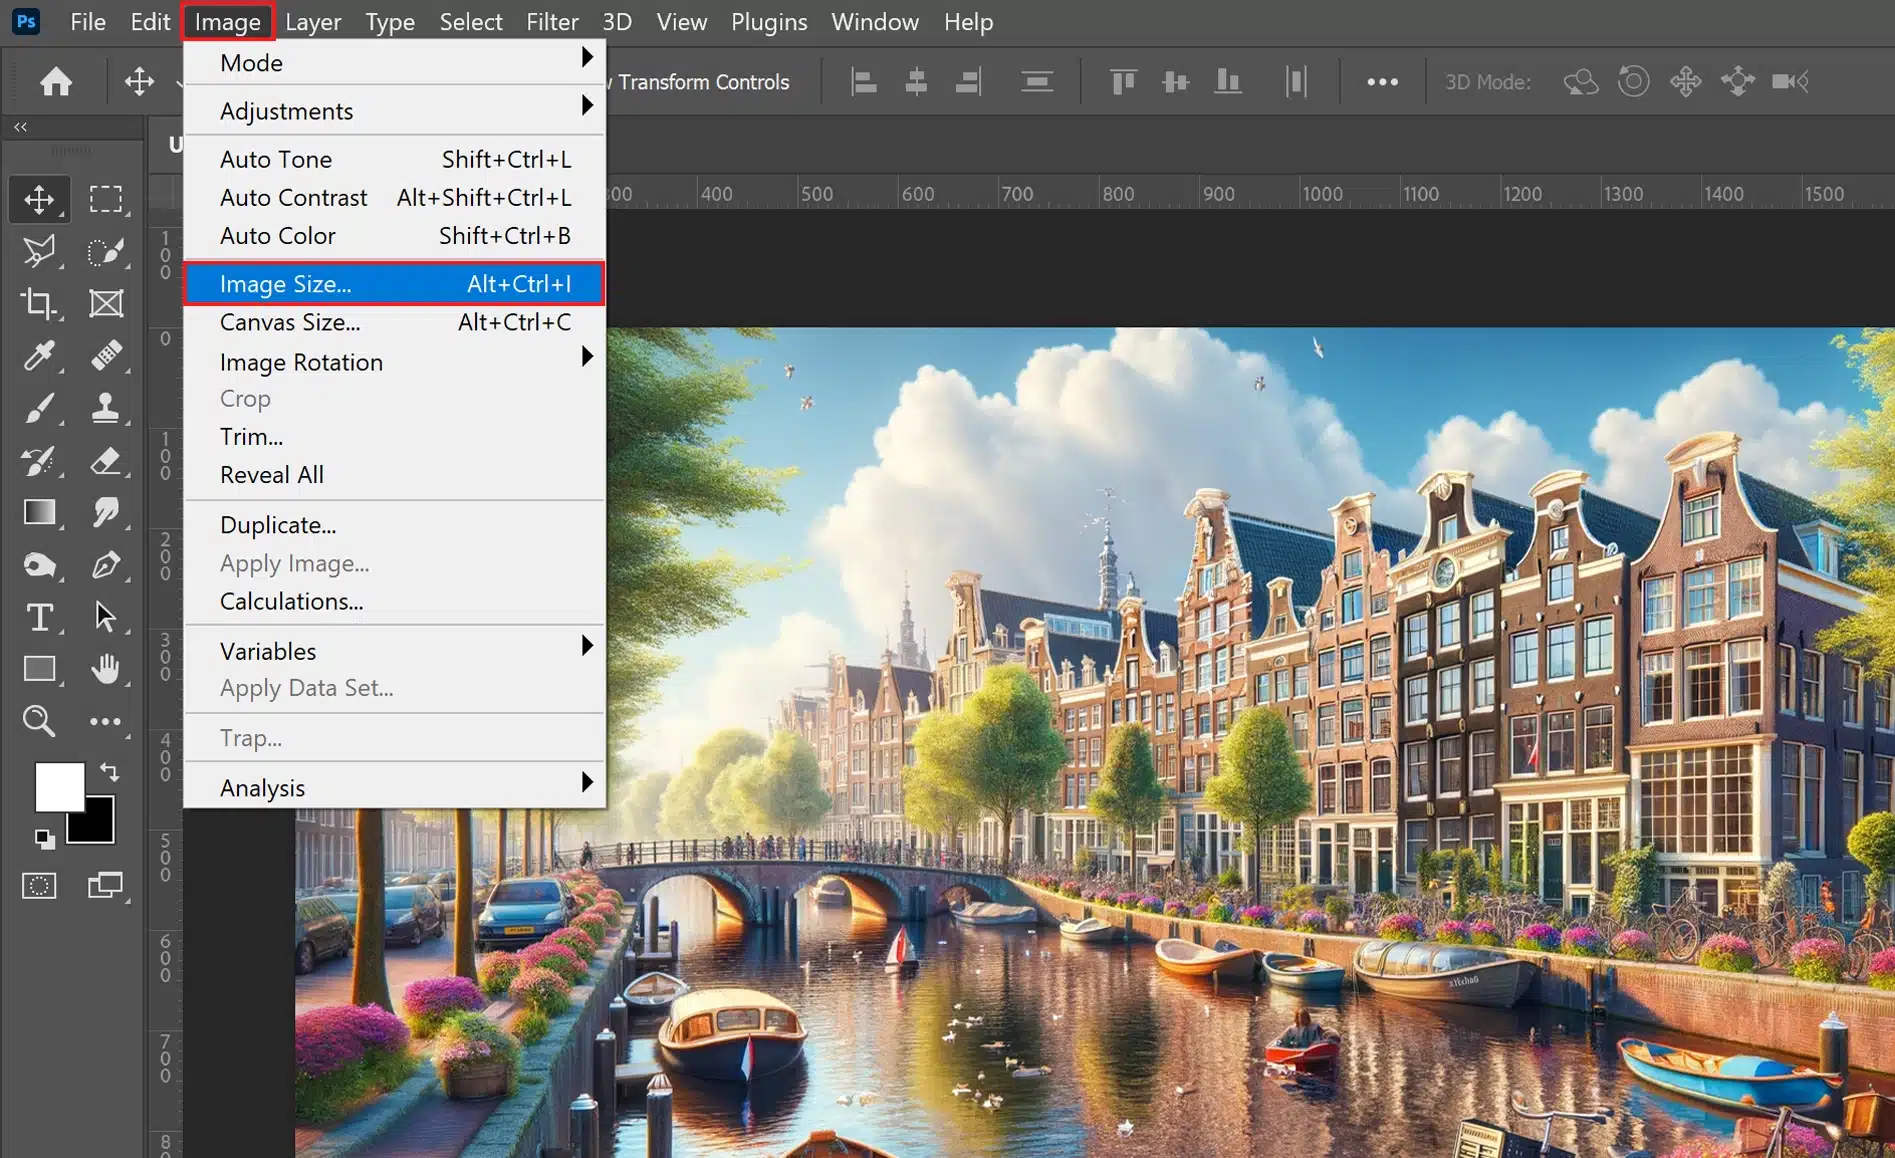
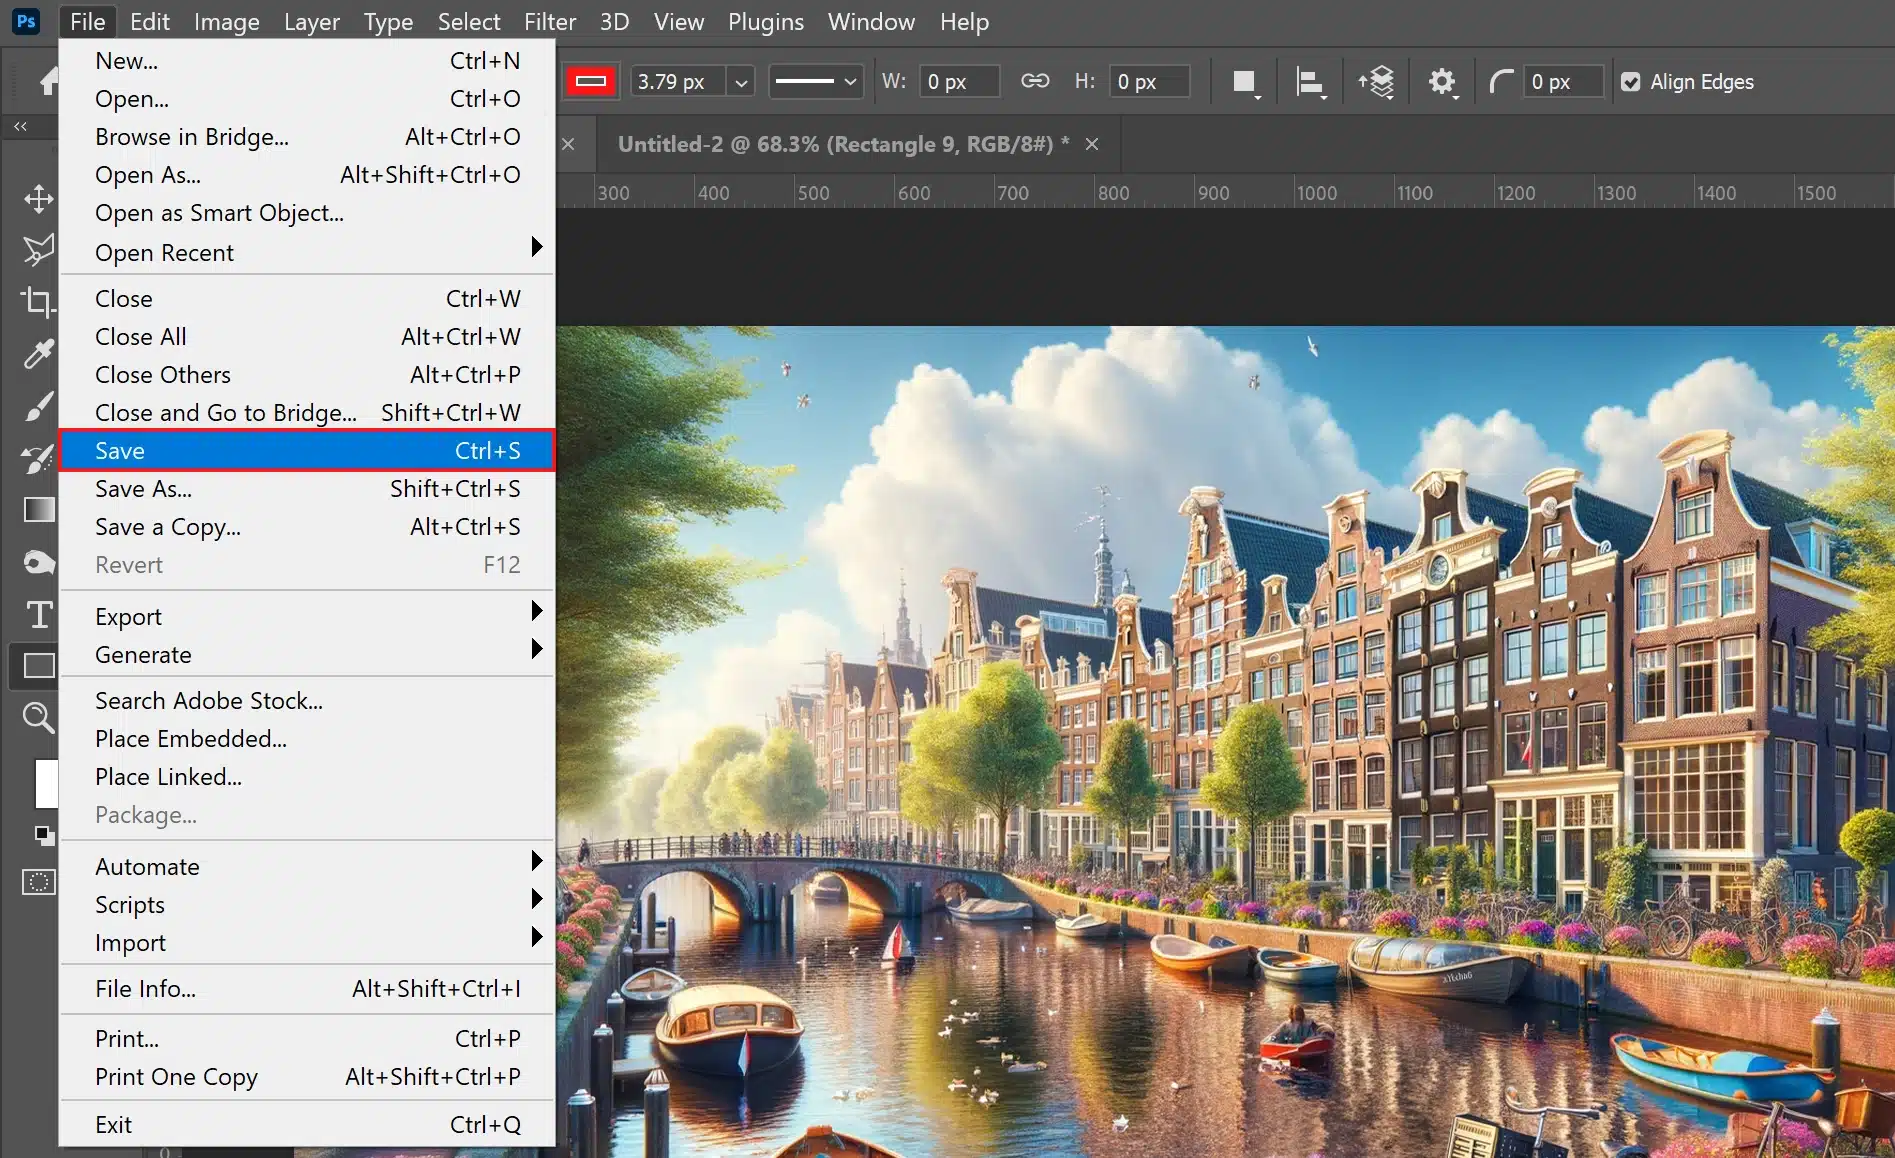
2. Navigating to Image Size Dialog Box Options
Accessing the right settings is crucial.
Open your digital image in Adobe Photoshop and navigate to ‘Image‘ then ‘Image Size‘ from the top menu, which will launch the Image Size dialog box.
This step sets the ground for effective resizing, as critical adjustments are done here.
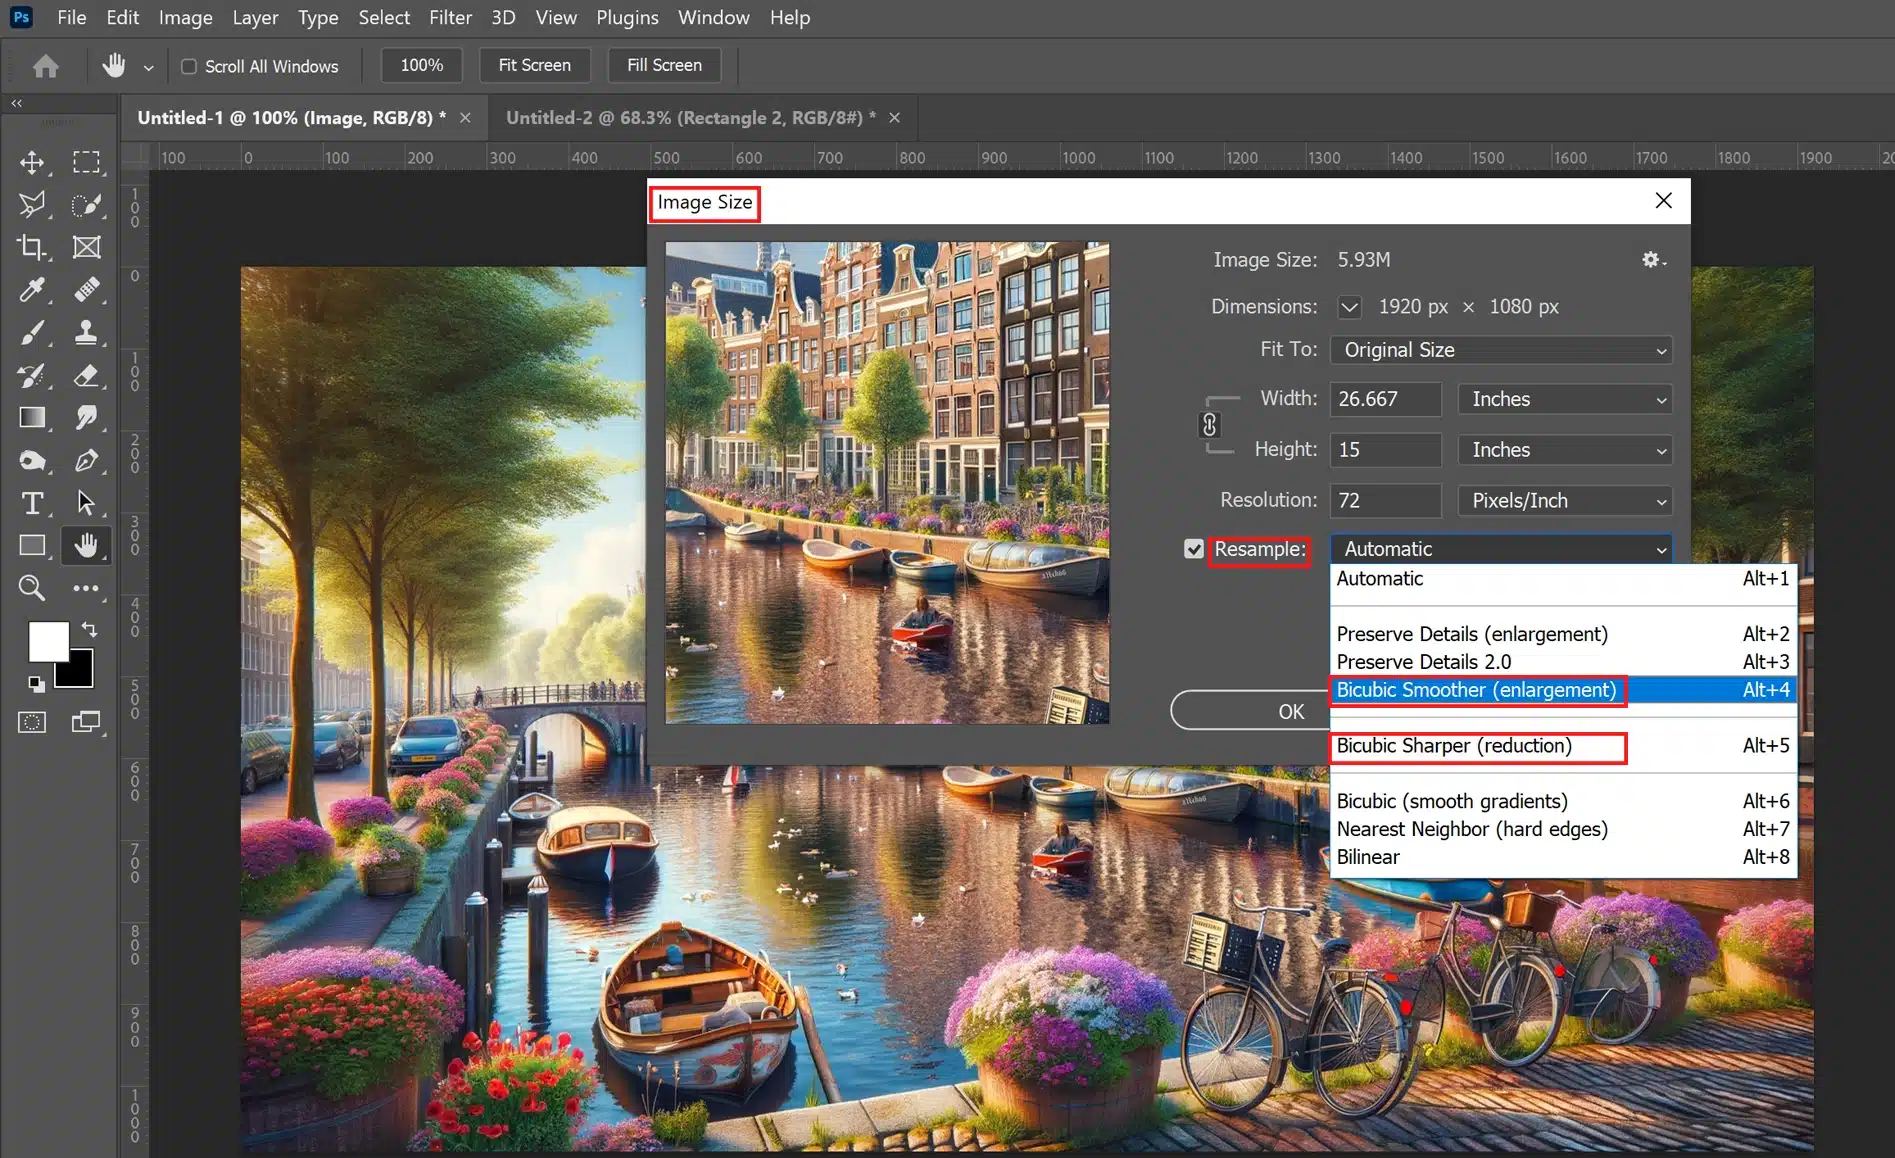
3. Choosing the Appropriate Resampling Options
In the Image Size dialog box, turn your attention to the section labeled ‘Resampling.’
Here, you have several options:
Understanding Bicubic Smoother vs Bicubic Sharper
Choosing between Bicubic Smoother ( best for enlarging images) and Bicubic Sharper ( ideal when reducing size) largely depends on your specific needs.
The resampling method determines how pixel dimensions are recalculated, hugely impacting original image’s texture.
4. Adjusting the Resolution and Dimensions
Refine document size within this same dialog box. Be careful when adjusting the width, height (measured in pixels ), and resolution ( measured in pixels/inch ) sectors.
Adjustments should be made considering how higher resolution affects the size of the file but enhances pixel dimensions without losing much on image quality.
5. Reviewing and Saving the Upscaled Image
After altering pixel dimensions, preview image changes by toggling the ‘Preview’ checkbox on/off within the dialog box to compare against your raw details setting before committing to them.
If satisfied with adjustments and enlargement outcome preserving desired qualities surrounding pixels & visual definition proceed to save your work using suitable file formats like JPEG or TIFF.
Photoshop Upscale Alternatives
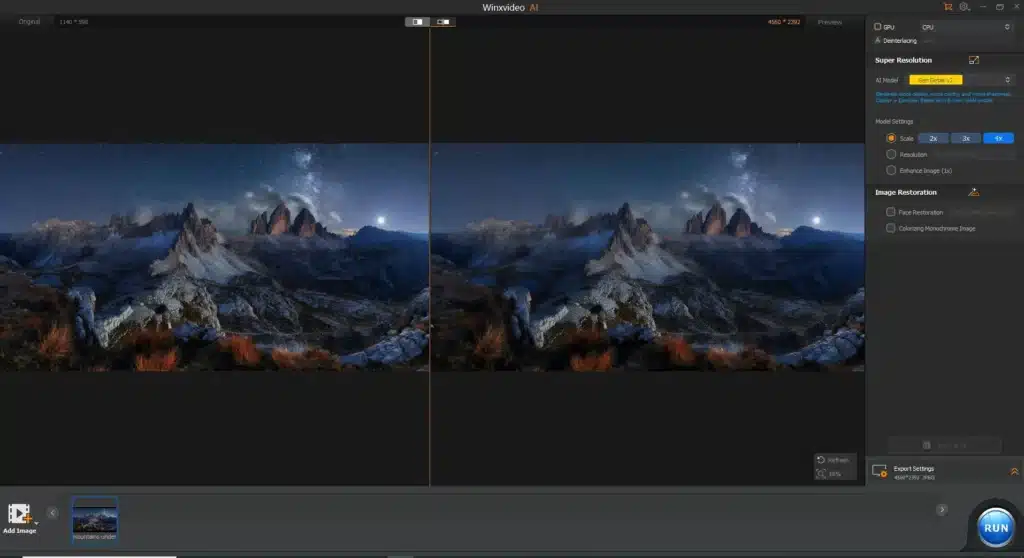
If you’re looking for an cheaper way to upscale images, consider using Winxvideo AI. This AI-powered tool allows you to enhance low-resolution images up to 4K, 8K, or even 10K with real, detailed results.
It’s a top alternative to Photoshop. It can restore old, blurry, or noisy photos, and even colorize black-and-white images. If you’re in a hurry or dealing with a batch of images, Winxvideo can save you a ton of time.
Optimizing Image Quality During Upscaling in Photoshop
When increasing the size of an image in Adobe Photoshop, it’s essential to keep the quality high.
Here are some effective strategies to achieve precise and detailed upscaled images:
Reducing Noise and Artifacts
Upscaling can introduce unwanted noise and artifacts, particularly with lower quality originals. To mitigate this:
Use Photoshop’s noise reduction tools before enlarging the image.
Choose a resampling method like Bicubic Smoother to minimize noise and keep essential details sharp.
Evaluate the original image quality and tailor your approach for the best results.
By following these streamlined steps in Adobe Photoshop, you can upscale images effectively, ensuring they remain suitable for both print and digital use while maintaining professional quality.
Common Challenges in Adobe Photoshop Image Upscaling
When enhancing the image size in Photoshop, various hurdles can compromise the quality of your results.
From losing clarity to distorting colors, understanding these challenges helps in choosing the proper techniques and tools for effective upscaling.
Dealing with Pixelation Issues
In the quest to enlarge images, one common issue is pixelation.
This occurs because the interpolation method used during resizing images can’t adequately replicate data for new pixels.
The traditional approach increases each pixel’s size, which disrupts the original image’s smooth appearance.
To handle this, you could utilize a more sophisticated resampling method that assesses surrounding pixels to create a balance and enhance image continuity, thus reducing overt pixelation.
To effectively combat pixelation troubles, it’s often wise to experiment with different Lightroom settings within the “image size dialog box,” where you choose an apt resampling method tailored for enlargement purposes.
Quality tools like Photoshop’s super resolution feature also leverage AI technologies to predict and add missing details realistically during upscale processes.
Maintaining Color Integrity and Brightness
Another significant hurdle while resizing includes maintaining the accurate reproduction of colors and brightness levels an essential aspect when dealing with photography or digital art meant for high quality prints or displays.
When you change an image’s dimensions in Photoshop using options like “Resize Image,” there can be unintentional shifts in color fidelity, brightness or aspect ratio, affecting how the image appears.
Ensuring consistency involves careful monitoring of “image resolution” settings and opting for a suitable interpolation method.
One practical approach is adjusting “document size” settings without altering the native pixel dimensions excessively to preserve initial color vibes.
Utilizing features designed for high resolution images in raw files can assist in managing these adjustments effectively.
Advanced Techniques for Professional Quality Upscaling
In digital photography and design, professional quality upscaling is essential.
It involves sophisticated techniques to enhance image size while preserving detail and preventing pixelation, ensuring the integrity of high resolution images.
This tool uses advanced machine learning to intelligently increase the pixel dimensions of an image, improving detail and color accuracy.
Additionally, the content aware scale allows users to resize images adaptively, avoiding distortion of crucial elements.
Leveraging Third Party Plugins and Tools
Photoshop’s capabilities are augmented by third party plugins, which offer specialized algorithms for better texture handling and detail sharpening:
Topaz Gigapixel AI utilizes deep learning technology for image enlargement.
ON1 Resize uses fractal based interpolation to enhance details and reduce noise.
Alien Skin Blow Up maintains sharpness without creating artifacts.
These plugins are handy for large scale print projects where clarity and file size are essential.
Exploring Alternative Software for Hybrid Workflows
Hybrid workflows combine multiple software solutions to utilize the strengths of different platforms.
For example, using Lightroom for initial detail preservation, followed by Photoshop for detailed adjustments, can enhance efficiency.
This approach is beneficial for integrating various visual arts techniques and non destructive resizing layers.
Comparison of Key Tools and Techniques
Tool/Feature
Function
Benefit
Super Resolution
AI driven upscaling
Enhances detail and color accuracy
Content Aware Scale
Adaptive resizing
Prevents distortion of crucial elements
Third Party Plugins
Advanced algorithms
Improves texture handling and sharpness
Hybrid Workflows
Combining software
Optimizes efficiency and versatility
By mastering these techniques, designers and photographers can significantly enhance their projects, ensuring high photo quality and satisfying client demands for exceptional digital artwork.
Practical Tips for Efficient Workflow in Photoshop Upscaling Images
Setting Up Effective Photoshop Workspaces
Customizing your workspace is crucial to maximize productivity during upscaling tasks in Photoshop.
A well organized workspace allows quicker access to necessary tools and panels, which streamlines the scaling process.
For instance, arrange your workspace to have quick access to panels like Layers, History, and Tools.
Use the “Workspace” menu option to save multiple layouts customized for different tasks, enlarging images might demand a different layout compared to color correction or photo merging.
Step 1: Open the ‘Window‘ menu, select ‘Workspace,’ then ‘New Workspace‘.
Step 2: Name your workspace according to its purpose (e.g., “Upscaling“).
This tailored setup not only saves time but minimizes disruptions, allowing for a smoother workflow.
Keyboard Shortcuts and Automation Scripts
Leveraging keyboard shortcuts and automation scripts can dramatically reduce the time spent on repetitive upscaling tasks.
Memorizing shortcut keys for actions such as increasing document size or adjusting resolution can significantly speed up operations.
For example:
1. Use Alt+Ctrl+I (Windows) or Option+Cmd+I (Mac) for quick image resizing dialogs.
2. Utilize Actions in Photoshop to automate sequences like upscale processing with predefined settings.
Moreover, refer to our detailed guide on Photoshop Shortcuts for further enhancing your speed and ensuring efficient use of image in photoshop manipulations.
Maintaining Original Image Backups
When working on extensive editing projects, preserving the original files is essential.
Before beginning any substantial edits or resizing actions:
1. Always create copies of original files.
2. Store these backups in an organized manner that makes them easy to locate if needed.
Ensuring there’s a fallback preserves your hard work from potential data corruption or undesired alteration during editing phases where the integrity of the digital images could be compromised unintentionally by the cropping feature.
Incorporating these practical steps into your Photoshop upscaling workflow will efficiently manage file sizes without sacrificing output quality while mitigating risks associated with irreversible modifications to the original files.
Frequently Asked Questions
How do I upscale an image in Photoshop?
To upscale an image in Photoshop:
Open the “Image Size” dialog box from the Image menu.
Choose a resampling method like “Preserve Details 2.0” from the dropdown menu.
Adjust the pixel dimensions to increase the size of the image while preserving quality.
Click “OK” to apply the changes.
Can you improve image quality in Photoshop?
Yes, enhancing image quality in Photoshop is straightforward. Go to the “Filter” menu and choose options like “Sharpen” or “Noise Reduction” to enhance clarity.
Additionally, you can use the “Adjustments” panel to tweak brightness, contrast, and color vibrancy, significantly improving your image’s quality.
What is the upscale plugin for Photoshop?
Photoshop offers several plugins that can help upscale images.
A popular option is the “ON1 Resize” plugin, which uses Genuine Fractals technology to resize images without losing detail.
Adobe’s built-in tools like “Preserve Details 2.0” and “Super Resolution” are also excellent for upscaling images directly within Photoshop.
One such feature is “Super Resolution,” available in Adobe Camera Raw, which uses machine learning to increase the resolution and detail of your images.
$2,061.00Original price was: $2,061.00.$1,061.00Current price is: $1,061.00. 27582
Download Your Free Guide Now!
Discover the secrets of photography with our printable guide! Master essential techniques like aperture, shutter speed, and ISO to create stunning images. Get your free printable PDF now and start turning your snapshots into masterpieces!