Photoshop Star Shape: Creating and Customizing Star Designs
Photoshop Star Shape: Creating and Customizing Star Designs
Creating a stunning Photoshop star shape can elevate your design projects to the next level.
Have you ever wondered how professionals craft those perfect star shapes in Photoshop and Lightroom? Well, you’re in the right place.
In this article, I’ll guide you through the step-by-step process, making it easy and enjoyable. Imagine adding that extra sparkle to your designs effortlessly.
Intrigued?
Let’s dive in and unlock the secrets to mastering the star shape in Photoshop!
Table of Contents
Creating a Star Shape in Photoshop
Creating star shapes in Photoshop is straightforward and fun.
In this section, we’ll explore how to use the polygon tool to draw perfect star shapes with ease.
Using the Polygon Tool
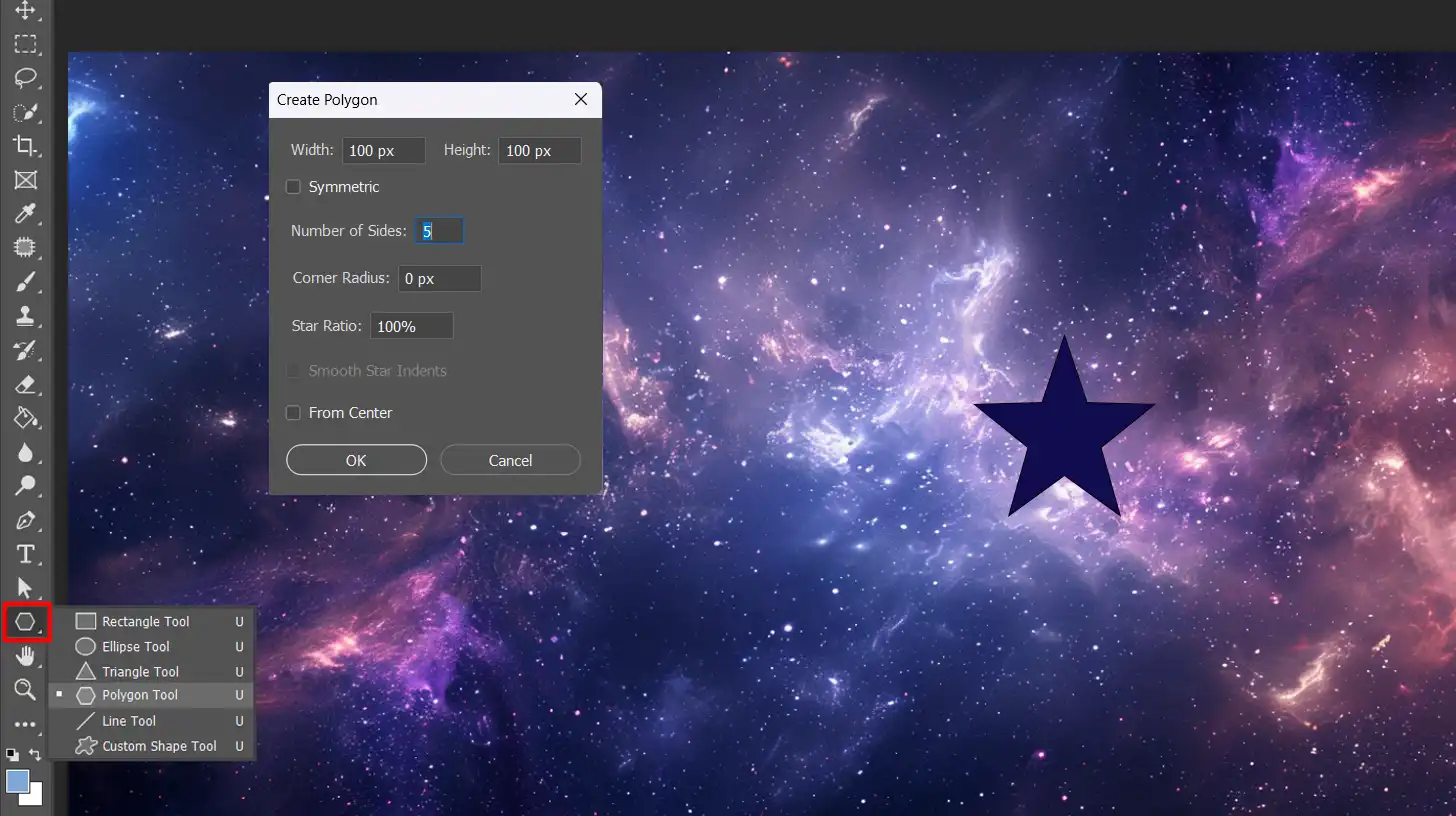
Let’s start with it. This tool helps make star shapes easy. In the shape tools palette, select the polygon tool.
Next, click anywhere on your workspace. A dialog box will appear.
In this dialog box, choose the number of sides. For a star, enter 5 or more. Then, check the Star option.
Finally, drag on your canvas to draw your star shape. Hold down the shift key to keep proportions even.
Steps to Create a Star Shape in Photoshop:
Select the polygon tool from the shape tools palette.
Click on your workspace to open the dialog box.
Enter the number of sides (5 or more) and check the Star option.
Drag on the canvas while holding the shift key to draw the star.
Adjusting the Star Shape in Photoshop
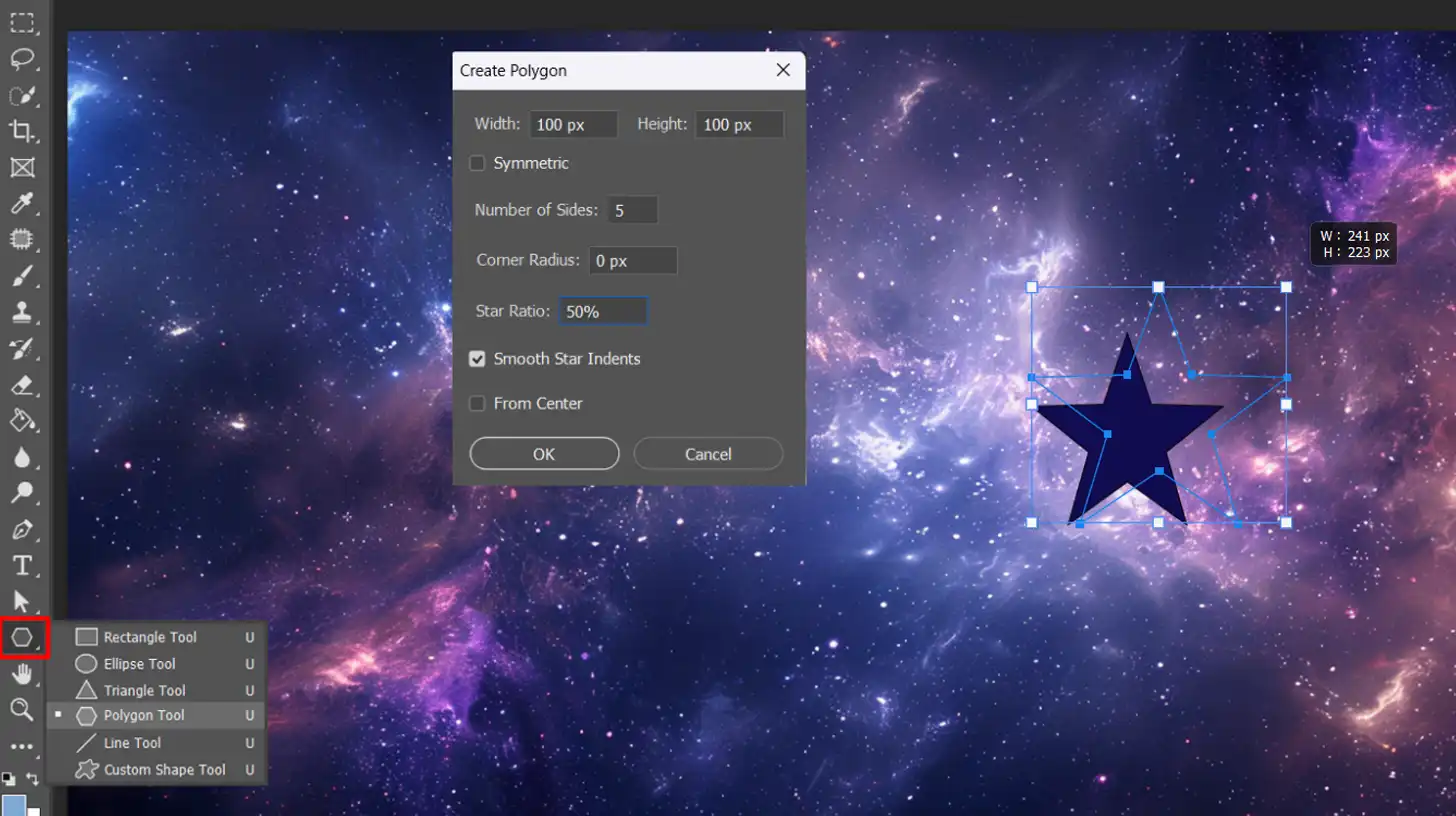
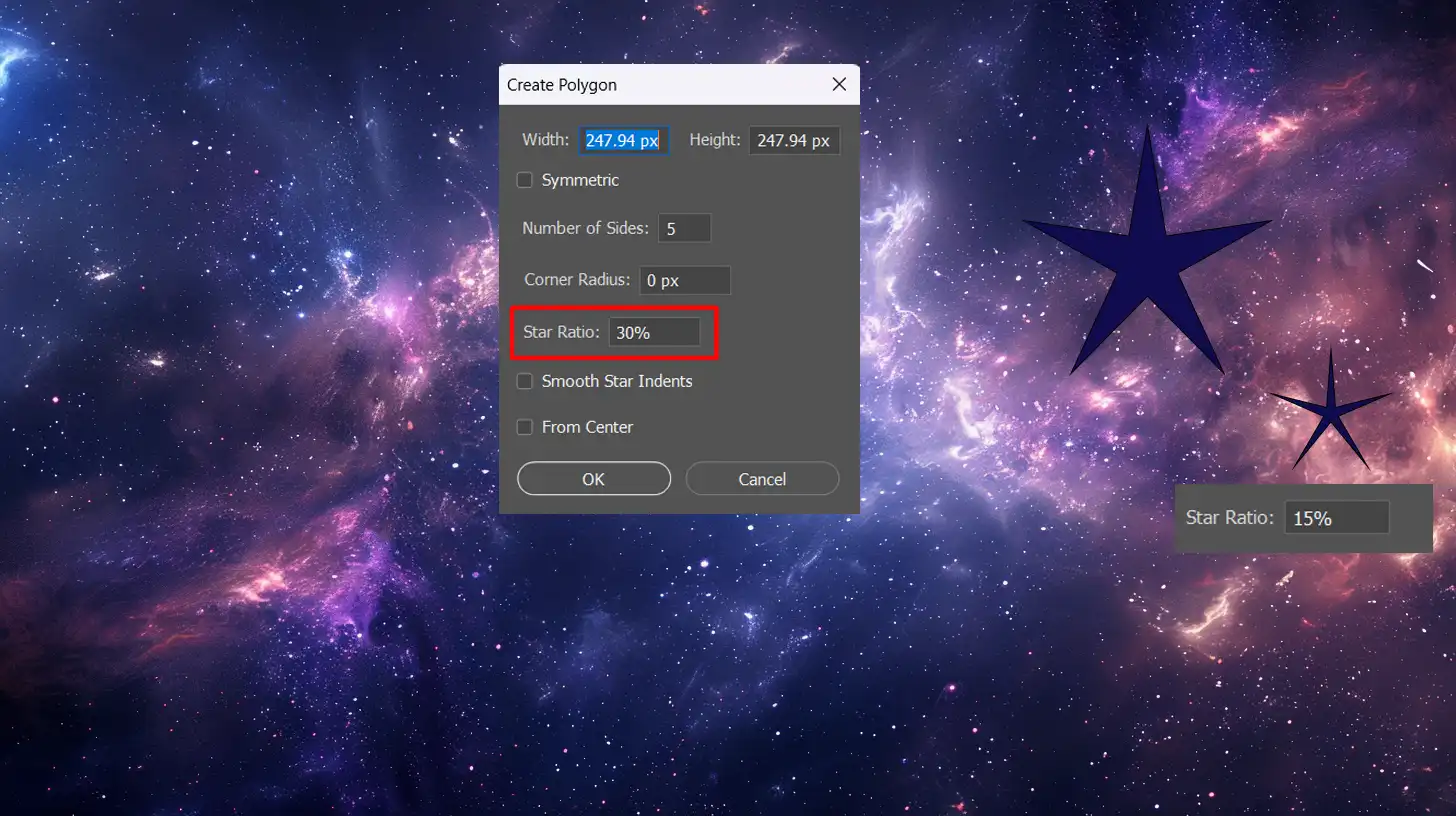
Once your star shape in Photoshop is drawn, use the properties panel for adjustments. You can change the size and star ratio value.
Additionally, you can switch to the move tool to reposition your shape. Use the options bar for further tweaks.
If you want to edit star shapes at any point, just double-click on your star. This opens up additional options in the properties panel.
Adjusting Steps on how to create Photoshop Star Shape:
Use the properties panel to adjust size and star ratio.
Switch to the move tool to reposition the shape.
Double-click the star to open more options in the properties panel.
Customizing Star Points in Photoshop
For those who like unique designs, you can customize star shapes. Head over to the shapes panel and select the custom shape tool.
Here, look for vector star shapes or create a new custom shape. Adjust the star ratio and other vector shape parameters.
To further enhance your design, you can add stroke or fill colors via the shape layer. Experiment with different vector shapes to find what works best.
Pro Tip: Save your custom settings in the options bar for quick access in future projects.
Take your star shapes to the next level with advanced techniques in Photoshop. In this section, we’ll delve into creating vector shapes for more precise and flexible designs.
To elevate your star shapes in Photoshop, let’s compare differentadvanced techniques:
Technique
Description
Best For
Creating Vector Shapes
Use the Polygon Tool, adjust sides and star ratio for precise and flexible designs.
Detailed and scalable star shapes
Using Custom Shapes
Select from pre-designed star shapes in the shapes panel for quick and consistent results.
Quick projects and consistent designs
Combining Elements
Merge star shapes with other elements like backgrounds and borders for a creative flair.
Complex and layered designs
Layer Effects
Apply various layer effects like strokes and fills to enhance star shapes.
Adding depth and visual interest
Creating Vector Shapes
Drawing stars using the shape tool is just the beginning. For more precision, switch to vector shapes. The custom shape tool in Photoshop allows you to explore various vector star shapes.
To create a vector shape star:
Select the polygon tool.
Enter the number of sides and check 'Star'.
Carefully adjust the ratio value for the right look.
Once the shape is drawn, fine-tune its position and size using the properties panel.
Using Custom Shapes
Custom shapes offer flexibility. Using custom shapes allows you to easily add shapes to your project, enhancing your design with unique and versatile elements.
Go to the shapes panel, select custom shapes, and find the perfect vector star. These pre-designed shapes can save time and ensure consistency.
To add a custom shape to your project:
Choose the custom shape tool and select from the available vector star shapes.
Adjust the star ratio value and color using the options bar.
Apply fill or stroke colors through the layers panel.
Combining Star Shapes with Other Elements
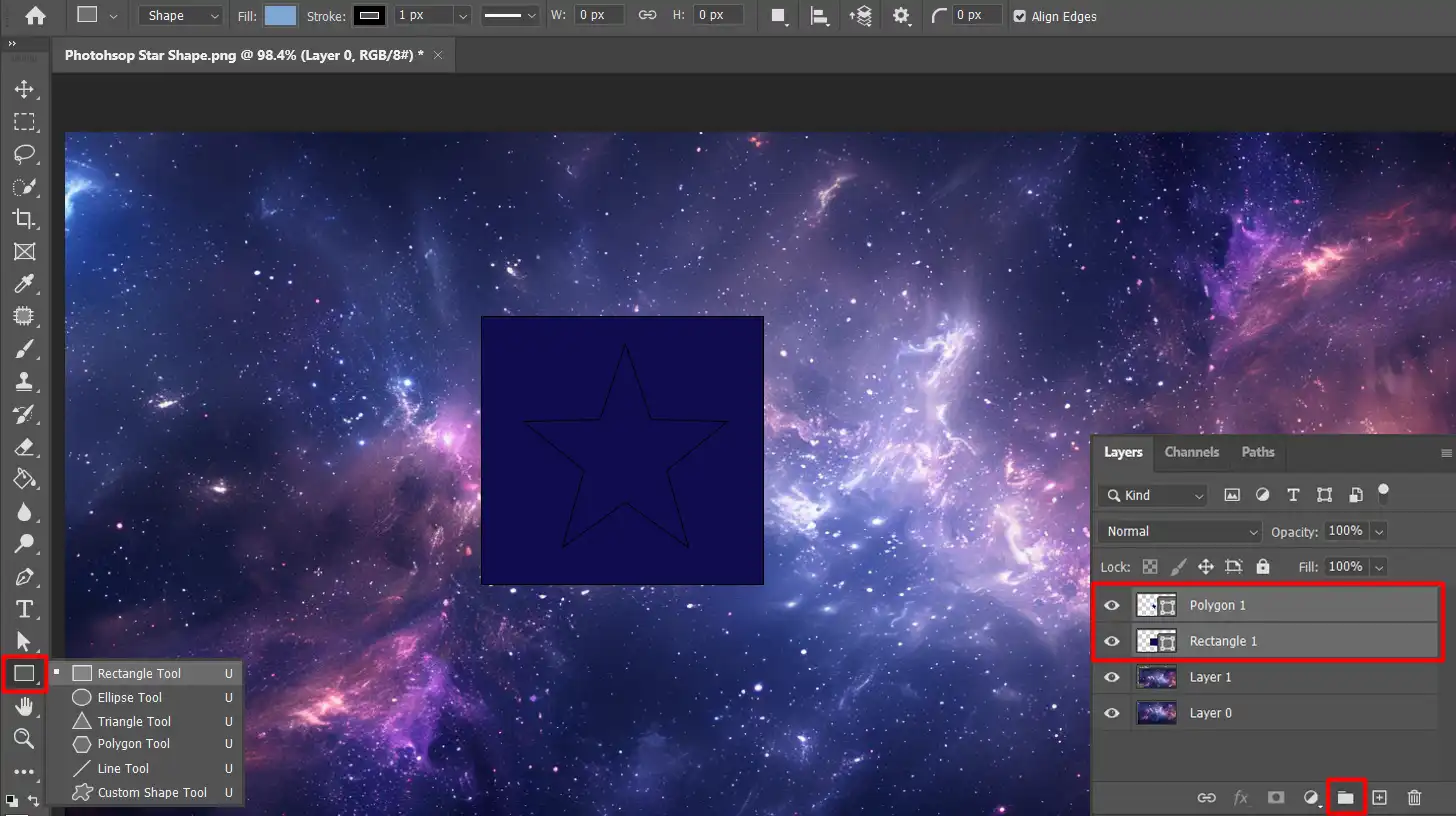
Now that you have different star shapes, combining them with other elements adds flair. Use the rectangle tool to create backgrounds or borders. Group elements together with the group icon for better organization.
For a polished look:
Align and distribute the star shapes using the alignment tools.
Modify each star's corner radius for unique results.
Experiment with layering effects to get creative.
Pro Tip: When working with vector stars, always save your settings for future projects. This method ensures efficiency and consistency in your designs.
For more advanced techniques on combining star shapes with other elements, refer to a comprehensive Photoshop masking guide to achieve seamless and creative results
Tips and Tricks for Perfect Star Shapes
Creating perfect Photoshop star shapes can be challenging, but with the right tips and tricks, you can achieve great results.
Common Mistakes to Avoid when creating a Photoshop Star Shape
When creating star shapes, certain mistakes can hinder your results. Let’s explore some of these pitfalls and how to avoid them.
Ensure Proper Sides Setting
Many users dive straight into creating a star shape and overlook setting the number of sides. This results in vector stars that may not look the way you want. Always check and set the number of sides before you start drawing.
Avoid Over-Complicating Designs
When using vector shapes, it’s easy to add too many layers and effects. Keep it simple at first. Too many elements can make your design messy and difficult to edit later.
Don't Miss Using the Star Ratio
The star ratio controls the depth of the star’s points. Forgetting to adjust this might leave you with vector stars that don’t fit your design. Play around with this setting to find the perfect look.
Optimizing Star Shapes for Different Projects
Optimizing star shapes can make them fit perfectly into various projects.
Start by adjusting their size and position with precision.
Adjust Size and Position Precisely
Photoshop lets you fine-tune size and position through the properties panel.
Use this to ensure your star shapes are exactly where you need them.
Choose the Right Custom Shape
Custom shapes offer a variety of star options.
Whether it’s for a festive design or a professional logo, select the one that fits best. Don’t forget to adjust the fill color using the color picker.
Layer Effects for Depth
Give your star shape some flair by combining it with other elements.
Try different layering effects to see what looks best. This step can make your design pop!
Save Your Settings
Save your frequently used settings for future projects. This practice ensures efficiency and consistency across your designs.
Pro Tip: Looking to tweak each corner of your star shape? Modify each star’s corner radius for unique results. This little trick adds a touch of uniqueness to your designs.
Now you’re ready to create eye-catching star shapes that enhance your projects!
For more advanced techniques, consider learning about the Photoshop Shape Tool and how to use layer effects to elevate your designs.
When optimizing star shapes for different projects, use Lightroom to fine-tune colors and details.
If you’re working with older versions of Photoshop, be aware that some features might differ. Always start with a new document to ensure a clean workspace.
Frequently Asked Questions
Is there a star shape in Photoshop?
Yes, Photoshop includes a star shape in its shape tools. You can find it by selecting the 'Custom Shape Tool' from the toolbar and then choosing the star shape from the shape options.
Is there a star filter in Photoshop?
Photoshop doesn't have a specific "star filter", but you can create star effects using filters like 'Add Noise', 'Gaussian Blur', and using blending modes such as 'Screen'.
How to draw a perfect 5-point star?
To draw a perfect 5-point star in Photoshop, select the 'Polygon Tool', set the sides to 5, choose 'Star' from the options, and adjust the 'Indent Sides By' slider to tweak the star’s sharpness.
How to draw a star shape?
To draw a star shape, you can use the 'Custom Shape Tool' and select a star from the options. Alternatively, use the 'Polygon Tool', set it to star mode, and choose the number of points you want for your star.
In conclusion, mastering the Photoshop star shape has genuinely transformed my design projects.
This simple yet versatile tool has allowed me to add creative flair to my work, making it stand out. Whether I’m designing logos, creating backgrounds, or enhancing photos, the star shape has been an invaluable asset.
If you’re looking to elevate your skills, I highly recommend checking out this comprehensive Photoshop course and a detailed Lightroom course.
These resources have been instrumental in refining my techniques and expanding my creative toolkit.
Happy editing!
If this article has helped you, then Like and Share it with your friends
$2,061.00Original price was: $2,061.00.$1,061.00Current price is: $1,061.00. 27585
Download Your Free Guide Now!
Discover the secrets of photography with our printable guide! Master essential techniques like aperture, shutter speed, and ISO to create stunning images. Get your free printable PDF now and start turning your snapshots into masterpieces!