Welcome to your guide on mastering Photoshop Smart Fill. If you’ve ever struggled with removing unwanted objects or fixing imperfections in your photos, this guide is for you.
I’ll walk you through the smart fill features in Photoshop, offering practical tipsyou can use immediately.
Let’s dive in and transform your editing process with Smart Fill!
Table of Contents
How to Use Photoshop Smart Fill
Learn the practical application of Photoshop’s Smart Fill feature. Now, gain a deeper understanding of how Smart Fill works within Photoshop to enhance your editing capabilities.
Smart Fill uses Photoshop’s advanced algorithms to fill in selected areas with surrounding pixels. It’s like magic for removing unwanted objects or imperfections.
You tell Photoshop what you don’t want, and it fills the gap with matching pixels.
Starting Out: A Beginner's Guide
Now that you’re ready to dive in, the next step to incorporating the Photoshop smart fill is to open your project. This simple action will set you on the path to exploring and creating in no time.
Open Your Project
First, open your image in Adobe Photoshop. Select the new layer that contains the area you want to edit.
Make a Selection
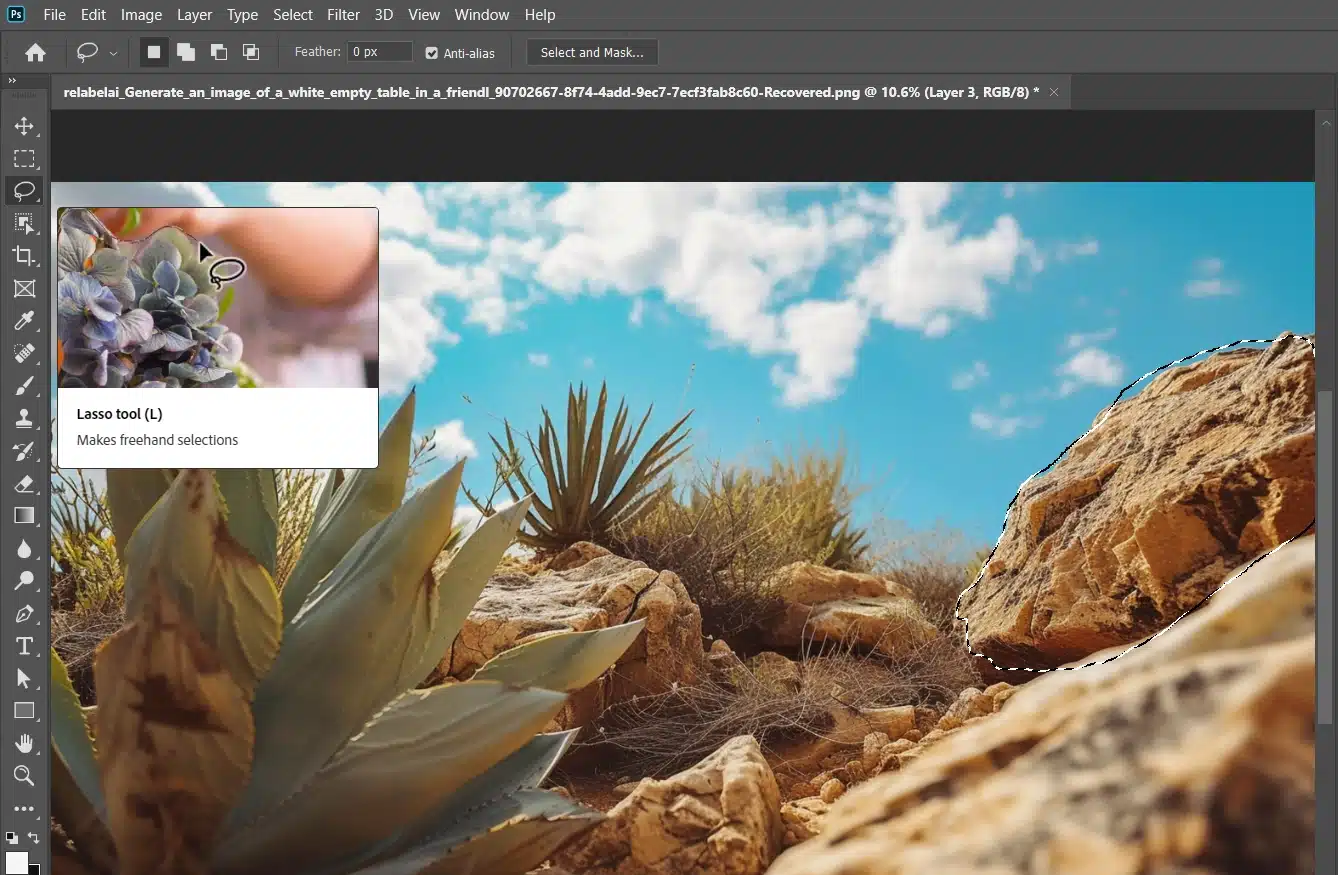
Use the lasso tool in Photoshop or any other selection tool to outline the area you want to fill. Ensure the selection is tight around the object for better results.
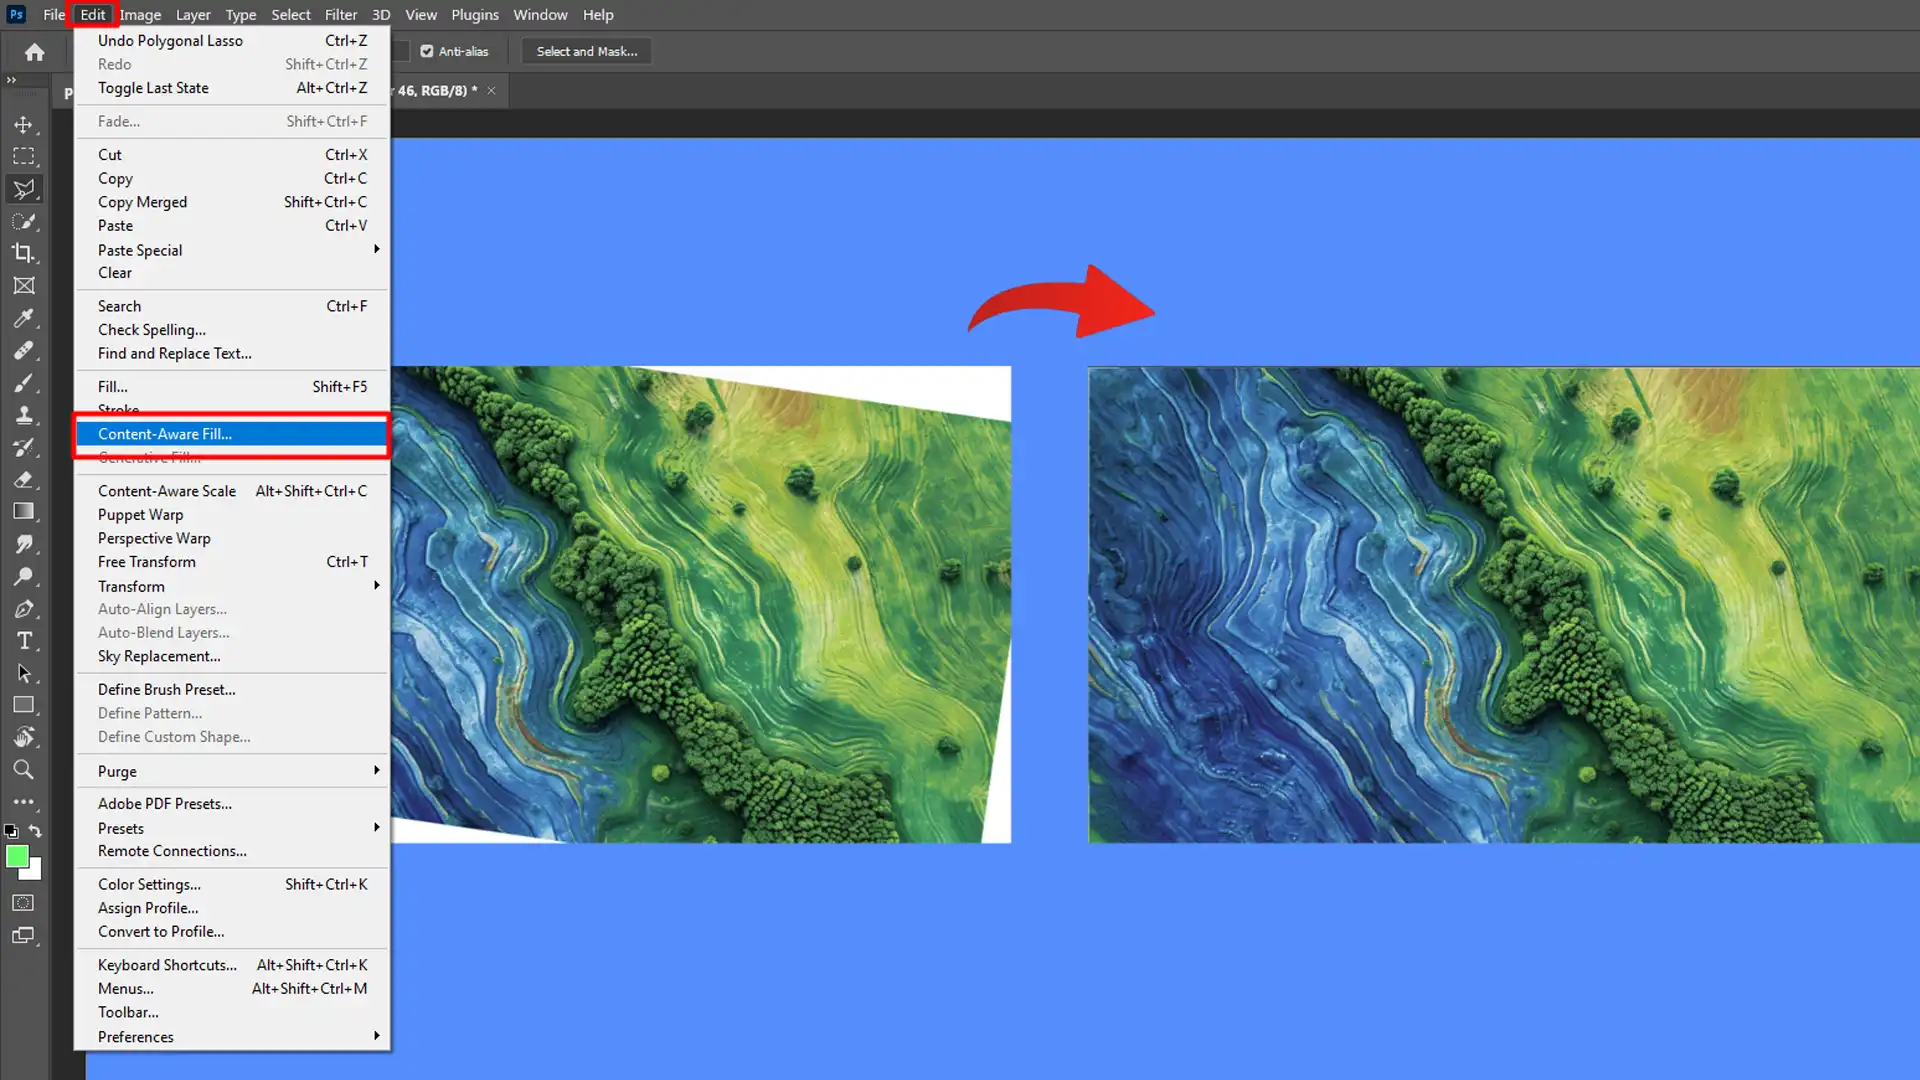
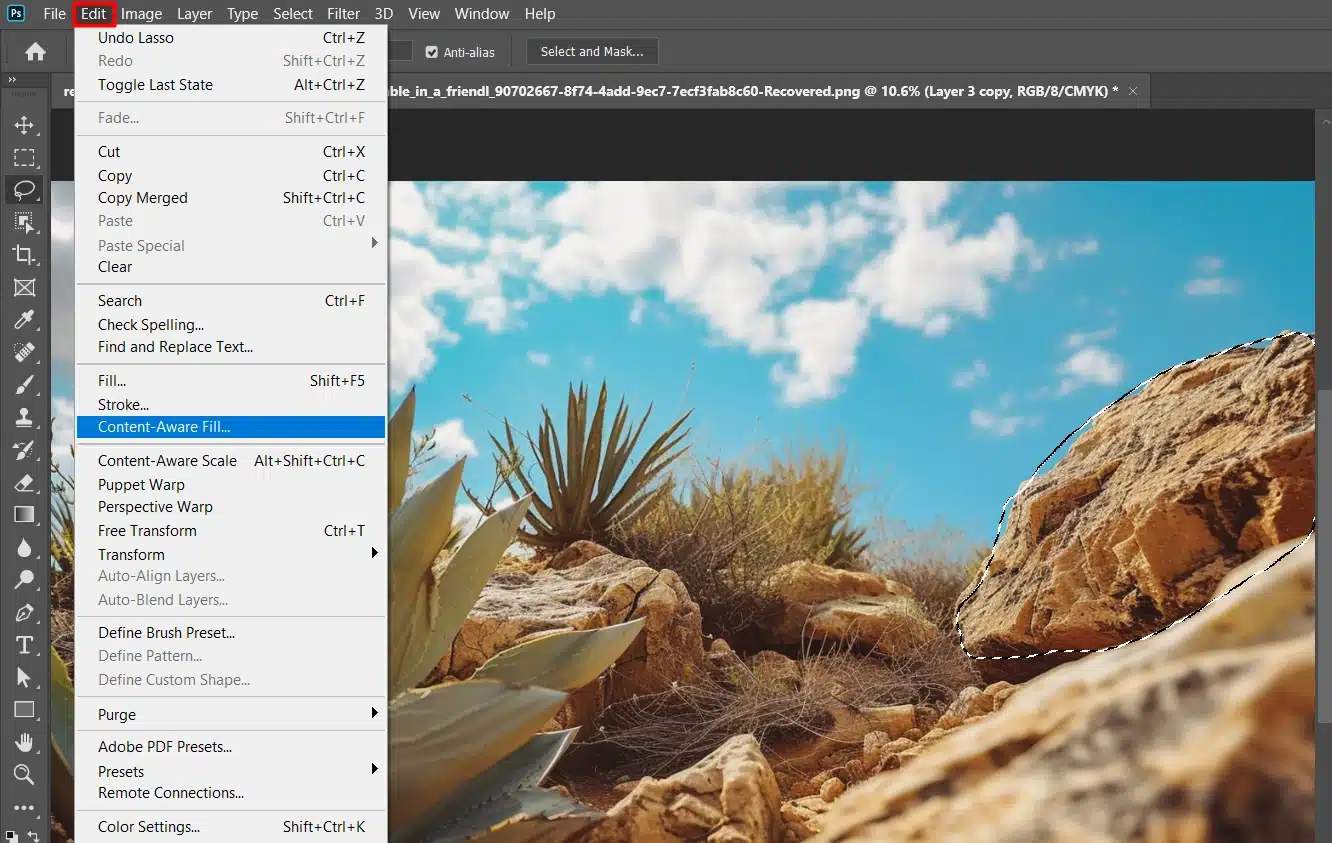
Using Content Aware Fill Panel
Use Content Aware Fill in Photoshop to masterfully remove unwanted elements from your images.
Now, let’s move forward by making precise selections to refine our edits.
Fine-Tune Settings in the Content Aware Fill Tool for Optimal Results
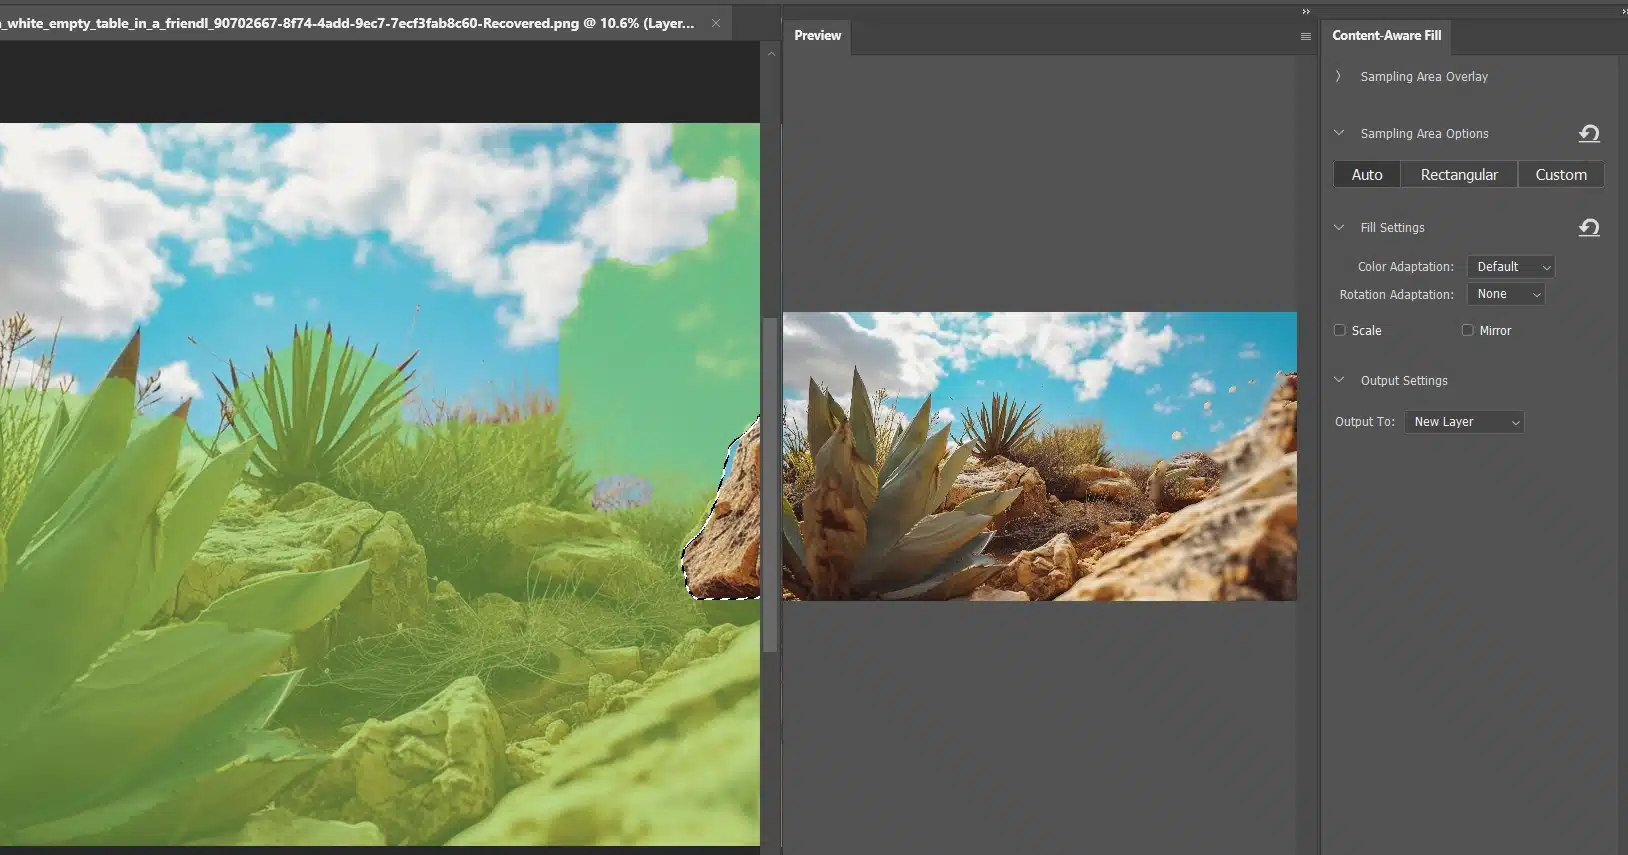
In the Photoshop Content Aware Fill Dialog Box adjust the Sampling Area.
Use the Sampling Brush Tool to manually define areas you want Photoshop to sample from. Set your Fill Settings to achieve the best results.
Preview and Apply Adjustments with Content Aware Fill Tool
Check your changes in the Preview Panel. Click Ok to apply the fill to your selection.
Pro Tip: Always work on a duplicated layer before applying any fills. This keeps your original image intact, allowing you to go back if something doesn’t look right.
Explore the Content-Aware Fill tool workspace to improve your editing skills.
Learn the significant concepts to use it effectively.
Exploring Significant Concepts
Alright, let’s get straight to it. Content-Aware Fill in Photoshop helps you remove unwanted objects from your photos.
You select the area you don’t want, and Photoshop fills in the gap using surrounding pixels. It’s like it reads your mind!
You start by choosing a selection tool like the Lasso Tool. Then you draw around the stuff you want to disappear.
It doesn’t have to be perfect.
Next, go to the Edit menu and use Content-Aware Fill tool. You’ll see options in the fill workspace. Adjust them to get the result you want.
Why Use Content-Aware Fill Tool in Photoshop?
Let’s say you’ve taken a great photo, but there are some unwanted elements ruining it.
Maybe it’s a random person in the background layer or a stray garbage can. You can use the content–aware fill tool to quickly fix these distractions before applying the smart fill.
Why spend hours trying to clean up a photo when the Content-Aware Fill tool does it in seconds?
It’s efficient and straightforward to use. It can save you tons of time compared to manual touch-ups like using the clone stamp tool or the patch tool.
Expert Tips for Mastering Content-Aware Fill Tool in Photoshop
Understanding and mastering Content-Aware Fill in Photoshop can significantly streamline your editing process and elevate the quality of your work. Here’s a comprehensive guide with expert tips to achieve the best results:
Duplicate Your Layer: Before applying Content-Aware Fill in Photoshop, it's important to add another layer. This simple step acts as a safeguard for your original image, allowing you to revert back if necessary without compromising the integrity of your work.
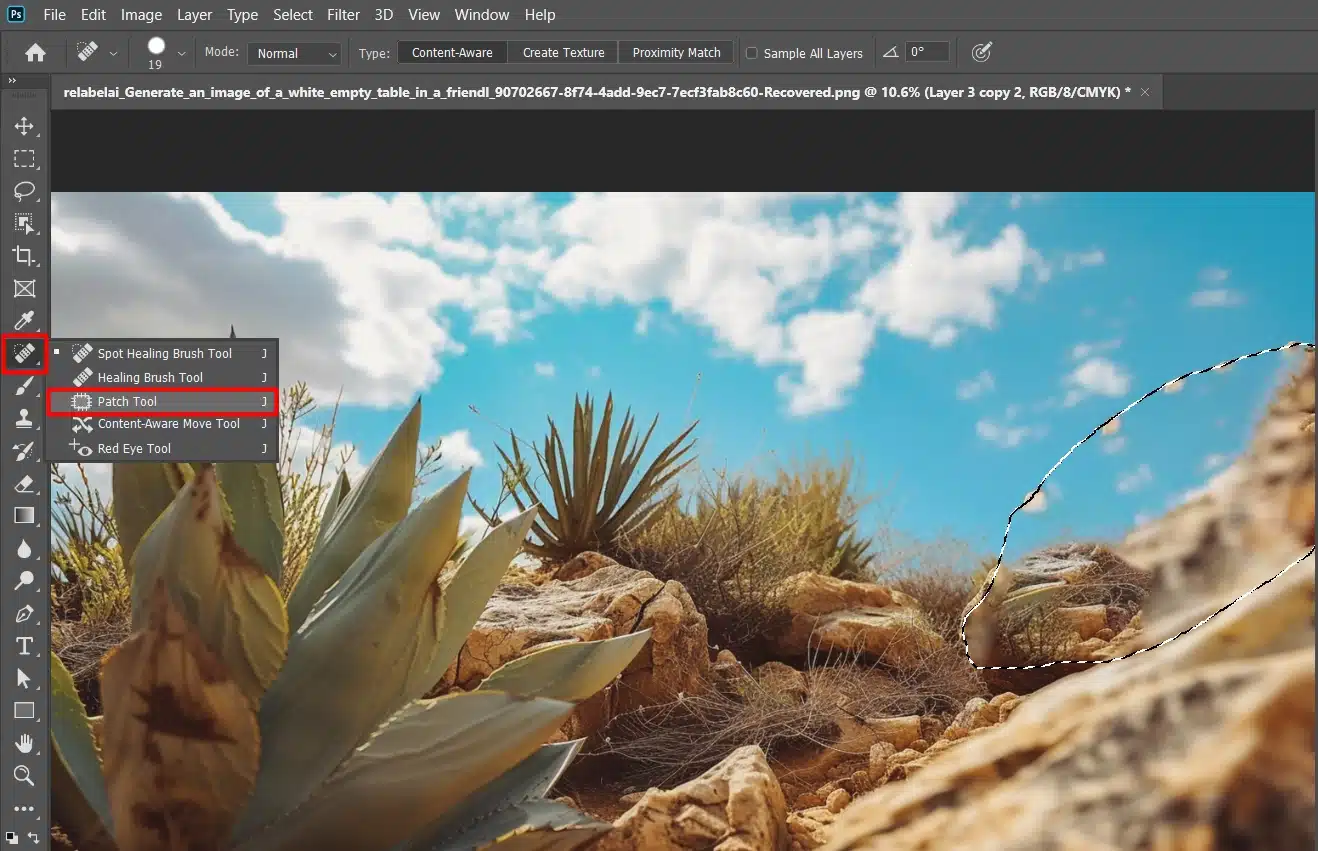
Utilize Additional Tools for Precision: In cases where the initial fill may not yield perfect results, leverage the Spot Healing Brush Tool for minor touch-ups or the Clone Stamp for precise adjustments. These tools offer enhanced control over specific areas, ensuring a more polished final image.
Enhance Precision with Zooming: Use the Zoom Tool to magnify areas of interest. This zoom functionality aids in achieving meticulous selections and adjustments, facilitating a more detailed and refined editing process. Toggle between layers to effectively evaluate and fine-tune your edits.
Common Mistakes to Avoid when You Use Content Aware Fill
Neglecting New Layers: Always work on a new layer when performing edits with Content-Aware Fill tool. This practice safeguards your original background layer, preventing inadvertent changes and allowing for seamless experimentation and refinement.
Optimizing Selections: To optimize the effectiveness of Content-Aware Fill, ensure your selections are precise and tightly encompass the unwanted elements. This approach minimizes blank spaces and enhances the tool's ability to seamlessly blend the filled areas with the surrounding pixels.
Correct Mode Selection: Verify that you're using the appropriate tools within the Content-Aware Fill workspace. Incorrect settings can lead to unintended outcomes. Double-checking ensures that you're maximizing the tool's potential and minimizing potential errors.
Pro Tip: Refine Your Fills for unparalleled control over your edits, consider adjusting the color adaptation settings. Fine-tuning these settings allows for seamless integration of filled areas with the surrounding pixels, achieving a natural and cohesive look in your final composition.
By implementing these expert strategies, you can utilize the full potential of Content-Aware Fill in Photoshop, enhancing your editing precision, efficiency, and overall workflow.
Would you like any further adjustments or additions?
Advanced Techniques
Unlock advanced editing techniques to elevate your projects. Now, explore how to integrate Smart Fill with layers for more intricate editing tasks.
Using Smart Fill with Layers
Alright, let’s talk about Smart Fill and layers. Layers keep your original image safe while you edit. Open your image in Adobe Photoshop and make a copy of your current layer.
Why copy the layer? It keeps your original work intact. Use the object selection tool options bar to select the stuff you want to remove.
Go to the menu bar, select Edit, and pick photoshop content aware fill. The content aware fill workspace pops up. Adjust the sampling area overlay to include areas similar to the one you want to fill.
This helps Photoshop pick the right spots. Use the green brush to mark areas to include and the red brush to exclude. Once you’re happy, click “Ok” to apply the fill.
Mixing Smart Fill with other tools can give better results. Sometimes, content aware fill tool isn’t perfect. Try these:
Use the patch tool for small fixes.
The clone stamp helps in tricky spots.
First, do your fill, then switch to the patch tool in Photoshop. Draw around the filled area that needs fixing. Drag this selection to a clean area; Photoshop replaces the bad part with the new sample.
For precise fixes, use the clone stamp and paint over flaws. Hold “Alt” to pick a good sample area and paint over the problem spot.
Combining these tools makes your edits detailed and the final image cleaner.
Pro Tip: Always zoom in while making small corrections. It gives you a clearer view and allows precise adjustments.
Remove Unwanted Objects from Complex Backgrounds
Master the art of eliminating unwanted elements seamlessly from intricate backgrounds.
Now, let’s explore how to effectively utilize Content-Aware Fill in Photoshop to achieve flawless edits.
Utilizing Content-Aware Fill Tool in Photoshop
Let’s talk about how to get rid of unwanted objects from tricky backgrounds using content-aware fill in Photoshop. This tool replaces the object with pixels from the surrounding area.
Just select the object and let Photoshop do the work.
Steps to Follow for Utilizing Content Aware Fill Tool
Pick the lasso tool or object selection tool from the toolbar. Draw around the object you want to remove.
Go to the edit menu and choose content-aware fill. A new window called the content-aware fill workspace opens.
Adjust the sampling area in the workspace to make sure Photoshop uses the right parts of the image to fill in the selected area.
Check the preview panel to see how the fill looks before applying it. Make any changes if needed.
Once satisfied, click OK and let Photoshop handle it. The program removes the object and blends the area seamlessly.
Fine-Tuning the Result
If the initial result isn’t perfect, use the clone stamp or healing brush tool to manually fix areas that need tweaking.
These tools help refine edges and blend textures for a better finish.
Pro tip when you use layers: Always work on a duplicate layer to keep your original image safe. This way, if you mess up, you can start over without losing your progress.
Difference Between Photoshop and Lightroom
While Photoshop excels at detailed edits like removing objects, Lightroom is more suited for batch editing and overall photo management.
And that’s it! A quick guide to using Photoshop’s content-aware fill to remove objects from complex backgrounds. Give it a shot, practice, and soon you’ll be editing like a pro!
When Content-Aware Fill Isn't the Best Option
There are certain scenarios where Photoshop’s Content-Aware Fill might not be the best option.
Here’s a quick comparison to help you decide when to use it and when to choose other tools:
Scenario
Use Content-Aware Fill
Use Other Tools
High-Contrast or Detailed Patterns
No
Yes (Clone Stamp Tool)
Human Faces
No
Yes (Patch Tool)
Natural Elements (Trees, Water)
No
Yes (Healing Brush Tool)
Small Touch-Ups
No
Yes (Spot Healing Brush)
Older Photoshop Versions
No
Yes (Manual Edits)
High-Contrast or Detailed Patterns
Content-Aware Fill struggles with high-contrast or detailed patterns. For example, blending a checkered floor can look strange.
Use the Clone Stamp Tool for complex patterns.
Human Faces
Content-Aware Fill can warp images with faces oddly, making them look unappealing.
Instead, use the Patch Tool or Healing Brush Tool for better results.
Natural Elements
For images with distinct natural elements like trees, rocks, or water, Content-Aware Fill may not replicate intricate details well.
This can mess up the whole look. Consider using Photoshop Shortcuts to quickly switch between tools for more precise edits.
Small Touch-Ups
Using Content-Aware Fill for small touch-ups is often overkill.
The Spot Healing Brush Tool is better for minor imperfections.
Older Photoshop Versions
Older versions of Photoshop may lack advanced algorithms, making the fill less effective and unpredictable.
Upgrading to the latest version ensures you have access to improved features and tools.
Pro Tip:
Always check your layer! Work on a new layer or duplicate layer to keep your original image safe.
This is one of the important Photoshop shortcuts that can save you time and effort.
Using Photoshop’s Content-Aware Fill for Composition Adjustments
Now that you’re ready to refine your compositions using Photoshop’s Content-Aware Fill, let’s dive into getting started with this powerful tool.
Starting Out
The content aware fill tool is a game-changer. It helps you fix your photo composition easily. Imagine you take a picture, but there’s an annoying trash can ruining it. This tool can make that trash can disappear like magic.
Using it with Content-Aware Fill to fix composition can further enhance your photos.
Mastering Content Aware Fill: Step-by-Step
Open your image in Adobe Photoshop.
Select the lasso tool from the toolbar. Draw around the unwanted object.
Go to the menu bar and choose content aware fill.
The content aware fill workspace opens. Here, you’ll see a preview of the result.
Fine-Tuning in the Workspace
In the workspace, you can adjust the sampling area to improve accuracy.
Use the sampling brush tool to manually select parts of the image.
The green overlay shows what part of the image Photoshop will use for the fill. This way, you can include or exclude areas as you please.
Finalize Your Edits
Check the preview to make sure the result looks good.
If needed, adjust the settings in the content aware fill box.
Once you’re happy with the result, click OK to apply content aware fill.
Instances Where Content Aware Fill Should Be Avoided
There are times when the content aware fill feature might not be your best friend.
High-contrast areas or detailed patterns can be tricky. Use the patch tool instead for better results in these situations.
This tip will save you from frustration.
Pro Tip: Always work on a duplicate layer. This keeps your original image safe, so you can start over if needed without losing your progress. It’s one of those little steps that can make a big difference.
Smart objects in Photoshop offer flexibility and non-destructive editing. However, knowing when to avoid Content-Aware Fill is significant for maintaining image integrity.
Practical Applications
Explore the practical applications of the techniques discussed. Here are some real-world examples to illustrate their effectiveness.
Real-World Examples
Got a photo with a random person or trash can in the background? Photoshop’s Content-Aware Fill can fix that quickly. Let’s dive into some examples.
Process Guide
Follow these simple steps to effectively remove unwanted objects when you use Content-Aware Fill:
First, open your image in Photoshop.
Select the layer with the mistake.
Use the Lasso Tool to draw around the unwanted objects. The tighter the selection, the better.
Go to the menu bar and choose Content-Aware Fill. You'll enter the content aware fill workspace.
Photoshop will use the surrounding area to fill in the gap.
Adjust the sampling area using the brush tools for even better results.
Happy with what you see? Click "OK" to enable content aware fill.
Case Studies
Check out these case studies to see how effective this tool can be:
Jane - A graphic designer cleaning up old family photos. She removes creases, fold marks, and extra people quickly with Content-Aware Fill.
John - A landscape photographer. He removes unwanted elements like cars or trash from his natural landscape shots seamlessly.
Mark - An amateur photographer. He deals with crowded tourist spots by using Content-Aware Fill to remove tourists from his photos.
Imagine enhancing your photos and achieving professional results without special skills.
Pro Tip: For the best results, zoom in on your selection. This helps you maintain precise edits and makes your final image cleaner. Happy Photoshopping!
Frequently Asked Questions (FAQs)
What's the process for using Smart Fill in Photoshop?
Open your project and select the area you want to fill.
Go to the 'Edit' menu.
Select 'Content-Aware Fill'.
Adjust the settings in the Content-Aware Fill panel as needed.
Click 'OK' to apply the fill.
What's the method for autofilling an area in Photoshop?
Select the area you want to autofill.
Right-click the selection and choose 'Content-Aware Fill'.
Preview the fill in the Content-Aware Fill workspace.
Make adjustments if necessary and click 'OK'.
How to do Photoshop AI Fill?
Choose the area you wish to fill using any selection tool.
Head to 'Edit' and select 'Content-Aware Fill'.
In the new workspace, adjust the sampling area and fill settings.
Click 'Apply' to complete the AI-assisted fill.
Why Can't I Content Aware Fill Photoshop?
Ensure you have the latest version of Photoshop installed.
Check if the layer is locked or not a raster layer; convert to a raster layer if necessary.
Verify that you have made a proper selection of the area.
If issues persist, consider resetting the tool settings or reinstalling Photoshop.
In conclusion, mastering Smart Fill in Photoshop has truly transformed the way I edit photos. This feature makes it super easy to remove unwanted objects and fix imperfections quickly.
By following the steps in this guide, you can make your photos look amazing with less effort. I’ve personally found that combining Smart Fill with other tools, like the Clone Stamp Tool and Healing Brush Tool, leads to even better results. Always remember to work on a duplicate layer to keep your original image safe.
$2,061.00Original price was: $2,061.00.$1,061.00Current price is: $1,061.00. 27584
Download Your Free Guide Now!
Discover the secrets of photography with our printable guide! Master essential techniques like aperture, shutter speed, and ISO to create stunning images. Get your free printable PDF now and start turning your snapshots into masterpieces!