Have you ever wondered how to create a captivating photoshop heart shape for your designs?
Whether you’re crafting a heartfelt card, a romantic social media post, or a creative project, mastering this skill can make your work stand out.
Imagine drawing attention with a beautifully crafted heart shape that speaks volumes.
Intrigued?
In this article, I’ll guide you through the simple steps to create the perfect heart shape in Photoshop, making your designs more engaging and visually appealing.
Let’s dive in and unlock the potential of your creativity!
Table of Contents
Creating Heart Shape Using Custom Shapes
Now, let’s get into the fun part, creating a heart shape using custom shapes in Photoshop.
The steps are simple but effective.
Step 1: Open Your Document
First things first, open your Photoshop document where you want to draw the heart shape.
This can be a new or existing file.
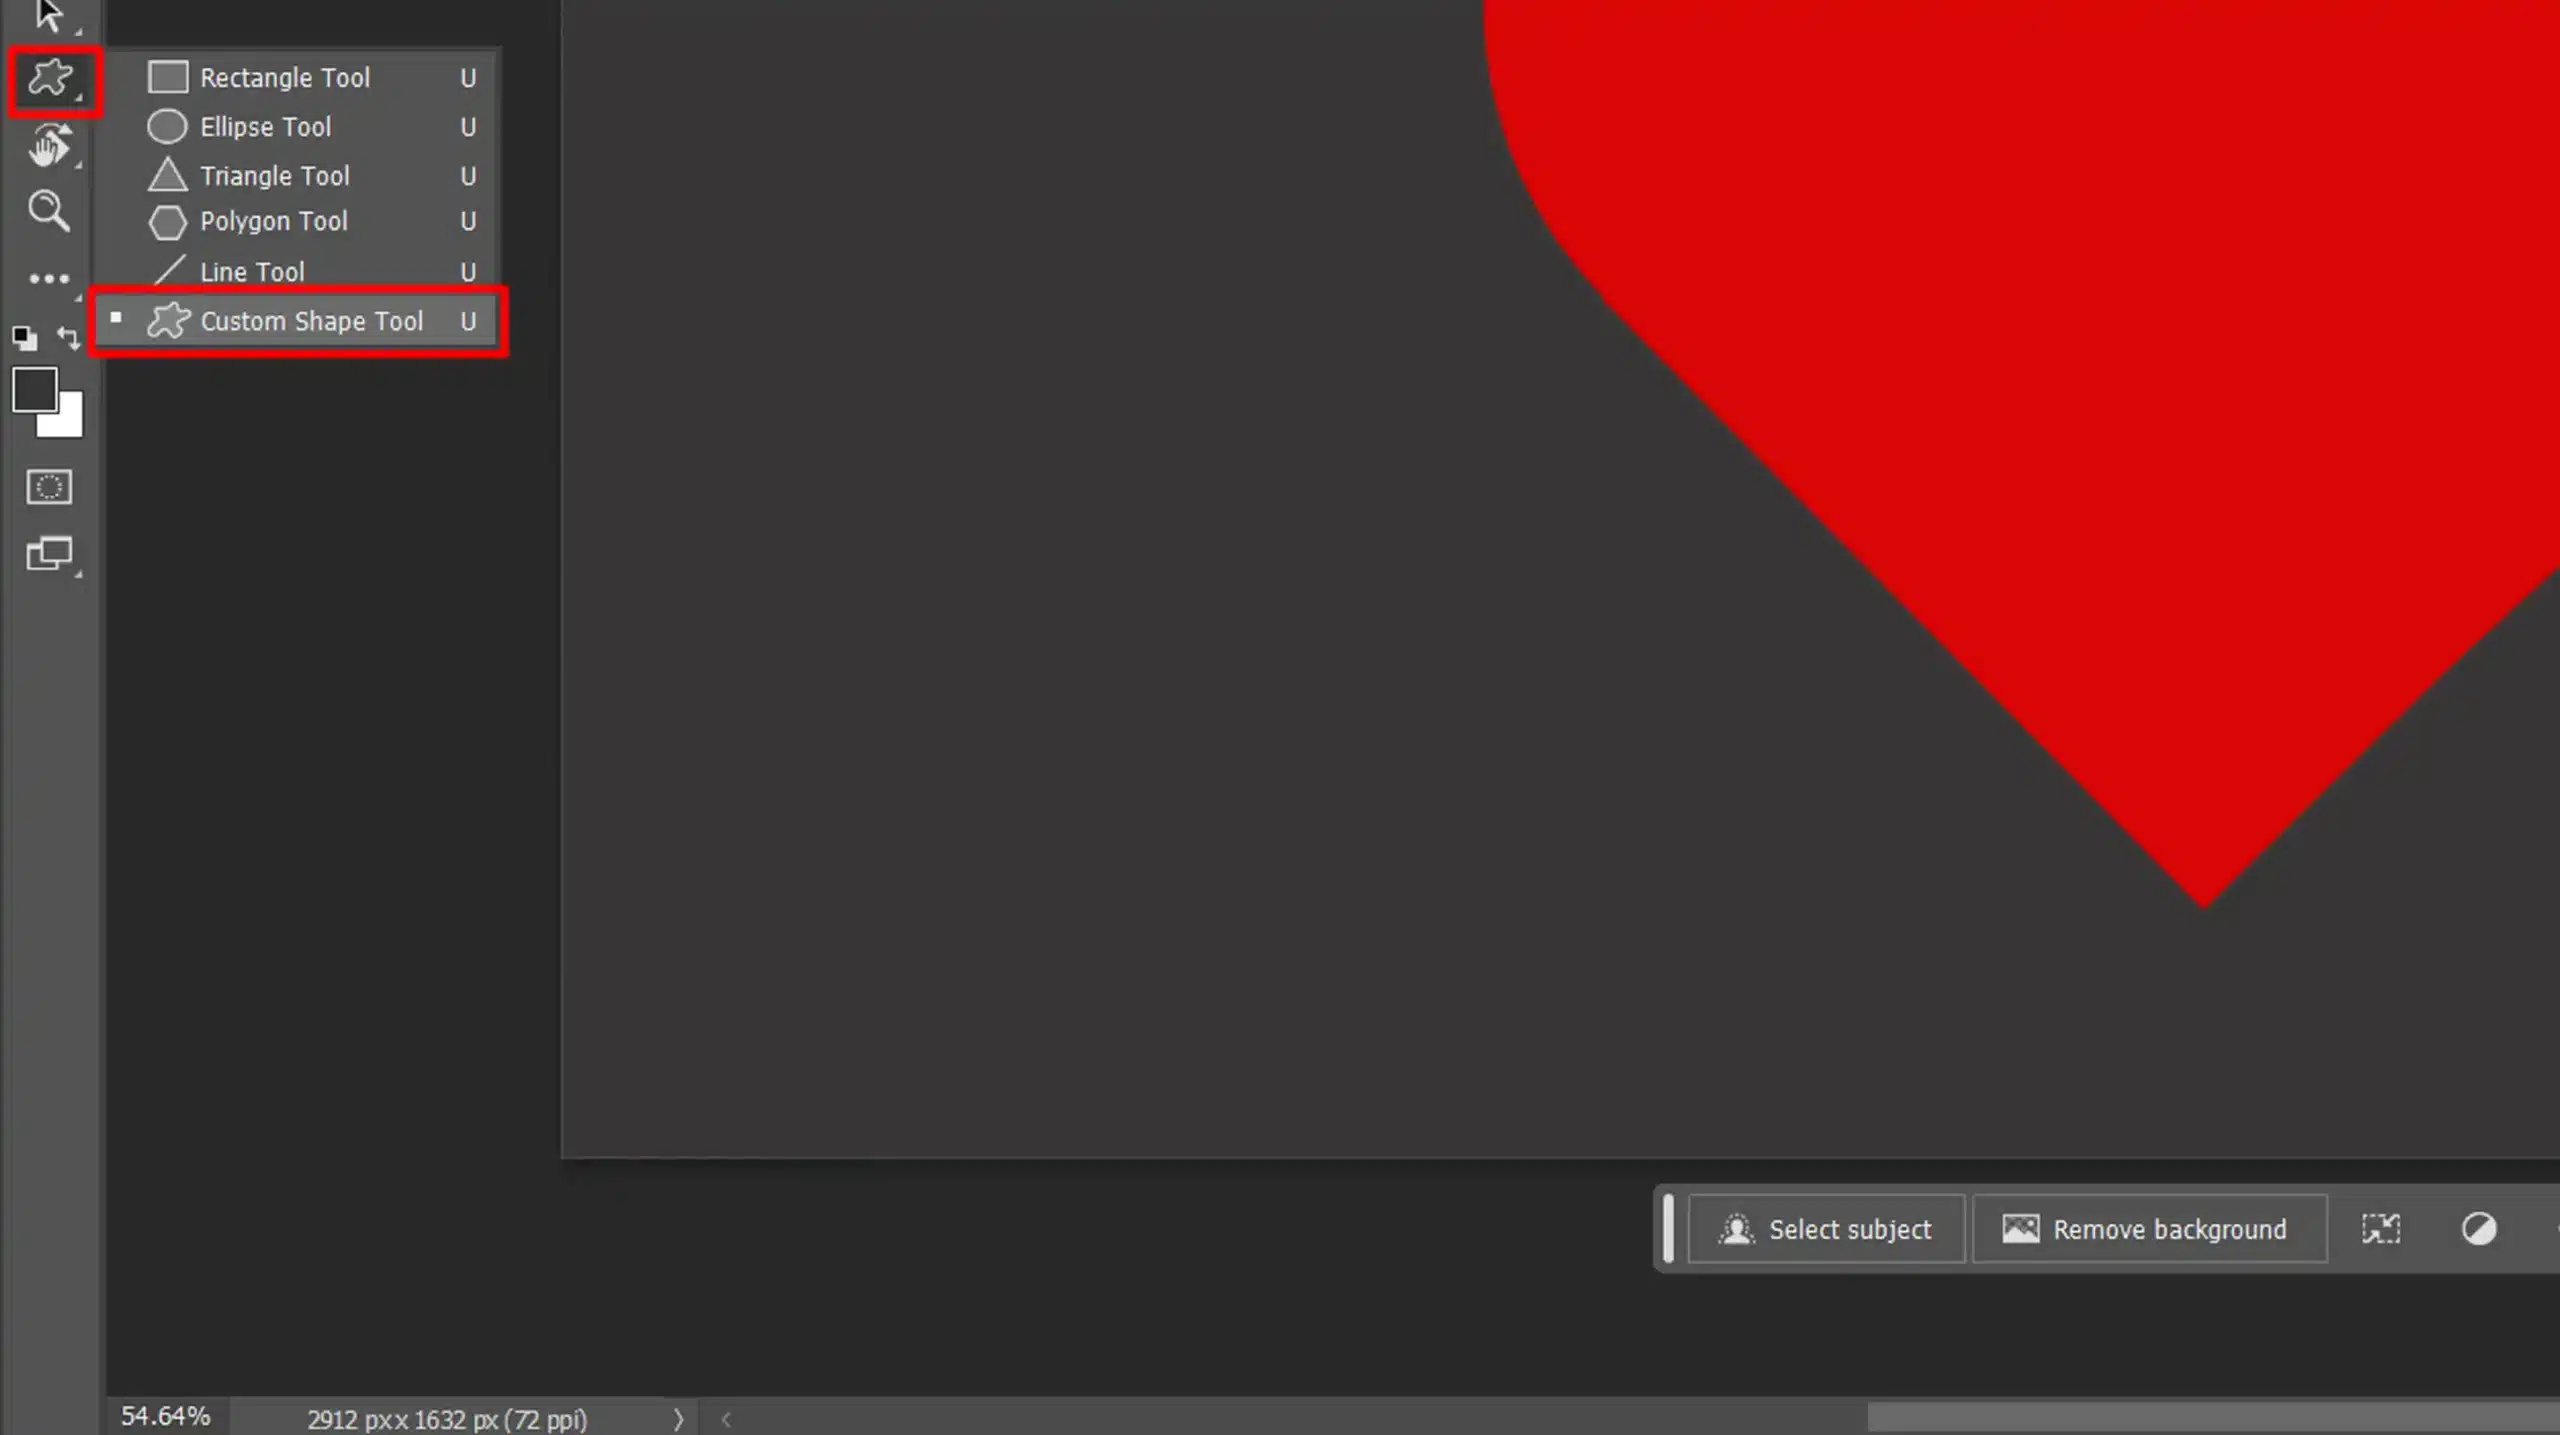
Step 2: Select the Custom Shape Tool
Next, go to the shape tools in the toolbar, and select the custom shape tool.
You’ll see various tools like the rectangle tool and polygon tool, make sure to pick the right one.
Step 3: Access Custom Shape Picker
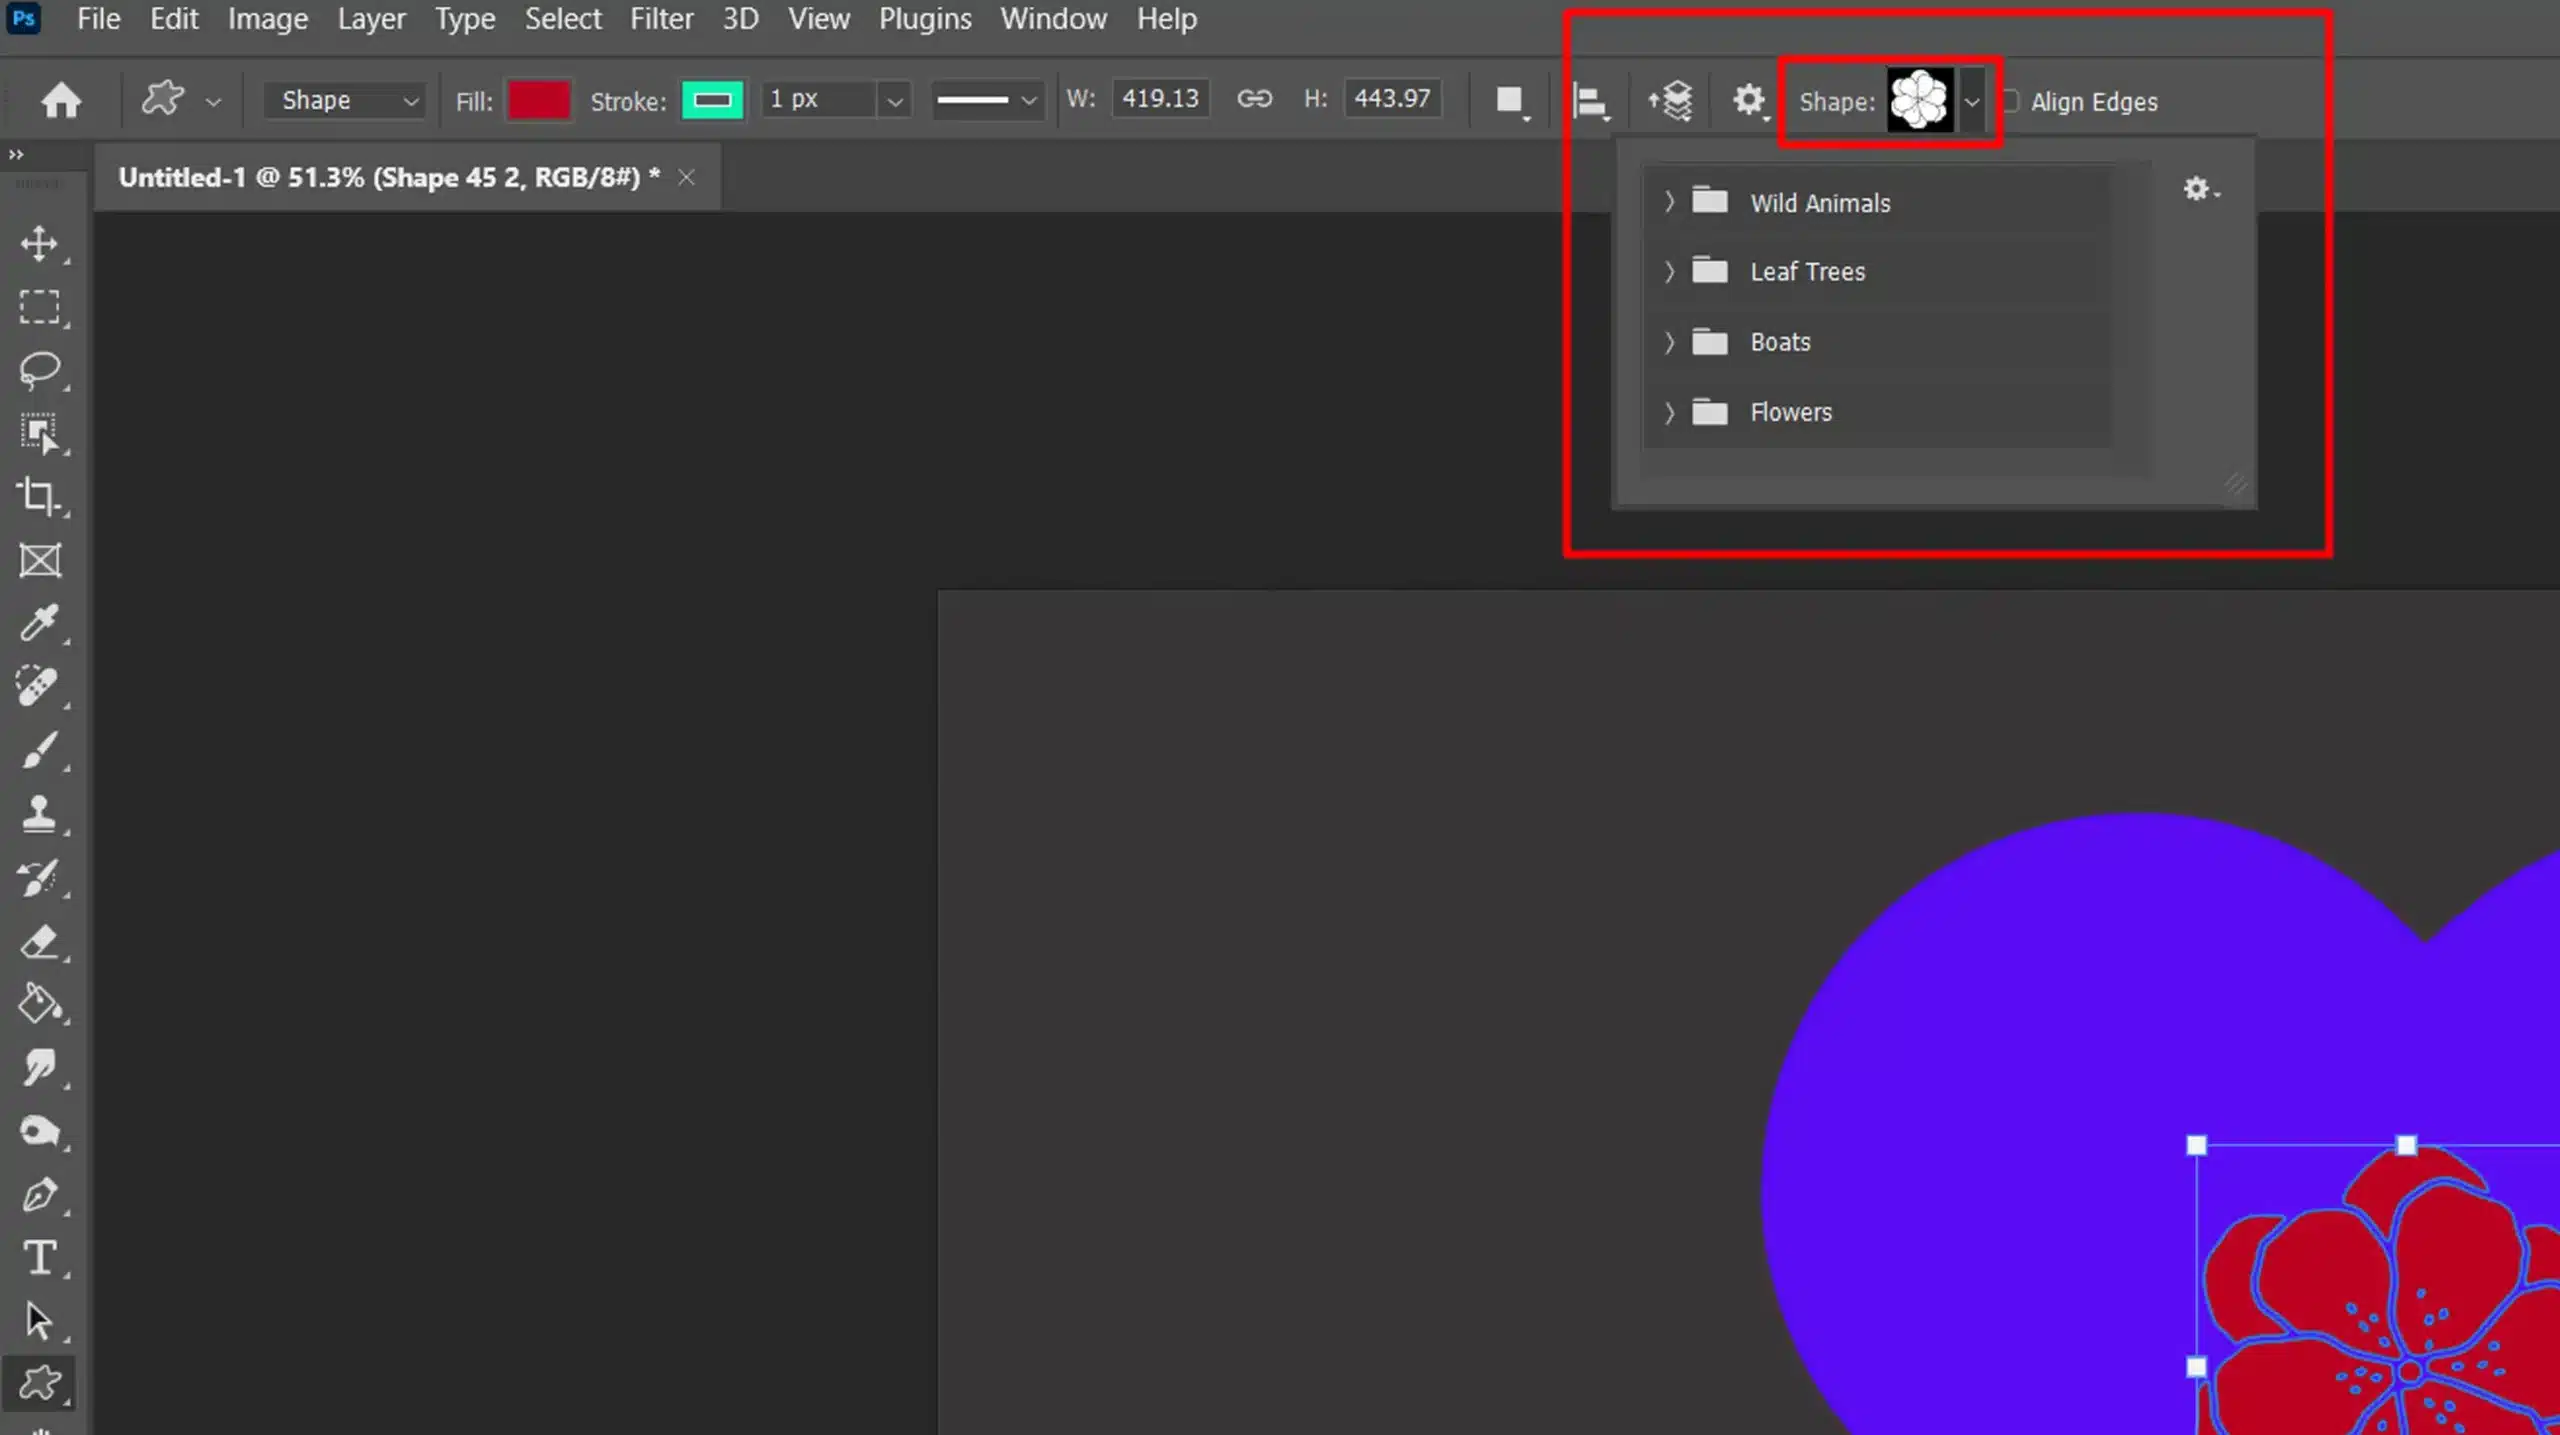
With the custom shape tool selected, navigate to the options bar at the top.
Click on the custom shape picker, which looks like a small arrow next to the shape symbol.
Step 4: Choose Your Heart Shape
In the custom shape picker, scroll through until you find a heart shape.
If you don’t see it, click on the gear icon and select “All” to load every available shape.
Step 5: Draw Your Heart Shape
Drag your cursor to draw the heart on the canvas.
Hold down the Shift key to keep proportions even while you drag.
Adjust the size by dragging from the corners.
To perfect the shape, drag the anchor points and carefully drag the edges to fine-tune your design.
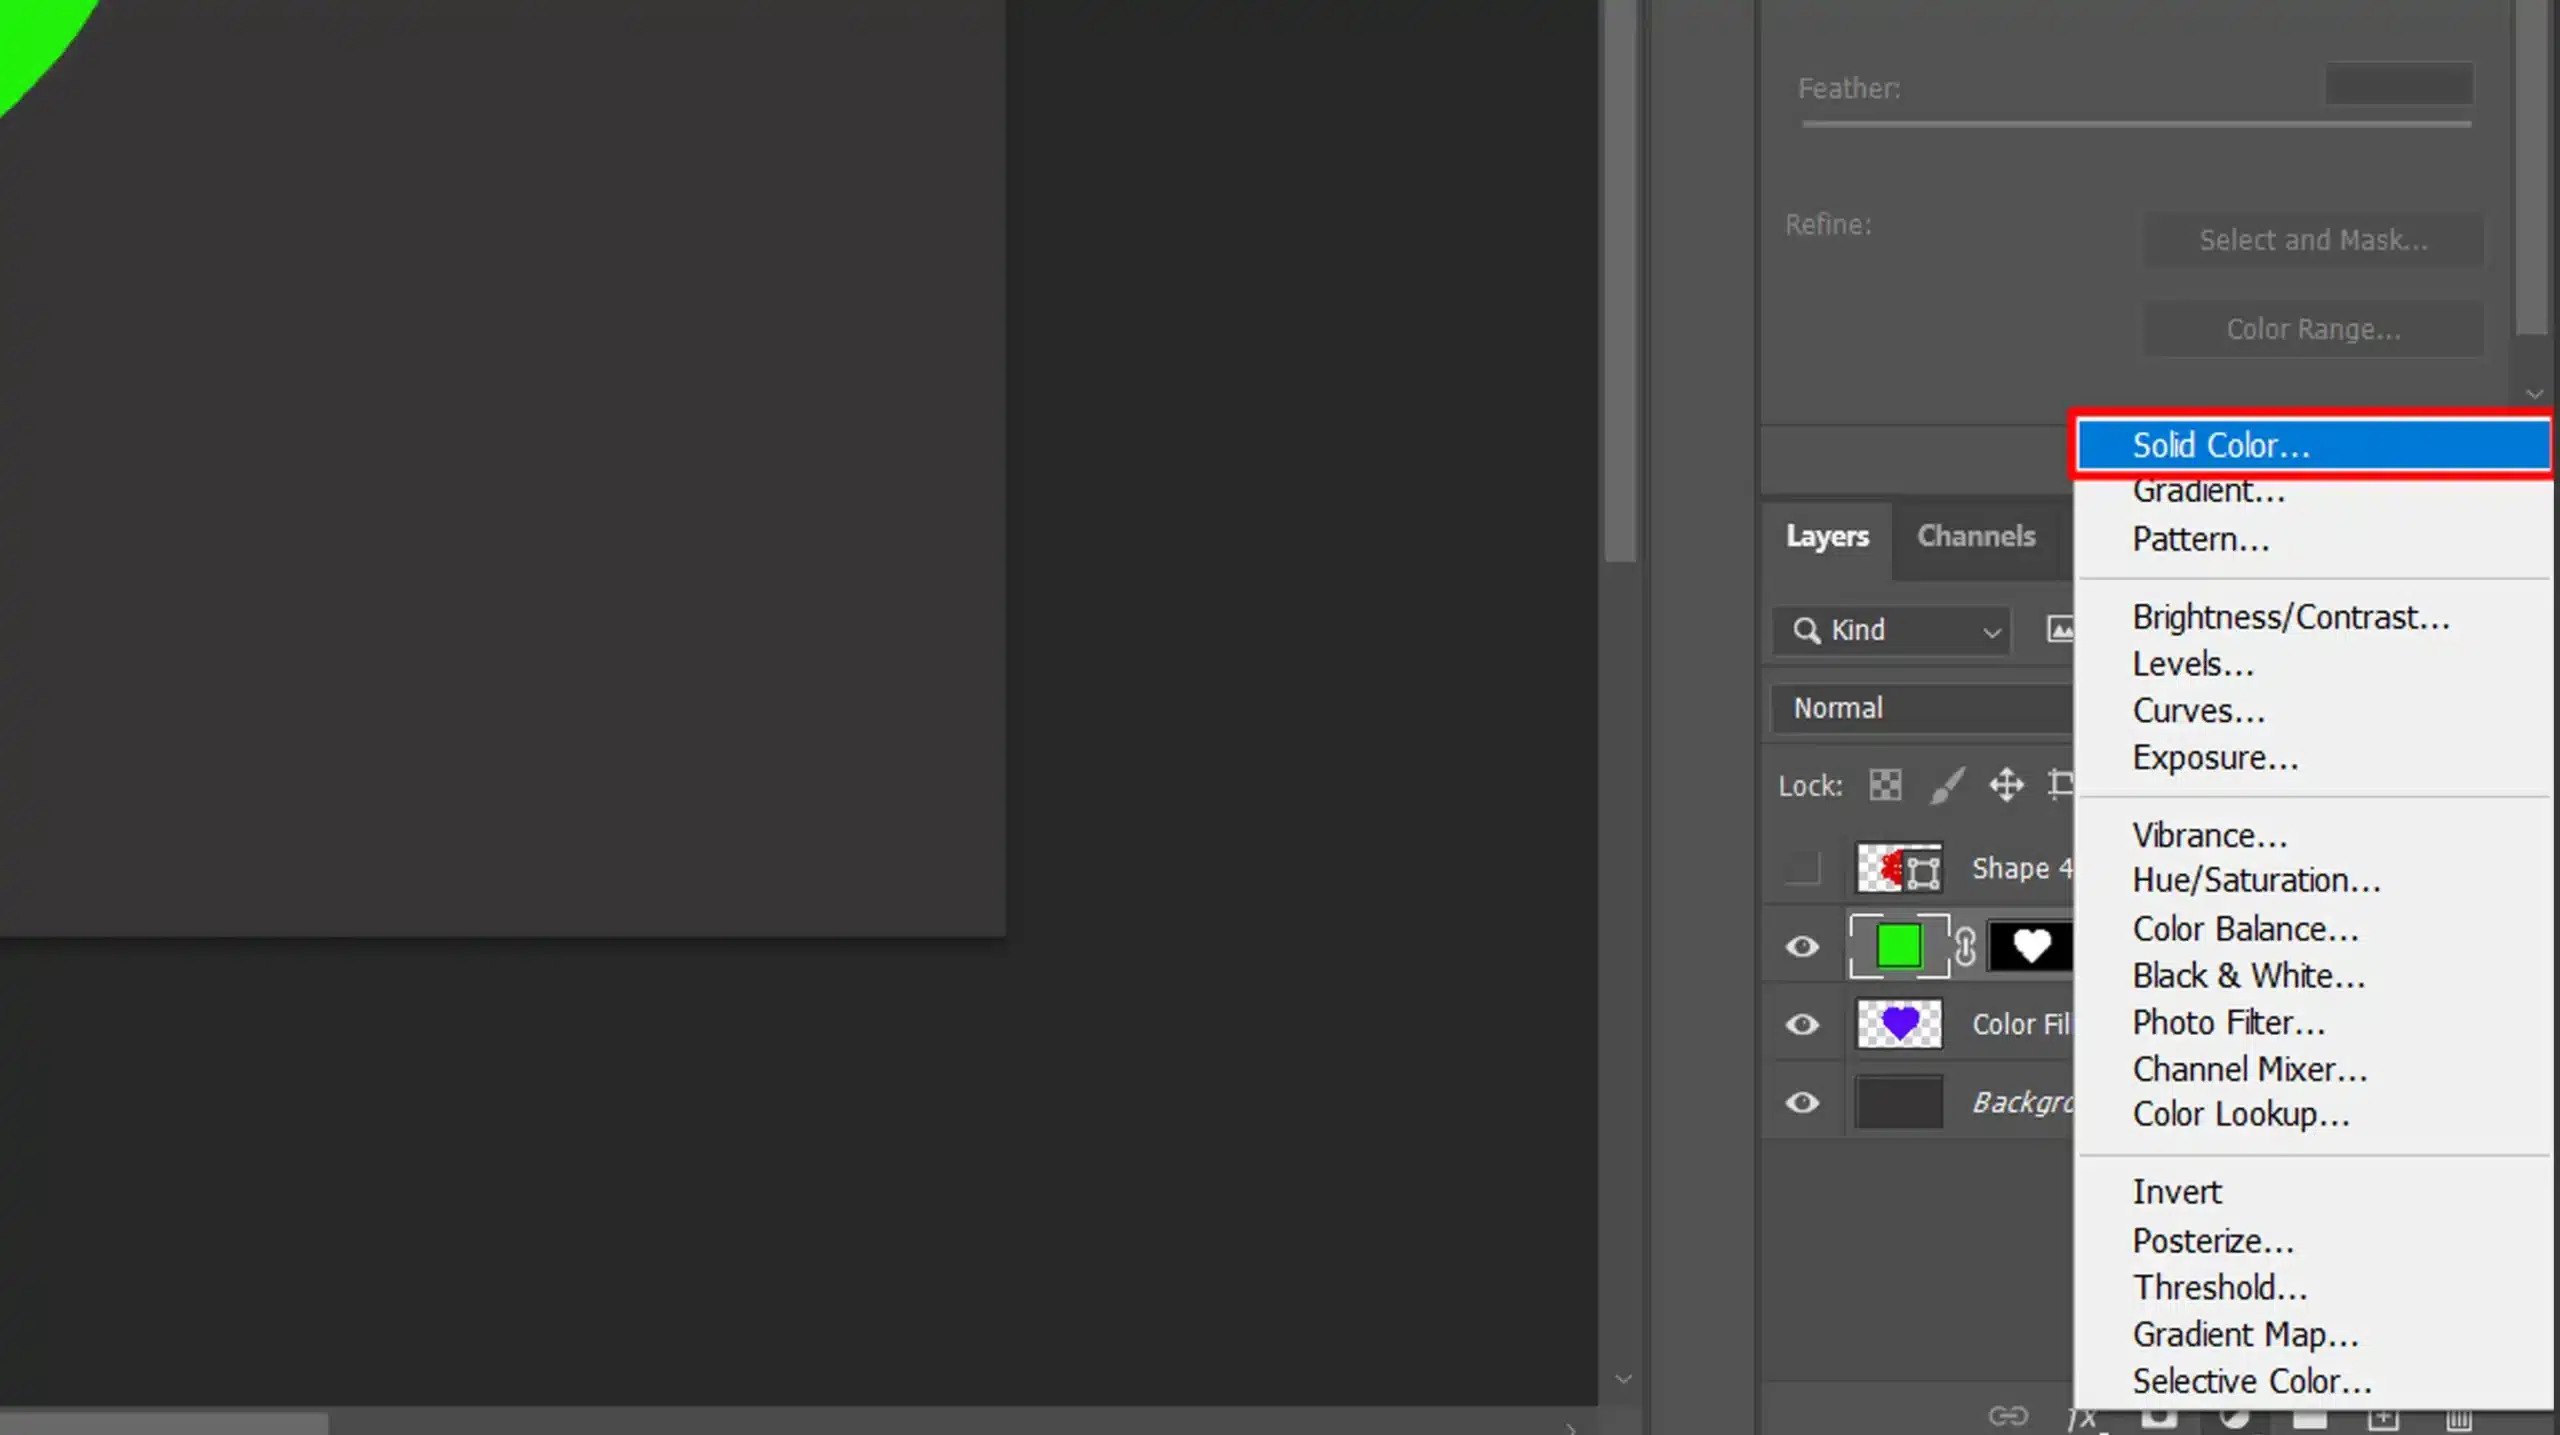
Step 6: Customize Your Heart Shape Color
With the shape layer selected, go to the solid color or color picker to change the heart’s color.
You can explore different color options here.
Step 7: Add Finishing Touches
Check the layers panel for any final adjustments. You might want to add a pattern, change the path, or even give the heart shape a different color.
Pro Tip: To create a symmetrical shape, always hold the shift key while drawing.
This technique ensures consistency and balance. If you’re looking to further refine your design, consider using the Photoshop masking feature to blend elements seamlessly or the gradient in Photoshop tool to add depth and dimension to your heart shape.
Creating Vector Shapes in Photoshop
Vector shapes are essential for many design tasks.
They allow for scalability without loss of quality.
Tools for Creating Vector Shape
In Photoshop, you use the shape tool to create these vector shapes.
This includes:
Custom shape tool
Rectangle tool
Polygon tool
Steps to Create a Custom Shape
Easy steps to create a custom shape:
Select the custom shape tool from the toolbar.
Head over to the options bar and find the custom shape picker.
Choose from various preset shapes available.
Once you select a custom shape (e.g., a heart), drag your cursor on the canvas to create it.
Hold the shift key to maintain proportions while drawing shapes.
Benefits of Using Vector Shapes
Here are some advantages for using vector shapes.
Advantages
Vector shapes are vector-based, which means they do not pixelate when resized.
This makes them perfect for logos, icons, and other graphic elements.
Color Adjustments
They also allow for easy color adjustments. With the shape layer selected, you can change the color using the solid color or the color picker.
This is done within the layers panel, offering flexibility and ease of use.
Applying Patterns
Additionally, you can apply patterns to these shapes.
To do this:
Ensure you have the right new shape selected.
Navigate to the gear icon in the options bar to access pattern options.
Advanced Vector Shape Techniques
Mastering vector shapes in Photoshop opens up a world of design possibilities.
For more advanced techniques, consider exploring the content-aware fill in Photoshop to seamlessly blend your shapes into complex backgrounds.
Always remember to check your alignment and proportions by holding the Shift key while drawing. This small step helps keep your designs neat and professional.
Pay attention to the corners of your shape and adjust them as needed. Make sure to also refine the corners for precise results.
Additionally, familiarize yourself with Photoshop shortcuts to speed up your workflow.
Using Custom Shapes in Photoshop
Custom shapes in Photoshop are vector graphics.
These shapes can be scaled up or down without losing quality.
Think of them as reusable and adjustable design elements.
Custom shapes come in pre-defined forms like rectangles, ellipses, and hearts.
You can also create your own custom shape that can be reused.
Common uses include logos, icons, and decorative elements.
Custom shapes are stored in the custom shape picker for easy access.
This way, you don’t have to recreate the same shape every time.
How to Access Custom Shapes
To access custom shapes, follow these steps:
Open Photoshop and create a new document.
Select the shape tool from the toolbar on the left side.
Navigate to the options bar at the top.
Click on the custom shape tool icon, which looks like a star.
In the options bar, find the custom shape picker located on the upper right.
Browse through the available shapes, and select the one you need.
Creating Custom Shapes
Select the custom shape tool.
In the options bar, choose “Shape” from the dropdown menu.
Simply click and drag to draw your shape on the canvas.
Hold down the shift key to keep the proportions of the shape.
Check the layers panel to see your new shape layer.
Using the gear icon in the options bar allows you to apply patterns and define strokes.
You can also choose a solid color or use the color picker to fill the shape.
Adjustments are quick and intuitive.
Pro Tip: Use the shape tools wisely, they save time and add creativity to your designs.
Mastering the Custom Shape Tool is beneficial because it allows for precise, versatile design creation, enabling you to quickly and efficiently produce unique shapes tailored to your project’s needs.
Introduction to the Custom Shape Tool
The custom shape tool in Photoshop is truly versatile. You can use it to create intricate designs quickly.
This tool is perfect for beginners and pros alike.
Understanding this tool isn’t just useful, it’s essential for anyone serious about design.
Custom shapes are vectors, which means they retain their quality when resized. In simpler terms, no matter how much you stretch or shrink a custom shape, it looks crisp.
Steps to Use the Custom Shape Tool
Start by opening Photoshop and creating a new document.
Select the shape tool from the toolbar. It's that rectangle or ellipse icon.
Choose the custom shape tool in the dropdown menu in the options bar. Here, you'll find the custom shape picker filled with various preset shapes.
Click on the icon of the custom shape picker and peruse through the available options.
Hold the shift key while dragging the shape to maintain its proportions, ensuring a perfectly proportionate shape every time.
After sketching your shape on the canvas, go to the layers panel. Ensure your newly created shape layer is selected.
Edit and style your shapes, such as applying fills and strokes.
Tips and Tricks for the Custom Shape Tool
To maximize the utility of the custom shape tool, here are some practical tips:
When drawing shapes, always hold down the shift key to maintain their aspect ratio.
Use the gear icon in the options bar for additional customization options, like patterns or solid colors.
The polygon tool also offers quick access to standard geometric shapes that you can integrate into your designs.
Are you interested in creating new shapes of your own?
The process is straightforward:
Use the pen tool to draw a path.
Convert that path into a shape.
Save these as custom shapes to access them anytime from the custom shape picker.
Revving up your designs has never been easier.
Pro Tip: Want to turn up the charm?
Creating a heart shape is simple with the custom shape tool. It’s in the shape picker, and it’s perfect for adding heartfelt touches to your designs.
While Photoshop is excellent for detailed edits, Lightroom offers powerful photo management and batch editing capabilities.
Creating and Saving Custom Shapes
Creating and saving custom shapes is essential for adding a unique touch to your designs.
By using the shape tool, you can easily draw and customize shapes to fit your project’s needs.
The shape tool offers various options to adjust and refine your shapes, ensuring they align perfectly with your vision.
Once you’ve designed the perfect shape, saving it for future use can save time and maintain consistency across your projects.
Mastering the shape tool allows for greater flexibility and creativity in your design process.
How to Create Custom Shapes
First, open your Photoshop. Then, create a new document. Navigate to the toolbar and select the shape tool.
Click and hold to see more options, then choose the custom shape tool.
Now, head over to the options bar and click on the custom shape picker.
Here you see a range of preset shapes. Select one by clicking on it.
To draw a custom shape, click on your canvas. Drag your mouse while holding down the Shift key to keep the proportions.
Once drawn, ensure your Shape Layer is active in the layers panel. This way, you can edit it smoothly without affecting your document.
You can also create a new custom shape by free skatching your paths with the pen tool.
After creating the path, right-click and choose “Define Custom Shape”. Name your new custom shape and save.
When creating and saving custom shapes, the polygon tool is invaluable.
It allows for precise and versatile shape creation, enhancing your custom designs. Master this tool to improve your shape creation skills.
Saving Your Custom Shapes
After creating, saving your custom shapes is straightforward:
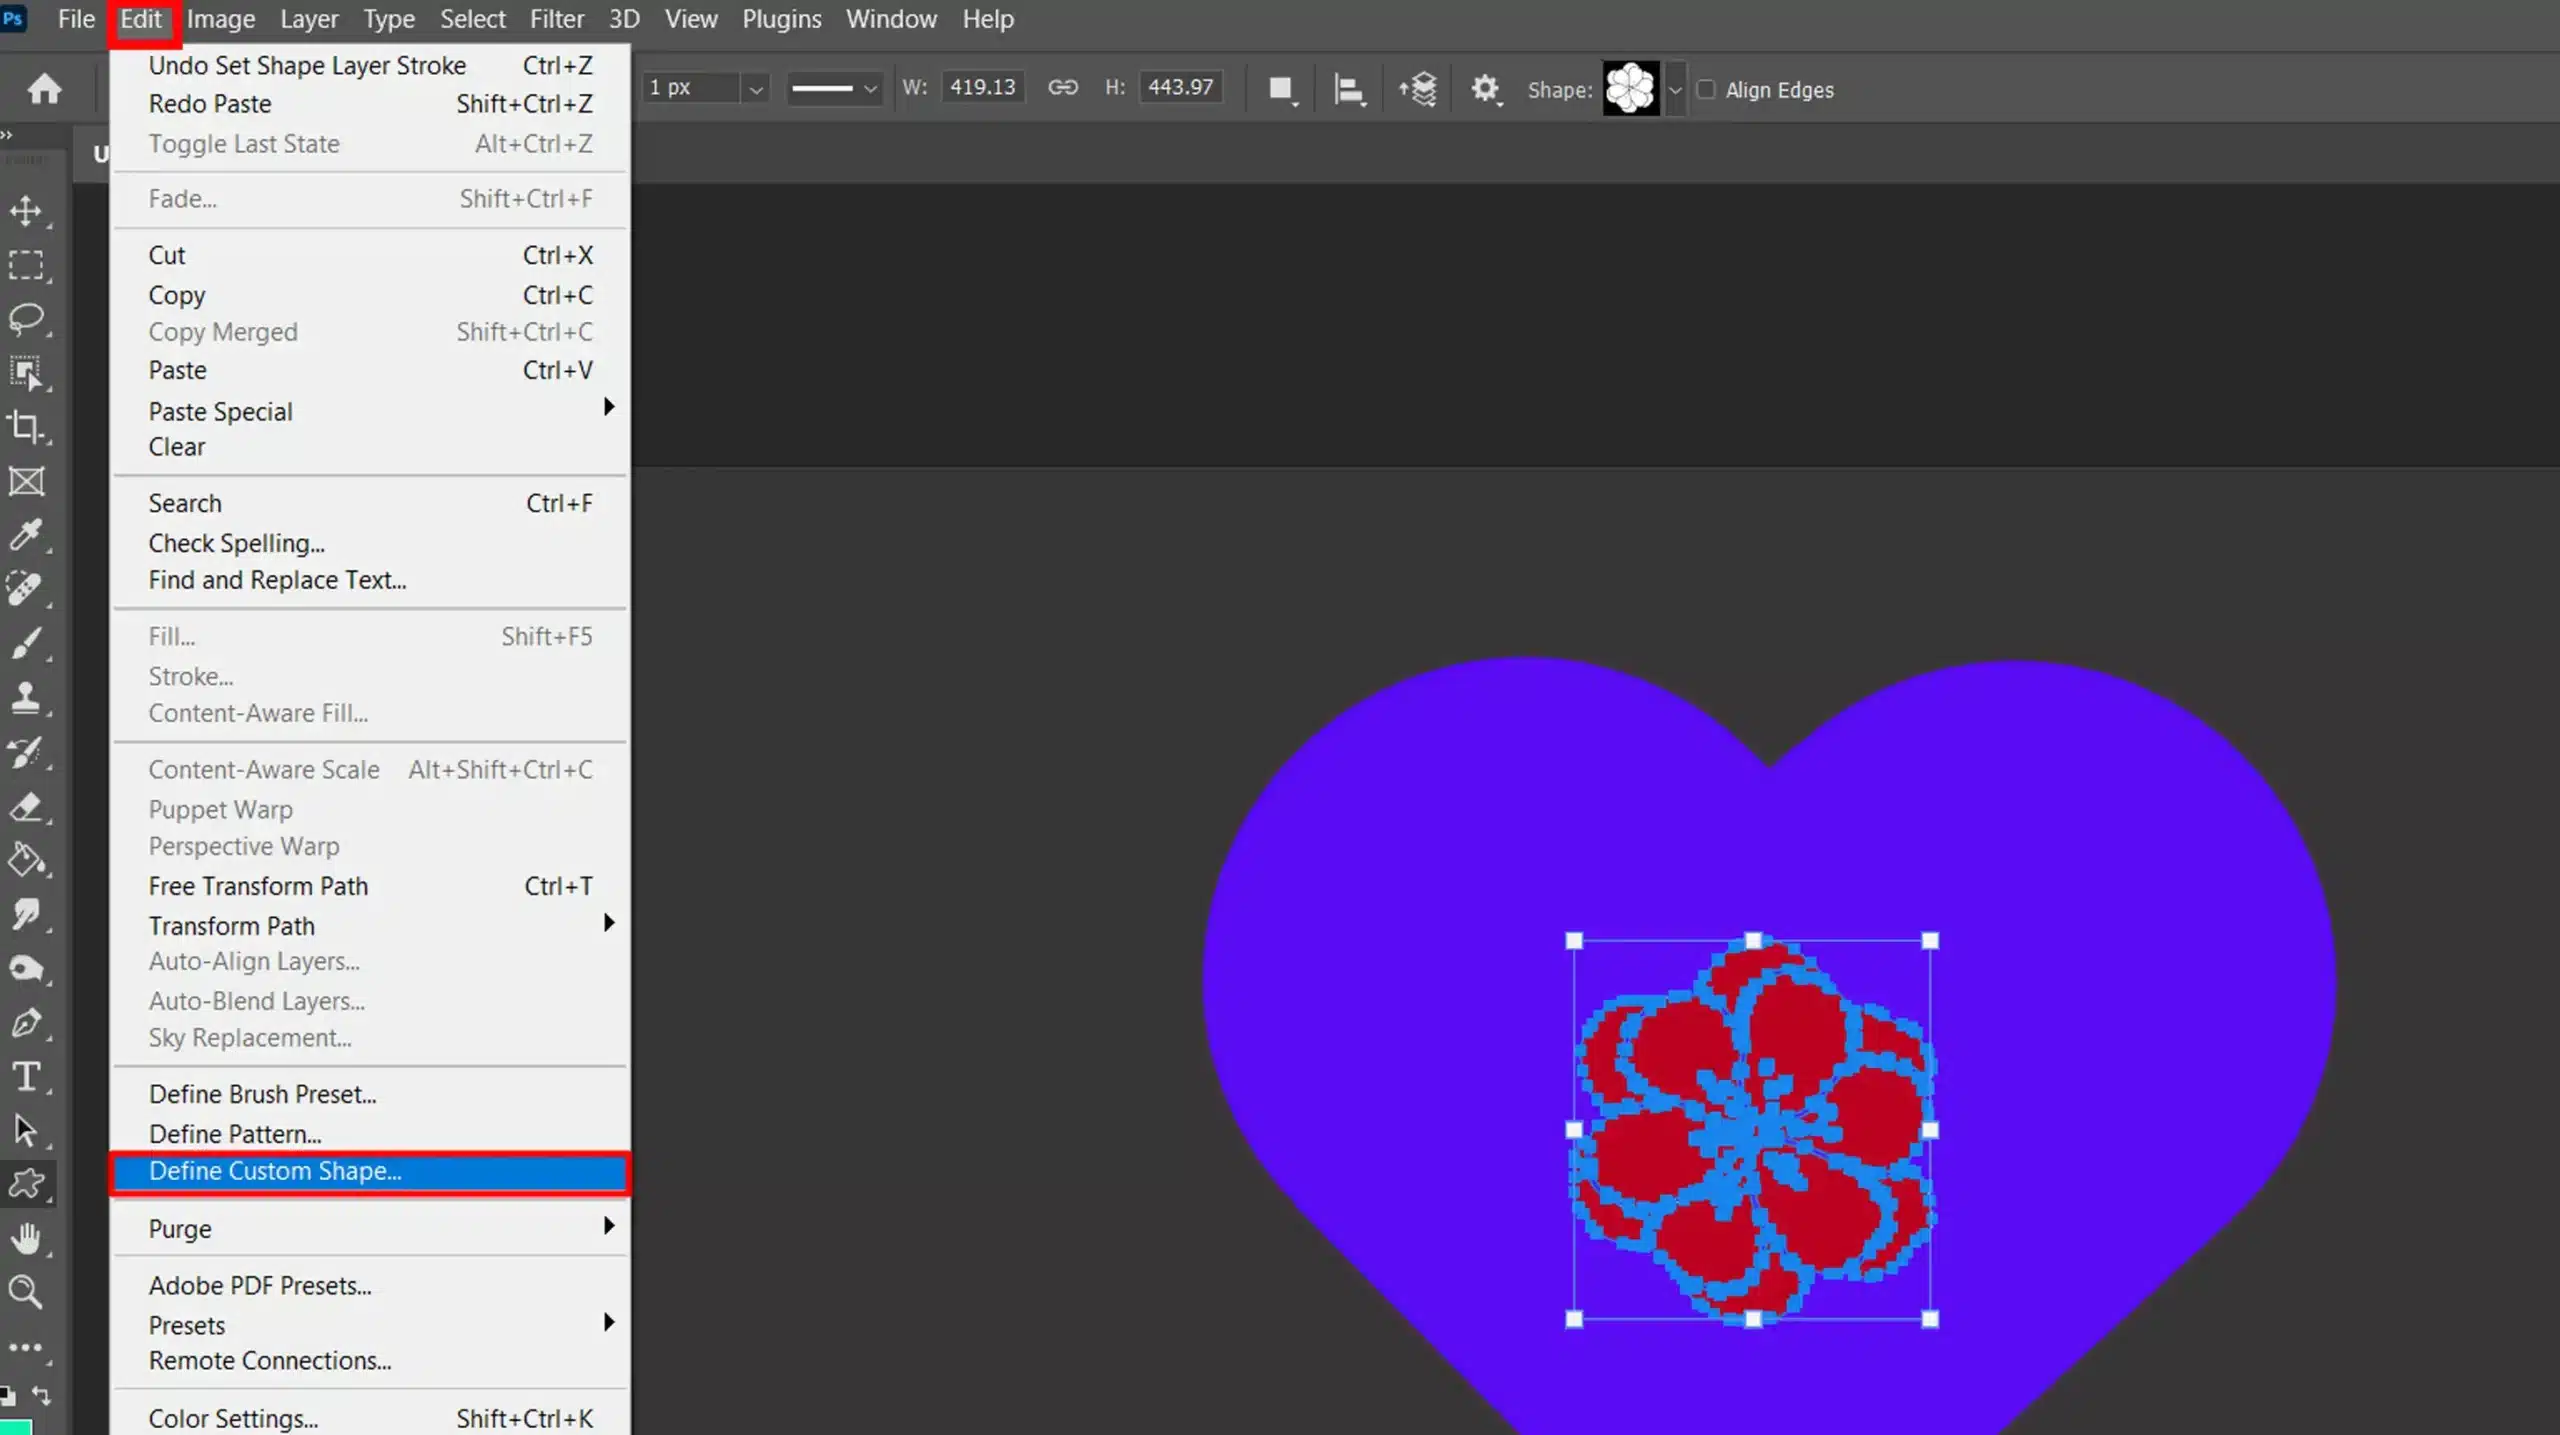
With your new shape selected, go to the Edit menu.
Choose "Define Custom Shape".
Give it a name, and save it.
Now it’s available anytime you need.
Remember to experiment with different paths, patterns, and colors using the color picker. These adjustments can make your shape unique and fit all your projects.
Pro Tip:
To create heart shapes, draw the shape and hold Shift for perfect proportions, whether you’re opting for a round or square design.
Finally adjust the corners to achieve the desired round effect. By following these steps, you will master creating and saving custom shapes in no time!
Additionally, you might find the Photoshop Shape Tool and Photoshop Masking useful for more advanced shape manipulations.
Practical Applications of Heart Shapes
Heart shapes have a variety of uses in both personal and professional projects.
In this section, we explore how to use these shapes effectively.
We focus on design projects and creative ideas.
Using Heart Shape in Design Projects
Heart shapes serve many design purposes. They can attract attention and convey emotion.
Here’s how to incorporate them into your projects:
Create a heart shape using the Shape Tool in Photoshop.
Select custom shape from the options bar for preset designs.
Hold Shift while drawing to keep proportions.
Edit the shape layer to adjust size and color.
Adjusting the shape layer is crucial for achieving the desired effect. You can change the color of the shape layer using the solid color option.
Additionally, fine-tuning the shape layer through various layer adjustments can add depth and dimension to your design, ensuring your shape layer integrates seamlessly with the rest of your project.
Creative Ideas for Heart Shape
Aside from traditional uses, heart shape can inspire more creativity.
Here are some ideas:
Combine hearts with other shapes for unique patterns.
Experiment with the Polygon Tool in Photoshop to add complexity.
Use paths to modify the heart shape, changing the width and curve.
Draw custom shapes by combining multiple paths.
The process to draw custom shapes and vector shape in Photoshop to bring a unique touch to your designs, allowing for greater creative expression and customization.
Playing around with different configurations can yield interesting results.
Remember, the key is experimentation.
You should enjoy the process.
Adjust the gear icon to fine-tune your design elements.
Pro Tip: Use the alignment tools to center your shape perfectly. This ensures a balanced and visually appealing design.
Common Mistakes to Avoid
Let’s dive into some common mistakes that folks make while using Photoshop and Lightroom to create custom shapes.
Avoiding these will ensure a smoother workflow and better results.
Common Mistake
Problem
Solution
Not Using the Shape Tool Properly
Distorted shapes
Hold Shift to maintain proportions
Ignoring the Options Bar
Missed customization options
Explore color and size settings
Overlooking Custom Shape Options
Lack of design variety
Use preset shapes for inspiration
Improper Layer Management
Complicated editing process
Organize and adjust layers
Avoiding Path Modifications
Limited shape adjustments
Learn to modify paths for unique results
Skipping Alignment Tools
Unbalanced design
Use alignment tools for professional look
Not Using the Shape Tool Properly
The shape tools are crucial, but sometimes they get overlooked. Remember to select the correct shape tool from the toolbar.
Don’t forget to hold the Shiftkey while drawing to maintain proportions. This ensures that your shape doesn’t look distorted.
When not using the Shape Tool, you might find it helpful to add shape manually for more control. This approach can give you precise results while creating custom designs.
Ignoring the Options Bar
The options bar offers several settings for your shapes, like adding a solid color or adjusting the size. Make sure to explore these features to get the maximum benefit out of your shapes.
It may seem trivial, but these settings can make a big difference in your final product.
Overlooking Custom Shape Options
Photoshop offers various custom shapes that can be very useful.
You can find these by clicking the gear icon in the options bar. These preset designs save you time and give you some creative inspiration right off the bat.
Improper Layer Management
Make sure to keep your shapelayers organized. When layers are mismanaged, it can complicate your editing process.
Use layer adjustments to change the size, color, and position of your shapes efficiently.
This helps keep your project structured and manageable.
Avoiding Path Modifications
Modifying paths isn’t as hard as it seems. Paths allow you to change the width and curves of your shapes.
Take some time to get familiar with path options to enhance your design skills.
Experimenting with paths can lead to some pretty unique results.
To streamline your workflow, mastering the path selection tool can be crucial.
This tool helps in avoiding path modifications by accurately selecting and managing paths.
Effective use of this tool ensures precision in your designs, making your editing process smoother and more efficient.
Skipping Alignment Tools
Alignment tools help center your shapes and keep your design balanced. It’s a tiny step that can make a big difference in the visual appeal of yourproject.
Ensuring proper alignment gives your design a polished and professional look.
Pro Tip: Experimenting with the polygon tool can give your designs more complexity. Try combining different custom shape to create unique patterns.
For those looking to streamline their workflow even further, mastering essential tools in Lightroom can make a significant difference.
Frequently Asked Questions
How do you insert a heart shape?
To insert a heart shape follow these steps:
Select the Custom Shape Tools from the toolbar.
In the options bar at the top, click the custom shape dropdown and choose the heart shape.
Click and drag on your canvas to draw the heart.
Is there a heart shape in Photoshop?
Yes, Photoshop includes custom shapes including a heart shape. You can find it in the custom shape tool options.
How do you make a heart effect in Photoshop?
Make a heart effect in few steps:
Open the custom shape tool and select the heart shape.
Drag to draw the heart shape on your canvas.
Apply different effects like gradients, shadows, or glows from the Layer Style menu to enhance the heart.
How do I cut an image into a heart in Photoshop?
Cut an image in four easy steps:
Open your image in Photoshop.
Select the Custom Shape Tools and choose the heart shape.
Draw the heart shape over the area of the image you want to cut.
Select the layer with your image, then go to the Layers Panel and click the \"Add layer mask\" button at the bottom.
$2,061.00Original price was: $2,061.00.$1,061.00Current price is: $1,061.00. 27584
Download Your Free Guide Now!
Discover the secrets of photography with our printable guide! Master essential techniques like aperture, shutter speed, and ISO to create stunning images. Get your free printable PDF now and start turning your snapshots into masterpieces!