Work on a duplicate layer to save the original image
Try different sampling options in the background eraser tool works for better results
Use the history panel to undo mistakes. You can go back to previous states if needed.
Mastering the background eraser tool makes creating transparent backgrounds easy.
For more advanced editing, using content-aware fill in Photoshop can seamlessly remove unwanted elements from your image, allowing the surrounding area to automatically blend in with the rest of the picture.
Also, learning Photoshop shortcuts can significantly speed up your workflow and increase your efficiency while editing images.
Setting Up Your Workspace for Photoshop Background Eraser Tool
To help you understand the differences between the Photoshop Background Eraser Tool and other photo editing tools, here’s a quick comparison highlighting their ease of use, precision, speed, and other key features:
Feature
Photoshop Background Eraser Tool
Other Photo Editing Tools
Ease of Use
High
Moderate to High
Precision
Very High
Varies
Speed
Fast
Moderate to Slow
Suitable for Novices
Yes
Varies
Functionality
Background removal
General photo editing
Cost
Part of Photoshop subscription
Free to High
Photoshop and Lightroom make removing background swatch easy. Let’s walk through some steps to get you started.
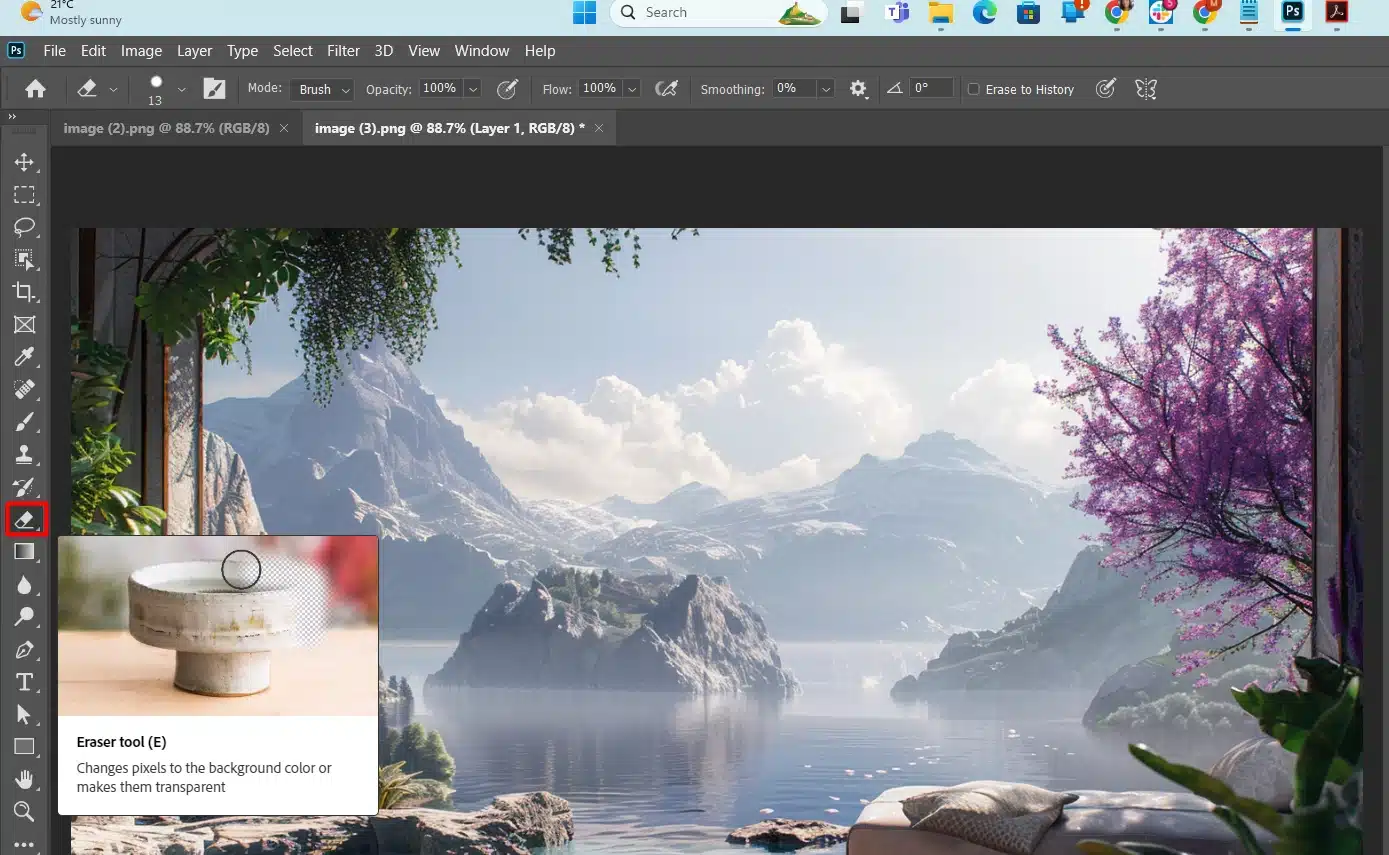
Choosing the Background Eraser Tool
Now, find the background eraser tool. Look at the toolbar on the left column.
Find the eraser icon. Click and hold it. A menu pops up.
Choose “Background Eraser Tool.”
Adjusting Settings
Brush size: Change the brush size in the options bar. Bigger for wide strokes, smaller for details.
Tolerance setting: This controls how much color variation the eraser tool allows. Lower values erase more specific colors, higher values take broader ranges.
Erasing the Background
Start erasing: Click and drag around the object. The background starts to disappear.
Select Protect foreground color: If the foreground color is similar to the background, use the foreground color option to protect it.
Refine edges: Find edges, adjust the hardness setting for cleaner edges. Use tools like Refine Edge for intricate details.
Maintaining Layer Panel and Masking
Layers panels: Always work on a duplicate layer to preserve the original image layer.
Layer mask: Add a layer mask for non-destructive editing. It lets you fine-tune the erased areas later.
Using the history panel helps you undo mistakes.
You can view all actions and revert if needed.
Advanced Tips
Other tools: The Pen tool or Magic Wand can be useful for tricky backgrounds. Each has its strengths.
Content-Aware Fill: For gaps or missing areas, try Content-Aware Fill to seamlessly rebuild parts of your image.
Pro Tip: Use the shift key to add to your selection when using the lasso tools or other selection tools. It offers precision and ease.
Learn how to effectively blur backgrounds in Photoshop because blurring the background, for instance, can help your subjects stand out more and give your photos a professional look.
By mastering these tools, background removal becomes a breeze.
Using the Photoshop Background Eraser Tool
Let’s continue with how to use the background eraser tool in Photoshop and Lightroom.
Adjusting Tool Settings
Proper settings make the eraser tool work better.
Here are the key adjustments:
Brush Size and Hardness
You can adjust the hardness and size of the brush:
Adjust the brush size: Use a large brush for big areas and a small brush for details.
Set the hardness: Softer edges blend, harder edges give precision.
Limits and Tolerance
Limits mode changes how the tool works:
Contiguous mode affects connected areas.
Discontiguous mode ignores connections and erases similar colors everywhere.
Adjust tolerance: Lower values target specific colors, higher values cover more colors.
Sampling Options
Choose sampling options:
"Continuous" samples colors as you erase.
"Once" samples one color and sticks to it.
"Background Swatch" uses the set background color for erasing.
Erasing the Background
Ready to erase? Click and drag the eraser over your image. It removes pixels that match the sampled color.
Protect the foreground color if your subject has similar hues to the background. This keeps important details safe.
Refining Edges
Edges can be tricky. Use Refine Edge for smooth edges around your subject.
The brush tools helps fine-tune. Adding a layers mask allows non-destructive editing, keeping visible layers intact.
Layer masks let you make reversible adjustments. If you mess up, you can fix it without starting over.
Pro Tip: Use Shift + select with tools like the pen tool or magic wand for precision and ease.
Follow these steps to remove backgrounds efficiently and create clean images for your projects.
For more advanced techniques, explore the patch tool that allows you to quickly remove imperfections from images by replacing them with nearby texture and color.
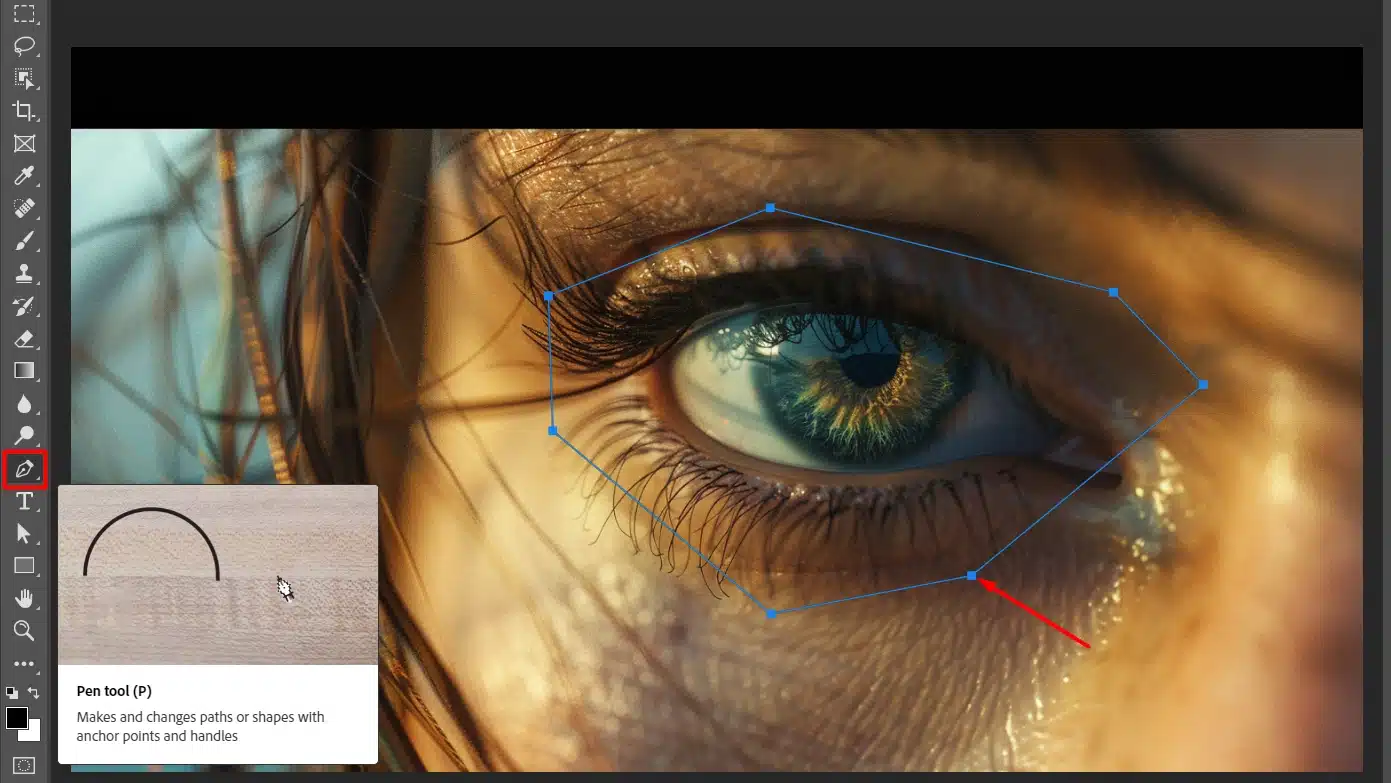
Remove a Background in Photoshop with the Pen Tool
Alright folks, let’s dive into using the Pen Tool to remove backgrounds from your images.
It’s not as scary as it sounds.
Selecting the Pen Tool
Next, locate the pen tool on the left side toolbar.
Click it or just press “P” on your keyboard.
Easy peasy.
Making Your Selection
Now comes the fun part. Click to set your first anchor point.
Continue clicking around the shape, dragging slightly for curves. Complete by connecting back to the initial point.
Creating a Path
After crafting a clean path, right-click inside the selection and choose “Make Selection“.
Set feather radius to 0 for sharp edges.
Background Removal
Here’s where magic happens. With the selection active, go to the layers panel and click Add Layer Mask. Ta-da!
Your old background vanishes.
Refining Edges
You might see rough areas. Don’t fret. Use the Properties Panel to adjust the mask edges and fine-tune anything that looks off. Find edges that need smoothing and adjust accordingly.
Saving Your Image: Finally, save your work by selecting File > Save As and choosing PNG format for a transparent background. If you want to make further adjustments, consider using the Content-Aware Fill tool to clean up any remaining imperfections.
Pro Tip: When using the pen tool, zoom in for precise control. Go steady and you’ll master removing backgrounds in no time!
Remove a Background in Photoshop with the Magnetic Lasso Tool
Feeling nervous about removing backgrounds in Photoshop? Don’t worry.
Let’s use the magnetic lasso tool. Simple steps, clear instructions, and a bit of humor.
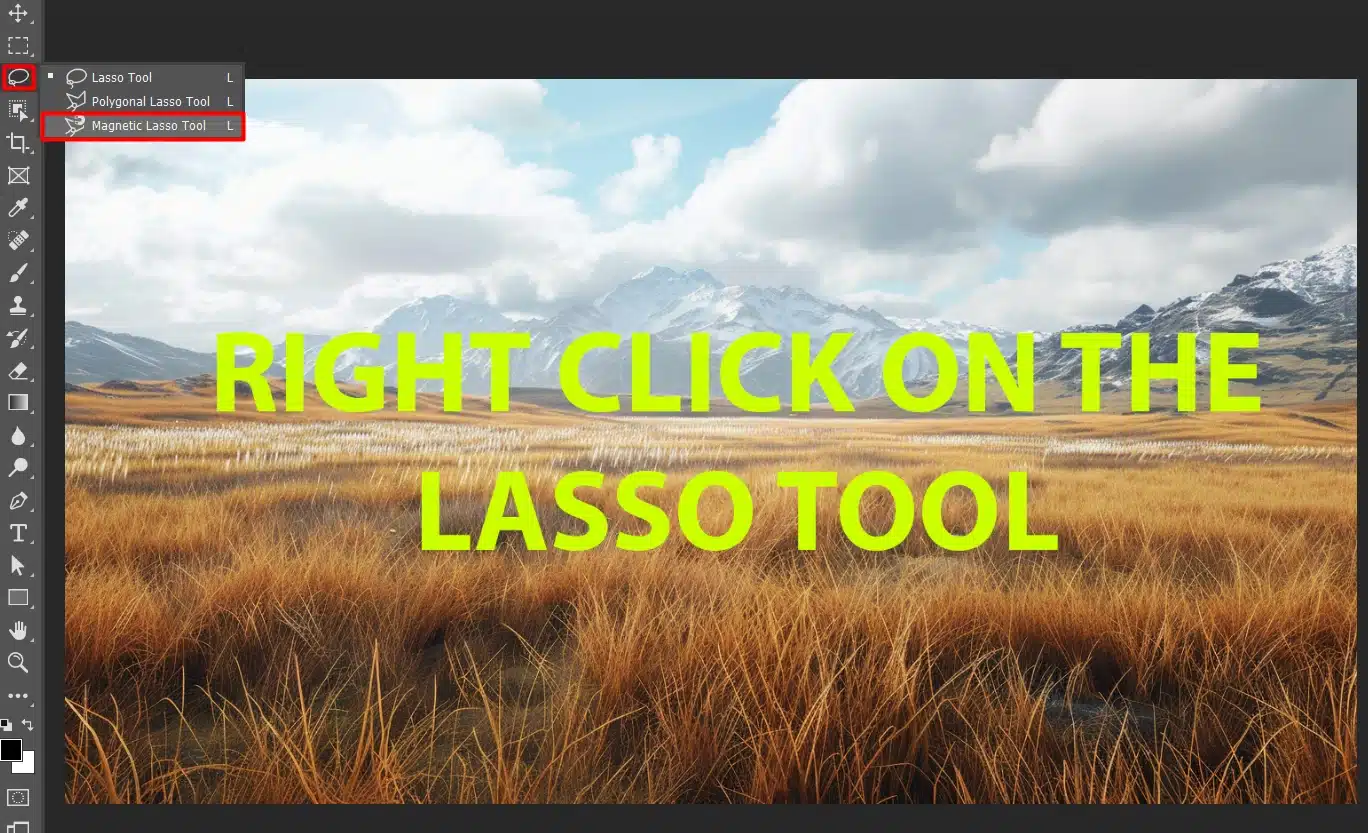
Selecting the Magnetic Lasso Tool
Find the Magnetic Lasso Tool in the left toolbar (under the standard lasso). Got it? Awesome! Click on it.
Making an Initial Selection
Start at a point along your object’s edge. Click to set the first anchor. Now drag around your object. The tool clings to the edges like magnets. Relax and let the program do the work!
Refining the Edges
If the tool goes off course, tap “Backspace” to undo points.
This keeps you close to the edges. Watch out for complex edges and adjust manually if needed.
Completing the Selection
Once you return to your starting point, click to close the loop.
Your object should now be surrounded by a shimmering line. This is your initial selection.
Removing the Background from the Layers Panel
Go to the layers panel. Create a new layer mask.
The old background disappears, leaving the object on a new layer. Easy, right?
Smoothing the Edges and Finishing Touches
For soft edges, use the Refine Edge function or Feather tool.
This smooths things out for a professional finish. Adjust the mask edges for finer details.
Adding a New Background
Want to add some flair? Add a new background layer. Drag it below your object layer, and pick a color or image that fits. Boom! You’ve got a transformed photo.
Pro Tip: For precise control, zoom in and take your time around tricky areas of the background layer. Patience pays off!
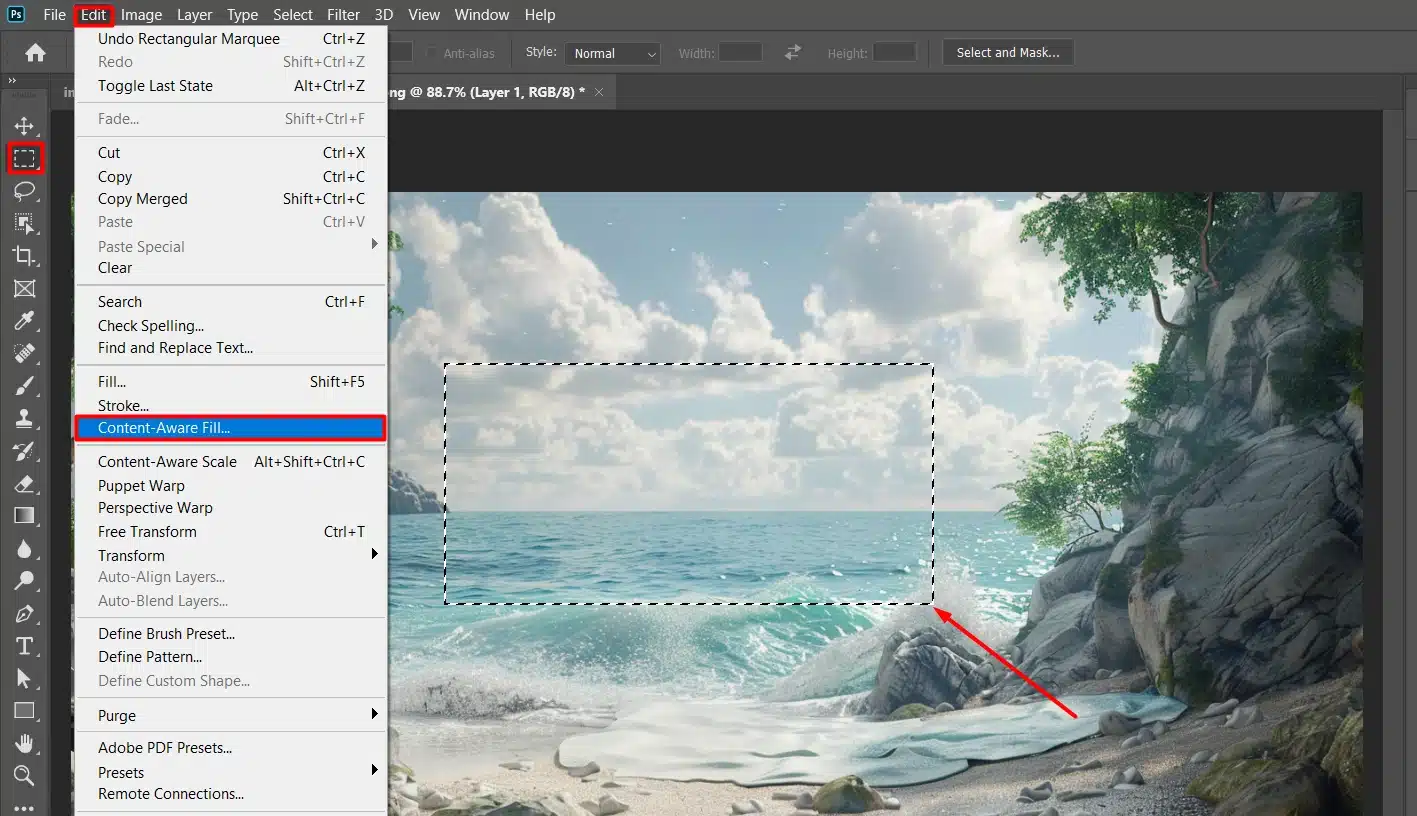
Using the Content-Aware Fill in Photoshop
For even more advanced editing, try using the Content-Aware Fill feature. This allows you to seamlessly fill in areas where the background was removed, making your edits look even more natural.
That’s it! With the Magnetic Lasso Tool and Content-Aware Fill, you can remove backgrounds quickly and easily.
Utilizing Online Background Remover Tools
When it comes to efficiently removing backgrounds from images, online background remover tools are indispensable.
These tools offer a user-friendly interface that automates the process, making it accessible to both beginners and seasoned professionals alike.
By simply uploading your image, these tools intelligently detect and eliminate the background, leaving you with a clean, transparent canvas.
This capability not only saves time but also enhances productivity, allowing you to focus more on creative aspects rather than tedious tasks.
Exploring the Background Color Swatch in Photoshop
In Photoshop, the background colors swatch is a powerful tool for refining and enhancing images.
By adjusting the background color swatch, you can easily manipulate the backdrop of your photos, ensuring your subject stands out prominently.
This feature provides precise control over the background’s color and tone, making it ideal for achieving desired visual effects and maintaining consistency across your projects.
Explore these tips for product photography for additional insights and techniques, especially useful for e-commerce and effectively showcasing your products.
This resource will help you enhance your photo editing and presentation skills, ensuring your products stand out with professional quality images.
Enhancing Workflow with the Remove Background Tool
The Remove Background Tool in Photoshop is a versatile feature designed to streamline the editing process.
By using this tool, you can swiftly eliminate unwanted backgrounds from images while preserving the integrity of your main subject.
This tool leverages advanced algorithms to detect edges and make accurate selections, making it an essential asset for tasks ranging from portrait retouching to product photography.
Incorporating the remove background tool into your workflow empowers you to achieve professional results efficiently and effectively.
Remove a Background in Photoshop with the Quick Selection Tool
Now, let’s look at how to actually use the quick selection tool to remove a background in Photoshop:
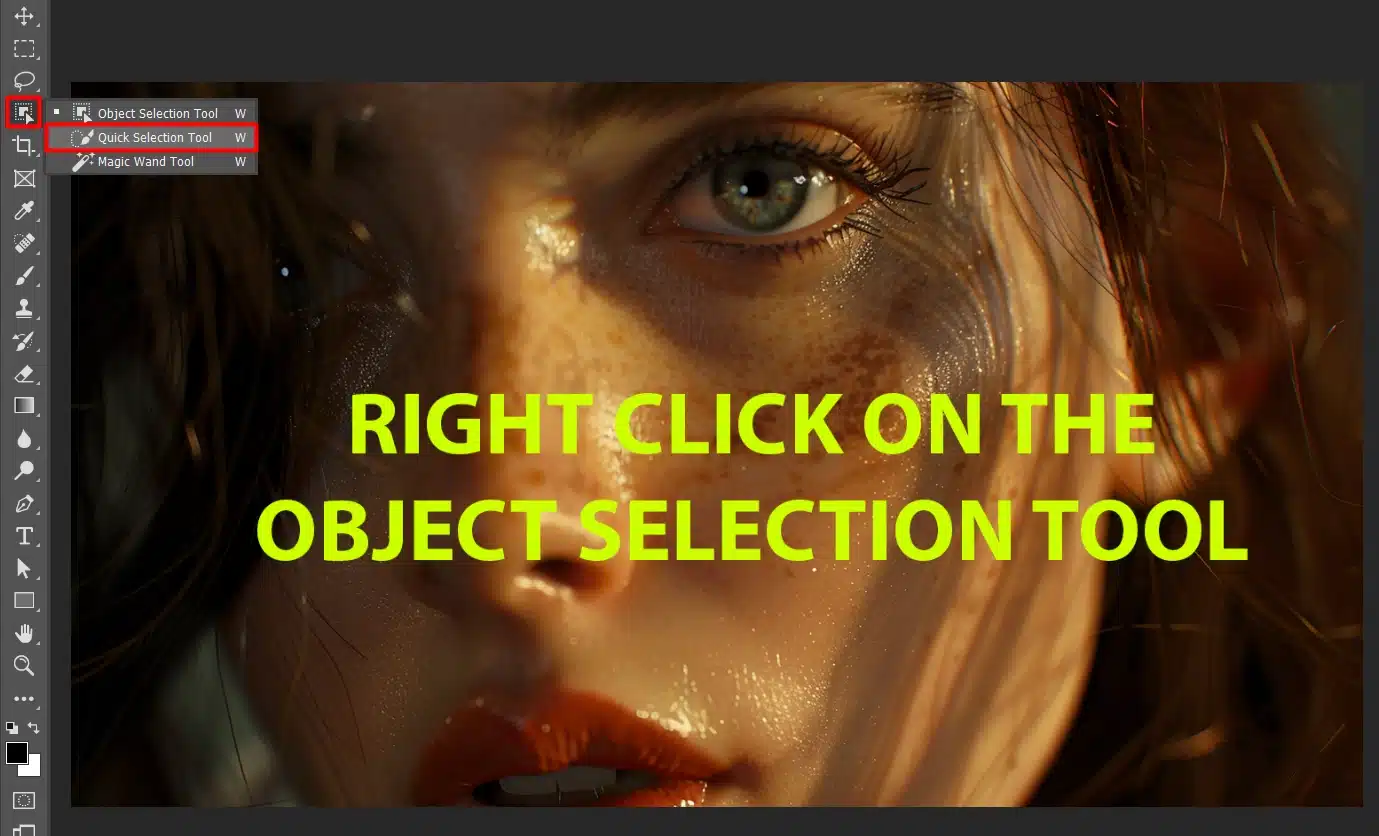
Picking the Quick Selection Tool
Find the Quick Selection Tool on the left toolbar.
It looks like a paintbrush with a dotted circle. Click on it.
Making a Selection
Click and drag the Quick Selection Tool over your subject. The tool detects the edges.
If it selects too much, hold the Alt key (or Option key on Mac) and drag to deselect.
Refining the Edges
With your selection active, click “Select and Mask” on the top options bar.
Adjust the view mode to see the changes better. Use the Refine Edge Brush Tool to smooth out tricky areas.
Removing the Background
Happy with the selection? Click “Output To” and choose “Layer Mask” Your background is gone! You now have a clean, isolated subject.
Final Touches
If you see rough edges, use the brush tool on the layer mask to clean it up.
Experiment with small brushes to fine-tune thoroughly.
Save your work by selecting "File," then "Save As."
Choose PNG file format to keep the background transparent.
Pro Tip: If your subject has similar colors to the background, use the refine edge tool to protect foreground color. This ensures precision in the selection process.
You can remove an object in Photoshop by using tools like the clone stamp to seamlessly erase unwanted elements from your photos.
Tips and Tricks for Background Eraser Tool
Mastering this tool requires a few tips and tricks to ensure precision and efficiency.
Over the years, I’ve discovered several techniques that make using the background eraser tool much easier and more effective.
Complex Backgrounds
Struggling with tricky edges when removing a background? No worries.
Here’s how to handle it like a pro.
Steps to Handle Complex Backgrounds
To tackle complex backgrounds effectively, follow these steps to ensure a clean and precise result:
First, open your image. Got it? Great.
Now let's talk tools. The eraser tool and background eraser are your best friends here.
The magic wand tool helps too, especially for selecting areas with many colors. Just click to select the part of the photo's background you want to remove.
When dealing with a busy background, switch on "Contiguous" mode in the magic wand tool settings. This isolates specific areas without picking up unwanted sections.
Set the tolerance setting based on your needs: a high tolerance erases more broadly, while a low tolerance pays attention to detail.
Messed up? No stress. The background eraser tool lets you control the removal process with precision.
Don't forget the auto erase option, a quick trick for removing unwanted edges of your selection.
Pro Tip: Keep your finger on the Alt key (Option key on Mac). It lets you switch between selecting and deselecting parts while using the background eraser tool.
It is important to familiarize yourself with Lightroom shortcuts. They can greatly speed up your editing workflow and increase efficiency when processing batches of photos.
Using Layer Masks
Layer Masks allow for precise control over where edits are applied, offering flexibility without permanently altering the original image.
When combined with the Background Eraser Tool, which efficiently removes backgrounds while preserving foreground details, users can achieve seamless cutouts with ease.
Steps to Use Layer Masks
Maximize the potential of this powerful feature, follow these steps to use layer masks effectively:
Start by duplicating your current layer. This step ensures you can always go back.
With your duplicate ready, select the "Add Layer Mask" option from the layers panel. This mask can cover or reveal parts of your image as you wish.
To fine-tune your masked image, use the brush tool. Set your brush color to black to hide areas or white to reveal them. It's like painting over a canvas, but you can reverse your mistakes.
Playing with the “Refine Mask” option can help you find edges seamlessly. If you see rough spots on your selection, smooth them out with this feature.
If you want to remove the background without changing the original image, follow these steps. You'll have much greater control over the final result.
Layer masks also supports transparency, meaning your edits blend perfectly into any desired background color.
Pro Tip: Use the feather option to soften the edges of your mask. It blends the object’s outline smoothly with the background layer.
Common Mistakes to Avoid
Photoshop and Lightroom users often make some common mistakes when trying to remove backgrounds.
It might look easy, but skipping details can wreck your hard work.
Over-Erasing
One of the first mistakes is over-erasing. When you use the eraser tool, it’s tempting to keep erasing till you think it looks perfect. However, this often leads to erasing parts of the main subject.
Not cool, right? Keep an eye on what you’re erasing. The background eraser works best when used with restraint. Don’t go all in at once.
Tips to Avoid Over-Erasing:
To maintain the integrity of your images and achieve precise results, follow these tips to avoid over-erasing:
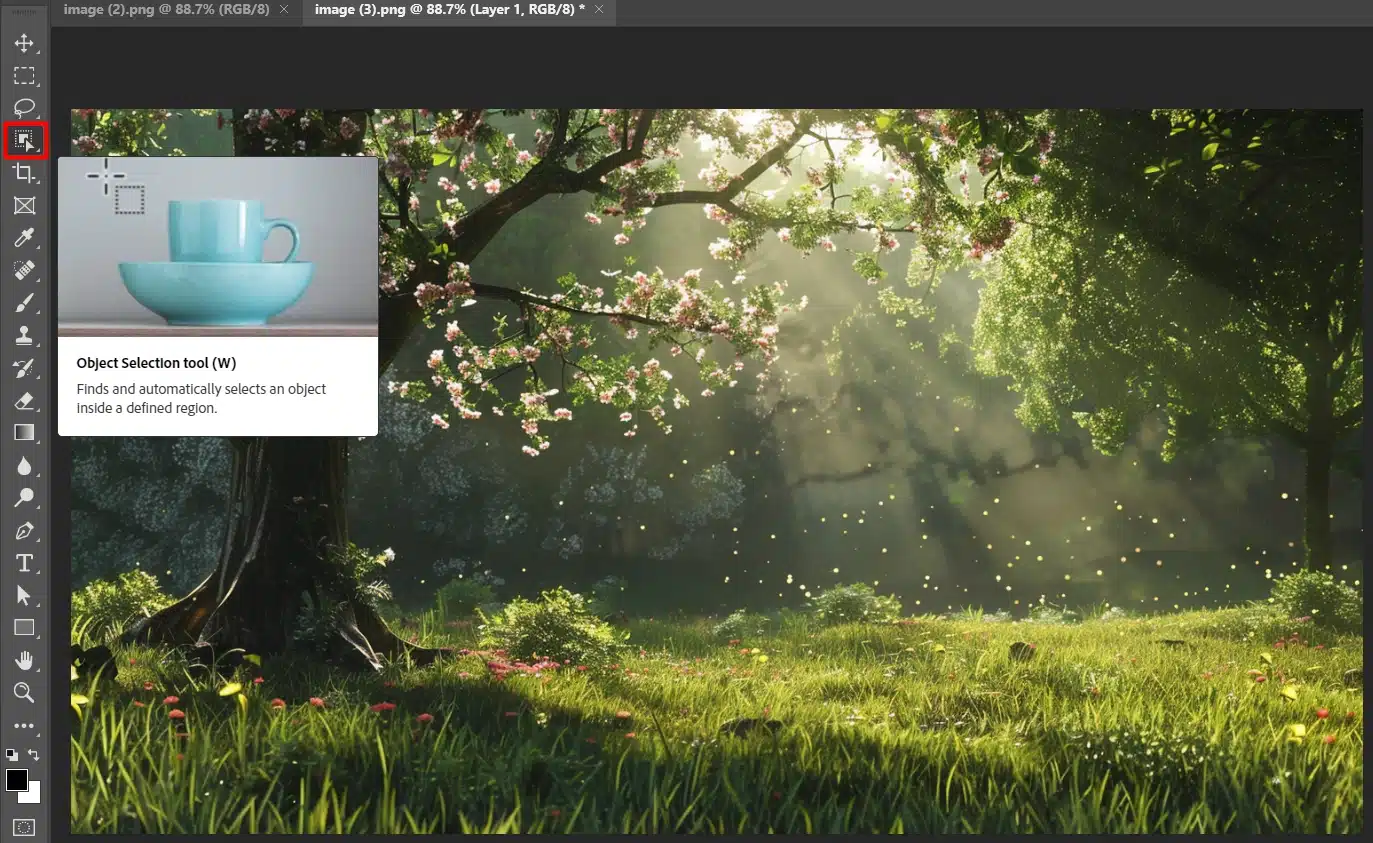
Instead of using the eraser tool aggressively, try the object selection tool. This tool helps pick out the subject accurately without removing vital details.
Go slow, and if needed, undo any oversteps. Trust me, taking it slow saves time in the long run.
To refine your selections and achieve precise edits, consider using the object selection tool. Object selection in Photoshop allows you to quickly and accurately isolate specific parts of an image for editing or removal.
Ignoring Edge Refinement
Another common mistake is ignoring edge refinement. Once you manage to remove the background from your image, edges can look rough or choppy.
You don’t want that. The refine edge option is here to save the day. Use it for smoothing out edges and giving a professional look to your image.
Edge Refinement Tips:
Achieving clean and precise edges is crucial when working on detailed image edits.
Try these tips to refine edges effectively:
Try tools like 'Select and Mask' to refine your selection, especially around hair or feathery edges. It’ll cut down the rough, aliased look that happens when you miss fine-tuning.
Don't ignore this step; it's what elevates your work.
Pro Tip: To get even more precise, play with the tolerance value of your tools. A higher tolerance might erase multiple colors at once, but a lower value helps in picking exactly what you want. Remember to utilize the magic wand tool sparingly.
Practice makes perfect!
Frequently Asked Questions (FAQs)
Where is the background eraser tool in Photoshop?
Open Adobe Photoshop.
Select the 'Eraser Tool' from the tools menu on the left.
Click and hold the 'Eraser Tool' to reveal its different modes.
Choose 'Background Eraser Tool' from the dropdown.
Does Photoshop have a background remover tool?
Yes, Photoshop includes a specific tool called the 'Background Eraser Tool'.
This tool helps you selectively erase the background while preserving the foreground elements.
What is the difference between eraser tool and background eraser tools in Photoshop?
Eraser Tool: This is a basic erasing tool that removes pixels as you drag it across the image, regardless of their color or content.
Background Eraser Tools: This tool is more advanced and allows you to erase the background while detecting and preserving the edges of the foreground object.
How do I remove part of a background in Photoshop?
Choose the 'Background Eraser Tools' from the tool options.
Adjust the tool's settings such as brush size, sampling, and tolerance according to your needs.
Click and drag the tool around the background you wish to erase. The tool will automatically detect the edges of the foreground, helping you maintain the integrity of the main object.
In wrapping up, using the Photoshop Background Eraser Tool has transformed how I handle image editing.
The tool is a game changer for removing backgrounds efficiently, helping photos look cleaner and more professional without a lot of fuss.
From my own experience, it’s all about practicing with the tool’s settings like tolerance and brush size to find what works best for each project.
If you’re keen to dive deeper into mastering this tool or want to expand your editing skills, check out my Photoshop Course and Lightroom Course. Both courses are designed to build your confidence and expertise, step by step.
For those looking to get started with Adobe products, you can find Photoshop and Lightroom on Adobe’s official site where you can download these powerful tools.
Remember, like any tool, the Photoshop Background Eraser Tool gets better the more you use it.
Happy editing!
If this article has helped you, then Like and Share it with your friends
$2,061.00Original price was: $2,061.00.$1,061.00Current price is: $1,061.00. 27584
Download Your Free Guide Now!
Discover the secrets of photography with our printable guide! Master essential techniques like aperture, shutter speed, and ISO to create stunning images. Get your free printable PDF now and start turning your snapshots into masterpieces!