Photoshop align tools are essential for achieving precision and symmetry in your designs
In this article, I’ll show you how to master the photoshop align techniques that can transform your projects from frustrating to flawless.
Imagine the satisfaction of perfect symmetry and balance in every design.
Intrigued?
Keep reading, and you’ll discover simple, effective methods to elevate your Photoshop game, ensuring your visuals stand out.
Ready to unlock the secrets?
Let’s dive in!
Table of Contents
Aligning Layers in Photoshop
Let’s dive into how we can make sure everything is aligned perfectly, from the leftmost layer to the rightmost pixel.
Aligning layers is a fundamental task when working in Adobe Photoshop. Without it, your designs can look cluttered and disorganized.
Difference mode in Adobe Photoshop compares two different layers by subtracting the left pixel and right pixel values of one from the other, creating a high-contrast image that highlights differences.
Aligning Layers Horizontally
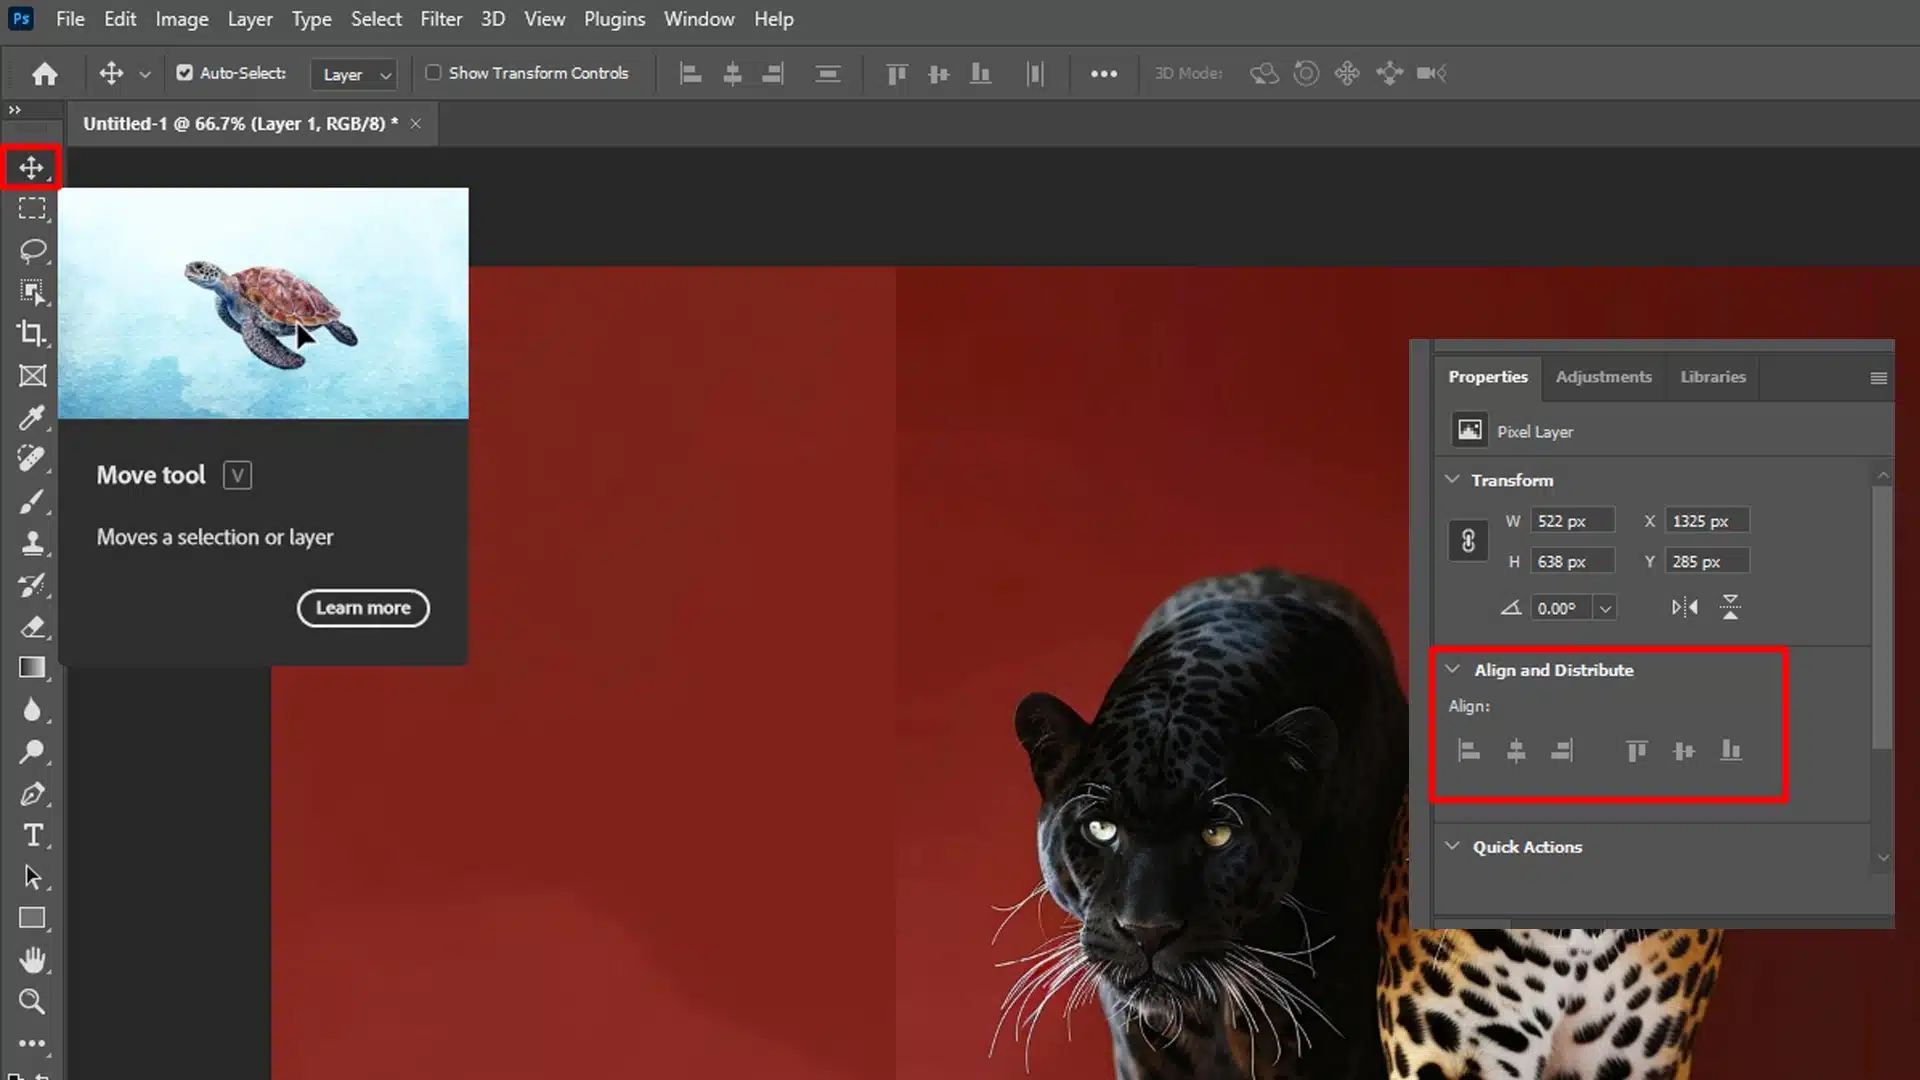
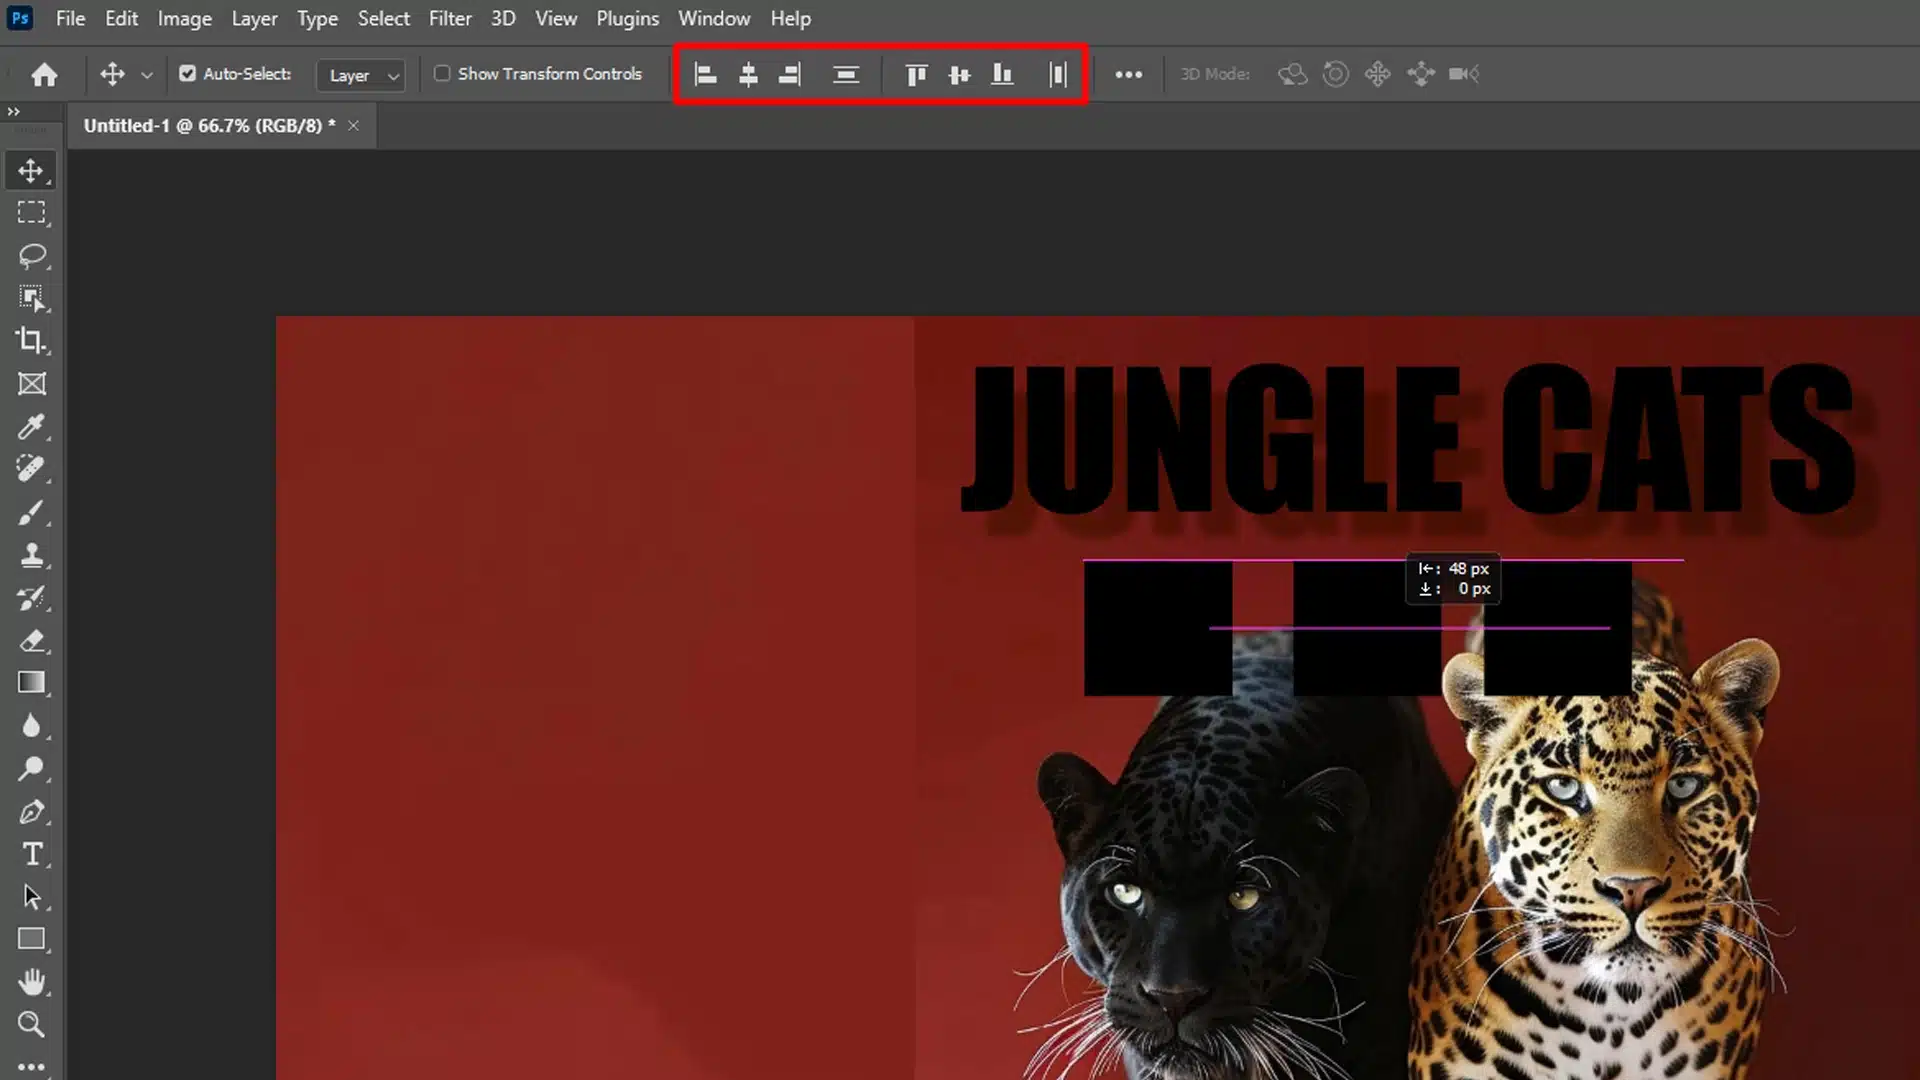
When you want to align layers horizontally, the Move Tools is your best friend. This tools is used for everything, from moving layers to moving images.
Follow these steps:
Select the Move Tool from the toolbox.
Click on the layer you want to move.
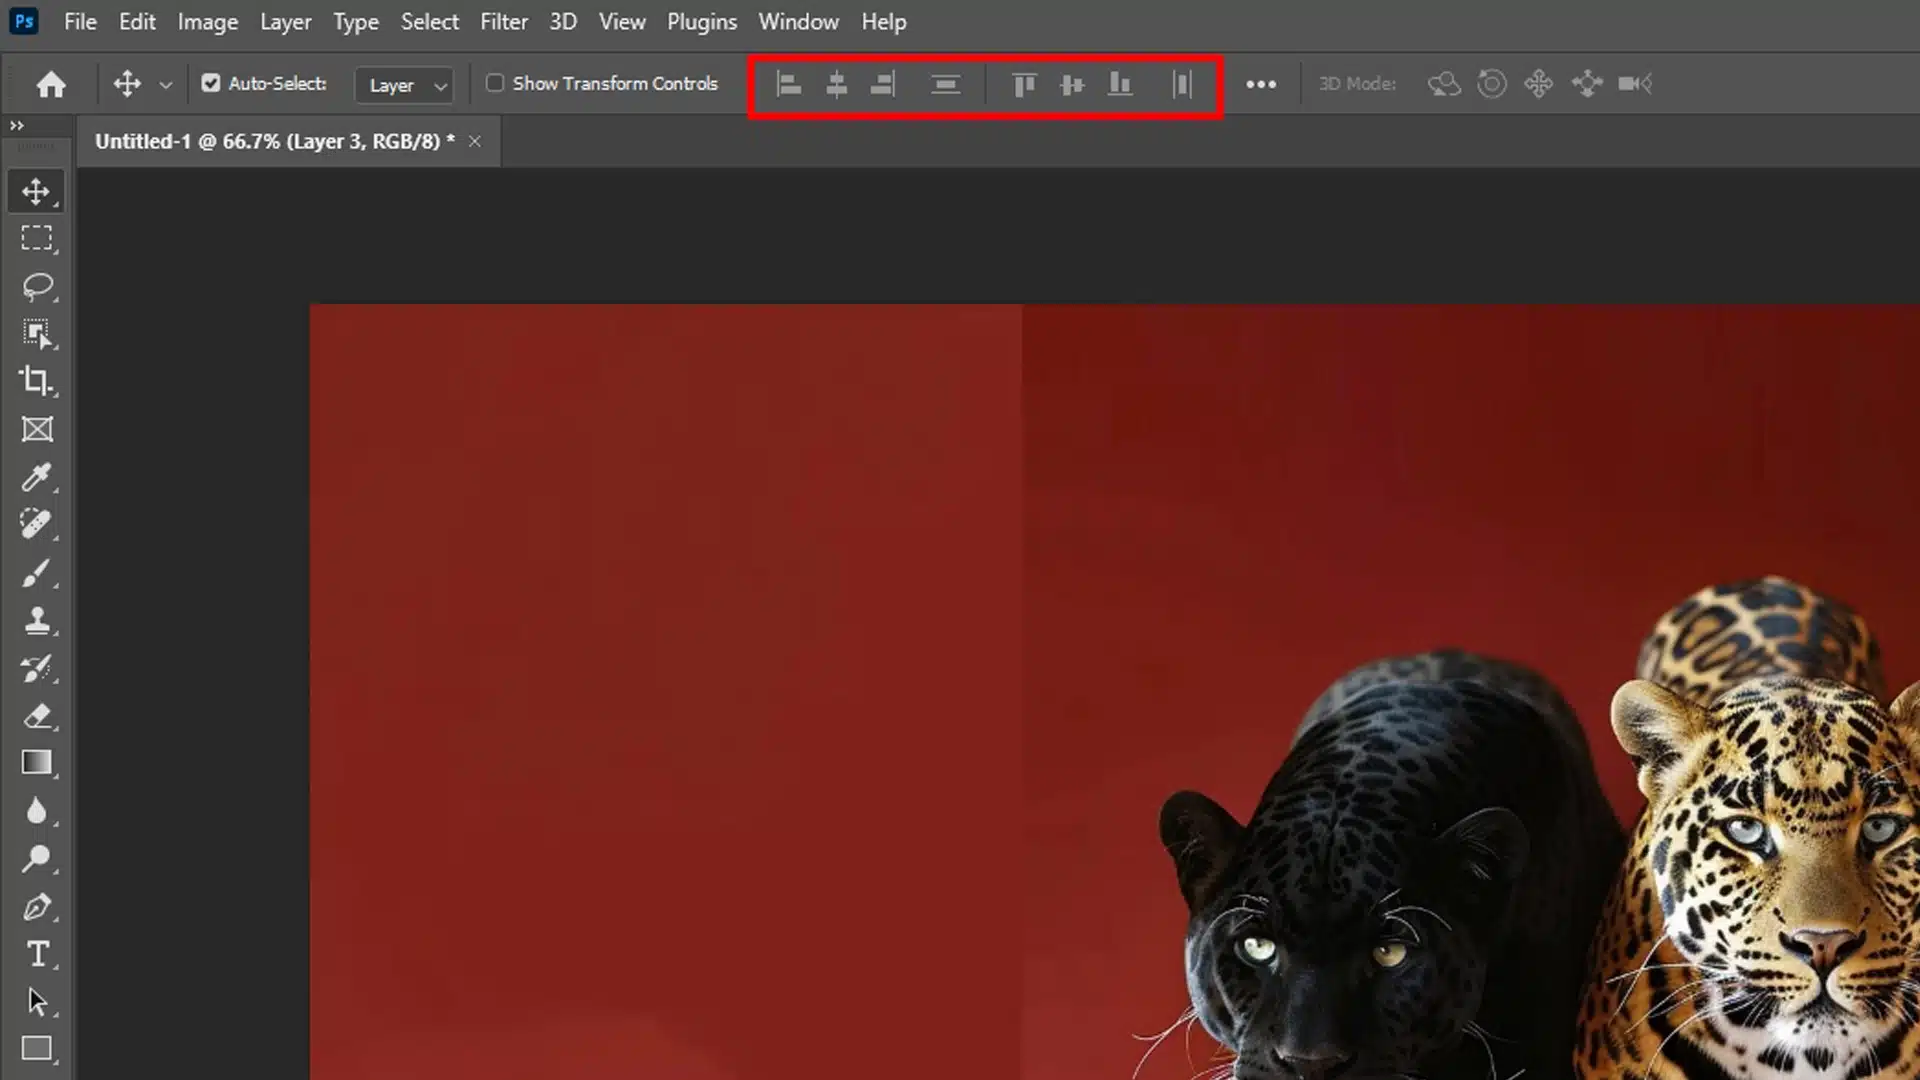
In the options bar at the top, you’ll see different alignment options:
Align Left Edges
Align Horizontal Centers
Align Right Edges
Choose the one that suits your needs:
If you want to align multiple layers, hold down the Shift key and select them.
Click on either the left, center, or right align buttons.
Your layers are now horizontally aligned.
Aligning Multiple Layers Vertically
Aligning vertical center works similarly. With the Move Tool selected, you’ll see these options:
Align Top Edges
Align Vertical Centers
Align Bottom Edges
Follow these steps:
Select the layers you need to align by holding the Shift key and clicking each layer.
Click the appropriate alignment button in the options bar.
Your layers will snap into place. It’s just that simple.
Distribute Layers in Layers Panel Evenly
To distribute layers evenly, follow these steps:
Select all the layers you want to adjust.
Use the Move Tool.
In the options bar, you’ll find the distribute buttons: horizontal spacing and vertical spacing.
Distribute Horizontal Centers
Distribute Vertical Centers
Select the appropriatebutton, and Photoshop will automatically distribute equal spacing between the layers.
These options are particularly handy when you’re dealing with three or more layers. No more guessing and eyeballing!
Pro Tip: Use Auto Align Layers to quickly arrange layers based on content. This feature is especially useful for organizing images in collages or panoramas.
With these techniques, aligning layers in Photoshop is a breeze. Keep practicing, and soon enough, it will become second nature!
Advanced Techniques for Photoshop Align
When it comes to aligning shapes and objects in Photoshop, utilizing advanced techniques can significantly enhance your workflow.
Technique
Description
Pros
Cons
Guides
Use guides for precise alignment by dragging from rulers.
Highly accurate, customizable
Requires manual setup
Smart Objects
Convert layers to Smart Objects for non-destructive editing.
Preserves quality, flexible
May add complexity to the file
Auto-Align Layers
Automatically aligns layers based on content.
Quick and efficient for complex layouts
May not always be perfect
Alignment Tools
Use the Move Tool for alignment options like horizontal and vertical centers.
Simple and easy to use, effective for basic tasks
Limited to straightforward alignments
These methods go beyond basic alignment, offering tools and strategies to achieve pixel-perfect results.
Using Guides for Precise Alignment
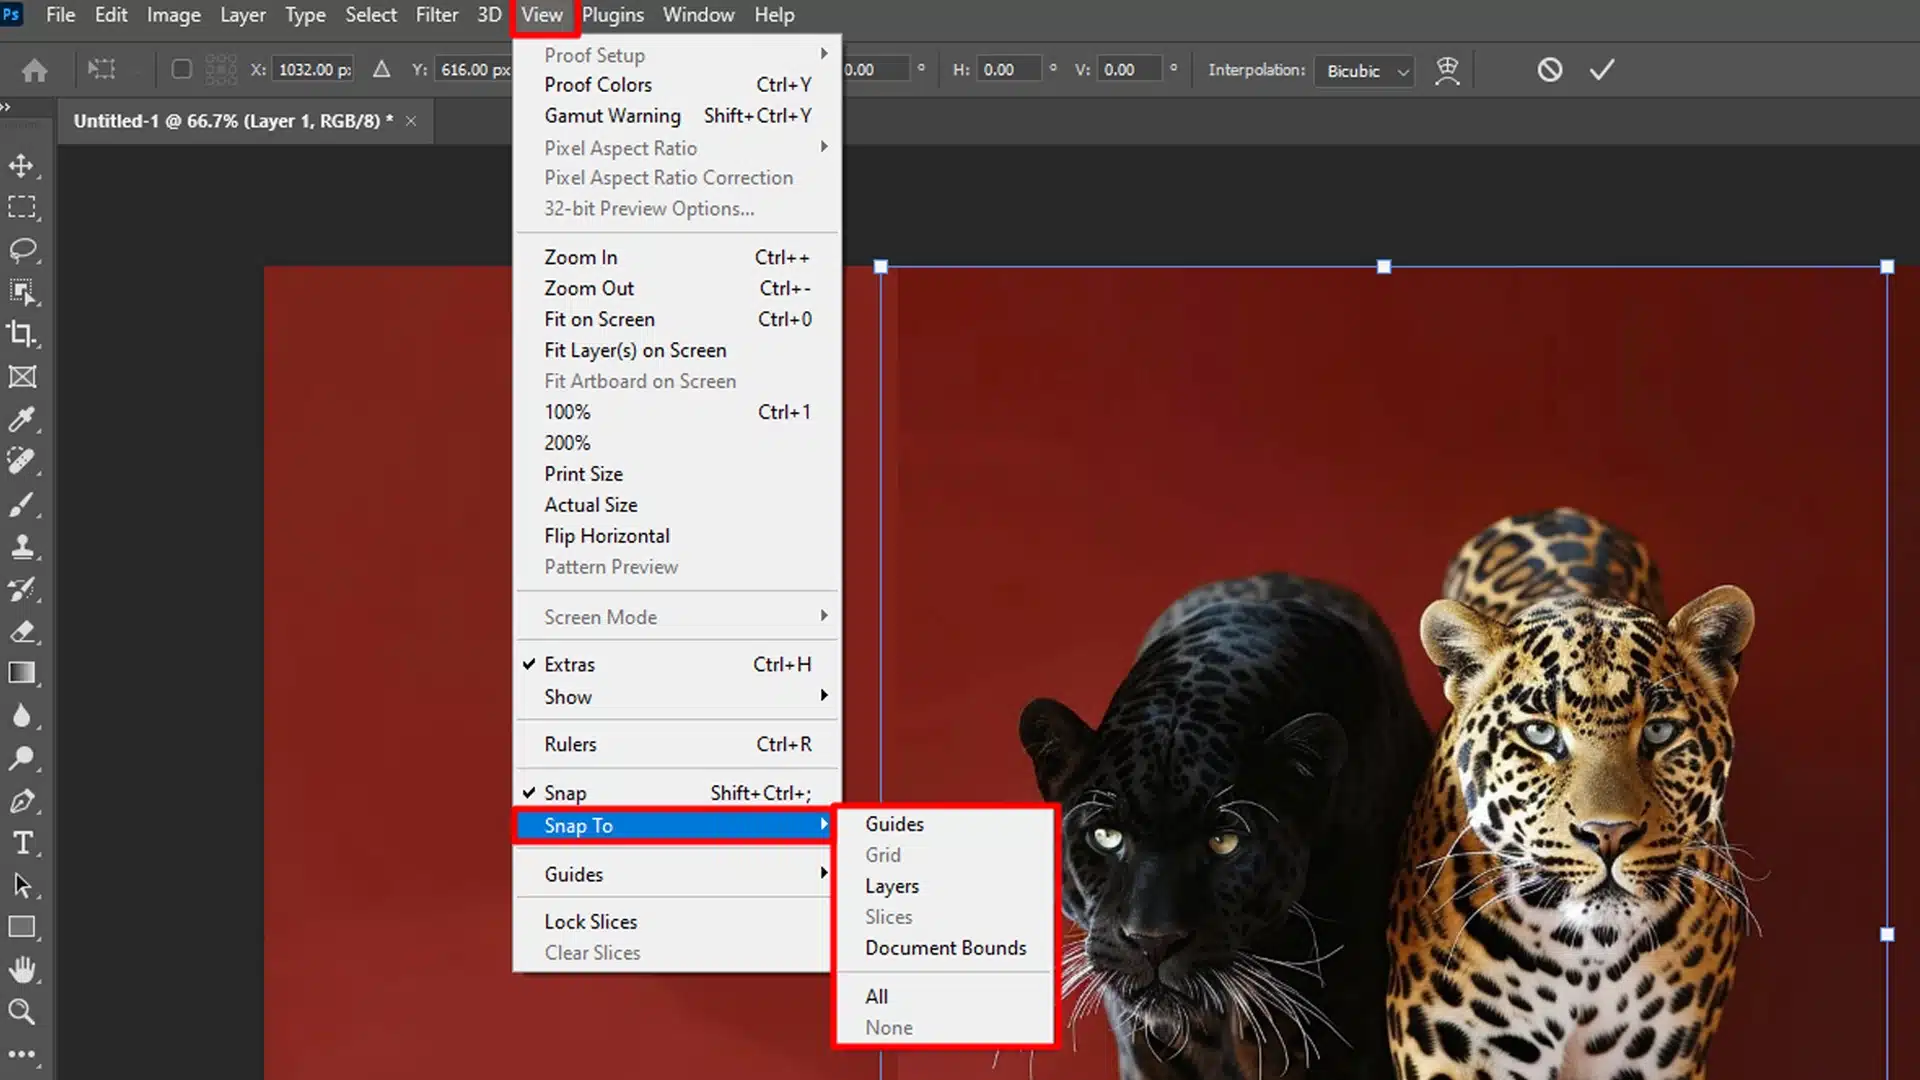
Let’s dive right into using guides for precision in Photoshop. You know those pesky moments when everything looks just a bit off?
Guides fix that. Begin by dragging guides from the rulers at the top and left of your workspace.
Place them where you want to align the objects.
When using guides for precise alignment, understanding composition rules can enhance your design’s balance.
Guides help you snap layers into perfect alignment, avoiding any guesswork. You align layers quickly and efficiently.
Moving on, enable the “Snap To” option. It ensures layers click to guides, making alignment smooth and precise. You can access this under the “View” menu.
Additionally, knowing how to add shapes in Photoshop in Photoshop can be very useful. This tool ensures each element fits perfectly in your layout
You also use Smart Guides. These appear as pink lines when you move an object around, showing distance in relation to other layers.
It’s like having a mini ruler on the screen all the time. Easy and effective.
Aligning Text Layers
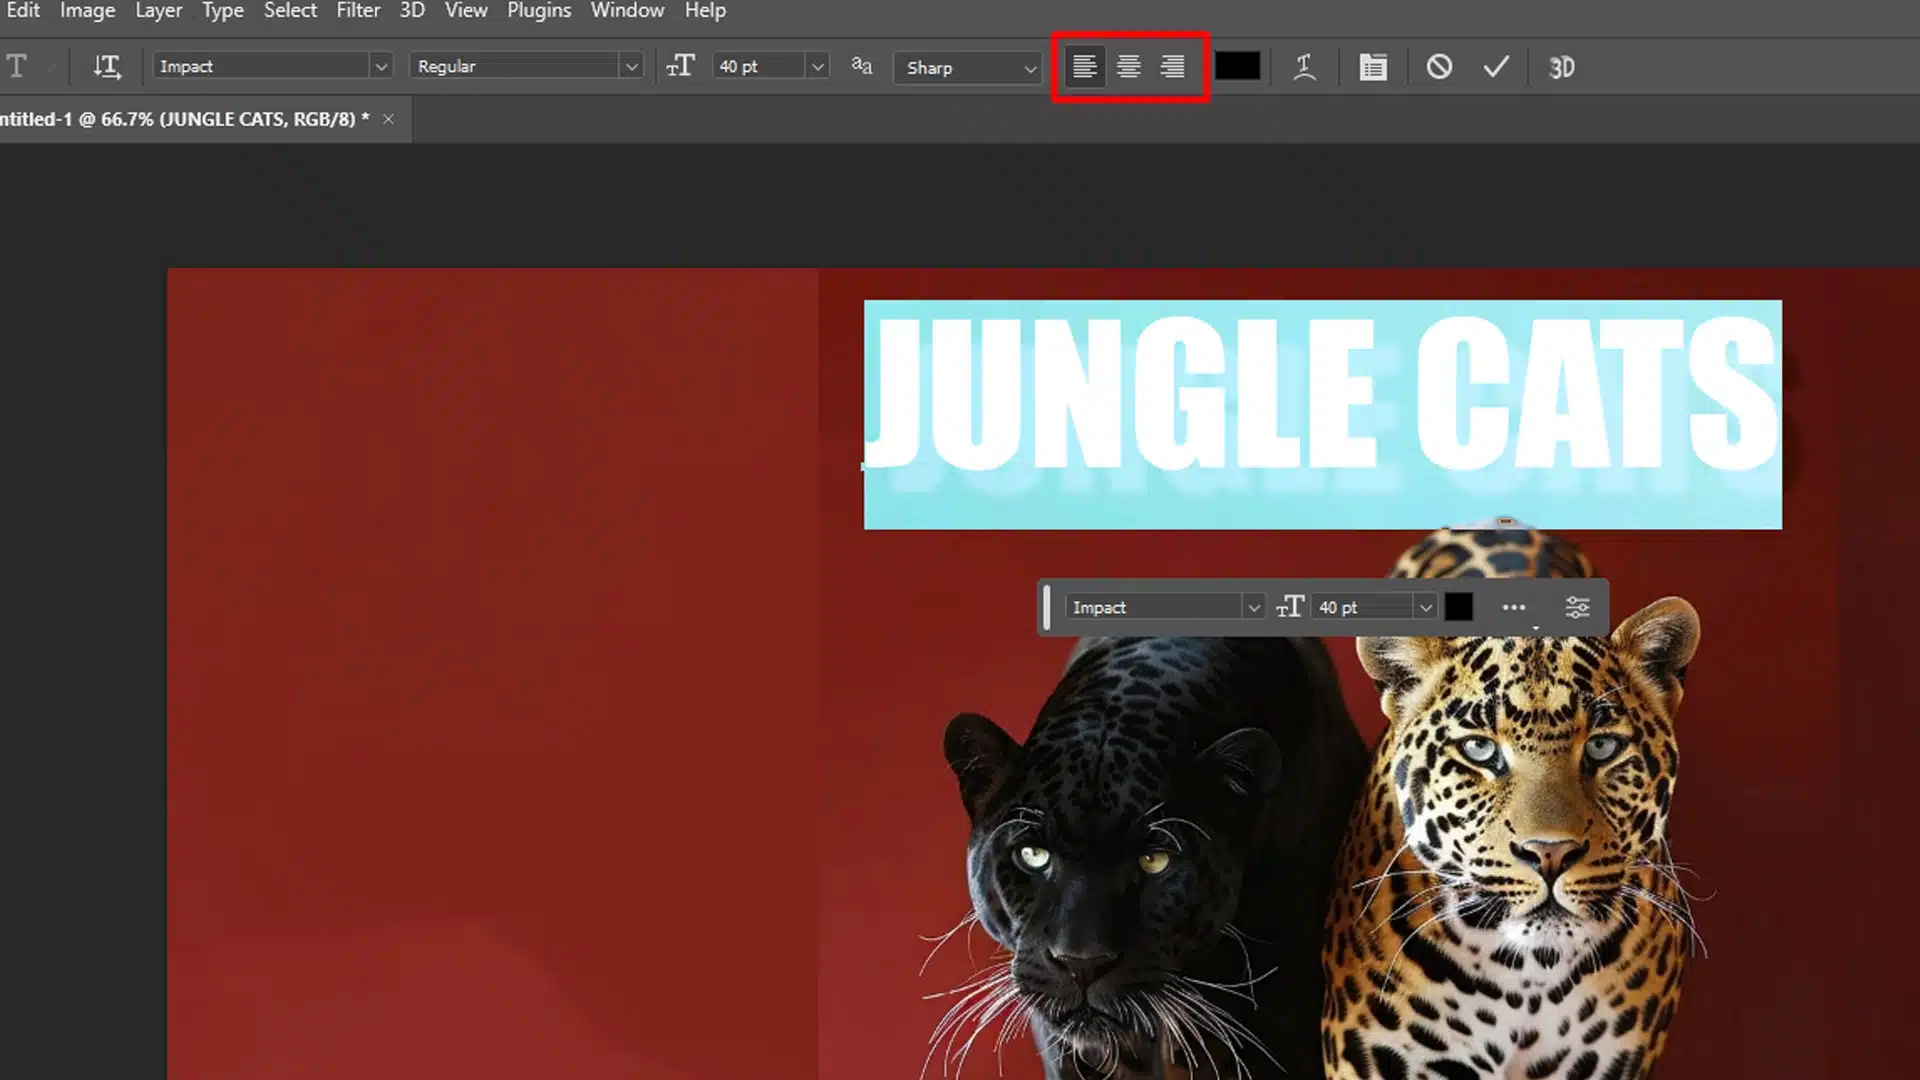
Aligning text in Photoshop is a breeze with these steps:
Select the text layer you want to align. If you're dealing with multiple layers, hold Shift and click on each.
Head over to the options bar at the top. Here, you'll find alignment icons just like in word processors.
"Center aligned," "align left," and "align right" are your go-to choices. Clicking one quickly positions the text.
For more customized alignment, use both horizontal center and vertical center tools. They enable perfect positioning in relation to other elements.
Another nifty trick is the Move Tool.
Select the text layer, use the Move Tool, then use arrow keys to nudge the text until it’s exactly where you want it.
The key is precision and control.
Aligning Shapes and Objects
Now let’s talk about aligning shapes and objects. using the shape tool can streamline your design process.
It helps in creating and aligning shapes with precision.
This works similarly to text, but adds a bit more flair:
Use the Move Tool to select the shape layer. Look for horizontal center and vertical center icons in the options bar. Clicking these icons positions your shape in relation to other layers.
Want to align multiple shapes? No problem. Select all the shapes, hold Shift, and click each one. Use alignment icons to position them collectively.
For complex layouts, leverage the aligned to the smart objects feature. Convert shapes into Smart Objects. You get better control and precision when moving them around.
If precision is what you're after, use the horizontal center pixel and vertical center pixel options. It allows pinpoint accuracy in aligning shapes with other elements.
Nudge tool also helps here, offering precise movements.
By converting layers into Smart Objects, you can apply transformations, filters, and adjustments while preserving the original data
To enhance aligning shapes and objects in Photoshop, the object selection tool is incredibly useful. This tool simplifies selecting and aligning complex shapes.
When aligning objects, it’s often necessary to first remove an object from the scene, ensures a cleaner, more precise alignment.
Additional Tips
Always name your layers. Trust me, it saves time. Organizing your Layers Panel makes finding and aligning layers easier.
A little expert tip for aligning shapes and objects, using the select subject feature can simplify your task by isolating key elements. This makes alignment easier and more accurate.
Achieving precise alignment in Photoshop can make a significant difference in the overall quality of your designs.
To enhance your alignment skills and learn more skills such as the side-by-side picture editing, consider incorporating these practical tips and tricks into your workflow.
Shortcuts like Ctrl+T(Cmd+T on Mac) transform selections rapidly.
Constant practice ingraining these keystrokes makes alignment second nature.
Over time, keyboard shortcuts reduce repetitive strain and increase productivity.
Mastery comes through repetition and application in daily tasks.
Start integrating them into your workflow today.
Auto Align Layers in Different Projects
Aligning layers in different projects might seem challenging but follows a simple process:
Ensure you select all the selected layers you want to align first.
Utilize the "Align" buttons provided in Adobe Photoshop's top options bar. These tools snap elements to precise spots.
Using 'topmost pixel' or 'bottommost pixel' alignment options aids accuracy.
For 'auto align' features, go to the Edit menu and choose accordingly. This tool aligns all elements relative to one another flawlessly.
Practice across varied projects helps perfect this skill.
Maintaining Consistency Across Layers
Consistency is key for professional-looking projects:
Always group related elements as linked layers. This makes it easier to manage and align.
The 'Distribute Layers' option helps in spacing elements evenly. Select layers and use the Distribute icons in the alignment panel. This keeps spacing uniform and aesthetically pleasing.
Use rulers and guides to maintain uniform distances. Keeping design elements consistent avoids visual clutter.
Pro Tip: Naming your layers in the layers panel keeps your project organized and streamlines the alignment process.
When maintaining consistency across layers, understandingcamera metering modes can be beneficial for consistent exposure in your photos, creating a more unified look in your designs and ensuring consistency across layers without additional editing.
Frequently Asked Questions
How do you align objects in Photoshop?
To align objects in few steps:
First: Select the layers you want to align in the Layers panel.
Next: Go to the 'Move Tool' or press 'V' on your keyboard.
Then: With the 'Move Tool' active, look at the top toolbar where you'll see alignment options.
Finally: Click on the specific alignment command you need (e.g., align vertical centers, align left edges).
What is the shortcut for align in Photoshop?
First: You must select the layers you wish to align.
Next: Ensure the 'Move Tool' is active - press 'V' if it’s not.
For aligning objects to the left: Press 'Cmd + Shift + L' (Mac) or 'Ctrl + Shift + L'(Windows).
For center alignment: Press 'Cmd + Shift + C' (Mac) or 'Ctrl + Shift + C' (Windows).
For right alignment: Press 'Cmd + Shift + R' (Mac) or 'Ctrl + Shift + R' (Windows).
How do I fix alignment in Photoshop?
Check: If you have selected the right layers; they should be the ones you need to align.
Use: The 'Move Tool' to activate the alignment options in the options bar.
Choose: The appropriate alignment tool from the top bar to adjust the objects as needed.
If: Objects are not aligning correctly, ensure that there are no hidden layers affecting the alignment.
How do I open align in Photoshop?
First: Select the layers you want to align from the Layers panel.
Next: Switch to the 'Move Tool' by pressing 'V'.
The alignment options: Will appear in the top toolbar once the 'Move Tool' is active.
Finally: Choose your desired alignment option from these tools.
$2,061.00Original price was: $2,061.00.$1,061.00Current price is: $1,061.00. 27584
Download Your Free Guide Now!
Discover the secrets of photography with our printable guide! Master essential techniques like aperture, shutter speed, and ISO to create stunning images. Get your free printable PDF now and start turning your snapshots into masterpieces!