Mastering the Art of How to Pixelate an Image in Photoshop
Mastering the Art of How to Pixelate an Image in Photoshop
Ever wondered how to pixelate an image in Photoshop?
Learning to pixelate parts of an image using Photoshop can be trickier than it seems, but worry not. Once you master the simple steps, it’s quite straightforward.
Pixelation can be both fun and functional, whether it’s hiding a friend’s face for a surprise photo gift or obscuring personal information before sharing it online.
Join me as we walk through the process of turning complex digital tasks into child’s play!
Table of Contents
Preparation for Pixelation : Resizing Images in Photoshop
Before delving into how to pixelate an image in Photoshop, it’s significant to prepare your image properly by setting up the background layer for optimal results and resizing the image.
This preparation ensures not only the best visual quality but also that the effects applied, like pixelation or mosaic filter, achieve the desired impact.
Choosing the Right Image Resolution for the Pixelate effect in Photoshop
Selecting the appropriate resolution is important when preparing an image for pixelation. High–resolution images offer more detail and a higher pixel count, which can be advantageous if seeking a refined pixelated image.
For those unfamiliar with terms like ‘resolution‘ or ‘pixel count,’ referring to a glossary of photography can be immensely helpful in understanding these concepts better.
However, depending on your project, such as creating pixel art, lower resolutions might be preferable to give that characteristic blocky appearance without extra steps.
When adjusting your resolution:
Aim for a balance between clarity and necessary detail.
Remember that increasing resolution can’t add details beyond what’s already in the original image; it merely increases the pixel count.
Understanding these differences ensures your pixelatedimages look crisp and professional.
Adjusting Image Dimensions for Optimal Pixelation
After setting the right resolution, resizing your image is the next step. This adjustment is pivotal for controlling how granular or coarse the pixelated effects appear in final edits.
Modifying dimensions can help accentuate or soften the pixel effect based on your creative vision for effective pixelation, particularly when applying a mosaic filter.
Steps to adjust dimensions effectively:
Open the "Image Size" dialog from Photoshop’s "Image" menu to tweak both pixels and inches.
Consider your need: Larger dimensions increase detail, but be careful, as overly large files may load slowly or become cumbersome.
Use shortcuts like keyboard shortcuts (e.g., Ctrl+Alt+I) to streamline this resizing process within a busy workflow.
An artwork resizer tool can help simplify the process of adjusting your image dimensions by providing a more intuitive interface and quick preset options for different styles of pixel art.
This can save time and ensure your pixelated effects are more consistent and visually appealing.
These preparations are foundational steps before applying any pixelation techniques, such as using a mosaic filter or exploring different styles within pixel art.
Step-by-Step Guide to Creating Pixel Art in Photoshop
Continuing from our previous discussion onupscale image manipulation, let’s dive into how to pixelate an image in Photoshop, a technique perfect for creating unique effects or obscuring sensitive information.
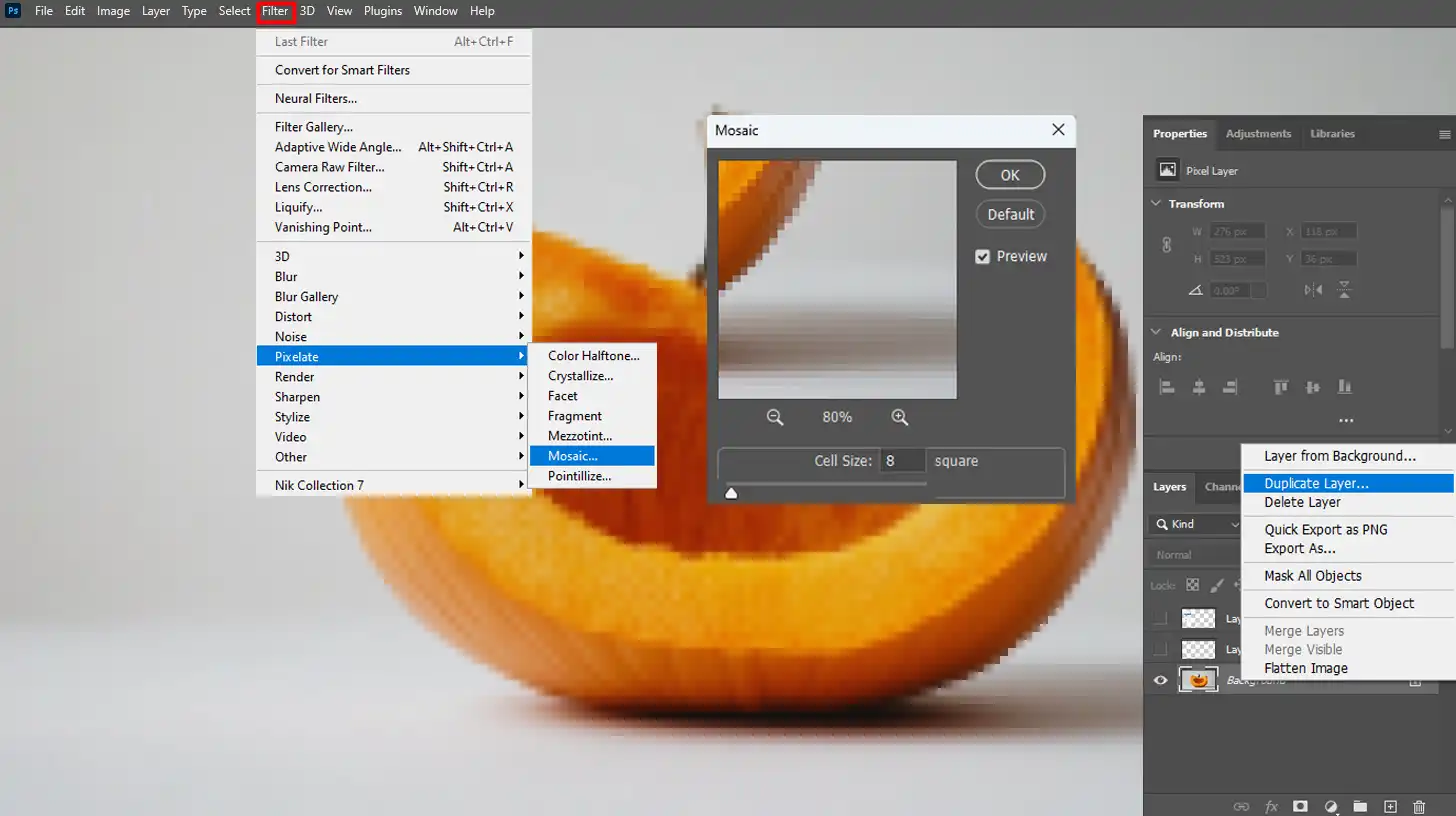
Accessing the Mosaic Filter
To start, open your Photoshop program. Instead of working directly on the original photo, create a duplicate layer of the image you wish to modify. This way, the original remains unaltered.
Navigate through the top menu and find the filter menu. Here, select the ‘Pixelate’ submenu, which reveals various options, including the “Mosaic filter.” Opening this filter is your first step towards achieving a pixelated image.
Open Photoshop and load your image.
Click on 'Filter' from the top menu
Choose 'Pixelate' followed by 'Mosaic'
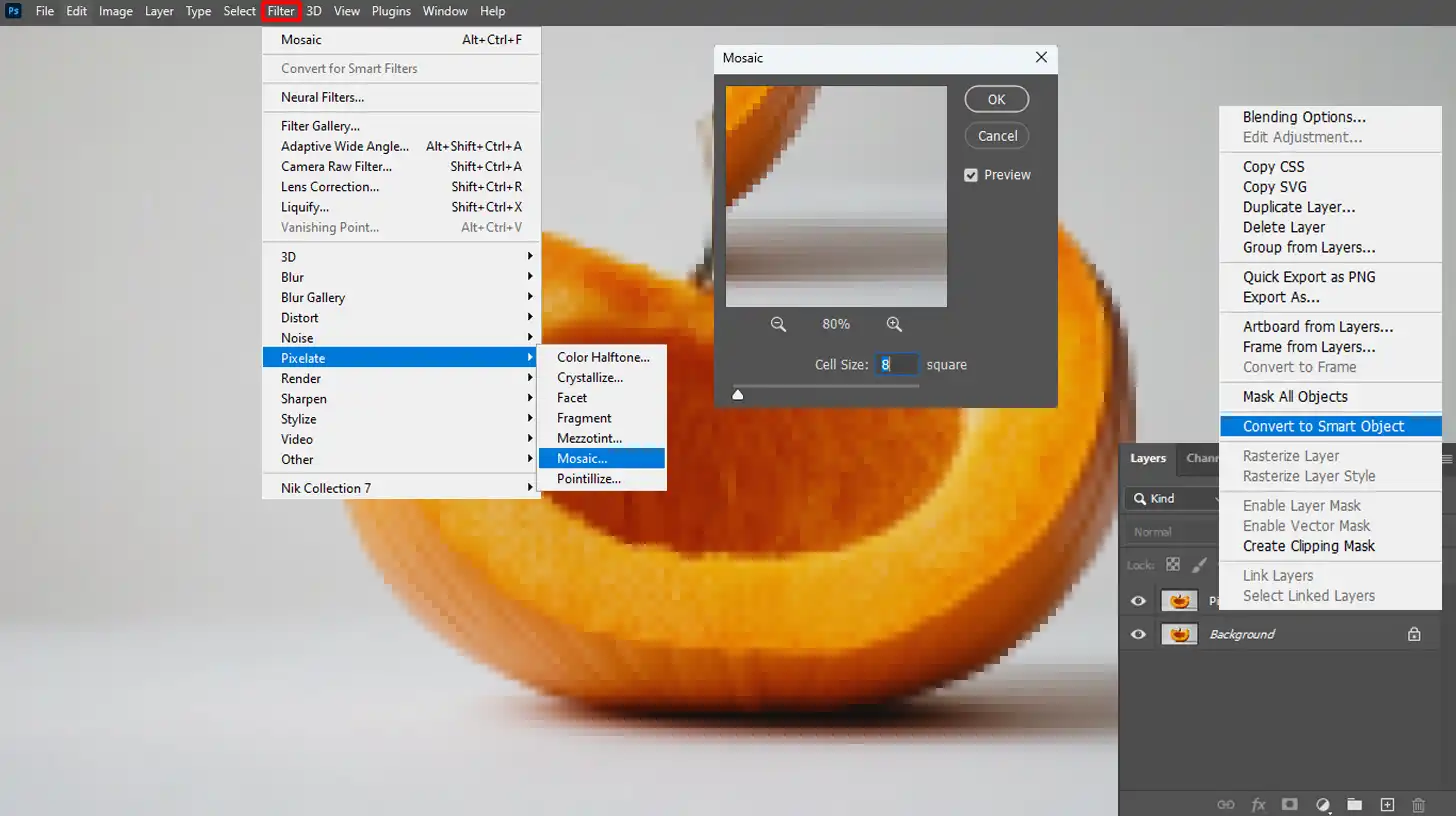
Setting Pixelation Levels
Adjusting the pixelation level involves interacting with the simple dialog box that pops up after selecting Mosaic.
You can modify “cell size,” which dictates how large each block of pixels will be. Remember, larger cells equate to more drastic pixelation.
This setting controls how much of the entire image gets obscured.
Modify ‘Cell Size’ in the dialog box after selecting Mosaic
Preview changes in real-time as you adjust settings
Applying the Effect to the Image
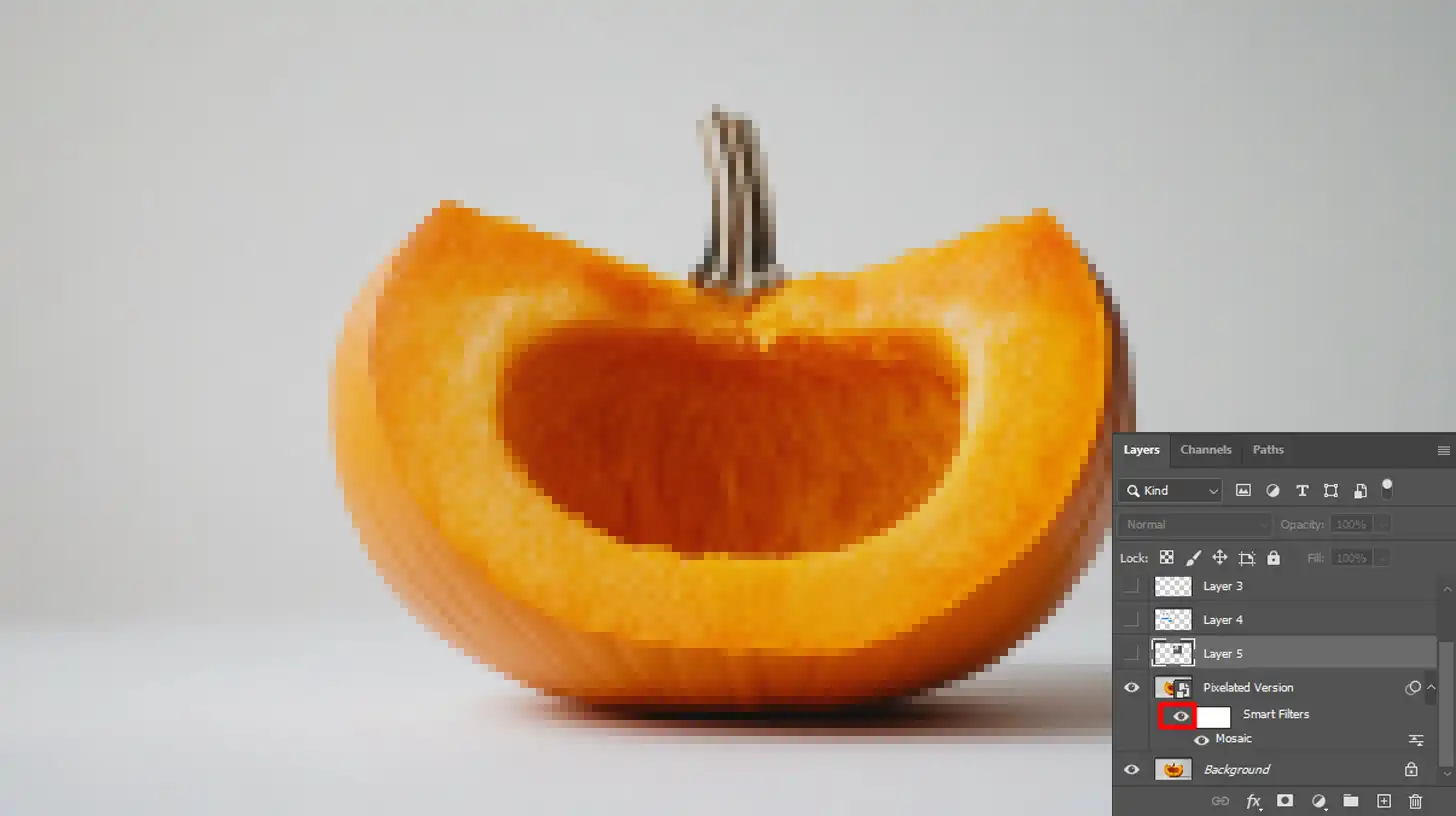
Once satisfied with your preview on the duplicate layer, apply these changes using smart filters to create a new version.
Smart filters allow for non-destructive edits, ensuring the original image is preserved for reference or further adjustments.
Simply click ‘OK‘ in the dialog box, which confirms and applies your desired level of pixelation across your project’s canvas.
Make sure you have selected or duplicated a layer if you want to preserve the original image. This allows side-by-side comparisons between untouched and altered visuals.
Mastering side by side image editing in Photoshop enables you to effectively compare before andafter pixelation, ensuring each effect enhances your image quality precisely.
Confirm settings by clicking 'OK.'
Observe changes applied directly onto your selected layer
Keep original for comparison (optional)
By following these steps within Adobe Photoshop’s rich toolkit, anyone familiar with basic tools like layers can quickly master techniques such as pixelation using filters like Mosaic.
Advanced Techniques: Enhancing the Pixelation Effect
When it comes to adding depth and texture to your digital artwork, understanding how to effectively apply pixelation can elevate your Photoshop skills.
This section explores advanced techniques for enhancing the pixelation effect beyond the basic use of the pixelate filter.
Layering and Blending Modes
Introducing multiple layers is important in creating complex visual effects. Start by ensuring your duplicate layer is set for experimentation, preserving your background layer, and allowing multiple trial runs without altering the original image.
This keeps your background intact while providing a canvas for experimentation.
In the layers palette, utilize various blending modes that dictate how layered pixels interact. These modes allow you to enhance or diminish effects without altering the original image, preserving its integrity throughout the creative process.
Experiment with blending modes in Photoshop like Lighten or Multiply to see how they affect the pixelated version of your image.
You can quickly switch between these modes using the keyboard shortcuts ‘Shift +‘ or ‘Shift-‘ to cycle forward or backward through the list. This allows for rapid testing of different effects without manual menu navigation.
Exploring these types of filters provides unique impacts on color and lighting, giving you complete control over the intensity of the pixelation effect.
Using Brushes for Manual Adjustments
For artists wanting finer control, using the layers palette on a duplicate layer allows for manual adjustments of pixelated areas directly on the background layer.
Additionally, the content-aware fill in Photoshop can be employed to intelligently fill in gaps or removeunwanted sections with seamless results, further refining your edits while ensuring the original layer remains pristine.
This strategy ensures any modifications can be tested and refined without affecting the base image.
Select a brush or use the lasso tool from the brush settings panel to precisely define the areas you want to modify. Adjust the brush size or refine the lasso tool selection according to the pixels needed for detailed adjustments.
Manually darken or lighten areas within the pixelated version to add texture where you feel more gradation is required.
This approach allows for precise control over the artistic effects, enhancing the visual richness and tactile feel of the image.
Use keyboard shortcuts to switch between tools faster, this efficiency lets you focus more on creativity rather than navigation in Photoshop’s interface.
For instance, pressing ‘B‘ toggles the brush tool without going through menus.
Through these methods, employing both automated filters and manual refinements via brushes, you significantly enhance how an image portrays texture and depth through pixelation while maintaining artistic command over every detail.
Tips for Maintaining Image Quality During Pixelation
When working with pixelate filters, it’s important to maintain the quality of your images.
Understanding how to properly apply these filters in Photoshop can make a significant difference.
Avoiding Common Mistakes
Pixelation should enhance, not detract from, the visual impact of your images. A frequent error is overusing the pixelate filter or applying it without considering the context of the image.
To prevent this:
To maintain image quality, always work on a duplicate layer before applying any pixelation, ensuring the original layer remains untouched for ultimate flexibility. This preserves the original image and provides flexibility in editing.
Use the filter menu judiciously; not all options are suitable for every image. Choose a filter that complements rather than overwhelms.
Opt out of using pixelation on the entire image unless absolutely necessary for creative intent.
Creating a new layer for adjustments allows you to revert changes easily if they don’t work as expected.
Best Practices for Pixel Size and Resolution
The choice of pixel size and resolution dramatically impacts the final appearance of your artwork in Photoshop.
Understanding the optimal resolution settings ensures your pixelated effects retain clarity and quality across all your Photoshop projects.
Here’s how you can optimize both:
Feature
Description
Benefits
Respect the Resolution
Higher-resolution images allow finer control over pixelated effects, maintaining clarity at various scales.
Improved image clarity and quality at any size.
Optimize Pixel Sizes
You can adjust the pixel dimensions via the dialog box: small enough to blend naturally within your project but large enough for desired stylistic effects.
Better integration and effect realization.
Utilize Keyboard Shortcuts
Keyboard shortcuts can expedite frequent tasks, such as switching between tools (e.g., the rectangular marquee tool) and adjusting settings.
Increases workflow efficiency.
Keep these tips in mind when working with pixelation in Photoshop to enhance its potential while safeguarding your project’s integrity, utilizing the layers palette for managing multiple edits seamlessly.
Properly managing pixel dimensions and utilizing the layers palette can help you handle multiple edits seamlessly.
Finalizing the Pixelated Image: Export and Saving Tips
After applying the pixelate filter and ensuring you’re satisfied with the effects on the duplicate layer, revert your focus to the background layer to ensure all modifications blend seamlessly before finalizing your save settings.
Maintain the high quality of the image and the quality of the pixelation effects to preserve its quality and ensure it’s optimized for whichever medium it will be displayed on.
Navigating through the various file formats and understanding their benefits can significantly impact your final product.
Utilize a keyboard shortcut, such as ‘Ctrl+Shift+S‘, to quickly bring up the ‘Save As‘ dialog box, allowing you to choose the appropriate file format efficiently.
Choosing the Right File Format
The choice of file format is pivotal when saving an image. Each format offers different advantages depending on how you intend to use the image.
JPEG: JPEG is best for photographs and images with gradients due to its balance of quality and file size. However, be aware that it uses lossy compression.
PNG: Ideal for graphics with fewer colors or images requiring transparency. It uses lossless compression, maintaining the original quality.
GIF: This format is suitable for simple animations but is limited to 256 colors. Use it if a minimal color range and animation are needed.
Choosing wisely based on where your image will be displayed will help maintain the integrity of your pixelated effects.
When dealing with different image file types, choosing the right file format is essential. This ensures your pixelated images maintain quality and are optimized for their intended use.
Optimizing Images for Different Media
Optimizing an image extends beyond simply choosing a file format; considerations must be made based on your target media:
Web Use: Compression is significant here. Reduce resolution without compromising visible quality to achieve smaller file sizes. Use tools from the filter menu or a keyboard shortcut to quickly adjust settings.
Print Media: Focus on high resolution (at least 300 dpi) and save it in TIFF format if possible for best results regarding color accuracy and sharpness.
Social Media: Each platform has its own preferred dimensions and resolutions; check these specifications before exporting files.
Remember, using tools like layer palette adjustments and ensuring consistent use of original image settings can significantly affect output clarity regardless of media type.
Frequently Asked Questions
Can you pixelate a picture in Photoshop, specifically focusing on adjustments in the background layer?
Absolutely! Photoshop makes it easy to pixelate images. The mosaic filter, found in the filter menu, allows you to adjust the cell size to achieve the perfect pixelated version of your original photo.
How do I pixelate an image?
To pixelate an image, select the pixelate filter from the filter menu in Photoshop. Choose the mosaic option and then adjust the size until you get the desired effect. This approach transforms any image into a pixel art masterpiece.
How to make pixel-perfect in Photoshop?
Achieving pixel perfection in Photoshop involves adjusting your image with precise pixel alignment.
Utilize the rectangular marquee tool for selecting areas, and pay close attention to the layers palette to ensure each pixel aligns perfectly, creating a sharp and clean look for your images.
How do I add pixels to an image in Photoshop?
To achieve this in Photoshop, simply create a new layer over your original image. Use the brush tool or select areas with the lasso tool and fill them to increase pixel density.
This method enriches the detail and texture of your pictures, enhancing their overall quality.
$2,061.00Original price was: $2,061.00.$1,061.00Current price is: $1,061.00. 27584
Download Your Free Guide Now!
Discover the secrets of photography with our printable guide! Master essential techniques like aperture, shutter speed, and ISO to create stunning images. Get your free printable PDF now and start turning your snapshots into masterpieces!