Mastering Layer Mask Photoshop: A Comprehensive Guide for Digital Artists
Mastering Layer Mask Photoshop: A Comprehensive Guide for Digital Artists
Creating stunning images in Photoshop often comes down to mastering one key tool: the layer mask. If you’ve ever wondered how professionals achieve seamless edits, this is the secret. In this article, I’m going to guide you through everything you need to know about using layer masks in Photoshop.
You’ll discover how to blend images, make precise adjustments, and elevate your photo editing skills to new heights.
Are you curious to see how a simple tool can make a big difference? Stick around, and let’s explore the world of layer masks together.
Table of Contents
Layer Masks in Photoshop
Mastering the art of concealment and revelation is critical to improving digital technology. It’s about fine-tuning the visibility of your work and bringing forth the subtleties of your creative vision.
Moreover, this next section dives into the novel techniques and perspectives to enhance your proficiency with this significant Photoshop feature.
What is Layer Masking?
Layer masks are fundamental equipment in Photoshop that provide you with the flexibility to modify the opacity of specific parts of your image without making permanent changes.
Therefore, imagine them as a digital template, where painting with different shades of grey dictates the transparency of the area you’re working on.
Here’s how to start:
First, begin by selecting the layer you want to mask.
Then, at the bottom of the layers panel, find the icon that looks like a rectangle with a circle inside and click it to add a mask to your layer.
Lastly, use the broom tool in black or white to paint on the mask and reveal or hide parts of the layer.
Remember, a white mask reveals the layer, black conceals it, and grey shades offer varying levels of transparency.
Moreover, this non-destructive fixing method ensures you can always revisit and adjust your covers without losing any of the underlying visual details.
Why Use Layer Masks in Editing
The true power of layer masks lies in their ability to provide precise control over image changes.
Whether you’re looking to adjust the sky in a landscape picture or modify the lighting on a subject’s face, layer masks offer the precision needed without altering the original photo data.
They are indispensable for creating realistic picture manipulations.
Moreover, using layer covers, you also maintain a non-destructive workflow, meaning you can experiment and repeat your edits without degrading the original picture.
Understanding Mask Concepts
To truly harness the potential of layer masks, it’s important to grasp the underlying concepts that govern their functionality.
This includes understanding how masks interact with different blend modes and how they can be refined with feathering to create smooth transitions.
Blend modes determine how masked sections interact with underlying layers, offering creative effects.
Feathering softens the refine edges of a mask, allowing for subtle transitions between masked and unmasked parts.
Mask properties can be adjusted for density and feathering directly in the properties panel, giving you quick control over the mask’s edge softness and overall effect.
Therefore, mastering these concepts allows you to create intricate and nuanced edits that elevate your imagery to professional standards.
Advanced Masking Techniques
Beyond the basics, advanced masking techniques can revolutionize your improving process. Here are some sophisticated strategies to consider:
First, use the pen gadget to create precise path-based masks for complex shapes. Implement channel-based selections to isolate and mask intricate details like hair or fur.
Then, explore luminosity masks to target and adjust specific tonal ranges within your picture.
Each of these methods requires some practice but opens up a world of possibilities for creative expression and technical refinement in your Photoshop projects.
For more detailed instructions, you can refer to a comprehensive Photoshop masking guide to master these advanced techniques.
Combining Masks with Adjustment Layers
Adjustment layers are another robust feature in Photoshop that, when combined with masks, provide a powerful way to apply image corrections selectively.
Here’s a quick guide:
First, add an alteration layer above the image layer you wish to affect.
Then, automatically, a white mask is attached, signifying that the adjustment affects the whole layer.
Lastly, paint on the mask with black to shield places from the change or with grey for partial effect.
Moreover, this technique is perfect for localized colour correction, exposure adjustments, and enhancing specific elements within your scene without impacting the entire image.
Also, don’t miss our comparison on Photoshop vs Illustrator, to understand where layer masks fit in your creative toolbox.
Therefore, by exploring these advanced tactics and integrating them into your workflow, you’ll be well on your way to mastering layer masks in Photoshop, unlocking a new level of creative control and precision in your digital artistry.
Creating and Managing Layer Masks
Layer masks are powerful tools in Photoshop. They allow for non-destructive changing and compositing by hiding or revealing elements of an image.
This section delves into practical strategies for creating and managing layer masks, streamlining your workflow, and achieving precise results in your picture revising process.
Steps to Add a Layer Mask
Adding a layer mask to your project is straightforward. Here’s a step-by-step guide:
First, open your project and ensure the layer you want to mask is selected.
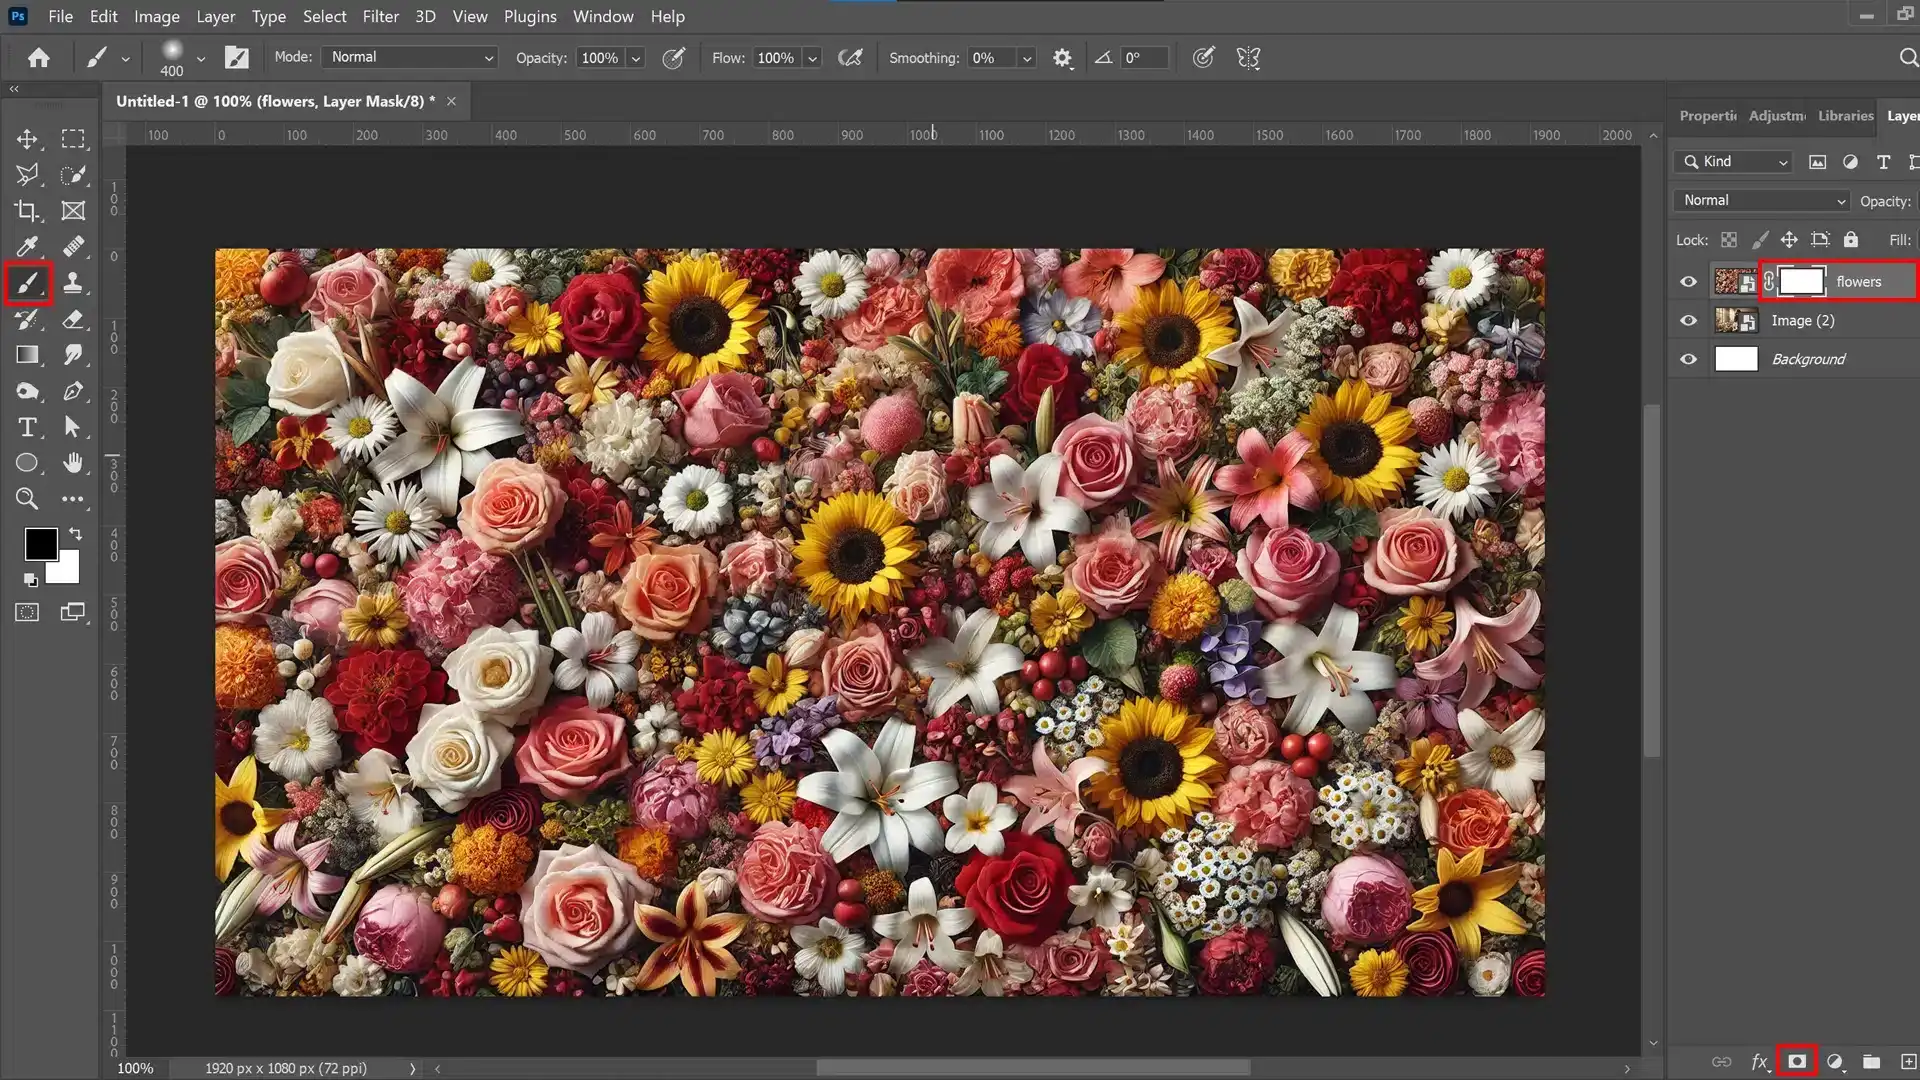
Second, at the bottom of the Layers Panel, you'll find an icon depicting a rectangle with a circle inside – this is the 'Add Layer Mask' button.
Then, once you click this button, a white mask thumbnail appears next to your layer, indicating that a mask has been added.
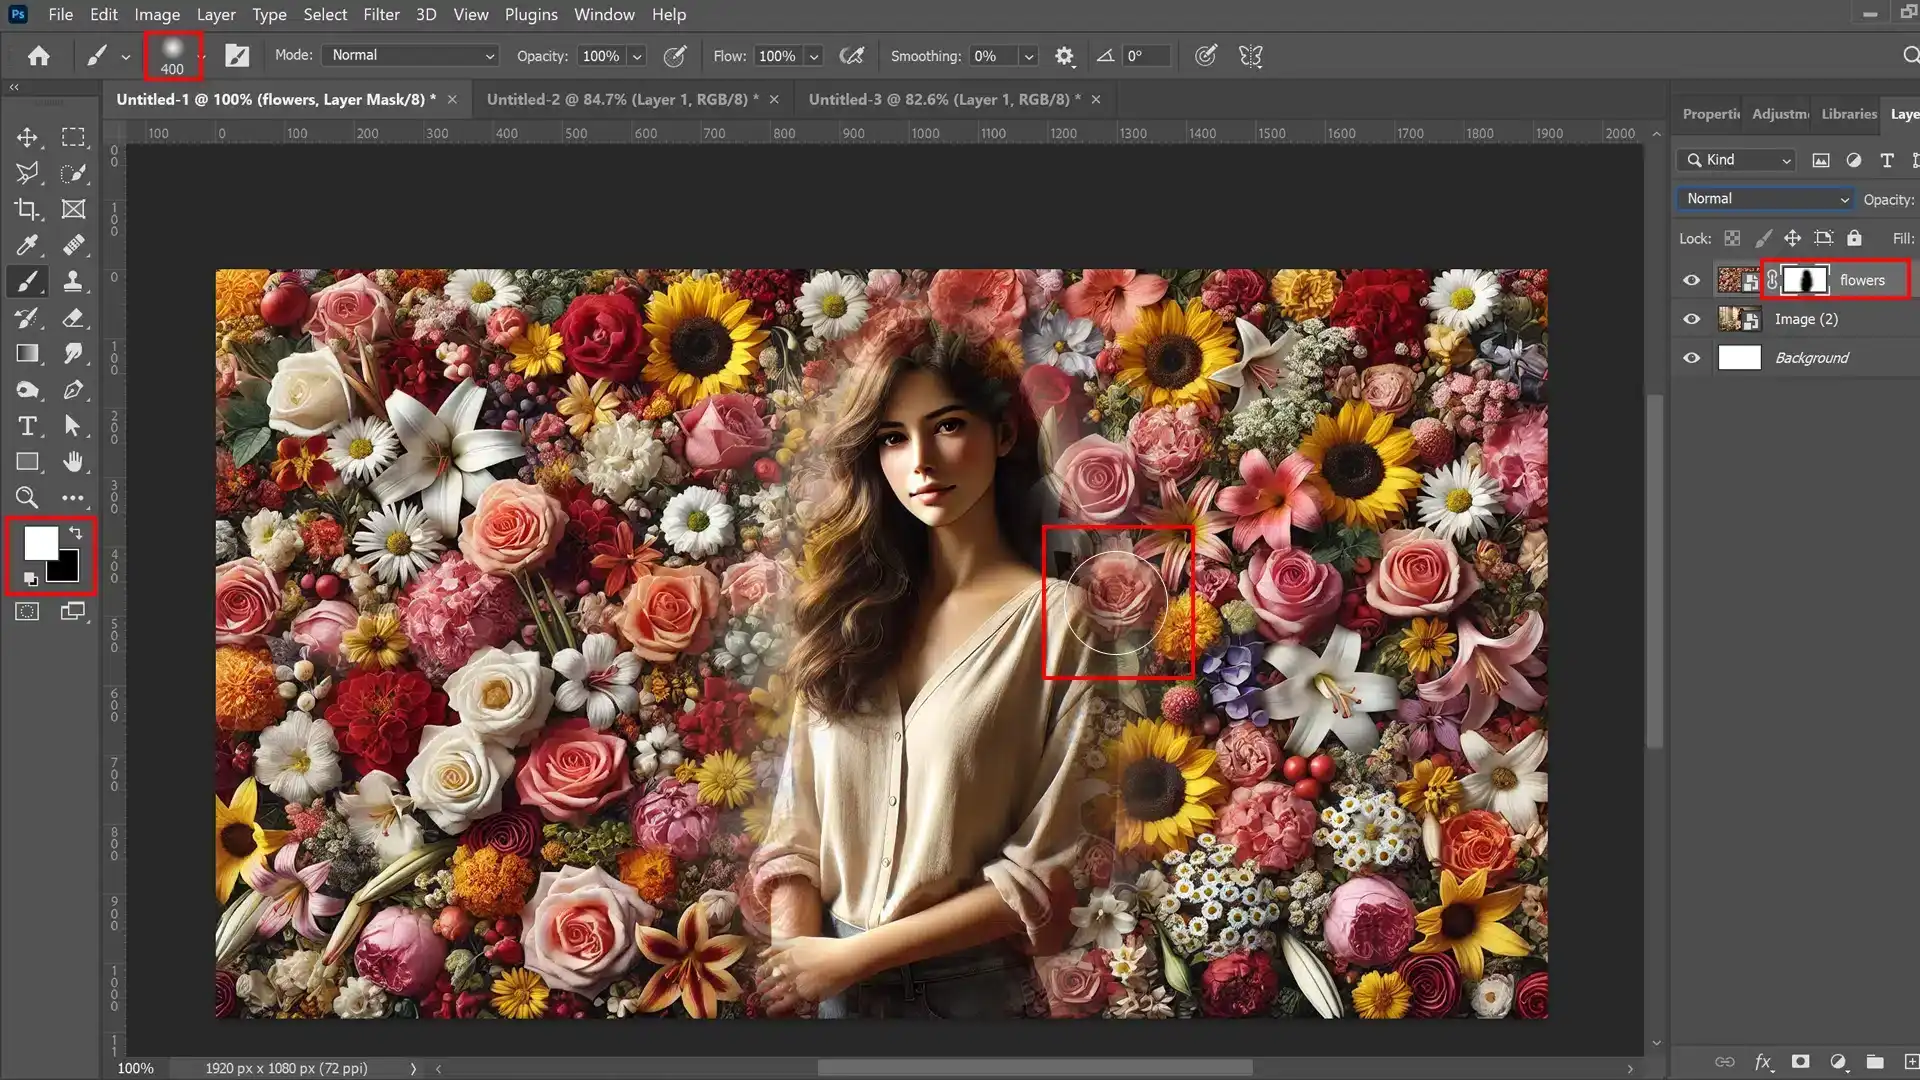
Lastly, to start masking, use the Paintbrush tool with black paint to conceal parts of the layer or white to bring them back.
Remember, a mask allows for flexible changes; painting with gray will partially mask the layer, creating a transparency effect.
Managing Masks in the Layers Panel
Efficient mask management involves understanding the Layers Panel’s functionality:
To view a mask, Alt-click (Option-click on a Mac) on the mask thumbnail.
Dragging and dropping a mask thumbnail allows you to move it between layers.
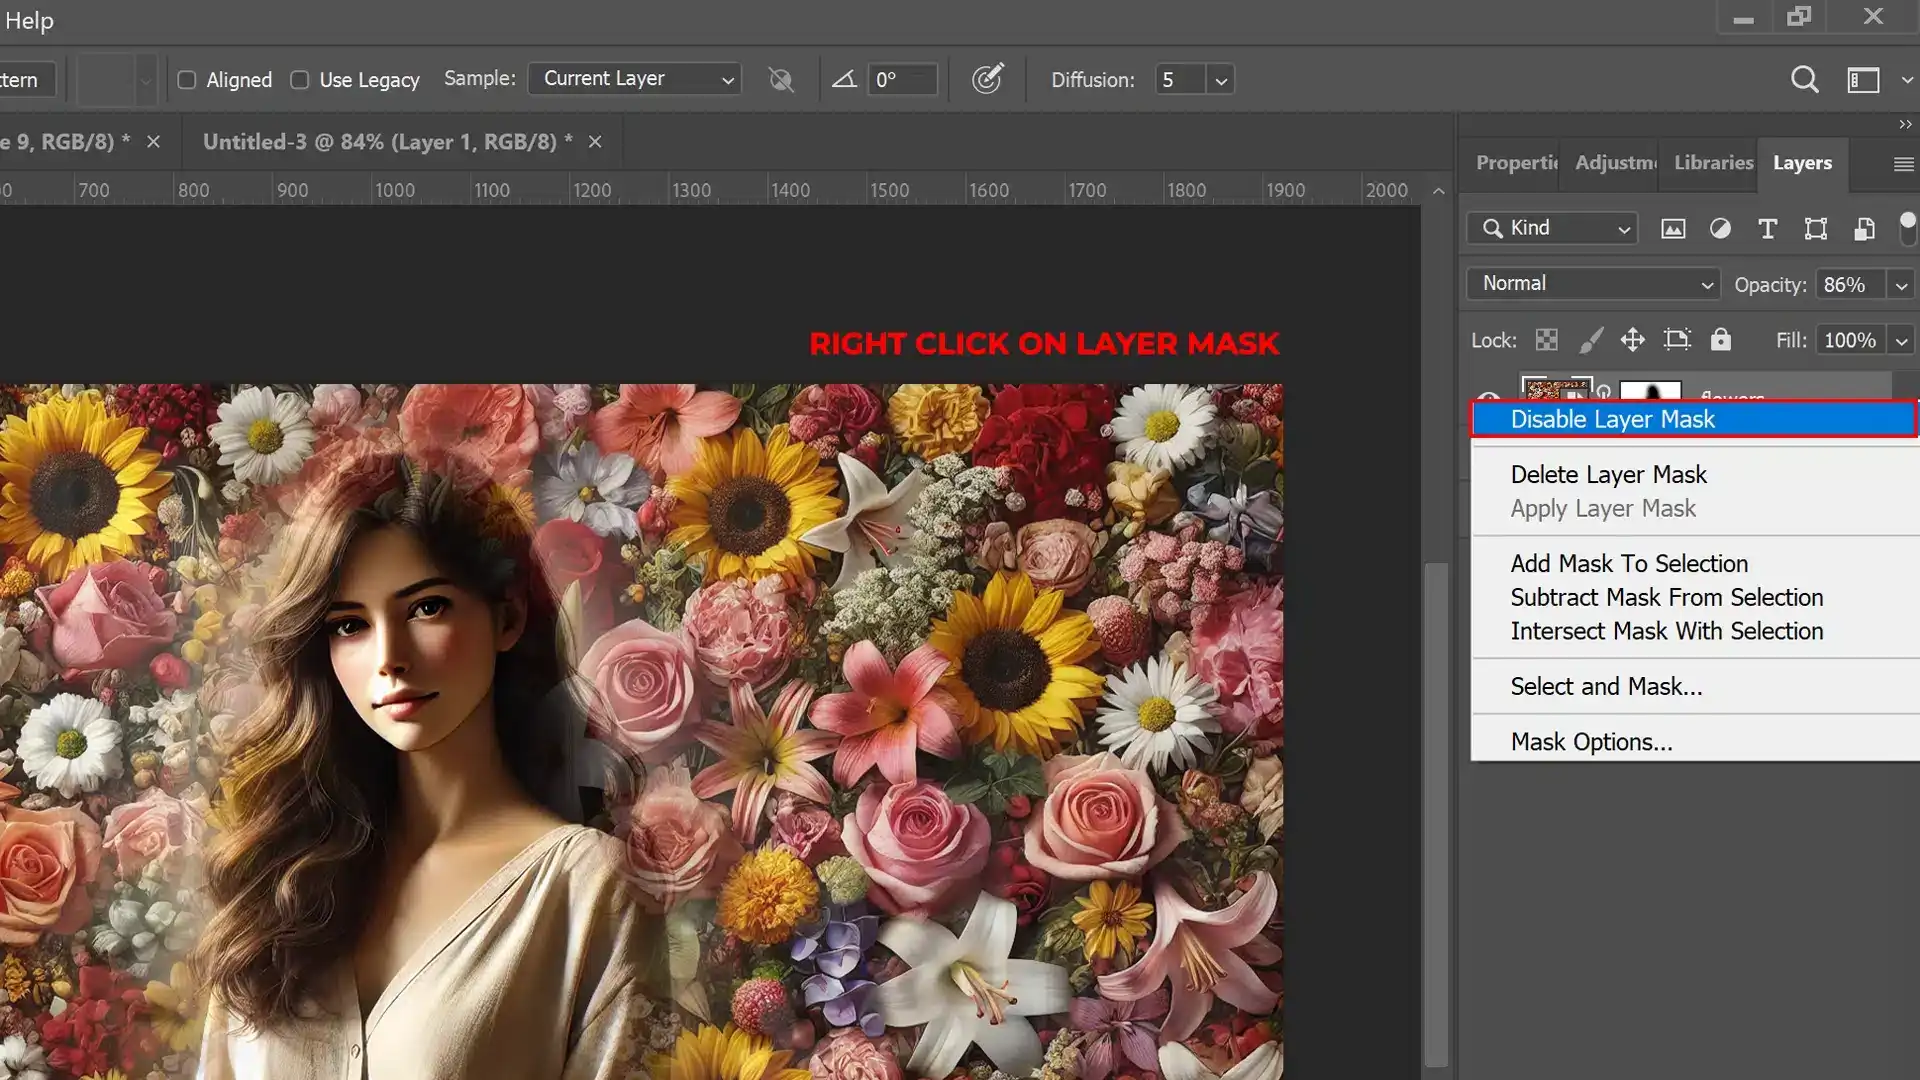
Right-click on the mask thumbnail for additional options, such as disabling or deleting the mask.
Use the Properties Panel to refine the mask edge to fit your subject more precisely.
Proper management ensures your masks are organized and your workflow remains efficient.
Tips for Efficient Mask Management
To optimize your use of layer masks, consider these tips:
Use keyboard shortcuts to toggle between the mask and layer content (press 'X' to switch foreground and background colors).
Lower the Broom gadget’s opacity for a softer, more gradual mask.
Save selections you may use again by going to 'Select' > 'Save Selection.' This allows you to load it as a mask later.
Link a mask to its layer by clicking the chain icon between the layer and mask thumbnails, ensuring they move together.
Adopting these practices will save time and enhance your refining precision.
Consider reading about selection toolsin Photoshop for further insights into selection gadgets that complement layer masks.
For those interested in creative compositions, learning how to make a collage in Photoshop can be a fantastic way to showcase your skills.
By following these structured approaches and incorporating the tips provided, you’ll master the art of creating and managing layer masks, elevating your Photoshop projects skillfully and efficiently.
Fine-tuning layer masks in Adobe Photoshop is like sculpting details on a piece of art. Each step and technique brings you closer to a flawless composition in which the subject and background harmonize.
This next section will explore innovative methods to refine layer masks focusing on precision and efficiency.
Vector Mask Option
This technique allows you to create a vector-based cover, which is helpful for creating a precise, scalable mask. Here’s how to use it:
Select the layer with the mask you want to refine.
Click on the "Add Vector Cover" button at the bottom of the Layers Panel.
Use the Pen Tool to create a path around the area you want to cover.
Once you've created the path, right-click on it and select "Make Choice."
Fill the choice with black or white to hide or reveal the area.
Change the path as needed to refine the mask.
Moreover, vector masks are particularly useful for creating precise masks around complex shapes, such as logos or text, where you need to maintain the sharpness and scalability of the mask.
Using Brush Gadgets for Cover Refining
The Brush Gadget is a versatile ally in the adjusting process. Here’s how to use it effectively:
First, start by selecting the Paintbrush gadget from the toolbox.
Second, choose a soft-edged brush to blend edges seamlessly or a hard-edged brush for crisp lines.
Then, set the foreground color to black to conceal sections or white to reveal them.
Adjust the paintbrush opacity to control the intensity of the mask application.
Lastly, use the X key to switch quickly between black and white as you work.
Zoom in and reduce the sweeper size for intricate masks to work on fine details. Remember to save your progress as you refine the mask.
Therefore, suggest an image placement here of a before-and-after comparison, showing the impact of the broom equipment alterations on a layer mask.
Adjusting Masks with Selections
Selections can dramatically speed up the mask refinement process:
Once selected, click on the mask thumbnail in the Layers Panel to activate it.
Fill the selection with black or white to hide or reveal the area.
Refine the edge of the selection by choosing 'Select and Mask' from the options bar.
This method allows for quick and precise alterations, ensuring that your mask only affects the desired image areas.
For even more precision, you can also use the object selection tool in Photoshop to easily select specific objects within your image, making the masking process even smoother.
Blending Modes for Advanced Masking
Blending modes can add a new dimension to your masks:
Experiment with different blending modes found in the Layers Panel with the layer mask selected.
Modes like Multiply or Screen can affect the visibility of the masked areas based on their luminosity.
Use the Opacity slider to fine-tune the strength of the blending mode effect.
Moreover, combining blending modes with layer masks can yield creative and unexpected results, offering a new level of control over how elements in an image interact.
By incorporating these advanced techniques, your layer masks will become more refined, allowing you to produce images with professional-grade editing.
Whether you adjust with precision using broom aid, streamline the process with selections, or explore the creative potential of blending modes, each tactic adds a layer of sophistication to your work in Photoshop.
In this section, we’ll explore innovative ways to utilize layer masks in Adobe Photoshop to elevate your image-fixing skills.
Therefore, by understanding these advanced applications, you’ll be able to fine-tune your work, giving you more creative guidance over your final image compositions.
Combining Multiple Masks
While working with complex compositions, you may find the need to use more than one mask on a single layer.
Moreover, this method allows for a nuanced approach to change, where each mask can target a specific aspect of the image:
First, use one mask to manage the visibility of the background while another manages the subject.
Then, apply a gradient mask to affect the overall mood and a pixel mask for intricate details.
Lastly, stack masks to create a transition effect between different adjustments.
For a seamless integration of multiple masks, ensure they work in harmony to produce the desired outcome. Remember, the top mask in the stack dictates the primary visibility.
Creative Uses of Layer Masks
Layer masks can be a playground for creativity. Here are some inventive ways to use them:
Texturizing: Apply textures to specific areas of an image using masks to create a tactile effect.
Vignetting: Craft a custom vignette by painting a mask around the edges of your image to focus attention.
Compositing: Combine elements from different images with masks to create a realistic composite.
Moreover, each technique requires a steady hand and an eye for detail. Use a soft brush to blend the mask edges subtly, ensuring the changes appear natural.
Masking with Adjustment Layers
Adjustment layers are non-destructive and can be paired with masks for targeted edits:
First, brighten or darken selective parts of an image with a Curves alteration layer masked to affect only those areas.
Then, change the color of an object by using a Hue/Saturation adjustment layer with a precise mask.
Lastly, enhance the sharpness of a specific feature using a mask on a High Pass filter alteration layer.
By linking masks with smart filters, you can pinpoint the exact locations of your edits, making your workflow more efficient and controlled.
Layer Covers for Transitions
This technique allows you to create seamless transitions between different alterations or elements within a picture. Here’s how to use it:
First, select the layer you want to apply the transition to.
Second, click on the "Add Layer Cover" button at the bottom of the Layers Panel.
Then, use the "Gradient Gadget" to create a gradient on the layer cover. Depending on the desired effect, the gradient can be linear, radial, or angled.
Adjust the gradient's opacity and feathering to manage the transition's softness and intensity.
Lastly, you can also use the "Broom Tool" to paint on the layer mask, adding or subtracting from the transition effect.
This technique is particularly useful for creating smooth transitions between different color schemes, lighting conditions, or image elements.
Therefore, it can also be used to create a gradient overlay effect, in which the layer’s opacity gradually changes across the picture.
For more detailed insights and techniques, you can explore Photoshop layering tutorials, which provide step-by-step guidance to perfect these advanced masking and layering methods.
Frequently Asked Questions
How to do layer mask in Photoshop?
Open your image in Photoshop.
Choose the layer to which you want to apply the mask.
Click the 'Layer Mask' icon at the bottom of the layers panel, which looks like a rectangle with a circle inside.
Use the brush tool to paint over the areas you want to mask. Black hides and white reveals the layer.
What does the layer mask tool do?
The layer mask tool allows you to hide parts of the layer without permanently erasing them.
It provides flexibility to edit the visibility of portions of your layer at any time.
Enables non-destructive editing, meaning you can change your adjustments any time.
What is the key for layer mask in Photoshop?
To quickly add a layer mask, you can press Alt (Windows) or Option (Mac) while clicking the 'Layer Mask' icon.
Press Shift + Alt + N (Windows) or Shift + Option + N (Mac) to disable or enable the mask temporarily.
How do I mask part of an image in Photoshop?
Pick the layer you want to mask.
Click on the 'Layer Mask' icon.
Choose the brush tool from the tool panel, set the foreground color to black, and paint over the areas you want to hide.
Adjust the brush size and hardness according to the detail needed for masking.
Mastering the layer mask in Photoshop changed how I approach digital art. I remember struggling with a digital painting, feeling stuck because I couldn’t blend layers smoothly.
Learning to use layer masks helped me blend and adjust without losing any original details. This gave me more freedom to experiment and improved my art’s depth and realism.
If you’re serious about improving your Photoshop skills, I suggest diving into layer masks and exploring new techniques. Check out my Photoshop Course to learn these skills step-by-step. If you’re also into photo editing, the Lightroom Course is a great place to start.
For those ready to use these powerful tools, try Adobe Photoshop or Adobe Photoshop Lightroom. They are great for enhancing your digital art and photo editing skills!
If this article has helped you, then Like and Share it with your friends
$2,061.00Original price was: $2,061.00.$1,061.00Current price is: $1,061.00. 27584
Download Your Free Guide Now!
Discover the secrets of photography with our printable guide! Master essential techniques like aperture, shutter speed, and ISO to create stunning images. Get your free printable PDF now and start turning your snapshots into masterpieces!