Lightroom Refine Photos: Essential Tips for Elevating Your Images

As an expert photographer, I know that every aspect counts when it comes to perfecting your images. Adobe Lightroom is a game-changer for those looking to refine photos in Lightroom and achieve breathtaking results. In this blog, I’ll share techniques for sharpening details, adjusting colors, and fine-tuning exposure using Lightroom Classic.

Let’s dive into Lightroom’s powerful feature and unlock the full potential for photographers.

Table of Contents

Refine Photos in Adobe Lightroom

A side-by-side comparison of a mountain landscape, showing the effects of photo refinement in Adobe Lightroom. The left side has cooler tones and lower contrast, while the right side displays warmer tones and enhanced contrast.

Refining your photos in Adobe Lightroom is a crucial step in the editing process that can elevate your images from good to exceptional. Whether you’re working on portraits, landscapes, or still life, Lightroom offers powerful essential tools to enhance your photos in both the Library Module and Develop Module.

Sharpening Details for Maximum Impact in Lightroom Refine Photos

Close-up portrait of a woman in Adobe Lightroom with the sharpening tool highlighted. The interface shows adjustments to enhance the detail and clarity of the image, focusing on sharpening sliders.

One of the most effective ways to enhance the clarity of images for photographers is through sharpening. Adobe Lightroom provides several tools that allow you to focus the sharpening effect precisely where it’s needed:

Adjusting Colors for Perfect Balance in Lightroom Refine Photos

A close-up portrait of a woman with a color calibration tool in Adobe Lightroom being used. The before-and-after comparison shows adjustments to the red, green, and blue primary colors to achieve a balanced and natural skin tone.

Color correction and grading can dramatically change the mood and feel of your photograph. Lightroom’s color adjustment tools provide flexibility and precision:

Fine-Tuning Revelation for Professional Results

A close-up portrait of a woman in Adobe Lightroom, with the histogram tool displayed. The image demonstrates the fine-tuning of exposure and color balance to achieve professional-level results.

Transparency adjustments are critical for achieving a balanced and polished look in your images. Several essential tools in Lightroom to help you get the lightening just right:

Practical Example: Refining a Natural Light Portrait

Close-up portrait of a woman in Adobe Lightroom with the sharpening tool highlighted. The interface shows adjustments to enhance the detail and clarity of the image, focusing on sharpening sliders.

When editing a natural light portrait in Lightroom, aim to enhance the subject while keeping a natural feel. Begin with the Basic panel to adjust light and contrast, then use selective sharpening for key details like the eyes. Finally, refine skin tones and other colors with the HSL panel for a sharp, well-balanced portrait.

By mastering these Lightroom techniques, you can significantly refine photos, making them stand out with clarity, color, and balanced exposure. These refinements not only enhance the visual appeal of your images but also ensure they convey the intended mood and message effectively.

Step-by-Step Guide to Lightroom Refine Photos

A close-up portrait of a woman displayed in Adobe Lightroom, with a side-by-side before and after comparison. The refined version on the right shows enhanced sharpening, color grading, and detailed skin tones.

Refining photos in Adobe Lightroom is an art that requires a good understanding of the software’s tools and features. In this guide, we will walk you through the essential steps to convert your images effectively.

Feature Purpose How to Adjust Tips
Exposure Adjusts the overall brightness of the image. Use the Exposure slider in the Basic panel. Start with Auto Adjustment for a balanced starting point.
Contrast Enhances the difference between light and dark areas. Increase or decrease the Contrast slider. Avoid overdoing it to prevent unnatural looks.
Highlights Controls the brightness of the lightest areas. Lower to reduce brightness, increase to brighten. Use alongside Shadows for balanced light control.
Shadows Adjusts the brightness of the darkest areas. Raise to reveal details in shadows, lower to darken. Useful for bringing out hidden details in underexposed areas.
Whites and Blacks Sets the white and black points of the image. Adjust the Whites and Blacks sliders. Helps in defining the dynamic range of your image.
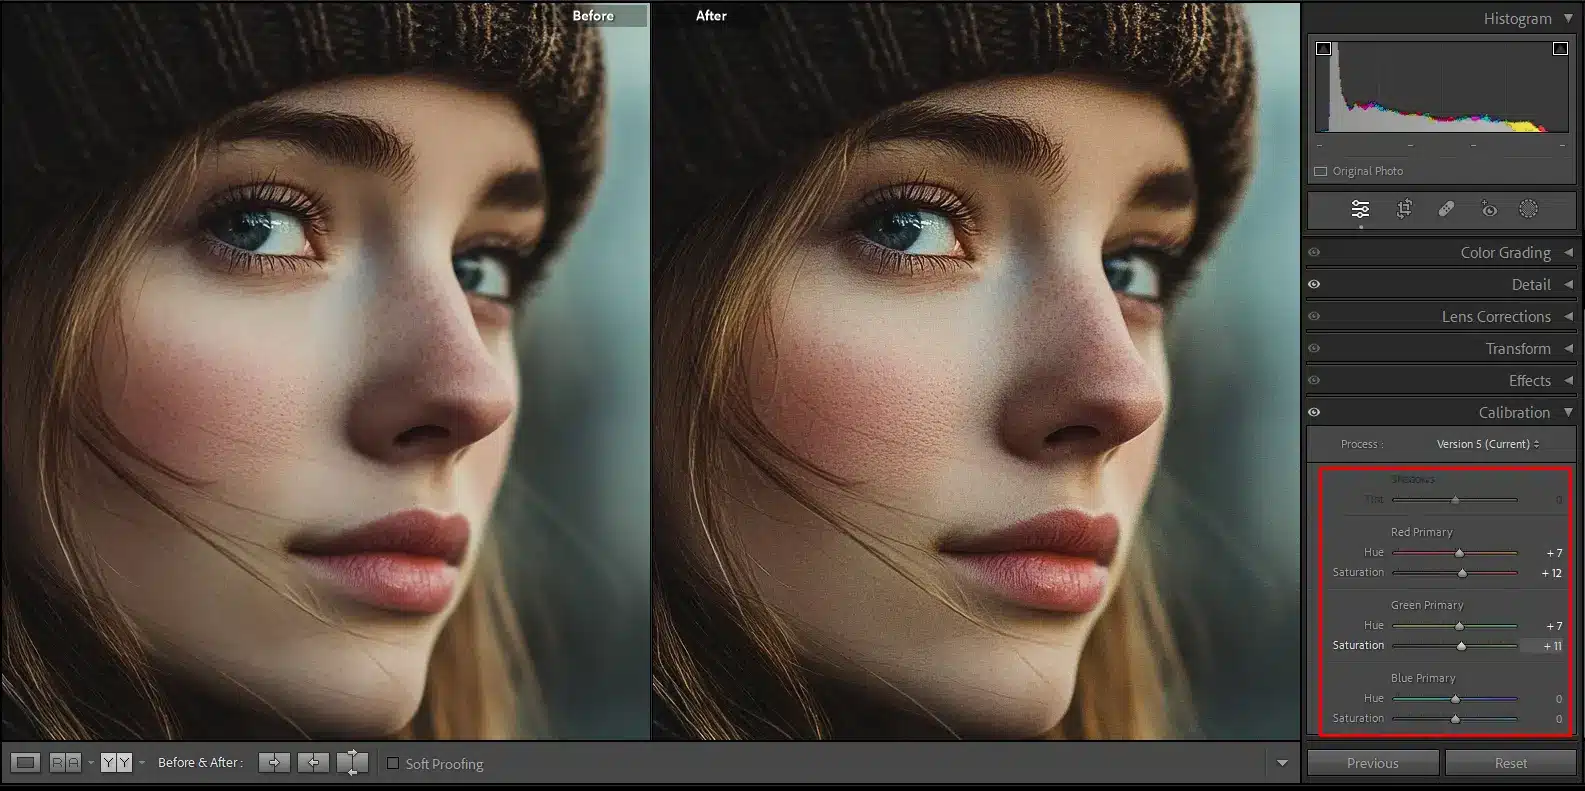
White Balance Corrects color temperature and tint for accurate colors. Use the Temperature and Tint sliders. Start with Auto White Balance and fine-tune as needed.

Import and Organize Your Photos

Basic Exposure and Contrast Adjustments in Lightroom Refine Photos

Fine-Tune Highlights, Shadows, Whites, and Blacks

Color Adjustments

Detail Enhancement

Apply Creative Effects

Save and Export

By following these steps, you can enhance your images with precision and creativity, ensuring they stand out whether viewed on screen or in print.

Common Questions about Lightroom Refine Photos

Photoshop-Masterclass-Advanced-Editing-Layer-Manipulation

How do I clean up photos in Lightroom?

To clean up images in Lightroom Classic, use the Spot Removal tool to remove dust spots and blemishes. For larger issues, the Clone and Heal options can duplicate or blend imperfections. The Adjustment Brush also allows you to fine-tune by adjusting light, clarity, or softness.

What do refine photos do in Lightroom?

Lightroom Refine photos involves a series of adjustments to improve the image’s overall quality and appearance. This includes enhancing details with sharpening, balancing radiance and contrast, adjusting color profile tones, and applying creative effects like vignette or grain. Using preset can streamline this process, allowing you to achieve a polished, professional look quickly. The goal is to take an already good photo and make it look polished, professional, and ready for sharing or printing.

How do I make photos clear and crisp in Lightroom?

To make your photos clear and crisp in Lightroom for mobile, start by using the Sharpening tool. Increase the Amount slider to sharpen the picture, but use the Masking slider to limit sharpening to only the edges and high-contrast areas (hold down Alt/Option while adjusting). The Clarity slider can also help by enhancing midtone contrast, making textures pop. Finally, check your Noise Reduction settings to note that your photo remains clear without introducing grain​.

How do I make my photos look better in Lightroom?

To make your photos look better in Lightroom box, follow these steps:

Conclusion: Lightroom Refine Photos

A landscape photograph of a church with mountains in the background, edited in Adobe Lightroom. The editing interface shows adjustments to the image's color grading and sharpening settings.

Mastering photo refinement in Lightroom classic has changed my photography approach. For example, a flat landscape shot from a mountain trip transformed into a vibrant snap with adjusted lightening, sharpened details, and increased vibrancy. Lightroom’s power is impressive.

To enhance your skills, check out our Lightroom Course and Photoshop course. Join today!

If Lightroom Refine Photos article has helped you, then Like and Share it with your friends

Facebook
Twitter
LinkedIn
Pinterest

Have a nice photoshoot!

Read more about: Photo Editing with Lightroom and Photoshop

Download Your Free Guide Now!

Discover the secrets of photography with our printable guide! Master essential techniques like aperture, shutter speed, and ISO to create stunning images. Get your free printable PDF now and start turning your snapshots into masterpieces!