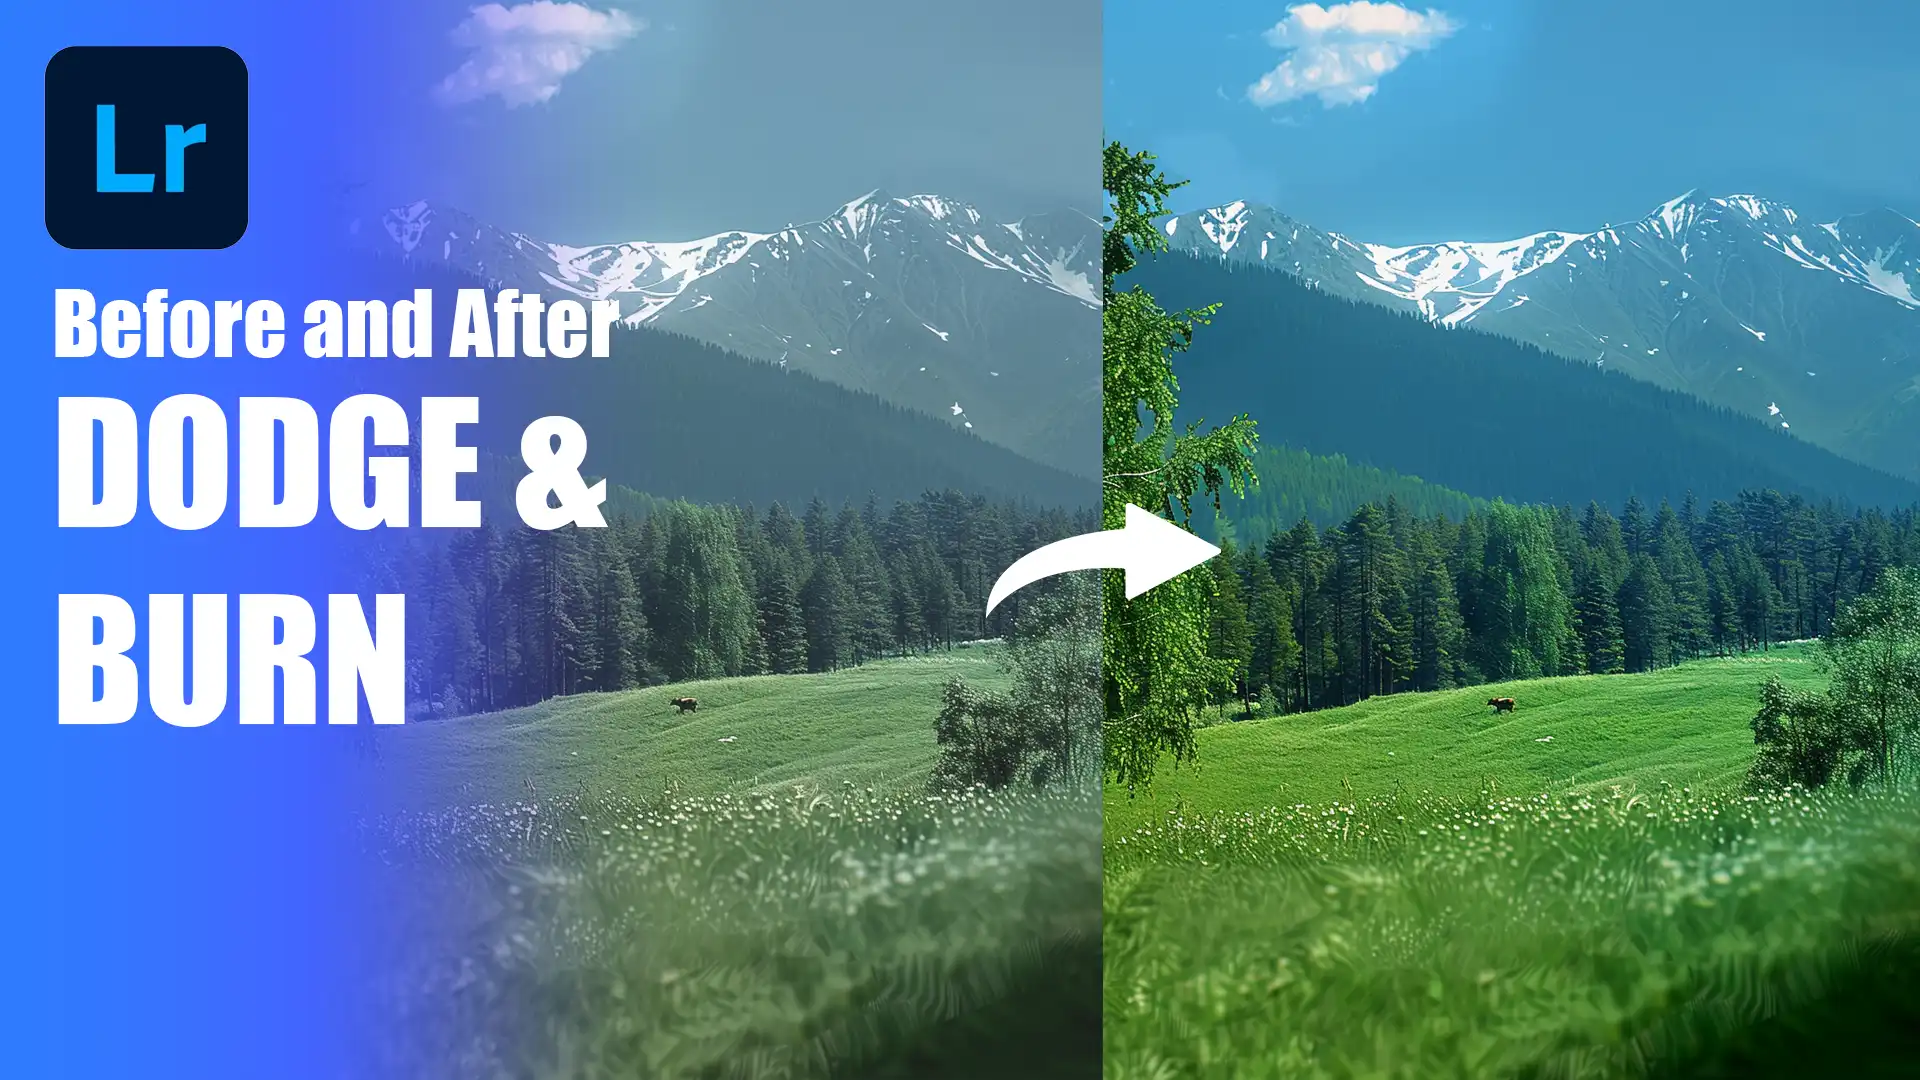
Lightroom dodge and burn is a technique that helps photographers make their images pop with dynamic contrast and captivating details. In this guide, I’ll walk you through the essentials of this powerful editing method.
Whether you’re looking to add depth to landscapes or bring out fine details in a portrait, mastering dodge and burn in Lightroom can elevate your photos from good to stunning.
By the end, you’ll have the skills to transform your images and make them stand out.
Table of Contents
Getting Started with Lightroom Dodge and Burn
Lightroom offers various of tools to enhance your images. One significant technique is dodging and burning. It’s important to understand how to use these tools effectively to create compelling photographs.
What is Dodging and Burning?
Dodging and burning involve selectively altering the exposure on specific parts of an image. Dodging makes areas lighter, while burning makes them darker.
You use these techniques to draw attention to certain elements, adding depth and dimension to your image.
Why Use Dodge and Burn in Lightroom?
You might wonder why Lightroom dodge and burn techniques are significant. Using these techniques, you achieve better photos by highlighting the main subject, enhancing details, or balancing exposure.
Specifically, it gives you the ability to manipulate light areas and shadows to make your burn photos stand out.
How to Use the Adjustment Brush
Step-by-step guide to using the Adjustment-Correction Brush for dodging and burning:
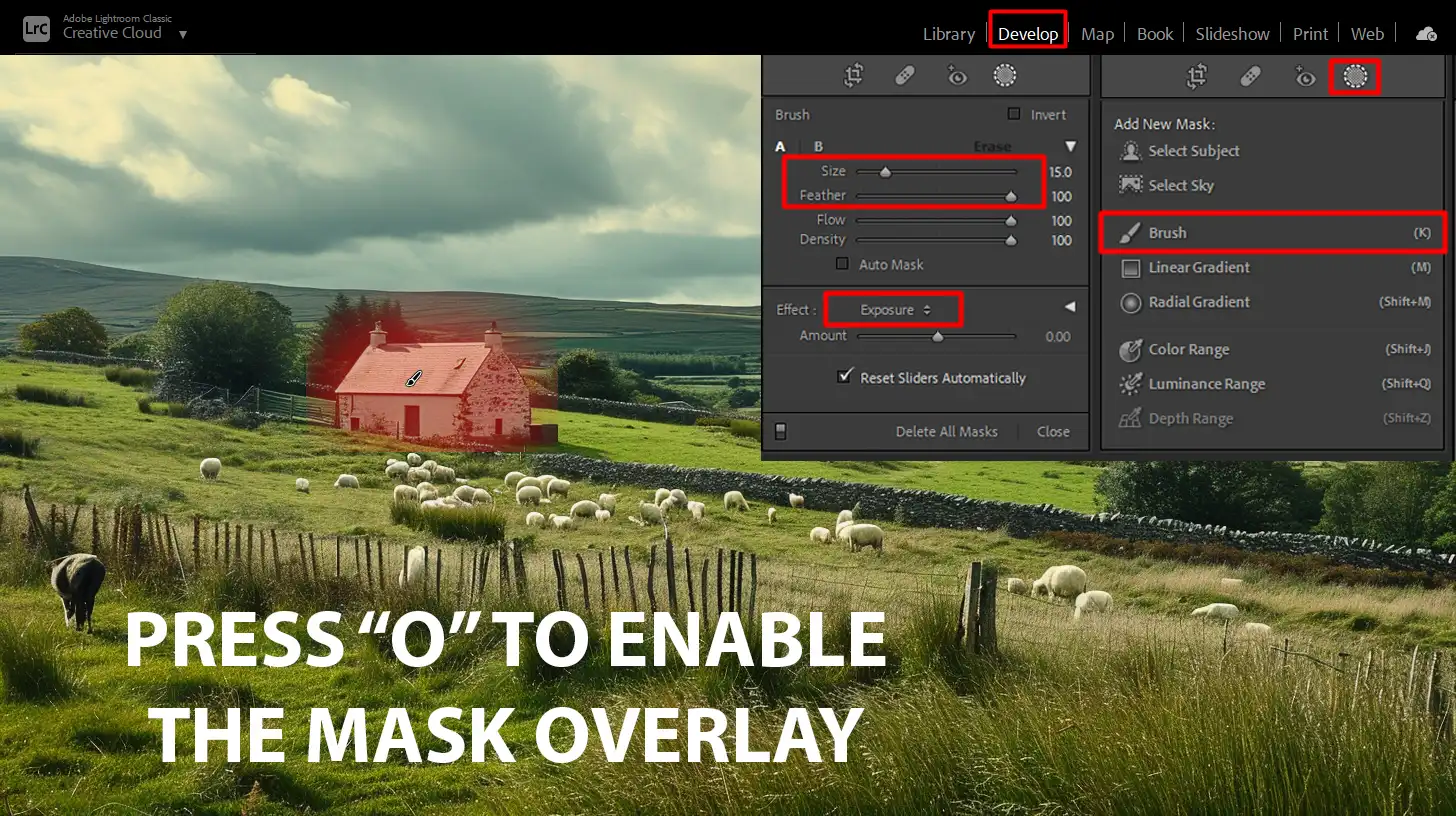
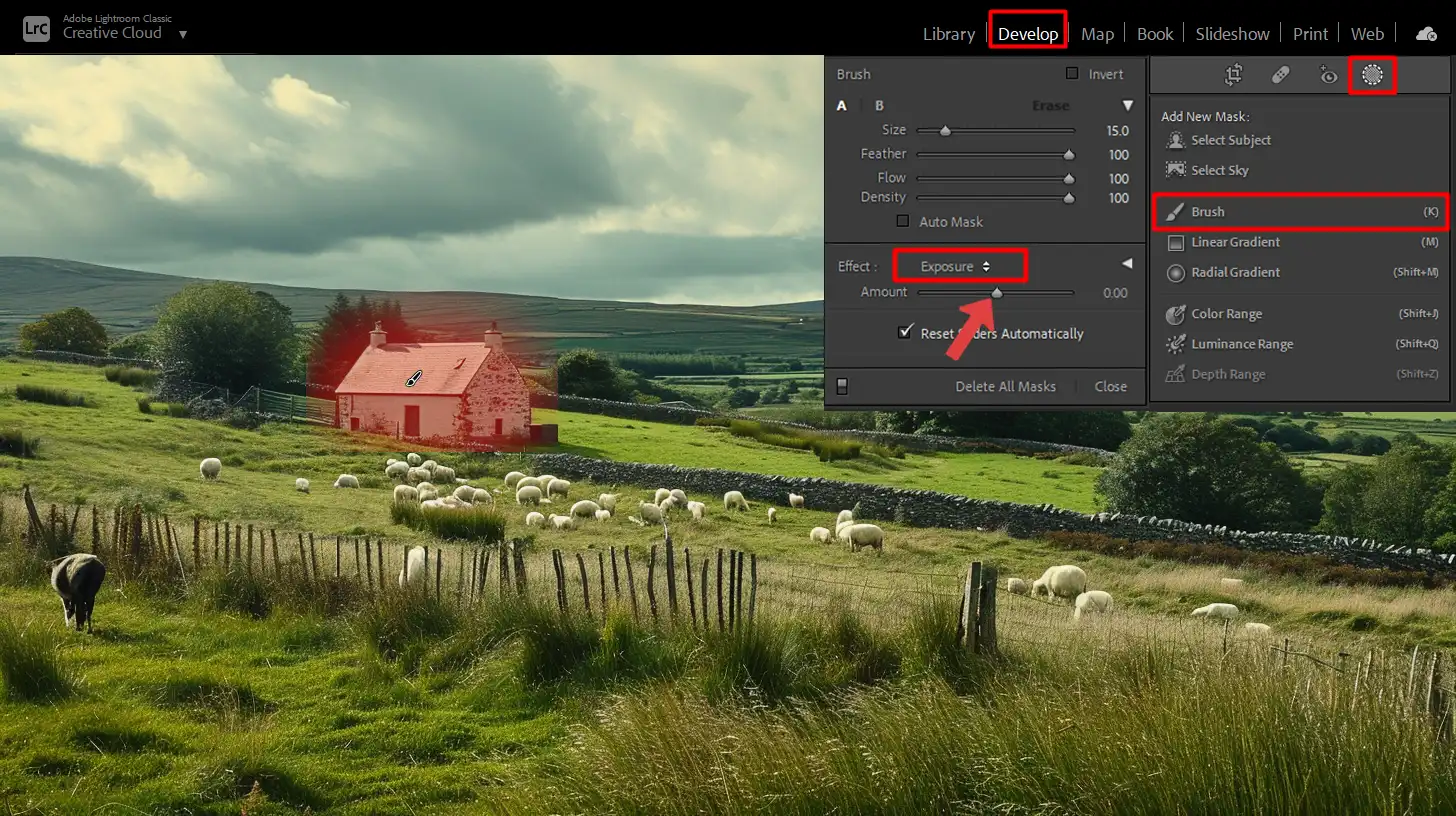
- Select the Adjustment Brush: First, click on the adjustment-correction brush icon in the top right corner. Then, choose the "Exposure" option.
- Set Your Brush Settings: Adjust the size and feather of your brush based on the area you want to work on. You can use the exposure slider to set how much you want to dodge or burn your image.
- Painting on the Image: Once settings are configured, paint directly onto your image. You will notice a red overlay indicating the areas affected.
- Mask Overlay: While painting, enable the mask overlay to see exactly where the adjustments are taking place. This helps in ensuring precision.
Blending and Refining Your Dodge and Burn
Using the Alt key (or Option key on a Mac), you can erase parts of your adjustments to blend seamlessly. If needed, you create a new brush for different sections of your image to maintain control over each area.
Using Radial and Graduated Filters
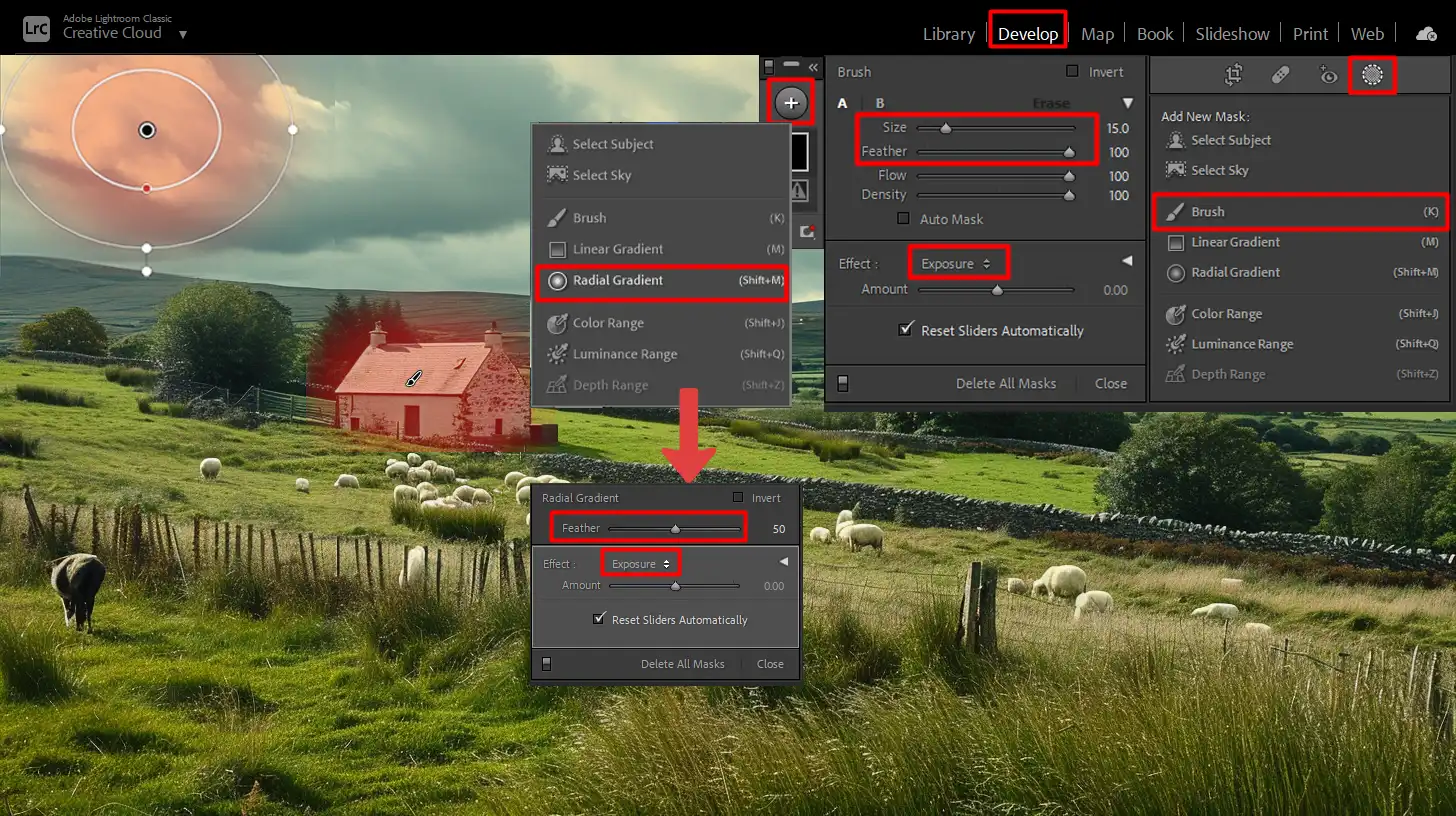
Apart from the adjustment-correction brush, you also use radial filter and graduated filter in Lightroom to achieve unique lighting effects. These filters help in creating a more controlled burn effect.
- Radial Filter: The radial filter lets you selectively brighten or darken circular areas. This tool is highly useful for enhancing the focus on a particular part of the image.
- Graduated Filter: The graduated filter creates a gradient of exposure adjustments across your image. It's an excellent tool for landscapes, preventing light imbalances between the sky and ground.
Pro Tip: Make use of auto mask to prevent your brush strokes from spilling over unwanted areas. This option ensures a cleaner, more precise workmanship.
Applying dodging and burning techniques in Lightroom Classic is easier than ever. These tools give you more control over your edits, helping you create visually striking images. Always experiment with different masking options to find what works best for your particular shot.
By following this simple tutorial, you will find that burning photos is not as intimidating as it seems. In summary, mastering dodge and burn techniques is a significant step to becoming proficient in digital photography.
Mastering the Basics of Dodge and Burn in Lightroom
This guide will walk you through the basics of using dodge and burn in Lightroom. Dodging makes areas lighter, while burning darkens them. These techniques are important for enhancing details in your burn photos.
Setting Up Your Workspace
First, open Lightroom Classic and import your image. Next, ensure that your workspace is organized for optimal workflow.
You’ll find the basic adjustment tools and the masking panel on the right side. Here, we’ll start using these tools effectively.
Steps to Set Up Your Workspace:
- Open Lightroom Classic.
- Import your image.
- Organize your workspace for optimal workflow.
- Locate the basic adjustment tools and the masking panel on the right side.
Using the Adjustment Brush
Select the Adjustment-Correction Brush from the Lightroom tools panel. This paintbrush lets you make subtle changes to specific parts of your photo. Adjust the brush size and feather to fit the area you’re working on.
Move the exposure slider to lighten or darken areas. Carefully apply paintbrush strokes to the areas you want to affect. This selective approach will give your photo more contrast.
Steps to Use the Adjustment Brush:
- Select the Adjustment-Correction Brush from the tools panel.
- Adjust the brush size and feather.
- Move the exposure slider to lighten or darken areas.
- Apply brush strokes to the desired areas.
Creating a Mask Overlay
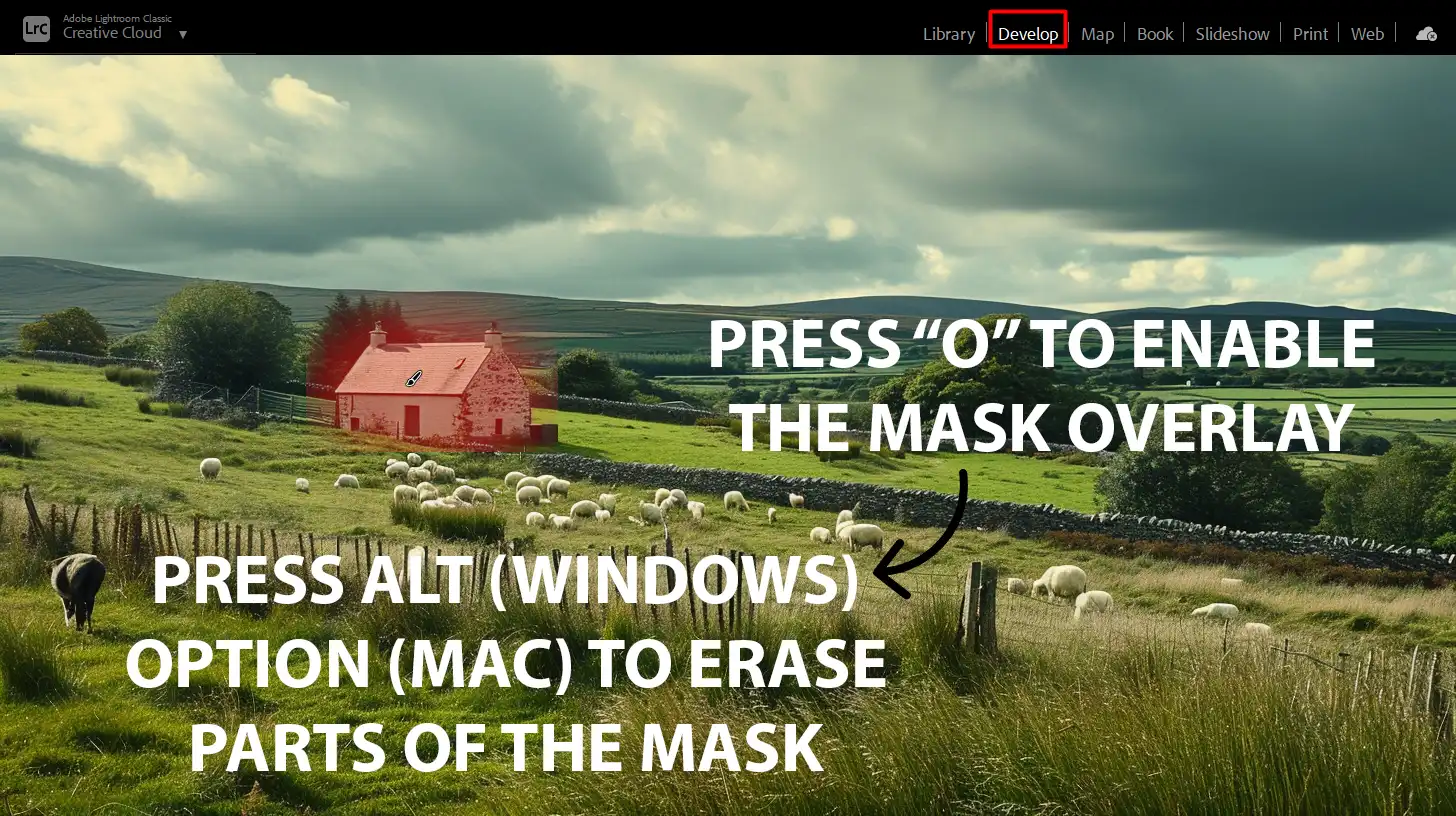
While using the paintbrush, enable the mask overlay. This shows where your adjustments will apply in red. It’s helpful for precision, especially when working on detailed areas.
Toggle the mask overlay on and off to see how your changes affect the overall image. If you need to refine your adjustment, hold the Alt key to erase parts of your mask. This ensures your edits are clean and controlled.
Tips for Creating a Mask Overlay:
- Enable the mask overlay to see adjustment areas in red.
- Toggle the mask overlay on and off to view changes.
- Use the Alt key to erase parts of the mask for refinement.
Remember, dodging and burning help you create depth and focus in your photos. Use the radial filter to brighten or darken larger, circular areas.
Apply the same technique to enhance landscapes or portraits. Both tools are part of your arsenal of Lightroom Classic techniques.
Pro Tip: Experiment with combining the Adjustment Brush and radial filter. This combination can add both fine details and broader lighting effects to your photos.
For more advanced editing techniques, consider exploring the difference between Photoshop and Lightroom. Each software has unique strengths that can complement your workflow.
Step-by-Step Guide to Dodging and Burning
Diving into dodging and burning begins with choosing the right paintbrush. Open Lightroom, pick the Adjustment Brush from the toolbar on the right. Adjust the size and feather settings until it fits the area.
Feather controls how soft the edges of your brush are, ensuring a natural effect. Size varies according to the area you need to cover. For larger areas, increase the size; for detailed work, a smaller size is better.
Avoid the temptation to rush. Fine-tuning your paintbrush size and feather creates a more seamless look.
Adjusting the Exposure Slider
Next, explore the exposure slider. This tool allows more precise control over light levels in your image. To dodge (lighten), slide to the right. To burn (darken), slide to the left.
Work in small amounts. Start at around +0.5 to experiment with the dodge effect and -0.5 for burning. If you overdo it, just tweak it back. Subtle changes have the most natural appearance, avoiding extreme contrasts.
Refining Your Edits
After initial adjustments, refine your work. Turn on the mask overlay to see the selective areas you’ve worked on, shown in red. This helps you pinpoint where to make corrections.
If you’ve gone overboard, hold down the Alt key (or Option key on Mac) and erase any excess. Make sure your new mask blends well with the rest of the image. Refining ensures a polished final product.
You can also create new masks for different parts of your images — useful for separating distinct areas like skies and landscapes. These small touches add professionalism to your edits.
Pro Tip: Combine dodge and burn techniques with radial filters to add subtle vignettes, focusing the viewer’s attention where you want it most. This creates visual interest without overpowering your photo.
For more advanced techniques, consider learning about the content-aware fill in Photoshop or how to use the patch tool in Photoshop for seamless edits.
Advanced Techniques for Dodge and Burn
One effective way to enhance your dodge and burn skills is by using multiple layers. It helps you keep edits non-destructive.
Here’s a quick comparison of advanced dodge and burn techniques in Lightroom. Each method offers unique ways to enhance your editing precision and create a more polished final. image
| Aspect | Overview |
|---|---|
| Multiple Layers for Dodge and Burn | Enhance your dodge and burn techniques by using separate layers for each tool. This allows for non-destructive edits and better control over highlights and shadows. |
| Blending Modes for Dodge and Burn | Experiment with blending modes such as Soft Light for a subtle dodge effect or Hard Light for stronger burns. Blending modes adjust how edits interact with the underlying image. |
| Opacity Adjustments for Layer Control | Adjusting the opacity of each layer allows for more subtle and refined edits, ensuring a balanced effect without overwhelming the image’s highlights or shadows. |
| Combining with Other Lightroom Tools | For enhanced depth and detail, combine dodge and burn with radial filters, gradient filters, and the adjustment brush. These tools work together to refine specific areas of your image. |
| Final Touches and Fine-Tuning | After applying dodge and burn, refine your image with color correction and sharpness adjustments to ensure a cohesive and professional final look. |
- Create a new mask layer.
- Apply dodge on one layer and burn on another. This keeps changes separate and modifiable.
- Work on the highlights with dodge tools on one layer.
- Address shadows using burn tools on another.
When using multiple layers, remember to adjust opacity. It allows for subtler adjustments in your edits.
Ensuring each layer is handled individually makes it easier to refine details. It gives more control over each aspect of the image.
Blending Modes and Their Effects
Blending modes play a significant role in dodging and burning. They modify how your edits interact with the underlying image.
- Soft Light mode is great for a gentle dodge effect.
- Hard Light mode, on the other hand, gives stronger burn effects.
Experiment with different modes to see what works best for your photo. It’s all about finding balance. Change blending modes for each layer.
This method can prevent light from washing out highlights or shadows becoming too dark.
By adjusting settings to prevent light from overwhelming the image, you can achieve a more balanced and detailed photograph.
Combining with Other Lightroom Tools
Combining dodge and burn with other essential tools in Lightroom enhances your photo’s depth. Try pairing them with radial filters and the masking tool.
- For a more light overall look, use radial filters to create vignettes. Dodge and burn specific areas within these filters for a detailed touch.
- Use the adjustment brush tool along with dodge and burn for precise control. It lets you target tiny areas that need refining.
- For an advanced approach, incorporate gradient filters. Adjust not only exposure but color and sharpness on specific parts of the image.
Pro Tip: Always turn on the mask overlay. It shows where you’ve applied changes. Tweaking the mask ensures your edits are smooth and natural-looking.
When combining Lightroom techniques with essential tools in Photoshop, like the brush or patch tool, you can achieve even finer control over your edits, allowing for a seamless transition between both software tools.
You can also integrate the Lightroom selection tool to precisely isolate areas for detailed adjustments, making your edits even more accurate and polished.
You can also use these tools to transform eyes in Photoshop, adding depth and intensity to your portrait edits for a more striking look.
Common Mistakes and How to Avoid Them
You know how tempting it is to keep making changes to your photos? We’ve all been there. But overdoing it can make your images look unnatural.
When using dodge and burn techniques, remember less is more. Start with low opacity settings to prevent extreme effects. Instead of heavy edits, focus on enhancing highlights and shadows sparingly.
Ignoring the Mask Overlay
Mask overlays show you exactly where your edits are applied. Ignoring them can lead to uneven and inconsistent results. It’s like coloring without staying inside the lines.
Turn on the mask overlay to have a clear view of your edits. Pay attention to areas where the burn or dodge effect might be too strong.
Make adjustments as necessary by erasing or reducing the effect. The goal is to create a balanced and polished image.
Not Using the Adjustment Brush Properly
The adjustment brush is a powerful tool for precise changes in Photoshop and Lightroom. But misusing it can ruin your edits. Use it to dodge and burn specific areas rather than broad strokes.
Control the size and feathering of the brush for detailed adjustments. This precision ensures you enhance the details you want without affecting the entire photo. Practice with smaller sections before moving to larger parts to get comfortable.
Pro Tip: When transitioning between Lightroom and Photoshop, remember that dodge and burn in Photoshop offers even more precision with layer-based editing.
By using layers, you can keep your adjustments non-destructive and easily refine specific areas without affecting the entire image.This method ensures your dodge and burn techniques remain subtle and professional across both platforms.
Practical Applications in Digital Photography
Mastering the art of dodging and burning can significantly elevate your photo editing skills, allowing you to bring out the best in both portraits and landscapes.
Enhancing Portraits
To enhance portraits, you want to subtly use dodging and burning techniques. These techniques can help highlight important facial features and add depth. Follow these steps:
- Start with a low opacity setting to prevent over-editing.
- Apply dodge and burn to the highlights and shadows carefully.
- Focus on the eyes, nose bridge, and cheekbones.
Improving Landscape Photos
For landscape photos, applying a light dodge can brighten up the sky and certain parts of the scenery. Use burn to darken the foliage and the foreground to add contrast.
Keep your effects subtle by using low opacity. Utilize masks to ensure even changes across the photo.
Always save your work in layers. This approach allows for easier adjustments. Additionally, consider using Lightroom shortcuts to speed up your workflow and make precise adjustments more efficiently.
Creating Dramatic Effects
To create dramatic effects, focus on exaggerating the existing highlights and shadows in the photo. Use the adjustment brush for precise changes.
You can develop compelling fire and smoke scenes or make stormy skies even more intense. Be mindful of the burn effect; overly strong effects can ruin the natural look of your photo. Experiment first on small sections before applying to larger areas.
For more advanced edits, such as removing unwanted elements or replacing colors, you might find the replace color tool in Photoshop particularly useful.
Pro Tip: When working with dodging and burning, make sure your monitor calibration is accurate. This practice ensures you see true color and brightness levels, helping to avoid overdoing the effect.
Tips and Tricks for Better Results
Streamline your editing process by organizing your tools and workspace efficiently, as this will help you navigate your software more quickly and focus on perfecting your techniques.
Organize Your Tools
When you fine-tune your workflow, start by organizing your tools. Make sure everything you use is easily accessible. Efficiency saves you time and effort. Use those Lightroom shortcuts and Photoshop shortcuts to speed things up.
Dodging and Burning
When doing dodging and burning, keep your settings low. You don’t want to overdo it. Apply lightly to highlights and shadows. Focus on areas like eyes, noses, and cheekbones. That’s where you see the best results.
Learning from Professional Photographers
Professional photographers offer a wealth of knowledge through their experience and creativity, and studying their work can provide valuable insights into mastering photography techniques.
Study Their Work
Don’t just rely on tutorials. Look at the work of professional photographers. See how they use dodging and burning techniques. Notice their light and shadow play.
Try to replicate that in your work. Experiment and learn, but don’t be scared to make mistakes.
Join Online Communities
Join online communities. There, you can get feedback and tips from others. Sometimes, all it takes is a fresh perspective to improve your skills.
Pro Tip: Calibrate your monitor often. This ensures that your colors and brightness levels are accurate when you dodge and burn.
Frequently Asked Questions (FAQs)

Is there Dodge and Burn on Lightroom?
- Yes, Lightroom offers tools for both dodging and burning to enhance photo editing.
How do you Dodge and Burn a picture?
- Select the Brush Tool from the panel.
- Set the brush to a lighter light level to dodge, or a darker light level to burn.
- Brush over areas you want to lighten or darken.
What is the difference between the Dodge effect and the Burn effect?
- The Dodge effect lightens areas of the image.
- The Burn effect darkens areas of the image.
What is the Dodge and Burn function?
- This function allows selective brightening or darkening of areas in an image, enhancing details and contrast.
Conclusion
In conclusion, mastering the Lightroom dodge and burn technique has truly transformed my editing process. By precisely controlling light and shadows, I’ve been able to bring out the best in my photos, making them more dynamic and visually appealing.
This method has not only saved me time but also enhanced the overall quality of my work. If you’re eager to elevate your photo editing skills, I highly recommend checking out this Photoshop course and this Lightroom course.
These resources have been invaluable in my journey, and I’m confident they’ll provide you with the tools and knowledge to excel in your own projects.
Read more about Photoshop:


