Mastering Image Quality: High Resolution vs Web Optimized
Mastering Image Quality: High Resolution vs Web Optimized
Ever wonder about the difference between high resolution vs web size images and when to use each? You’re not alone!
As more of our lives go digital, understanding the right picture clarity for various applications becomes important.
In this article, we’ll delve into the important distinctions and practical tips to help you make the right choice. Stick around;
it’s simpler than you think!
Table of Contents
Understanding Image Resolution
Grasping the concept of image resolution is important for producing high-quality visuals. This section will help clarify the basics, starting with an explanation of what image resolution is.
What is Image Resolution?
So, what’s the deal with image resolution?
It’s about how much detail your image has.
More details mean a better quality setting.
Pixels and Dimensions
Pixels are the small dots that make up your images. Think of them like tiny building blocks.
When we talk about pixel dimensions, we mean how many of these tiny blocks fit in the width and height of an image.
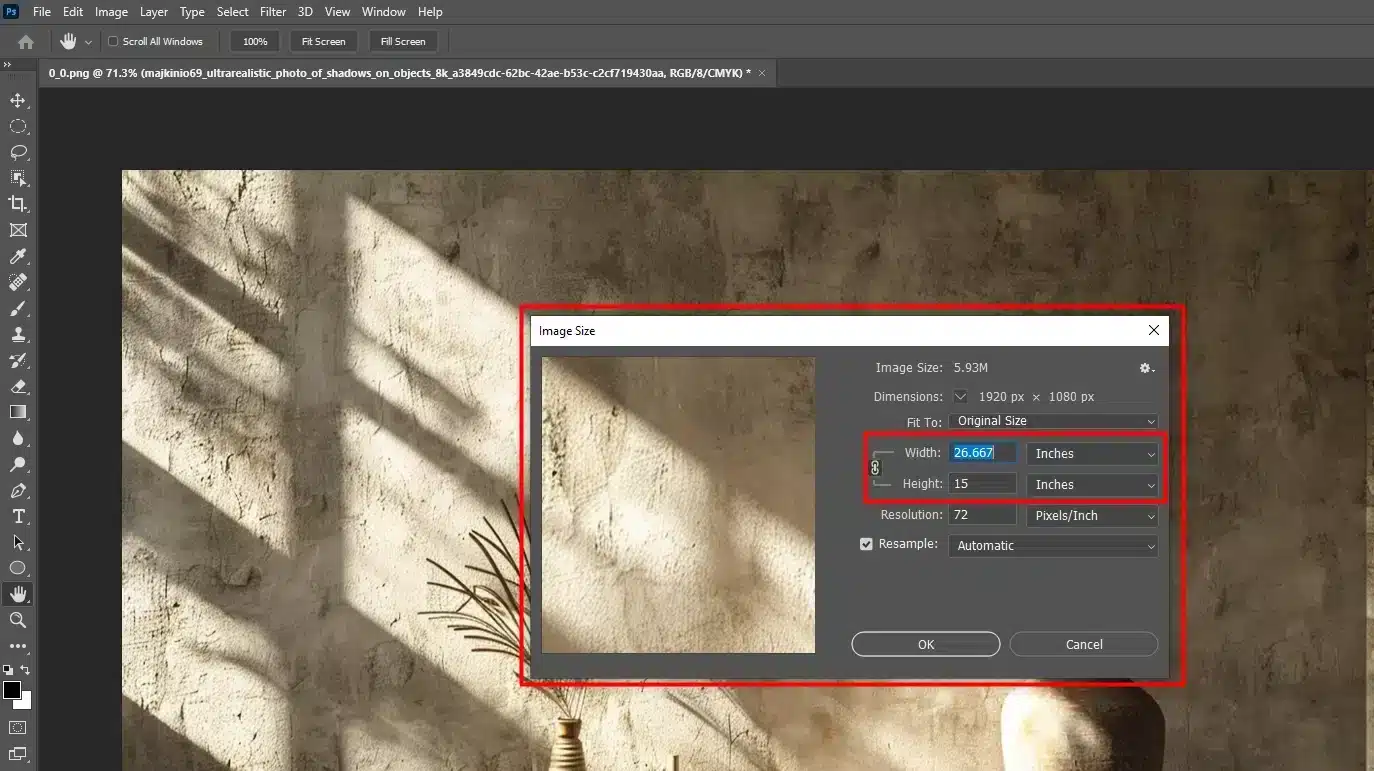
For example, a 1920×1080 image size has 1920 pixels in width and 1080 pixels in height.
Why does resolution matter? It affects how good your photos look when printed or displayed on a screen. Higher resolution means smoother colors and more details. On screens, higher resolution makes your images look sharper.
But higher resolution also means bigger file sizes. Large files can slow down your web pages. This is why it’s wise to optimize your image size before uploading it to your website.
This is where selecting the right resolution and understanding the difference between NEF or JPEG format for high resolution vs web size comes into play. Optimizing your images can also be efficiently done using essential tools in Lightroom.
Choosing the Right Resolution
How do you pick the right resolution? It depends on what you need:
Aspect
Printing
Web Viewing
Resolution
300-350 dpi (dots per inch)
72 pixels per inch (PPI)
Purpose
High-quality prints
Display on digital screens
Image Quality
Sharp, detailed
Good quality, optimized for web
File Size
Larger
Smaller
Loading Speed
Not applicable (print only)
Faster
Suitable Applications
Brochures, posters, high-quality prints
Websites, digital displays
Resizing Images in Photoshop
When resizing images in Photoshop, use the resample option. This changes the pixel dimensions count without hurting picture clarity.
Watch out for file size, though, as high-res images can take up a lot of space. You must balance between resolution and file size, especially when you are using the content-aware fill in Photoshop to maintain image quality without increasing file size unnecessarily.
Best File Formats for Print
For top-notch print quality, save your images as PNG. It keeps more details than JPEG and doesn’t compress the image size as much.
Main Differences Between High Resolution and Web Size
So, what’s the big deal about resolution and web size?
High-definition images have a lot of tiny pixels.
This makes them great for printing. Think of them as having more dots per inch (DPI), making them super clear and sharp when printed.
Web-sized images are smaller and faster to load on a website. No one wants a website that takes forever to load because of heavy images, right?
So, we say goodbye to some of those extra pixels to give us a leaner, quicker-loading image. This balance is crucial, particularly when you’re working with different image file types or using tools like the clone stamp tool in Photoshop to ensure the best quality with the smallest file size.
What does Image Resolution mean?
Resolution measures the amount of detail in an image using pixels. Imagine your image as a grid made up of tiny squares.
The more squares (or pixels) you have, the more detailed your image will be. It’s like comparing your fancy new HDTV with an older TV; more pixels equal a more precise display.
When you hear “high resolution,” think of lots of tiny squares packed together closely. This is great for printing where details matter.
But for the web, it’s different. We don’t need all those extra details bogging down our web pages.
To create visually appealing graphics, understanding the difference between high resolution vs web size images is significant.
Adding shapes in Photoshop allows for precise customization, whether you’re working with high resolution for print or optimizing for web viewing.
Pixel Dimensions and Image Size
Pixel dimensions refer to the number of pixels along the width and height of an image. For example, an image that is 1920×1080 is 1920 pixels wide and 1080 pixels high.
Image size often refers to the file size – how much space your image takes up on your computer or when you upload it online.
A higher resolution means more pixels and, consequently, a larger image file size. This is great for keeping high-quality images for presentations but slows down the website.
To achieve stunning visuals, it’s important to understand how to upscale images without losing quality. Mastering pixel dimensions and image size ensures your upscaled images maintain sharpness and clarity.
Why Resolution Matters for Printing
Let’s talk print! The magic number here is usually 300 DPI (dots per inch). Why? The human eye can’t usually spot the individual pixels at this resolution.
This means smooth prints without jagged edges.
High-definition images ensure your photos look amazing when printed. The details are clear, colors are sharp, making it look just like the real thing.
However, this high resolution isn’t always needed for web use.
The Web-Sized Strategy
For the web, lower resolution works fine. Why? Because screen resolutions are not as demanding as print. Most websites use a resolution of 72-96 PPI (pixels per inch).
This is enough to display a good-quality image on screens.
We need smaller file sizes to make our websites fast. No one likes a slow-loading page, right? Reducing the pixel dimensions and, hence, the file size can help your page load quicker without compromising too much on the visual quality.
How to Optimize Images for Web
When you’re preparing an image for the web, consider the resolution requirement. Use a tool like Photoshop to resize your image. Use the resample option.
This changes the number of pixels without messing with the visual quality too much.
Aim for a balance – keep the image size manageable while ensuring it looks good on screen. Compressing your images to reduce file size can also help.
Keep an eye on how the image looks after compression; you don’t want it to appear blurry or pixelated.
Defining High Resolution and Web Size Images
Understanding image resolution is important to creating great visuals. This section will cover the basics, starting with what image resolution means.
Understanding Image Resolution
Alright, let’s get straight to the point. You know, image resolution.
It’s the quality of a digital image. Basically, it’s the size of the image.
Think of it as the number of tiny squares, called pixels, that make up your picture. More pixels mean better maximum quality.
Why is Image Clarity Important?
It depends on what you want to do with your image:
For printing: You want high resolution. Print resolution, measured in dpi (dots per inch), must be high so the printed image doesn't look fuzzy.
For websites: A lower resolution is often fine. Lower resolutions keep file sizes smaller, making webpages load faster. No one likes waiting for large images to load, right?
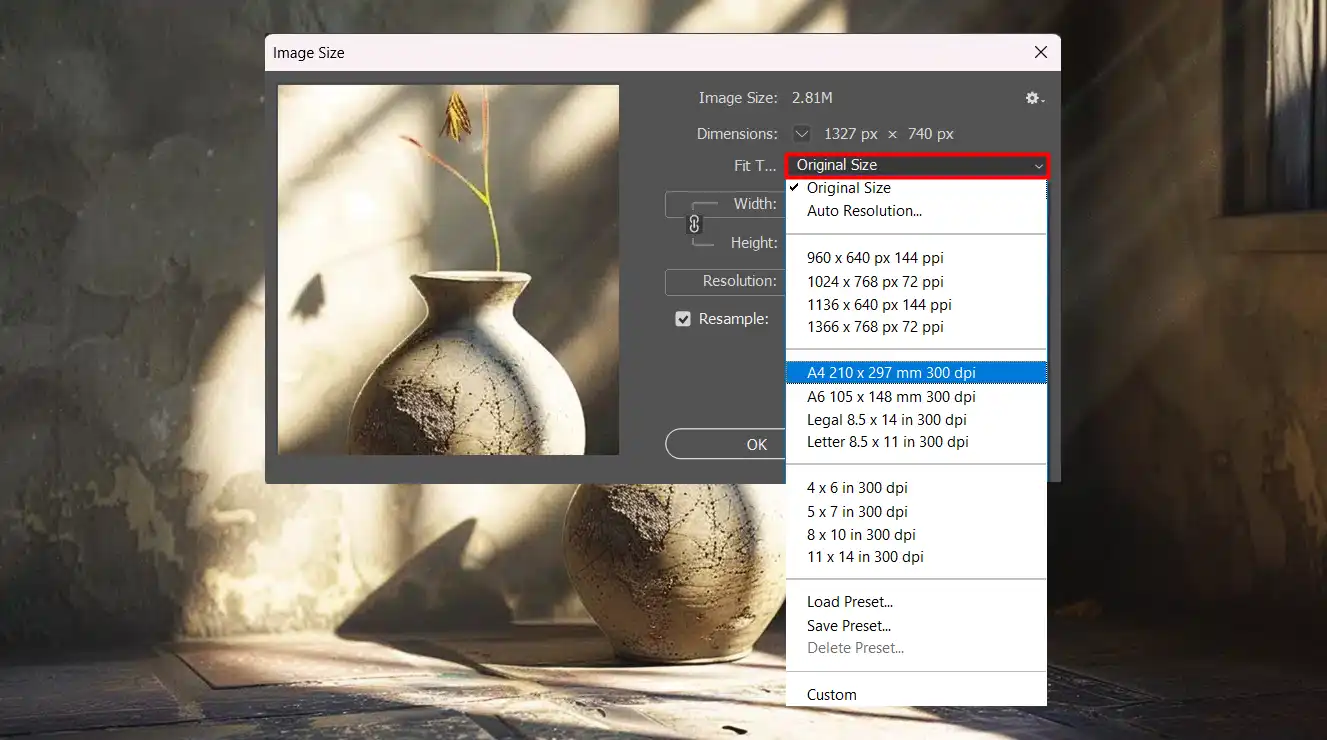
Adjusting Resolution in Photoshop
In Photoshop, you can change the resolution to fit your needs. Got an image too large for your website? You can reduce the resolution by resampling the image.
You’ll reduce the number of pixels but keep the same image size in inches. This gives you a smaller file size and faster loading times.
If you have a low-resolution image but need it for print, you can try increasing the resolution. Be cautious; adding more pixels won’t magically improve the quality.
It often just makes the image look worse since the extrapixels guess what color they should be.
After adjusting the lens correction for optimal clarity, photographers can enhance both high-resolution images for print and web-sized versions, ensuring they maintain sharpness and detail regardless of size.
General Guidelines
Here’s a simple rule of thumb: Use high resolution for print and lower resolution for web.
Print resolution: Around 300 dpi.
Web images: 72 pixels per inch is usually enough.
Don’t forget about file formats. Saving high-quality print images in PNG format can help. Unlike JPEG, which compresses the image, PNG keeps all the details intact.
What's Web Size?
Do you know when you’re on a website, the pictures load fast and look good? High quality vs. web optimisation is significant to refining your images for the best performance.
It’s important in Photoshop and Lightroom. It keeps your images sharp and quick to load.
High resolution vs. web size is important to optimizing your images for the best performance.
Also, exploring editorial photography can provide valuable insights into optimizing high and low-resolution images for web applications.
Emphasizing the importance of selecting the appropriate resolution to maintain quality while ensuring fast loading times.
Your images should look good but not slow down your website. Nobody likes waiting for web pages to load, right?
How to Resize Images for Web
Resizing images is easy. Follow these steps:
Step one: Open your image in Photoshop or Lightroom.
Look for the image size option.
Change the width and height to fit your needs.
A good rule of thumb is to keep the longest edge around 1200 pixels for most web photos.
JPEG: Great for photos. It balances quality with small file sizes.
PNG: Use this for transparent backgrounds or detailed graphics. The file size might be bigger.
Keep your image size small without losing too much quality. A bigger file means a longer wait for images to load on your website.
Avoid Uploading Large high resolution Images
Don’t upload massive, high-resolution images. Not everyone has high-speed internet.
Big images take forever to load and chase people away. Stick to optimized file sizes. Your viewers will thank you.
When Lower Quality is Fine?
Sometimes, low quality is fine if the image loads quickly and looks decent. Reduce your image size, but make sure it doesn’t look too pixelated or blurry.
For example, images for blog posts don’t need to be high resolution. Lower resolution with acceptable quality works fine.
Choosing the Right Image Size
Choosing the right image size is about balance. If it is too big, your site slows down. Too small, it looks bad.
Here are some quick tips:
For full-screen images: 1200-2000 pixels wide.
Gallery images: 800-1200 pixels wide.
Check your display settings. Modern screens often need higher resolutions. Adjust to make it look good.
Common Misconceptions About Resolution
Alright, let’s clear up some myths about image resolution.
You might think higher resolution always means better quality. Well, that’s not always true.
Misconception #1: Higher Resolution Always Means Better Quality
More pixels don’t always mean better images.
Sure, it can mean clearer pictures. But for the web, super high resolution can be overkill. Larger file sizes slow down your website.
For most web use, 72 dpi (dots per inch) works fine. It keeps things looking good and loading fast.
Misconception #2: Low Resolution Images are Useless
Low resolution images aren’t always bad. They can be just right. If you’re sharing on social media or in an email, low resolution keeps things simple.
They load quickly and look decent on smaller screens. It’s all about what you need them for.
Misconception #3: Print Quality and Web Quality are the Same
Print needs a higher resolution. Blowing up a small picture makes it pixelated and blurry. For print, aim for 300 dpi. This ensures sharp, crisp images.
Those high-res images take up more space. Save them for when you really need them. On the web, stick to lower resolutions to keep pages fast.
Misconception #4: More File Size Means Better Quality
File size and image quality don’t always go hand in hand. Bigger file sizes can be a pain. They eat up your storage and bandwidth.
Optimize your images without losing quality. Tools like Photoshop and Lightroom let you adjust resolutions and compress files smartly.
Also, while adjusting your resolution in the editing software, it’s good to know that using shortcuts is a game-changer for enhancing your workflow efficiency and boosting speed. Mastering these shortcuts ensures you complete tasks quickly and effectively.
Find the best balance between quality and file size.
Misconception #5: Resolution Can Fix a Bad Photo
Resolution isn’t a magic fix. If an image isn’t captured well, boosting the resolution won’t help. A blurry picture stays blurry, no matter how many pixels you add.
Focus on taking good photos from the start – proper lighting, steady shots, and good composition. Then, use software to polish them up.
Creating Effective Visual Content
Creating great visuals isn’t just about tech specs. It’s about meeting your audience’s needs. Think about where they’ll see your images and adjust accordingly.
If it’s for print, go high resolution. If it’s for online, keep it light. Strike the right balance for your purpose. Understanding these nuances saves time, frustration, and storage space.
Why Web Size Matters for Websites
Choosing the right image size for your website can have a big impact on its performance and user experience. Next, we’ll discuss how image size affects speed.
Loading Time Considerations
Alright, you know the drill about image resolution and file sizes. Now, let’s chat about why high resolution vs web size matters for websites.
Ever waited ages for a webpage to load because of huge images?
Annoying, right?
Smaller, optimized images make a big difference.
So, why care about image sizes? First, speed. Smallerimages mean faster loading websites. Fast sites keep visitors happy. Nobody likes staring at a loading screen.
Shrinking image size helps your site run smoothly without losing too much quality.
Bandwidth Usage
Next, data usage. Big image files gobble up more bandwidth.
While web viewing, uploading images, or engaging in other online activities, bandwidth determines how quickly data can be transferred
Efficient management of bandwidth ensures smoother web browsing and faster file uploads without compromising user experience.
This is a headache for folks with slow internet or limited data.
Keeping images light ensures everyone can access your page quickly and easily.
Practical Guidelines for Managing High Resolution and Web Size
So, how do you do this? Let’s get practical:
Use tools like Photoshop or Lightroom to resize images before uploading.
Aim for the longest edge to be around 1200pixels for most web photos.
For smaller images like thumbnails, 400-600 pixels on the longest side should work.
Choosing the Right Format
Choosing the correct format is important, too:
JPEG is great for photos – it balances quality and file size.
PNG works well for graphics with transparency.
Avoid TIFF or BMP formats; they create unnecessarily large files.
Smaller images lead to faster load times and a better user experience.
Frequently Asked Questions (FAQs)
Is high resolution or web size better quality?
High Resolution: Offers better quality with more detail, suitable for printing and editing.
Web Size: Lower quality suitable for online use, faster to load but less detailed.
What is the difference between Pixieset web size and high resolution?
Web Size: Typically smaller in dimensions and file size, optimized for quick loading and online viewing.
High Resolution: Larger in size, designed for printing and detailed viewing, retains high image quality.
What is the resolution size for printing vs web?
The two main resolutions are:
Printing: Requires higher resolution, generally 300 dpi (dots per inch) or higher to ensure clear and crisp prints.
Web: Lower resolution suffices, around 72 dpi, which is optimal for fast loading times and decent display on digital screens.
What is high resolution photo size?
High resolution photos are typically sized at 300 dpi or more.
The dimensions can vary, but they are usually large enough to be printed without losing quality.
knowing the difference between high resolution vs web size has made my workflow much smoother.
High-resolution images are perfect for print because they capture so much detail.
But for the web, smaller, optimized images keep my websites fast and user-friendly.
When I first started using Photoshop and Lightroom, I often struggled with picking the right image size.
Now, I always make sure to resize my images based on their final use.
This simple step saves me a lot of time and keeps my work looking professional.
If you’re looking to improve your skills, check out my Photoshop Course and Lightroom Course. Understanding when to use high resolution vs web size has made all the difference in delivering.
If this article has helped you, then Like and Share it with your friends
$2,061.00Original price was: $2,061.00.$1,061.00Current price is: $1,061.00. 27584
Download Your Free Guide Now!
Discover the secrets of photography with our printable guide! Master essential techniques like aperture, shutter speed, and ISO to create stunning images. Get your free printable PDF now and start turning your snapshots into masterpieces!