Frequency Separation Photoshop: The Skin Retouching Guide
Frequency Separation Photoshop: The Skin Retouching Guide
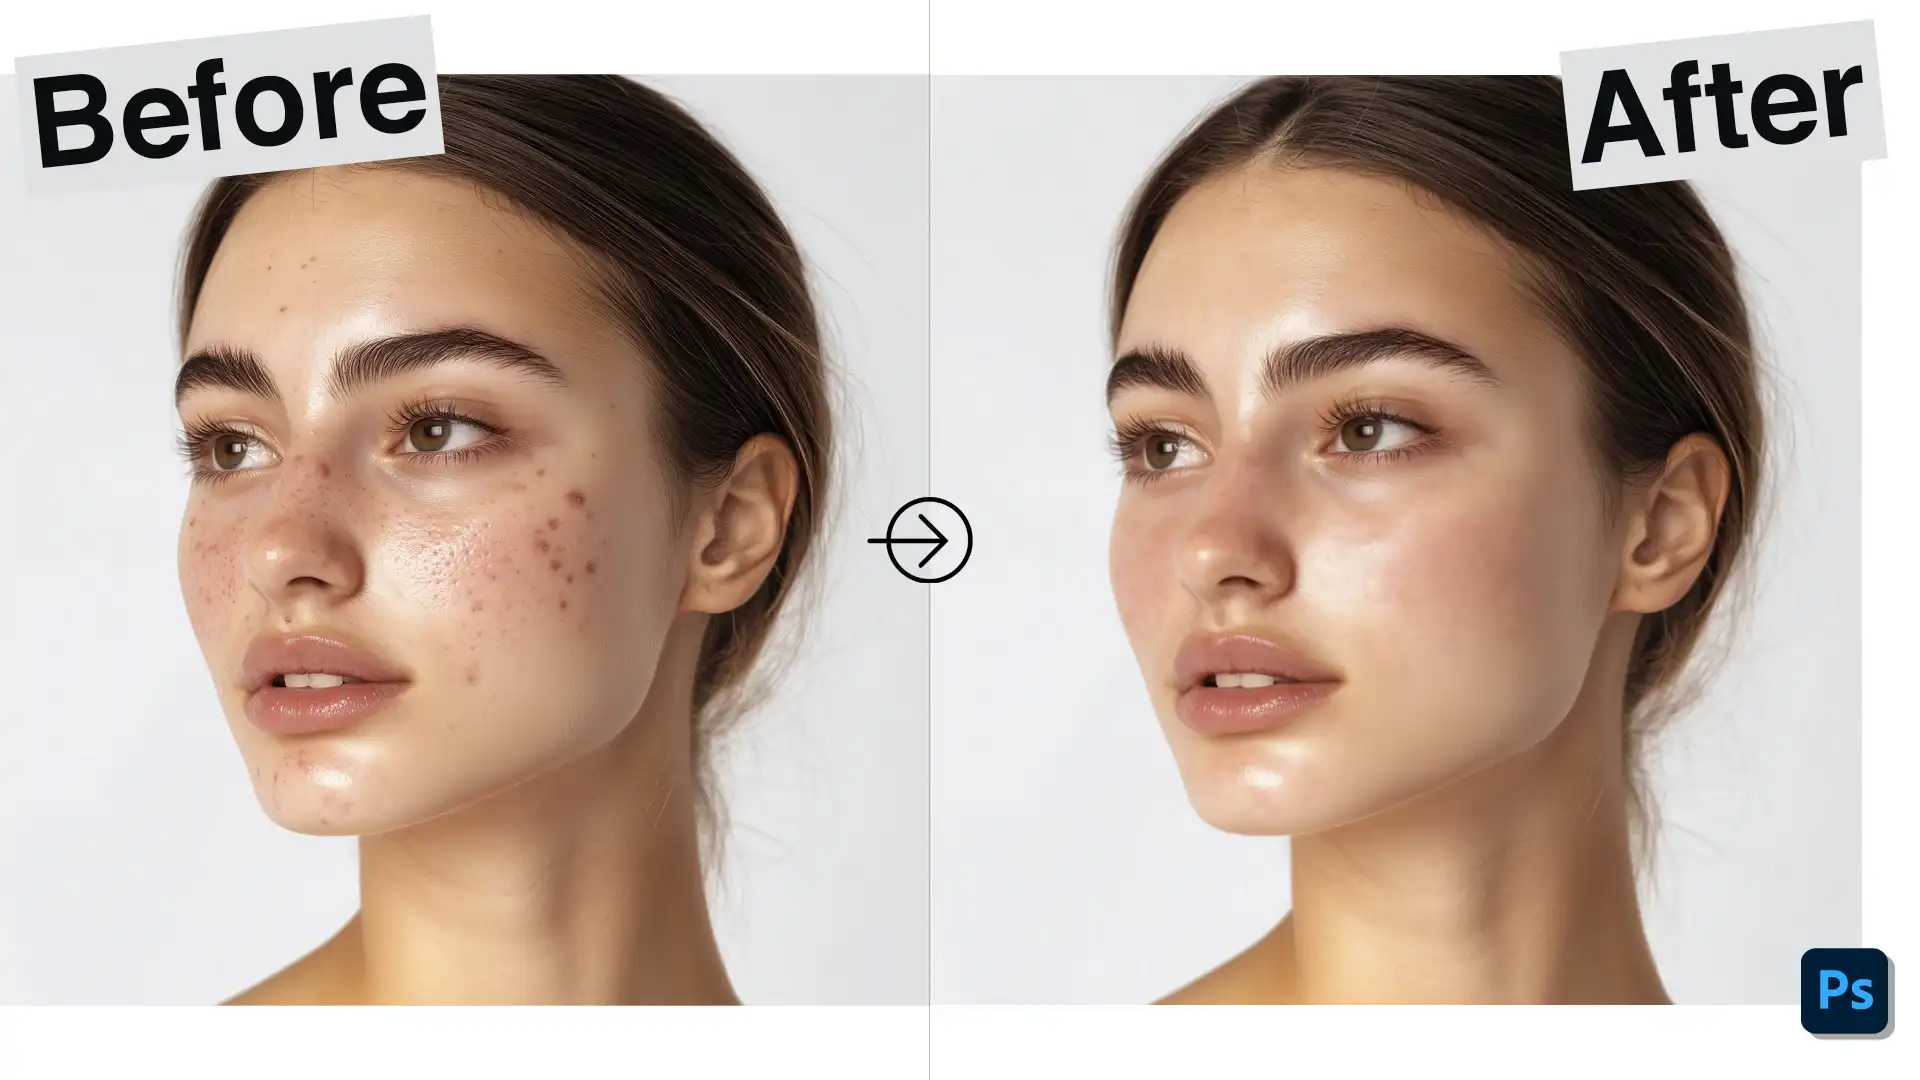
Frequency separation Photoshop is a powerful technique that can transform your photo editing process, and I’m here to guide you through it.
Are you looking to enhance your images by achieving that perfect balance of texture and tone without compromising on quality? Imagine having the ability to smooth skin and retain its natural detail effortlessly.
By the end of this article, you’ll not only understand how frequency separation works but also how it can elevate your photography to new heights.
Let’s dive deeper into this game-changing tool and discover how it can make your photos stand out.
Table of Contents
What is Frequency Separation in Photoshop?
Frequency Separation in Photoshop is a powerful technique used for skin retouching. It involves dividing an image into different layers to enable precise editing.
This process separates the image into high and low-frequency layers, allowing you to edit textures without altering the entire image.
Why Use Frequency Separation?
Frequency separation provides enhanced control over your retouching process. You can smooth out skin tones on the low-frequency layer while preserving the skin texture on the high-frequency layer.
This results in more natural edits, maintaining the integrity of important details. For those looking to refine their skills,learning Photoshop essential techniques like this is invaluable.
Understanding Layers: High Frequency and Low Frequency
Let’s break down these layers:
High-Frequency Layer Explained
Use the high-frequency layer to refine textures and remove imperfections while keeping colors intact.
The high-frequency layer retains delicate elements like skin texture.
By editing this layer, you can address blemishes and imperfections without affecting the colors.
Use tools like the Healing Brush or Clone Stamp for precise edits.
Low-Frequency Layer Explained
Use the low-frequency layer to adjust color and tone for smoother, more even skin without affecting texture.
The low-frequency layer focuses on color and tone.
This affects large areas, leaving textures intact on the other layer.
Creating a Background Layer
The background layer is the starting point of frequency separation. Begin by duplicating your original image to create a base layer that separates from the texture layer. This base layer serves as a safety net in case you need to revert changes.
Pro Tip: Always save a copy of the unedited image as a backup!
Step-by-Step Guide to Frequency Separation in Photoshop
Frequency separation Photoshop simplifies retouching by letting you separate texture from color. This step-by-step guide will walk you through setting up and applying this technique for natural-looking edits.
Preparing Your Image
Begin by opening your photo in Adobe Photoshop. Think of this as setting up your canvas. Keep a clear focus on what needs skin retouching.
This focus ensures you address specific areas where you want the magic of frequency separation to happen.
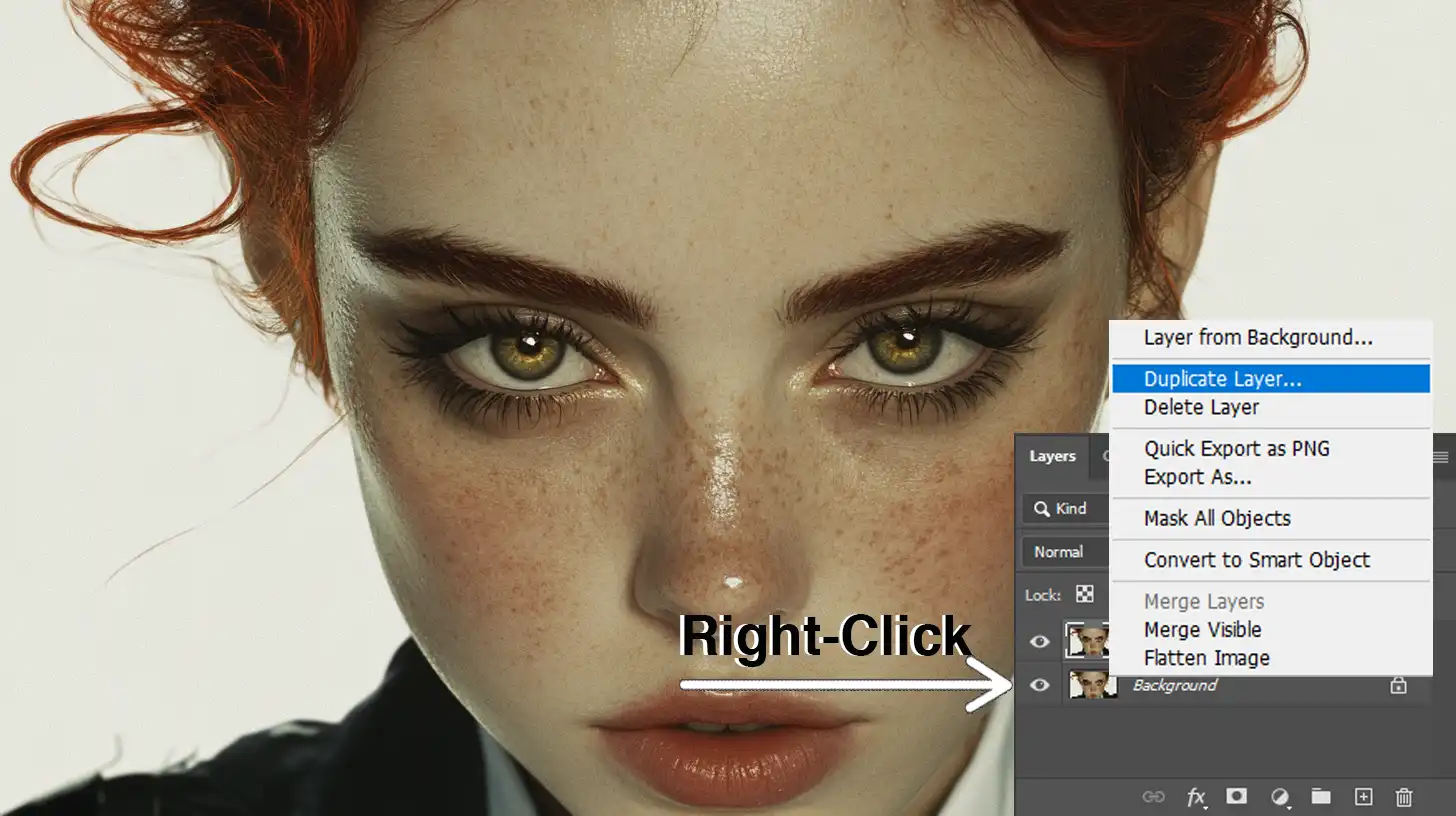
In the layers panel, duplicate the background layer. You do this by right-clicking on the layer and selecting ‘Duplicate Layer.’
Now, you have the top layer to maintain details and the bottom layer for smoothing. These layers separate the information you need for effective editing.
Setting Up Layers for Frequency Separation
Follow these steps to set up the high and low-frequency layers for effective skin retouching.
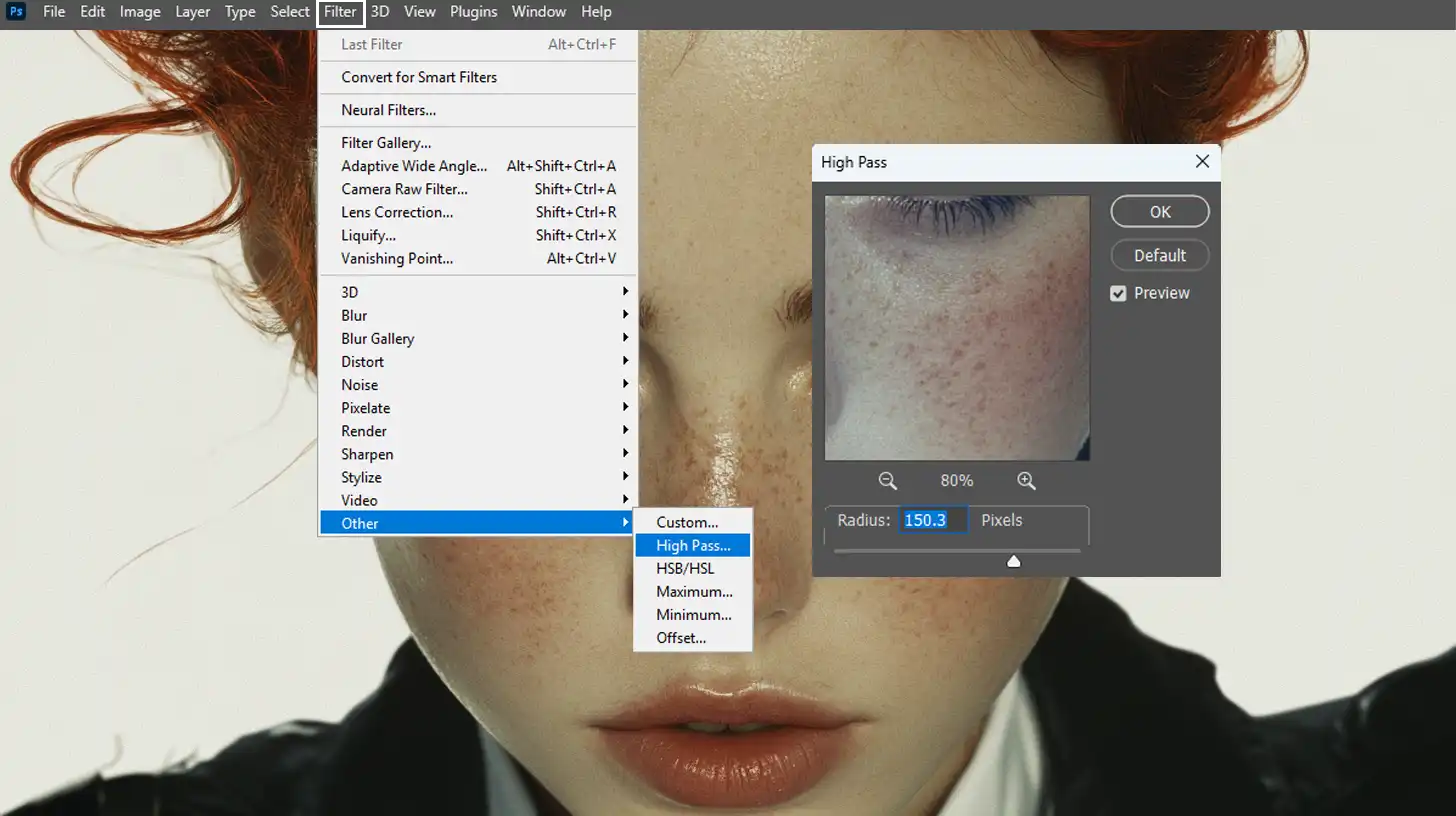
Work with the high-frequency layer. This holds the fine details like pores and skin texture. Select the top layer and go to Filter > Other > High Pass. Adjust until you see the desired skin texture. It may look grey, but that’s perfect.
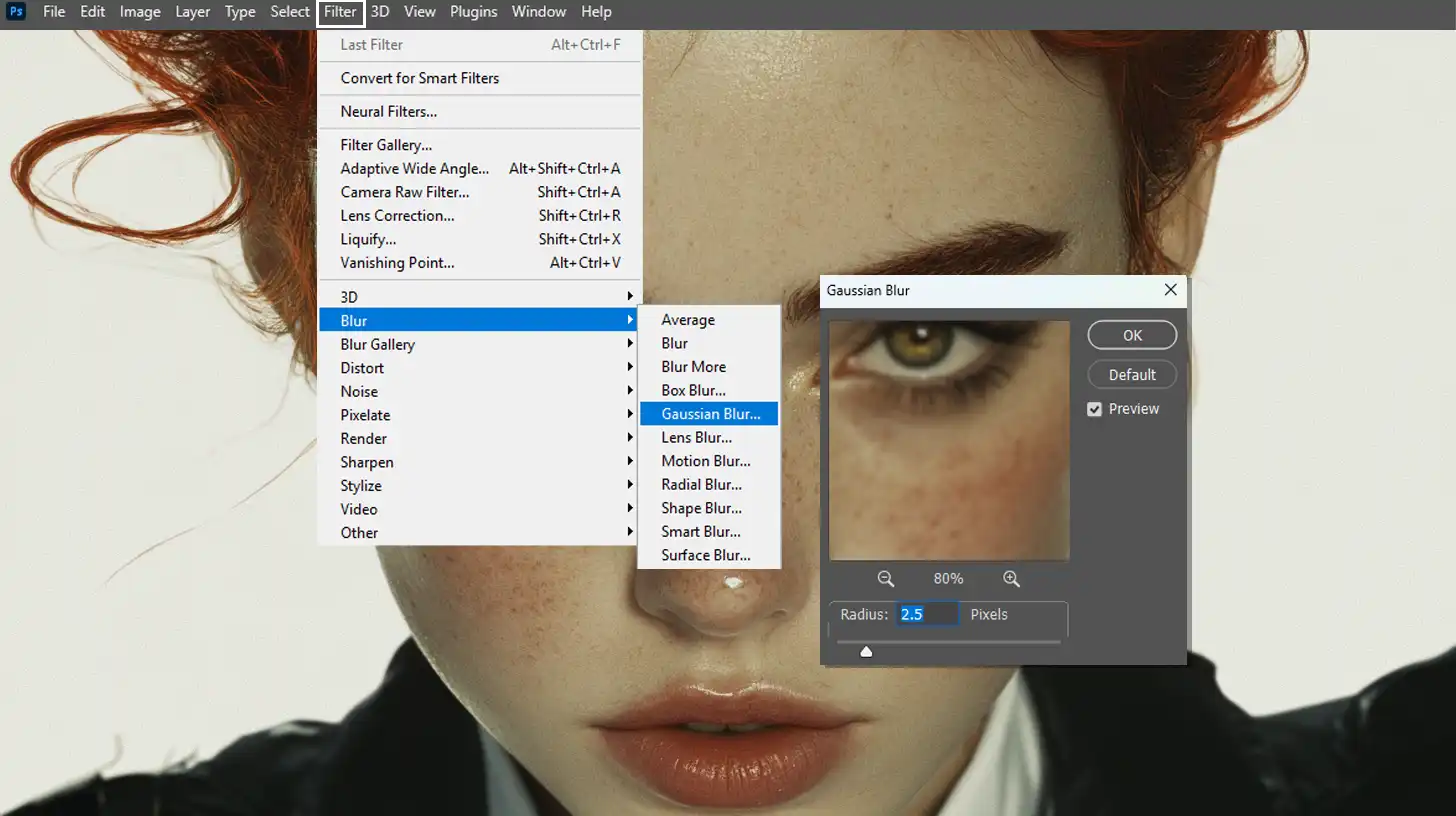
For the low frequency or color layer, work on the smooth areas. Here, go to Filter > Blur > Gaussian Blur. Start with low numbers and increase until the skin tones appear soft but not overly blurred.
Applying Frequency Separation Techniques
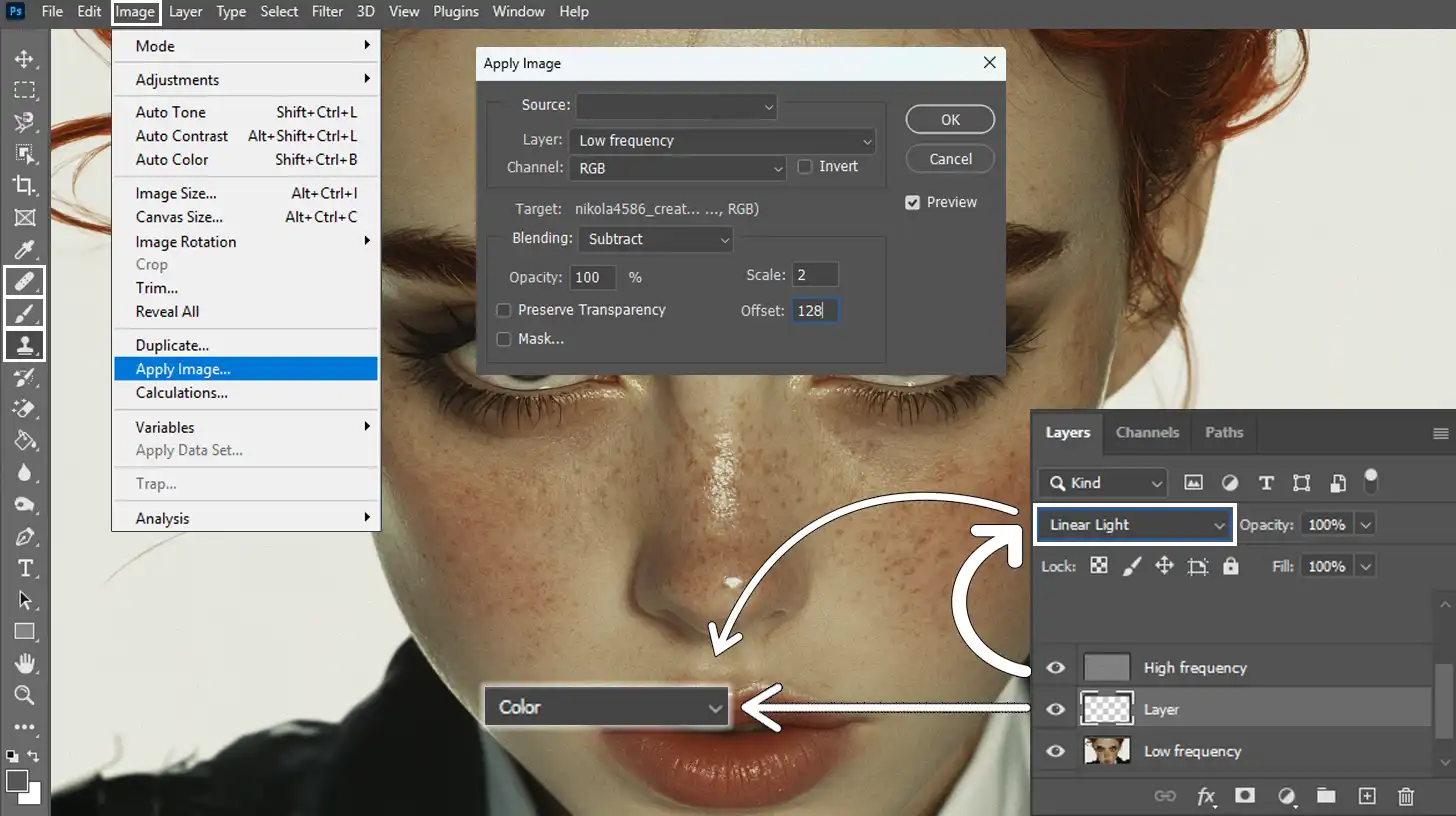
To make magic and understand frequency separation, begin by using Apply Image on the high-detail layer. This step helps you separate textures clearly from colors, allowing you to make changes without affecting fine details.
Use the clone stamp tool or healing brush to fix blemishes on the high-frequency layer, maintaining the natural skin texture.
Now set the blending mode of the high frequency layer to Linear Light. For more precision, use the brush tool on the new layer for color corrections.
Finally, save your work and invest time to master frequency separation.
Pro Tip: Save your frequent actions, like a frequency separation action, to speed up your workflow and make it easier to remove blemishes in Photoshop efficiently.
For more advanced editing, consider learning how to use the patch tool in Photoshop to seamlessly remove unwanted elements from your images.
Advanced Techniques in Frequency Separation
In frequency separation, advanced techniques allow you to refine textures independently from color adjustments. This method enhances your control over smoothing and sharpening, especially when bringing out finer details in your images.
Enhancing Details with High-Frequency Layer
First, we’re going to unleash the power of the high-frequency layer:
Duplicate the layer of your image. This creates one layer for texture and another for color or tone. Your top layer will be our focus for capturing details.
By using the High Pass filter, we isolate those intricate details, sometimes called high-frequency information.
Once we've used the filter, set the blend mode to Linear Light. Go to the layers panel and select Linear Light from the dropdown menu. This process helps sharpen our textures, giving them that perfect crispness.
When you want to touch up little blemishes without altering important details, grab that trusty healing brush tool.
Smoothing Skin with Low-Frequency Layer
Moving to the other half of the duo, we have the low-frequency layer, which helps achieve that soft, glowing skin:
On the bottom layer, use the filter blur, specifically Gaussian Blur, to eradicate rough patches or inconsistent tones. Think of this step as a smoothing balm, straightforward yet transformative.
Here, focusing on tonal consistency rather than detail will help. If you need to adjust colors subtly, you can add a new layer and adjust its color layer attributes until you're happy with the outcome.
For even further retouching flexibility, consider using a frequency separation action that automates these tasks, making the process faster and repeatable.
So, in essence, frequency separation retouching breaks down the image into details and tones separately, allowing specific adjustments to each without interference.
The two layers of texture and blur work harmoniously together to create stunning images.
Pro Tip: Convert your starting layer into a smart object before separating frequencies. This step enhances Photoshop skin retouching by enabling non-destructive editing, making it easy to backtrack if needed.
When working with frequency separation Photoshop, certain mistakes can impact the final look. Let’s explore these common issues and learn how to avoid them for realistic results.
Over-Retouching
Over-retouching can lead to an unrealistic and unnatural appearance in portraits. In frequency separation retouching, it’s easy to lose sight of the texture layer. The skin may look too smooth if you overuse tools like the healing brush tools or blur layer.
Remember, the goal is to maintain a natural texture while correcting blemishes and imperfections. To achieve this, consider using Photoshop shortcuts to streamline your workflow and prevent excessive editing.
When working on the high-frequency layer, be mindful of the level of detail you’re removing. Keep skin texture intact for a realistic result. Avoid the temptation to use the filter blur on a high setting.
Ignoring Image Resolution
Ignoring image resolution affects the quality of your final work. High-resolution images create crisp and clear results. When creating a duplicate layer, ensure the resolution supports detailed retouching. If the resolution is too low, the edits may appear blurred.
Ensure you’re working with images that provide ample pixel information. Image resolution impacts how high-frequency information comes through.
Proper resolution fosters better outcomes, particularly when applying the apply image technique.
This technique allows for precise adjustments on the color layer, ensuring that changes support the image’s integrity.
Pro Tip: To quickly assess your work, periodically toggle the visibility of your layers to see your before-and-after progress.
By doing so, it becomes easier to determine whether your frequency separation edits hold up or if revisions are necessary.
And remember, when you’re finished, don’t just click ok; save your work in a structured way to keep things organized!
Practical Applications of Frequency Separation
Frequency separation offers practical solutions in photo editing by isolating textures from colors, making it easier to enhance specific areas without affecting the entire image. This technique is especially helpful in tasks like portrait retouching, where subtle adjustments can make a big difference.
Aspect
Overview
Frequency Separation in Portrait Retouching
Allows for smoothing skin and preserving natural texture by separating color and detail layers, resulting in realistic portrait edits.
Texture Layer for Spot Removal
Utilizes the high-frequency layer to remove blemishes and minor imperfections without affecting color.
Color Layer for Smoothing Tones
The low-frequency layer enables smoothing of skin tones, creating a balanced and even look without impacting texture.
Frequency Separation in Product Photography
Enhances product images by removing glare, refining surfaces, and preserving intricate details, helping to create attractive, high-quality photos.
Using Apply Image for Precision
Apply Image tool helps isolate high and low frequencies with greater accuracy, leading to more precise editing.
Portrait Retouching
Portrait retouching benefits from frequency separation. Have you ever looked at a photo and noticed the smooth yet realistic skin? That’s the work of frequency separation in Photoshop.
It separates texture from color, allowing us to adjust each part without messing up the other. Imagine touching up a photo and keeping smile lines while smoothing out blemishes.
You use the texture layer to handle small details and the base tone layer for larger color shifts.
Here’s how it happens:
Create frequency separation, ending up with two layers: one for texture and one for color.
Use the clone stamp tool on the texture layer to remove any spots or imperfections. Each dot removed gives the photo a natural feeling.
Spend time tweaking with high frequencies to get the perfect look.
Product Photography
Next, let’s talk about product photography. Here, frequency separation ensures every item we edit remains realistic and enticing. Who doesn’t love a sharp image that highlights every tiny detail? Buyers need persuasion, and clear product images do just that.
With the texture layer, we can focus on refining surfaces. No space for glare or imperfections here! Just swap out any unwanted reflections.
For instance, if there’s some text on a packaging photo, focus on its precision using frequency separation without tampering with the background. Adobe Photoshop helps in managing color smoothly.
One important thing to do while editing is to use the ‘apply image‘ tool. It works wonders, making frequency separation more precise.
When you’re all set, be it skin in portrait retouching or fine details in products, just click ok after confirming changes. You’ll see quality shine through.
Pro Tip: Never over-edit. Always check your final work on a different screen. Fresh perspectives aid perfection.
Frequently Asked Questions (FAQs)
How do you do frequency separation in Photoshop?
Open your image in Adobe Photoshop.
Duplicate the background layer twice.
Rename the top layer to "High Frequency" and the middle layer to "Low Frequency."
Select the "Low Frequency" layer and apply a Gaussian Blur to soften details.
Choose the "High Frequency" layer, set the layer blending to 'Linear Light', and apply 'Apply Image' to subtract the "Low Frequency" details.
Adjust the layers individually to refine details and tones.
What is frequency separation for beginners?
Frequency separation is a photo editing technique used in Photoshop to separate the texture of an image from the tone and color.
This method allows you to work on fine details (like skin texture) and color edits separately, making detailed retouching easier.
Is frequency separation good?
Yes, it's highly effective for detailed retouching, especially in portrait photography.
It helps smooth skin without losing its texture and maintains a natural look.
However, it requires practice to master the technique fully.
What is the meaning of frequency separation?
Frequency separation refers to a technique in image editing where the image is divided into a layer for textures (detail layer) and a layer for tones and colors (base tone layer).
This separation facilitates more precise adjustments and corrections in photo editing.
In my personal journey with photo editing, mastering “frequency separation Photoshop” was a game-changer. It allowed me to enhance my images while maintaining their natural texture, setting them apart from others.
This technique helped me create visually striking photos, especially when I needed to smooth out skin tones without losing important details.
If you’re looking to dive deeper, my Photoshop Course offers a step-by-step guide to mastering frequency separation and more advanced techniques. For those who want to explore a broader range of tools and techniques, my Lightroom course covers essential skills for transforming your images.
For anyone just starting with Photoshop or Lightroom, you can check out Adobe’s Photoshop software and Photoshop Lightroom for great tools to get started or refine your skills.
Whether you’re a beginner or looking to refine your skills, these courses can guide you through the intricacies of photo editing, ensuring your images always look their best.
If this article has helped you, then Like and Share it with your friends
$2,061.00Original price was: $2,061.00.$1,061.00Current price is: $1,061.00. 27582
Download Your Free Guide Now!
Discover the secrets of photography with our printable guide! Master essential techniques like aperture, shutter speed, and ISO to create stunning images. Get your free printable PDF now and start turning your snapshots into masterpieces!