Draw Curved Line in Photoshop: A Step-by-Step Guide
Draw Curved Line in Photoshop: A Step-by-Step Guide
Ever tried to draw a curved line in Photoshop but felt overwhelmed by the options and tools?
You’re not alone. Many people find this task tricky, but it’s essential for creating polished, professional designs.
In this article, I’ll walk you through the process step-by-step, making it easy and approachable.
Whether you’re working on a digital illustration, designing a logo, or editing a photo, mastering curved lines can significantly elevate your work.
Intrigued?
Let’s dive in and unlock the potential of your creative projects!
Table of Contents
Getting Started with the Pen Tool
Learning to use the Pen Tool can feel overwhelming, but once you understand the basics, the possibilities are limitless.
This guide will help you get a good grasp on how to draw curved lines, straight lines, and create complex shapes efficiently.
Understanding the Pen Tool
The Pen Tool is fundamental for creating lines in Photoshop. You may wonder why you need it when there are other tools like the Brush Tool or Line Tool.
However, the Pen Tool offers precise control. You can place anchor nodes to define your lines.
Think of anchor nodes as the cornerstones of your design.
Key Concepts:
Anchor Point/Nodes: Marks the beginning and end of a line segment.
Path Segment: The line connecting two anchor nodes.
Curved Line: Can be added by manipulating the handles on an anchor point.
It’s essential to start simple. Begin by placing two points to draw straight lines.
Later, you can practice creating curved lines by adding and adjusting anchor nodes and the corner point.
To create a precise path, start with a corner point for sharp turns, then place the third point to define the curve.
Use a smooth point to ensure gradual transitions between segments, and adjust the corner points if the curve needs to follow a direction opposite to the initial flow.
Composition in photography is all about arranging elements within the frame to create a visually pleasing image.
The Pen Tool in post-processing can help you adhere to these composition rules by allowing precise adjustments, such as selecting and repositioning elements within the frame.
This ensures that your image aligns perfectly with the rule of thirds, enhances leading lines, or maintains symmetry, ultimately refining your composition to achieve the desired visual impact.
Setting Up Your Workspace
Before jumping into drawing curved line or any other shapes, it’s crucial to set up your workspace.
Ensure you have the following:
A visible grid to help you align elements.
The Pen Tool selected from the toolbar.
Layers panel open, so you can manage different elements easily.
Status bar visible to get feedback on your actions.
Spend a few minutes getting familiar with this setup before moving on to advanced techniques.
Basic Pen Tool Techniques
Let’s dive into basic techniques for using the Pen Tool.
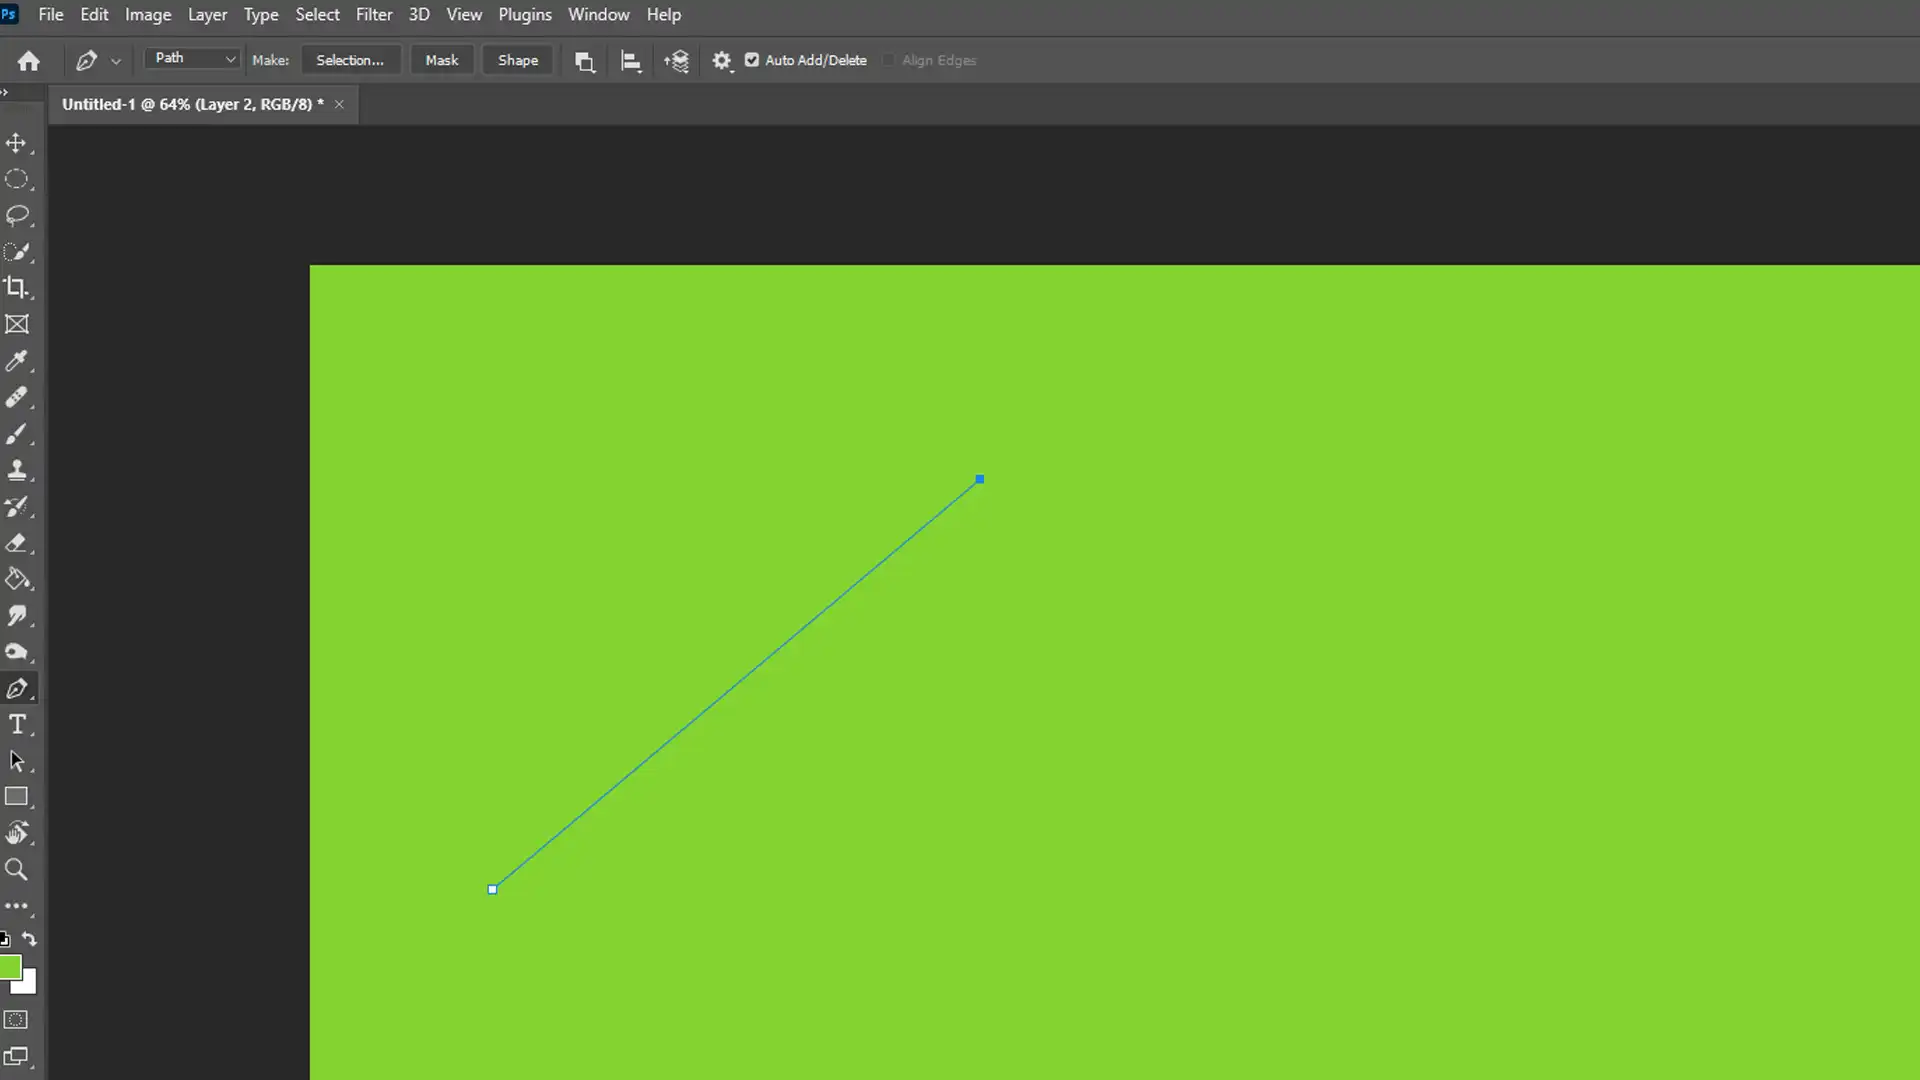
Initially, place your first point by clicking anywhere on your canvas.
This becomes your initial starting point. Then, click again to place the second point, forming a straight line between the two points.
To add curves, click and drag when placing an new anchor point.
This creates handles that you can adjust to form a smooth line digital art often requires.
Quick Tips:
Hold the Shift key to constrain your line to 45-degree angles, making sure your straight lines are perfect.
Use the Ctrl/Cmd key to temporarily switch to the Direct Selection Tool, allowing you to move anchor nodes freely.
To make a complex shape, combine straight and curved lines by placing a mix of regular and smooth anchor nodes.
Once you’re comfortable with these basics, you can experiment with adding more anchor points and creating intricate designs.
The new Curvature PenTool can simplify processes, allowing for smoother curved paths by automatically adjusting handles as you click to place anchor points.
Using the Pen Tool in post-processing allows precise adjustments to align and refine those perspectives for perfect composition.
Pro Tip: Always zoom in when placing anchor points. It will improve your accuracy and overall quality of the lines in Photoshop.
To achieve the desired line thickness in your design, start by setting the width according to your project needs.
Begin with placing the first smooth point to ensure a gentle curve.
As you progress, add a corner point where you need a sharp direction change.
Finally, place the third point to complete the curve, adjusting the handles as needed for the perfect shape.
How to Draw Curved Lines in Photoshop
Drawing curved line in Photoshop might seem tricky, but it’s easier than you think.
It’s all about anchor points, handles, and some patience.
Drawing a Simple Curved Line
To start, I recommend using the Pen Tool. Make sure you have it selected in the toolbar.
Follow these steps:
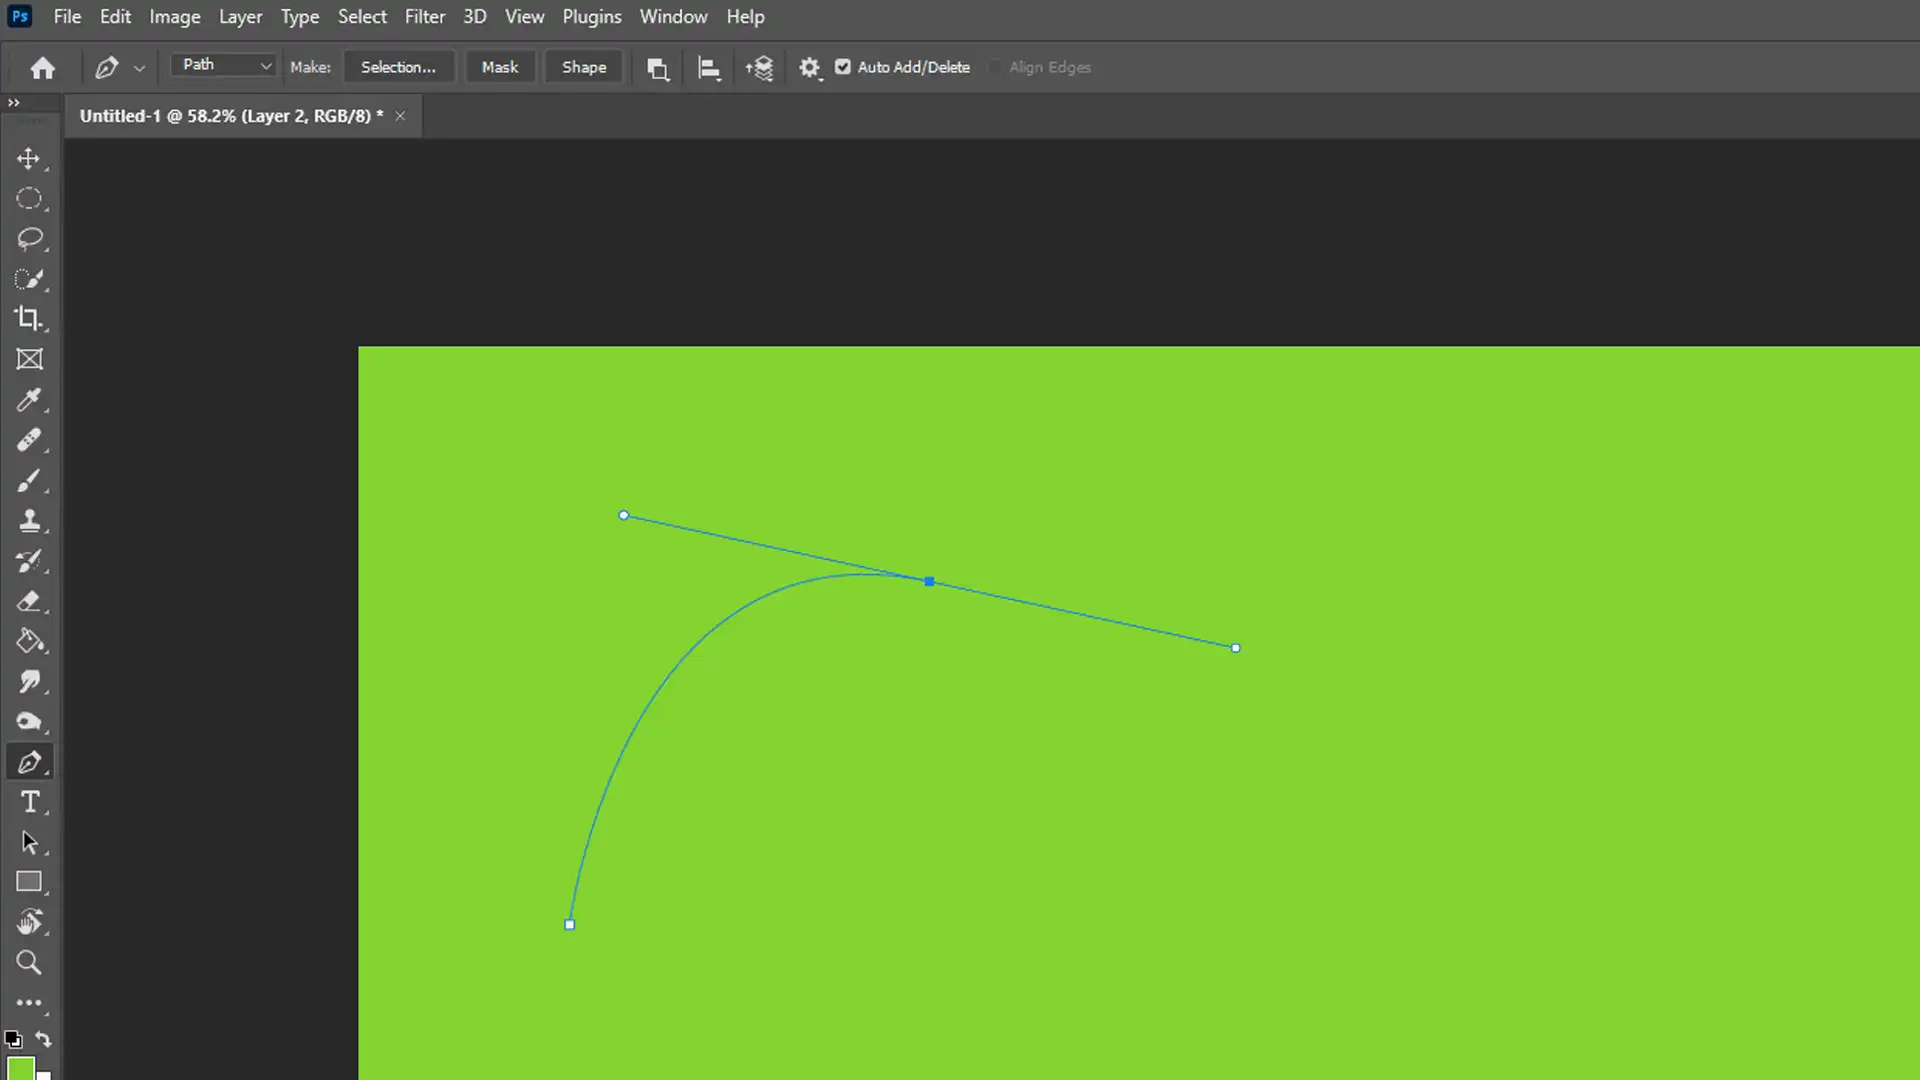
Click once to place your first anchor point. This will be the start of your curve.
Click again to place your second point. This is where the magic happens!
Instead of just clicking and releasing for a straight line, click and drag. By dragging, you create handles that control the curve direction and length.
Adjust these handles to form the smooth arc you need. You can move both the anchor point and handles to shape the curve until it looks right.
Always remember, practice makes perfect.
The more you play with this, the easier it gets.
Creating Complex Curved Lines
When it comes to more complex curved lines, combining straight and curved segments is key. .
Follow these steps:
Start by placing an new anchor point as before.
For the next point, use the Curvature Pen Tool. Click and drag, then let go to see the curve shape.
Place another anchor point to continue to the existing path.
If you need sharp corners, hold the Alt key and click on the anchor point to break the handles. This will turn it into a corner point, giving you more control over direction changes.
These techniques help us create more intricate and elegant shapes. It’s like creating art with pixels.
Maintaining the same direction with your anchor nodes ensures a consistent and smooth flow throughout your design.
Adjusting Curved Lines
Even after you’ve drawn your curved line, you can still make adjustments:
Select the Path Selection Tool (black arrow) and click on your path. You can move anchor points or drag handles to refine the curve.
For finer adjustments, use the Direct Selection Tool (white arrow). Clicking on an anchor point will reveal the handles, letting you tweak the curve more precisely.
Zooming in on your work helps a lot. You’ll see the details clearer and make better adjustments.
Pro Tip: Hold the Shift key while clicking to keep lines aligned at specific angles or to constrain paths. This makes drawing neat and polished curved lines easier.
By practicing these steps, you’ll master drawing curved lines in Photoshop. Embrace the learning process; it brings creativity to your fingertips and will elevate your graphic design skills. For more advanced techniques, consider exploring the Content-Aware Fill in Photoshop and Photoshop Shortcuts to enhance your workflow.
Advanced Techniques for Drawing Curved Lines
Mastering advanced techniques for drawing lines allows for greater precision and creativity, enabling you to create complex, fluid shapes with ease.
Using the Curvature Pen Tool
To effectively use the curvature pen tool:
Place your first point by clicking on the canvas.
Move to the next spot where you want the curve, click, and drag to create your curve.
The curvature pen tool automatically creates smooth curves as you add points.
To make changes, use the Path Selection Tool to adjust the points or curves.
For sharp corners, hold the Alt key, click on an existing point, and adjust the handles separately.
Don’t forget to zoom in for more precise adjustments. Use the zoom technique for better control
Additionally, practicing with the curvature pen tool will improve your ability to create complex shape and achieve more accurate designs.
Combining Straight and Curved Lines
To combine straight and curved lines:
Start with a straight line by using the pen tool.
Click to place the first anchor point, then click again to draw straight lines.
Switch to the curvature pen tool to add curved lines from any point.
Add anchor points where you wish to transition from straight to curved or vice versa.
Manipulate the handles for desired curvature while keeping adjacent lines straight.
Practice combining these techniques for making a complex shape.
For more detailed editing, refer to essential tools like the Pen Tool to master both straight and curved lines. Understanding how to manipulate these lines with the Pen Tool allows for precise adjustments and enhancements in your design work.
Select the path with the direct selection tool to isolate points.
Click on an anchor point to move it or adjust its handles.
For deleting unnecessary points, right-click and select "Delete Anchor Point".
To add more control points, use the add anchor point tool and click on the path segment.
Adjusting the handles can fine-tune the curve without moving the entire point.
Zooming in can help with detailed adjustments for better precision.
Pro Tip: Use the brush tool to sketch a rough guide line in Photoshop before committing to the pen tool or the masking tool. It helps visualize the complex shape more easily.
How To Draw Straight Lines In Photoshop With Brush
Drawing straight lines in Photoshop might sound tricky, but it is quite simple with the brush tool.
I’ll guide you through each step to ensure clarity.
Step-by-Step Guide
Follow these steps to draw a straight line:
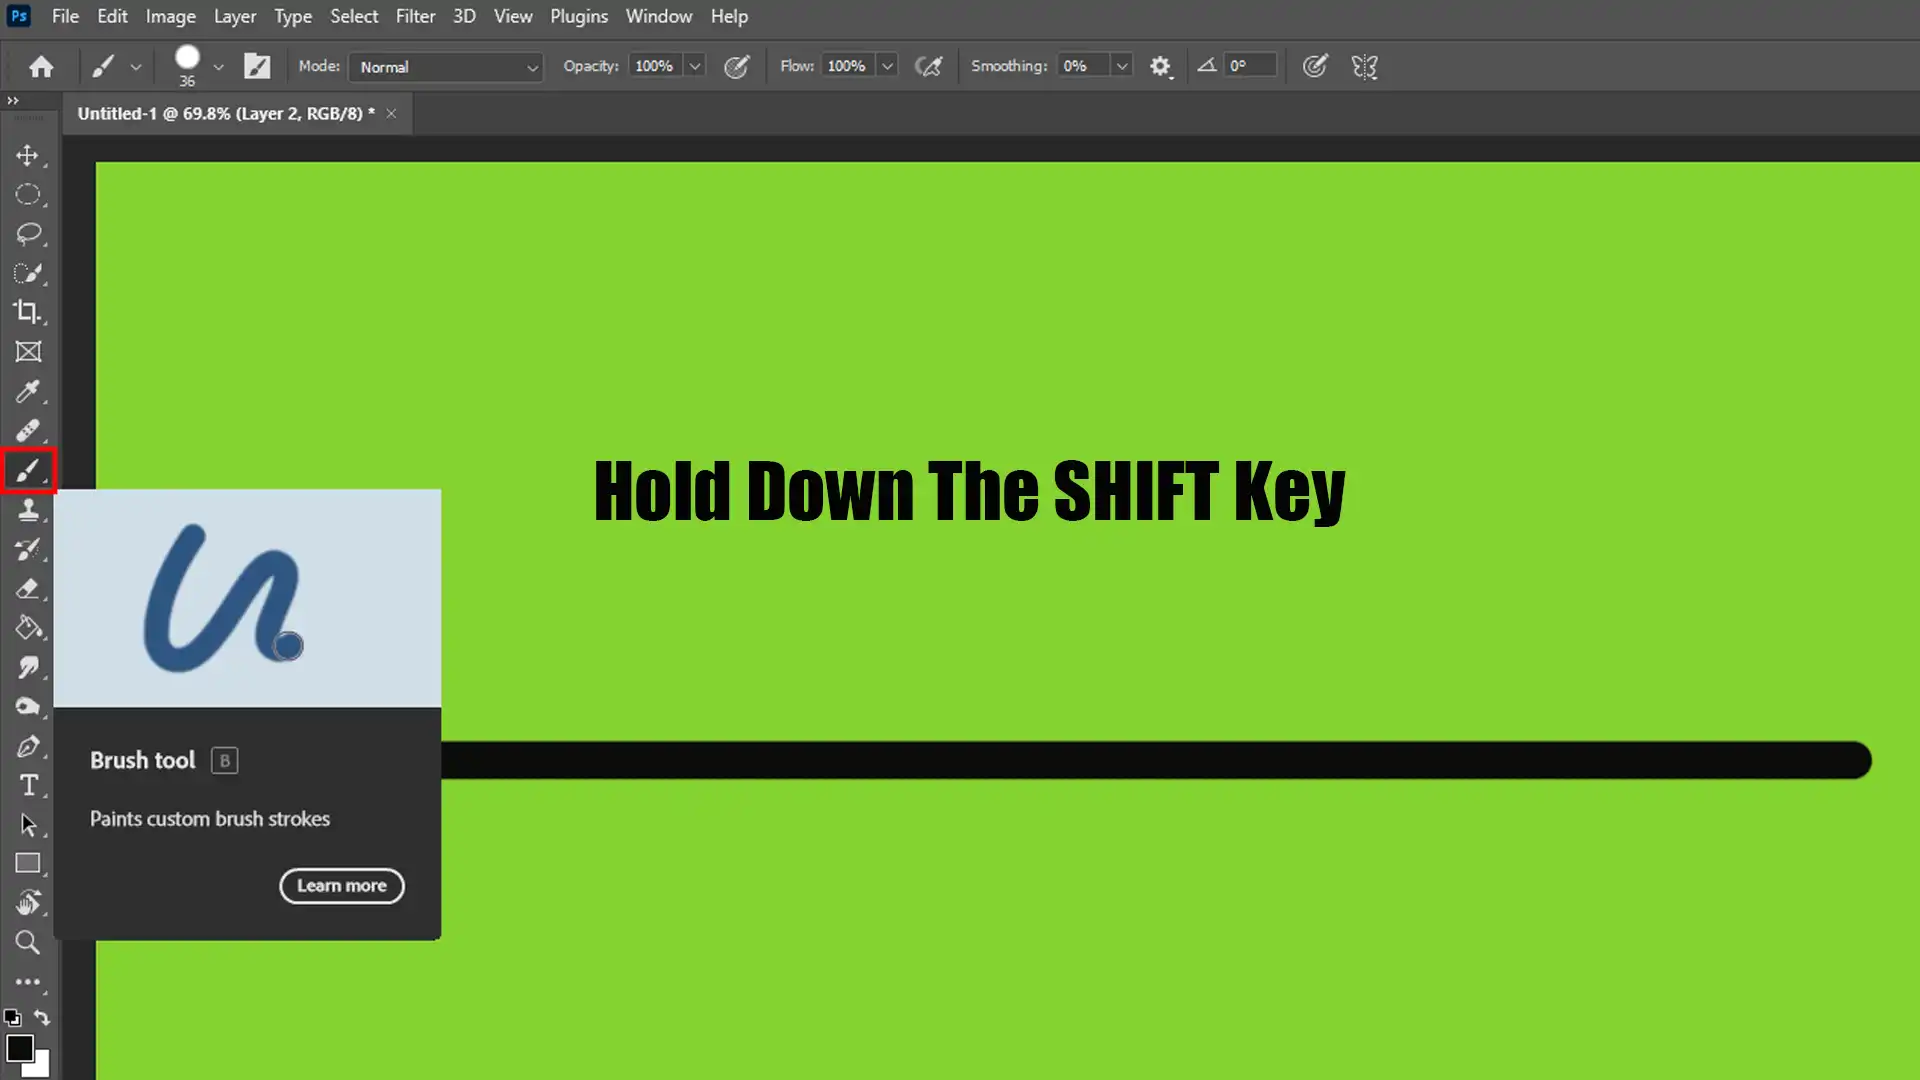
Open your Photoshop and select the brush tool.
Set the brush size and hardness according to your preference.
Click on the canvas and hold down the Shift key.
While holding Shift, click on the second point where you want your line to end. This method ensures a straight line every time.
Repeat the process for multiple straight lines. Just click and hold Shift for every new line segment.
If you make a mistake, simply undo with Ctrl + Z and try again.
Additional Tips
Remember the importance of Zoom for precise placement of your points. Zooming in helps you create the exact line you envision.
Pro Tip: If you need to draw many lines of equal spacing, consider using the line tool. It’s a handy alternative for creating uniform straight lines quickly.
Related Tools and Techniques
For more advanced editing, you might want to explore the Content-Aware Fill in Photoshop to seamlessly remove unwanted elements from your image or learn how to use the Patch Tool in Photoshop for spot corrections.
Additionally, understanding the difference between Photoshop and Lightroom can help you decide which software is best suited for your specific editing needs.
Practical Applications of Curved Lines
When we want to draw curved lines, Photoshop gives us several tools.
The pen tool and the curvature pen tool are particularly essential.
Feature
Curvature Pen Tool
Pen Tool
Curve Creation
Smooth and flowing curves
Sharp and controlled curves
Ease of Use
Ideal for continuous, natural curves
Better for precise and detailed paths
Complex Shapes
Easily handles complex shapes with fewer points
Requires more anchor points for complex designs
Flexibility
Adjusts curves with simple drag
Allows detailed adjustments with anchor points and handles
Click on the canvas to set your first point. Remember, a new curvature pen tool helps in making smooth curves.
Move to the second point, then click and drag to shape your curve.
For more advanced shapes, add a third point or even more. Each additional anchor creates intricate designs.
Practice makes perfect, so keep going back and adjusting.
Designing Logos and Icons
To design effective logos, use the pen tool in Photoshop.
Start by plotting your first point.
Then proceed to the second point. By dragging this point, you can create gentle curves or sharp corners.
A well-placed corner point changes the entire design’s look. You can generate clean, scalable logos this way.
Icons benefit too when you draw curved lines with the freeform pen tool.
It adds personality and uniqueness to the design. The pen tool provides precision, while the freeform pen tool offers flexibility.
Designing logos and icons involves selecting the right shapes and elements to create a strong visual identity.
When incorporating color images into your logo or icon design, choosing the appropriate color palette is crucial for conveying the right message and emotion
Enhancing Photos with Curved Lines
Curved lines in Photoshop enhance the beauty of your photos.
Use the curvature pen tool to make subtle or dramatic enhancements.
Draw your first point, then move to the second point. Each curve adds flow and movement.
It transforms a static photo into a dynamic image. Adjusting each anchor fine-tunes the effect.
These changes look natural and blend seamlessly. This technique brings an artistic touch to everyday photos. It’s a simple tweak but leaves a big impact.
Pro Tip: Zoom in when working on curved lines to ensure accurate placement. This small adjustment guarantees cleaner, more professional results.
For more tips on enhancing photos, check out how to use the Clone Stamp Tool for seamless edits.
Tips and Tricks for Drawing Smooth Curves in Photoshop
These tips and tricks for perfect curved lines will help you streamline your drawing process, avoid common mistakes, and enhance your precision for creating smooth, flowing curves.
Common Mistakes to Avoid
Here are some mistakes you should steer clear of:
Avoid clicking too fast: Take your time when using the pen tool. Rushing often leads to jagged lines. Clicking too quickly can make it more difficult to draw a smooth curved line in Photoshop.
Don't forget to adjust anchor points: Anchor points are key. Adjust them carefully to get the desired shape. Each anchor point controls a segment of your curved path.
Avoid adding too many points: Adding fewer points helps maintain the curve’s natural flow. Too many points can make lines in Photoshop look awkward and less smooth.
Speeding Up Your Workflow
Some easy ways to speed up your flow:
Utilize Snapping: Turn on snapping. It helps lines stay aligned with grids and guides, an essential feature when drawing.
Zoom In: Zoom in on intricate parts to ensure more precise adjustments when creating curved paths. This is one of the essential tools in Photoshop for achieving precision.
Use Fewer Points Initially: Start with fewer points. Add more as needed. This method maintains speed without sacrificing quality and helps control curved lines accurately.
Using Keyboard Shortcuts
Essential shortcuts for quick editing:
Switch Tools Quickly: Press 'P' to select the pen tool and 'Shift + P' to toggle between the pen tool and curvature pen tool. Mastering these Photoshop shortcuts can significantly enhance your efficiency.
Anchor Point Adjustment: Hold 'Ctrl' while clicking to adjust your anchor points quickly, allowing finer adjustments to curved paths.
Remove Points: Press 'Alt' while clicking an existing point to remove it from your line without affecting the overall shape.
Pro Tip: Experiment with both the pen tool and the curvature pen tool for different designs.
Start with a straight line in Photoshop and use the second anchor point to create gentle curves or corner points as needed.
Frequently Asked Questions
How to Draw Curve Lines in Photoshop?
To draw curve lines in Photoshop, you can follow these steps:
Open your Photoshop project and select the Pen Tool from the toolbar.
Click on the canvas to create the first anchor point of your curve.
Click again where you want the curve to end. Do not release the mouse button on the second click.
Drag the mouse to bend the line in Photoshop into a curve. Adjust the curve by moving the mouse until you're satisfied with its shape.
Release the mouse button to set the curve.
How to Draw a Curved Line?
Drawing a curved line in Photoshop is simple using the Curvature Pen Tool:
Select the Curvature Pen Tool from the toolbar or press Shift + ~.
Click on the canvas to place the first point.\n
Continue to click at different points along the path where you want the curve to change direction.
Photoshop will automatically create smooth curves between these points.
Adjust any point by clicking and dragging it to refine your curve.
Where is the Curvature Pen Tool in Photoshop?
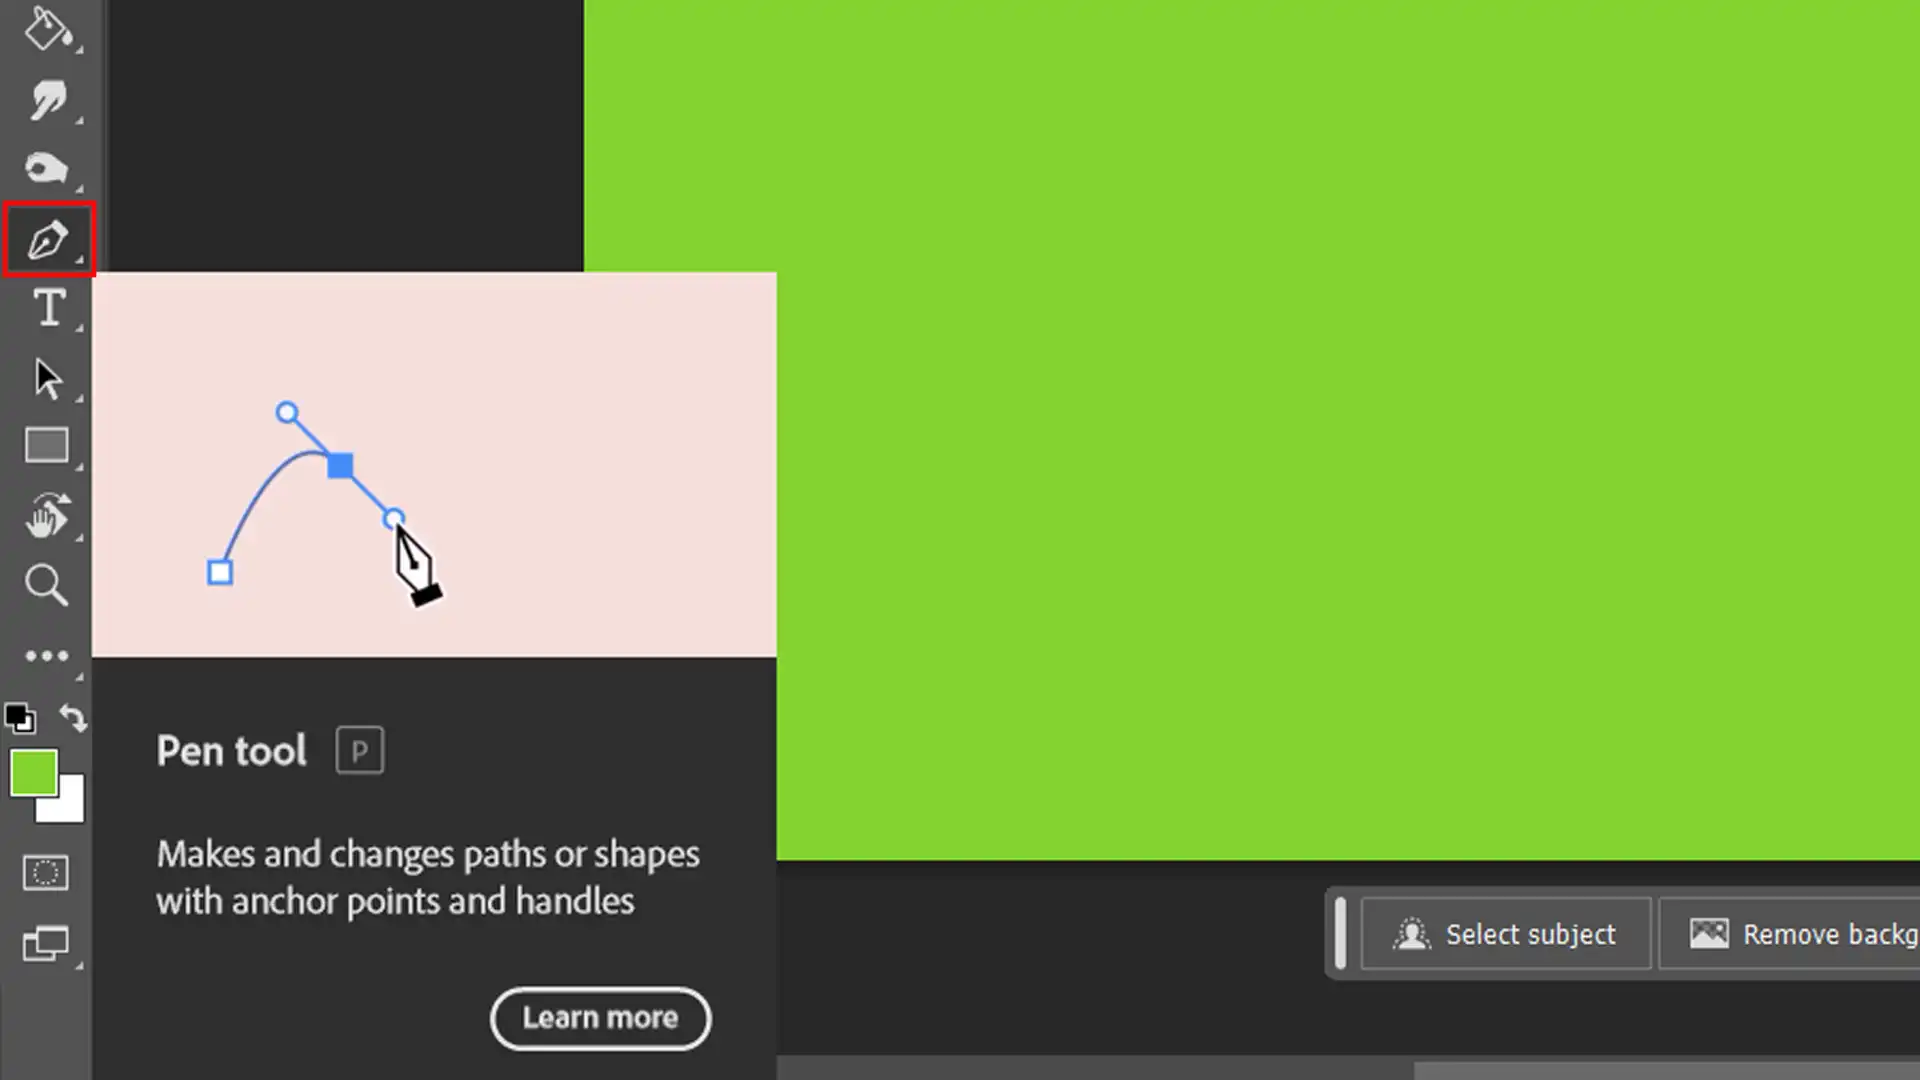
You can find the Curvature Pen Tool in Photoshop’s toolbar. It may be hidden under the standard Pen Tool.
Here’s how to access it:
Look for the Pen Tool icon in the toolbar, which resembles a fountain pen tip.
Click and hold on the Pen Tool icon to reveal the tool group.
Select the Curvature Pen Tool from the list that appears.
How Do You Draw an Arc in Photoshop?
To draw an arc in Photoshop, you can use the Ellipse Tool with some specific settings:
Select the Ellipse Tool from the toolbar or press U.
On the top options bar, change the mode from Shape to Path.
Click and drag on the canvas to draw an ellipse.
Without releasing the mouse, hold down the Alt key (Option on Mac) to draw from the center.
Use the Direct Selection Tool (A) to select and delete segments of the ellipse, leaving only the arc.
When it comes to drawing curved lines in Photoshop, mastering the basics can make a big difference in your design work.
I’ve found that practicing with tools like the Curvature Pen Tool and Pen Tool can help you create smooth and precise curves, whether you’re working on logos, icons, or photo enhancements.
Remember, patience is vital. Take your time to adjust anchor points and curves to get the best results.
For those looking to dive deeper, consider exploring more advanced techniques through our Photoshop Course and Lightroom Course.
These resources offer step-by-step guidance to enhance your skills further.
Also, check out the latest versions of Photoshop and Lightroom on Adobe’s Photoshop and Lightroom for the best tools and updates.
Happy editing!
If this article has helped you, then Like and Share it with your friends
$2,061.00Original price was: $2,061.00.$1,061.00Current price is: $1,061.00. 27584
Download Your Free Guide Now!
Discover the secrets of photography with our printable guide! Master essential techniques like aperture, shutter speed, and ISO to create stunning images. Get your free printable PDF now and start turning your snapshots into masterpieces!