Are you looking to add watermark Lightroom Classic to protect your photos or brand your work?
You’re in the right place! As a photographer, I understand the importance of safeguarding your images while maintaining a professional look.
In this guide, I’ll walk you through the process step-by-step, ensuring that your photos not only remain secure but also exude a polished appearance.
By the end of this article, you’ll have the knowledge and confidence to effortlessly add watermarks in Lightroom Classic, keeping your creative work safe and stylish.
Let’s dive in and elevate your photo protection game!
Table of Contents
Preface to Watermarking in Lightroom Classic
Why Add Watermarks?

You want to add a watermark in Lightroom Classic to protect your photos. Watermarks help prevent unauthorized use. Imagine sharing your work online, a watermark ensures credit returns to you.
It also adds value to your images. Many photographers watermark photos as a standard practice.
Benefits of Watermarking Your Photos
Watermarking offers practical benefits:
- Prevents unauthorized use.
- Reinforces your brand identity.
- Makes your work recognizable.
Adding watermarks builds trust. Clients see your watermark and recognize quality. It’s a small step with big impacts.
How to Add a Watermark in Lightroom Classic
In Lightroom, adding a watermark is simple:
- Open Lightroom and go to the "Library Module".
- Select the image or several images you want to watermark.
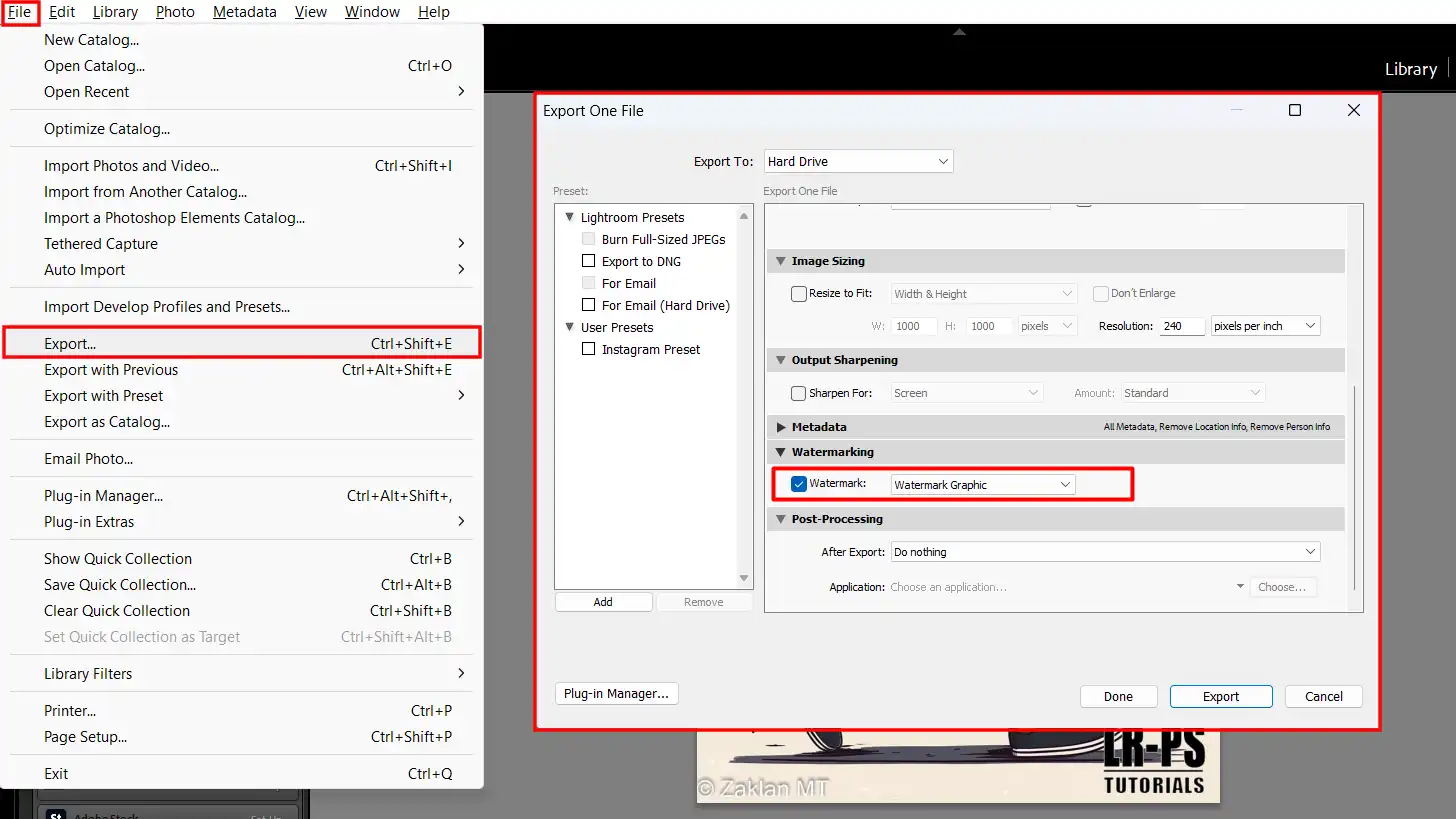
- Click “Export” to open the export window.
- In the export window, scroll down to the "Watermarking" section.
- Check the "Watermark" box.
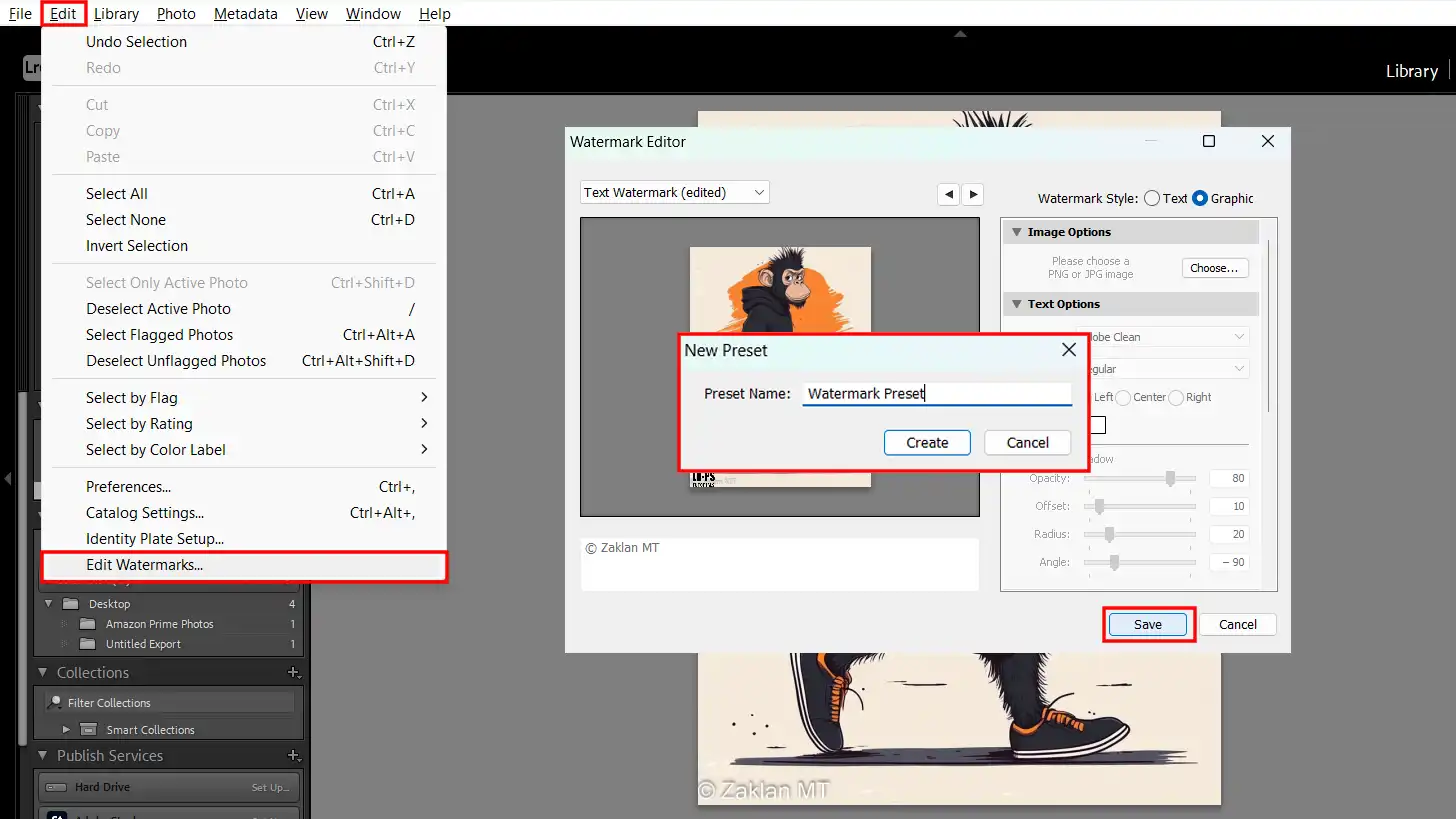
- Choose "Edit Watermarks" to enter the watermark editor.
Customizing Your Watermark
You want your watermark to be unique.
Here’s how:
- In the watermark editor, you can use both text and graphic watermark.
- For a text watermark, type your text in the box provided.
- Change the font, color, and size to match your style.
- For a graphic watermark, upload a transparent PNG file. Position it on the image where it looks best.
- Adjust your watermark's opacity to make it subtle yet visible.
- Save your customization as a new preset for future use.
Using Watermark Preset

Watermark preset simplify your workflow. Once you’ve created your watermark preset, you can apply it consistently:
- When exporting, select your saved watermark preset.
- You can create multiple watermark preset for different purposes. For example, have one for client images and another for social media posts.
Exporting Watermarked Images
Here’s a streamlined export process:
- In the export window, review all settings.
- Ensure your watermark preset is selected.
- Choose your export settings like JPEG format, export location, and any additional metadata.
- Hit "Export" to complete the process with your watermark in place.
Pro Tip: Keep your watermark simple and non-intrusive. Too large, and it distracts from the photo. Too small, and it’s easily ignored.
That’s it. Now you know how to add a watermark in Lightroom Classic and Photoshop!
How to Add Watermark in Lightroom Classic
Adding watermarks to your photos ensures they remain credited to you and avoid unauthorized use.
Today, we’re discussing how to add a watermark in Lightroom , perfect for protecting and branding your work.
Step-by-Step Guide to Adding Watermarks
- First, open Lightroom and navigate to the "Library Module".
- Select the images you want to watermark.
- Once selected, right-click and choose “Export” to open the export window.
- Scroll down until you find the "Watermarking" section.
- Check the "Watermark" box, then click “Edit Watermarks” to enter the watermark designer.
Choosing the Right Watermark Style

Choosing the correct watermark style is essential. You can select a text watermark or a graphic design watermark based on your needs:
- Text Watermark: Typically involves typing your name or logo and customizing its appearance.
- Graphic Watermark: Uses a logo or symbol with a transparent background.
Customizing Your Watermark
Customizing allows your watermark to be uniquely yours. In the watermark designer, you can:
- Adjust fonts, colors, and transparency for text watermarks.
- For graphic watermark customization, upload your PNG file with a transparent background and position it appropriately on the image.
- Play around with opacity to balance visibility without distraction.
Save your settings as an “export preset” for future ease.
Adding watermarks doesn’t have to be complicated. With Lightroom intuitive tools, marking your images is a breeze.
Understanding the differences between Photoshop and Lightroom is key for effective photo editing. For tasks like adding a watermark in Lightroom Classic, Lightroom offers a streamlined approach.
Pro Tip: Keep your watermark simple yet effective, it should enhance, not crowd your photo.
For more advanced editing, consider using Photoshop for tasks like removing shadows or adding texture to your images.
Creating and Using Watermark Presets
A watermark template preset is a pre-configured setting that you can use to easily add a watermark in Lightroom to any of your photos.
Rather than tweaking the settings for every single image, you create a preset, saving you time and effort. It’s about working smarter, not harder. Once set, you apply it to all the photos you want to protect.
How to Create a Watermark Preset
To create a watermark template preset in Lightroom, follow these steps:
- Open Lightroom and move to the Library Module.
- Select the images you want to add a watermark to.
- Right-click and select “Export” to open the export settings window.
- Scroll down until you find the "Watermarking" section. Check the box named "Watermark".
- Click “Edit Watermarks” to open the watermark editor.
- You have options: create a text watermark or use a graphic design watermark. Adjust fonts, colors, transparency if you opt for text, upload a PNG file for a graphic design watermark.
- Customize the position and opacity of the watermark to ensure it's visible yet not distracting.
- Save this configuration as an "export preset" for future use.
Creating a preset is simple but effective. The effort you invest in will save you a lot of time over multiple uses.
Applying Watermark Presets to Your Photos
With your new watermark preset ready, here’s how to apply it:
- Select your desired images in the Library Module.
- Right-click and choose "Export" again.
- In the "Export" dialog, find the "Watermarking" section.
- Select the preset you created from the dropdown menu.
- Finish the export procedure by clicking on the “Export” button.
And voila! You now have your images adequately watermarked, protecting your work from unauthorized use. If you’re editing tons of pictures, this step is a game changer.
Pro Tip: Always keep your watermarks subtle. Overly dominant watermarks can distract from the beauty of your images. An ideal watermark balances visibility and discretion.
For more tips on how to optimize your workflow, check out our articles on Lightroom Shortcuts and Essential Tools in Lightroom.
Editing and Customizing Watermarks
Watermarks serve a crucial role in protecting the integrity of your images. To modify watermarks in Lightroom Classic, you first need to navigate to your Library Module.
Select the images you wish to watermark and proceed to the export settings. Within the Export screen, you’ll see a “Watermark” box that you must check. This step opens up the watermark editing options.
Here, you can choose between text or graphic watermark. A text watermark allows you to input custom text, adjust font, size, color, and opacity.
For a graphic watermark, you can import an image file, adjust its placement, and scale to fit your photos perfectly. Save your configuration as an “export preset” for future use. This way, you’ll streamline your workflow each time you add watermarks to your images.
Advanced Customization Options
For those looking to add a personal touch or more sophisticated effects, Lightroom provides advanced customization options.
You can control the opacity, size, alignment, and inset of your watermark using sliders. Also, via the “Effects” settings, you can add shadows to make your text or graphic stand out against any background.
Whether you choose a subtle or bold watermark, these settings ensure your mark fits seamlessly into your image.
You can create different watermarks for various types of images. A landscape photo might require a different watermark configuration compared to a portrait shot.
Experimenting with these settings will help you find the most effective way to protect and brand your work.
Tips for Effective Watermark Design
Creating an effective watermark in Lightroom involves balancing visibility and subtlety.
Here are some tips:
- Keep Your Watermark Simple: A complex design can distract viewers from the main image.
- Placement is Key: Position your watermark in a place where it’s visible but not intrusive. Bottom corners or sides work well.
- Adjust Opacity: Lowering the opacity ensures the watermark doesn't overpower your image.
- Consistent Branding: Use the same watermark for all professional works to maintain a cohesive brand identity.
- Test on Various Images: Ensure your watermark looks good on different types of photos and lighting conditions.
When you add a watermark layer to your images, remember that consistency and subtlety often work best for viewer engagement.
Pro Tip: Always double-check your watermark’s positioning and visibility after exporting to ensure it meets your expectations. This prevents the hassle of having to re-export images.
Using Graphic Watermarks
A graphic watermark is an image or logo added to your photos to protect them from unauthorized use. It helps ensure that your ownership remains visible, even when the pictures are shared online.
How to Create a Graphic Watermark
To create a graphic watermark, follow these steps:
- Design your logo or watermark using design software like Photoshop.
- Save it in a high-resolution, transparent format like PNG.
- Open Lightroom and go to the Library Module.
- Import your watermark image.
- Customize the placement, opacity, and size to your preference.
Applying Graphic Watermarks to Your Photos
Once your watermark is ready, it’s time to apply it:
- Select the images you want to watermark.
- Go to the Export settings.
- Check the "Watermark" box to open watermark options.
- Choose your graphic watermark from the dropdown menu.
Make sure to adjust the position and size carefully. Consistency in watermarking helps maintain a professional look.
Always double-check the final output after exporting your images in JPEG format.
Creating a photo grid is essential for organizing and presenting your images effectively. When you’re applying graphic watermarks to your photos, a well-structured grid helps ensure your watermark is consistently placed across multiple images.
This method not only protects your work but also maintains a cohesive look.
Pro Tip: Keep your watermark subtle yet recognizable. Overpowering watermarks can distract viewers.
For more detailed guidance on photo editing, consider exploring articles on how to use lens correction in Lightroom or learning about essential tools in Photoshop.
Export Settings for Watermarked Photos
To export your watermarked photos, first, you need to get the export configurations right.
| Aspect | Overview |
|---|---|
| Understanding Your Drone’s Camera and Settings | Learn about key camera settings like ISO, shutter speed, aperture, white balance, and picture profile/color mode to enhance image quality. |
| Flight and Safety Precautions | Conduct pre-flight checks, practice basic maneuvers, and understand no-fly zones to ensure safety and compliance. |
| Essential Add-Ons for Enhanced Photography | Utilize accessories like ND filters, extra batteries, and carrying cases to improve the photography experience. |
| Creative Techniques and Composition | Explore different angles and composition techniques to capture unique and visually interesting shots. |
| Advanced Flying Techniques | Develop skills in advanced flying maneuvers such as orbiting, revealing, and tilt-revealing to create dynamic footage. |
| Editing and Post-Processing | Use color correction, cropping, and HDR processing to refine images and bring out their best qualities. |
| Staying Current with Regulations | Stay informed about FAA guidelines and local laws to ensure legal and safe drone operation. |
Begin by selecting your images in Lightroom. Head to the File menu and click on Export. This action will open the Export dialog box.
Steps to Configure Export Settings

- Choose a destination folder for your exported files.
- Select the preferred image format (e.g., JPEG format).
- In the File Settings section, ensure Image Format is set to JPEG.
- Go to the Watermarking section and check the box that says "Watermark".
- Select your watermark from the preset list or create a new one by clicking Edit Watermarks.
Recommended Export Configurations:
- Set Quality to 80%. This balances file size and quality.
- Check the box for resizing to ensure consistency in photo dimensions.
- Choose the appropriate Output Sharpening settings. Generally, Screen is best.
Best Practices for Exporting Watermarked Photos
Every time you add a watermark in Lightroom, keep it subtle. Your goal is to protect, not distract.
Use these best practices:
- Maintain a consistent placement. Usually, the bottom-right corner works well.
- Adjust opacity to ensure the watermark is visible but not overpowering.
- Consider the legal implications. Watermarking may deter unauthorized use but won’t replace copyrights.
To give your pictures a more polished look using Lightroom presets, you might want to adjust the Develop Module settings before exporting.
Troubleshooting Export Issues
Troubleshooting? No problem. Experiencing hiccups during exporting can be frustrating.
Here are some common issues and their solutions:
- Incorrect File Format: Ensure the image format is set to JPEG. Converting your image to JPG format can help maintain compatibility with various platforms.
- Watermarks Not Appearing: Confirm that the watermark option is enabled in the Export dialog.
- Resolution Issues: Double-check the resize options to maintain photo quality.
If you’re having trouble with watermarks, revisit the watermark designer to make sure everything is set correctly.
One handy tip before we part ways: Always preview your watermarked images before finalizing the export process. This ensures everything looks just right!
When searching for one of the best Lightroom training options, consider how it covers Lightroom Classic.
A comprehensive training course can help you master this tool effectively.
Check out our top-rated course to boost your skills and make the most of Lightroom Classic.
Frequently Asked Questions

How do I add a watermark to my photos in Lightroom Classic?
- Open Lightroom and go to the 'Export' dialog.
- Find the 'Watermarking' section and check the box to enable watermarking.
- Click on the drop-down menu to choose a preset or create a new watermark.
- Adjust the settings according to your preferences, including the watermark's position, opacity, and size.
- After customizing, hit 'Save' to apply the watermark to your photos upon export.
Where are Lightroom Classic watermarks stored?
- Watermarks in Lightroom are stored as part of the Lightroom catalog settings.
- They are located in the Watermark Designer under the 'Edit Watermarks' option.
- You can access and manage your saved watermarks from this editor anytime.
How do I make a transparent watermark in Lightroom?
- Open the Watermark Designer in Lightroom.
- Select or create the watermark you want to use.
- Adjust the 'Opacity' slider to make the watermark more transparent.
- Preview the changes and adjust until you achieve the desired level of transparency.
- Save the settings to apply the transparent watermark to your images.
Can you put a logo in Lightroom?
- Yes, you can add a logo as a watermark in Lightroom.
- In the Watermark Editor, choose the option to create a new watermark and select 'Graphic'.
- Upload your logo file, and it will be added as a watermark.
- Adjust the size, position, and opacity to fit your needs.
- Save your settings to use the logo as a watermark on your photos.
Conclusion
In conclusion, adding a watermark in Lightroom Classic is a simple yet powerful way to protect and brand your photos. From my own experience, using Lightroom’s built-in tools makes it easy to ensure your watermark is added consistently across all your images.
If you want to dive deeper into both Lightroom and Photoshop, check out my Lightroom course and Photoshop course.
They offer practical tips and techniques that can enhance your photo editing skills.
For more details about Lightroom and Photoshop, visit Adobe’s Photoshop and Adobe’s Lightroom.
Both tools have unique features that can help you create and protect your visual content effectively.
Happy Watermarking!
Read more about Photoshop:


