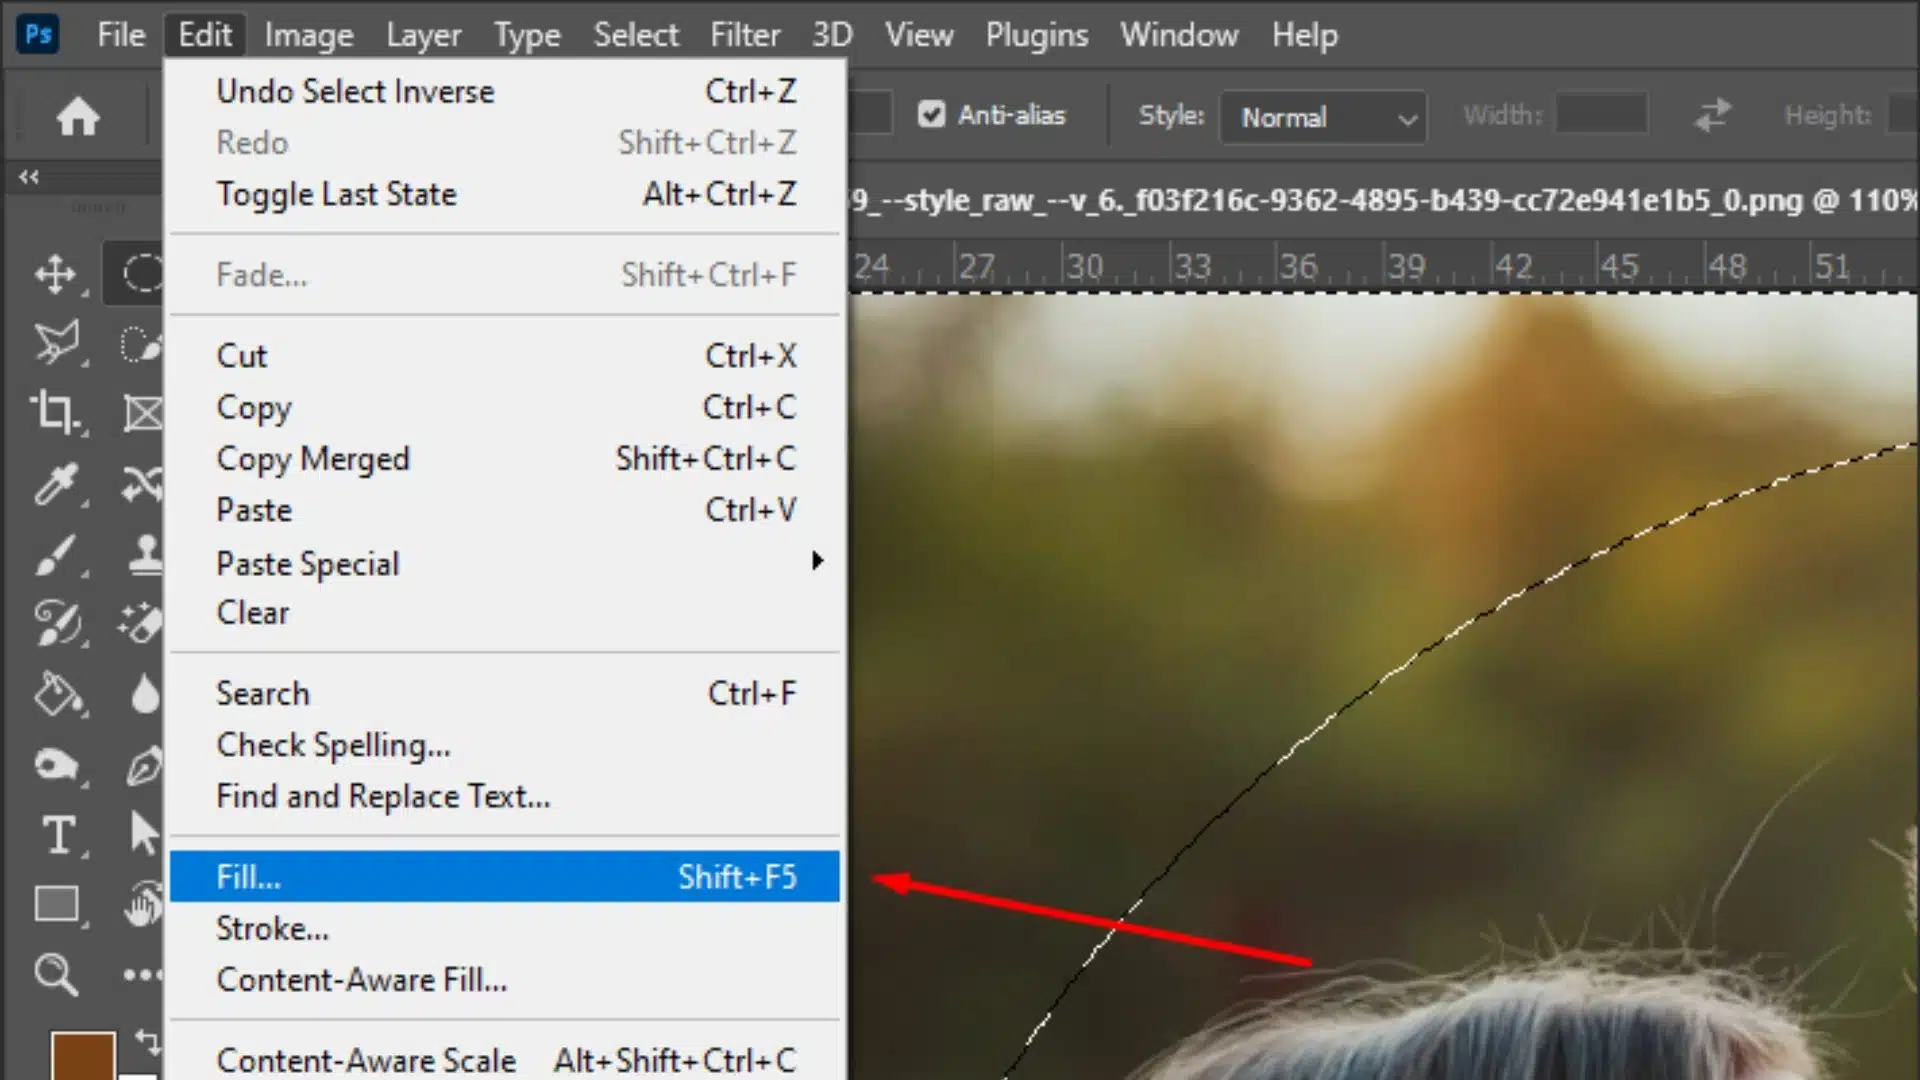
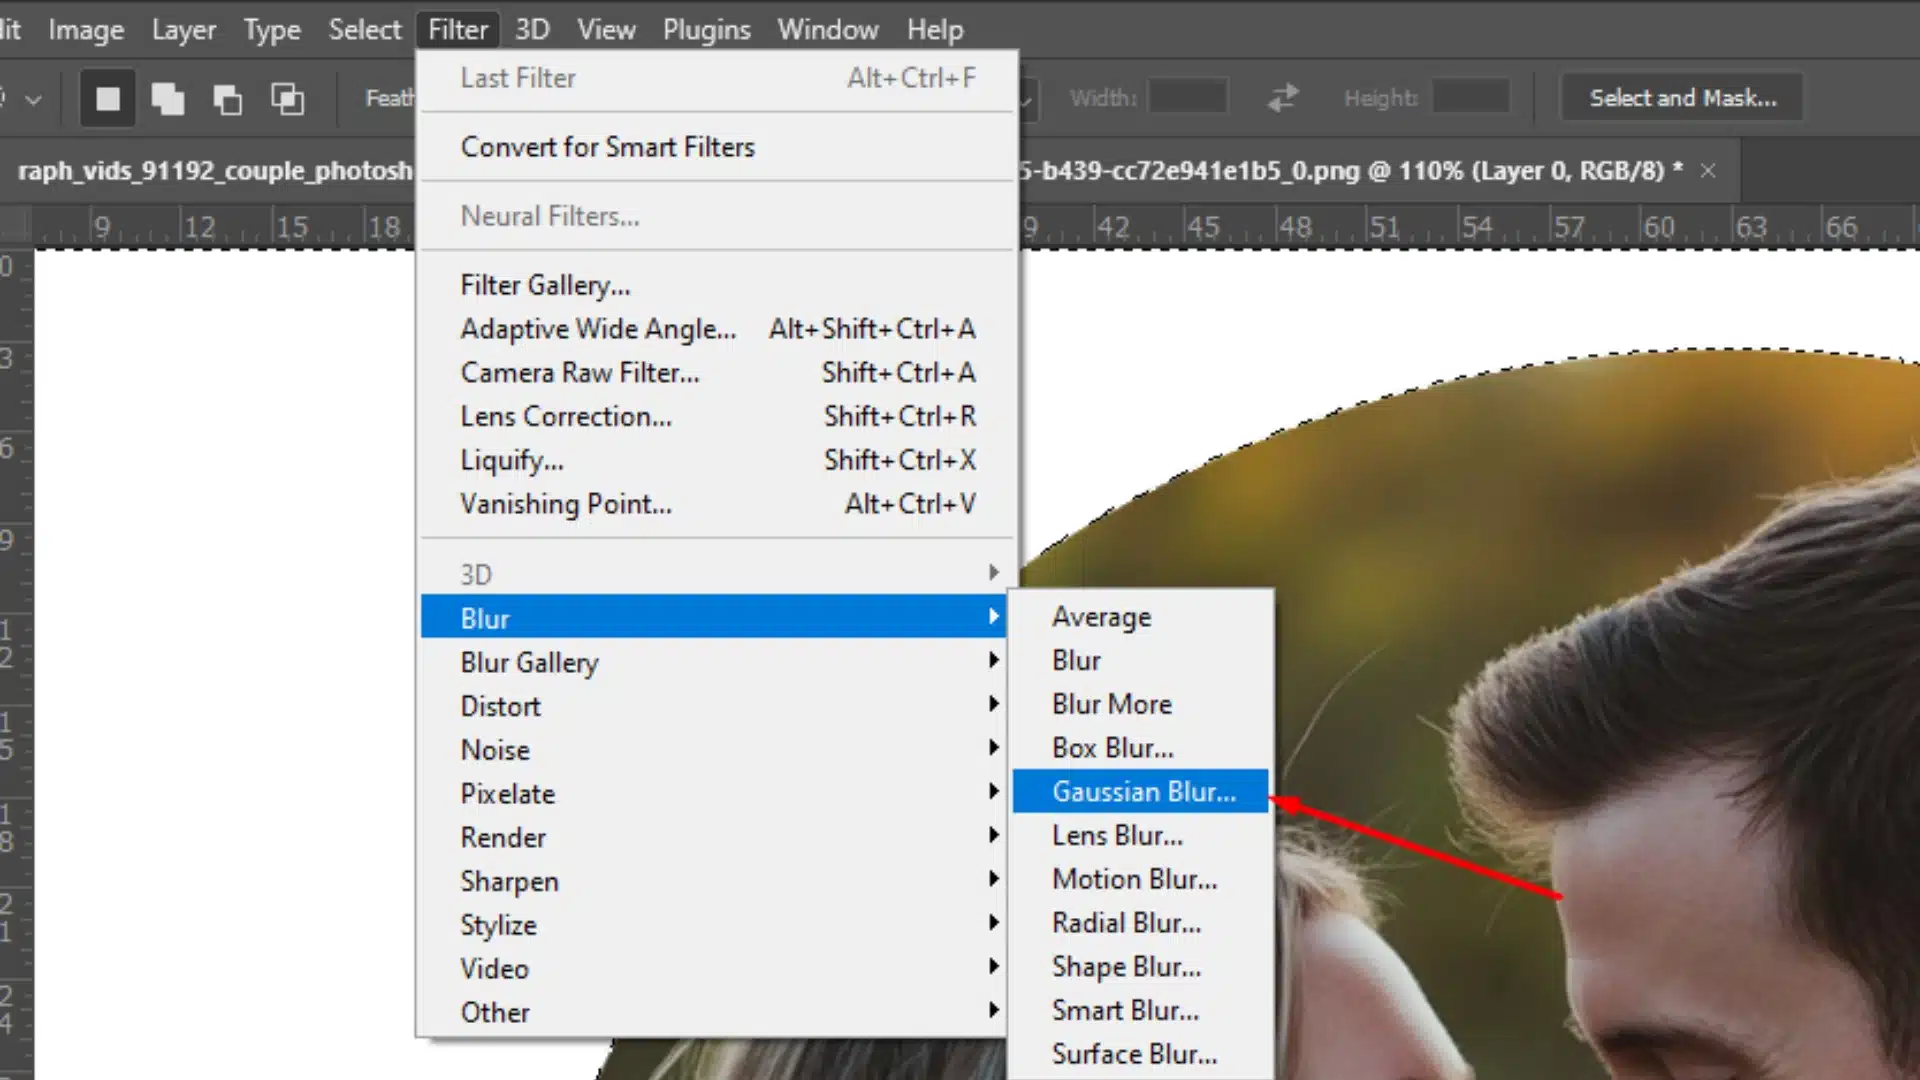
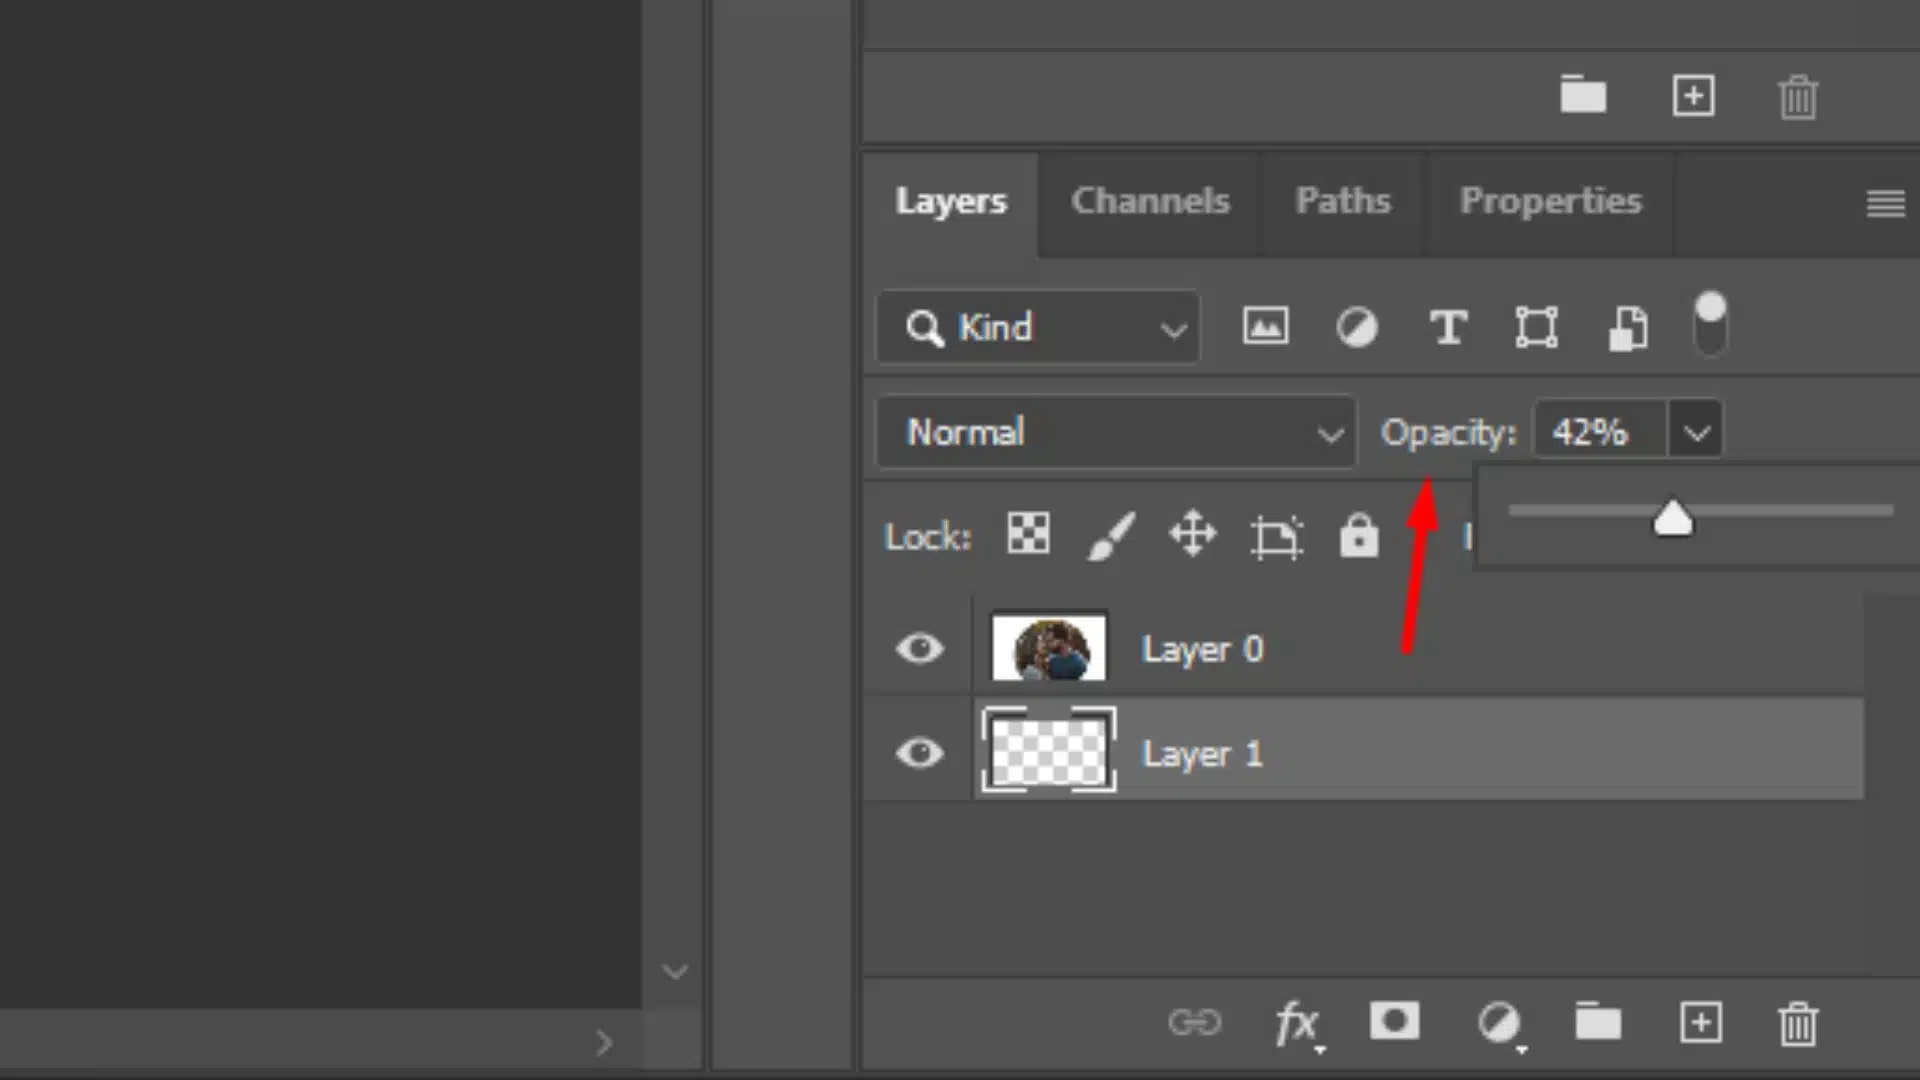
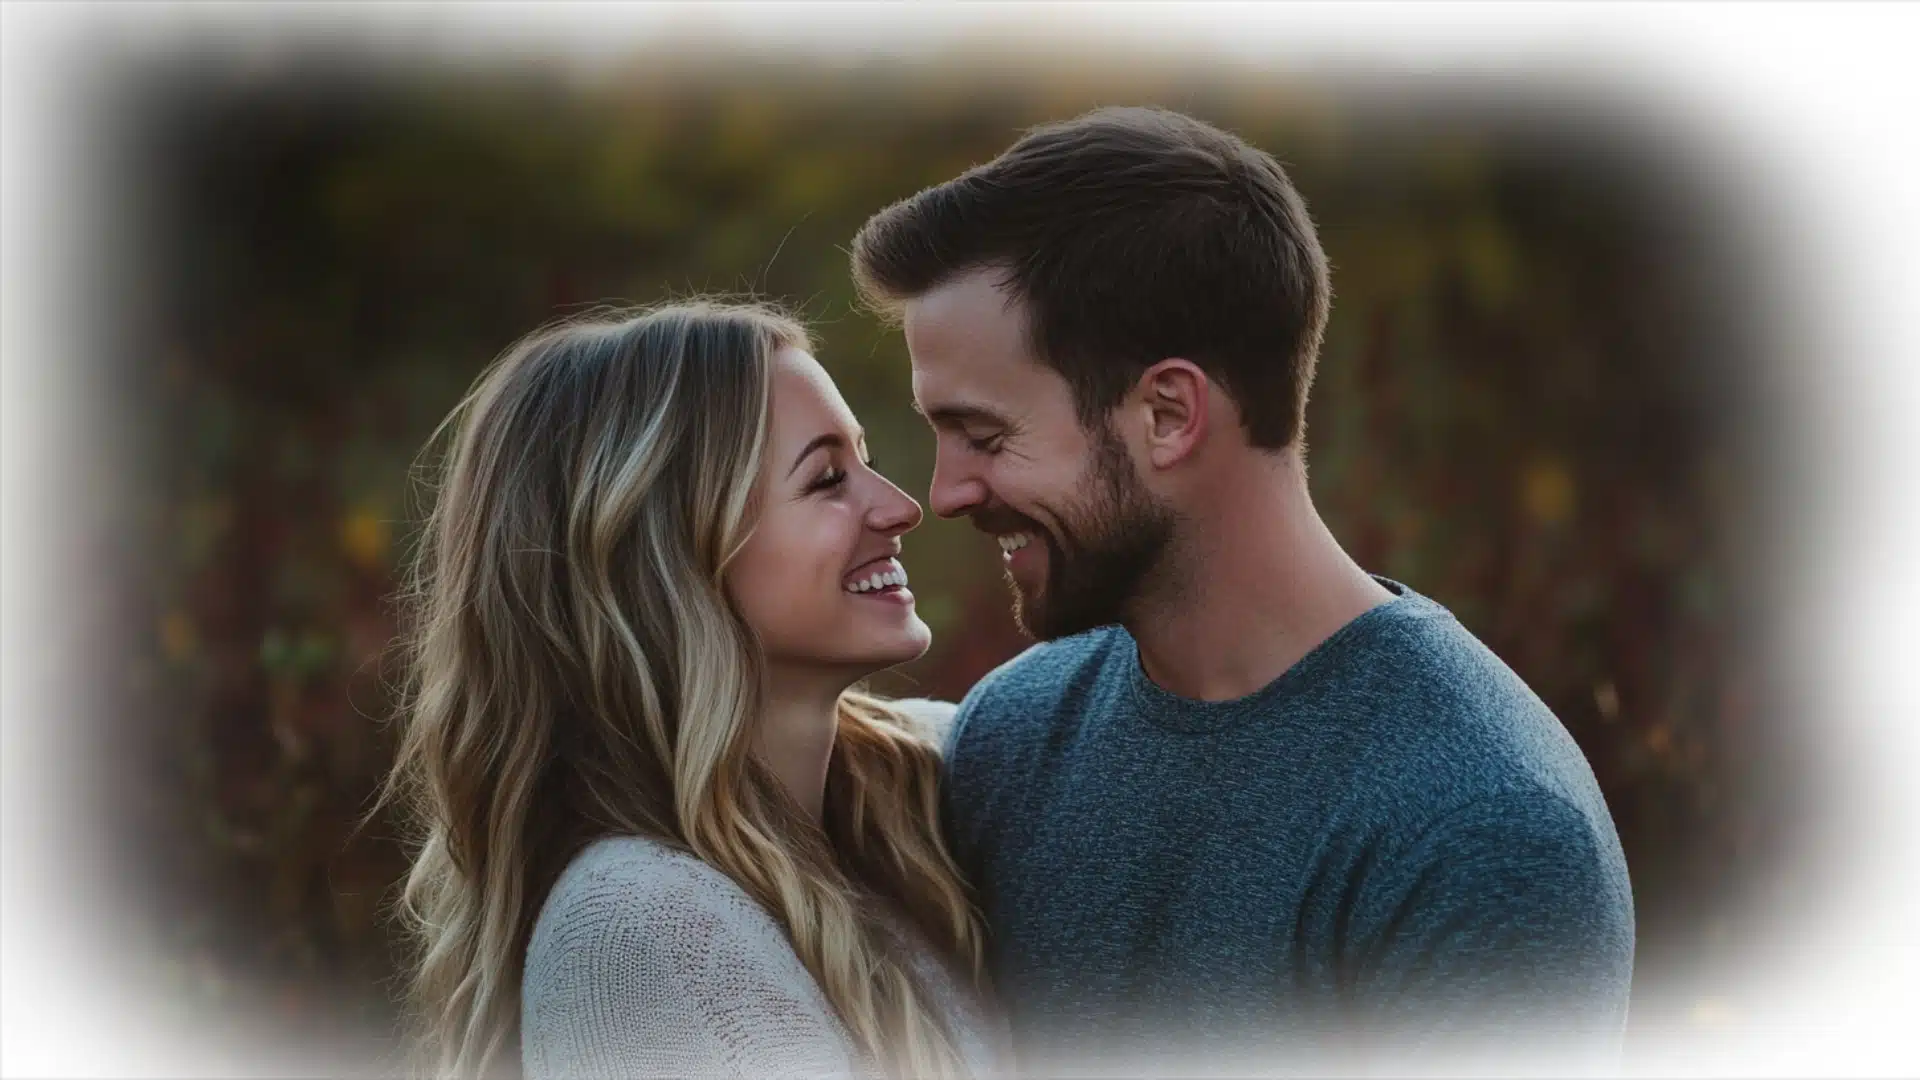
White Vignette in Photoshop to Enhance Your Photos

A white vignette in Photoshop is a great way to enhance photos by softly brightening the edges of an image. This effect naturally draws the viewer’s eye to the center, highlighting the subject and creating a clean, professional look. It’s a popular technique among photographers for adding a subtle touch of charm.

This article will guide you on how to create a white vignette in Photoshop, step-by-step. It covers the best methods, and tips. Let’s explore how a well-executed white vignette can transform an ordinary photo into a stunning visual masterpiece.

Table of Contents

Why Use a White Vignette in Photoshop?

A white vignette enhances photos by softly brightening the edges and drawing focus to thecentral point, highlighting the main subject. This simple yet effective technique adds a polished look, particularly beneficial for portrait editing, wedding photos, and product pictures. The vignette effect directs the viewer’s eye naturally to the most important part of the picture, ensuring a clean and professional finish.

Benefits of a White Vignette:

Using this vignette effect in Adobe Photoshop can easily add sophistication to your pictures, making them stand out in any setting. It’s a versatile technique that enhances photos by drawing attention of viewer where it matters most.

How to Create a White Vignette in Photoshop: Step-by-Step Guide

Adding a white vignette in Photoshop is simple and can add a professional touch to any image. It helps draw the viewers attention to the main subject by softly brightening the edges. Follow these steps to easily add a white vignette to your photos.

1. Upload the Image

A smiling couple in an outdoor setting being edited in Photoshop with the workspace visible.

2. Create a New Layer

Screenshot of the Layers Panel in Photoshop showing how to create a layer by clicking the plus icon.

3. Select the Elliptical Marquee Tool

Screenshot of Photoshop showing how to select the Elliptical Marquee Tool from the Tools Panel.

4. Invert the Selection

Screenshot of Photoshop showing how to invert a selection using the Select > Inverse option from the menu.

5. Add a White Vignette

Screenshot of Photoshop showing how to add a white vignette using the Fill option from the Edit menu.

6. Fine Tune with Gaussian Blur

Screenshot of Photoshop showing how to apply Gaussian Blur to a White Vignette in Photoshop.

7. Adjust Opacity

Screenshot of Photoshop showing how to adjust the opacity of the vignette layer in the Layers Panel.

Tips for Creating the Perfect White Vignette:

This method lets you add a professional touch to your pictures while keeping the editing process simple and flexible. It’s an easy way to improve your photographs and draw the attention of viewers to the most important parts of your photo.

Best Techniques for Adjusting a White Vignette in Photoshop

Adjusting a white vignette in photoshop is crucial for making sure the effect looks natural and well-blended. With the right techniques, you can control how much the vignette influences your photo and how it directs the attention of viewers to the most important elements. This guide will walk through the best techniques to modify this vignette effect in Photoshop.

Using the Vignette Filter for Quick Adjustments

The vignette filter in Photoshop offers a fast and easy way to create and tweak a vignette effect. Here’s how to use it:

Upload Your Image

Start by uploading the photo into Photoshop and ensuring it’s fully visible in your workspace.

Access the Vignette Filter

Go to Filter > Lens Correction from the top menu. In the panel that opens, you’ll find the vignette sliders under the “Custom” tab.

Adjust the Amount and Midpoint

The Amount slider controls the intensity of the vignette. Move it right to brighten the edges or left to darken them. The Midpoint slider adjusts how far the vignette effect reaches into the image. Move it left for a larger vignette, and right for a smaller, more focused one.

This method is quick and effective, but it offers limited customization. It’s ideal for photographs that need only a small touch of drama or mood enhancement. For a more polished look, don’t forget to consider the white balance in photography. It can significantly impact the feel of your photographs.

Fine-Tuning with Layer Mask Adjustments

For more control over the vignette, adjusting through layers provides flexibility and non-destructive editing. Here’s how:

Create a New Layer

Add a layer by going to Layers Panel and clicking “Create New Layer.” This allows you to work non-destructively and modify the vignette effect separately from the original image.

Select the Elliptical Marquee Tool

Use the Elliptical Marquee Tool from the Tools Panel to select the area around the main part of your image. The Marquee Tool in Photoshop is key for making precise selections.

Fill with White and Invert Selection

Go to Edit > Fill and choose white as the color. Then, invert the selection (Ctrl + Shift + I on Windows, Cmd + Shift + I on Mac) to make sure the vignette applies only to the outer edges of your image.

Apply Gaussian Blur for Smoother Edges

Go to Filter > Blur > Gaussian Blur. Adjust the slider to smooth out the edges of the vignette, making it blend naturally with the photo.

Adjust Opacity and Masking

Lower the opacity in the Layers Panel to fine-tune the intensity of the vignette. You can also paint on the mask with a soft brush to further customize where the vignette appears or fades.

Experimenting with Colors for Custom Effects

A white vignette doesn’t always have to be just white. You can experiment with subtle shades to match the background or overall tone of your design. This approach helps to add depth and create a more cohesive look.

Create a Color Fill Layer

Go to Layer > New Fill Layer > Solid Color and choose a soft tone like light gray or off-white. This adds a slight tint to the vignette.

Apply Masking and Gaussian Blur

As before, use the mask and blur tools to adjust how the colored vignette blends into the background.

By fine-tuning the vignette using these techniques, you can create an effect that suits a wide range of images, from wedding photography to commercial product photography. With these techniques, you can add professional-level adjustments to your images and make sure the vignette effect enhances rather than overwhelms the picture.

When to Use a White Vignette in Photography

A white vignette can be a powerful tool to enhance images, but knowing when to apply it is crucial. This subtle brightening around the edges draws the attention to the most important part of the picture. Below are the ideal situations for using a white vignette, supported by real-life examples and explanations.

Ideal Scenarios for White Vignettes

Enhancing Portraits

White vignettes work beautifully in portrait photography. By adding brightness around the subject, the vignette makes the face or figure stand out, while gently fading the surrounding elements into the backdrop.

Product Photography

In product photography, a white vignette can give the image a clean and polished look. It separates the product from the background, helping potential customers to scroll through graphics with a clear view of the item.

Example: A cosmetic bottle on a clean white background can benefit from a vignette, which directs attention to the product while still maintaining the overall clean and professional appearance.

Minimalist Designs

Minimalism is all about simplicity, and a white vignette can be a subtle way to enhance that simplicity in your design. It keeps the focus on key elements, without overwhelming the picture with too much contrast or color.

When to Avoid White Vignettes

White vignettes are not always appropriate for every image. Here’s when it’s best to avoid them:

High-Contrast Images

If your photo has a lot of contrast, a white vignette may be too overpowering and detract from the overall design. Darker images with bold tones don’t always blend well with a bright vignette.

Nature and Landscape Photography

For outdoor or nature shots, a white vignette might not match the color palette of the scene. These types of graphics often have natural tones that may not blend well with a bright vignette.

Knowing when and how to use a white vignette ensures that it enhances your graphics without overwhelming them. Achieving the right white balance is essential for a cohesive and appealing photograph.

White Vignette vs. Dark Vignette in Photoshop

Feature White Vignette Dark Vignette
Purpose Softly brightens the edges to create a clean, polished look. Adds a sense of depth by darkening the corners.
Best for Portraits, product shots, minimalist designs. Nature photography, moody or dramatic scenes.
Impact on Viewer Creates a light, airy feel, perfect for highlighting subjects. Directs viewer’s attention to the subject through shadows.
Effect on Mood Gives the image a soft, uplifting atmosphere. Adds drama and depth, often used in storytelling.
Color Used White or light shades. Black or dark tones.
Editing Tools Free to use in most editing software or apps. Available through most editing apps and tools.
Ease of Adjustment Simple to fine-tune using brightness and opacity sliders. Easy to adjust by controlling the darkness level.

To apply a white vignette in Photoshop, start by uploading the image you want to edit. Select the Elliptical Marquee Tool to create a selection around the part of the image you want to keep in focus. Invert the selection so that the outer edges are selected. Fill the selection with white, then apply a Gaussian Blur to soften the transition between the vignette and the image.

White and dark vignettes have their strengths, and choosing the right one depends on the mood and effect you want to create.

Frequently Asked Questions

Photoshop-Masterclass-Advanced-Editing-Layer-Manipulation

When to use a white vignette?

A white vignette is best used when you want to soften the edges of a photo and keep the viewer’s attention on the main part of the image. It works well in portrait photography, product shots, and light, airy compositions. White vignettes are also ideal for achieving a clean, polished look, especially for pictures where you want to highlight the subject without making the image feel heavy or dramatic.

How to get a white vignette?

To add a white vignette, you can use photo editing tools like Photoshop. Most editing apps and software have a vignette effect option in their filters or adjustments. You can modify this effect to lighten the edges instead of darkening them. Some apps may have a free download option for specific vignette presets that include white vignettes.

What is a vignette in photo editing?

In photo editing, a vignette is an effect that gently darkens or brightens the corners or edges of an image, helping to draw attention to the center or the important part of the photo. Vignettes are often used to add a soft, subtle border that blends into the rest of the image, enhancing the overall composition in photography and making the viewer focus on the subject.

How do I put a white vignette in Photoshop?

To apply a white vignette in Photoshop, start by uploading the image you want to edit. Select the Elliptical Marquee Tool to create a selection around the part of the image you want to keep in focus. Invert the selection so that the outer edges are selected. Fill the selection with white, then apply a Gaussian Blur to soften the transition between the vignette and the image.

Conclusion

Using a white vignette in Photoshop to soften distracting edges and highlight the main subject in a shot.
Using a white vignette in Photoshop has often helped me improve my photos by softening distracting edges and drawing focus to the main elements. While editing a product shot, the white vignette allowed me to maintain a clean, professional look while ensuring that the product stood out.

If you want to learn how to apply these techniques and much more, check out our Photoshop Course and Lightroom Course.

If “White Vignette in Photoshop to Enhance Your Photos” article has helped you, then Like and Share it with your friends

Facebook
Twitter
LinkedIn
Pinterest

Have a nice photoshoot!

Read more about: Photo Editing with Lightroom and Photoshop

Download Your Free Guide Now!

Discover the secrets of photography with our printable guide! Master essential techniques like aperture, shutter speed, and ISO to create stunning images. Get your free printable PDF now and start turning your snapshots into masterpieces!