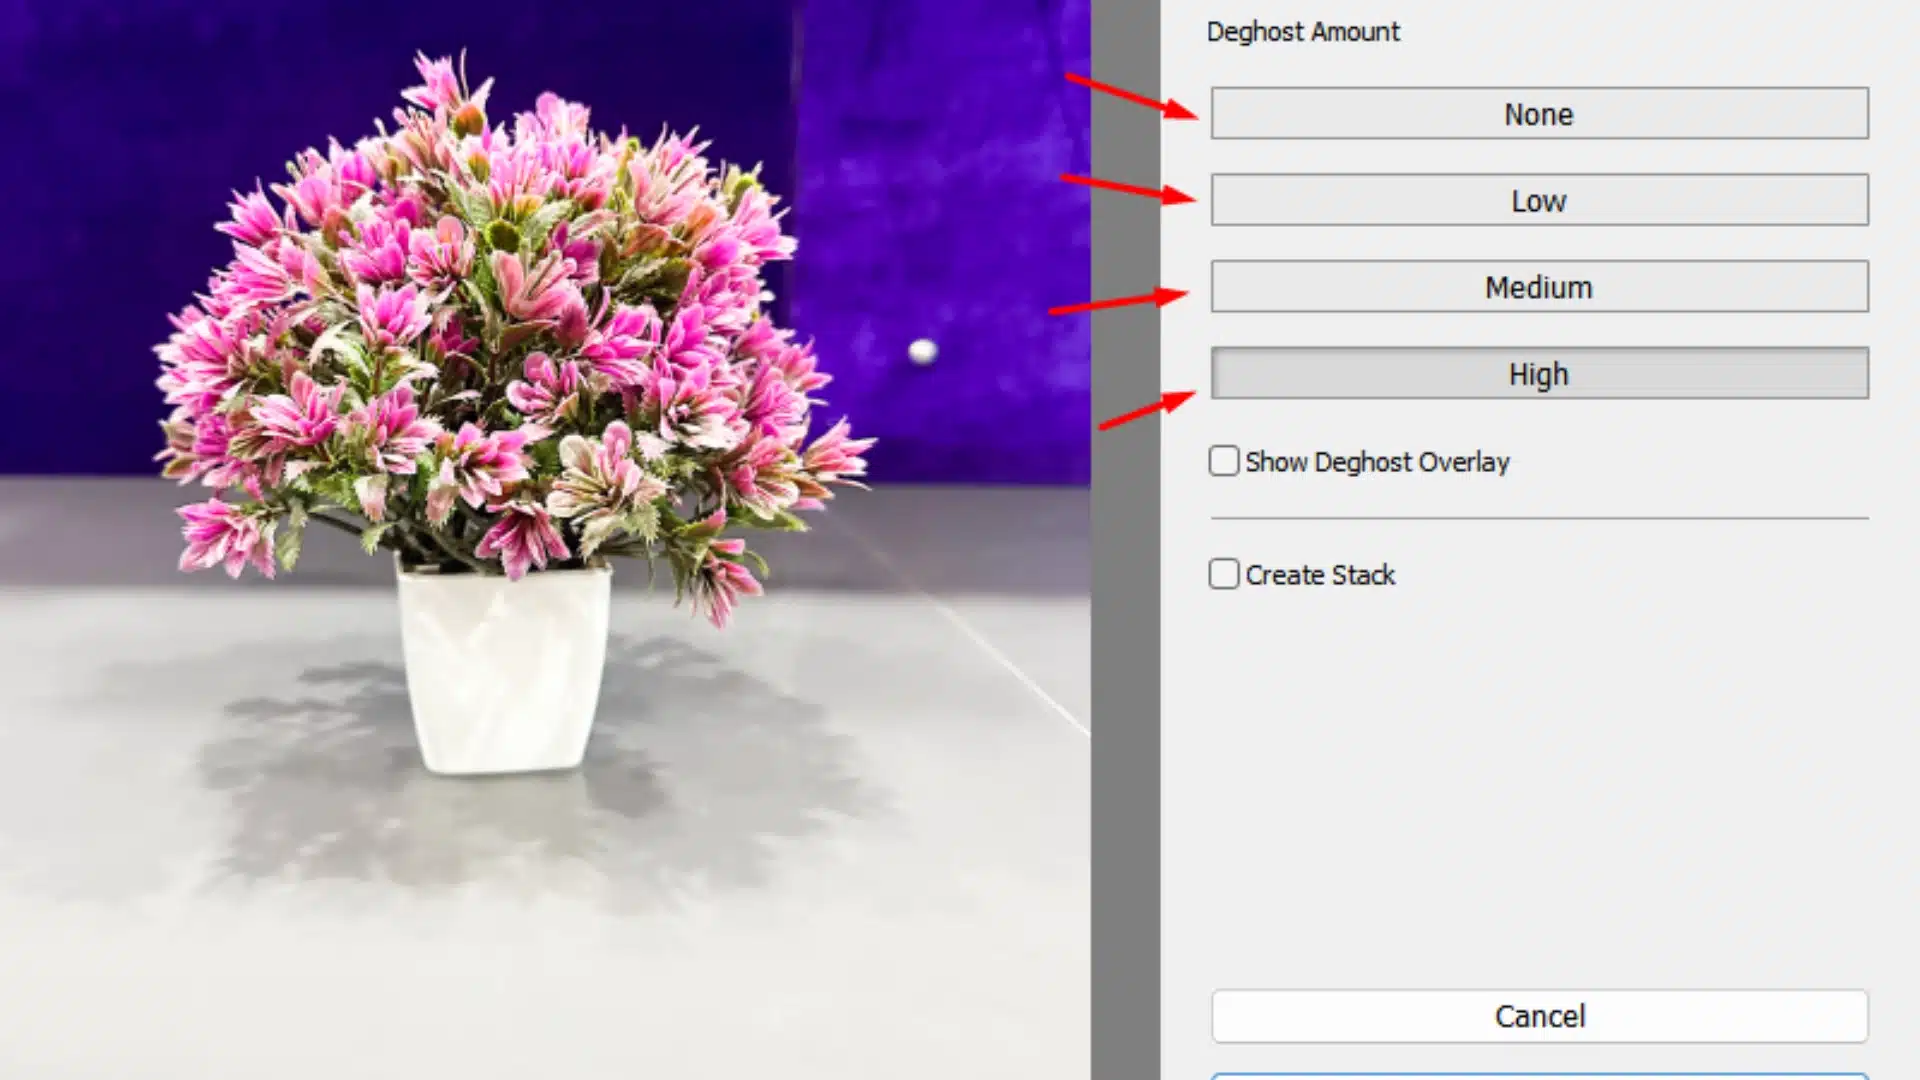
What Is Deghost in Lightroom? Tips for Achieving Flawless Images

As a photographer, you know the struggle of capturing flawless images in dynamic settings. One common issue is dealing with moving subjects or fluctuating light conditions, which can lead to unwanted ghosting effects in your photos. Thankfully, Adobe Lightroom provides a solution through its Photo Merge feature. But what is Deghost in Lightroom?

In this blog, I’ll explain what Deghosting is and how it works. This technique will enhance your images by eliminating pesky ghosting artifacts. Whether you’re a seasoned pro or a hobbyist eager to refine your photo editing skills, understanding this tool can enhance your final images. Let’s dive into the details!

Table of Contents

Understanding Deghosting in Lightroom: What Is It and How Does It Work?

What Is Deghosting in Lightroom?

Deghosting is a critical feature in Lightroom’s HDR photo merge. It helps photographers eliminate unwanted artifacts, known as “ghosts,” that appear due to movement between multiple exposures. When merging photos in HDR photography, these elements may appear multiple times or become blurred in the image. This can lead to noticeable motion blur in lightroom. Deghosting effectively reduces or eliminates these unwanted effects, resulting in a natural-looking HDR image.

How Deghosting Works

When you use Lightroom to merge HDR images, the deghosting feature compares the bracketed exposures to identify areas where movement occurred. Instead of combining all exposures, Lightroom selects a single exposure for those areas to eliminate the ghosting effect. The software allows you to choose from different deghosting levels: Low, Medium, and High. Your choice depends on the amount of movement detected between the exposures.

Key Steps in Using Deghosting:

Practical Tips for Effective Deghosting

TipAction/AdviceResult
Select the Right Deghosting IntensityStart with the Low setting. If ghosting persists, gradually increase to Medium or High. Be cautious, as higher settings can introduce artifacts.Achieves a natural-looking HDR photo with minimal ghosting.
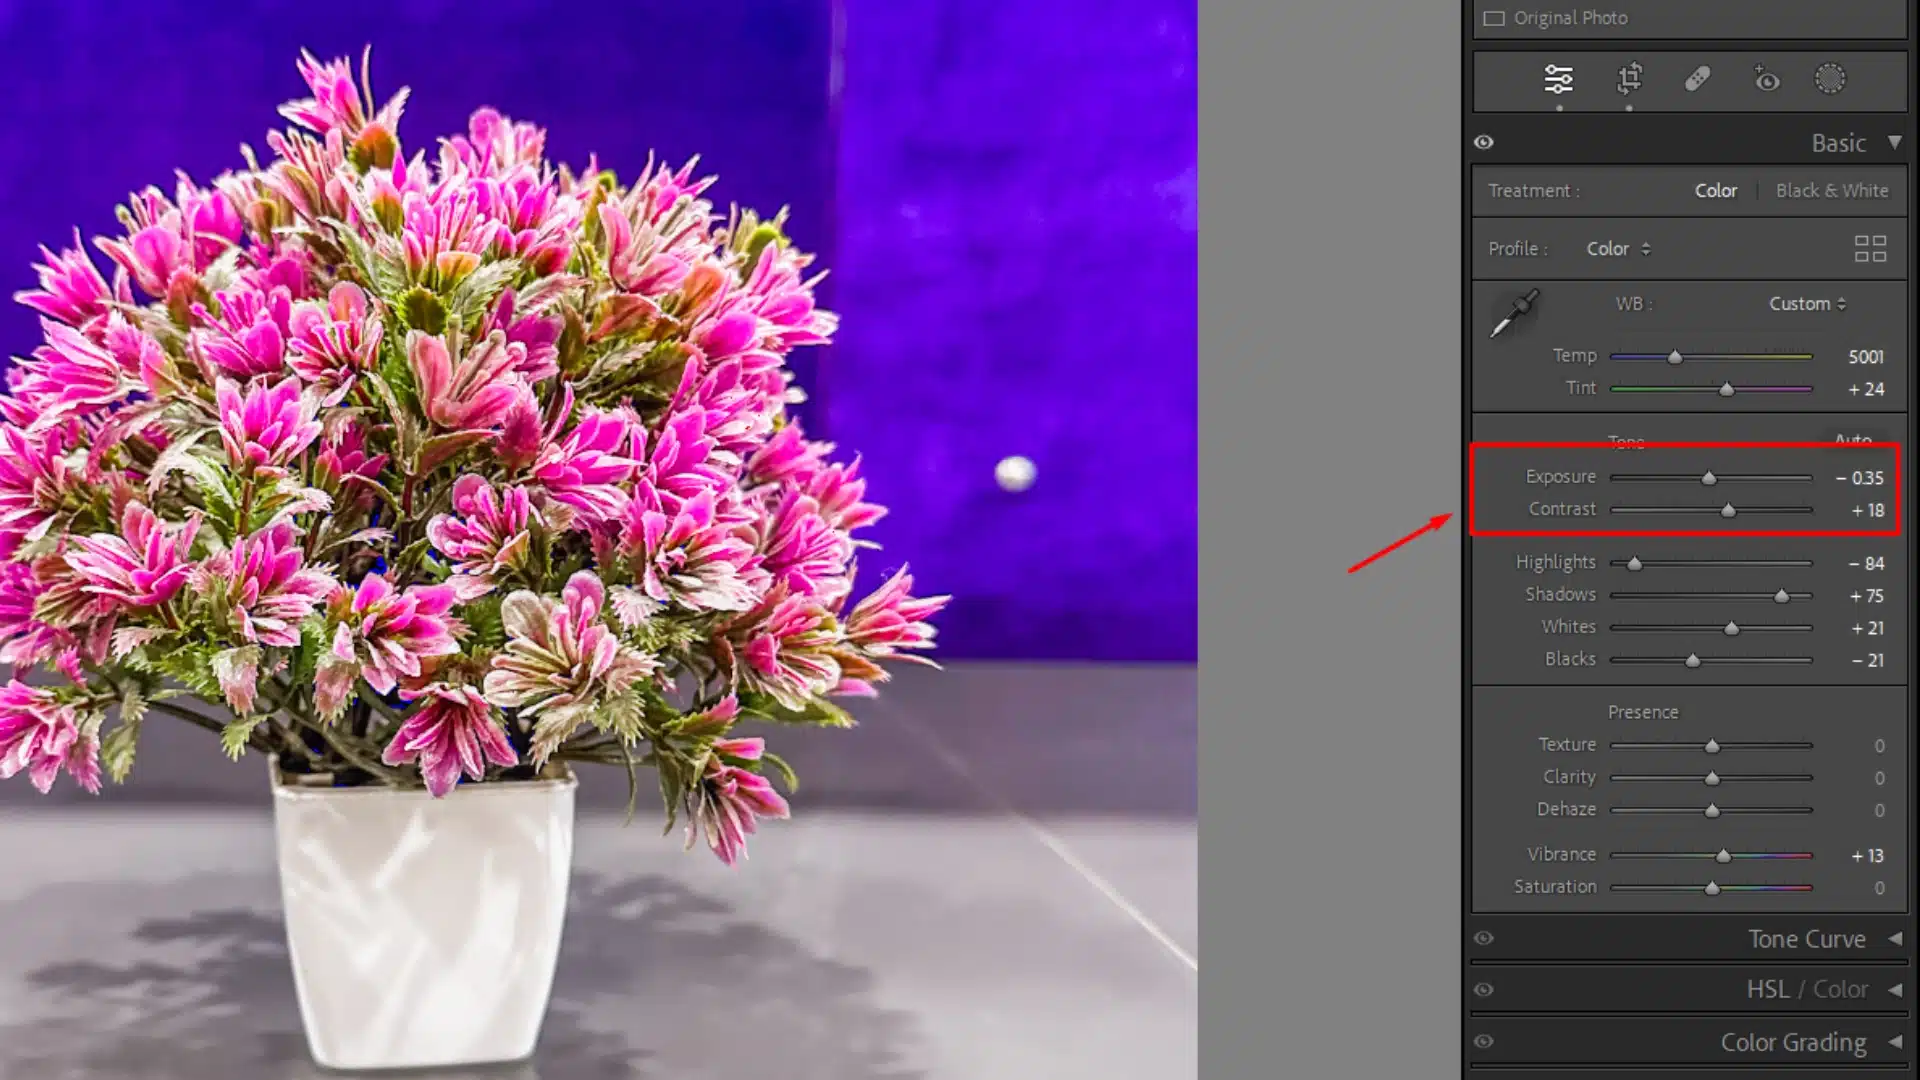
Examine Final HDR PhotoAfter merging, carefully review the image, focusing on areas with movement and shadow edges for residual ghosting.Ensures ghosting artifacts are eliminated effectively.
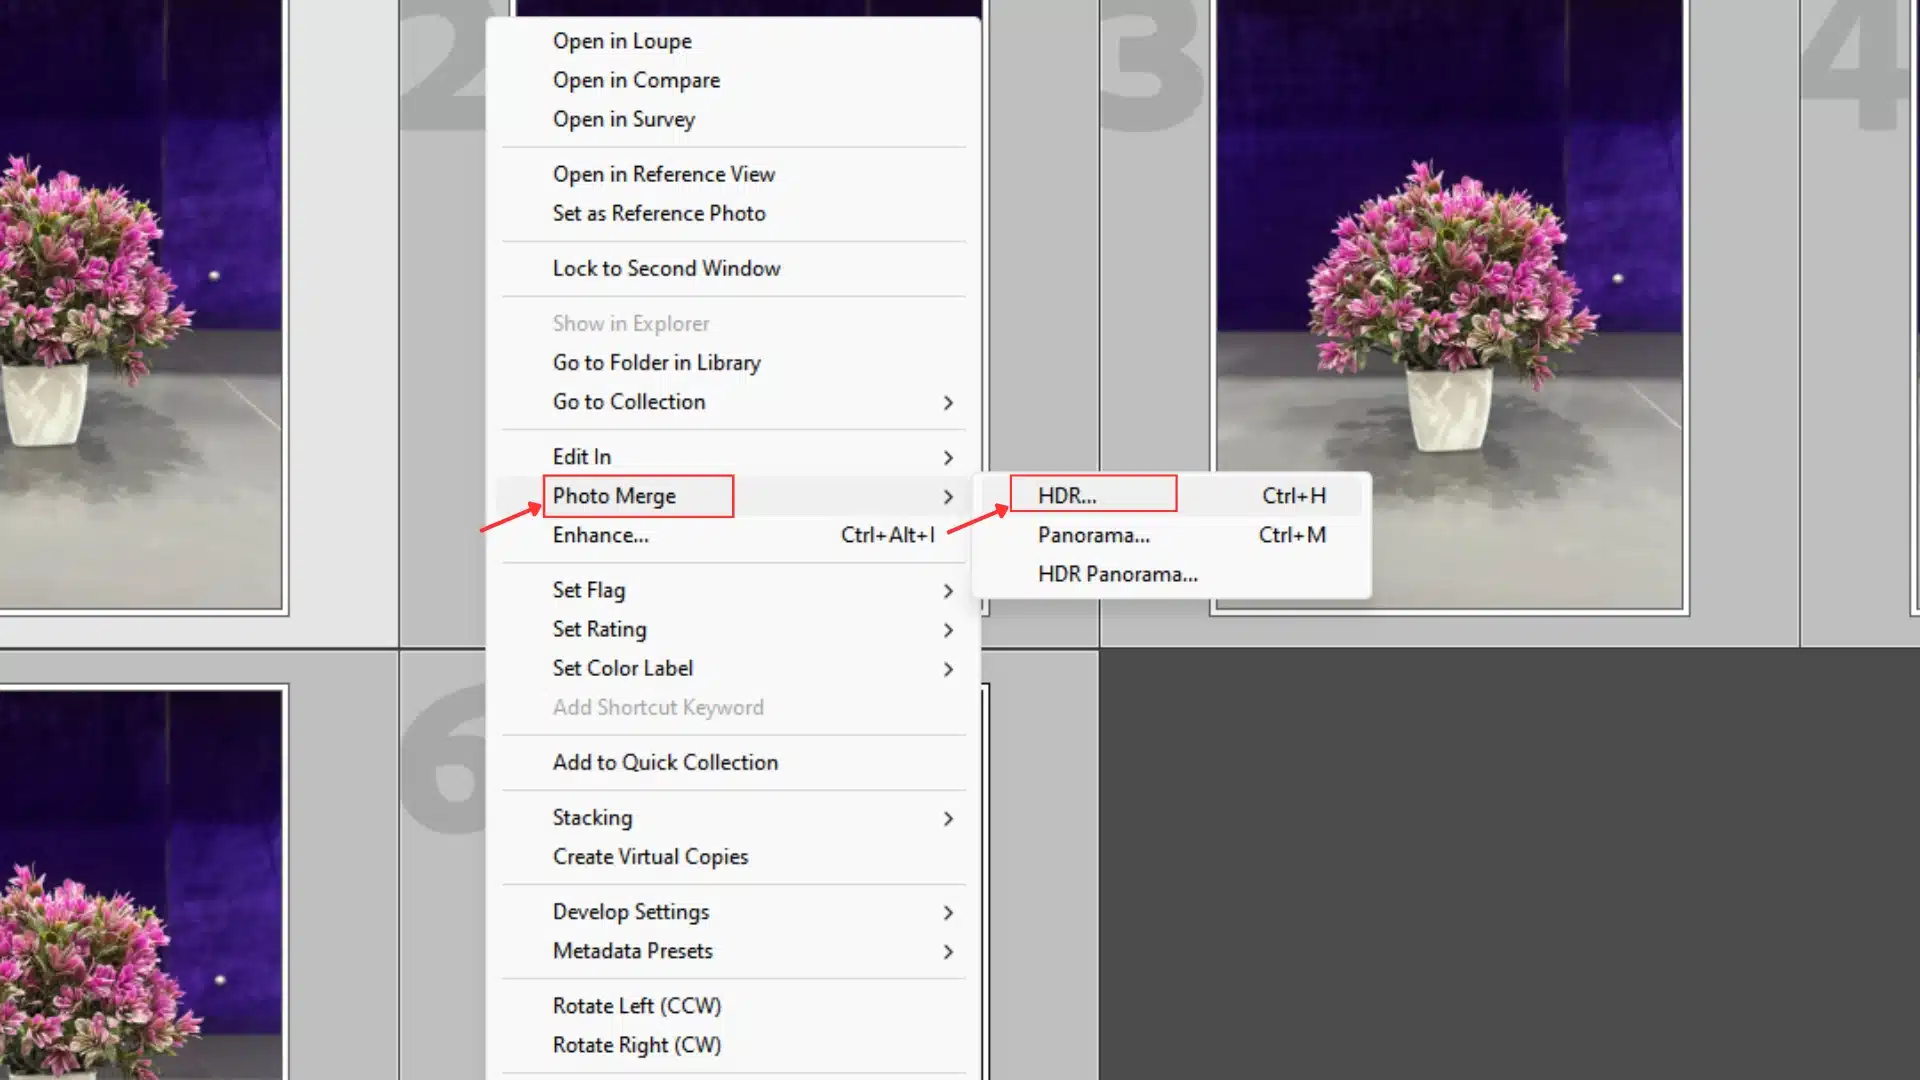
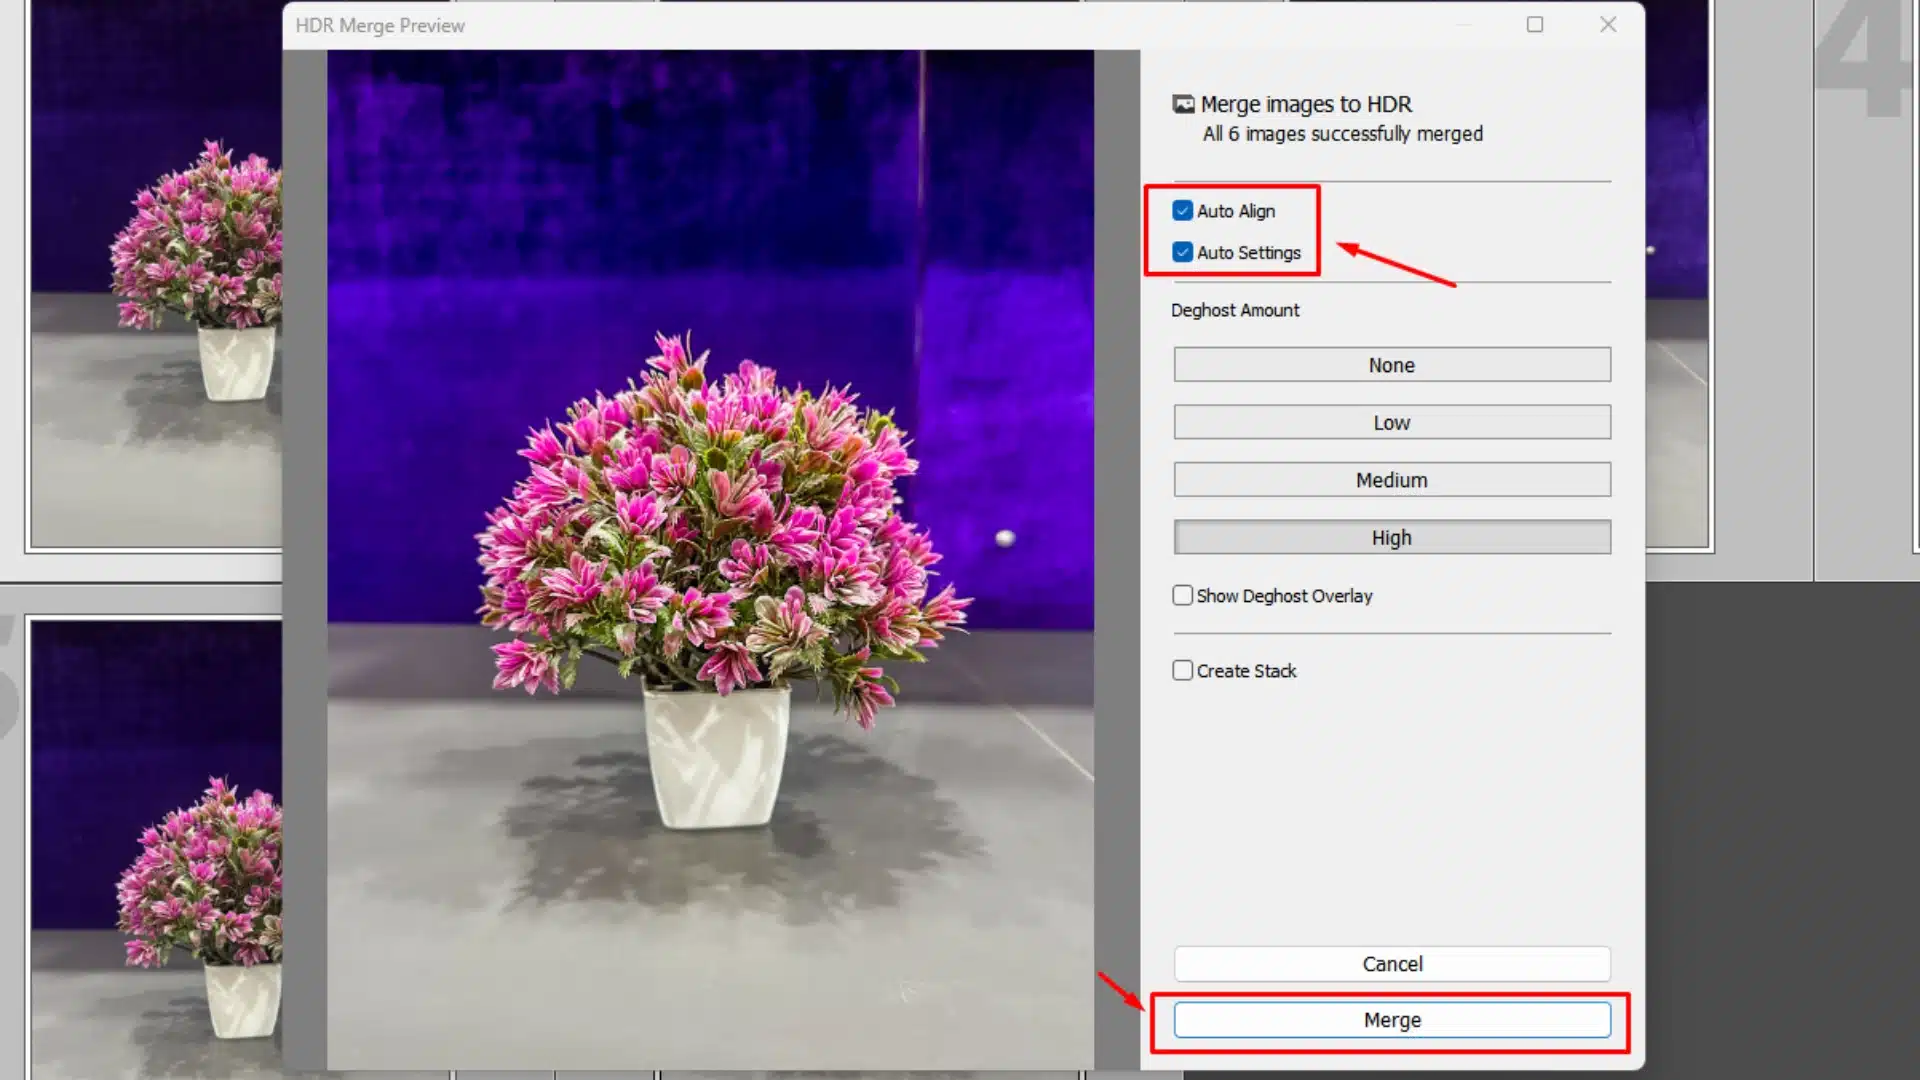
Enable Auto Align & Auto ToneTurn on Auto Align to correct slight exposure misalignments and Auto Tone to ensure balanced light and color across the image.Fixes misalignment and balances the dynamic range.
Save as DNG FormatSave the merged image as a DNG file, retaining all adjustments and allowing for further fine-tuning in future edits.Preserves image quality and edits for advanced post-processing control.

Limitations and Considerations

While deghosting in Lightroom HDR merge is powerful, it’s essential to use it judiciously. Overusing the High setting can lead to unnatural transitions between static and dynamic areas. It affects the overall quality of the blend pictures and the complete image. Additionally, remember that deghosting can sometimes reduce the benefits of high dynamic range. This occurs by limiting the blend of exposure levels in areas with movement.

Deghosting in Lightroom‘s HDR photo merge can significantly enhance the quality of your HDR images. It makes them cleaner and more professional. By understanding how to adjust settings and when to apply them, you can achieve an optimal HDR merge. This will showcase the full dynamic range of your scenes without unwanted artifacts.

How Do You Create an HDR Image with Deghost in Lightroom?

Creating this in Lightroom, especially when dealing with moving elements, requires careful attention to the deghosting feature. This process ensures that your HDR photo is free from ghosting artifacts and maintains a natural look. Here’s a step-by-step guide to help you through the process:

Step-by-Step Guide to Creating an HDR Image with Deghost in Lightroom

Capture Your Bracketed Exposures

A DSLR camera on a tripod, positioned indoors, ready to capture bracketed exposures with a blurred background of plants and soft light.

Import and Prepare Your Images in Lightroom

Lightroom interface showing a sequence of bracketed photos of a potted plant, prepared for HDR merging.

Initiate the HDR Photo Merge

Lightroom interface showing the right-click menu to initiate an HDR photo merge using the Photo Merge, HDR option.

Adjust Deghosting Settings

Lightroom HDR Merge window displaying deghosting options: None, Low, Medium, and High, next to a potted plant.

Choose the Appropriate Deghosting Level: In the HDR Merge window, you have the option to adjust deghosting levels, Low, Medium, or High, based on the amount of movement in your images.

Finalize and Merge the Images

Lightroom HDR Merge window displaying Auto Align, Auto Settings options, and the Merge button for finalizing the HDR process.

Post-Merge Adjustments

Lightroom Develop module showing exposure and contrast adjustments after HDR merge for a vibrant potted plant image.

Practical Tips for Creating Optimal HDR Images

By following these steps, you can create HDR images in Lightroom that effectively utilize the deghosting feature to remove unwanted artifacts while preserving the full dynamic range of your scene.

FAQ about Deghost in Lightroom

Ultimate-Lightroom-Course-Detailed-Image-Adjustments

What is ghosting in HDR Lightroom?

Ghosting in HDR Lightroom refers to the visual artifacts that occur when there is movement between the multiple exposures used to create an HDR image. This can happen when subjects like people, animals, or leaves move during the exposure sequence. The resulting HDR image may show these moving objects as semi-transparent or blurred, creating a ghost-like effect that can detract from the image’s quality. This effect is particularly noticeable in scenes with fast-moving elements or windy conditions. Fortunately, Lightroom’s Deghosting feature can help correct these artifacts by aligning the exposures and reducing or removing the ghosting effect.

How to remove ghosting in Lightroom?

To remove ghosting in Lightroom, use the Deghosting feature during the Lightroom HDR merge process:

By following these steps, you’ll ensure that your HDR image is free from distracting ghosting artifacts, resulting in a clean and balanced final photograph.

What does HDR merge do in Lightroom?

The HDR merge in Lightroom combines multiple photos taken at different exposure levels into a single image using the HDR Photo Merge feature. This process enhances the dynamic range of the final photo, capturing details in both the highlights and shadows that would be impossible in a single exposure. HDR merge is especially useful for scenes with extreme contrasts, like sunsets or indoor scenes with bright windows, resulting in a more balanced and detailed final image.

Additionally, this technique helps preserve texture and depth in both bright and dark areas, making your photos appear more vivid and lifelike. By integrating multiple exposures, Lightroom’s HDR merge ensures that no important details are lost, even in challenging lighting conditions.

Should I edit in HDR on Lightroom?

Editing in HDR photography on Lightroom is beneficial if you’re working with pictures that have a large dynamic range, such as landscapes or scenes with significant contrast between light and dark areas. HDR editing allows you to capture and fine-tune details in both shadows and highlights, resulting in a more vibrant and realistic image.

However, it’s essential to use HDR Photo merge thoughtfully, as over-processing can lead to unnatural results with excessive detail or color distortion. Striking the right balance ensures your final image retains a natural and appealing look while showcasing the full range of your scene.

Conclusion: Deghost in Lightroom

Side-by-side comparison of a flower arrangement before and after using Lightroom's deghosting feature to remove ghosting artifacts.

Creating natural-looking HDR images in Lightroom has transformed how I approach my photography. When I worked on flower arrangement shot, the lighting variations could have easily caused ghosting issues.

With Lightroom’s deghosting feature, I created a sharp, balanced image that highlighted every detail without distracting artifacts. This tool is perfect for ensuring clarity and vibrancy, even when dealing with multiple exposures in still life or dynamic environments.

To enhance your photo editing skills and master essential tools in lighroom like HDR merging and deghosting, check out our Lightroom Course and Photoshop Course.

If “What Is Deghost in Lightroom? Tips for Achieving Flawless Images” article has helped you, then Like and Share it with your friends

Facebook
Twitter
LinkedIn
Pinterest

Have a nice photoshoot!

Read more about: Photo Editing with Lightroom and Photoshop

Download Your Free Guide Now!

Discover the secrets of photography with our printable guide! Master essential techniques like aperture, shutter speed, and ISO to create stunning images. Get your free printable PDF now and start turning your snapshots into masterpieces!