Vector Mask Photoshop: A Guide to Precise Edits

If you love creating eye-catching images, mastering the use of a vector mask Photoshop can make a big difference.

I’ve explored techniques that turn ordinary photos into captivating art with ease.

Curious to learn more? In this article, I’ll share practical and powerful tips on how to use vector masks in Photoshop to enhance your editing skills and make your visuals truly stand out.

Table of Contents

Creating a Vector Mask Photoshop

Ps interface showing the steps to create a vector mask on an image of a woman holding a cat, with the 'Layer' menu and options highlighted.

Creating a vector mask in Photoshop allows for precise and flexible editing by controlling which parts of a layer are visible. In this section, you’ll learn how to use vector masks to sharpen your editing skills and bring more creativity to your projects.

Step-by-Step Guide to Create a Vector Mask Photoshop

To create a vector mask, start by opening your image in Photoshop. 

Go to the layers panel and make sure your layer is selected. If you don’t have any existing layer masks, this is the time to get started.

Next, select the pen tool from the toolbox on the left. Using this tool, draw a path around the part of the image you want to keep. This can be precise because vector masks use mathematical equations to define the shapes, which allows for sharp edges.

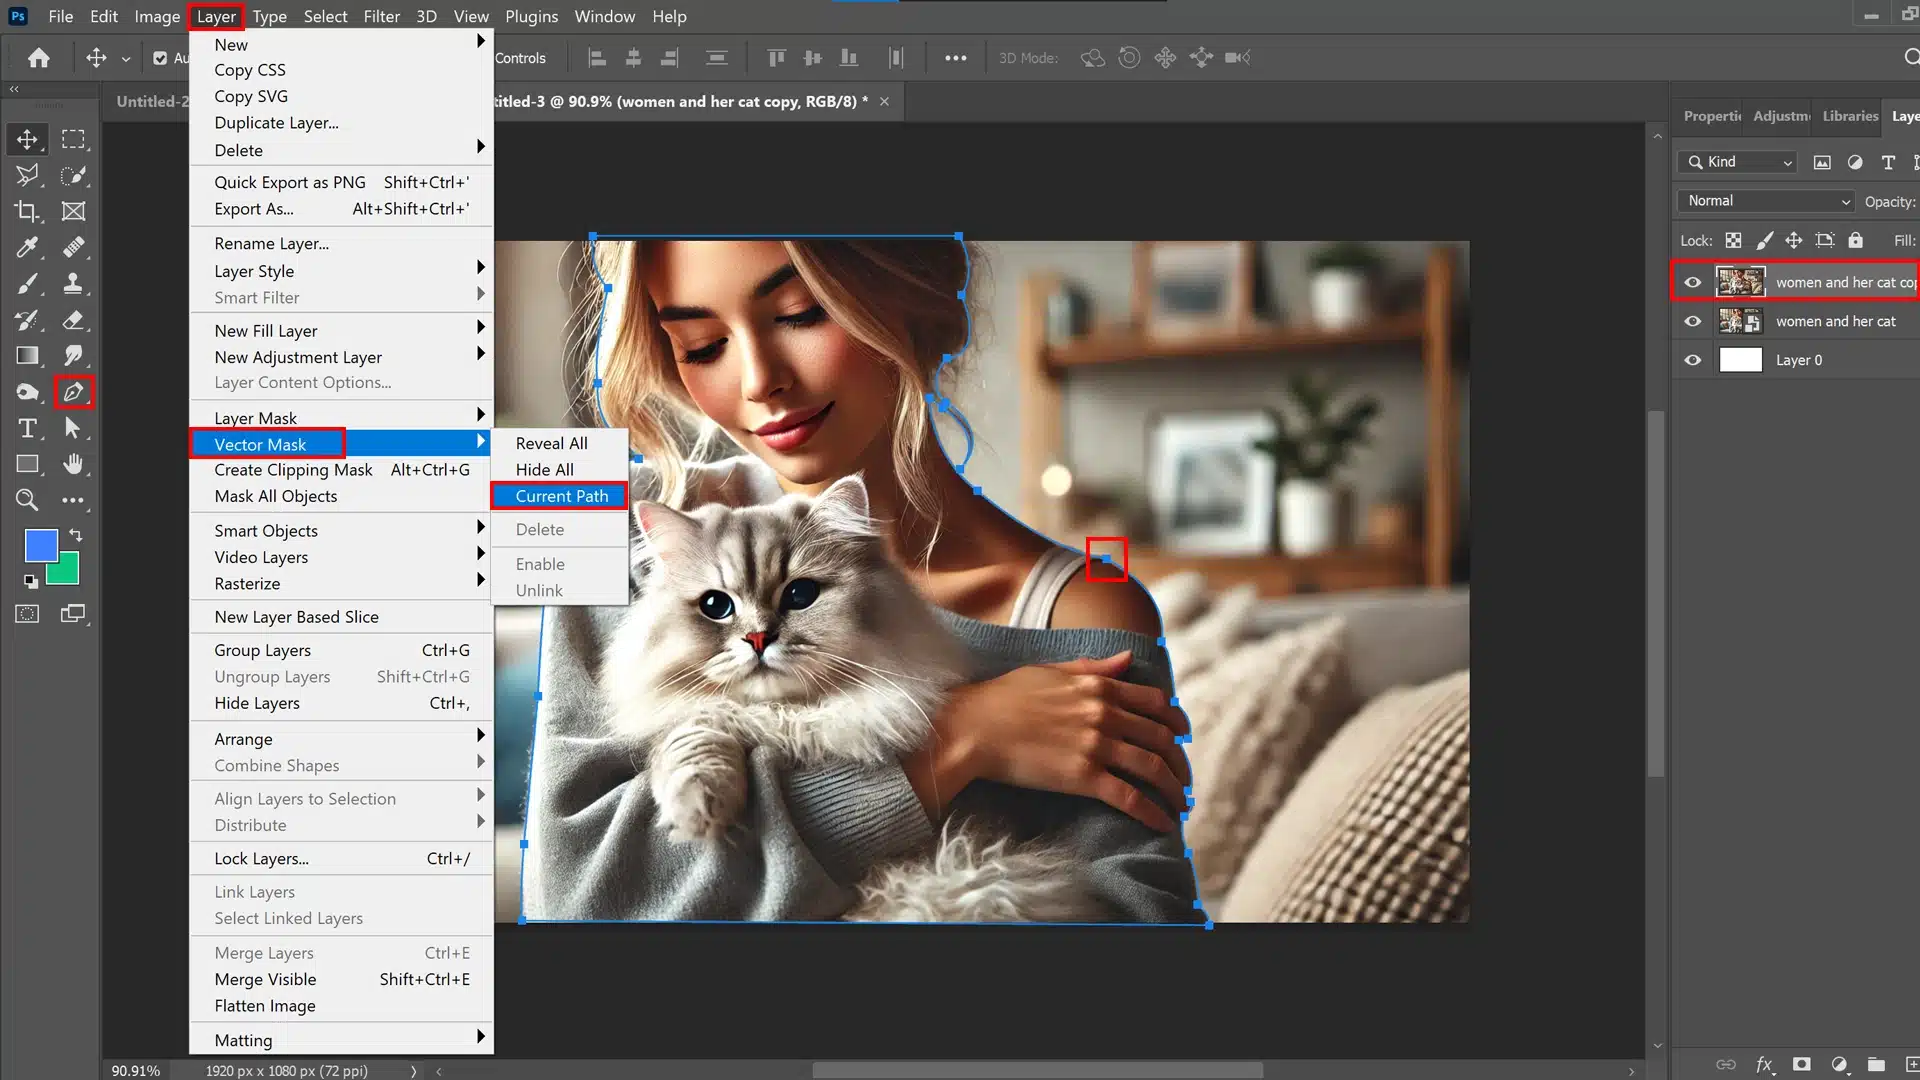
Once the path is complete, go back to the Layers panel. Click on the Add Vector Mask icon at the bottom. You will notice a new vector mask thumbnail next to your layer thumbnail. This indicates that a mask is now active.

You can modify the vector mask easily. Just select the path selection tool from the tools menu to move or adjust your path as needed.

Alternatively, use the direct selection tool for even finer control over the individual anchor points and curves of your path. This flexibility gives you full control over what is hidden or revealed.

Adding shapes to your vector mask is also simple. Choose one of the shape tools like Rectangle, Ellipse, or Custom Shape Tool. Draw within the same layer and it will incorporate into your existing vector mask.

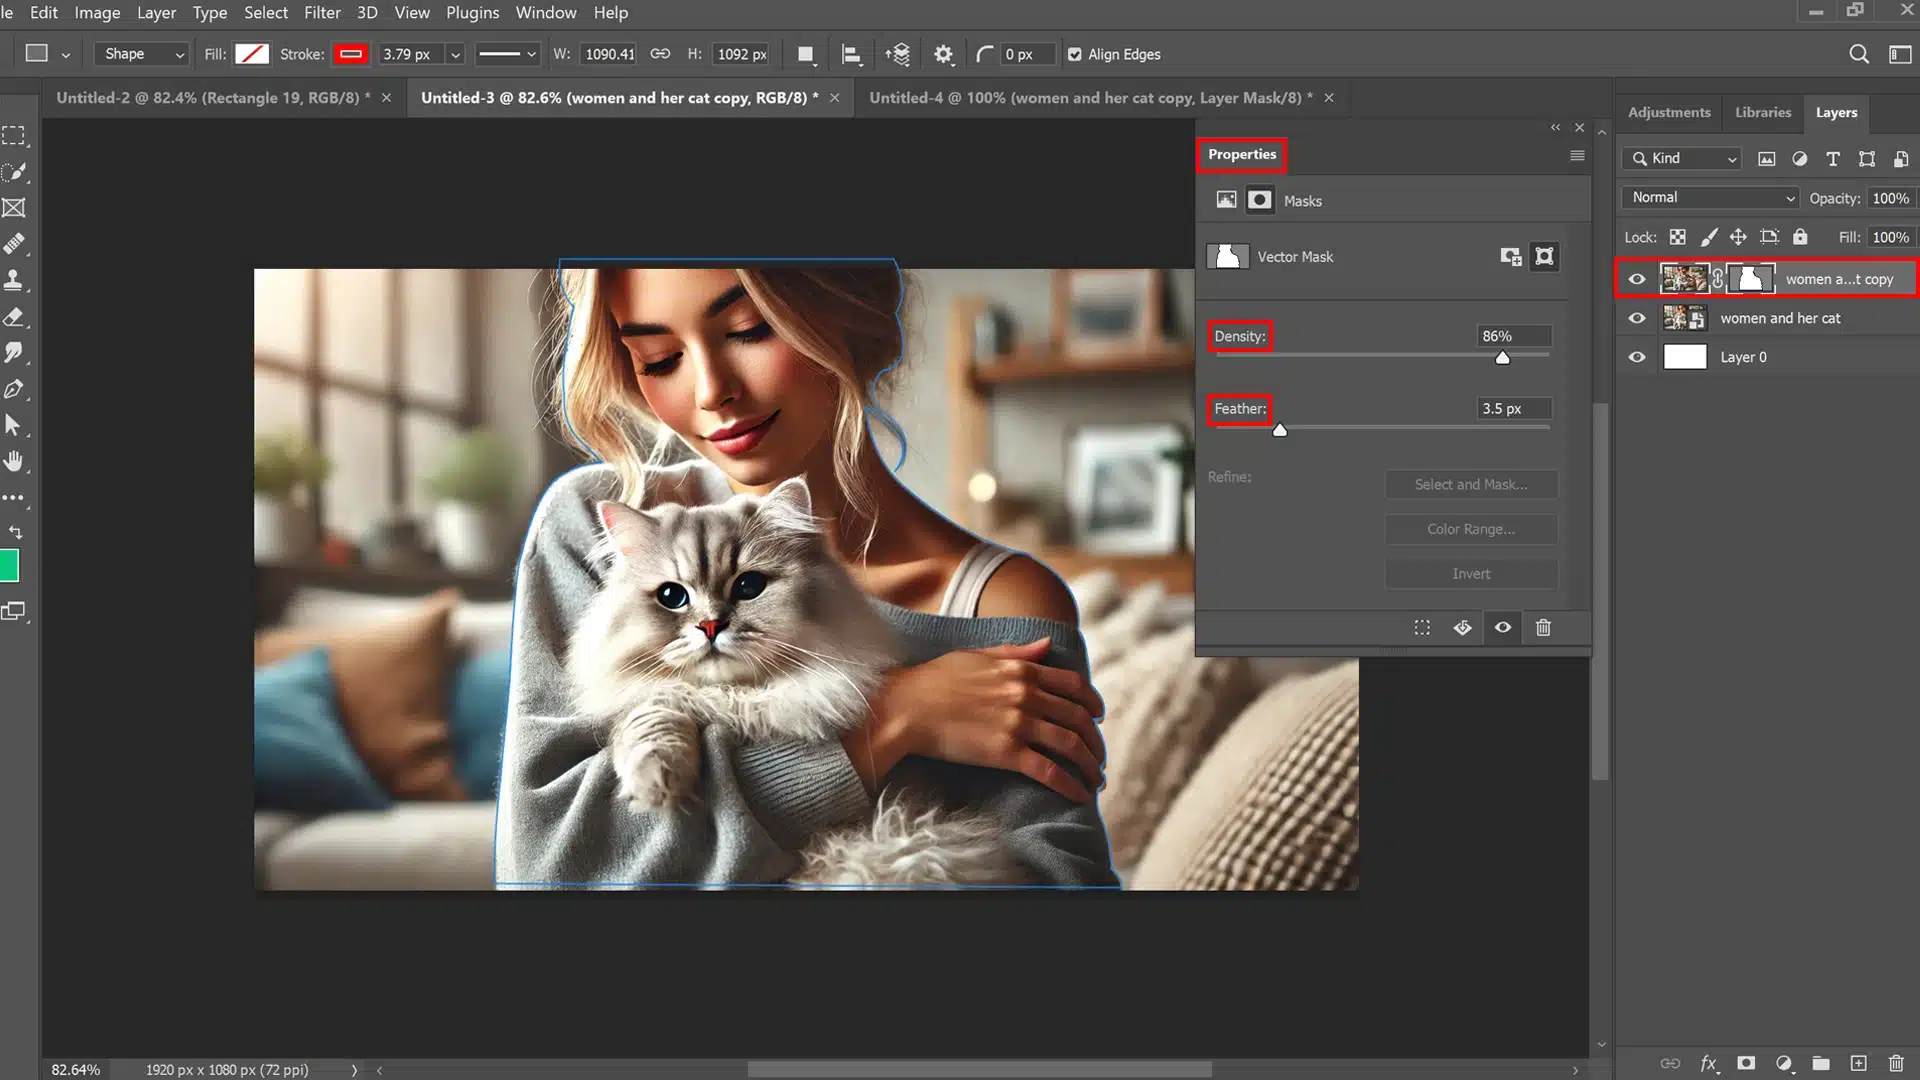
To refine the mask even further, use the Properties panel. You will find options to adjust mask density, feathering, and application. These adjustments allow for smooth blending and sharp detailing. 

The Direct Selection Tool can also be helpful when you need to make slight adjustments to the vector mask, ensuring that every detail is just right.

Common Mistakes and How to Avoid Them

Layer Masks vs. Vector Masks

Comparison of Ps interface showing layer masks and vector masks, highlighting the differences in icons and layer management in the panel.

When editing images in Photoshop, understanding the types of masks, such as the layer mask and Photoshop vector mask, can be very helpful. 

Let’s dive into into the differences and practical uses of the layer mask and vector mask.

Differences Between Layer Masks and Vector Masks

Layer masks are based on pixel data. 

Essentially, they allow you to hide or reveal parts of the layer without permanently altering the original image.

You use grayscale colors: black hides, white shows, and shades of gray create varying levels of transparency.

On the other hand, vector masks utilize paths and a vector shape made up of resolution-independent lines and curves. 

They maintain high quality no matter how much you resize them. They maintain high quality no matter how much you resize them, making them perfect for designs that require straight lines.

The principal difference lies in how you modify each type of mask:

Vector mask thumbnail indicates sharp edges compared to the softer look of a layer mask thumbnail.

When to Use Each Type of Mask

Each mask type excels in different scenarios:

You might also find it helpful to use the properties panel to tweak vector masks. The properties panel offers options to adjust density and feathering, enhancing your mask’s precision.

Sometimes combining these masks is beneficial. For example, apply a layer mask for shadows and a vector mask for object edges.

Pro Tip: For more advanced techniques, consider exploring how to use the content-aware fill in Photoshop to seamlessly remove unwanted elements from your images.

Additionally, mastering the patch tool in Photoshop can significantly enhance your image editing workflow.

Advanced Techniques with Vector Masks

Ps interface showing advanced techniques with the Properties panel open, demonstrating the use of Density and Feather adjustments on a masked image of a woman holding a cat.

Advanced techniques with vector masks can help you push your creative boundaries in Photoshop. 

By exploring different methods, you can enhance your designs, achieve cleaner edits, and create more dynamic compositions. 

Let’s look at how combining vector masks with other tools can elevate your work.

Combining Vector Masks with Other Tools

Combining vector masks with other tools enhances your image editing game. Start by using the vector mask icon in the layers panel. 

This helps you keep track of edits without messing up the original layer.

Next, grab the pen tool. Draw crisp paths around your object. These paths become your vector mask. If you need to tweak the edges, use the properties panel. 

Adjust the density slider and feather slider to get smooth transitions.

Think about using a layer group. Apply vector masks to grouped overlays for consistency. 

This trick works wonders in logo design. You can move the entire group without losing your masking detailsmaking it an important step in any masking guide.

Creative Uses for Vector Masks

Vector masks are a game changer for creativity. Say you want to integrate vector graphics into a image. 

Vector masks ensure sharp edges no matter how much you resize. Unlike pixel-based masks, they stay smooth and clear preserving the quality of each shape.

Ever used shape tools? Combine them with vector masks to create interesting designs. 

For example, masks can hide and reveal parts of a shape to craft complex patterns.

You can also animate your masked objects. Create a series of overlays with different vector masks and make an animation. 

Photoshop’s timeline feature lets you see your creations come to life.

Don’t forget the density slider in the properties panel. This is your secret weapon for refining the mask’s visibility. Drag the slider until you achieve the perfect balance.

Pro Tip: Always rename your layers and masks in the layers panel. This practice keeps your workflow organized and saves time during complex projects.

For more advanced techniques, consider learning how to use the Content-Aware Fill in Photoshop. This tool can complement your vector masks by intelligently filling in areas based on surrounding content.

Additionally, understanding the difference between Photoshop and Lightroom can help you decide which software best suits your specific needs.

Troubleshooting Vector Masks

Ps interface showing a red error icon over an image with a vector mask applied, demonstrating common mistakes when using vector masks, such as incorrect path placement.

When working with vector masks, it’s common to encounter a few challenges. Understanding how to troubleshoot these issues can save time and improve your workflow.

Let’s dive into some typical problems you might face and how to resolve them.

Common Vector Mask Issues

Let’s face it, working with a vector mask in Photoshop can sometimes be tricky. 

Sometimes, your mask doesn’t align as expected. Other times, you might find your vector mask thumbnail is missing. 

If your masked areas don’t look right, it’s time to troubleshoot.

The most common issues with vector masks include:

It’s tiring, but we can fix these issues.

How to Fix Vector Mask Problems

Alright, let’s tackle these problems head-on:

Pro Tip: Use Photoshop shortcuts to create and toggle between different masks quickly. It saves time and effort!

Benefits of Using Vector Masks

Ps interface showing a green check mark on an image with a correctly applied vector mask, demonstrating the benefits..

Vector masks come with several benefits. 

You already know some of the common issues.

Feature Vector Masks Pixel-Based Masks
Resolution Independence Maintains quality at any scale Loses quality when scaled
Layer Mask Management Precise, efficient with alignment Less precise, harder to align
Ease of Use Clear thumbnail, intuitive adjustments Can be less clear, more manual adjustments
Creativity Non-destructive, easily adjustable Destructive, changes are permanent

Let’s dive into why learning about these masks is worth it.

Resolution Independence

First, vector masks are resolution independent. This means that no matter how much you scale your image, it never loses quality. Unlike pixel-based masks, your edges remain crisp and clean.

Efficient Layer Mask Management

Layer mask management becomes efficient with vector masks.

Ease of Use with Layers Panel

Another notable benefit is the ease of use with the layers panel.

Non-Destructive Creativity

Photoshop vector masks foster creativity without fear of making permanent changes. 

Since masks are non-destructive:

Pro Tip: To make your masks even more precise, pair them with paths. Refer to a comprehensive Photoshop layering tutorial and use the path operations in the options bar to adjust the shapes easily. 

This way, you avoid jagged edges and keep your masks looking smooth.

Frequently Asked Questions

Modern desk setup with a computer screen displaying 'FAQ' in bold letters, symbolizing a section dedicated to frequently asked questions in Ps.

How do I make a vector mask in Photoshop?

What is the difference between layer mask and vector mask in Photoshop?

What is a masking vector?

Can you do vector in Photoshop?

Conclusion

Learning how to use tools like the vector mask Photoshop has made a big difference in my image editing. By combining Photoshop and Lightroom, I’ve been able to work faster and get better results. 

These programs help me make my photos look just how I want them without wasting time.

If you want to improve your skills, I recommend taking the Photoshop Course and the Lightroom Course. Both have helped me a lot on my journey.

Also, if you don’t have Photoshop or Lightroom yet, you can get them from Adobe’s Photoshop and Adobe’s Lightroom. 

Give these tools a try, and see how features like the vector mask in Photoshop can take your editing to the next level!

If this article has helped you, then Like and Share it with your friends
Facebook
Twitter
LinkedIn
Pinterest

Read more about Photoshop: 

Download Your Free Guide Now!

Discover the secrets of photography with our printable guide! Master essential techniques like aperture, shutter speed, and ISO to create stunning images. Get your free printable PDF now and start turning your snapshots into masterpieces!