Are you struggling to resize image for printing in Photoshop?
You’re not alone!
Many people face challenges when preparing their photos for print.
But don’t worry, I’ve been there too. In this guide, I’ll walk you through the steps to ensure your images come out crisp and clear, regardless of size.
Imagine the satisfaction of seeing your perfectly resized photo for printing hanging on the wall. Intrigued?
Keep reading, and let’s transform your digital images into stunning prints together!
Table of Contents
Understanding Image Resolution
Let’s start with the basics. Image resolution refers to the amount of detail an entire image holds. Higher resolution means more detail.
We measure it in pixels, tiny dots that make up the image. More pixels lead to better images when resized or printed.
Think of pixels as small building blocks. More blocks make the image clearer and sharper. If you use fewer blocks, the image gets blurry.
So, a higher pixel count equals better clarity. This is crucial when you want to resize an image for printing with a resize tool without losing quality.
Why Image Resolution Matters for Printing
When it comes to printing, image resolution becomes extremely important. Printing an image with low resolution results in poor-quality prints. You need high-resolution images for clear, sharp, and high quality prints.
Consider this: The bigger the print size, the higher the resolution needed. Higher resolution means more detail and more detail means better print quality.
For example, a 300 DPI (dots per inch) image is usually adequate for high quality printing. Thus, the print size dictates how much resolution you need.
When preparing photos for print, resizing images is crucial. Proper resizing ensures optimal quality and avoids pixelation, highlighting why image resolution matters for printing.
How to Resize Images for Printing Correctly
Lets set up the workspace with these simple steps:
Open your image editing software. Photoshop or Lightroom is popular.
Navigate to the images menu and select the resize tool.
Enter the desired image dimensions. Ensure the aspect ratio is locked to prevent distortion.
Check the pixel count to maintain the images quality. For example, reducing too much can cause pixelation.
If you need specific sizes, a custom size option is helpful.
Pro Tip: Always save a copy of the original image before resizing. This allows you to revert if the resized version doesn’t meet your expectations.
For flawless prints, mastering the content aware fill tool can help in seamless edits. This technique complements knowing how to resize images for printing correctly, ensuring high-quality results.
Understanding the difference between Photoshop and Lightroom is key when learning how to resize images for printing correctly. Each tool offers unique features for image preparation and editing
Preparing Your Image for Printing In Photoshop
Proper preparation of your image in Photoshop is essential for achieving high-quality print results. This involves several steps to ensure that your digital file translates well to a physical format.
Choosing the Right Image Size
When we consider resizing an image, we always start with the basics. We need to select the right image size to match our printing needs. To ensure high resolution and keep those images crisp, we should begin by opening the image file in Photoshop.
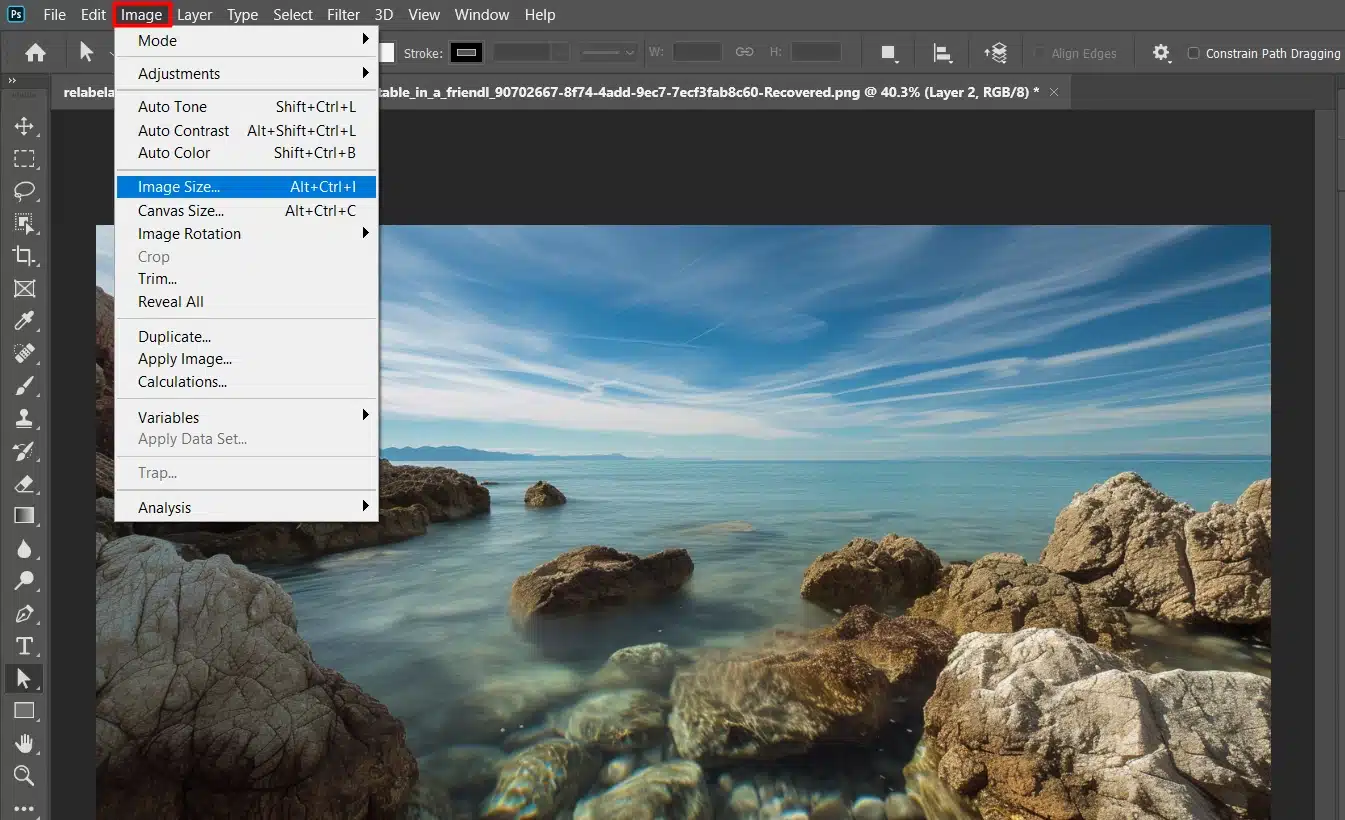
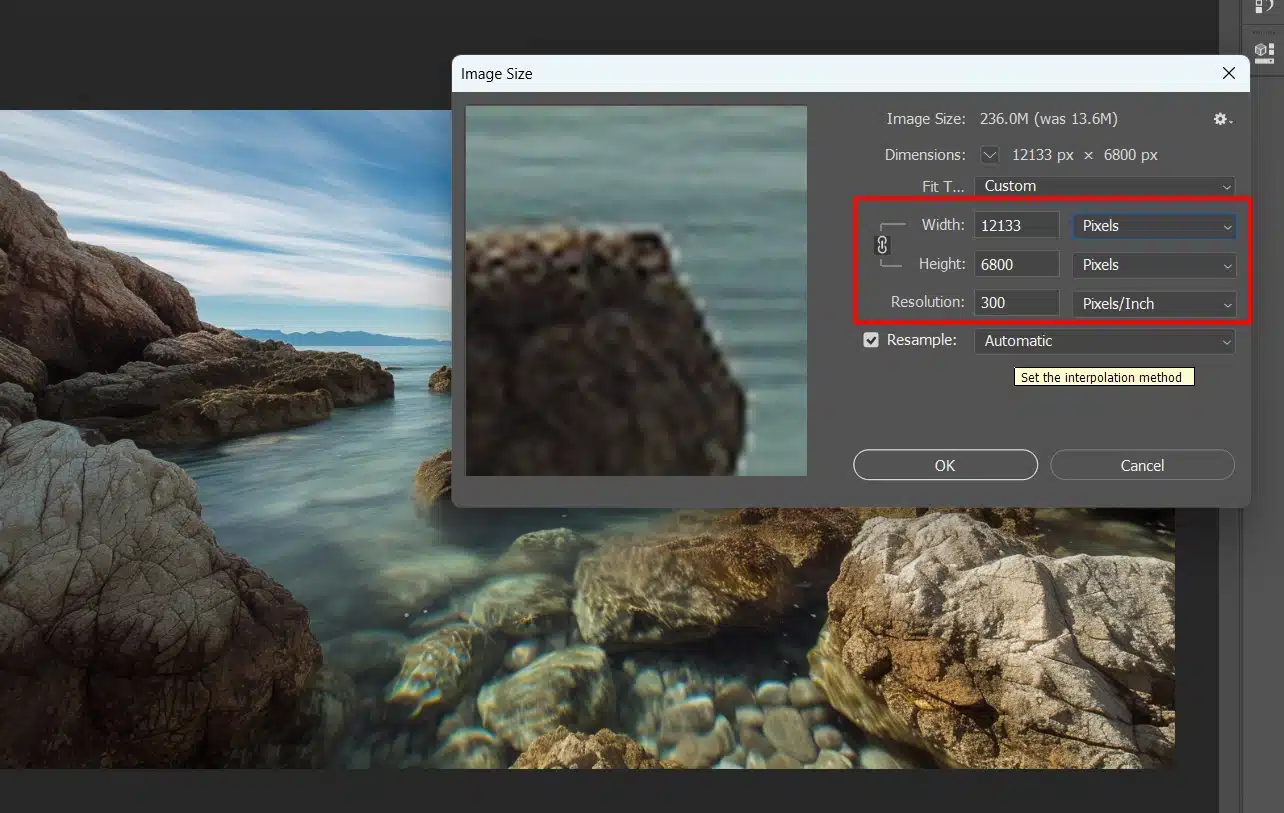
Next, we must head to the “Image” menu and choose “Image Size.” Now, a dialog box asks us to fill in the width and height fields.
Here, keeping the aspect ratio locked is key, ensuring the entire image remains undistorted. Then, we’ll adjust the pixel dimensions to match our desired output.
It’s important that we check the file size as it may affect the print quality. The goal is to achieve the right balance, avoiding low quality images and ensuring more pixel dimensions for better.
When preparing images for print, adding shapes can enhance your design and layout. Making your prints stand out.
Adjusting Image Quality
Once we’ve chosen the right size, we need to focus on images quality. To avoid losing quality, we should ensure our resolution is set at 300 pixels per inch (PPI). This PPI setting is crucial for high-quality print.
Let’s move to the “Adjustment Layers” to tweak brightness, contrast, and other settings. Tools like the crop tool can be useful here, especially if we need to customize the resized image for printing for specific frames or sizes.
Don’t forget to save a copy of the original File before making any major changes. This helps us keep the original resolution intact while allowing us to try different adjustments.
Lastly, it’s good practice to export the resized images in a format that best fits our needs, such as TIFF for professional prints or JPEG for common use.
When preparing images for print, choosing the right file format to maintain quality is crucial. Understand the differences between RAW and JPEG formats and decide which is best for your printing needs.
Pro Tip: Use Lightroom for batch resizing images. It can save you a lot of time when you need to resize multiple photos at once.
Advanced Resizing Techniques for Images
Resizing images in Photoshop can be both simple and straightforward. Here’s a step-by-step to help you resize an image for printing:
Open the image file in Photoshop by navigating to the File menu and selecting Open.
Go to the Image menu and click on Image Size. This opens the dialog box for resizing.
In the dialog box, find fields for width, height, and resolution. Adjust the pixel width and pixel height as needed.
Make sure to lock the aspect ratio by checking the Constrain Proportions box to avoid image distortion.
Set the resolution to 300 pixels per inch (PPI) for high-quality prints. This will ensure your photo print remains sharp.
Check the actual image size in the Document Size fields to match it with your intended print size.
If you need precise control over image dimensions, use the crop tool to create a specific frame. Just hit C on your keyboard, then adjust.
After resizing, save the new image to File> Save As. Choose a suitable file format. TIFF is great for professional prints, while JPEG is ideal for general use.
Resizing Mistakes
Not understanding how to easily resize images properly can result in poor print quality. Here are some common mistakes and how to avoid them:
Ignoring Aspect Ratio: Always lock the aspect ratio to avoid distorted images.
Wrong Resolution Settings: Make sure the resolution is set to 300 PPI for print size settings; anything lower might result in pixelated prints.
Overlooking File Size: Keep an eye on the file size of your resized image. Large file sizes can slow down your system and make sharing difficult.
Forgetting to Save a Copy: Always save a copy of the original image before making changes. This way, you have a fallback option if something goes wrong.
Using the Wrong Tool: Ensure you use the image resizer feature correctly. Misusing tools can lead to images quality issues.
Remember, resizing photos is essential but not daunting. With practice, anyone can master it.
Pro Tip: For batch processing, consider using Lightroom alongside Photoshop. It can make resizing multiple images a breeze!
Optimizing Image Quality for Print
Explore essential aspects of optimizing image quality in Photoshop for printing.
This table highlights advanced retouching techniques, high print fidelity, required skill levels, key tools like retouching and color adjustment, and the expected outcome of producing high-quality prints.
Aspect
Details
Techniques Covered
Advanced retouching, resolution adjustment
Focus
High print fidelity
Skill Level
Intermediate to Advanced
Key Tools
Retouching, color adjustment
Outcome
High-quality, detailed prints
Learning to optimize image quality for print can significantly enhance the visual appeal of your final product. It’s not just a skill for professionals; with the right guidance, anyone can master it.
This guide will lead you through essential steps to improve your images for printing, ensuring your photos look impressive on paper.
When preparing images for print, resizing layers correctly ensures your design elements are proportionate and clear.
Enhancing Image Resolution
Resolution plays a crucial role in the quality of printed images. When beginning to resize an image, always set the resolution to 300 PPI (Pixels Per Inch).
This ensures fine detail retention. Navigate to the Image Size option in Photoshop’s Images menu. Adjust the width and height to your desired dimensions while keeping the aspect ratio intact. Locking the aspect ratio prevents distortion.
Open your image in Photoshop.
Select Image Size from the Images menu.
Set the resolution to 300 PPI.
Adjust width and height while locking aspect ratio.
Keeping the minimal resolution and aspect ratio consistent helps maintain the clarity and sharpness of your photo especially on photos that have effects such as the old paper texture.
Balancing Image Size and Quality
High-quality images often come with large file sizes, which can be cumbersome. Balancing the new image size and quality is essential. The key is to achieve optimal size without compromising the image’s integrity.
Start by opening your image in Photoshop.
Use the Image Resizer tool to adjust dimensions.
Choose Save As and select an appropriate format like JPEG or TIFF.
When you resize an image, a good practice is to monitor the file size. Large files can slow down your system and make sharing difficult.
Finally, consider using a free image resizer for batch processing multiple images efficiently. This tool helps you manage many files at once without a significant time investment.
Common Mistakes to Avoid
Understanding these points ensures you get the most out of your photo print experiences.
Always save a copy of the original image before making changes.
Ensure the resolution is consistently set to 300 PPI.
Lock the aspect ratio to avoid distorted images.
Pro Tip: Use Lightroom for batch processing to resizemultiple images quickly.
This saves time and ensures consistency across all your resized photos.
Understanding and using the essential tools in photoshop is important, insures avoiding common mistakes and achieve professional-quality results.
Practical Tips for Better Print Results
Achieving high-quality prints requires more than just pressing the print button. Various factors contribute to the final output, including the quality of the original image, printer settings, paper type, and even the environment in which you print.
Choosing the Right Paper
When it comes to printing, choosing the right paper is key. It affects how your printed image will look and feel. You have options: gloss, matte, or a specialty type like canvas.
Glossy paper: Gives prints a shiny finish, enhancing colors and details.
Matte paper: Offers a non-reflective surface ideal for black and white photos.
Think about the kind of image you’re printing. For vibrant and colorful pictures, glossy paper works best.
If you’re printing something with lots of text, like an academic paper, matte might be a better choice. Always check the printer’s manual to ensure you use a compatible paper type.
Printer Settings and Calibration
Optimizing your printer settings ensures you get the best print quality. Start by calibrating your printer. Most modern printers have built-in calibration tools. Regular calibration helps maintain color accuracy, ensuring your prints match what you see on your screen.
Calibrate your printer: Use the built-in calibration tools available in most modern printers.
Set the resolution: Adjust to 300 PPI for high-quality prints. This setting is crucial for maintaining detail and sharpness.
Use the correct paper profile: Select the specific type of paper to help the printer manage ink distribution effectively.
Test print: Always do a test print to ensure everything looks good before committing to a large batch.
Troubleshooting Common Issues
Even with the best practices, printing issues can arise. Here are some common problems you might encounter and effective troubleshooting steps to resolve them, ensuring smooth and high-quality printing outcomes.
Dealing with Blurry Prints
Blurry prints can frustrate anyone. To tackle this, check your photo resolution. Aim for 300 PPI (pixels per inch) to ensure sharp prints.
If you resize an image incorrectly, it may lose quality. Tools like Photoshop have a “resample” option. This feature helps maintain clarity when resizing. Resize photos with the original aspect ratios.
Printer settings are crucial. Go into the settings menu and select “high quality” or “best quality.” Also, ensure the paper type matches your printer’s capabilities. Most printers allow calibration. Run a calibration process regularly to avoid blurry outcomes.
Fixing Color Inconsistencies
Color inconsistencies can be another common issue. First, calibrate your monitor. Monitors and printers can display colors differently.
Calibration tools ensure colors match between devices. When using Photoshop or Lightroom, always check the color profiles. Each paper type may require a unique profile.
Ensure you select the correct one from the dropdown menu. In settings, verify the ink levels. Low ink can affect color output.
Replace cartridges if necessary. Lastly, use soft proofing. This tool shows how colors will appear when printed. It helps make adjustments before the final print.
It speeds up the process and keeps quality consistent.
This step-by-step guide saves valuable time.
In conclusion, troubleshooting these common printing issues involves:
Checking resolutions
Calibrating devices
Ensuring correct settings
Don’t let blurry prints or color inconsistencies deter you from creating stunning photos.
Advanced Techniques for Professional Results
To achieve professional results in your printing projects, mastering advanced techniques is crucial.
These techniques go beyond basic adjustments, allowing you to refine every detail of your image for the best possible output.
Using Photoshop Filters
Filters in Photoshop can enhance your photos dramatically. These tools allow you to add effects and create high-quality images effortlessly.
Step-by-step process of applying filters to achieve your desired effects:
Select the image you want to work on.
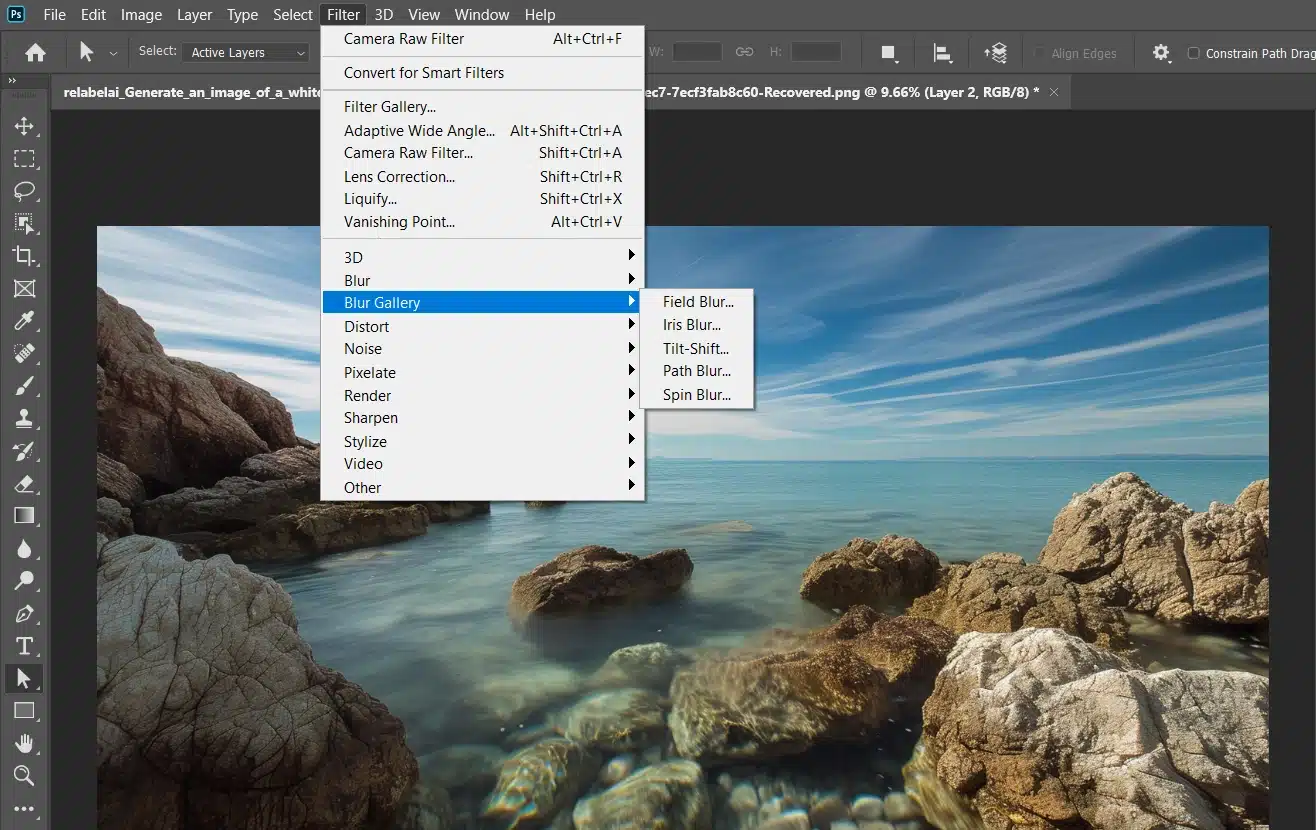
Go to the "Filter" menu at the top.
Browse through the options, ranging from blur effects to distortional elements.
Once you find the desired filter, apply it and adjust the settings to suit your needs.
Remember, filters can help transform a normal photo into art. If you are unsure which to use, try experimenting with different filters. That way, you get a feel for what each one does. This can aid creativity and professional output.
Layer Adjustments and Blending Modes
Layer adjustments and blending modes are powerful features. They enable you to tweak images and merge several seamlessly, whether for color correcting or adding more depth.
Steps for Layer Adjustments:
First, open your image in Photoshop.
Create a new adjustment layer by clicking the half-filled circle icon at the bottom right.
Choose the type of adjustment needed. Options include brightness, contrast, hue, and saturation.
Afterward, explore different blending modes from the layers panel; modes like "Multiply" and "Overlay" can give unique looks.
Layer adjustments and blending modes are essential when editing multiple images. They allow you to manage edits without altering the actual image.
These features ensure flexibility in changing specific areas. Try various combinations until you are satisfied with the results.
Pro Tip: Always save your work in different stages. This ensures you don’t lose significant edits and lets you revert anytime.
Essential Tools in Photoshop
Photoshop offers many essentialtools that can significantly improve your editing workflow. From the quick selection tool to the content-aware fill, mastering these tools can lead to more efficient and effective photo editing.
Steps to Use Essential Tools:
Open your image in Photoshop.
Select the tool you need from the toolbar on the left.
For example, use the Quick Selection Tool to make fast and accurate selections.
Utilize the Content-Aware Fill to remove unwanted objects seamlessly.
Understanding and using these essential tools can elevate your editing skills, making your workflow smoother and more productive.
Frequently Asked Questions
How do I resize an image to print?
Open your image editing software.
Select the resize or scale option.
Enter the desired dimensions or percentage to resize the image.
Save the resized image.
How can I print a picture to the exact size that I need?
Open the image using a photo editing tool.
Adjust the canvas or image size to your specific dimensions.
Use the print preview to check if the size matches your requirements.
Print the image on a test sheet to ensure accuracy before final printing.
What software lets you resize a photo and print at a specific size?
Adobe Photoshop: Offers extensive features for resizing and printing.
GIMP: A free and open-source alternative with robust resizing and printing capabilities.
Microsoft Paint: Simple tool for basic resizing and printing tasks.
Canva: Provides easy-to-use options for resizing and direct printing options.
How do I resize an image to fit a certain size?
Determine the dimensions needed for your project.
Open your image with photo editing software.
Locate the resize or scale function in the tool.
Input the required dimensions or scale proportionally to fit the desired size.
Mastering image resizing for printing is crucial for achieving perfect prints. It’s about more than just adjusting dimensions preserving quality and clarity.
Whether you’re printing memories or professional work, understanding these basics is essential.
$2,061.00Original price was: $2,061.00.$1,061.00Current price is: $1,061.00. 27584
Download Your Free Guide Now!
Discover the secrets of photography with our printable guide! Master essential techniques like aperture, shutter speed, and ISO to create stunning images. Get your free printable PDF now and start turning your snapshots into masterpieces!