Have you ever wondered how to create stunning motion effects in your photos using radial blur Lightroom?
Imagine transforming an ordinary image into a dynamic, eye-catching masterpiece that grabs attention instantly.
In this article, I will guide you through a simple yet effective technique to apply radial blur.
By the end, you’ll be able to add that perfect touch of motion to your photos, making them more engaging and visually appealing.
Let’s dive in and unlock the potential of your images with this powerful tool.
Table of Contents
How to Apply Radial Blur Lightroom
The process of editing adjustments and adding radial blur in Adobe Lightroom is straightforward.
Whether you’re new to Lightroom or looking to enhance your editing skills, this guide covers everything you need.
Step-by-Step Guide to Using Radial Blur
First, open the photo you wish to edit in Lightroom’s develop module. Select the radial filter from the tools at the top.
This tool will allow you to create customizable elliptical shapes over selected parts of your image. To use it effectively, double-click, drag it on, and drag over the desired area to draw an ellipse.
Next, adjust the size and position of the radial filterby clicking on the edges of the ellipse and dragging.
Begin making adjustments by turning the focus to the feather slider, which controls the hardness and softness of the edges.
A high feather value will result in a more gradual blur, while a lower value will make the transition sharper.
After positioning the filter correctly, start adjusting the specific settings for the blur effect. Play with clarity, sharpness, and other sliders in the effects panelto achieve the desired dim effect.
Using the Radial Gradient Tool for Blur Background
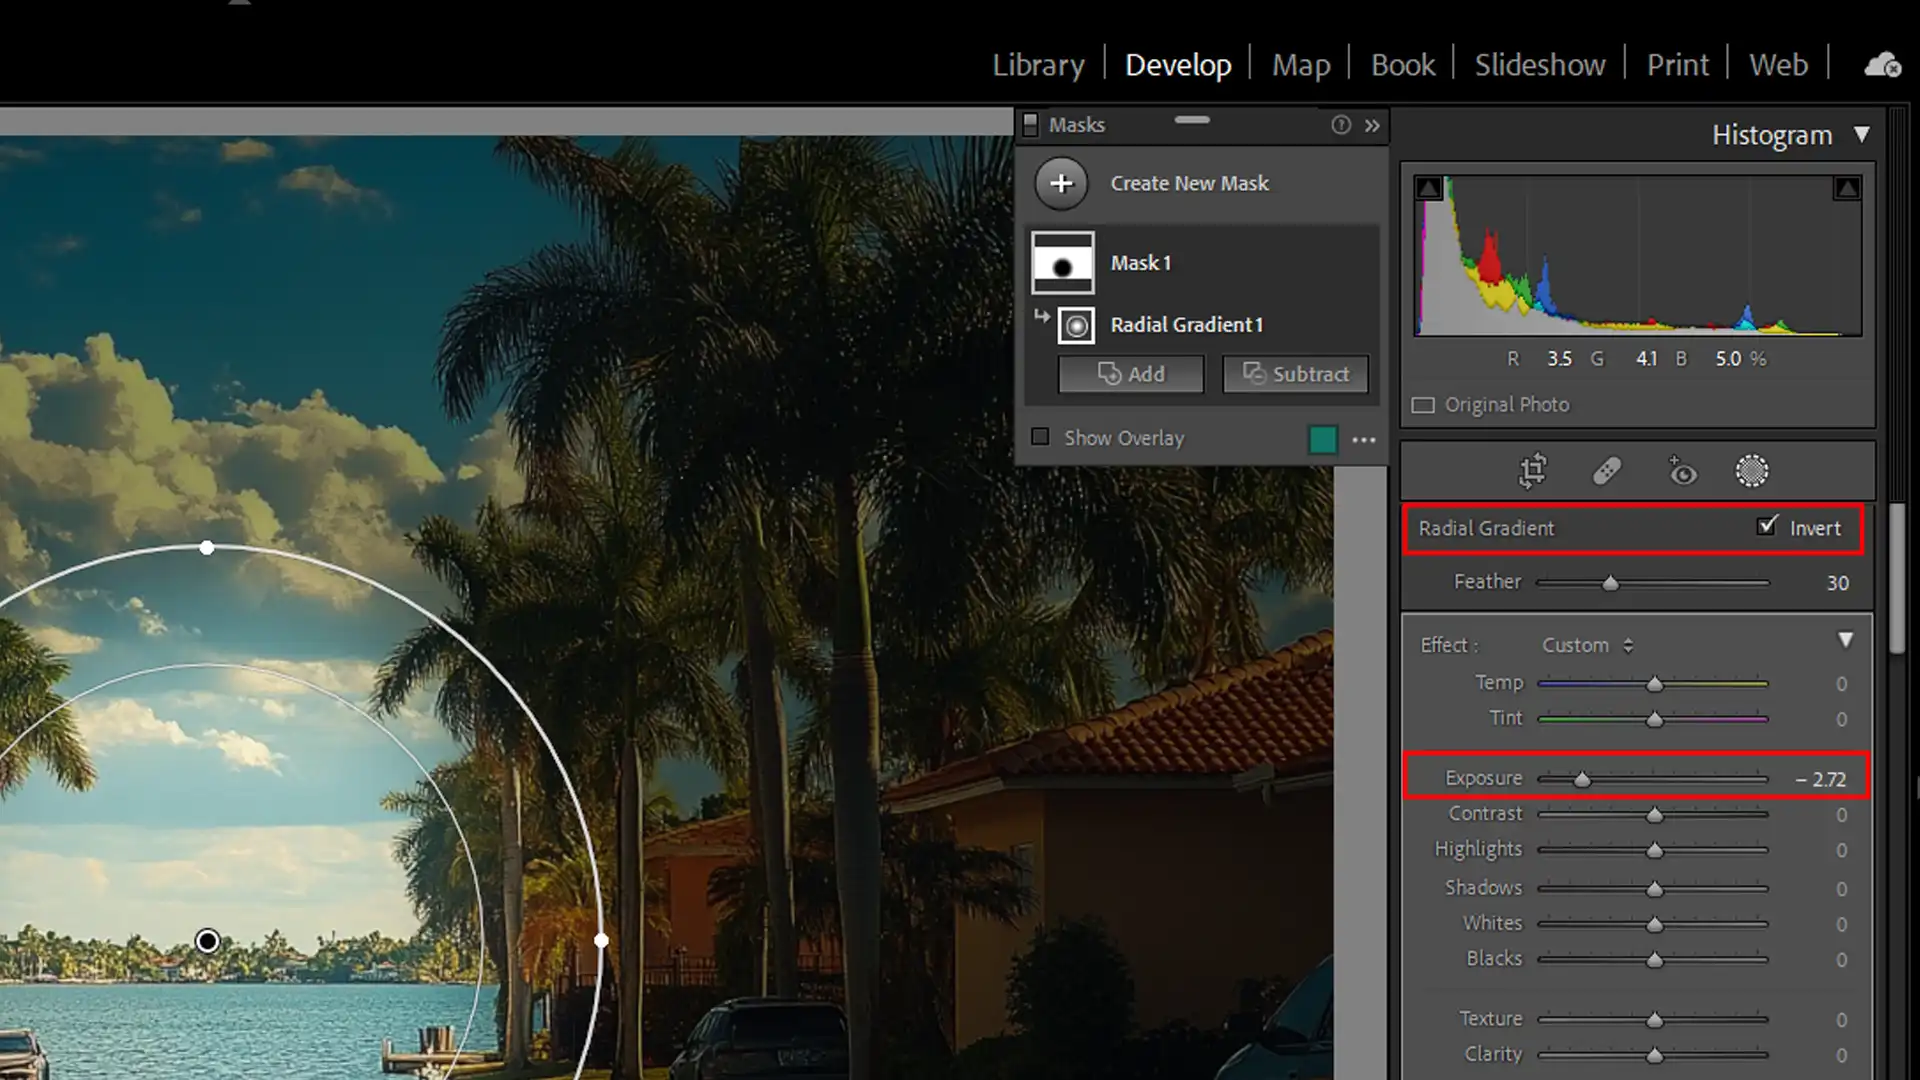
Within Lightroom Classic, the radial gradient tool provides flexibility in creating blurred background. After selecting the radial gradient, apply it by clicking and dragging on the image.
This will form an elliptical shape that you can reposition. Within the radial gradient panel, modify the sliders to customize the blur backgroundeffect. Adjust exposure for more dramatic results or tweak contrast to make your object stand out.
The possibilities are numerous, which makes this tool valuable for different photographic styles. If needed, apply multiple radial filters to various areas of your photo.
Combining several filters allows for layered background blur effects, enabling you to produce more complex and artistic results.
Fine-Tuning the Blur Effect
Once you have a basic background blur in place, it’s time to fine-tune. Use the sharpness slider to control the degree of sharpness inside the radial filter.
This ensures the central focus remains clear while the surrounding areas are blurred. Also, consider using the adjustment brush tool to make localized changes where the radial filter might not suffice.
You can refine these areas for better integration and consistency in the final image.
Switching between graduated filters and radial filters can help achieve a seamless look, especially when working on intricate and busy scenes. Keep in mind that less can be more.
Overusing the blur effect may distract from the subject rather than enhancing it. Aim for a natural look unless a dramatic artistic appearance is your goal.
Pro Tip: After applying the radial gradient, fine-tune by toggling the auto mask option. This helps achieve clean, precise adjustments around the edges of your blur, which is especially useful for delicate details.
Photoshop’s blur gallery offers powerful options like the lasso tool to apply various blur effects with precision. By mastering these tools, you can effectively use blur to enhance your photos and achieve stunning results.
Creative Uses of Radial Blur
Radial blur is a powerful tool in Lightroom that can enhance your photos in unique ways.
Below, we’ll explore some creative uses of this technique to elevate and edit your photography.
Enhancing Portraits with Radial Blur
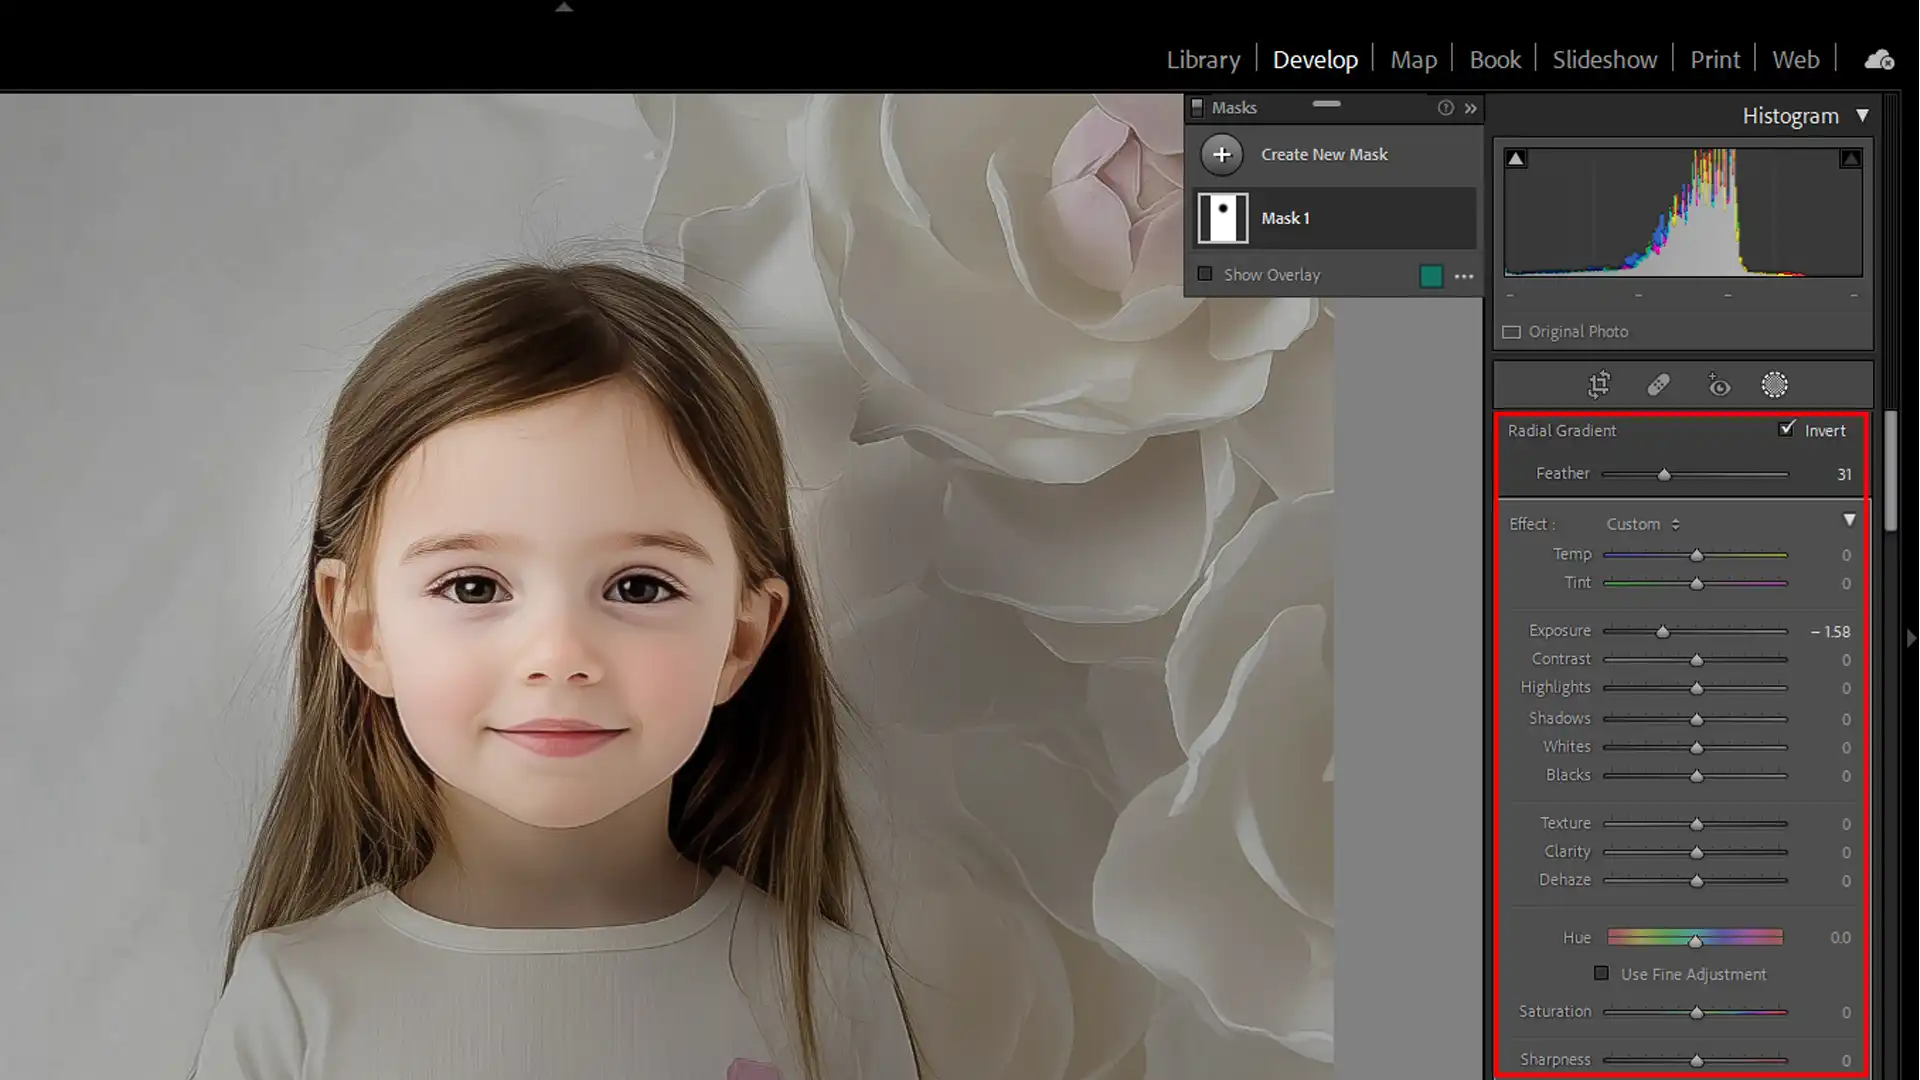
Enhancing portraits with radial blur adds a dynamic focus to the subject, creating a compelling visual effect that draws attention and adds depth to your images.
When you edit portraits in Lightroom, you can easily use the radial filter to blur the background while keeping the subject sharp and clear.
This technique helps emphasize the subject, making them stand out against a softened backdrop, ultimately elevating the overall impact of your portrait.
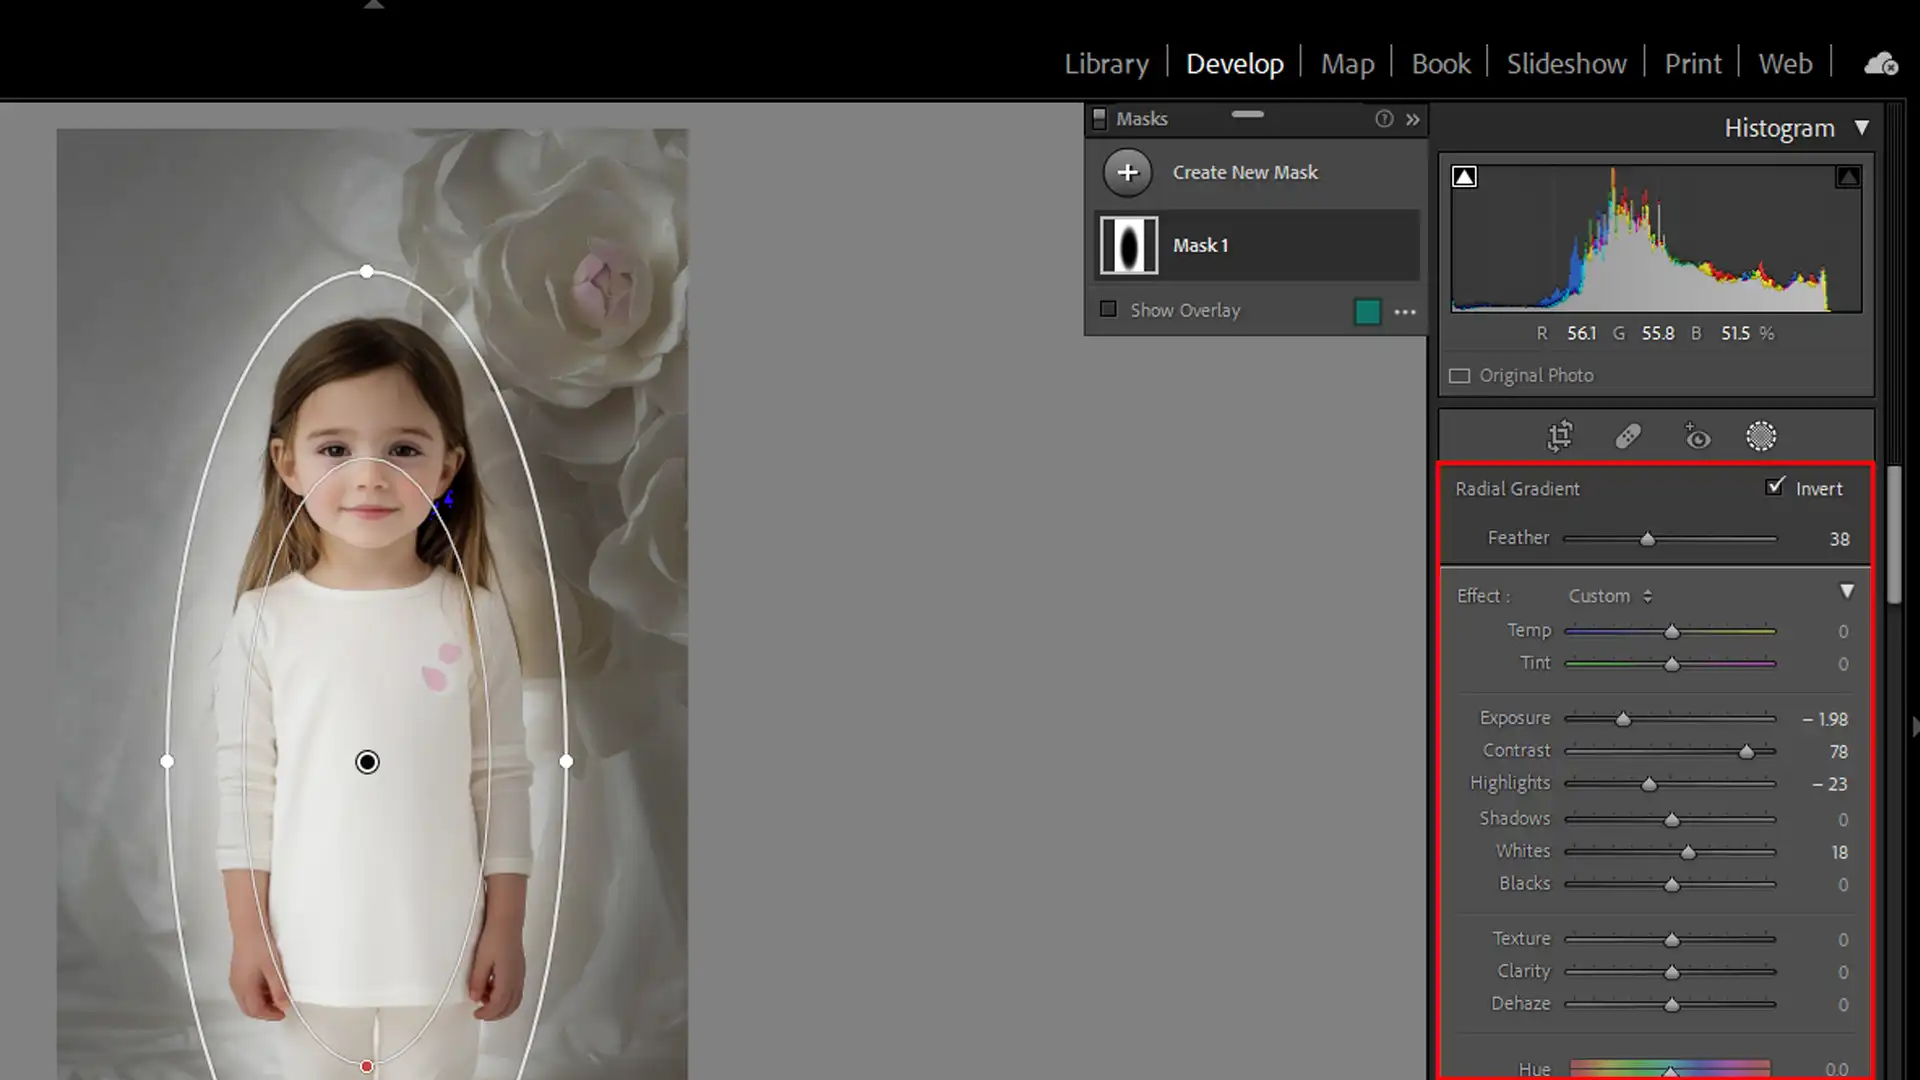
Draw Focus
Use the radial filter to draw an ellipse around the subject or viewer’s eye or face. This will blur the background and make the subject pop.
Soften Skin
Apply a slight blur using the clarity slider and sharpness sliders within the radial filter. This subtle adjustment gives the skin a smoother look without affecting the entire image.
Add Depth
By blurring three lines in the center of the background, your portrait gains depth and a professional touch.
Learning how to blur a background in Photoshop can dramatically enhance your images. By using blur techniques effectively, you can achieve a professional look and make your subject stand out.
Creating Depth in Landscape Photos
Creating depth in landscape photos involves using techniques like radial blurs to emphasize focal points and add a sense of dimension and perspective to the scene.
Highlight Focal Points
Use the radial filter to focus on a specific area like a tree or a mountain. This makes it stand out by applying a background to blur the background around it.
Enhance Vignetting
Create a subtle vignette effect to naturally guide the center pin the viewer’s eyes towards the center of the image.
In Lightroom, you can easily add a vignette using the post-crop vignetting slider found in the Effects panel. Adjust the amount, midpoint, roundness, and feather to achieve a balanced and professional look.
For those seeking more advanced control, consider using the vignette in Photoshop. Photoshop offers additional options, such as layer masks and gradient tools, allowing you to create more customized and intricate vignette effects.
Seamless Integration
Combine radial filters with linear gradient tools for a seamless blend of sharp and blurred areas, giving the photo a rich depth.
Adding Drama to Action Shots
Adding drama to action shots can be achieved by applying radial dim to highlight motion and intensity, making the scene more dynamic and engaging.
Emphasize Motion
Use the radial filter to apply blur around a moving object, like a car or a runner. This creates a feeling of speed and dynamism.
Layering Effects
Combine multiple radial filters for layered blurs that highlight different parts and mask specific portions of the motion, enhancing the overall impact.
Fine Adjustments
Utilize the radial gradient tool to make precise adjustments that bring out the best in your action shots.
Pro Tip: When using radial filters, always zoom in to 100% to check fine details and make sure the background blur looks natural.
You can toggle the auto-mask option for more precision and utilize the mask icon and mask panel for precise adjustments to ensure a seamless blend with the rest of your image.
For more tips on advanced editing techniques, consider learning about Lightroom shortcuts and how to effectively use the radial filter in your workflow.
Common Photo Editing Mistakes and How to Avoid Them
It’s easy to get carried away with the radialblur. Instead of enhancing your photo, excessive dim can make it look unnatural.
Use subtle adjustments to the blurbackground achieve a more polished look.
Mistake
Description
How to Avoid
Excessive Radial Blur
Overuse of radial blur can make photos look unnatural.
Use subtle adjustments; consider Gaussian Blur for precision.
Ignoring the Subject
Blurring the background too much can overwhelm the subject.
Keep your subject in focus and ensure it stands out.
Inconsistent Lighting
Uneven lighting can detract from photo quality.
Use tools like Dodge and Burn in Photoshop to balance lighting.
Overdoing the Blur Effect
It’s easy to get carried away with the radial blur. Instead of enhancing your photo, excessive dim can make it look unnatural.
Use subtle adjustments to the blur background achieve a more polished look. For more control, you might consider using and learning more about the gaussian blur in Photoshop.
Ignoring the Subject
Always keep your subject in focus. The purpose of a radial filter is to enhance your subject by blurring the background.
Ensure that your subject stands out, not blends in with blur background of the blurred area. This is especially important in portrait photography where you blur the background your subject should be the focal point.
Inconsistent Lighting
Lighting consistency is important. Whether you are using a radial filter or a linear gradient, ensure that the lighting appears natural.
Inconsistent lighting can distract viewers and reduce the quality of your image. If Lightroom’s tools aren’t enough, you can also utilize tools like dodge and burn in Photoshop to balance lighting effectively.
Pro Tip: When using adjustment brushes, zoom in to adjust to ensure fine details are refined. Combining blur effects with proper lighting can transform your images dramatically.
To perfect the effect, carefully adjust the brush size as you start blurring the background, ensuring a smooth and natural transition.
Advanced Techniques for Radial Blur
Now, let’s move on to advanced techniques for applying radial blur. I know it sounds fancy, but I’ll make it simple and enjoyable for you.
Unite this with advanced techniques for radial blur, you can elevate your images by blending motion and focus.
Combining Radial Blur with Other Effects
Combining radial blur with other effects can create remarkable images.
Here’s how you do it:
First, apply the radial blur to isolate your subject.
Next, use the radial filter for additional lighting adjustments.
Enhance colors with the linear gradient to add some drama.
Use other tools like exposure and contrast adjustments to balance the image.
Combining these effects brings depth and emphasis to your subject.
It’s like magic, but without the wand.
Using Radial Blur for Backgrounds
If you wonder how to dim photo backgrounds effectively, here’s a a step by step instructions-by-step guide:
Select the radial filter in Lightroom Classic.
Place it over the subject and adjust the feather for smooth transitions.
Reduce clarity and increase blur to dim the background.
Tweak exposure and highlights to retain focus on the subject.
This method helps to blurbackgrounds while keeping your subject sharp, giving a cinematic look to your photos.
Additionally, combining the radial filter with a linear gradient can enhance the effect, allowing you to further blur the background and create a more dynamic and visually striking image.
A practical tip: Use subtle radial blurs to keep it natural.
Pro Tip: For a balanced image, avoid excessive blur effects. Keep the subject sharp and ensure consistent lighting throughout. Remember, practice makes perfect, so don’t be afraid to experiment.
Frequently Asked Questions
Can you do radial blur in Lightroom?
Yes, you can apply a radial blur, but it requires using the radial filter creatively, as there’s no specific ‘radial blur’ feature.
Where is the radial filter in Lightroom?
The radial filter in Lightroom can be found in the Develop module. Look for the tool strip just below the histogram, and you’ll see an icon that looks like a circle or oval.
Does Lightroom have a blur tool?
Lightroom doesn’t have a dedicated blur tool like you might find in other photo editing software. However, you can achieve a blur effect using the adjustment brush, radial filter, or graduated filter by reducing clarity and sharpness.
How do I add directional blur in Lightroom?
To add directional blur in Lightroom, you can use the graduated filter. Drag the filter in the direction you want the blur to go, and then decrease the clarity and sharpness to create the blur effect.
$2,061.00Original price was: $2,061.00.$1,061.00Current price is: $1,061.00. 27584
Download Your Free Guide Now!
Discover the secrets of photography with our printable guide! Master essential techniques like aperture, shutter speed, and ISO to create stunning images. Get your free printable PDF now and start turning your snapshots into masterpieces!