Understanding pixel dimensions is crucial for anyone working with digital images.
Have you ever wondered why some photos look sharp and clear while others appear blurry or pixelated?
In this article, I’ll guide you through pixel dimensions, explaining how they impact image quality and what you need to know to make your photos look their best.
Whether you’re a seasoned photographer or just starting, this guide will help you master the art of pixel dimensions and elevate your digital imagery.
Curious to learn more?
Read on to discover the secrets behind stunning digital photos!
Table of Contents
Understanding Pixel Dimensions
Grasping the concept of pixel dimensions is important for various aspects of digital imaging, such as printing, web design, and digital art.
What Are Pixel Dimensions?
Pixel dimensions refer to the measurement of the width and height of an image in terms of pixels.
Each pixel acts as a single point in that image. They combine to create the whole image. Think of them as tiny building blocks.
The greater the number of pixels, the higher the image resolution. More pixels mean more detail.
Why Pixel Dimensions Matter
Pixel dimensions impact image resolution and quality. Higher pixel density means better image clarity when viewing on screens or printing.
When choosing print size, resolution plays a crucial role. You may wonder how many pixels are needed for a good print.
Use a print size calculator to determine the best fit for your desired image quality.
How to Measure Pixel Dimensions
Measuring pixel dimensions is simple:
- Open your image file in any editing software like Photoshop.
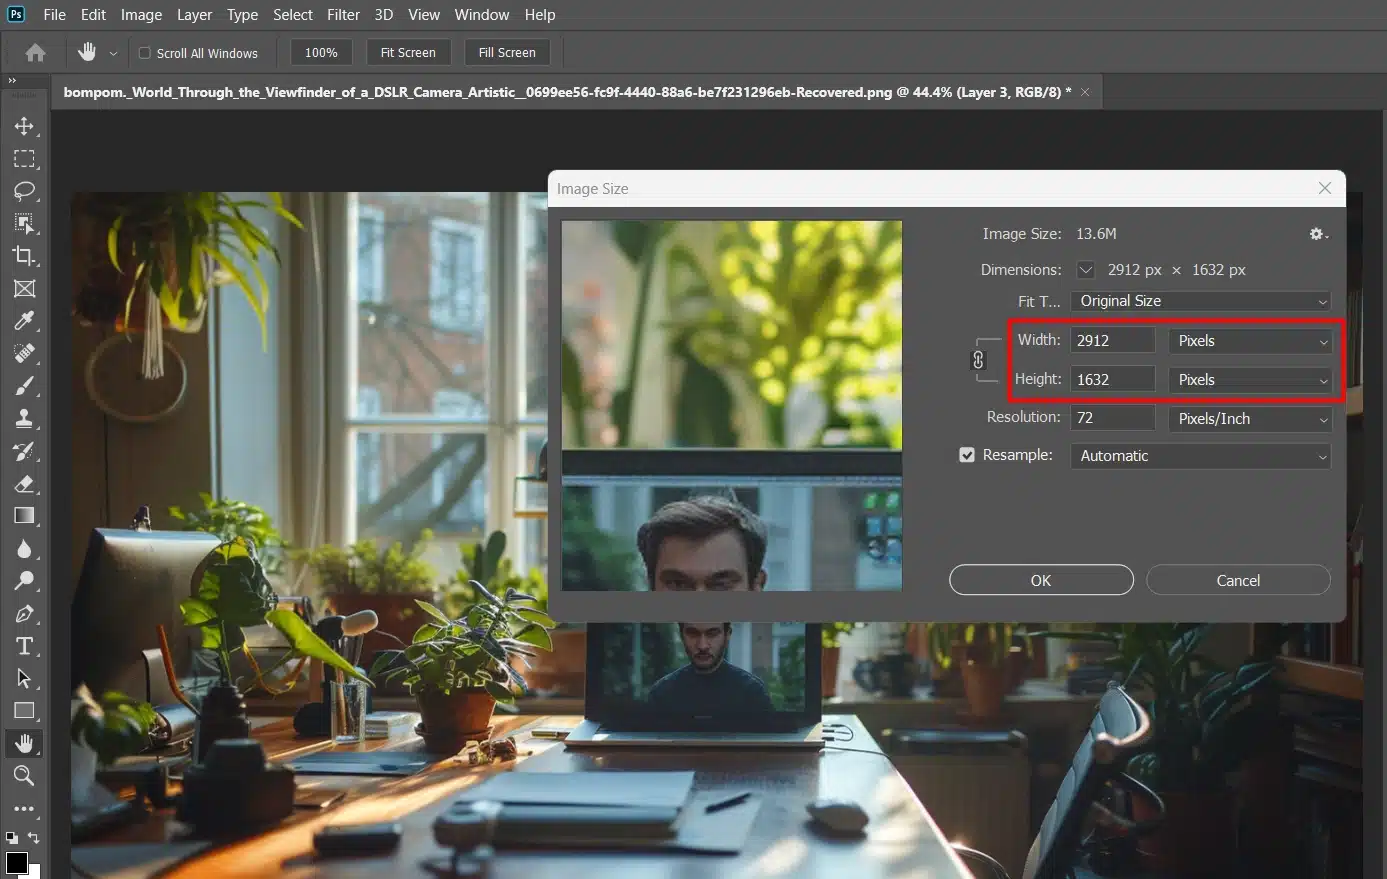
- Go to the image menu and check the document size.
- You'll see pixel height and width.
- Divide these values by the dpi (dots per inch) for printing, which gives the image's physical size.
Pro Tip: When adjusting pixel dimensions, always check the number of pixels and the intended display or print size.
It ensures you maintain the image clarity and avoid pixelated results. For more advanced editing, consider using essential tools to fine-tune your images.
Image Resolution Explained
Perception of image resolution is essential for mastering software like Photoshop and Lightroom. Let’s explore what resolution entails, its effects, and how to adjust it effectively.
Defining Image Resolution
Image resolution refers to the number of pixels in a digital photo. The more pixels, the better the detail. Simply put, resolution measures clarity.
- Pixels are tiny colored squares making up a digital image.
- Pixel dimensions refer to image width and height in pixels. For example, a 1920x1080 image has 1920 pixels width and 1080 pixels height.
- Pixels per inch (PPI) indicate how many pixels fit into one inch. Higher PPI means higher resolution.
Resolution impacts the image’s quality and size. More pixels bring more clarity but increase the file size. For screen use, a resolution of 72 PPI works fine, but printing needs at least 300 PPI for good results.
Impact of Image Resolution on Quality
Higher resolution offers more detail in your images. This detail becomes significant when viewing on a computer screen or printing. At a lower resolution, the image looks blurry or pixelated, especially if enlarged.
- Higher resolutions improve print quality. For example, an image with 300 PPI looks sharp and clear when printed.
- When printed at the same size, an image with a higher PPI shows more detail than one with a lower PPI.
- Be mindful. Higher resolution increases file size. Large files take up more storage space and can slow down software performance.
To avoid poor quality, always check your image resolution before printing. Consider the specific print size you need and adjust accordingly. Use a print size calculator to ensure correct print size measurements.
For an in-depth explanation you should fully grasp the impact of pixel dimensions, it’s also important to understand the different image file types.
Adjusting Image Resolution

Sometimes, you need to adjust image resolution to fit your needs. In programs like Photoshop, this process involves a few straightforward steps:
- Open your image file.
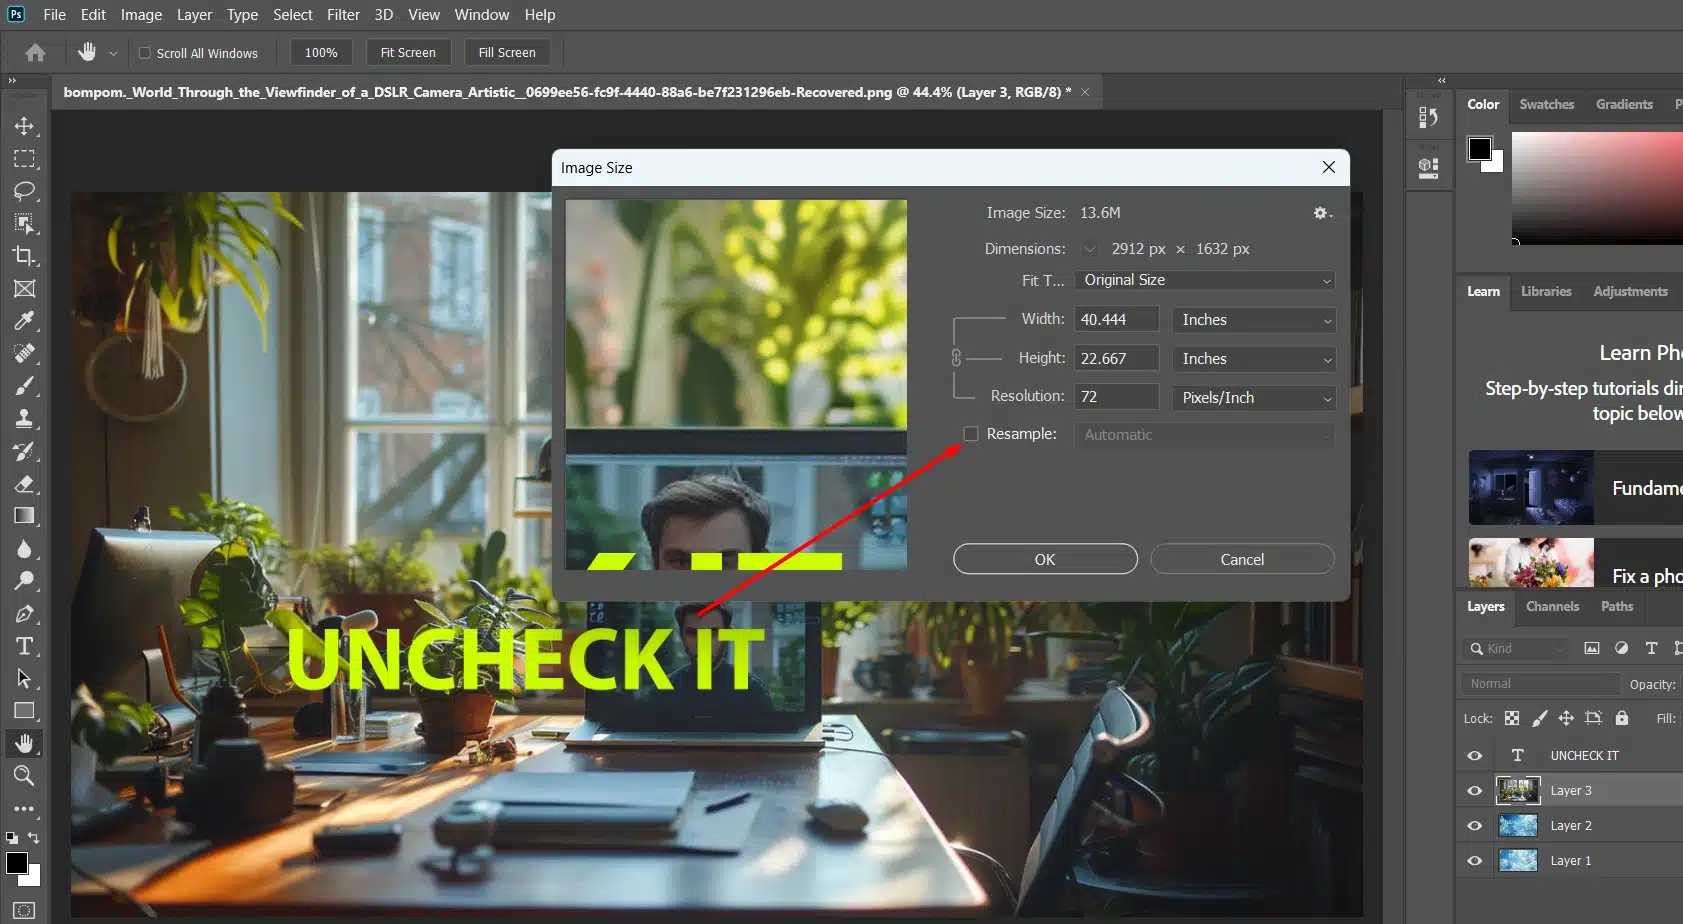
- Navigate to the 'Image' menu and select 'Image Size.'
- Ensure 'Resample' is unchecked to avoid altering pixel dimensions.
- Enter your target resolution in PPI. The document size in inches changes accordingly.
For more precise adjustments, try using advanced tools in Lightroom. They allow finer control over pixel dimensions and image size, ensuring quality is maintained. You can also use essential tools to streamline your workflow.
When adjusting, remember the balance between high resolution and manageable file size. If it is too high, your file might become unworkable. Too low, and your image clarity suffers, especially in print.
Pro Tip: Always save a copy of your original image file before making adjustments. That way, you can revert if something goes wrong. This simple step can save you a lot of headaches.
By understanding and managing image resolution well, anyone can create clear, high-quality images ready for any screen or print. Dive into your next project confident in your ability to handle image resolution efficiently.
If you need to adjust individual layers within your project, you must first learn to resize layers, which is essential to understanding the process.
Resizing is an important process in Photoshop seeing as you can not only resize layers, but even resize images and resize pixel arts.
Image Dimensions and Their Importance
Image dimensions are the measurements of an image’s width and height. They are expressed in pixels for digital use and inches for print. When you take a picture with a digital camera, the image dimensions determine its clarity.
Pixels are the individual tiny squares of light making up your image. Whenever you hear talks about “resolution,” it’s about how many of these pixels fit into one inch. More pixels per inch (PPI) means sharper images.
How to Determine Image Dimensions

To determine image dimensions, open the image in your editing program.
On Photoshop, go to ‘Image Size.’ You’ll see pixel dimensions showing width and height. In Lightroom, navigate to the Export dialog box, which will display the dimensions.
Utilizing essential tools can make this process even more efficient.
But why does this matter? If you plan to print your photo, you must know the print size. Suppose the image width is 3000 pixels, and you want to print it at 300 PPI. Divide the width by the PPI, yielding a 10-inch print width.
Optimizing Image Dimensions for Different Uses
Choosing the right image dimensions depends on its end-use:
- For the web, screen resolution at 72 PPI suffices. This keeps file size manageable, ensuring a quick website load.
- For printing, strive for at least 300 PPI. This guarantees that fine details are preserved, producing crisp, high-quality images devoid of pixelation.
Understanding these basics helps ensure your images look their best, whether on screen or print. So next time you choose image size, remember the importance of pixels per inch.
Pro Tip: If uncertain about the right dimensions, always go slightly higher in resolution. It’s better to have a sharper image than a blurry one.
Choosing the Right Image File
Selecting the appropriate image file format is crucial for maintaining quality and ensuring compatibility across various platforms like Photoshop or if you work with Lightroom.
You need to know the file types that are most commonly used across platforms. Different formats offer distinct advantages based on your needs. There are a few common types:
- JPEG: Most common format. Small file size, good for web use. But it compresses data.
- PNG: Larger than JPEG, supports transparency. Ideal for web graphics with clear backgrounds.
- TIFF: High quality, large file size. Best for print and professional photo editing.
- RAW: Uncompressed images from cameras. Keeps all data for maximum editing flexibility.
Best Practices for Image File Selection
Knowing when to use each file type is essential:
- JPEGs: Work well for posting photos on social media due to their small size.
- PNGs: Transparency abilities make them useful for web graphics.
- TIFF files: Ensure quality doesn't degrade when preparing for print.
- RAW: Choose for in-depth photo editing to keep as much detail as possible.
Choosing the right file affects the pixel density and print size of your photos. Higher pixel density provides better quality, which is necessary for large prints.
When working with pixel dimensions, choosing the right image format is essential. For a detailed comparison between RAW and JPEG formats, look at this informative guide on RAW or JPEG format.
Converting Between Image File Types

Sometimes, you need to convert an image file from one type to another. This is simple in Photoshop:
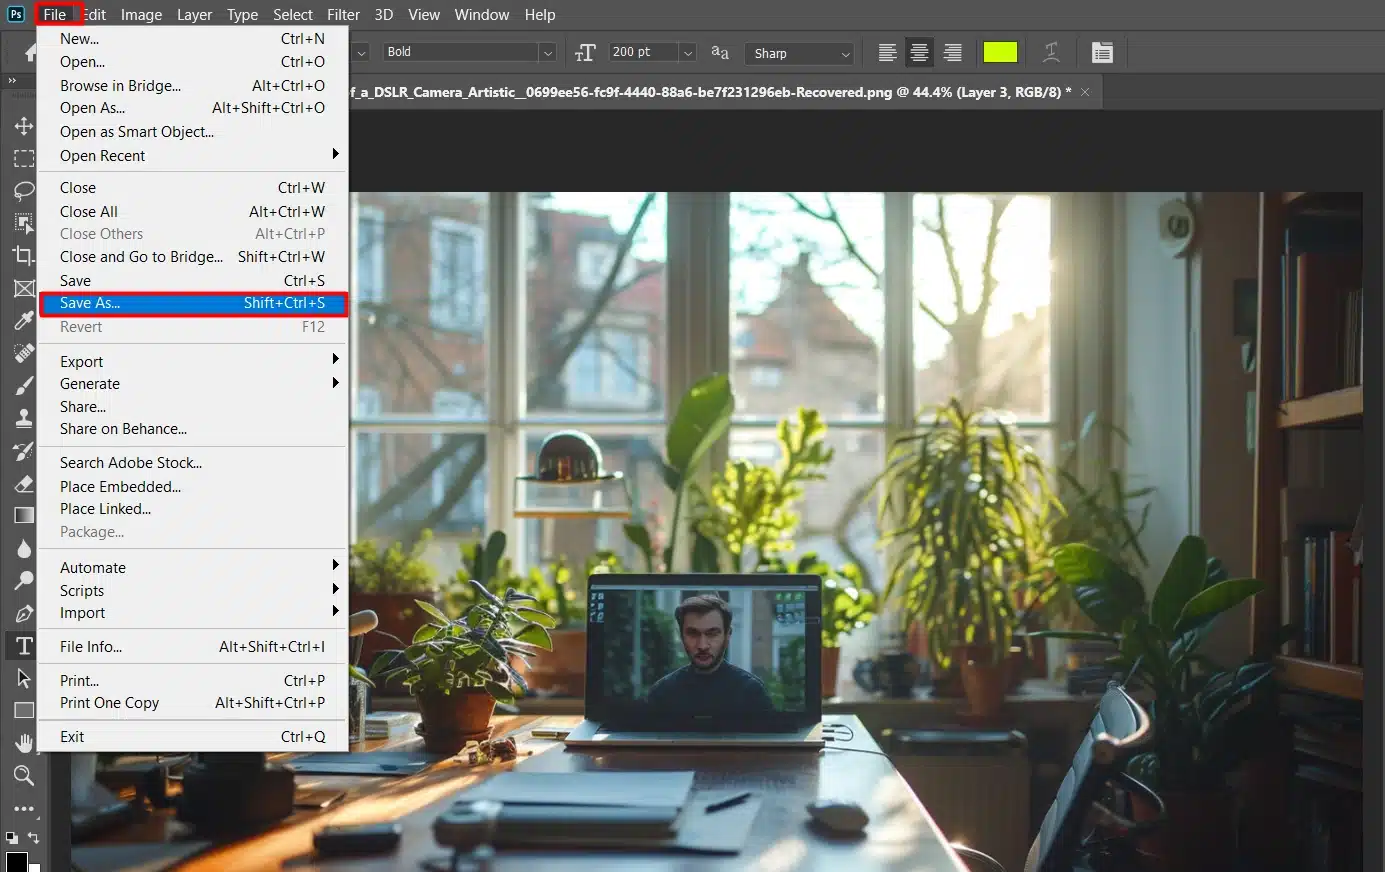
- Open your image.
- Click "File" -> "Save As" to choose your desired format.
Conversion can impact the image’s pixel size and file properties. For example, converting a JPEG to PNG often increases the file size without improving quality.
Embedded the pixel dimensions section in Photoshop makes the conversion process smooth and helps you keep track of the image’s pixel height and width.
Pro Tip: Always keep a backup of the original photo before conversion to avoid losing any valuable data.
By following these guidelines, you can better manage your image files for web or print. Good luck navigating your photo editing journey!
Print Size: Getting It Right
Calculating the correct print size from pixel dimensions is essential to ensure your photos look their best. Here’s a quick comparison table to help you understand the relationship between pixel dimensions, resolution, and print size.
This will guide you in selecting the right dimensions for high-quality prints.
| **Pixel Dimensions** | Resolution (PPI) | Print Size (Inches) |
|---|---|---|
| 1200 x 1800 | 300 | 4 x 6 |
| 2400 x 3000 | 300 | 8 x 10 |
| 3000 x 4500 | 300 | 10 x 15 |
| 3600 x 5400 | 300 | 12 x 18 |
Calculating Print Size from Pixel Dimensions
To print your photos at their best quality, you need to know the print size. It’s important to start by calculating the correct print size from pixel dimensions. Here’s how we do it:
Steps to Calculate Print Size:
- Find out your image's pixel dimensions. Open your picture in Photoshop and look at the "Image Size" dialog box to see its width and height in pixels.
- Determine the desired print resolution, measured in pixels per inch (PPI). For high-quality prints, 300 PPI is common.
- Divide the width and height of your image by the resolution. For example, if your photo is 3000 by 4500 pixels, at 300 PPI, your print size would be ten by 15 inches.
Remember, each pixel per inch contributes to your print’s clarity. Too many or too few pixels can affect the photo’s quality. If you’re aiming for the largest size without losing quality, keep the resolution high.
Standard Print Sizes and Their Uses
Different print sizes serve various purposes. Let’s look at some standard sizes and where they fit best:
- 4x6 inches: Great for small frames and photo albums. It's a popular size for casual pictures.
- 5x7 inches: Slightly larger, suitable for framed gifts and wall collages. More impactful than 4x6 while still compact.
- 8x10 inches: Ideal for portraits and feature photos on walls. This size is standard for cherished memories.
- 11x14 inches: Frequently used for small posters and art prints. Offers a good balance between size and detail.
- 16x20 inches: A large print, fitting for statement pieces in your home or office. Ensure high pixel density.
Understanding these sizes helps you choose the best one for your project. Avoid resizing images too much to preserve pixel quality.
Pro Tip: When preparing an image for print, always check your printer’s requirements for dpi and adjust accordingly. This ensures clarity and precision in your final output.
Additionally, using essential tools like the “Image Size” dialog box, can help you manage your pixel dimensions effectively.
Understanding image upscaling without losing quality is crucial for working with pixel dimensions, especially when enlarging images for print or maintaining clarity in digital formats like websites or social media platforms
Frequently Asked Questions
What size is 1920x1080 pixels in inches?
- To find the size in inches of a display or image with 1920×1080 pixels, you need to know the pixel density (PPI) of the device. Size in inches = number of pixels / PPI.
What is the resolution of 640x480?
- The resolution of 640×480 refers to a display or image with 640 pixels in width and 480 pixels in height. This resolution is often called “VGA” (Video Graphics Array).
How do you measure the pixel size of an image?
- To measure the pixel size of an image, you need the image’s dimensions in pixels and the image’s physical size. Pixel size = physical size/dimension in pixels.
Is pixel size or resolution?
- Pixel size and resolution are related but distinct concepts. Pixel size refers to the dimensions of an individual pixel, while resolution refers to the total number of pixels in an image or display.
Conclusion
In conclusion, understanding pixel dimensions has truly transformed my photo editing skills.
By mastering pixel dimensions, I’ve achieved sharpness and clarity in my images that I previously thought were out of reach. It has even made mastering focus photography feel like a breeze.
If you want to enhance your editing prowess, I highly recommend checking out my Photoshop Course and Lightroom course. These resources provide comprehensive guidance on working with pixel dimensions and other essential techniques.
Additionally, Adobe offers powerful tools like Photoshop and Lightroom to help you take your images to the next level.
Dive into these tools and courses to see the difference they can make in your work. Happy editing!
Read more about Photoshop:


