Have you ever felt overwhelmed by the sheer number of Photoshop tools names and their functions? You’re not alone.
As someone who spends a lot of time in Photoshop, I know how important it is to understand and effectively use these tools to elevate your creative projects. In this article, I’ll guide you through the significant tools and techniques you need to know.
Whether you’re a beginner or looking to refine your skills, you’ll find valuable insights that can take your Photoshop game to the next level.
Table of Contents
Getting Started with Core Photoshop Tools Names
Before diving into Photoshop, it’s helpful to understand its core tools and layout.
Let’s start with a quick look at the Photoshop interface to familiarize you with the workspace and tool options available for your projects.
Overview of Photoshop Interface
When you first open Photoshop, you see a myriad of tools and panels. Don’t worry; it gets easier.
The main workspace includes the toolbar, the canvas (where you edit your images), and various panels on the right. You can move these panels around or close them if they’re in the way. Later, you’ll want to customize this setup based on your needs.
Customizing Your Toolbar
Customizing your toolbar makes your workflow smoother. First, click on the three dots at the bottom of the toolbar. Select “Edit Toolbar.” Here, you can drag and drop tools to reorder them.
Maybe you use the clone stamp tool often? Move it to the top for easy access. Under “Extra Tools,” you find more tools you might need, like the art history brush tool or brush tool. Add or remove tools based on your preferences.
Photoshop Tools Names You Should Know
- Brush Tool: Paints on your canvas like a traditional brush.
- Healing Brush Tool: Great for removing blemishes and imperfections.
- History Brush Tool: Paints your image to a previous state.
- Background Eraser Tool: Removes backgrounds efficiently.
- Magic Eraser Tool: Erases similar-colored areas with a click.
- Magnetic Lasso Tool: Selects objects with high contrast edges.
- Spot Healing Brush Tool: Fast blemish removal tool.
- Clone Stamp Tool: Copies exact pixels from one area to another.
- Pencil Tool: Creates sharp, hard-edged lines.
- Sharpen Tool: Sharpens parts of your image.
- Mixer Brush Tool: Mixes colors, simulating real painting.
- Eraser Tool: Removes parts of your image.
- Patch Tool: Repairs larger areas of an image.
- Paint Bucket Tool: Fills a selected area with color.
- Zoom Tool: Zooms in and out of your canvas.
Understanding these core tools is pivotal. You experiment with each one to see how they change your images. Practice makes perfect, so keep playing around.
Pro Tip: Always remember to save copies of your work in stages. This habit lets you go back and fix mistakes without redoing everything. familiarize yourself with the perspective crop tool, rotate view tool and other essential tools to streamline your editing process.
Photoshop Tools Names
If you’re eager to dive into Photoshop, understanding the tools names is important. Let’s break down some of the most useful ones so you can start editing like a pro.
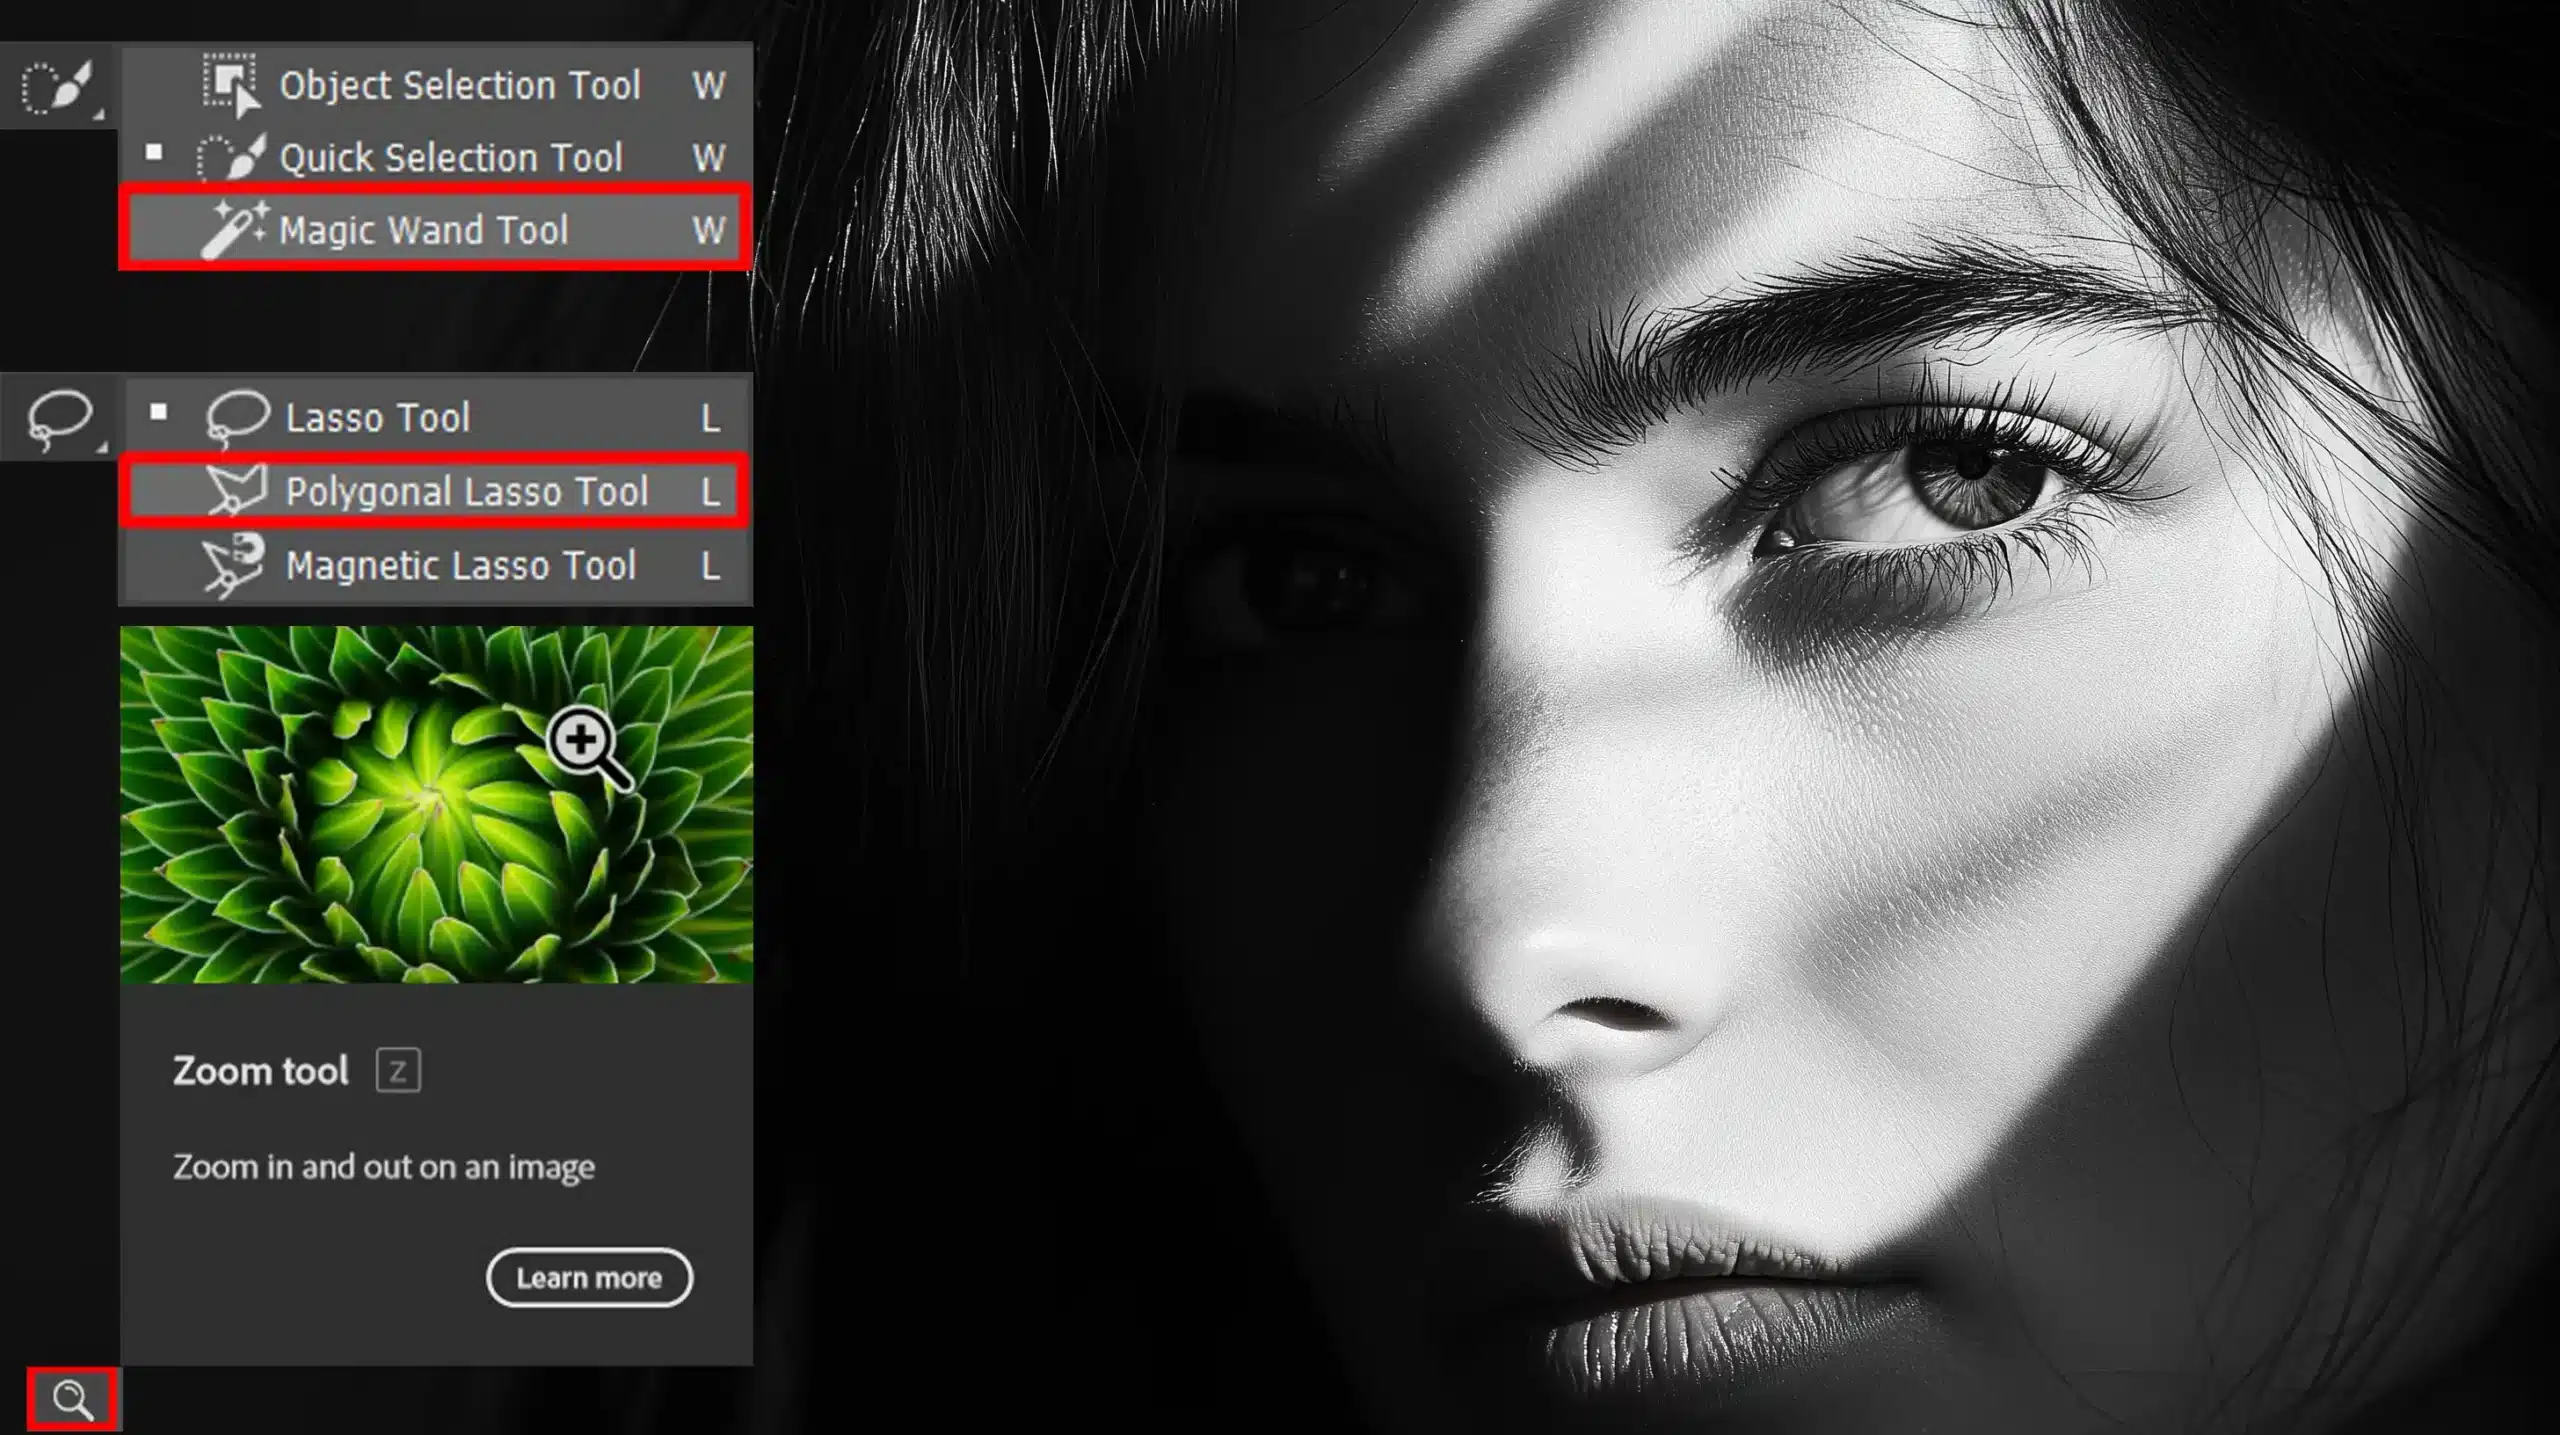
Selection Tools
- Magic Wand Tool: This tool selects pixels of similar color with one click. It's great for quick selections when colors contrast sharply.
- Polygonal Lasso Tool: Use this for straight-edged selections. Click to create anchor points and double-click to close the selection.
- Zoom Tool: Zooming in and out on your canvas allows you to focus on small details. Simply click to zoom in or hold Alt while clicking to zoom out.
Selection tools help you isolate parts of an image to edit. Play around with these tools, including the Elliptical Marquee Tool, to see which ones suit your projects best.
The elliptical marquee tool is particularly useful for selecting circular or oval-shaped areas, giving you even more control over your editing.
For even better precision and comfort while making selections, use the Rotate View Tool to adjust the canvas angle, allowing you to work from different perspectives.
Crop and Slice Tools
- Crop Tool: This tool crops your images to remove unwanted areas. Adjust the crop box to your desired size and hit Enter.
- Perspective Crop Tool: Corrects distortions when you need to crop and straighten an image simultaneously. Click and drag around the area you want to keep.
- Slice Tool: Divide a large image into smaller sections, making it easier to save and optimize each part separately. The Slice Tool is perfect for web design, allowing you to work with smaller pieces for better control and faster loading times.
These tools are important for shaping your photos and prepping them for various platforms. Crop and Slice streamline your workflow, and the Slice Tool specifically helps in dividing images efficiently for web use or detailed edits
Measurement Tools
- Eyedropper Tool: Helps you sample colors from your image, allowing for consistent color usage. Click the color you need to pick it up.
- Ruler Tool: Measures the distance between two points. Click and drag to measure, helping you align and space elements evenly.
- Note Tool: Adds text notes within your document. Handy for keeping track of adjustments or edits as you work on collaborative projects.
Pro Tip: For more advanced techniques, consider exploring how to use the patch tool in Photoshop or the content-aware fill in Photoshop. These tools can significantly enhance your editing capabilities.
Additionally, mastering the Elliptical Marquee Tool, one of the key Photoshop tools names, can help you create precise selections that are important for detailed edits and complex compositions. Learning these Photoshop tools names and their functions can greatly improve your workflow and results.
Brush Tools Photoshop
Brush tools in Photoshop offer a range of options for painting, retouching, and enhancing images. Each tool has its unique use, allowing for creative and precise edits and creating various painting effects.
Let’s explore some of these brush tools.
Healing Brush Tool
This tool works magic on imperfections. Imagine you have an old photo with scratches or blemishes.
Just a few strokes of this handy tool and, poof, they’re gone! It samples pixels from one part of your image and blends them seamlessly to another area.
Art History Brush Tool
This brush allows your photo to mimic art styles. By painting over specific areas, you can transform your image into something resembling a watercolor, impressionist painting, or even abstract art.
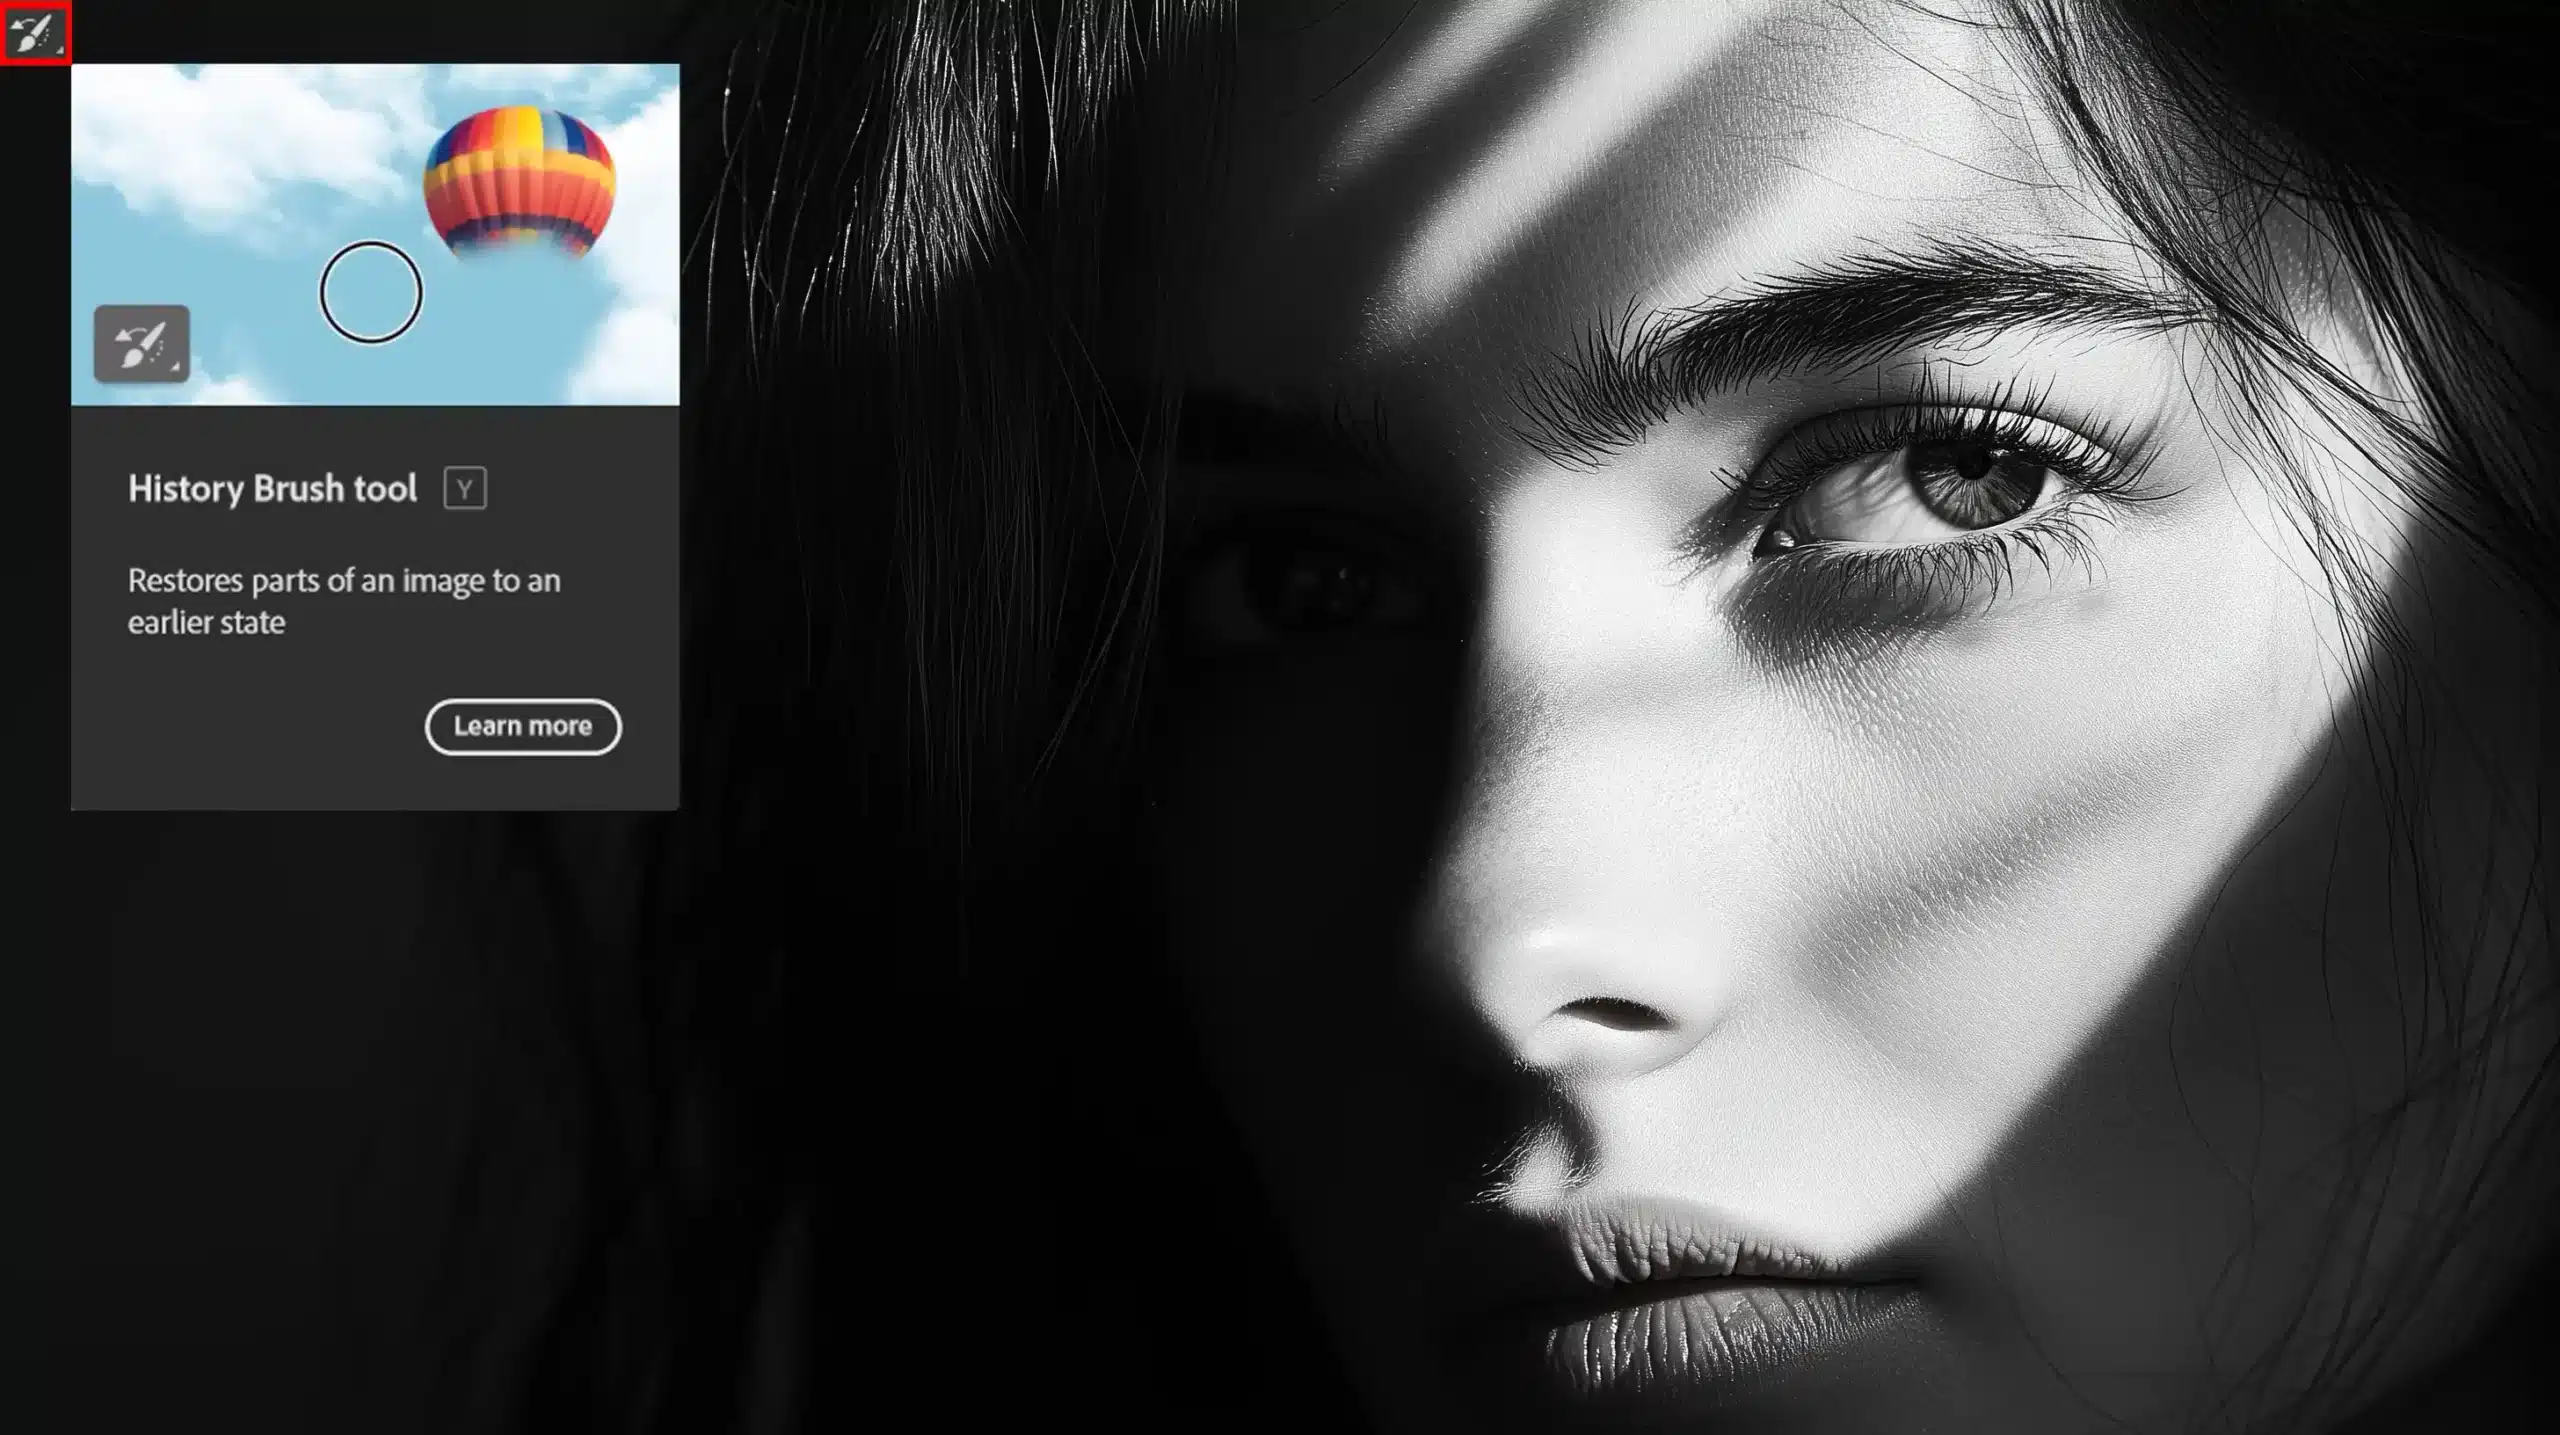
History Brush Tool
History brush tool paints sections of your image to a previous state while keeping other edits intact. It’s like having an undo button for specific parts of your photo.
Imagine painting with confidence, knowing you can always step back. The History Brush keeps those happy accidents from being permanent.
Eraser Tools Photoshop
Photoshop can be a bit confusing when you’re just getting started, especially with all the different Photoshop tools names to remember.
But don’t worry! Today, we’ll focus on eraser tools. With practice, these tools become second nature.
Background Eraser Tool
This tool helps you remove backgrounds effortlessly. Imagine you have a photo of a friend, and you want to get rid of the busy background.
First, select the eraser tool, then hold down to choose the background eraser tool. Click and drag around your friend, and watch the background disappear. The tool works by sampling colors and removing similar ones.
Why Use It?
- It's quicker than manually selecting and deleting background areas.
- It preserves the edges, making your subject stand out.
Magic Eraser Tool
This tool is another nifty option. It’s like waving a magic wand and seeing parts of an image disappear. Select the magic eraser tool, click on an area you want to remove, and voila! Transparent pixels replace the unwanted sections.
When to Use It?
- Great for images with high contrast between the subject and background.
- Quick fixes for non-complex backgrounds.
Pro Tip: Always fine-tune your work using the spot healing brush tool or clone stamp tool to ensure smooth edges. It might take a bit more time, but it guarantees a polished finish.
Familiarizing yourself with different Photoshop tools names and their functions can help you make more precise edits.
Advanced Photoshop Tools
So, you’ve made it past the basics and now you’re ready to dive into advanced Photoshop tools. This is where knowing specific Photoshop tools names really comes in handy!
Whether you’re touching up vacation photos or creating stunning graphics, these tools will help you achieve your vision.
Pen Tool
The Pen Tool can feel like a tricky beast. However, mastering it opens endless possibilities. It allows for precise selections and paths. The trick is to practice those curves.
Select it and click to create anchor points, and drag for curvature. Start small, maybe outline a simple shape. Gradually, you’ll outline complex figures with ease.
Type Tool
If you want text in your images, the Type Tool is your best friend. You can adjust font, size, color, and spacing.
Try adding some effects like drop shadows or strokes. This tool makes blending text with images easy. Additionally, using it with the pattern stamp tool can add some artistic flair to your typography.
Shape Tools
Square, circle, polygon – whatever shape you need, the shape tools have you covered. Click and drag to create your shape. The custom shape tool lets you create unique shapes.
Simply select the custom shape tool and choose from preset shapes or create your own. This tool is perfect for designing logos and complex designs.
Pro Tip: Combine different tools together for even more impressive results. Use the mixer brush tool to blend colors after drawing shapes. Or apply the blur tool to soften edges for a more natural look.
Try pairing the pattern stamp tool with the type tool to fill text with creative patterns, giving your typography an extra layer of depth.
Creative Tools in Photoshop
Photoshop’s creative tools can help bring your artistic visions to life.
Understanding the right Photoshop tools names is important, whether you’re enhancing a photo or crafting a unique design, these tools can make the process intuitive and fun.
Let’s explore some important features to get you started.
Gradient Tool
The Gradient Tool lets you create smooth transitions between colors. You can find this tool in the toolbar; it looks like a rectangle filled with color. Click and drag to apply the gradient. You’ll notice how it adds depth and intensity to your image, making it more lively.
Gradients work well on backgrounds, text, or even entire images. Experiment with different types like linear or radial gradients for diverse effects. Photoshop allows you to edit gradients by changing the colors, opacity, and blending modes.
Pro Tip: Use gradients to enhance sky backgrounds, making sunsets look stunning.
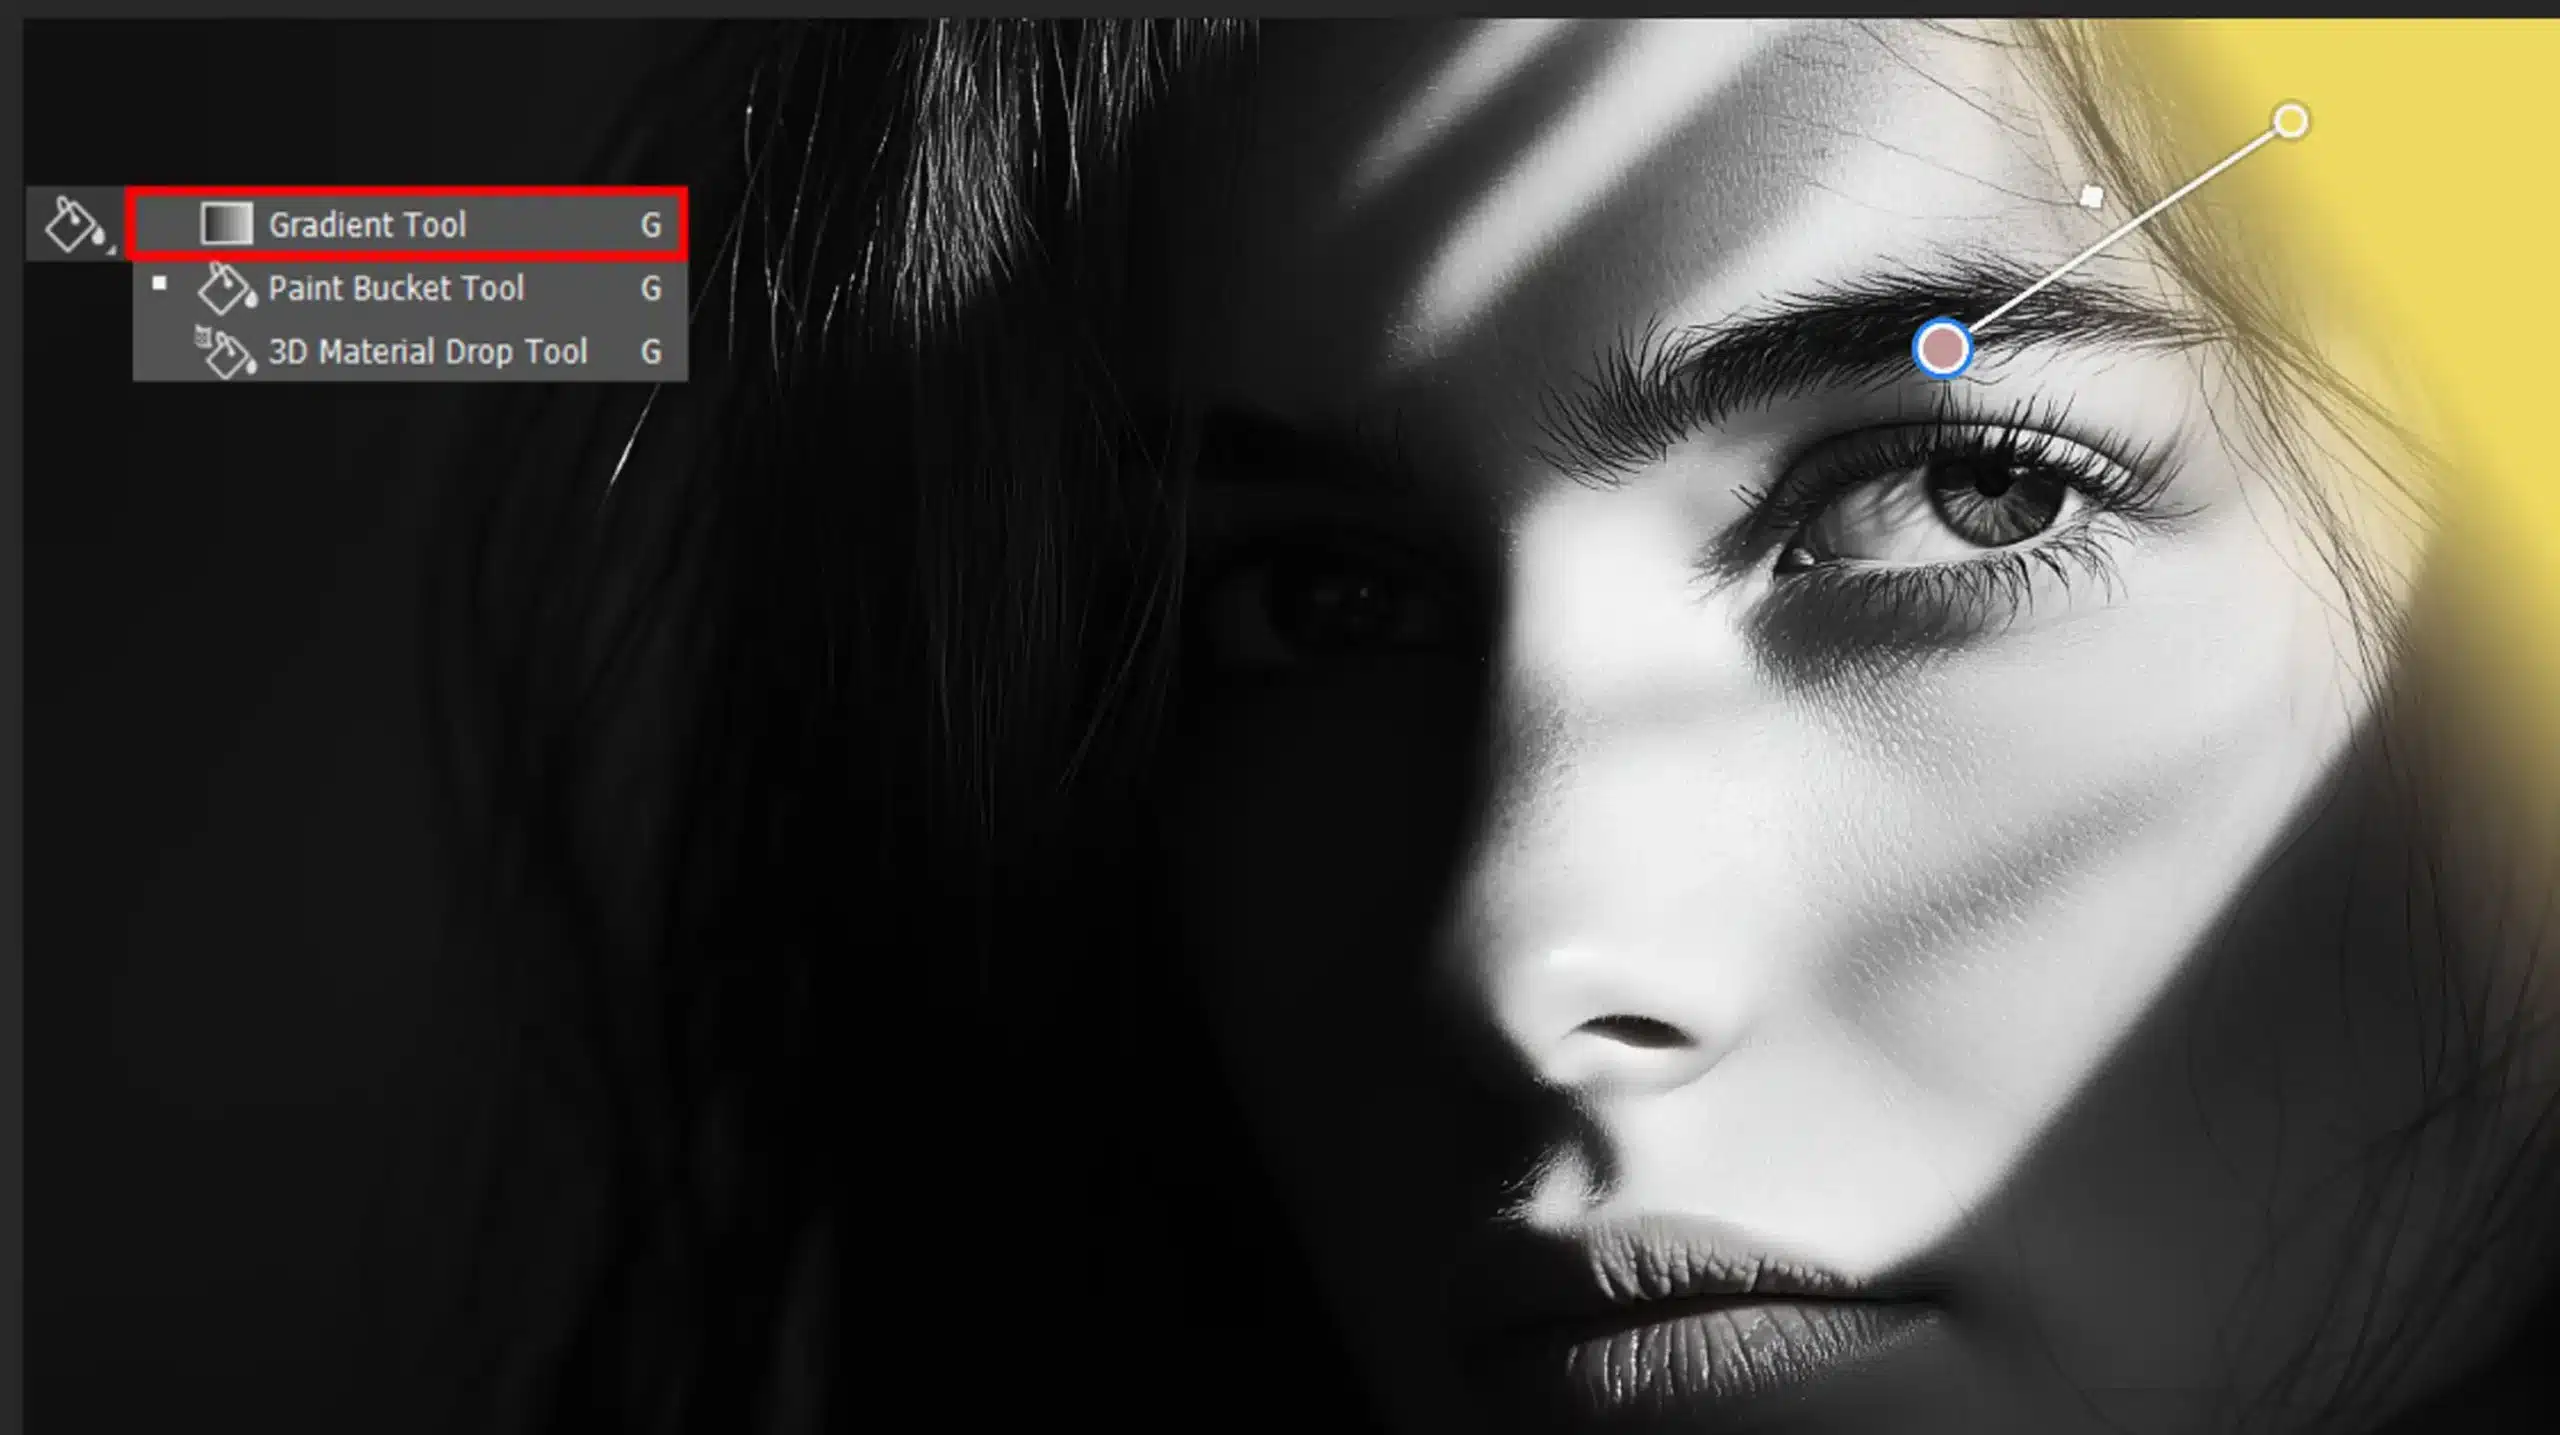
Paint Bucket Tool
Sometimes you just need to fill an area with color quickly. That’s where this tool comes in handy.
Think of it as a digital paint can that fills any enclosed area with your chosen color with just one click. It’s super useful when you want to add solid colors to shapes or backgrounds.
Select it, choose your color, and then click on the area you want to fill. The tool works best with simple, confined areas. If the edges aren’t well-defined, use the pencil tool to draw borders first. This ensures the color stays within the designated areaand complements other painting tools in your workflow.
3D Tools
Ready to take your designs to another dimension? Photoshop’s 3D Tools let you turn flat images into dynamic three-dimensional objects. With these tools, you can create text and shapes that pop out of the screen. They’re perfect for adding a wow factor to your projects.
Start by selecting the 3D menu and choose the type of 3D layer you want to create. You can manipulate these layers to adjust depth, lighting, and perspective.
Final Touches
Don’t be afraid to experiment with the sharpen tool and blur tool for finishing touches. These can add final adjustments to your masterpiece. Practice makes perfect, so keep exploring these retouching and painting tools to create amazing artwork!
Pro Tip: For those looking to streamline their workflow, mastering Photoshop Shortcuts can save you a lot of time. Additionally, understanding the difference between Photoshop and Lightroom can help you decide which software is best suited for your specific needs.
Adjustment and Retouching Tools
As someone tasked with teaching old folks Photoshop, I must admit it’s kind of cute. Our focus today? Adjustment and retouching tools, some of the most impactful Photoshop tools names to learn.
These tools can change the game in photo editing, making your images look crisp and professional.
Below is a comparison of some important Photoshop tools and how they can be used to achieve professional results.
| Aspect | Overview |
|---|---|
| Pen Tool | Allows for precise selections and paths. Practice with small shapes and gradually move to complex figures for better mastery. |
| Type Tool | Used for adding text to images. Adjust font, size, and color, and apply effects like drop shadows or strokes for enhanced typography. |
| Shape Tools | Provides a variety of shapes like squares, circles, and polygons. The custom shape tool allows you to create unique and complex designs. |
| Pattern Stamp Tool | Used in combination with the Type Tool to fill text with creative patterns, adding depth to typography. |
| Mixer Brush Tool | Blends colors for a more natural look after drawing shapes. Excellent for creating smooth gradients and realistic painting effects. |
| Blur Tool | Softens edges and reduces harsh lines for a more natural appearance. Ideal for finishing touches on graphics and photos. |
Dodge and Burn Tools
The Dodge and Burn tools help adjust light and dark areas in an image. Here’s how the Burn Tool can darken parts and add depth.
Burn Tool
The burn tool darkens specific areas of your image. Imagine you’re working on a photo, and some parts are too bright. This function is super handy for adding shadows or depth.
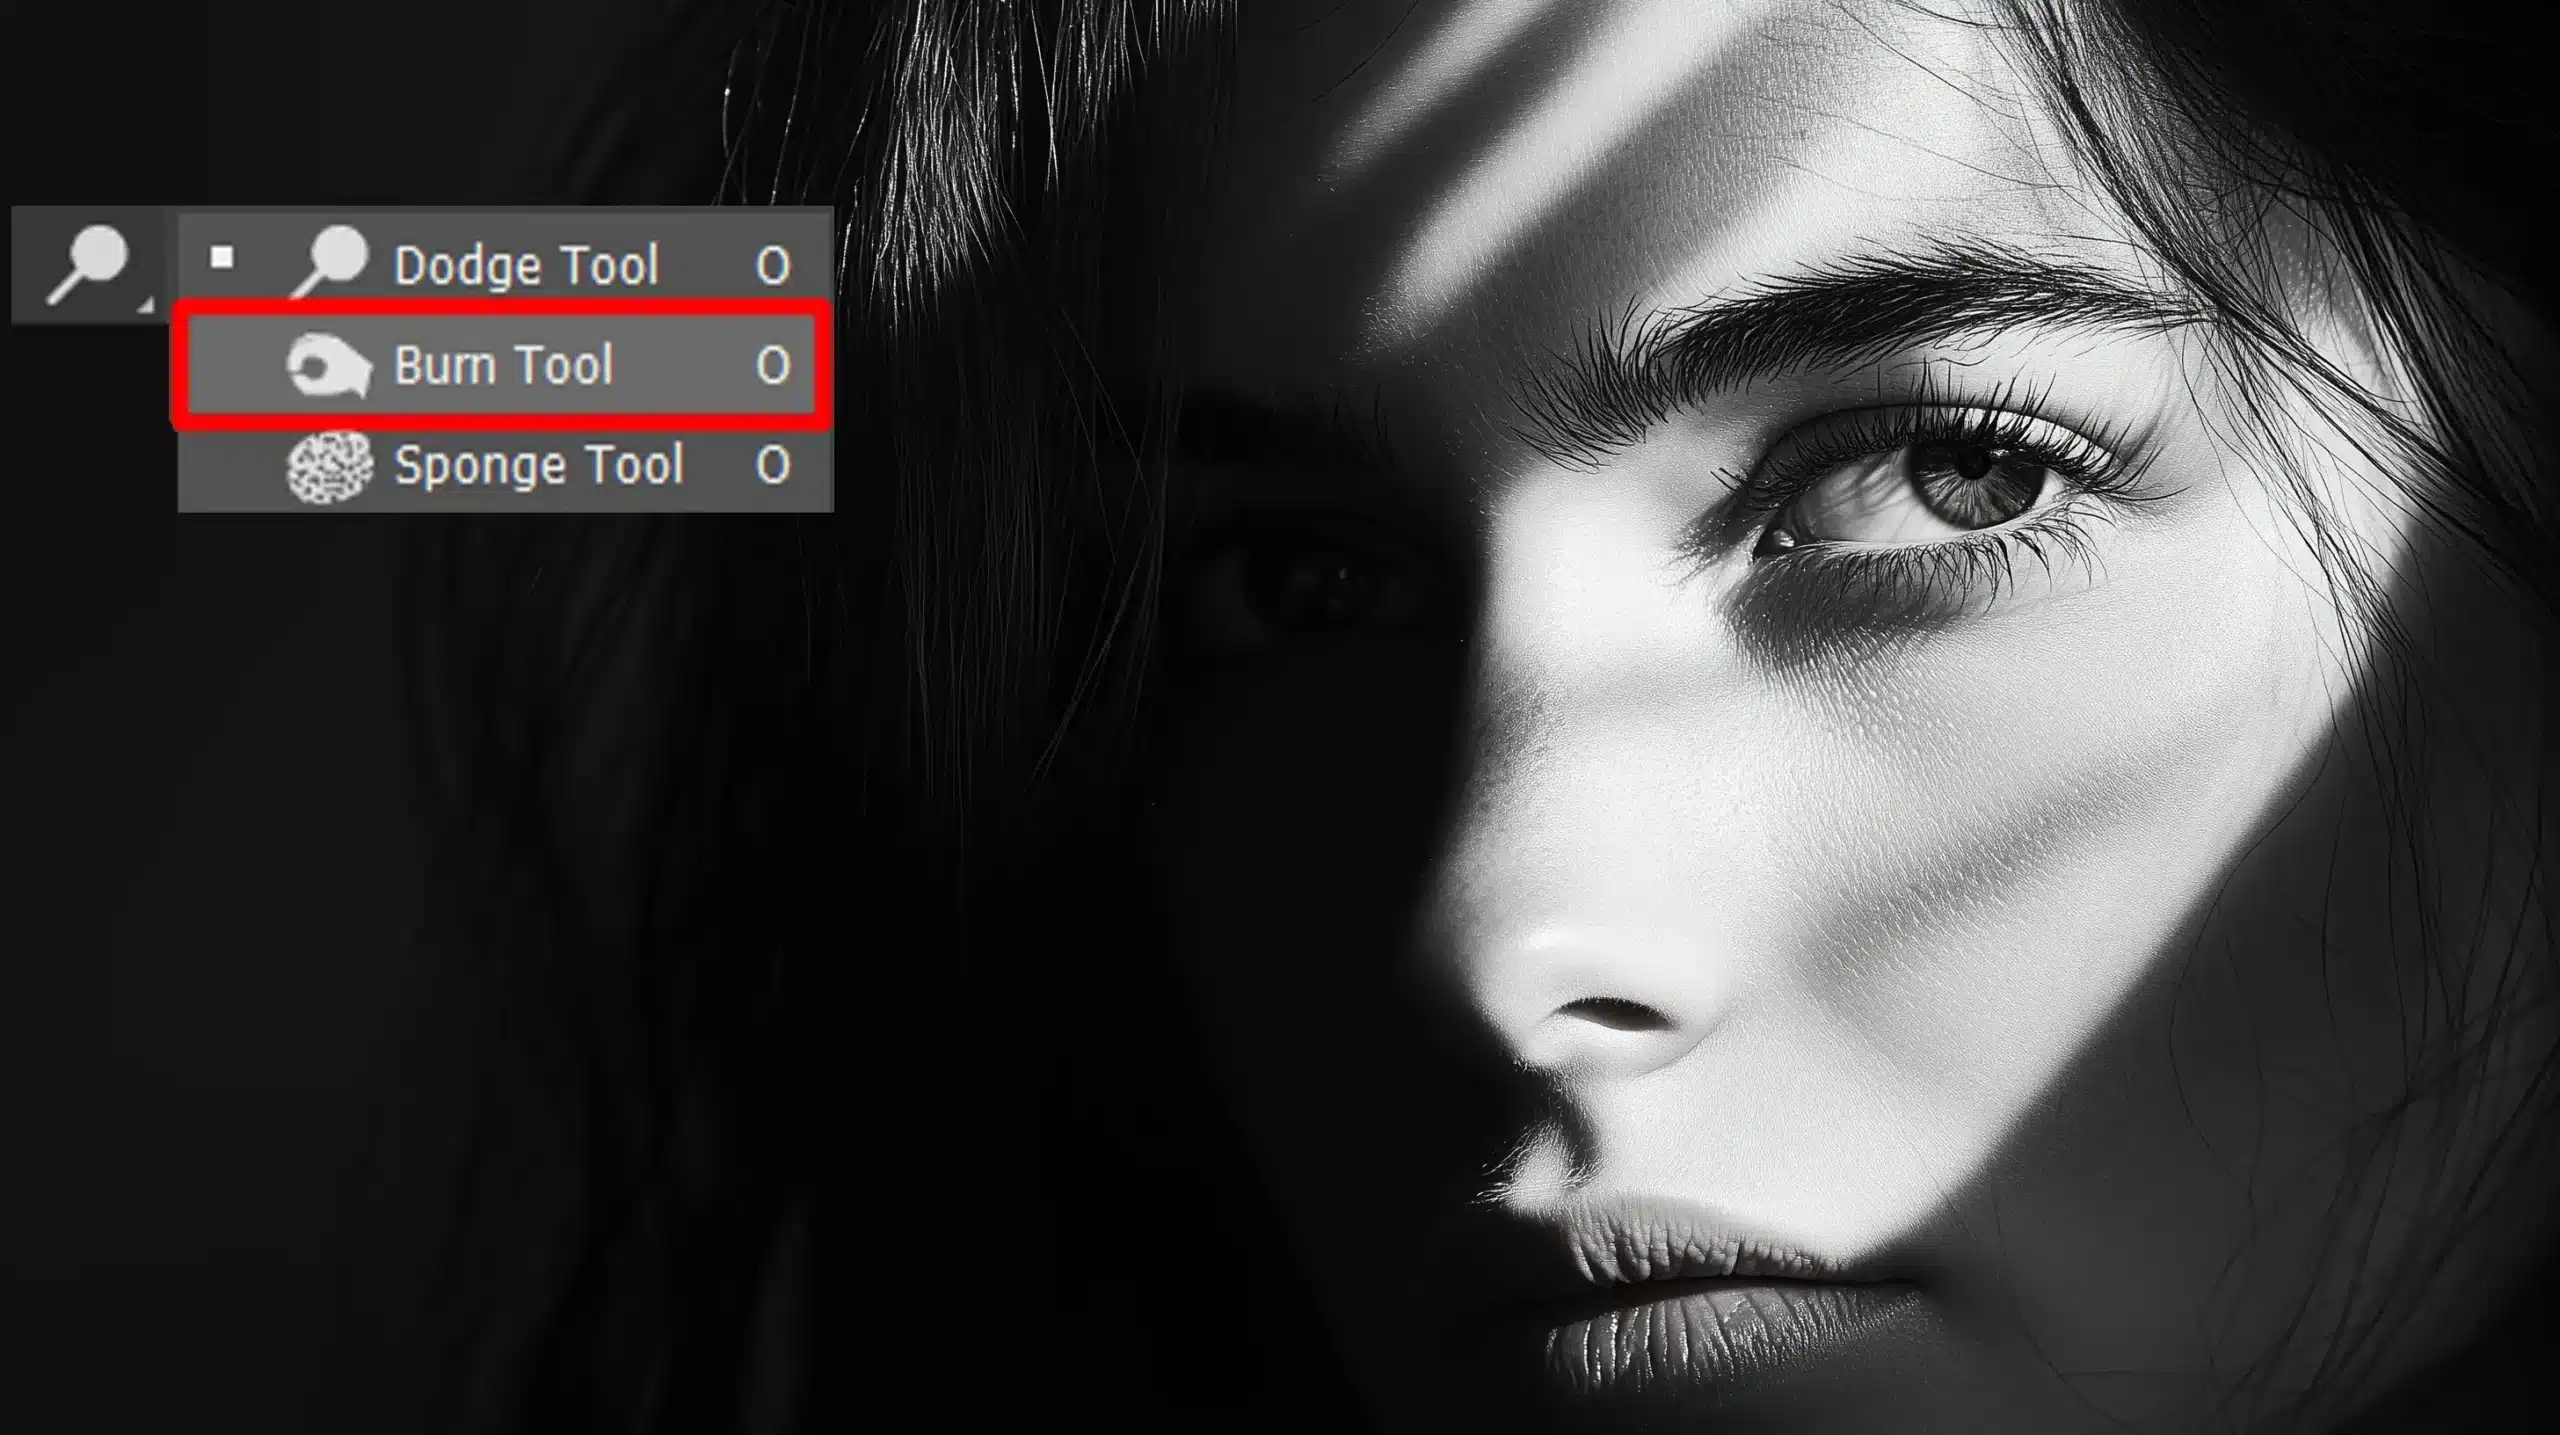
Dodge Tool
Next on our list is the dodge tool, the sibling of the burn tool. This one lightens specific areas. Picture a scenario where the subject of your photo is lost in darkness.
A few strokes with the dodge tool can brighten things up, making the subject pop.
Sponge Tool
Meet the sponge tool. This tool adjusts the saturation levels of your image. Use the sponge tool in “saturate” mode. Want them to look a bit vintage and faded? Switch to “desaturate” mode.
Miscellaneous Tools
These tools may not be the stars of the show, but they play significant supporting roles.
Hand Tool
The Hand Tool might sound mundane, but trust me, it’s incredibly useful. If you’re zoomed in or working on fine details, it allows you to navigate without disturbing your work. It’s like having an extra set of eyes.
To use the Hand Tool, simply press the spacebar and click and drag to move around the canvas. The Hand Tool can save you precious time, particularly when adjusting fine details like in retouching and painting tools.
Pro Tip: If you’re working with multiple layers and need to align elements precisely, hold down the spacebar to activate the Hand Tool temporarily while using another tool.
Zoom Tool
Whether you’re dealing with the minutiae of pixel-perfect edits or getting a broad overview, this tool has your back.
Here’s a quick guide:
- Select the Zoom Tool from your toolbar.
- Click to zoom in, or hold Alt (Option on Mac) to zoom out.
- If you’re multi-tasking, press Ctrl and the plus or minus keys (Cmd and plus/minus on Mac) for quick adjustments.
Pro Tip: Double-click the zoom to tool to zoom in the toolbar to instantly fit your image to the screen. It’s a life-saver when you need to reset your view quickly. Pair it with the Rotate View Tool to adjust the canvas angle and navigate comfortably around your image while zoomed in on specific details.
Just like understanding the different types of lenses and choosing between a prime vs zoom lens for different photography needs, knowing when to zoom in or out in Photoshop can greatly improve your workflow.
Frequently Asked Questions (FAQs)

Which 7 tools are found in Photoshop?
- Brush Tool
- Clone Stamp Tool
- Gradient Tool
- Eraser Tool
- Lasso Tool
- Pen Tool
- Healing Brush
- Brush Tool
- Clone Stamp Tool
- Gradient Tool
- Eraser Tool
- Lasso Tool
- Pen Tool
- Healing Brush
Which are the 5 tools in Photoshop called?
- Move Tool
- Selection Tool
- Crop Tool
- Eye Dropper Tool
- Paint Bucket Tool
What are the Photoshop tools called?
Photoshop tools include a variety of functionalities designed to enhance and edit images effectively. Some commonly used tools are the Brush Tool, Selection Tool, Lasso Tool, Clone Stamp, and Healing Brush, among others.
How many tools are there in Photoshop?
Photoshop offers a comprehensive set of tools, with over 60 different tools available in the toolbar, including various brush tools, selection tools, and manipulation tools to assist in detailed and diverse image editing tasks.

Conclusion
Learning Photoshop tools names has really made a difference in how I edit my photos. Knowing which tools to use, like the Healing Brush, Clone Stamp, and Pen Tool, has saved me so much time and helped me improve my work.
If you want to learn more about using these tools and get better at editing, I recommend checking out my Photoshop Course and Lightroom Course.
These courses cover everything you need to know to make the most of your editing software. Also, if you don’t have Photoshop or Lightroom yet, you can get them from Adobe’s Photoshop and Adobe’s Lightroom. With the right tools and some practice, you can take your editing skills to the next level.
Read more about Photoshop:


Course

Light Effect Photoshop


Lightroom Course 2025

Adobe Photoshop Course 2025

Photo Editing Course


