At the heart of these designs lies a fundamental, the Photoshop toolbar, which offers limitless possibilities at your fingertips.
Understanding this robust set of tools can transform your simple images into stunning artwork.
Whether you aim to enhance photos, design web pages, or create captivating art, navigating and utilising this toolbar effectively can open up a world of creativity.
Moreover, let’s dive into what makes the toolbar in Photoshop an fundamental asset for beginners and seasoned users alike!
Table of Contents
Detailed Exploration of Each Tool in the Photoshop Toolbar
Brush Tools and Pencil Tools offer exceptional precision for drawing and painting.
The brushing tool allows you to create various effects by altering size, shape, and opacity.
For instance, using the brushing tool to create intricate patterns can create stunning visuals.
Adjust the pencil tool for sharper edges and more defined lines, which is ideal for sketching designs directly onto the canvas.
Important Tools:
- Brush Tools: Ideal for seamless painting strokes.
- Pencil Tool: Best used for sharp drawings.
- Mixer Brush Tool: Blends colors like physical paint.
Eraser Tools and Their Functions
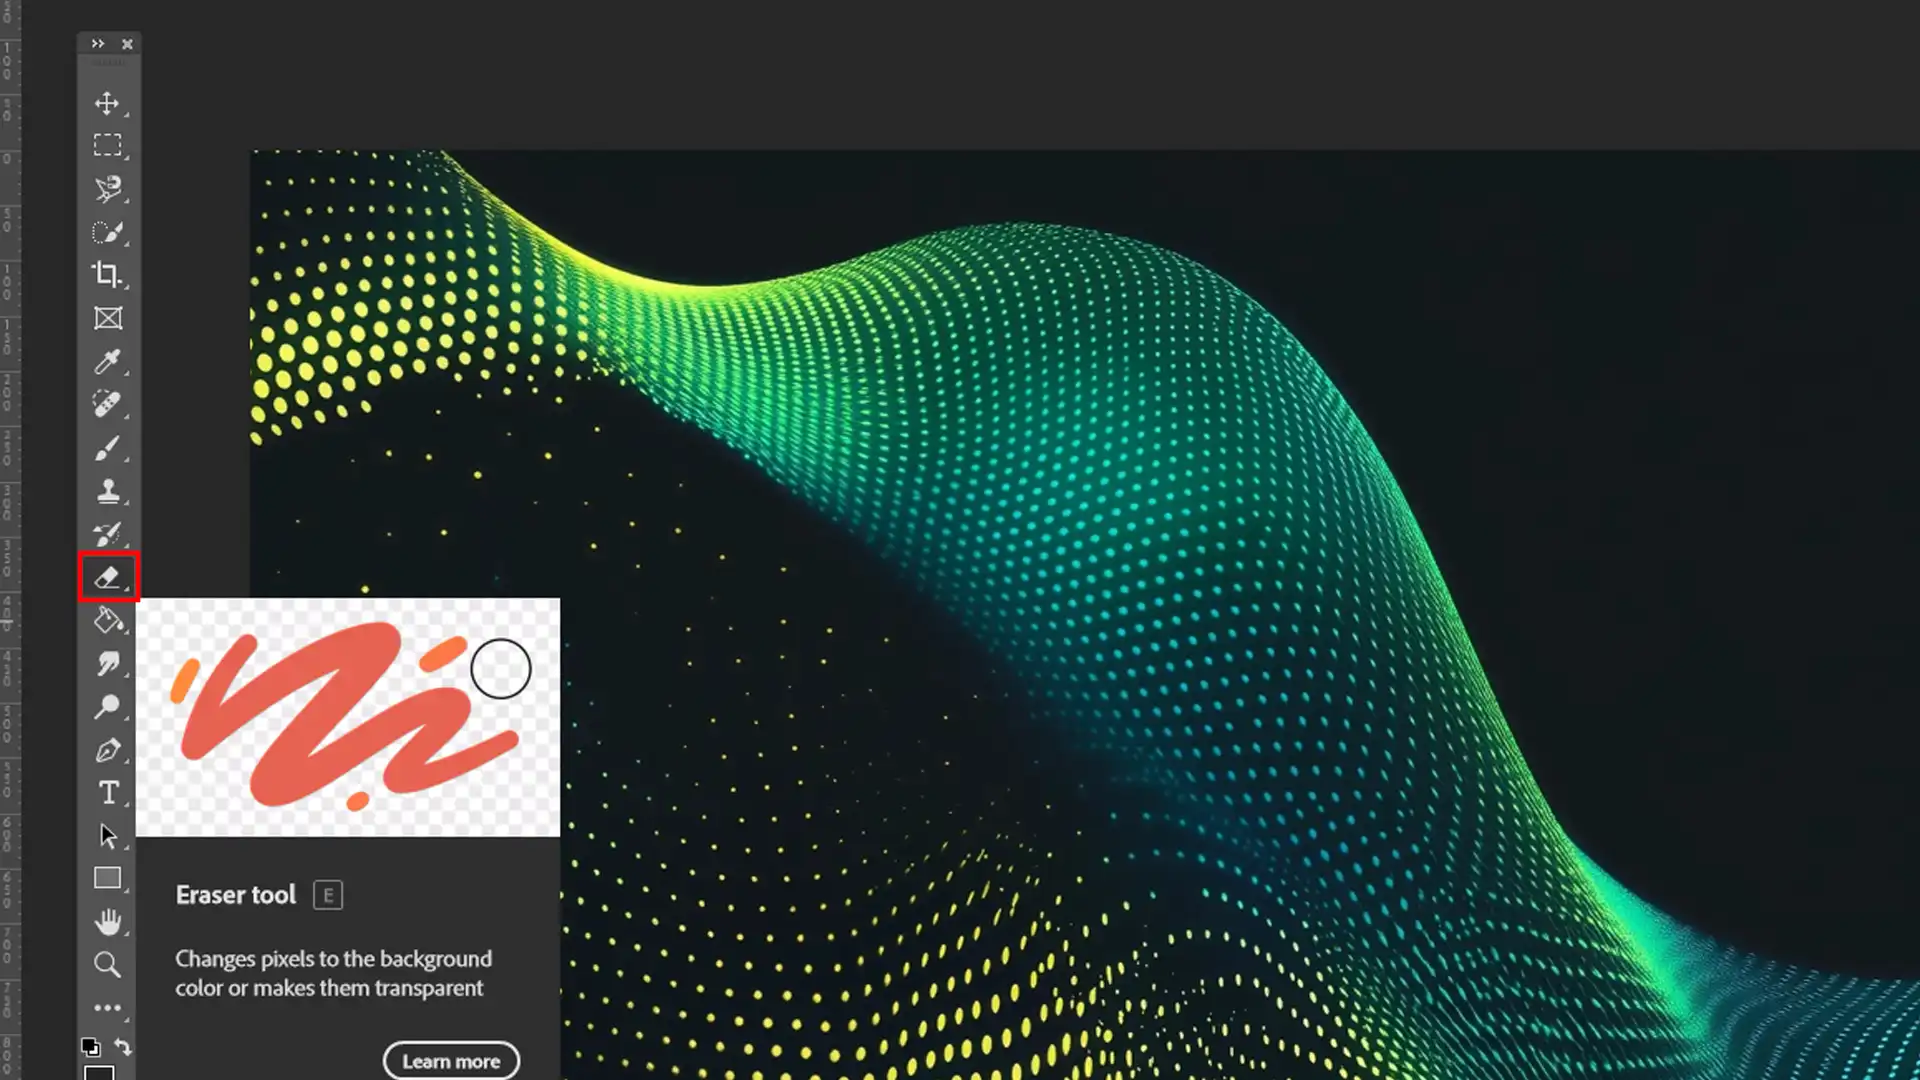
The eraser tools are fundamental to removing unwanted areas or object selection in photo editing.
The standard eraser tool works like a conventional eraser but offers more control with settings adjustments.
Unlock your creative potential today by exploring Adobe Photoshop!
Important Variants
- Eraser Tool: Removes pixels from layers.
- Background Eraser Tool: Eliminates background colors with precision.
- Magic Eraser Tool: Quickly removes similar color areas within an image.
Combining the eraser tools with masks enhances nondestructive editing, allowing you to make flexible adjustments.
Pro Tip: While the eraser tools are great for precision removal, consider using the quick selection tool for faster and more efficient editing.
This tool allows you to select large areas quickly based on color and texture, making it easier to isolate and remove unwanted elements without manually erasing them pixel by pixel.
Personal Experience Table:
The table below highlights my personal experiences with different eraser tools and how each is best utilized for specific tasks in Photoshop.
| Task | Use Case | Optimal Tool |
|---|---|---|
| Remove Background Selection | Precisely erase backgrounds behind objects | Background Eraser Tool |
| Delete Specific Pixels | Eliminate specific parts of an image | Standard Eraser |
Selection and Cropping Tools
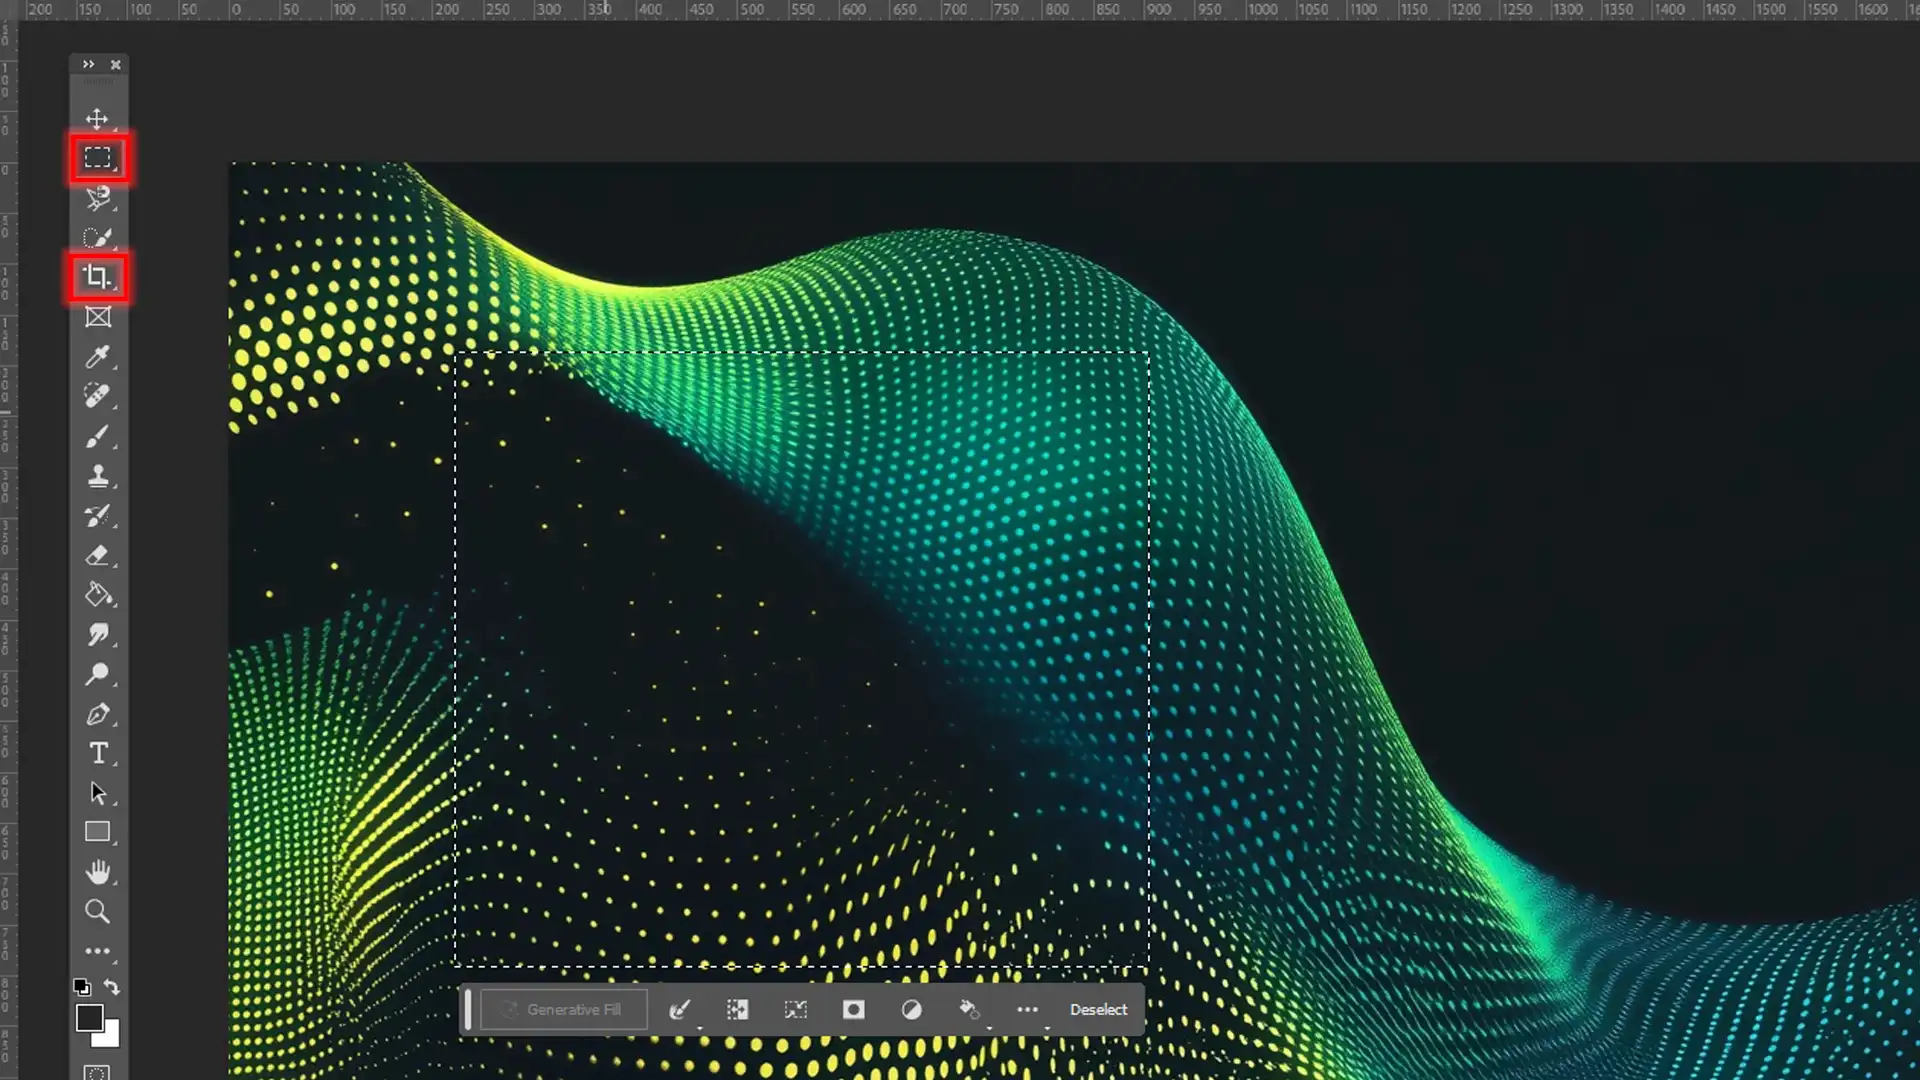
Selection and cropping tools isolate sections of an image for focused editing or adjustment.
Among the selection tools in Photoshop, the versatile marquee tool helps mark rectangular or elliptical shapes cleanly. Here are some important tools
- Rectangular Marquee Tool: Selects rectangular areas precisely.
- Elliptical Marquee Tool: Perfect for circular selections.
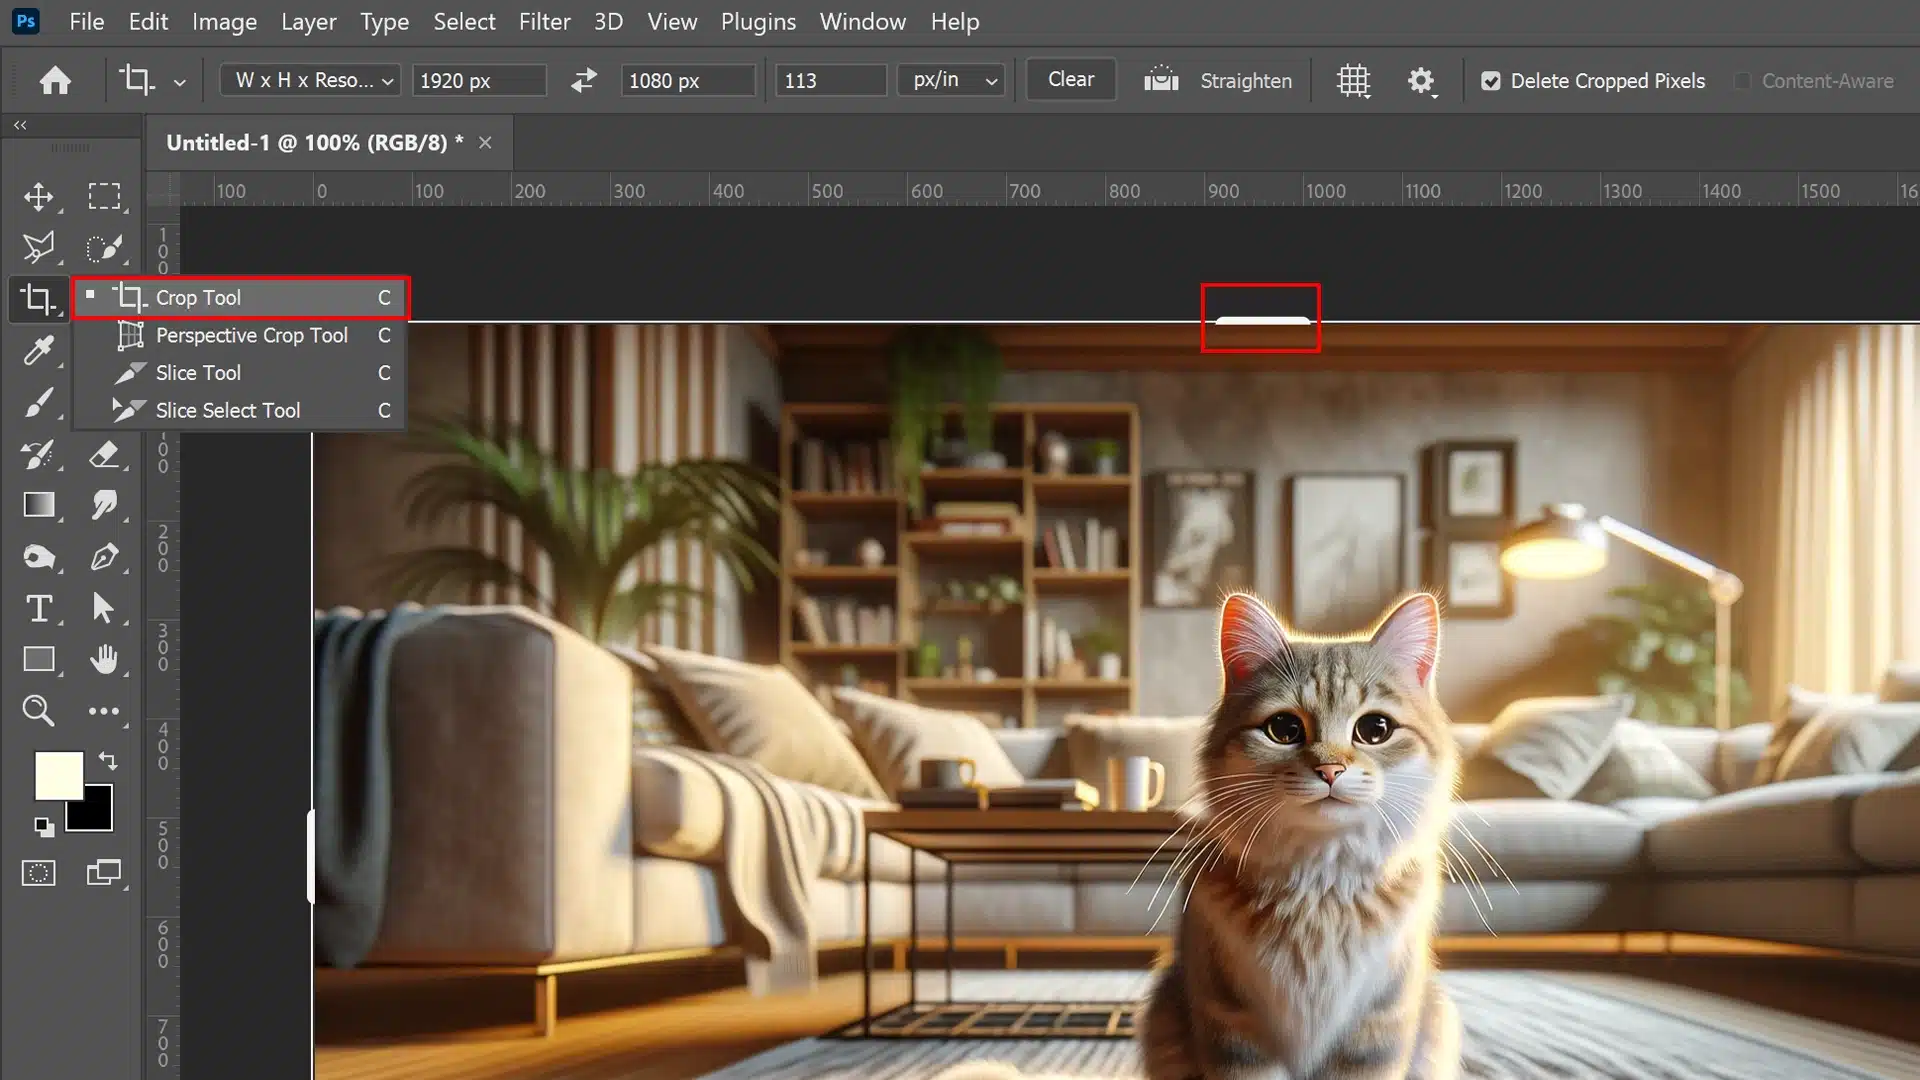
- Crop Tool: Trims images to desired dimensions efficiently. Learn how to crop images perfectly.
The rectangular marquee tool helps modify banners since it provides clear boundaries.
Additionally, the lasso tool and polygonal lasso tool for angular selections offer diverse options based on your specific selection needs.
By mastering these essential tools in Photoshop, you elevate your editing projects significantly beyond basic touch-ups.
Selecting Areas with the Marquee Tool
The marquee tool is essential for selecting rectangular or elliptical areas within your image.
Located in the toolbar, this tool offers precision when isolating parts of your image for editing.
To use it, click and drag to draw a selection around the area you want to work with.
You can choose between the rectangular and elliptical marquee tools by clicking and holding the tool icon.
Moreover, hold down the Shift key to adjust the selection’s aspect ratio, or add to it by holding the Alt (Option on Mac) key.
Elliptical Marquee Tool
The Elliptical Marquee Tool in Photoshop selects elliptical or circular areas within an image.
You can find it in the toolbar, nested under the Rectangular Marquee Tool, or by pressing the M key and then Shift + M to toggle between the two.
Click and drag to create an elliptical selection. Hold the Shift key while dragging to constrain the selection to a perfect circle.
The elliptical marquee tool is ideal for creating round selections for editing, cropping, or applying effects to specific parts of an image.
Photoshop Toolbar: Keyboard Shortcuts for Common Tools

Keyboard shortcuts are essential for a faster workflow.
Here’s a quick guide to some commonly used tools:
| Tool | Shortcut |
|---|---|
| Move Tool | V |
| Marquee Tool | M |
| Lasso Tool | L |
| Crop Tool | C |
| Brush Tool | B |
| Healing Brush Tool | J |
| Clone Stamp Tool | S |
Using these shortcuts, you can switch between tools seamlessly without interrupting your creative flow.
For example, pressing “C” instantly selects the crop tool, helping to adjust the composition quickly.
Moreover, a lesser-known tip is using Shift plus the shortcut key to cycle through related tools, like from the rectangular marquee tool to the elliptical one.
Explore the free crop Photoshop feature to gain complete control over your image composition. Using this tool, you can freely adjust your image size and shape for a perfect fit.
Mouse and Tablet Gestures to Enhance Editing Speed in Photoshop Toolbar
In addition to Photoshop keyboard shortcuts, gestures on your mouse or tablet can significantly boost your editing pace.
Mouse Tips:
- Double-clicking the zoom tool icon allows you to zoom in instantly.
- Right-clicking while using the brush tool brings up brush options without navigating menus.
Tablet Tips:
- Utilising pressure sensitivity when working with the brushing tool gives finer control over line thickness.
- Customising buttons on your tablet pen can replace frequent actions, such as switching between the spot healing brush tool and dodge tool, making retouching quicker.
Zoom Tool
The zoom tool in Photoshop allows you to magnify or reduce the view of your image for detailed editing.
By selecting the tool from the toolbar or pressing the Z key, you can click to zoom in and Alt–click (Option–click on Mac) to zoom out.
The Zoom Tool helps you focus on intricate details or get a comprehensive view of your project, enhancing your precision and workflow efficiency.
Dodge Tool
This Tool Darkens specific areas of the image. This tool can be used to enhance details in the highlights.
Burn Tool
The burn tool darkens specific areas of an image to enhance details and contrast, and by adjusting the range and exposure settings of the burn tool, you can selectively target shadows, midtones, or highlights for more nuanced control.
Enhance your images with the dodge and burn tool. This essential Photoshop feature lets you lighten or darken specific areas, adding depth and dimension for professional photo results.
Crop and Slice Tools
The Crop Tool trims and adjusts the composition of an image, while the Slice Tool divides an image into smaller sections for web use.
The Slice Tool can also create interactive areas within your design, making it easier to manage and optimize different parts of your image for various web layouts.
Learn how to crop in Photoshop using the crop tool and slice tools. These essential features help refine your images seamlessly, providing precise control and enhancing your creative workflow.
History Brush Tool
Art History Brush Tool
Sponge Tool
Using the Magic Wand Tool for Quick Selections
The Magic Wand in Photoshop simplifies the process of selecting areas with similar colors.
With its intuitive design, you can quickly isolate sections of your image, making it an invaluable tool for tasks like background removal or color adjustments.
Here’s how to use it effectively:
- Select the Magic Wand Tool: Click on the wand icon in the toolbar or press W on your keyboard.
- Adjust Tolerance: Set the tolerance level in the options bar. A higher tolerance selects a broader range of colors, while a lower tolerance selects a narrower range.
- Refine Your Selection: Use additional tools like the Lasso or Quick Selection tools to fine-tune your selection.
- Click to Select: Click on the area of the image you want to select. The Magic Wand Tool will automatically select areas with similar colors based on your tolerance setting.
Mastering the Pattern Stamp for Custom Textures
The Pattern Stamp in Photoshop allows you to apply custom patterns to your images with ease. It’s ideal for creating textured backgrounds or adding unique patterns to your designs.
Unlock your creativity with a Photoshop pattern and dive into mastering the pattern stamp for custom textures.
This guide seamlessly blends patterns into your designs, enhancing your projects with stunning, customized textures.
Here’s how to use it effectively:
- Select the Pattern Stamp : Click on the Pattern Stamp Tool symbol in the toolbar or press S on your keyboard (after selecting the brush tools, press Shift + S to cycle to the Pattern Stamp Tool).
- Choose a Pattern: In the options bar, click on the pattern preview to open the Pattern Picker. Select the pattern you want to use or create a new custom pattern.
- Adjust Settings: Customize the pattern's scale, alignment, and opacity using the options bar settings.
- Apply the Pattern: Click and drag over your image to paint the pattern. Adjust your brush size and shape as needed to get the desired effect.
Hidden Features and Lesser-Known Tips
Photoshop has numerous hidden features that many users overlook.
Knowing these can further enhance efficiency:
Hidden Tools:
Some tools are tucked away under different categories.
- The paint bucket tool is found under the gradient fill options by right-clicking its icon.
- Use the toolbar's extra settings gear icon for direct navigation to access more tools quickly.
Enhanced Editing Controls
- Use Shift + brackets [ ] keys to adjust brush size dynamically while using painting tools.
- For refined color sampling, hold down Alt (Option on Mac) while using the eyedropper tool, which activates temporarily during painting.
Lesser Known Gems
- Press Alt (Option) + Delete (Backspace) to quickly fill selections with foreground colors rather than navigating menus.
- Create custom shapes using the punching techniques of vector layers combined with paths from various sections of image files.
When I first started using Photoshop, discovering these tricks transformed my workflow substantially.
By implementing shortcuts and gestures into my practices with an array of accessible yet powerful hidden features, my productivity soared immediately!
Whether you’re fine-tuning details via the Healing Brushing Tool or framing images perfectly with the Crop Tool, these strategies will ensure everything flows smoothly so technical snags don’t hinder creativity!
Bringing together various Photoshop tools can significantly enhance your workflow.
Using the Paint Bucket Tool
The paint bucket, found in the toolbar, is perfect for quickly filling areas with color. It allows you to fill an entire area or selection with your chosen color.
Simply click inside the area you want to fill, and the paint bucket will apply the color uniformly.
In the options bar, adjust the tolerance level to control how much of the surrounding area is filled based on color similarity.
Therefore, this tool is especially useful for creating solid backgrounds or adding color to specific parts of your image.
Custom Shape Tool
The Custom Shape Tool in Photoshop allows you to add predefined vector shapes to your projects.
These shapes can be resized and customised without losing quality, making them perfect for creating icons, logos, and other design elements.
Select the tool from the toolbar, choose a shape from the options bar, and click and drag on your canvas to create the shape.
Linking Photoshop Toolbar Actions with Layers
Connecting the toolbar with Photoshop actions like the paint bucket tool and custom shape tool with layers optimises efficiency.
- First, use the move tool to adjust layer positions quickly.
- Second, combine the marquee tool with layers for precise selections.
- Lastly, apply to fill colors directly using the paint bucket on selected layers.
For example, when working on a photography edit, I use the move tool with adjustment layers to fine-tune color corrections seamlessly.
Move Tool
The Move Tool in Photoshop is essential for repositioning layers, selections, and guides within your project.
Activate it by selecting the tool from the toolbar or pressing the V key.
Click and drag to move the selected element to your desired location.
Lastly, move tool is fundamental for arranging and organising different components in your design, ensuring everything aligns perfectly.
Synchronisation with Adjustment Panels
Synchronising toolbar tools such as the spot healing brush tool and magic eraser tool with adjustment panels enhance control over photo edits.
- The healing spot brushing tool works great for removing blemishes while adjusting tones
- Syncing the magic eraser tool allows non-destructive background removal alongside brightness adjustments.
Using these combined functionalities ensures edits remain flexible.
For instance, during a product shoot edit, applying spot healing and targeted level adjustments cleaned up the image without losing detail.
Quick Fixes with the Spot Healing Brush Tool
The healing spot brush tool is ideal for removing blemishes and imperfections from your photos.
This tool, found in the toolbar, uses content-aware technology to blend the correction seamlessly with the surrounding area.
Therefore, to use it, simply click on the imperfection you want to fix, and the tool will automatically replace it with a matching texture from nearby pixels.
This tool is excellent for quick touch-ups and making your photos look flawless with minimal effort.
You can adjust the brush size in the options bar to suit the area you’re working on for more precise corrections.
Using History Panel to Reverse Photoshop Toolbar Actions
The history panel is crucial for managing toolbar actions like those by the sharpen tool, making reversals easy without starting over.
- First, erase the effects of the Sharpen tool on specific steps using history states.
- Then, recover from the undesired blur tool effects applied by mistake.
I recall an incident where an accidental blur tool effect nearly ruined my project.
Returning to a previous state via the history panel made recovery straightforward and stress free.
Moreover, this panel is invaluable when utilising tools that may have unforeseen impacts on your work.
Customising the Photoshop Toolbar for Efficient Workflow
Streamlining the toolbar in Photoshop can substantially improve your workflow.
Therefore, by customising it, you can use the most-used tools more swiftly and effectively.
Adding and Removing Tools
To add or remove tools in Photoshop, click on the three dots at the bottom of the toolbar and select “Edit Toolbar.”
This gives you complete control over which tools are easily accessible.
For example, if you frequently use the brush tool but never touch the pattern stamp tool, you can replace one with the other.
I replaced my seldom-used vertical type tool with the more frequently needed horizontal type tool.
This simple adjustment saved me valuable seconds when switching between tasks.
Here is a step-by-step guide on how to add and remove tools:
- First, click on "Edit Toolbar."
- Second, drag unwanted tools from your main toolbar to backup storage.
- Then, drag preferred tools into primary positions.
- Lastly, confirm changes by clicking "Done."
Here’s a quick list of fundamental items I included:
- Brush Tool
- Healing Brush Tool
- Clone Stamp Tool
Pro Tip: If you find yourself often needing to remove the background from images, consider adding the remove background button to your toolbar.
This will allow you to quickly access this feature without searching through the menus, streamlining your editing process even further.
Photoshop Toolbar: Creating Custom Tool Presets
Custom tool presets allow you to save specific settings for any Photoshop tool you customise often.
For instance, setting up different brush sizes or modifications like smoothing characteristics means one-click transitions instead of tweaking settings every time.
In my experience, having preset settings for both the primary and textured versions of brushes made switching styles effortless during intricate edits.
Common Custom Presets of the Photoshop Toolbar
The table below provides an overview of some common tools in Photoshop and their preset usage.
Understanding these presets can help streamline your workflow and enhance your editing efficiency by allowing you to apply commonly used settings with just a click.
| Tool | Common Preset Usage |
|---|---|
| Brush Tool | Various thickness profiles |
| Dodge Tool | Different exposure levels |
| Crop Tool | Standard aspect ratios |
These benefit everyone by reducing repetitive adjustments while ensuring precision across multiple projects.
Photoshop Toolbar: Organizing Tools for Easy Access
Organising Photoshop’s vast array of tools using groups speeds up finding exactly what you need quickly.
Group related items include all those used for selection tasks, including lasso tools, such as polygonal lasso tool and magnetic lasso variations.
Moreover, aligning together logically under an overarching category simplifies decision-making processes mid-edit tremendously, beneficially streamlining entire creative procedures collectively.
Significant painting items
- Brush Tools
- Mixer Brush (particular specialised artwork)
Simplified grouped layouts enhance streamlined workflows, providing flexibility and superior performance.
These intuitive modules promote efficient operations and cohesive methodologies, resulting in optimised, scalable functions.
Organising selections upfront makes the process more logical and beneficial, leading to synergistic throughput and comprehensive functionality.
This method ensures productivity optimisation and consistent success.
Pro Tip: To achieve a realistic painting effect in your artwork, utilize the Mixer Brush tool with various brush presets.
This tool allows you to blend colors and create textures that mimic traditional painting techniques, enhancing the depth and feel of your digital art.
Step-by-Step Guide to Resize Images Using the Photoshop Toolbar
Resizing your images is crucial to perfecting your photos. This step-by-step guide will help you through the process.
Selecting the Proper Tool for Resizing
First, choose the right tool on the Photoshop toolbar.
Depending on your level of precision, you’ll need either the crop tool or the marquee tool.
- First, open your image in Photoshop.
- Then, select the crop tool from the toolbar (easy to find with a distinct icon).
- Alternatively, use the marquee tool if you prefer more control over selection areas.
Personal Example: I often start with the marquee tool, creating a custom area before switching to other tools for finer adjustments.
Discover more with Adobe Lightroom.
Photoshop Toolbar: Adjusting Image Dimensions
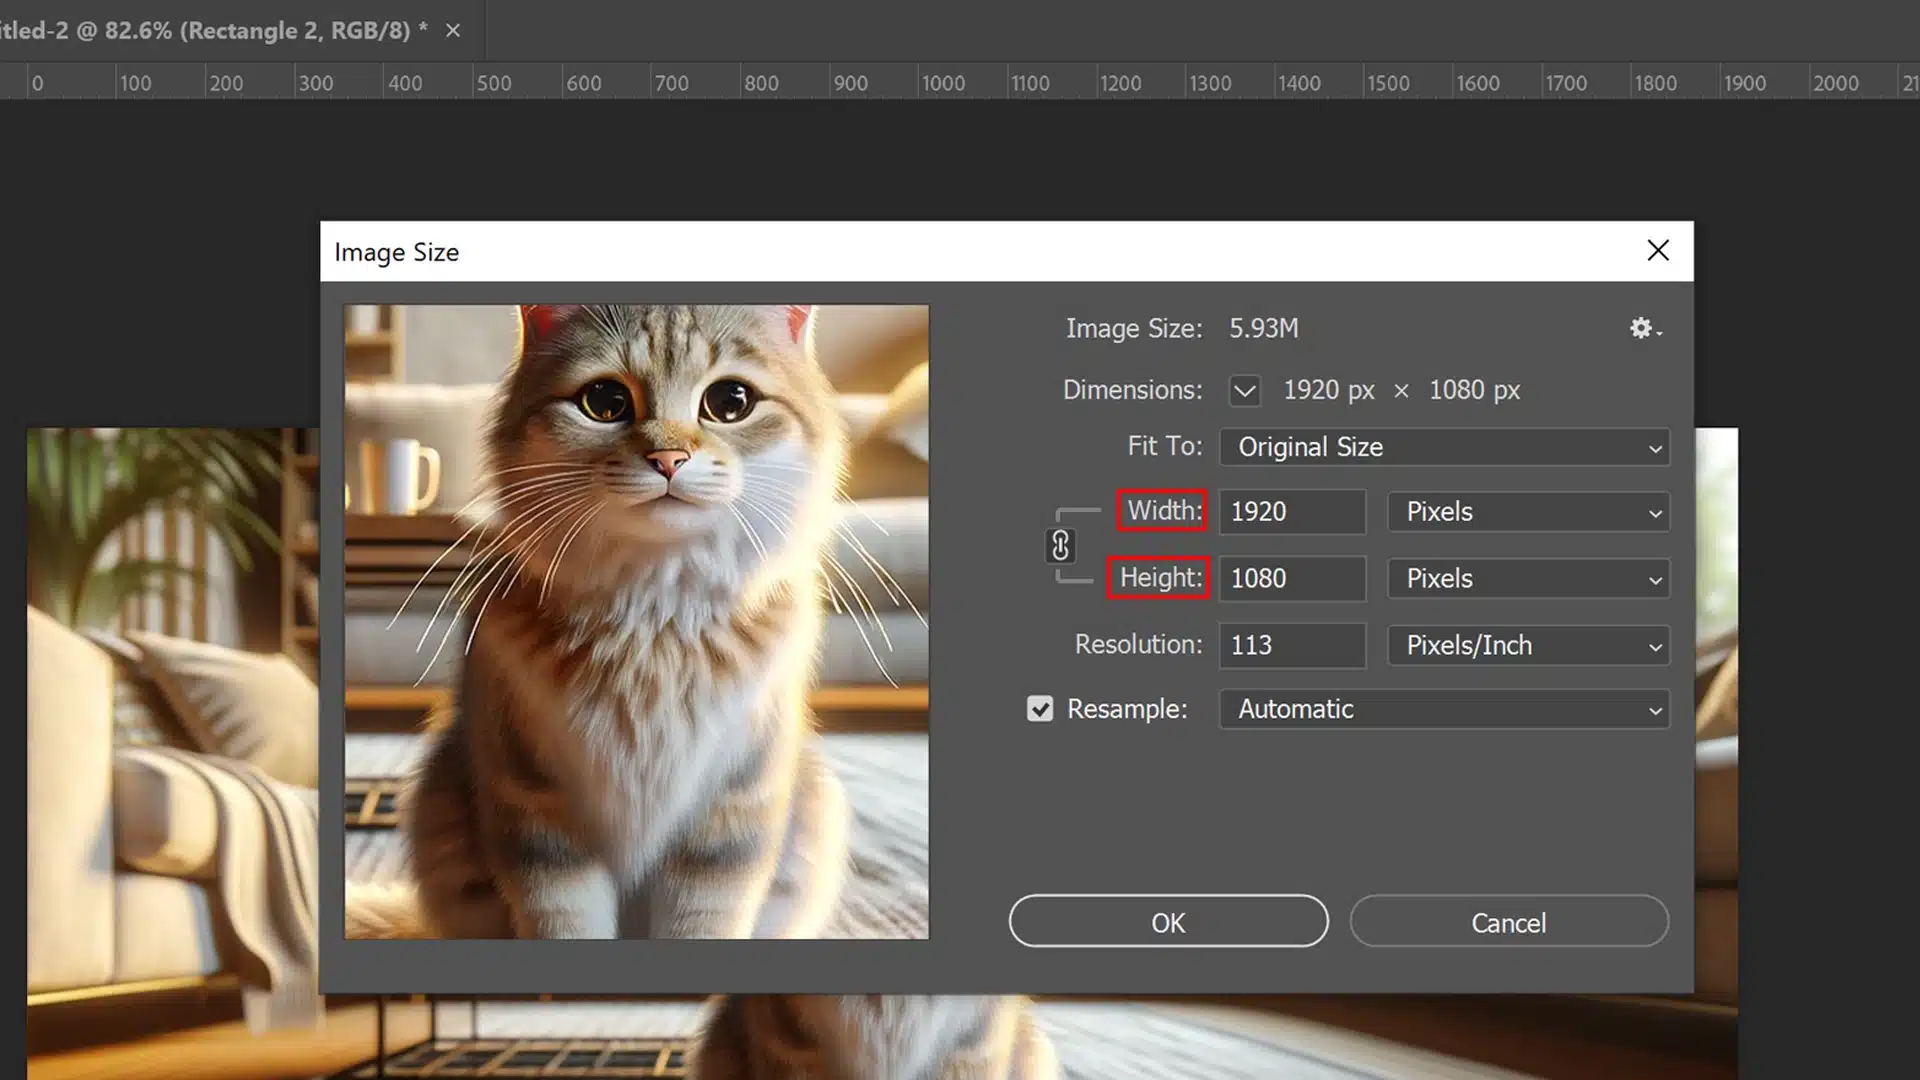
Once equipped with your chosen tools, proceed to adjust dimensions accurately.
- Draw a selection around your desired area using either tool.
- Once selected, navigate to Image > Image Size in the top menu.
- Enter new width and height values in pixels or percentages.
For precise resizing, using both tools can help ensure accurate cropping and scaling of your images, making them perfect for any medium.
Optimising Resolution for Different Uses
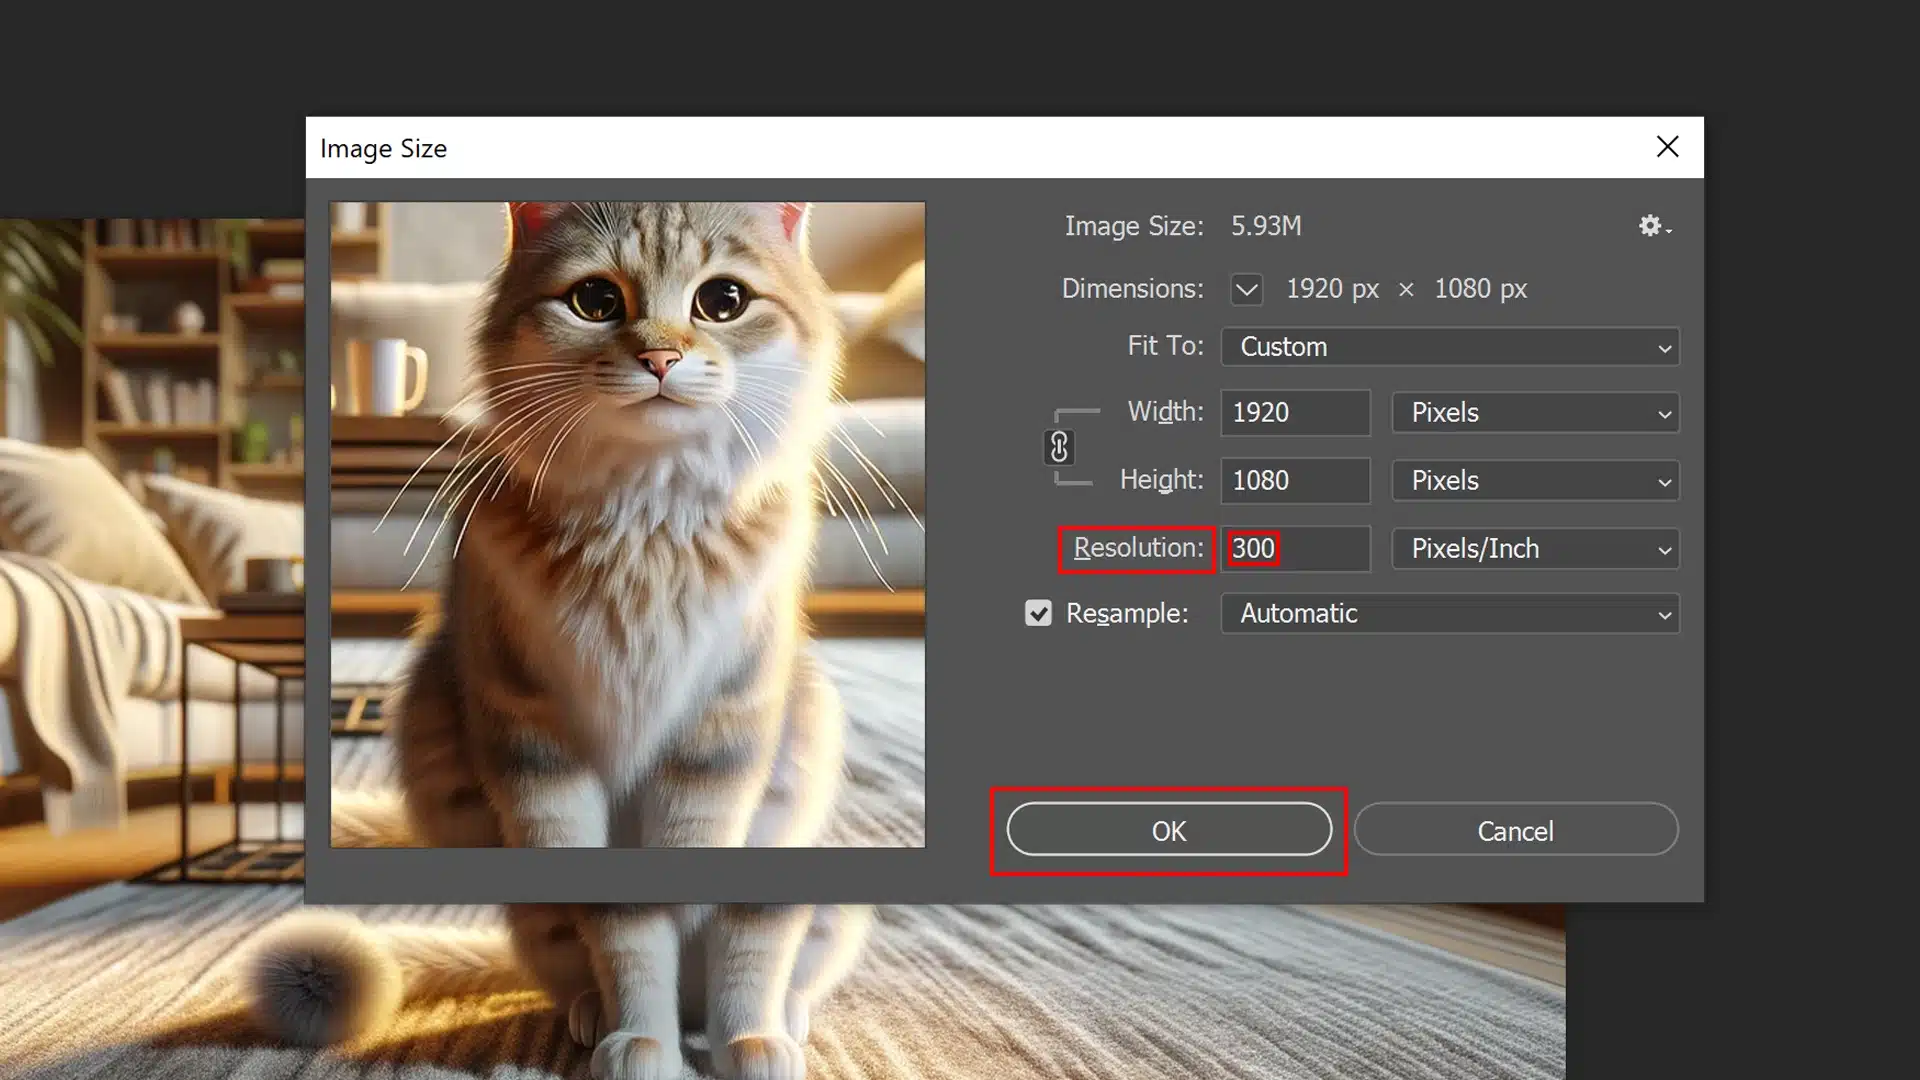
Depending on where you’ll display your images, different resolutions are needed.
Therefore, high resolution is required for prints, and low resolution is required for web use.
| Usage | Ideal Resolution |
|---|---|
| Web | 72 DPI |
| 300 DPI |
Example: I resized some family portraits at 300 DPI for print. They looked stunning as canvas prints!
Saving and Exporting Resized Images
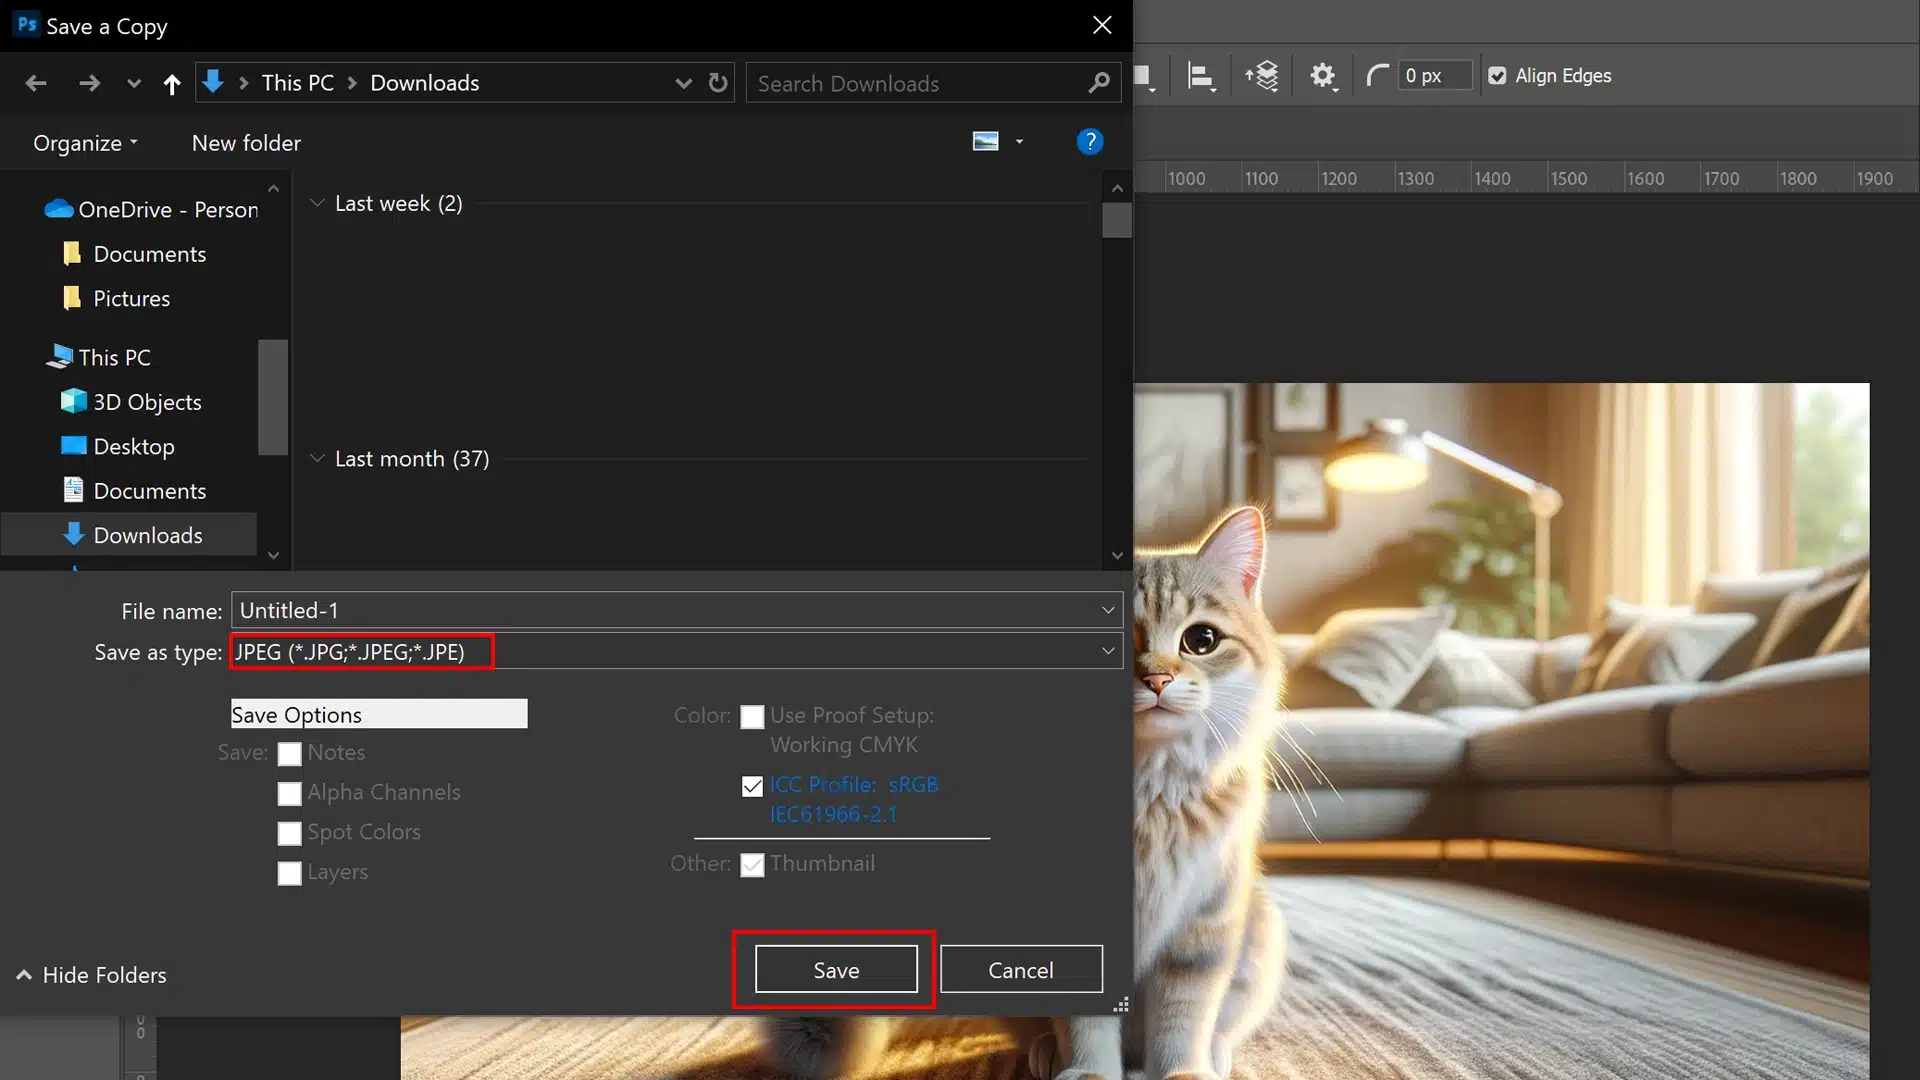
To preserve quality, save and export correctly:
- go to File > Save As.
- choose file format JPEG, PNG based on usage.
- click Save.
Choose File > Export > Save for Web/Devices for web optimisation.
This compresses files without significantly reducing quality.
Personal Tip: Always keep an original copy of high-res files before exporting resized versions, particularly when staging multiple resize jobs within the same project flow.
By following these steps, you’ll efficiently optimise image resizing workflows using essential Photoshop tools!
Frequently Asked Questions (FAQs)

How do I get my Photoshop toolbar back?
- To restore the toolbar in Photoshop, go to the Window menu, select Tools, and ensure the toolbar is checked.
- This action will immediately restore the toolbar to its default layout, ensuring you have all the essential tools at your fingertips again.
Where is the Photoshop tools panel?
- When you start Photoshop, the Tools panel is prominently displayed on the left side of the screen.
- This panel contains a variety of tools essential for your editing tasks.
- Some tools in the Tools panel come with additional settings and options, which are accessible in the context-sensitive options bar located at the top of the screen.
- Moreover, this bar dynamically changes to display relevant options based on your selected tool. Additionally, many tools in the Tools panel have secret tools nested beneath them.
- You can access these hidden tools by clicking and holding on a tool icon, which will expand to reveal the additional tools available in that category.
- This feature lets you keep your workspace organised while providing quick access to a wide range of editing tools.
What is the toolbar in Photoshop?
- The tools option bar in Photoshop provides context-specific settings for each tool.
- Located at the top screen, this bar changes options as you switch between tools.
- It enhances efficiency by allowing adjustments to the settings of the currently selected tool, including brushes, selection tools, and type tools.
Where are the tool options bar Photoshop?
- The options bar is located directly below the menu bar in Photoshop. This horizontal menu spans across the top of the workspace and is positioned just under the main menu.
- By default, it aligns to the left side of the screen, though it stretches horizontally to provide ample space for various tool-specific options.
- The options bar dynamically updates based on the tool you have selected, offering relevant settings and controls to enhance your editing workflow.
- Therefore, this strategic placement ensures that essential options are always within easy reach, facilitating a more efficient and streamlined editing process.

Conclusion
Mastering the Photoshop toolbar can significantly enhance my creative capabilities. Whether I’m resizing images, fine-tuning photos, or organizing my workflow, these tools offer endless possibilities.
With practice and the proper knowledge, I can transform my projects into professional-quality artwork.
Ready to elevate your Photoshop skills?
Check out our Photoshop Course for in-depth tutorials and tips. Moreover, if you’re looking to enhance your photo editing abilities further, our Lightroom Course offers advanced techniques and tools.
Dive in and unlock your full creative potential!
Read more about Photoshop:


Course

Light Effect Photoshop


Lightroom Course 2025

Adobe Photoshop Course 2025

Photo Editing Course


