Unlock the full potential of your text designs with the “Photoshop text underline” feature. As someone who lives and breathes creativity, I know how important it is to make every element of your design communicate effectively.
Are you struggling to make your text stand out and grab attention? Discover how a simple underline can dramatically enhance readability and aesthetic appeal.
I promise you that mastering this technique will not only elevate your projects but also set your work apart in a crowded digital space.
Don’t miss out on taking your skills to new heights – it’s time to make your text as dynamic as the stories you tell.
Table of Contents
Why Underline Text in Photoshop?
Photoshop offers a range of features that enhance text presentations. One of these is the underline text in Photoshop feature, which can be a valuable tool for various design purposes.
Common Uses of Photoshop Text Underline
Here are some common ways to use the underline feature in Photoshop. These techniques will help you enhance your text and improve the overall design of your projects.
- Emphasizing Important Points: Underline helps highlight important parts of a text, making sure it stands out. In Adobe Photoshop, this can be achieved effortlessly, similar to using Photoshop Shortcuts for quick access.
- Creating Consistency: Maintaining a consistent style across documents enhances readability. The underline feature supports uniform presentation in digital content, much like how Lightroom photo editor ensures consistency in photo editing.
- Aesthetic Design: For graphic designers, the underline adds an aesthetic touch. It can be combined with other formatting options to create a visually appealing result.
How to Apply Underline in Photoshop
To apply an underline to your text in Photoshop, follow these simple steps. This process will help you enhance your text and improve its visual impact in your design.
- Start by choosing the text tool from the tools bar.
- Click on the existing text you want to underline or create new text.
- Access the character panel, which allows you to make adjustments like underlining.
- Click the underline button; with a single click, your text layer displays the underline.
Try experimenting with dotted lines or dashed underlines. These effects offer variety while keeping consistency. Use the line tool for such creative pursuits.
Tips for Effective Underlining
To make the most of your underlining in Photoshop, consider these helpful tips. They will ensure your text stands out and looks professional in your design.
- The character panel holds the main component for many formatting changes; it's advised to make this your new best friend.
- Keep in mind that using the same color as your background may not yield the desired outcome. Instead, choose colors that stand out.
- You can always come back to the character panel and click the option if you need to adjust or remove the underline.
Pro Tip: Make sure your text is in a separate text layer so it remains flexible for further adjustments. This ensures any changes you make will not affect your other components.
Once you’ve mastered underlining, you can also explore Photoshop text effects like shadows or text portrait effects to create more dynamic and visually striking designs.
Step-by-Step Guide to Underline Text
Underlining text in Adobe Photoshop is a simple process that can enhance your design. Follow these steps to quickly apply the underlined text to your project.
Accessing the Character Panel
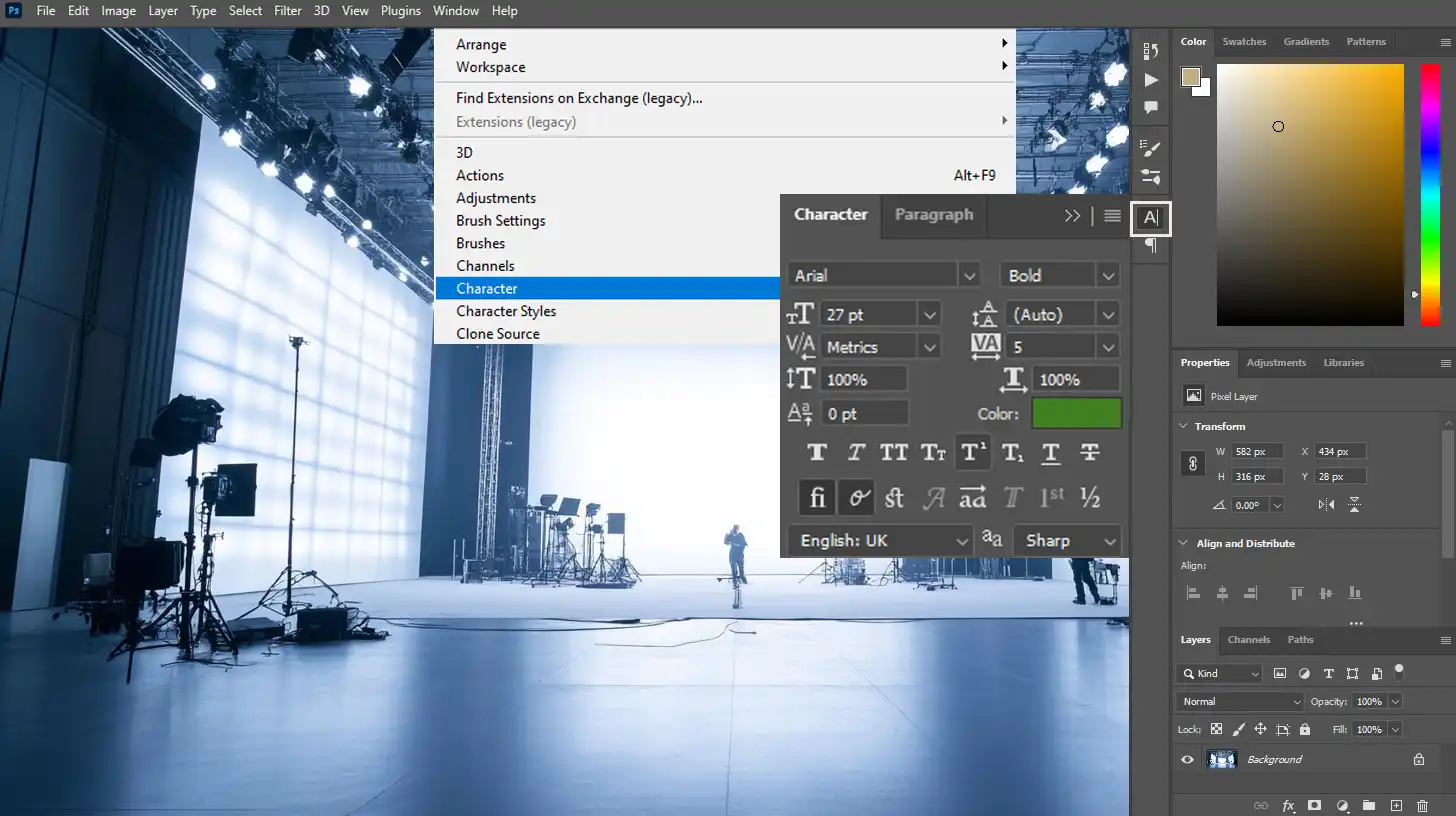
The path to underline supremacy starts with the character panel. Curious where to find it?
- Navigate through the Window menu up top.
- Click 'Window' and then 'Character'.
- The character panel emerges on the right side of your screen.
- Look for the character panel icon that resembles a fancy 'A'.
- Just a quick click is all you need; there's no need to double-click.
Using the Text Tool

Once you’ve got that panel open, grab the text tool from your toolbox. It’s that mighty ‘T’ icon you usually ignore.
- Click it.
- Draw a bounding box on your image.
- Don’t overthink the font choice; focus on encoding meaning.
Applying the Underline Text Option
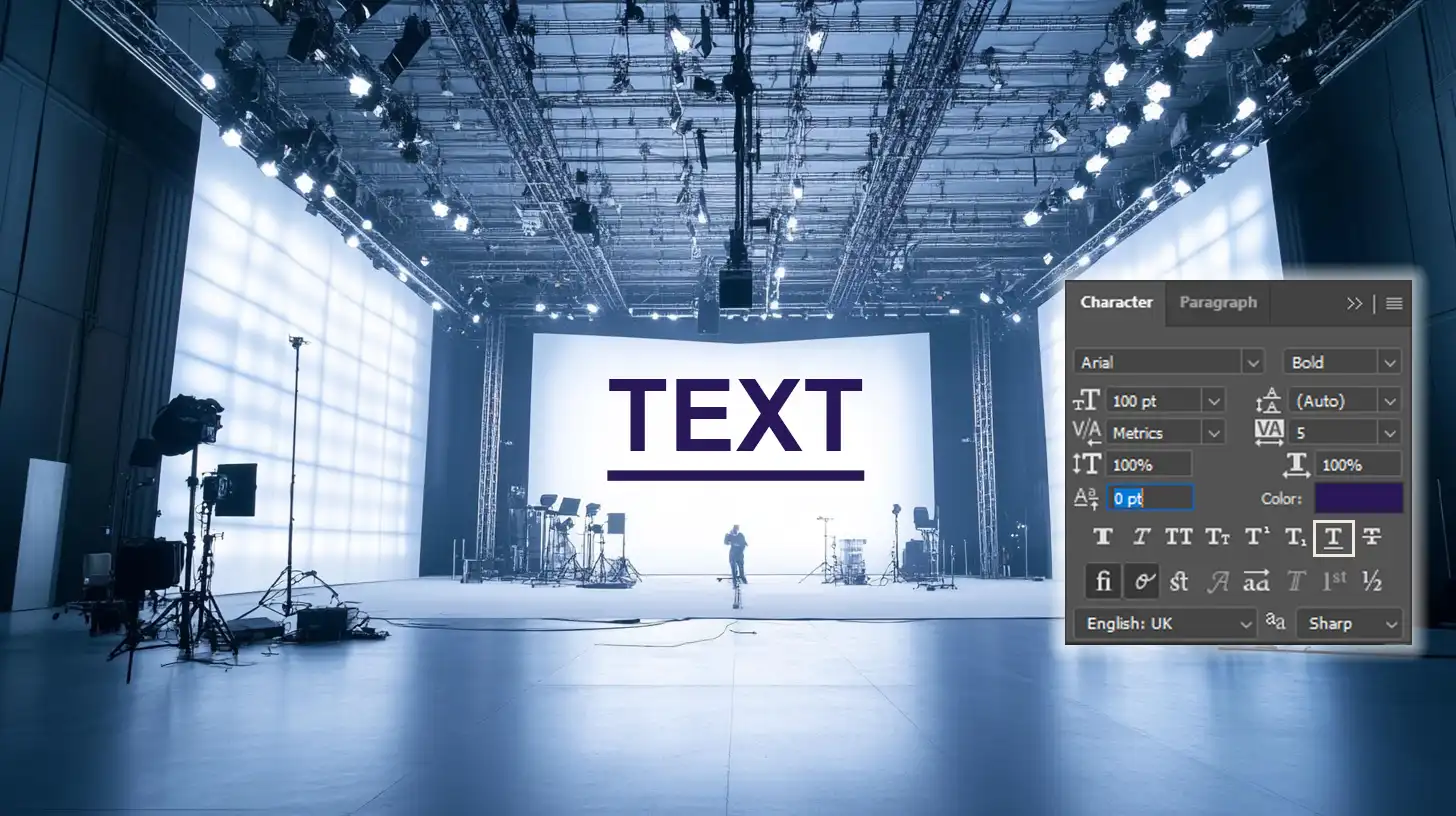
To apply an underline to your text in Photoshop, follow these straightforward steps. This will help you enhance your design and make your text stand out effectively.
- In the character panel, your much-desired underline feature awaits.
- Click on the underlined 'T' icon.
- When handling text layers, achieving that sharp underlined effect is easy once mastered.
- If you misplace something or want more options, the layers menu often saves the day.
Remember, the underlying essence of creativity lies in your hands. Whether adjusting colors or experimenting with the underline feature, let your skill emerge. Embrace mistakes; they teach more than we credit.
Pro Tip: Use contrasting colors for the underline and text. This technique can help your text stand out, especially when creating a movie poster in Photoshop.
For those looking to further enhance their skills, consider exploring the difference between Photoshop and Lightroom to understand which software best suits your editing needs.
Advanced Techniques for Text Underlining
When you want to take your designs further, there are advanced ways to underline text in Photoshop. Let’s explore how to customize these styles for a more unique look.
Customizing Underline Styles
You can bring creativity into how you underline text in Photoshop by manually adding unique styles.
While Photoshop doesn’t offer automatic dashed or dotted underlines, you can use the Line Tool to create custom dashed lines or apply other creative methods for a distinctive look under your text.
Steps to Underline Text
Follow these steps to easily underline your text in Photoshop. This will help you create a more dynamic and visually appealing design.
- Begin with the type tool to create the bounding box for your selected text.
- Double-click on the text layer for more style choices. Use contrasting colors for a vibrant look.
- Utilize the layers panel to enhance your options further, providing a professional touch.
Layer Styles and Effects
Layer styles and effects can take your text to the next level in Photoshop. Let’s explore how to make the most of the layers panel to enhance your designs.
Working with Layers Panel
Use these steps to work effectively with the layers panel in Photoshop. They’ll help enhance your underlined text and ensure precise positioning.
- Add effects using the layers panel. Blend modes and transparency changes enhance your underlined text.
- Use the move tool for precise text positioning, complementing your design.
Enhancing Text Layer
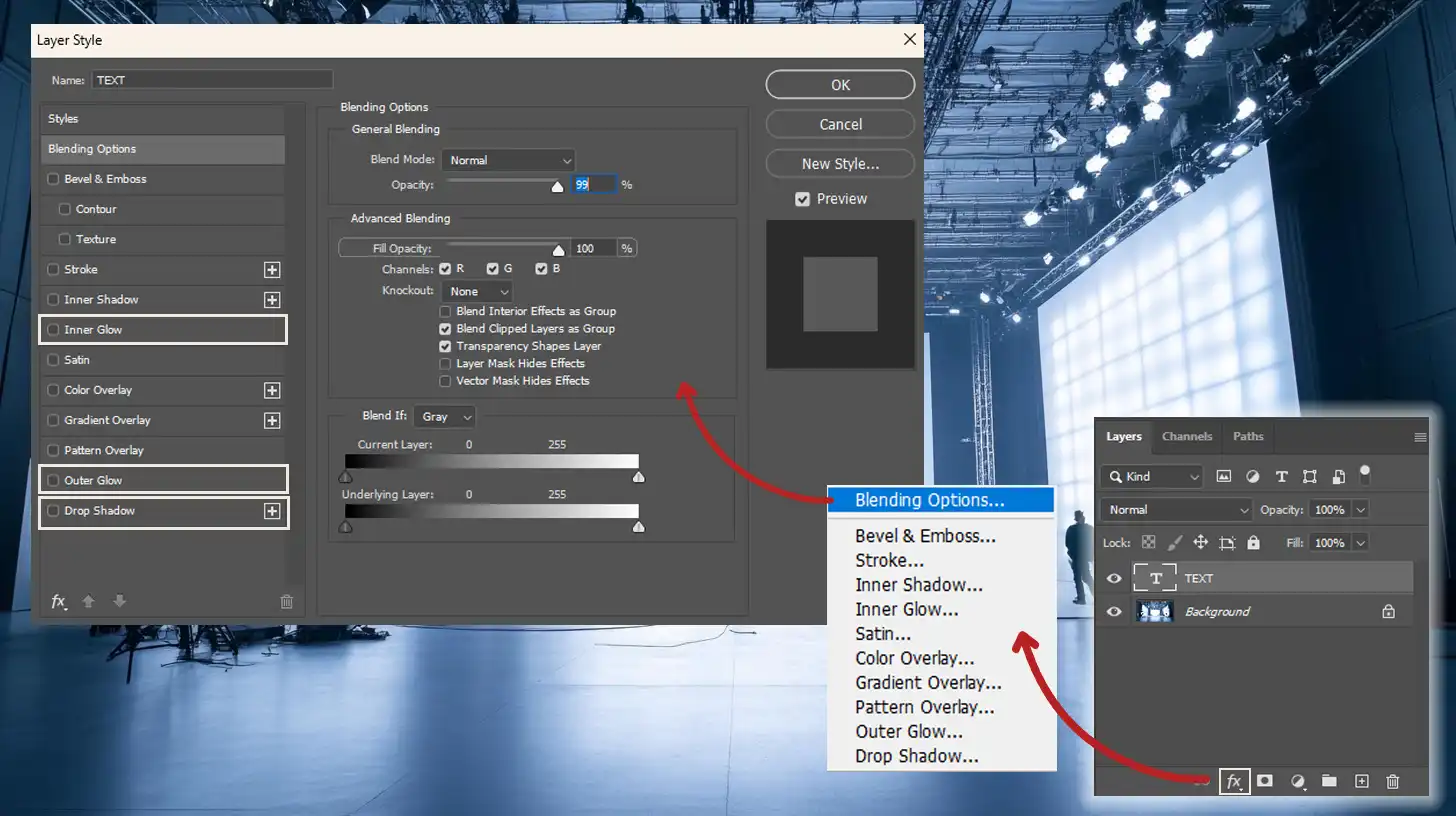
To enhance your text layer in Photoshop, follow these steps. They will help you add depth and make your underlined text stand out.
- Give the underlined text a facelift with layer styles. Use the options bar to play with shadows and glows.
- Double-click the type layer to explore a world of layer effects, adding depth and making your text pop.
Creating bold underlines with these techniques makes images more eye-catching. This journey, full of exploration and discovery, helps elevate your projects.
Pro Tip: Photoshop allows customization beyond just text underlining. Experiment with essential tools in Photoshop!
For instance, you can use a Photoshop text box to add more design elements around your text. Additionally, learn how to add texture to text in Photoshop to create even more visually striking effects.
Layer effects can also transform normal underlined text into spectacular visual elements.
Troubleshooting Common Issues
Adobe Photoshop is a powerful tool, but sometimes, issues can arise when working with layers and panels. These problems can disrupt your workflow as you create your document, but with the right steps, you can define the issue and easily fix it.
This table bellow highlights common issues encountered when working with layers and text in Photoshop, along with effective solutions.
| Aspect | Overview |
|---|---|
| Layer Visibility Issues | Learn how to check visibility icons to ensure your layers are active and visible. |
| Missing Panels | Find out how to restore missing panels through the Window menu for quick access. |
| Managing Layers | Utilize smart objects to keep your edits safe and non-destructive for flexible adjustments. |
| Text Underlining Issues | Troubleshoot underlining issues by checking your active text and using the toolbar for easy toggling. |
| Advanced Text Adjustments | Quickly fix text issues by using shortcuts to access detailed adjustments in your designs. |
Fixing Layer and Panel Problems
When working with layers, visibility issues can sometimes arise. The visibility icon helps define which layers are active and visible, ensuring you can create the effect you want without confusion.
Layer Visibility
In the world of Photoshop, layers can sometimes seem to disappear. Before panicking, check your layers panel for visibility icons.
They might just be hiding. If you’re still having trouble, consider using the object selection tool to ensure the right layer is active.
Missing Panels
If your panels are missing, you may have accidentally closed them. Simply go to the Window menu and select the panel you’re missing. For quick access, familiarize yourself with Photoshop shortcuts to streamline your workflow.
Managing Layers
Are your layers jumbled? Right-click on the layer’s name and choose “Convert to Smart Object.” Smart objects help keep your edits safe and non-destructive, much like using smart filters in Photoshop for flexible adjustments.
Text Underlining Issues
If you’re experiencing issues with underlining text, follow these steps to troubleshoot and easily apply the underline feature correctly.
- If your character panel click underlines everything but not the right text, your active text might not be accurate. Triple-check before applying any underline feature.
- To easily underline text, use the toolbar to toggle underline mode without trouble.
Don’t forget the power of underlined text in Photoshop. It can fill gaps between chaos and clarity. If things get chaotic, save and restart your session. This powerful tool design works wonders.
Advanced Text Adjustments
Double-clicking while holding the Alt key allows you to jump straight into detailed text adjustments, fixing any issues quickly.
Pro Tip: Not everything needs an underline! Sometimes, bold text or italics can highlight uniqueness better.
Frequently Asked Questions

How to underline text in Photoshop?
- Select the text you want to underline.
- Look for the underline formatting button in the toolbar it usually looks like a T with a line under it.
- Click the underline formatting button to apply the underline to your selected text.
How to draw a line under text in Photoshop?
- Open your text layer by clicking on it in the Layers panel.
- Select the Text Tool (T).
- Type your text, then select it within the text box.
- In the options panel at the top, find the underlined T icon and click it to underline your text.
Why is there a line under my text in Photoshop?
- The line under your text is likely because the underline text option is enabled.
- To remove it, select your text.
- Go to the options bar at the top and click the underlined T icon to toggle it off.
How do you line text in Photoshop?
- If you mean aligning text: select your text layer and use the Move Tool (V).
- Find the alignment options in the top toolbar to align left, center, or right as needed.
- If you mean underlining text, follow the steps given in "How to draw a line under text in Photoshop."
Conclusion
Using the Photoshop text underline tool has really transformed how I work on design projects. It’s simple to use, yet it adds that professional touch, making my text more readable and polished.
As I explored more of Photoshop’s features, I found myself getting better at creating standout designs, which gave me more confidence in delivering top results.
If you want to take your design skills to the next level, I highly recommend checking out this Photoshop course. It helped me sharpen my techniques and learn new tricks that I use in every project.
For anyone interested in photo editing, you should also explore the Lightroom course. It’s been a game-changer for me, providing the knowledge I needed to make my photos look professional.
If you want to try Adobe Photoshop or Adobe Lightroom yourself, they’re great tools that will make a big difference in your designs and photos.
Read more about Photoshop:


