Photoshop Lessons: Mastering Basic to Advanced Editing Skills
Photoshop Lessons: Mastering Basic to Advanced Editing Skills
Are you looking to elevate your photography skills? Photoshop lessons can be the game-changer you’ve been searching for.
Imagine transforming your photos from ordinary to extraordinary with just a few clicks. Intrigued?
In this article, I’ll walk you through the important tips and tricks to master both Photoshop and Lightroom, two powerful tools that photographers and designers swear by.
Whether you’re a beginner or looking to refine your skills, these Photoshop lessons will help you achieve stunning results.
Stay with me, and I’ll show you how to unlock your creative potential and make your photos truly stand out. Let’s get started!
Table of Contents
Basic Photoshop Lessons
Starting with the basics is important for any new skill. In this section, we’ll cover fundamental concepts and Photoshop lessons to help you get comfortable with Photoshop.
Let’s begin with understanding the interface.
Mastering the Interface: Significant Concepts from Photoshop Courses
To begin with Adobe Photoshop, familiarize yourself with the interface.
The interface features several panels and tools that help in editing photos and graphic content.
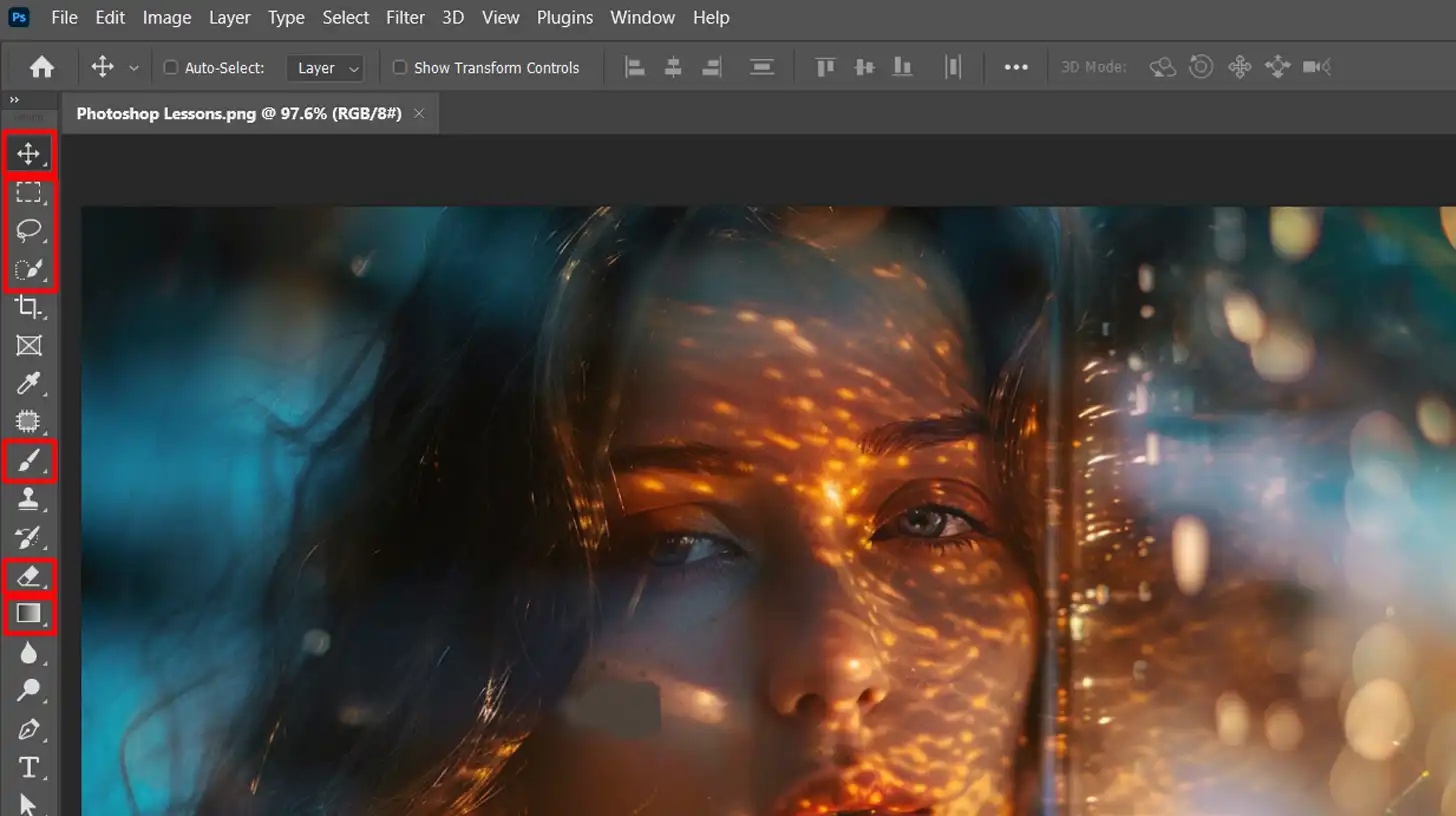
First, notice the Tool Bar on the left. It holds all the important tools.
The Options Bar at the top changes depending on the selected tool.
The various panels on the right, like Layers and History, offer different functions and settings. Mastering this layout is important for efficient workflows.
Basic Tools and Their Functions
Basic tools in these Photoshop lessons are easy to learn and highly effective:
Move Tool: Helps to move elements on your canvas.
Selection Tools: Highlight and manipulate portions of your image.
Brush Tool: Allows you to paint directly on your image, which is useful in digital painting.
Eraser Tool: Removes unwanted areas from your layers.
Gradient Tool: Creates smooth transitions between colors, significant for background edits.
These are some fundamental tools, each serving a unique function in image editing.
Additionally, learning Photoshop shortcuts can significantly speed up your workflow.
Understanding the basic tools and their functions is foundational in Photoshop, and supplementing this knowledge with Lightroom Photoshop tutorials can enhance your overall photo editing skills.
Working with Layers
Photoshop layering is a fundamental concept you’ll learn in Adobe. Create a new layer for each new element in your project.
Think of layers as transparent sheets stacked atop each other. Use Adjustment Layers to modify colors and brightness without altering the original layer.
Layer Masks allow selective editing; paint on the mask to hide or show parts of the layer.
This concept of layers ensures flexibility and control when working on complex projects.
Pro Tip: Always name your layers and keep them organized. This simple practice saves time and stress when managing multiple layers.
For mastering the concept of working with layers, follow a step-by-step tutorial to understand how to create, organize, and manipulate layers effectively in your projects.
To effectively work with layers, it’s beneficial to learn Photoshop through structured tutorials, as mastering this skill allows for more flexible and precise editing.
Expert-Level Editing Tools in Photoshop Courses
Once you’re comfortable with the basics from the Photoshop lessons, explore advanced techniques like using the content-aware fill in Photoshop to seamlessly remove unwanted objects from your images.
This powerful tool can save you hours of meticulous editing.
Mastering expert-level editing tools in Photoshop courses can significantly elevate your skills, and enrolling in a comprehensive photo editing course will help you apply these advanced techniques with greater confidence.
Intermediate Photoshop Tutorials
Once you’re familiar with the basics, it’s time to dive into more advanced techniques.
In this section, we’ll explore skills that will enhance your photo editing capabilities.
Advanced Selection Techniques
Mastering selection techniques in Adobe Photoshop is significant. They allow you to make precise edits.
It all starts with the quick selection tool. It helps you highlight areas quickly. Simply click and drag over the area you want to select.
Next, there’s the magic wand tool to get familiar with from these Photoshop lessons. It’s perfect for selecting areas with similar colors.
Adjust the tolerance level to refine your selections.
Lower tolerance selects colors that are more similar to the clicked pixel. Higher tolerance selects a broader range of colors.
For more control, the Lasso Tool family comes into play:
The Lasso Tool lets you draw freehand selection shapes.
The Polygonal Lasso Tool allows for straight-edged selections.
The Magnetic Lasso Tool clings to high-contrast edges.
Ever heard of refining the edges in Photoshop? This feature polishes your selections. It smooths, feathers, and contracts or expands the edge.
This helps when you need perfect edges on your selections.
Layer Masks and Clipping Masks
In Photoshop, using masks and clipping techniques will become your go-to tools.
Layer Masks
Layer masks let you hide parts of a layer. Black conceals, white reveals.
Add a mask by clicking the layer mask icon at the bottom of the Layers panel. Use the Brush Tool to paint on the mask. You can always undo the changes, keeping your original image intact.
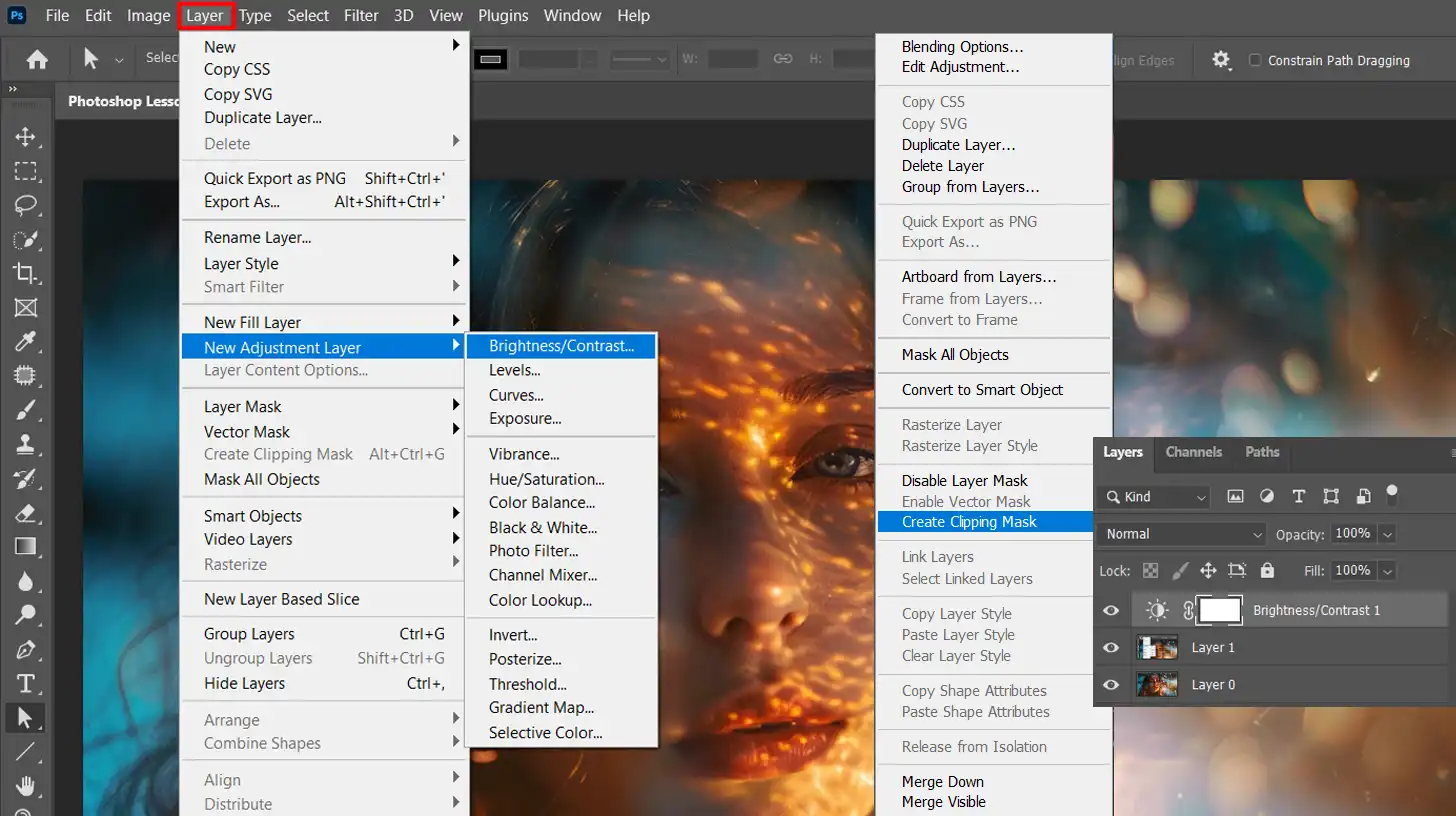
Clipping Masks
Clipping masks restrict your adjustments to one layer. Put an adjustment layer above your target layer.
Right-click and select “Create Clipping Mask.” Your adjustment now only affects the underlying layer.
Photo Editing and Retouching in Photoshop Classes
Editing and retouching photos redefine your Adobe Photoshop skills. It’s about creating stunning images. Here’s the rundown:
First, the Healing Brush Tool is significant. It fixes blemishes and imperfections. Just hold the Alt key and click to sample, then paint over the issue.
Next, the Clone Stamp Tool is very handy. It lets you duplicate parts of your image. Choose your sample area by holding Alt and clicking, then paint over the area you want to fix.
For more advanced edits, Adjustment Layers are a must-have. Adjust brightness, contrast, and color without altering the base image.
Finally, consider mastering Photoshop filters like Photoshop’s Camera Raw Filter. It allows for deep, detailed edits like the ones found in Adobe Camera.
Pro Tip: Always work on a copy of your original image. This way, you can revert to the original if needed. And explore generative fill options they can extend images creatively while offering endless possibilities.
Advanced Photoshop Tutorials
As you progress in your Photoshop skills, you’ll encounter more sophisticated features and techniques. This section covers advanced tools that offer greater control and flexibility in your editing process.
The following table outlines important features and use cases for both, highlighting their respective strengths and applications in photo editing.
Feature
8-Bit
16-Bit
Color Values
256 per channel
65,536 per channel
Total Colors
16.7 million
281 trillion
Color Depth
Limited
Richer and smoother transitions
File Size
Smaller, easier to manage
Larger, requires more storage
Use Cases
General use, web graphics
Professional editing, printing
Editing Flexibility
Less flexible
More flexibility for adjustments
Working with Smart Objects
Smart objects are a game-changer in Photoshop because they allow non-destructive editing. You can resize layers without losing quality, which is fantastic for maintaining image integrity.
Double-clicking a Smart Object opens it in a new window, allowing isolated edits. When you save, the changes automatically reflect in your main project.
Layer styles, filters, and adjustments applied to Smart Objects are also non-destructive. This method of working preserves your original image data.
Complex Compositing Techniques
Compositing allows you to combine images to create a single, cohesive output.
Masking Layers: Use them for precise control over which parts of each layer are visible.
Blending Modes in Photoshop: Experiment with different blend modes to achieve various artistic effects.
Adjustment Layers: Color balance and curves adjustment layers can match tones and colors across different multiple images.
Refine Edge Tool: Perfect for blending edges seamlessly when cutting out objects from their backgrounds with the refine edge tool.
Creating Custom Brushes
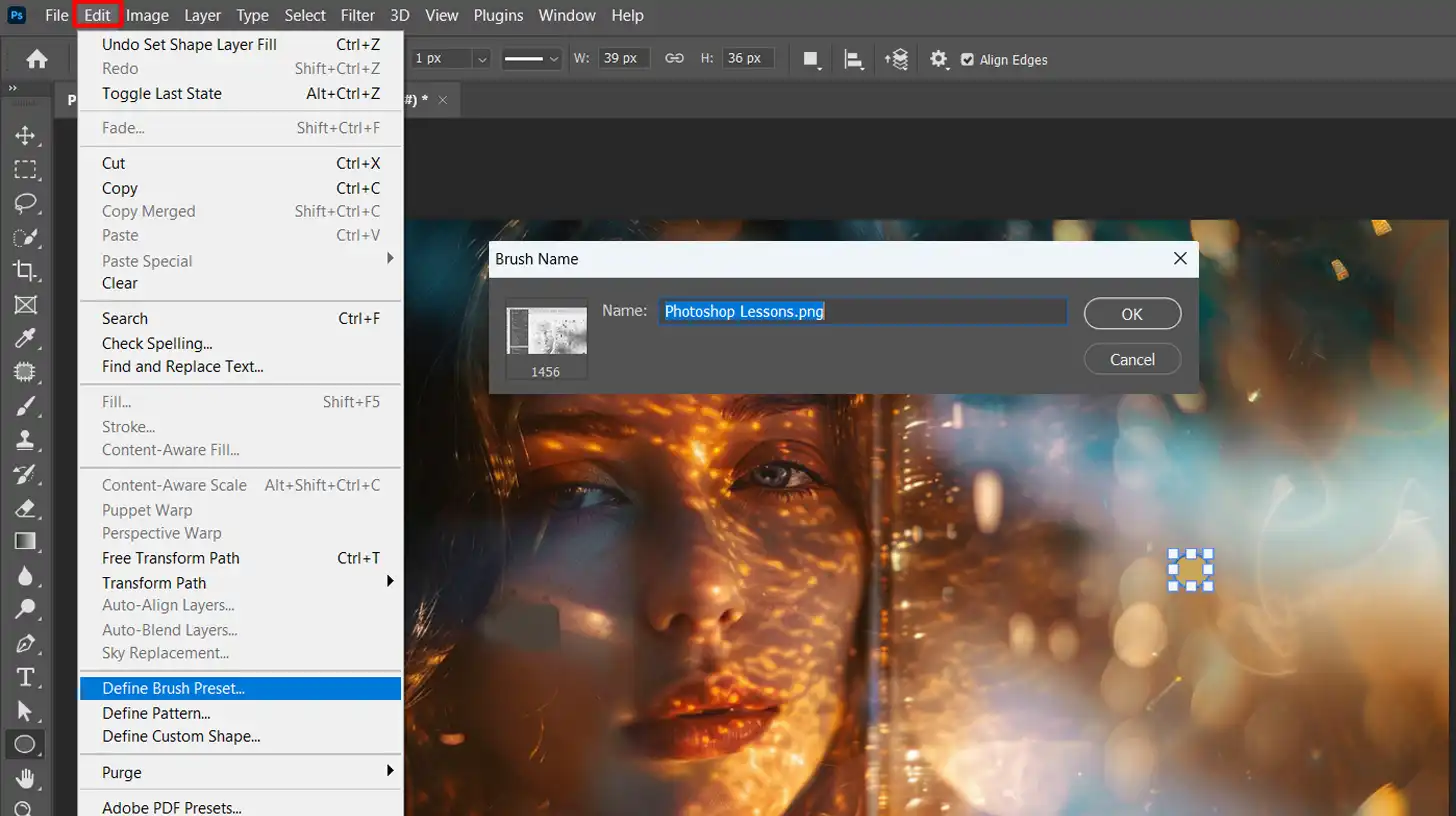
Custom brushes can make digital painting and image editing tasks easier. Here’s how you can create them:
First, select a shape or pattern you want to turn into a brush tip.
Go to Edit > Define Brush Preset.
Rename the brush to keep your presets organized.
You can fine-tune your brushes in the Brush Settings panel, where you can adjust size, spacing, angle, and other dynamics.
Experiment with different settings to find what works for you.
Pro Tip: Always start by understanding the basics before diving into more advancedskills.
Remember, these Photoshop tutorials are here to help you take your image editing to the next level.
Adobe Photoshop Tutorials for Specific Projects
Photoshop offers a range of tools and techniques tailored for various creative projects. In this section, we’ll explore tutorials focused on specific applications, starting with creating digital art.
Creating Digital Art
There are numerous ways to create digital art using Adobe Photoshop. First, become familiar with the Photoshop interface. This will help you locate the Photoshop tools needed for your project more efficiently.
Steps to Create Digital Art:
Start by sketching your idea using the brush tool. Experiment with different brush settings to find the best fit for your style and needs.
Using layers is important. They allow you to edit parts of your artwork without affecting other parts.
Try the AI generative fill tool for adding interesting effects or backgrounds. Using generative fill is a game-changer for enhancing creativity without much hassle.
Designing Graphics for Web
Designing graphics for the web involves more than just artistic skills.
Begin with the appropriate canvas size for your project to ensure that your images load quickly and display correctly on different devices. Use Photoshop CC to export graphics in formats optimized for web use.
Significant Tips for Web Graphics:
Focus on clarity and simplicity. Web graphics should be clean and to the point.
Utilize the use Photoshop feature for creating crisp icons or buttons.
Consistent use of colors and fonts helps maintain a professional look.
Don’t forget to test how the graphics appear on various browsers.
Photo Manipulation Techniques from Adobe Photoshop lessons
Photo manipulation can transform ordinary images into extraordinary creations. Start by learning to edit images like a pro.
Crop, adjust color balance, and apply different types of filters to enhance visual appeal. Use the step by step tutorial provided in Photoshop tutorials to deepen your understanding of these techniques.
Expert Techniques:
The AI generative fill option allows you to generative fill in missing parts of an image intelligently. This feature can save time while enhancing creativity.
Combine multiple photos to create stunning composites. Masking layers and blend modes help integrate elements seamlessly, making your work look cohesive and polished.
Pro Tip: Always remember to save a backup of your own images before making any major edits.
This ensures you can start fresh if something goes wrong.
It’s a simple habit that can save a lot of headaches in the long run, especially when experimenting with new features in Photoshop.
Adobe Photoshop Lessons for Graphic Design
Graphic design requires specific skills and techniques in Photoshop.
This section will guide you through various projects, starting with creating logos and icons.
Creating Logos and Icons
When you use Photoshop to create logos and icons, start by opening a new document with the correct canvas size.
Begin sketching your ideas using the brush tool. Remember, layers are your friends. They help you edit different parts independently, so use them!
Next, refine your sketches to create clean, professional designs. Focus on simplicity and clarity, as these are important to effective logos and icons.
Use vector shapes for scalability. You can also benefit from experimenting with the pen tool and shape tools for precision.
Finally, test your design at various sizes to ensure it retains its readability and impact.
Designing Posters and Flyers
For posters and flyers, consider the purpose and message first. Choose a suitable dimension for print or digital display.
Create a balanced layout by dividing your canvas into grids. This helps with alignment.
Add your images and text, ensuring they are high quality. Adjust their placement carefully.
Use contrasting colors to make important information stand out. Incorporate the Content-Aware Fill in Photoshop to add creative backgrounds or effects.
Don’t forget to proofread your text and check the overall visual appeal before finalizing your design.
Integrating Lightroom into your workflow can greatly enhance your process when designing posters and flyers, offering advanced color correction and fine-tuning options.
Typography and Text Effects
Typography adds personality to your design. Start by selecting fonts that match the theme of your project.
Adjust the spacing, alignment, and size for readability. Utilize layer styles to add effects like shadows, glows, and gradients.
Explore Photoshop tutorials to understand how different text effects work.
These Photoshop tutorials can include 3D text, neon effects, or embossed styles. When applied correctly, these effects can make your text resonate with viewers.
Lastly, always balance creativity with readability. Your text should be visually attractive yet easy to read.
Pro Tip: Always save a backup of your project files. It’s a small step that can save you from losing hours of hard work.
General Tips from Photoshop Classes
Learning how Photoshop lessons can be daunting but with these significant skills and step-by-step tutorials, you can quickly become proficient in Photoshop.
Using the latest version of Photoshop CC will ensure you have all the current tools and updates.
Additionally, explore Photoshop beta and Adobe Firefly for innovative features and tools. Remember, practice makes perfect, and the more you use Photoshop basics, the more confident you’ll become in your design abilities.
Combine images, use Creative Cloud for syncing files, explore Photoshop Beta, Adobe Firefly, and Adobe Bridge for the latest features, and keep pushing your creative boundaries.
Now, you’re ready to create stunning designs.
Understanding the evolution and features of Photoshop can significantly enhance your general tips from Photoshop classes, providing a deeper context for the techniques you learn.
Frequently Asked Questions (FAQs)
How can I learn Photoshop by myself?
Start by exploring the official Adobe Photoshop tutorials, which are great for beginners.
Watch Photoshop tutorials on YouTube to see practical applications of Photoshop tools.
Practice regularly by trying to replicate projects you like or by experimenting with your own designs.
Are there classes to learn Photoshop?
Yes, there are numerous online platforms like Udemy, Coursera, and LinkedIn Learning offering Photoshop classes.
Many community colleges and technical schools also offer in-person Photoshop courses.
Workshops and seminars by professional designers can provide hands-on learning experiences.
How long does it take to fully learn Photoshop?
The basics can be learned in a few weeks with consistent practice.
Becoming proficient might take several months of regular use and learning.
Mastering Photoshop, including all its advanced features, could take a few years, depending on the complexity of the projects you tackle.
Which course is best for Photoshop?
Adobe's own tutorials and courses are highly recommended for beginners and advanced users alike.
For structured learning, consider courses from platforms like Udemy or Coursera, which often include project-based learning and peer feedback.
Look for courses that offer practical exercises and real-world projects to enhance your skills more effectively.
Taking structured Photoshop lessons has been a game-changer for me. They have not only honed my editing skills but also unlocked creative potential I didn’t know I had.
Whether you’re a beginner or looking to refine your techniques, I highly recommend investing time in quality instruction.
My own journey started with this Photoshop course, and it transformed the way I approach every project.
Additionally, complementing it with a Lightroom course has streamlined my workflow and enhanced my efficiency. If you’re serious about taking your image editing to the next level, these courses are a must.
If this article has helped you, then Like and Share it with your friends
$2,061.00Original price was: $2,061.00.$1,061.00Current price is: $1,061.00. 27584
Download Your Free Guide Now!
Discover the secrets of photography with our printable guide! Master essential techniques like aperture, shutter speed, and ISO to create stunning images. Get your free printable PDF now and start turning your snapshots into masterpieces!