
Let me introduce you to the magic of the “Liquify in Photoshop” tool. This powerful feature opens up a world of creative possibilities, allowing you to reshape and refine your photos to achieve stunning results.
Imagine having the ability to effortlessly adjust facial features, perfect body proportions, or even create surreal artistic effects that push the boundaries of your imagination. With the liquify tool, you can manipulate your images in ways that enhance their beauty or convey unique artistic visions.
Whether you’re a beginner eager to learn or a seasoned pro looking for a refresher, understanding how to effectively use the liquify tool can elevate your editing skills to new heights.
Let’s explore the fascinating capabilities of the liquify tool and discover how it can transform your creative projects.
Table of Contents
What is the Liquify Tool in Photoshop?
The liquify tool in Photoshop allows you to bend and warp parts of an image, transforming the appearance of your photos without losing any detail.
This feature is invaluable for retouching, enabling subtle adjustments or dramatic changes to certain elements.
Why Use the Liquify Filter?
Before we delve into the benefits, let’s explore why the Liquify filter is a valuable tool for your editing toolkit. Here are three key reasons to incorporate it into your workflow:
- Creative Freedom: The liquify filter lets you experiment with your image by gently pushing and pulling its features. It's a fun and engaging way to explore your creative potential.
- Retouching Power: Enhance portraits by modifying slight imperfections or highlighting specific details. The face-aware liquify feature allows quick adjustments to facial features.
- Precision Control: Tools like the forward warp tool and freeze mask tool provide control over how and where changes occur, directing your edits precisely on the canvas.
Getting Started with the Liquify Tool
Open your image in Photoshop and navigate to the filter menu.
Select the liquify filter, and a new window opens with various liquify tools, such as the forward warp tool, pucker tool, and bloat tool.
Each tool serves a specific purpose and offers different results.
- Forward Warp Tool: Push pixels in any direction you desire, similar to gently bending a rubber band until it takes the shape you want.
- Pucker Tool: Pinch pixels inward to make parts of your image smaller, which is ideal for slimming down areas.
- Bloat Tool: Expand specific sections outward, giving them a bigger appearance and useful for enhancing hair volume.
- Freeze Mask Tool: Protect areas you don't want to change by "freezing" them so they remain intact.
Advanced Tips for Using Liquify Tools
To make the most of the Liquify tools, consider these advanced tips. Each one is designed to help you enhance your editing precision and efficiency:
- Monitor your brush pressure and brush size. Adjusting these settings controls the effect each stroke applies.
- For more control, save your settings with save mesh. This feature allows easy reversion to previous states.
- When working with smart objects, remember that they maintain image quality, and changes made in the liquify filter adapt seamlessly.
Pro Tip: When you use the liquify tool in Photoshop, always duplicate the original layer first. This step ensures you don’t lose the initial image and offers a point of comparison after edits.
Getting Started with Liquify Tool
Before diving into your creative edits, it’s important to know how to access the Liquify Filter in Photoshop. This powerful tool allows you to manipulate images in various ways, from subtle adjustments to dramatic transformations.
Understanding the process of getting to the Liquify tool will set you up for success in your editing journey.
How to Access the Liquify Filter in Photoshop
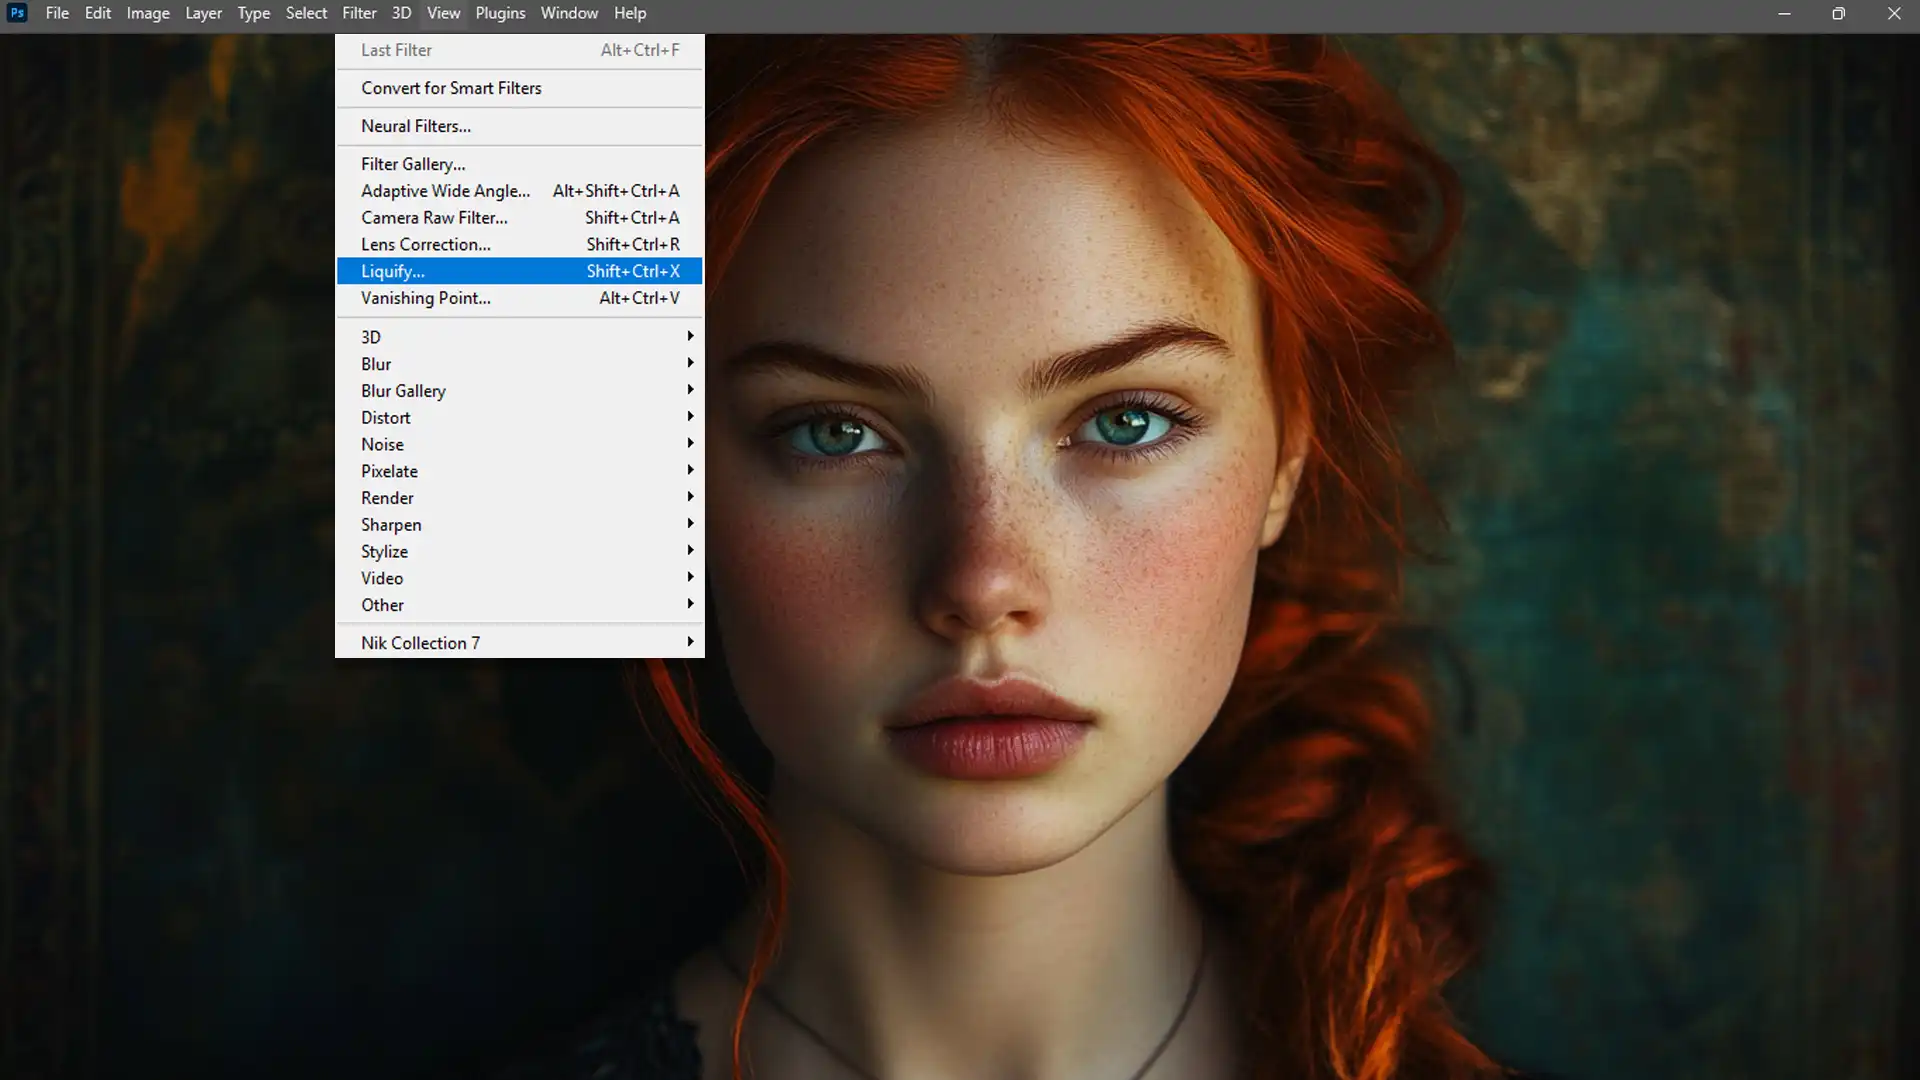
The first step is accessing this magic tool:
- Open Adobe Photoshop.
- Click on "Filter" in the menu.
- Find the liquify filter tucked away like a hidden gem waiting to be discovered.
With this, you’ll embark on a journey of creativity and amazement. The Adobe Photoshop Liquify tool offers many possibilities for editing photos, becoming a powerful tool for creative expression.
Basic Controls and Interface
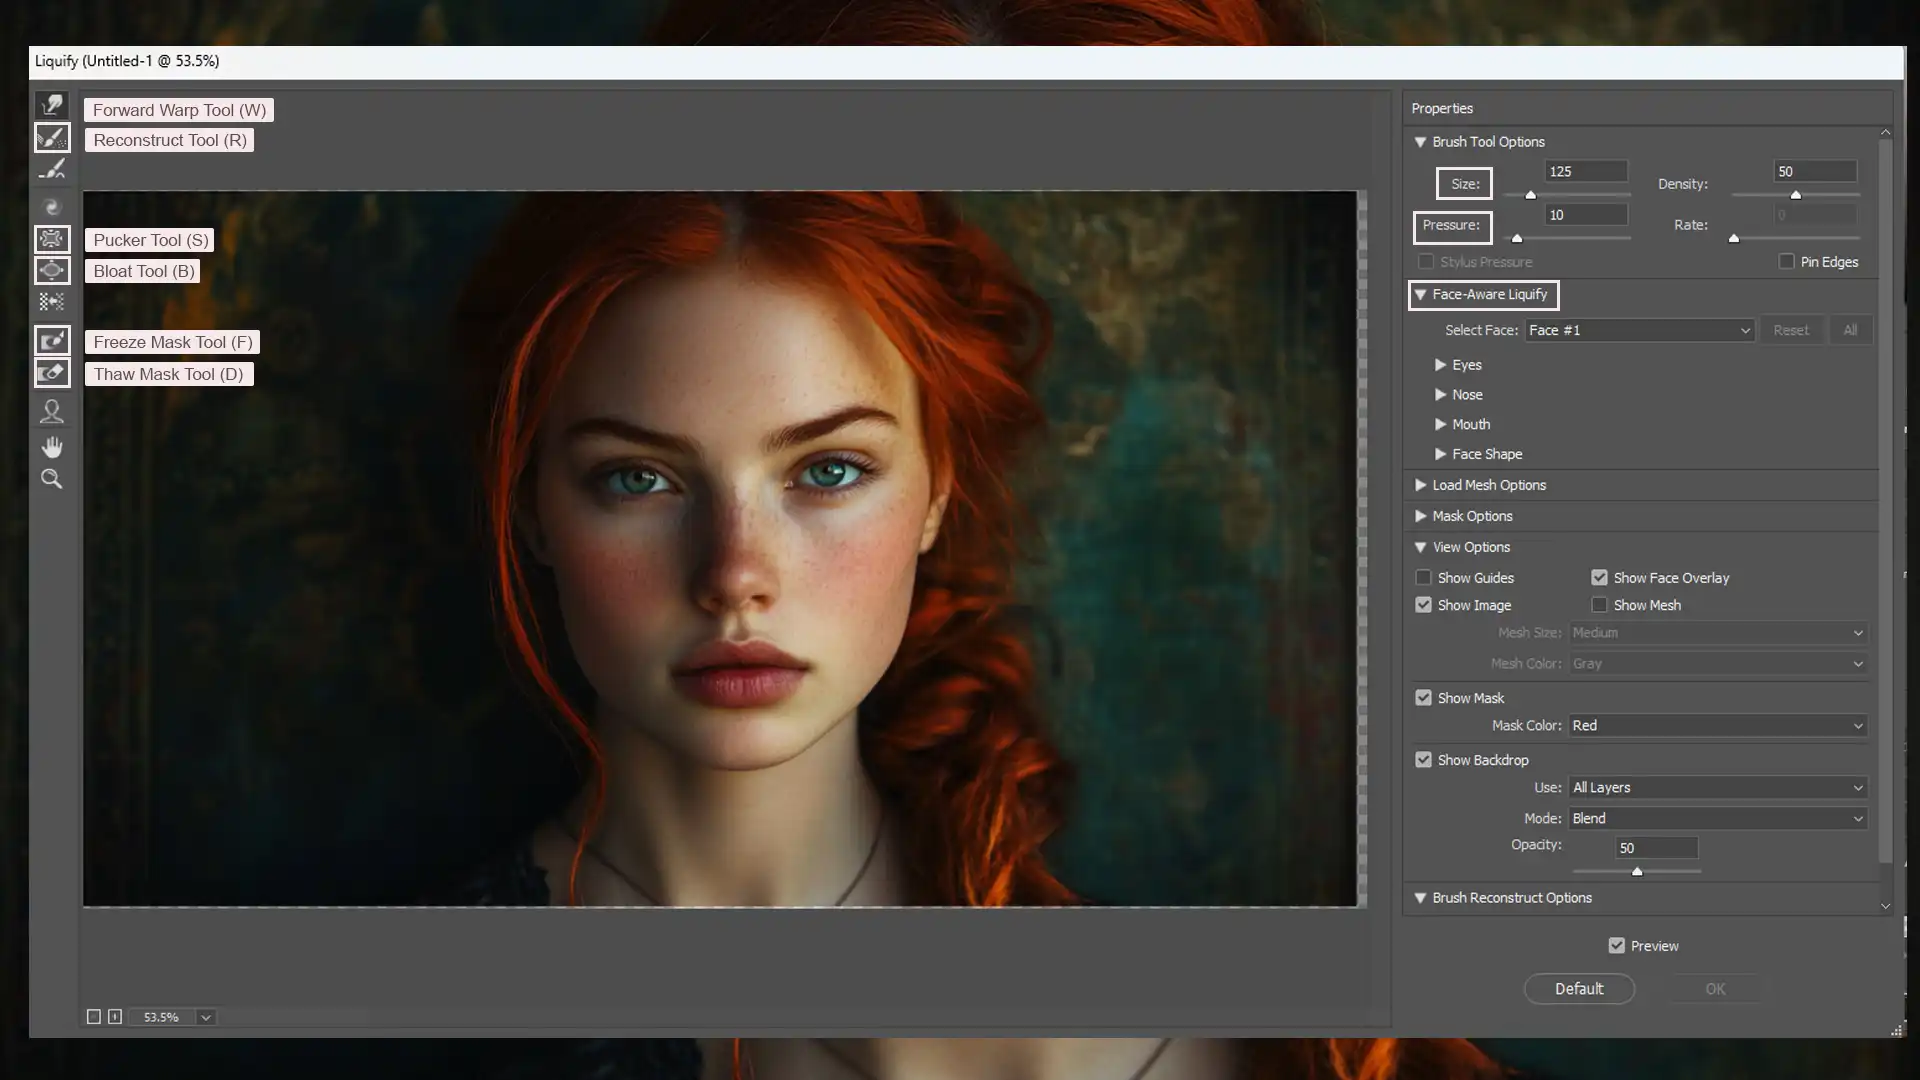
Now, let’s explore the interface. When you enter the liquify filter window, you’ll spot several intriguing options:
- The forward warp tool is ideal for nudging pixels around, gently shifting parts of the image.
- The bloat tool makes elements pop, perfect for exaggerating or contracting parts.
- The pucker tool is great for shrinking elements.
- Use face-aware liquify to adjust facial characteristics precisely, like nose size or eye adjustments.
When using the Liquify tool in Photoshop, two important elements are brush pressure and brush size.
Adjusting these settings in the liquify dialog box allows you to experiment and fine-tune your transformations, ensuring each adjustment fits seamlessly into the image.
Taking the time to explore these options helps guarantee that each transformation lands perfectly, enhancing the overall effect of your edits. Remember:
- The freeze mask tool lets you protect areas from alteration.
- The thaw mask tool gives flexibility where needed.
- The reconstruct tool offers a magic wand back to sanity if things go awry.
Imagine channelling the creativity of a master artist or scientist, and allow your imagination to guide you with the twirl clockwise tool.
This process isn’t overly complicated, and you don’t need advanced technical knowledge. Just take your time, explore, and enjoy working with the Liquify tools!
Finally, be sure to save your work by using the save mesh option. This provides a convenient backup for each of your creative projects.
Pro Tip: Keep experimenting with mask options; they’re important to precise edits.
Additionally, consider using the portrait filter in Photoshop to enhance your images further and achieve stunning results with your liquify adjustments.
For those interested in expanding their skills further, consider exploring Lightroom training or learning how to remove shadows in Photoshop to enhance your editing toolkit.
Understanding the Liquify Filter
Let’s dive into the fascinating world of the liquify filter, a powerful feature in Photoshop. It’s not just for professionals; anyone can use it to create stunning images. With my diligent side, I assure you it’s more accessible than you’d think.
Liquify Tool Options
The liquify tool in Photoshop offers various options for transforming images:
- Forward Warp Tool: Gently nudges and reshapes pixels.
- Bloat Tool: Expands selected areas.
- Pucker Tool: Contracts selected areas.
- Reconstruct Tool: Restores order when edits get wild.
However, it’s important to keep things straightforward. Stay curious, and use the zoom tool sparingly to maintain perspective.
Remember, more straightforward adjustments help preserve realism. Adjust the brush settings to match your style, but focus on enjoying the process rather than striving for perfection.
Using the Forward Warp Tool
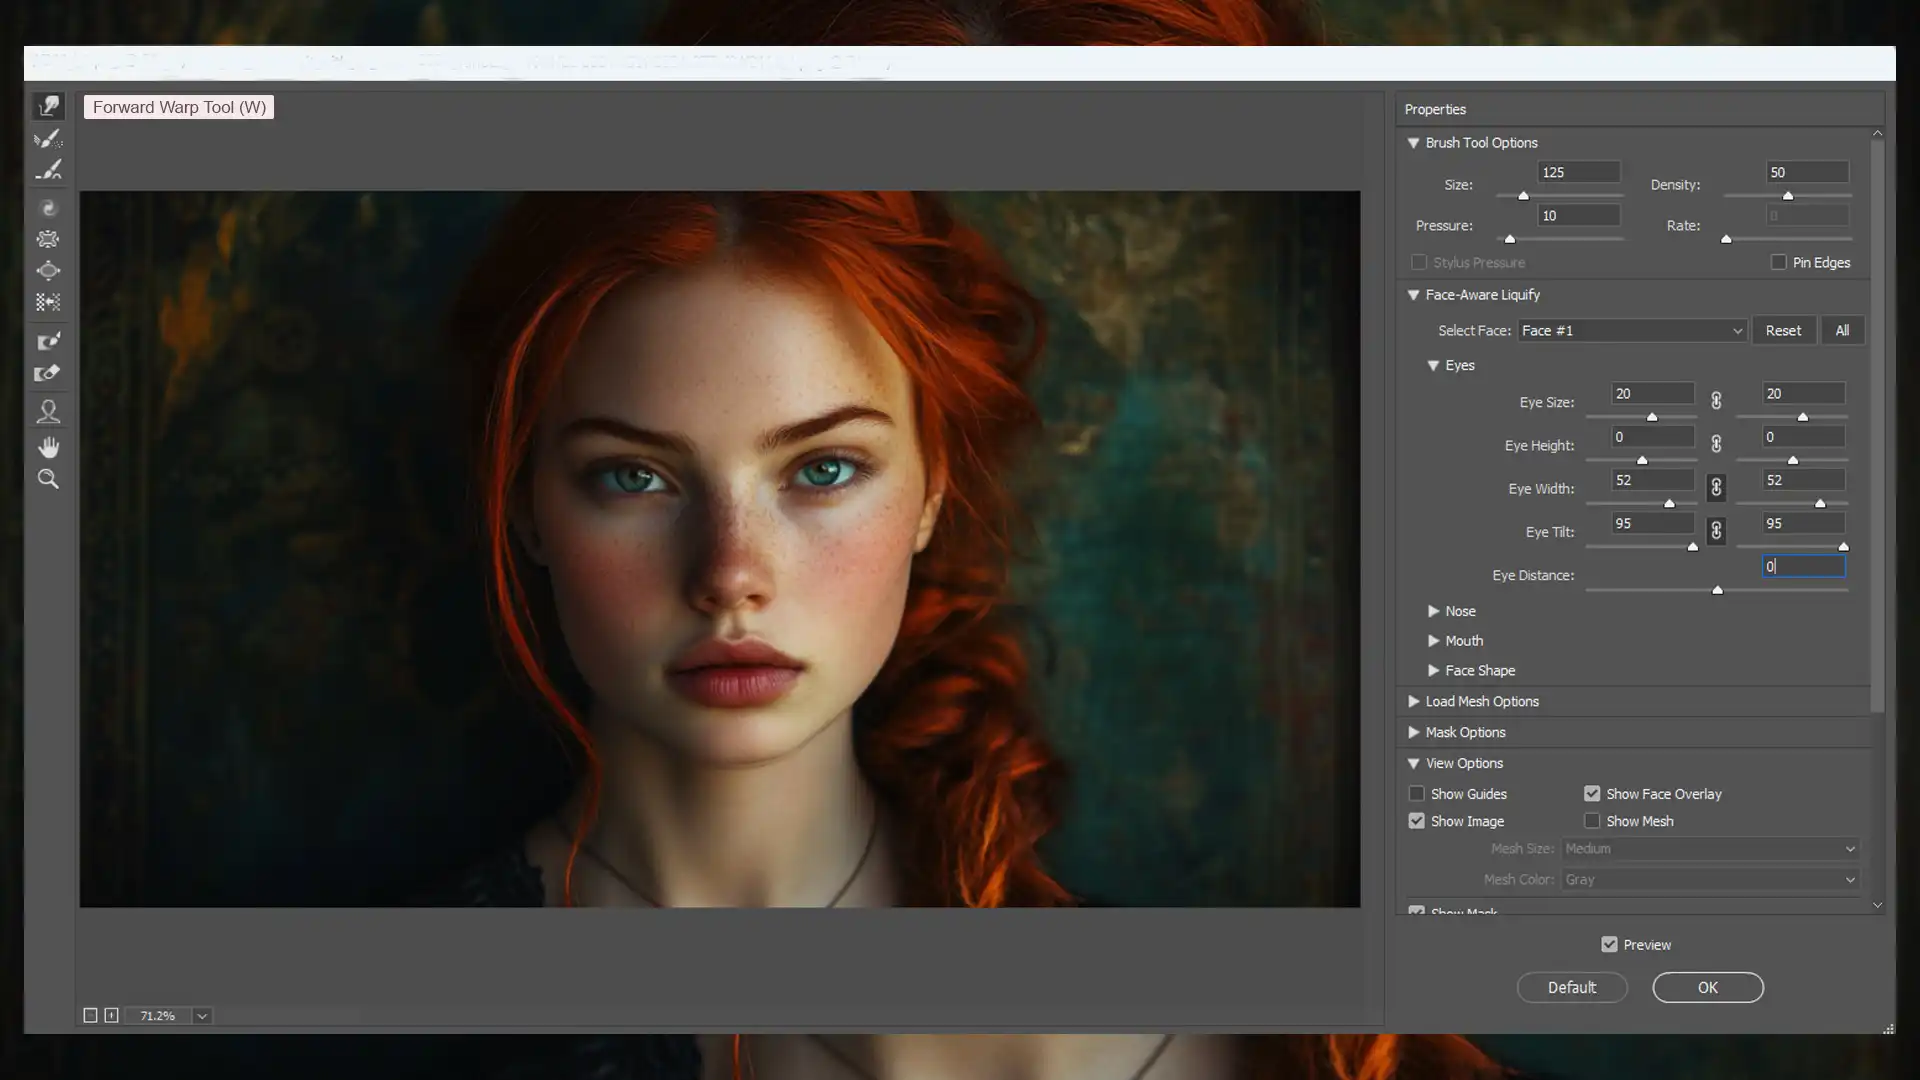
This tool is the hero when using the liquify tool. Picture a magical finger pushing parts of your image where you want them.
You adjust elements effectively but keep experimentation light. This way, your image keeps its natural charm. Modify facial characteristics using this tool carefully, ensuring each change feels realistic.
Utilizing the Freeze Mask Tool
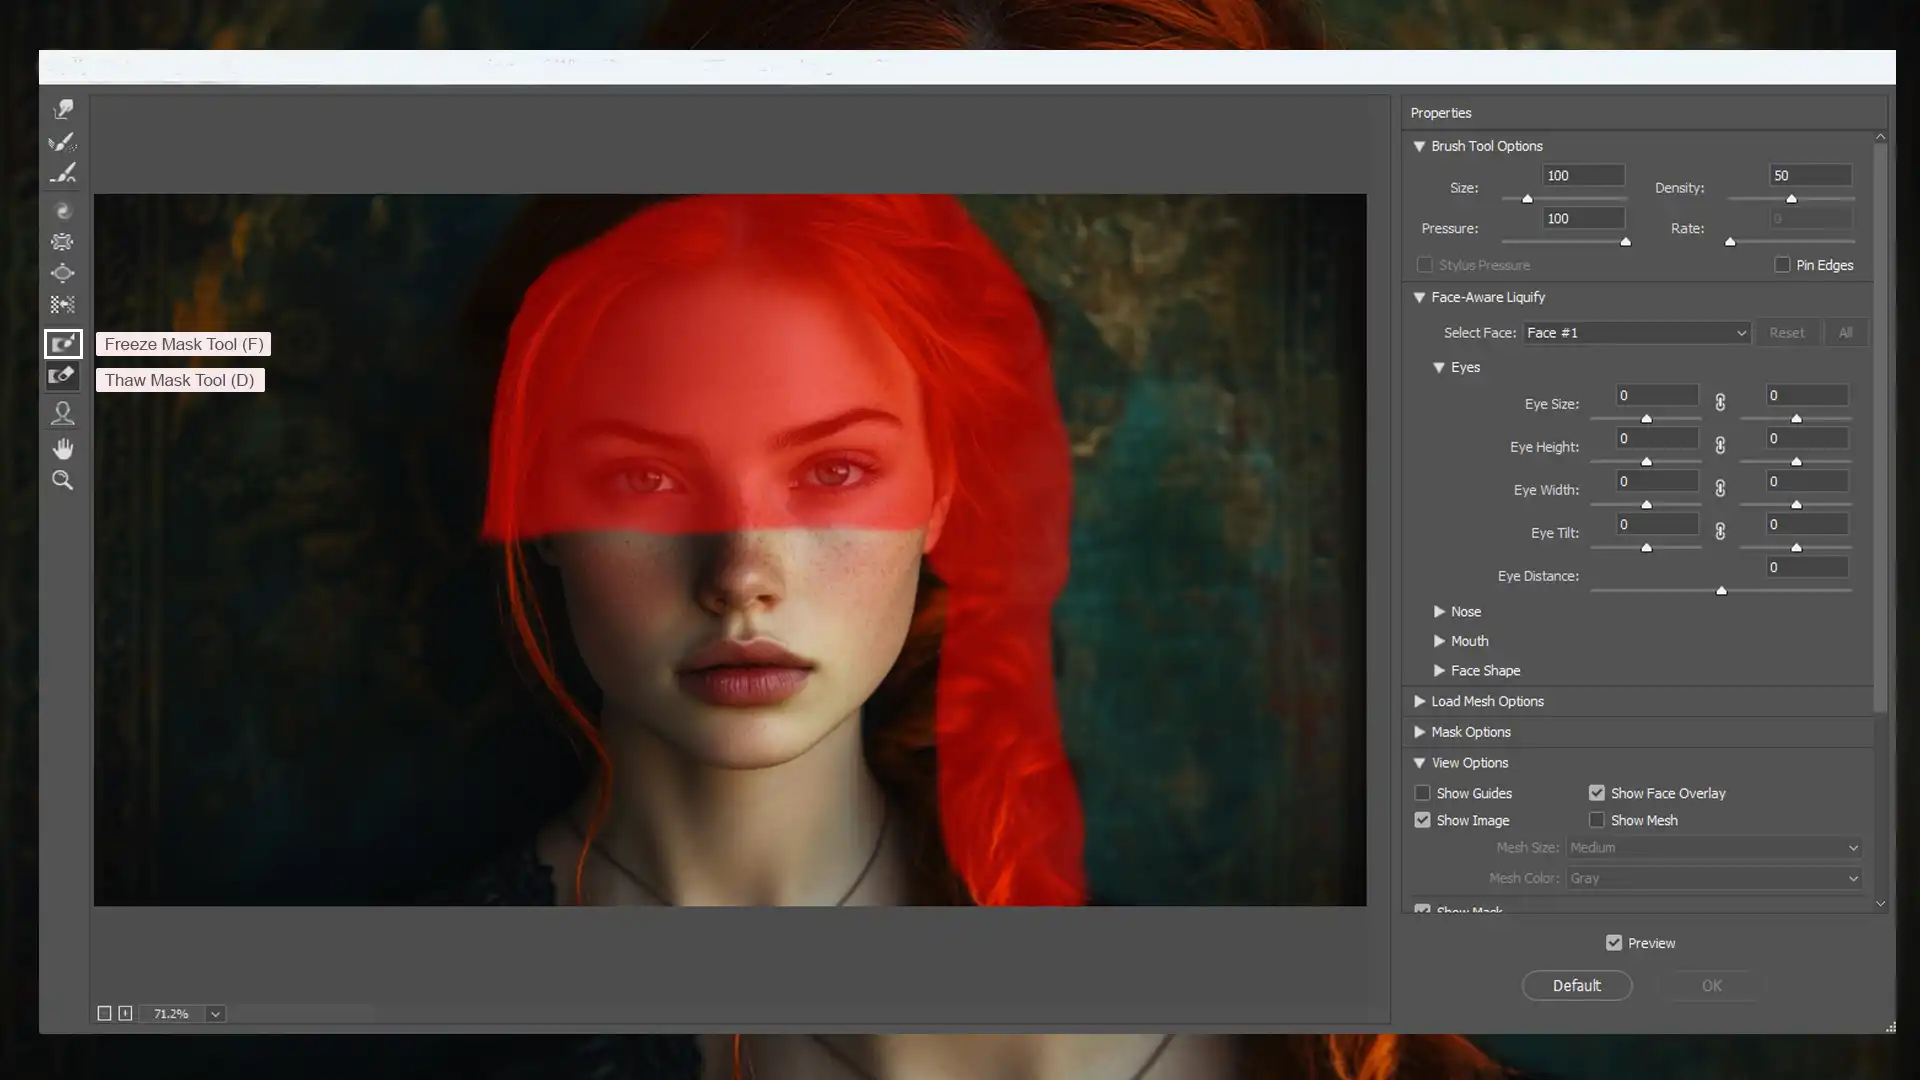
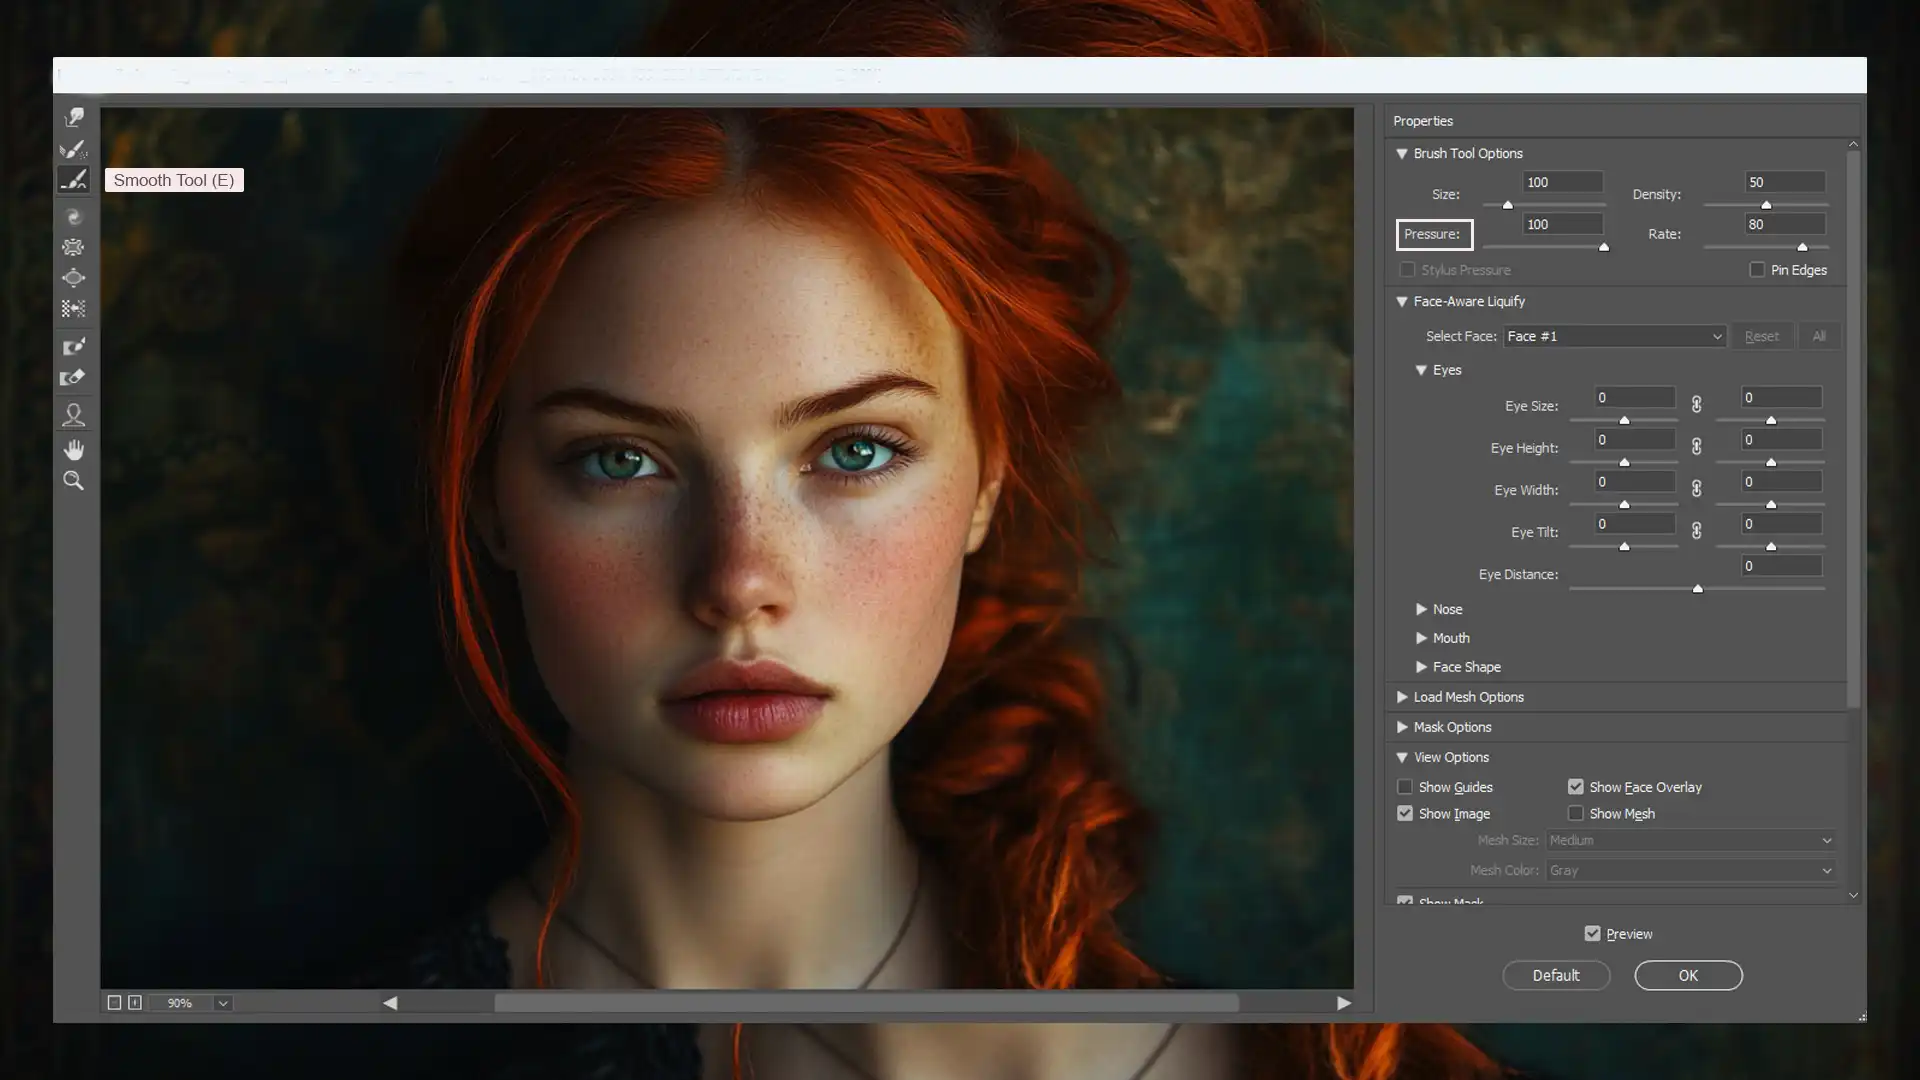
The freeze mask is an unsung hero, protecting areas you want unchanged. Imagine having a magic eraser that selectively saves portions of your artwork.
With the thaw mask tool, unfreeze areas as needed, letting your creativity breathe. It’s a gentle reminder that even art has boundaries.
When using the Photoshop Liquify tool, respecting these boundaries ensures the integrity of your image’s composition.
Throughout the process, use the smooth tool to seamlessly blend the altered areas with the untouched sections. The goal is to achieve a balanced look, enhancing your creations without losing their original essence.
Engaging with smart objects reinforces your project consistency. Work smarter to keep your edits non-destructive, giving room to explore without lasting damage. Enjoy your editing journey and embrace every unexpected change made by the twirl-clockwise tool!
Pro Tip: Set the brush pressure low for subtle changes when you use the liquify tool. Such finesse adds professional polish, especially for beginners honing their skills.
For those looking to expand their editing skills further, exploring Photoshop shortcuts can significantly enhance your workflow efficiency.
Additionally, understanding the difference between Photoshop and Lightroom, as well as Photoshop Elements vs Lightroom, can help you choose the right tool for your specific editing needs and enhance your overall editing experience.
Advanced Techniques with Liquify in Photoshop
The Liquify Tool in Photoshop offers endless possibilities for creativity. By utilizing the Face tool, you can easily manipulate facial attributes to create stunning artistic effects.
Whether you’re aiming for a surreal look or enhancing natural expressions, mastering these techniques will elevate your design work.
Creating Artistic Effects
Looking to enhance your photos? The Liquify tool in Photoshop can turn ordinary images into striking works of art.
- Using the push-left tool, you can give a swirling sensation to water or sky.
- With the twirl tool, create mesmerizing spirals.
Experiment freely and let your creativity guide you rather than striving for perfection.
Photo Retouching with Liquify
Ever taken a picture that was almost perfect? That’s where Photoshop’s liquify tool steps in. Tweak details older cameras might miss.
- You can adjust facial characteristics with ease, making smiles brighter or noses straighter.
- Using the face-aware liquify tool highlights your subject without losing charm.
Delicate touches make all the difference. Remember, it’s about enhancing beauty, not changing identity.
Tips and Tricks for Better Results
Let’s get practical! When you use the liquify tool, take your time. Experiment with brush size for different effects.
- Use the smooth tool to blend subtle shifts seamlessly.
- Have fun pressing the thaw mask and explore flowing creativity.
- Combine with smart object layers to keep edits reversible.
- Need more precise control? Using a stylus can enhance your editing experience by capturing pressure levels for greater accuracy.
Use the hand tool to navigate your canvas and keep everything organized! Plus, engage with the zoom tool; watch details come alive under magnification.
Pro Tip: Before getting started, duplicate your layer! This way, if results are unexpected, you’ll always have an untouched original to return to. Photoshop your way to the perfect edit by experimenting without fear!
Practical Applications of Liquify Tool
In the world of fashion and beauty photography, subtle enhancements can make a significant difference. By learning to use the Liquify Tool, photographers can refine facial characteristics and body shapes to achieve a polished look.
The Face tool streamlines this process, allowing for precise adjustments that enhance overall aesthetics while maintaining a natural appearance.
Fashion and Beauty Photography
Alright, picture this! You’re a photographer with a passion for fashion. Your latest shoot went well, but those little tweaks need attention. No worries, because the liquify tool in Photoshop is your new best friend.
Enhancing Portraits
In fashion and beauty photography, perfection is often part of the job. The tool works magic on portraits without losing authenticity.
Whether it’s smoothing out irregularities or gently altering a model’s expression, it provides precision and artistic freedom in retouching.
One popular trick is using the face tool to slightly adjust facial features, like brightening eyes or softening a smile. These are subtle touches that make a world of difference.
Working with Layers
When working with layers, embrace the safety net of a smart object. This feature keeps original integrity while experimenting with edits. Think of it as insurance for your work.
Pro Tip: Keep the brush density low for controlled adjustments. It’s like painting but on your own terms.
This approach is significant for effective Photoshop face editing, allowing you to make subtle changes while maintaining a natural look. It’s like painting but on your own terms.
Creative Design Projects
Now, let’s explore the world of design, where creativity thrives. You have plenty of ideas ready to be brought to life.
The liquify tool in Photoshop offers endless possibilities. Transform landscapes, create abstract art, or experiment with surreal imagery, your possibilities are endless.
Dynamic Elements
To bring your designs to life, consider incorporating these dynamic elements. Here are some effective techniques to enhance your compositions:
- Using the bloat tools adds a dynamic flair to elements such as clouds or waves.
- With the push-left tool, create whimsical twists in foliage or fabrics.
- Implement the hand tool to navigate across your canvas seamlessly, keeping focus on flow.
Artistic Flexibility
Mix in the brush tool when you feel spontaneous, letting emotions drive the strokes. The mixture of traditional artistry with digital flexibility fuels inspiration.
Precision and Control
Playing with mask options ensures precise manipulations, protecting sections that don’t require change. At the end of your creative session, embrace the reconstruct tool if you stray too far from the project vision. It serves as your friendly undo button.
Pro Tip: Experiment with blending on different layers, liquefying while interacting across textures and colors to enhance your masterpiece. You can always tap the reconstruct tool to return elements back unchanged.
Look, learning to use the liquify tool effectively widens your horizons. From touching up photos to crafting original artwork, it’s a pathway to creation.
Common Mistakes to Avoid
Let’s explore some common mistakes that many face while learning these powerful tools. I understand that the learning process can be confusing, so let’s approach it in a straightforward way!
Interest
One of the biggest mistakes with the liquify tool in Photoshop is going overboard.
- Try to use the liquify tool sparingly. Start small; let your edits enhance rather than overpower.
- For those enhancing facial features, the face tool is magic, but again, less is more.
- The face-aware liquify option provides precise adjustments, ensuring you avoid any unintended distortions to facial features
Desire
Speaking of enhancements, guard against neglecting the basics. Jumping straight into the complex tools means missing out on foundational practices, like using the brush tool properly.
- Brush density plays a massive role in controlling your edits.
- And one subtle trick many overlook: the push-left tool. It can add intriguing twists and turns to your images when wielded gently.
Additionally, the face-aware liquify feature can help you make targeted adjustments to facial features, enhancing your portraits while keeping them natural.
Action
One common mistake is editing directly on the original layer. Always create a smart object copy before starting your edits. Relying solely on Ctrl+Z to undo changes is not a reliable approach.
Experimenting with liquify filter tools can unleash endless creative possibilities. They offer options for playful expression while maintaining the integrity of your work.
Pro Tip: Utilize essential tools in Lightroom, such as lens correction in Lightroom, to streamline your editing process and avoid common photo editing mistakes. This can enhance your workflow and ensure your images look their best.
Frequently Asked Questions

How to Get Liquify in Photoshop?
- Open Photoshop and load the image you want to edit.
- Go to the Filter menu.
- Select Liquify through the dropdown options.
How Do You Get the Liquify Mode in Photoshop?
- Start by opening your project in Photoshop.
- Navigate to the Filter menu on the top bar.
- Click on Liquify to enter the liquify mode.
Why Can't I Use the Liquify Tool in Photoshop?
- Ensure your image layer or background layer is not locked.
- Check that the image is in a supported format like JPEG or PNG.
- Make sure Photoshop is updated to the latest version.
Where is Liquify in Photoshop Elements?
- Open your image in Photoshop Elements.
- Look for the Filter menu in the top navigation bar.
- Choose Distort, then select Liquify through the expanded options.

Conclusion
In conclusion, mastering the “Liquify in Photoshop” tool has transformed the way I approach photo editing. It’s an incredibly versatile feature that allows for subtle adjustments or dramatic transformations, depending on the needs of the project.
Using the liquify tool, I was able to make those refinements quickly and effectively, elevating the final image to a new level.
If you want to enhance your skills, I encourage you to explore my Photoshop Course and Lightroom Course. These courses are designed to help you unlock the full potential of these tools and make your editing process more creative and enjoyable.
Whether you’re just starting or want to refine your techniques, these resources can be a great addition to your learning journey. And if you’re ready to get started, consider checking out Adobe Photoshop and Adobe Photoshop Lightroom to elevate your photo editing game!
Read more about Photoshop:


