Have you ever taken a photo only to realize later that the perspective is all wrong? Lightroom perspective correction tools can be a game-changer for anyone looking to perfect their images.
Imagine transforming your photos from amateur-looking shots to professional-grade masterpieces with just a few clicks. In this article,
I’ll guide you through the simple yet powerful tools in Lightroom that can correct perspective issues and give your photos the polished look they deserve.
Whether you’re a seasoned photographer or just getting started, these tips will help you elevate your work to the next level.
Let’s get started!
Table of Contents
Understanding the Lens Corrections Panel
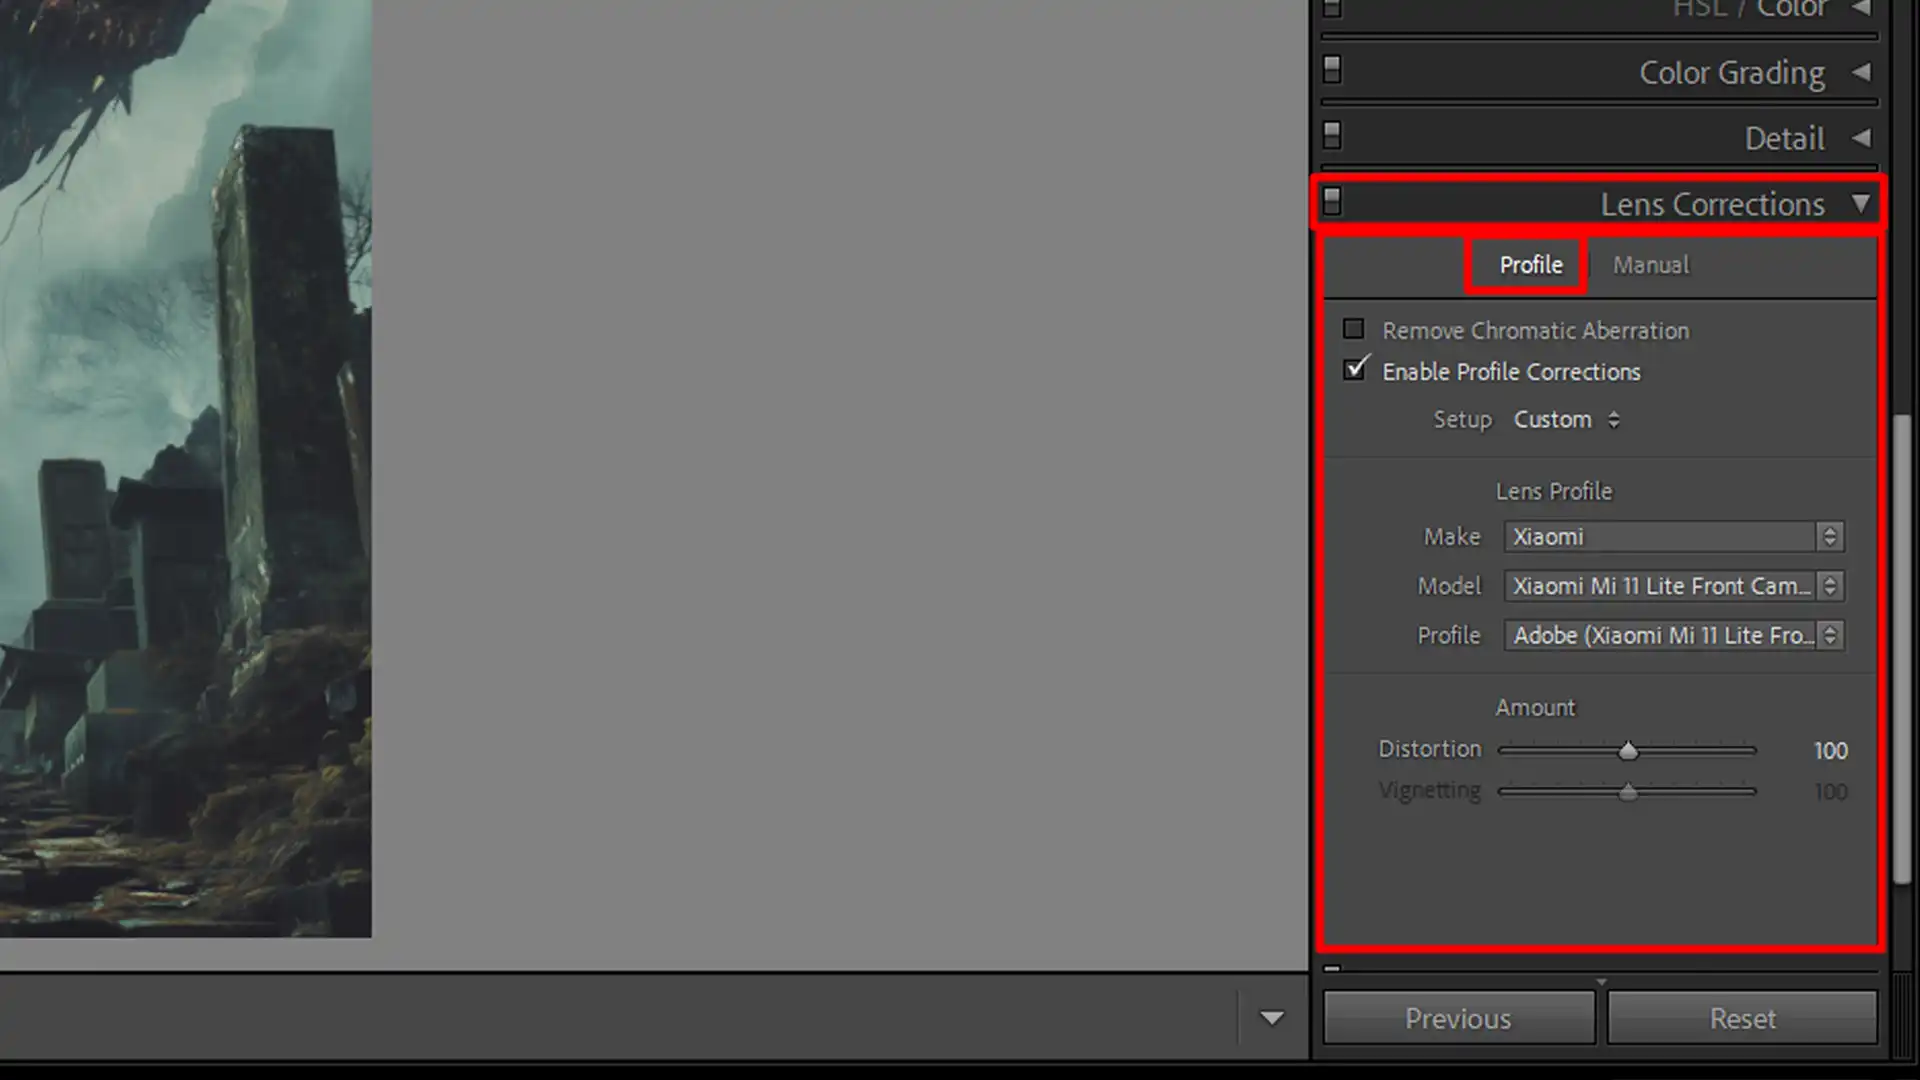
We begin by understanding the lens correctionspanel. It corrects distortions in photos, making them look professional.
To use it, go to the Develop module in Lightroom.
You will find the Lens Calibration Corrections panel on the right.
Activating the Enable Profile Correction checkbox applies lens correction based on your camera’s lens combination.
This immediately fixes common distortions inherent in lenses.
Applying Lens Corrections
Now, let’s apply the lens calibration corrections.
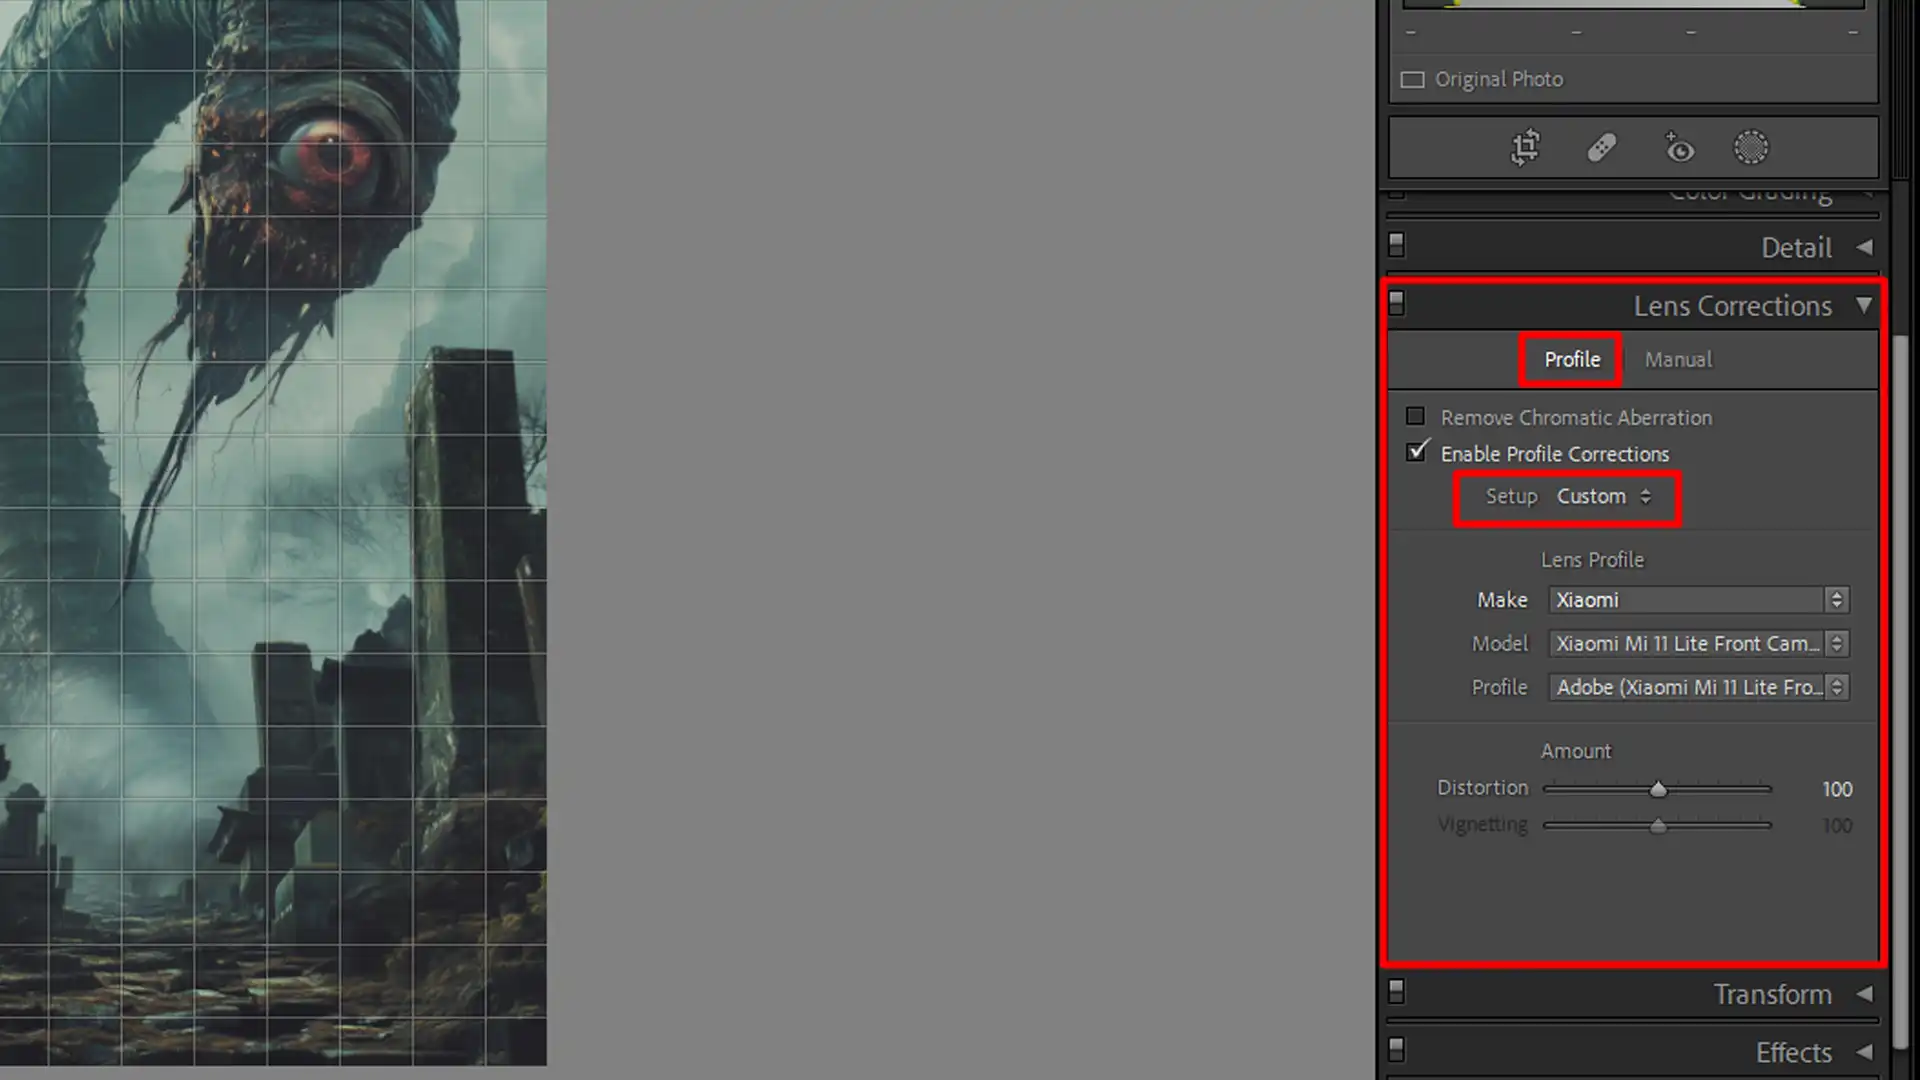
You’ll find both profile and manual adjustment tabs:
In the Profile tab, enable profile correction to fix basic lens distortions.
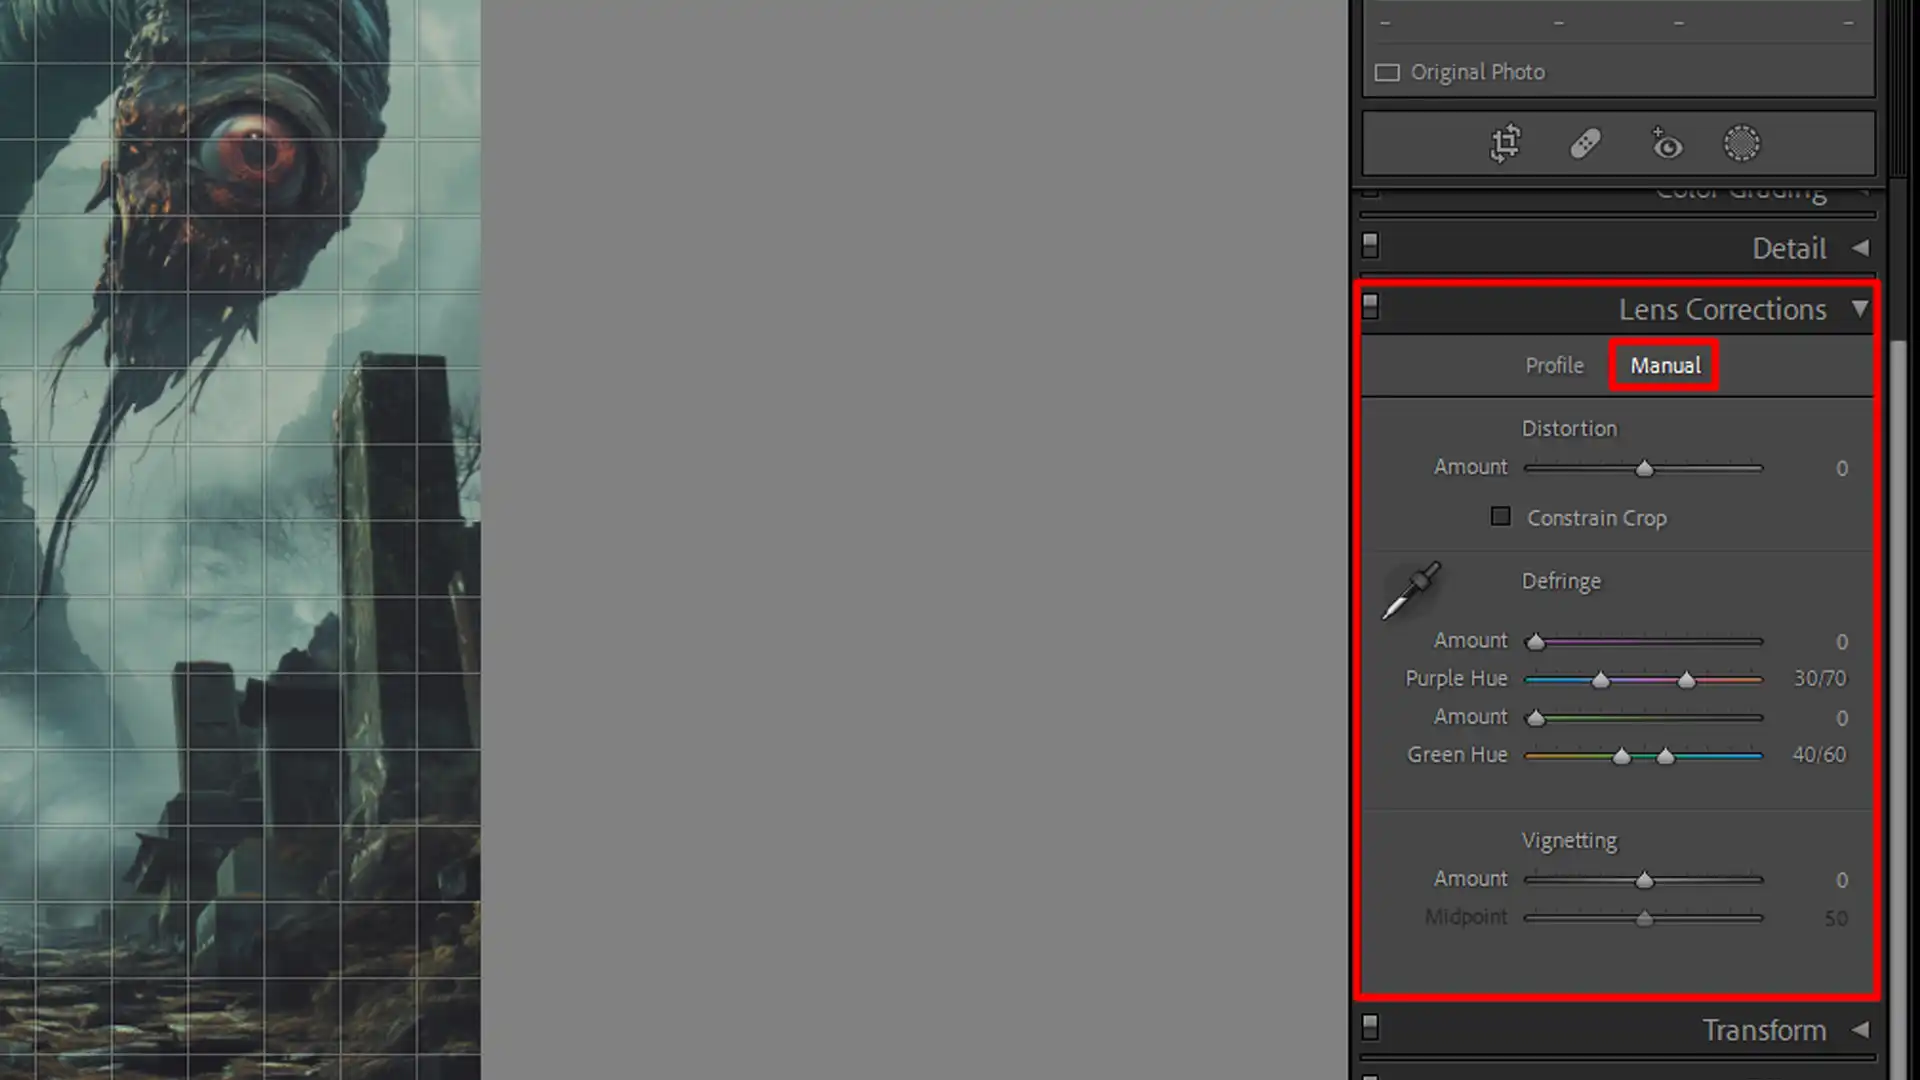
For more control, use the Manual adjustment tab.
In the Manual adjustment tab, sliders such as Distortion, Horizontal, and Vertical allow precise adjustments:
The Vertical Slider corrects upright lines that may appear slanted.
Setting both vertical and horizontal lines straight makes all the difference.
Using perspective adjustment correction tools like the Crop Overlay Tool helps achieve better image analysis.
Don’t overlook the Aspect Slider for fine-tuning the aspect ratio of your images.
Pro Tip: When working with multiple images, consider using the Auto button in Upright mode. It offers auto perspective corrections, saving you time while ensuring straight lines and consistent results.
Correcting Vertical Lines
Understanding how to correct upright lines in your photos makes a big difference. Upright lines often appear skewed, especially when you use a wide-angle lens.
By correcting these lines, you can achieve a more balanced and professional-looking image.
Let’s dive into how you can fix this issue effectively.
Identifying Vertical Lines
First, let’s identify those upright lines. Upright lines are up-and-down lines. They should be straight but might look crooked in your photo because of lens distortion.
By focusing on these lines, you can ensure accurate perspective adjustments and enhance the overall alignment of your image.
For example, buildings often show this problem.
Examine your original image for any such discrepancies.
Using the Upright Tool
The next step is using the Upright tool in Lightroom. You’ll find it in the LensDistortion Corrections panel.
Follow these steps:
Enable Profile Corrections if it’s not activated yet.
Click the "Upright" button. Several modes are available: Auto, Level, Vertical, and Full.
Auto mode tries to correct everything, including horizontal and vertical attributes.
Vertical mode focuses on correcting upright lines.
If you don’t get perfect results with Auto, try the Verticalmode next. The tool analyzes the perspective of your image and adjusts it accordingly.
If you need finer control, switch to the Manual adjustment tab. Here, use the Vertical slider to adjust the correction of your upright lines manually. It allows precise control over vertical details.
For tricky images with complex perspectives, use the straightening tool for a touch-up. Ensure the final image has straight lines, no lens distortion, and professional quality.
To master advanced perspective correction, combine tools like the Guided Upright and Transform panels with precision adjustments and custom presets to achieve impeccable image alignment and correct complex distortions effectively.
Instructional Lightroom Perspective Correction
Manual perspective adjustment correction is essential when automatic tools fall short. This method involves tweaking settings to rectify distortions in your image.
Begin by identifying which parts of the photo require adjustment. If upright lines look crooked, it signals the need for corrections.
Open Lightroom Photo Editor and head to the Lens Distortion Corrections panel. If you aren’t familiar with the term ‘Lens Calibration Corrections,’ it’s basically a set of tools designed to fix various types of lens distortions.
First, ensure you enable Profile Corrections.
Click on the “Manual” tab. Here you’ll find sliders like Horizontal and Vertical, allowing fine-tuning:
Adjust the Vertical slider to straighten upright lines.
For correcting horizontal attributes, use the Horizontal slider.
These changes can significantly improve the overall geometry of your images.
Although it can be time-consuming, mastering manual perspective adjustment correction gives you more control. It ensures no minor distortions linger in your final picture.
Knowing when to use manual correction is vital to achieving those perfectly straight lines.
Think of it as your secret weapon.
Adding an Overlay Grid
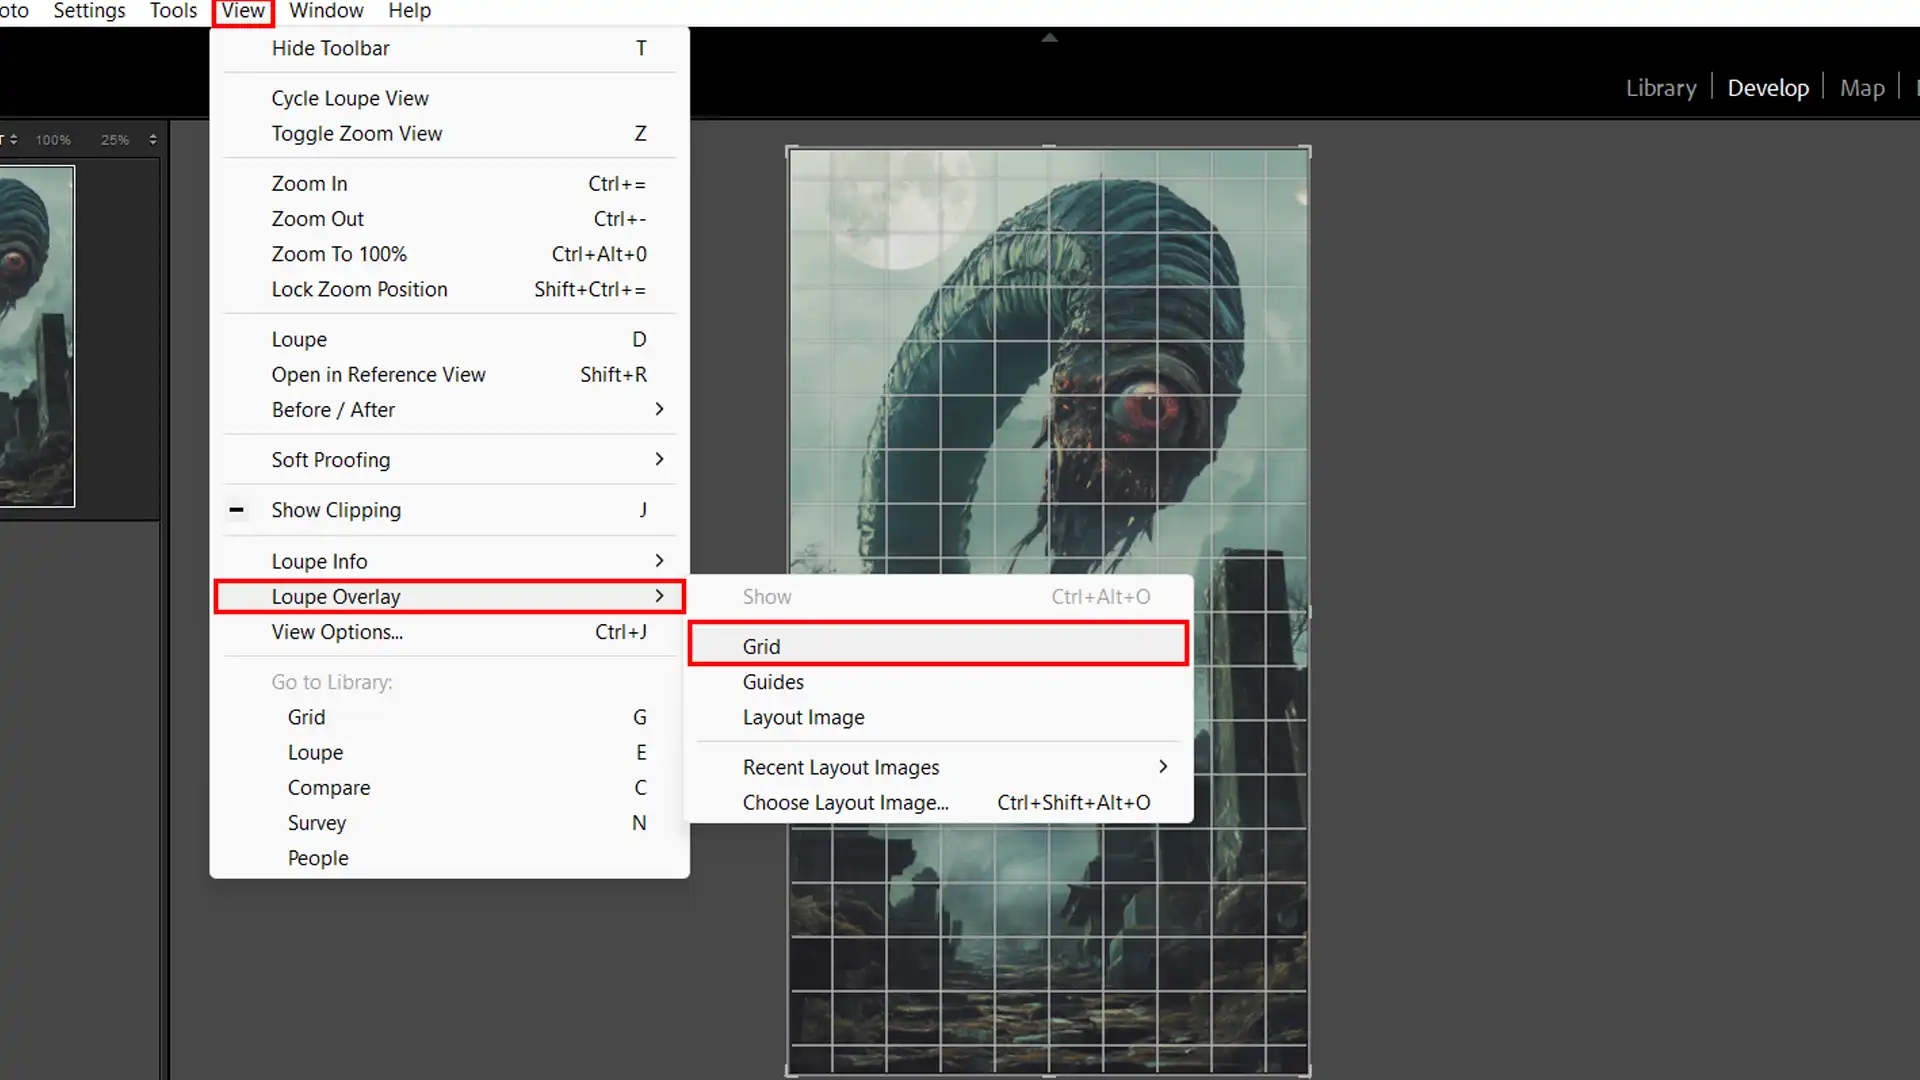
Adding an overlay grid is a valuable technique for achieving precise geometric corrections.
In Lightroom, you can activate the grid by selecting the Crop Overlay tools and choosing the grid option from the menu.
This grid helps you align key elements in your photo, making it easier to straighten crooked lines and ensure that horizontal and vertical edge are properly aligned.
By using the grid, you can visually assess and adjust the geometry of your image, ensuring a more professional and balanced look.
This simple tool can make a significant difference in perfecting your perspective adjustments.
To enhance your photo editing, adding an overlay grid can significantly help with alignment. If you need to draw a curved line in Photoshop, this grid will guide your adjustments effectively.
Fine-Tuning Your Adjustments
Now let’s delve into fine-tuning your adjustments. Once you’ve corrected major distortions, it’s time for subtle tweaks.
Zoom in at 100% to spot any remaining distortions-this helps catch issues not visible at a lower zoom level.
Utilize the Crop tool to eliminate any white areas around the edges that may appear due to perspective adjustments.
This ensures that the finished product looks polished and professional. Having an edge in perspective adjustment correction can be crucial.
For example, slight lens distortions can often leave an otherwise perfect image looking a bit off. Adjusting the image manually allows you to correct these imperfections, regardless of the complexity of the original distortion.
Always remember, small changes can make a huge impact on how your photo feels and looks.
In the Basic tab, utilize the Straighten tool. This tool is beneficial for final touches that bring out the best in your image. Properly adjusted images capture the viewer’s attention more effectively.
Pro Tip: Save different versions of your work during the correction process. This helps you compare and select the best-corrected image.
Always keep versions like a document history at hand.
For achieving perspective mastery in photography, it’s crucial to focus on fine-tuning your adjustments. Perfecting these details can elevate your work significantly.
Perspective Adjustment Correction Common Mistakes and How to Avoid Them
Avoid over-correcting distortions, failing to align the image properly, and neglecting to check your adjustments at 100% zoom to ensure a professional and accurate final result.
Over-Correction
We all want our photos to look perfect. Sometimes, we can get too enthusiastic with the lightroom perspective corrections.
Over-correcting an image often makes it look unnatural, for example, stretching or compressing it too much.
To avoid this:
Always review your photo after each adjustment.
Remember that less can often be more in these cases.
Step back and take a fresh look at your image later.
Pro Tip: When in doubt, compare your adjusted image with the original to ensure you’re not going overboard.
Ignoring Lens Distortion
Lens distortion is a common issue that can drastically impact the quality of your photos. Ignoring it will lead to images that look warped or skewed.
Most lenses produce some level of distortion, including barrel distortion (lines bow out) and pincushion distortion (lines pinch in).
To correct lens distortion:
Head to Lightroom's Lens Distortion Corrections panel and enable the Profile Correction option. This tool automatically corrects distortion based on your camera and lens type.
Use the Manual adjustment tab for fine-tuning. Adjust the Vertical and Horizontal sliders to get those upright lines straighter. This step is essential for clean, professional results.
Zoom into your photo at 100% to catch any minor distortions you might have missed initially.
Use the Crop tool to remove any unwanted visible edges. Cropping will help tidy up your final picture. A clean crop is often the last touch needed for a polished look.
Pro Tip: Save different versions of your image as you make adjustments. This practice lets you choose the best version without having to re-do the corrections from scratch.
Exporting Your Corrected Lightroom Photos
When you’re ready to export your corrected photos, start by choosing the right export settings. These settings depend on how you want to use the image. Do you plan to print or share it online?
For prints, ensure you select a high resolution, while for online sharing, optimize for web quality to balance clarity and file size.
For Printing
You want high-resolution images. Set the DPI (dots per inch) to 300. This ensures the photo looks sharp when printed.
Save the image in formats like TIFF or PNG for the best quality.
For Online Sharing
Images don’t need to be that high in resolution, 72 DPI is fine. Save the images in JPEG format to keep the file size small, making uploading faster and easier.
Adjust the JPEG quality setting accordingly: Higher quality means larger file sizes but better image fidelity.
Lower quality means a smaller file size but poorer image quality.
Saving and Sharing Your Work
After selecting the appropriate export settings, it’s time to save and share your work.
Naming Your Files
Name your files carefully. Use a naming convention that helps you find the image later. For example, “Vacay2023_BeachSunset” works well.
Saving Multiple Versions
To save multiple versions of one photo, like black and white or cropped versions-use different names. This way, you don’t overwrite your work.
Final Checks and Sharing
Before sharing online, check each image once more. Make necessary adjustments to ensure it looks the best.
Once satisfied, upload them to social media or send them via email. You can even create online albums for easy sharing with friends and family.
Pro Tip: Always check your image for any remaining distortion before finalizing. For those using Lightroom, consider utilizing some essential tools in Lightroom to make your workflow more efficient.
When focusing on Instagram export settings, it’s essential for sharing online effectively. Proper export settings ensure your images look their best on social media.
Optimize these settings to enhance your online sharing experience.
Why Perspective Adjustment Correction is Important
Have you ever taken a photo only to realize that the lines aren’t straight?
This is where perspective adjustment correction comes in handy.
Aspect
Before Correction
After Correction
Perspective
Distorted lines, structures appear off-kilter
Straightened lines, structures look accurate
Lens Distortion
Visible distortion in building or architectural shots
Corrected distortion, improved image clarity
Adjustments
Manual corrections may be needed
Use auto and manual adjustments for precision
When we take pictures, especially of buildings or interiors, we often get unintended distortions.
The Basics of Lightroom Perspective Correction
Perspectives can be tricky, making buildings look like they’re falling over. That’s due to something called lens distortion, a problem we can fix.
Understanding Lens Distortion Corrections Panel
In Lightroom, you can go to the lens distortion corrections panel to start fixing these distortions. This panel offers several tools that make the job easier.
How to Use the Upright Modes
Ever heard of upright modes? These are features in the lens correction panel that help you straighten your photos. You can use the auto button for quick fixes, but sometimes you might need to fine-tune things manually.
Horizontal and Vertical Adjustments
When correcting an image, focus on both vertical and horizontal lines. The software can align these lines to give you a better overall appearance.
You have sliders available for these adjustments, making the process quite simple.
Manual Lightroom Perspective Correction
If auto adjustments don’t cut it, you can switch to manual custom correction. Here’s what to do:
Go to the manual adjustments tab in the lens distortion corrections panel.
Use the vertical bar slider for up-down vertical line adjustments.
Adjust the horizontal line with the horizontal details slider.
Tweak other settings like aspect ratio if needed.
Before and After: What's the Difference?
Look at the original image and compare it with the corrected one. You’ll notice the significant change in appearance. Proper lightroom perspective corrections can make a significant impact in creating great photos.
Pro Tip: Always enable profile correction first to handle any built-in lens distortions. Then move on to lightroom perspective corrections for an even better result.
This approach ensures that both lens distortion and perspective issues are addressed for a polished and accurate image.
For more detailed guidance, check out our Learn Photography Articles section to master these techniques and more.
Added these keywords: Learn Photography Articles, How to Use Lens Correctio in Lightroom.
Getting Started with Lightroom Perspective Correction
Are your photos looking a bit off? Do buildings seem to lean or skew in your images? If so, you’re probably dealing with lens distortion.
Luckily, there are effective ways to correct lens distortion and bring back the sharp, professional look to your photos.
Thankfully, Lightroom offers tools to make perspective adjustment correction a breeze.
Understanding the Lens Distortion Corrections Panel
The Lens Distortion Corrections panel is where the magic happens. This is where you tackle those pesky distortions caused by your camera lens.
The panel offers several options:
Start by enabling profile corrections.
This automatically adjusts common distortions based on your lens and camera combination.
Sliders for horizontal and vertical adjustments to align straight lines in your photo. These tools help you make your images look more natural.
How to Access the Lens Distortion Corrections Panel
First, open Lightroom and go to the Develop module. You can find this module on the top right pane. In this module, look for the Lens Distortion Corrections panel on the right sidebar.
Within the panel, you’ll notice a section labeled “Basic.” This tab provides options like enabling profile correction and using the auto perspective adjustments feature.
Clicking these options lets Lightroom do most of the work for you.
Enable Profile Correction: Often, enabling this option solves most of your distortion issues. It uses your lens's profile to correct default distortions. Click the checkbox next to it and see immediate improvements.
Horizontal and Vertical Sliders: For finer control, use the horizontal and vertical sliders. They allow you to manually adjust the perspective, ensuring upright lines and straight lines are perfect.
Pro Tip: After making your perspective adjustments, use the overlay crop tool to remove any white areas around the edges of your final picture. This ensures a polished, professional look.
Mastering Lightroom perspective correction can make a huge difference in your photos. By fine-tuning your adjustments and using tools like overlay grids, you can fix distortions and achieve better results.
I’ve found that taking time to perfect these details really improves the quality of my work.
$2,061.00Original price was: $2,061.00.$1,061.00Current price is: $1,061.00. 27584
Download Your Free Guide Now!
Discover the secrets of photography with our printable guide! Master essential techniques like aperture, shutter speed, and ISO to create stunning images. Get your free printable PDF now and start turning your snapshots into masterpieces!