Are you struggling with how to tilt text in Photoshop?
You’re not alone; I’m here to guide you through it step-by-step.
In just a few simple moves, you can add a dynamic flair to your designs.
Imagine transforming plain, flat text into eye-catching, rotating text elements that make your projects stand out.
Whether you’re a beginner or have some experience, this guide will make the process straightforward and enjoyable.
Ready to dive in?
Let’s get started and add that tilt to your text!
Table of Contents
How to Tilt Text in Photoshop
Today, we’ll learn how to tilt text in Photoshop. It’s a handy skill that can add flair to your projects.
We’ll go step-by-step, so stay with me.
By the end, you’ll be tilting text like a pro.
Creating a Text Layer in Photoshop
First, open your Photoshop document. Select the Text Tool from the toolbar on the left.
Click anywhere on the canvas to create text layers, and type your desired text.
If you need to adjust the size, use the Options Bar at the top. You can change the font, size, color, and more there. Remember, making the text layer stand out enhances readability.
Using the Layers Panel
Now that your text layer is ready navigate to the Layers Panel on the right.
Ensure the text layer selected is active. This is important because only the selected layer will be affected by any transformations.
If the panel isn’t visible, just go to the Window menu and select Layers. This step makes it easier to manage all layers in your project precisely.
Entering Free Transform Mode
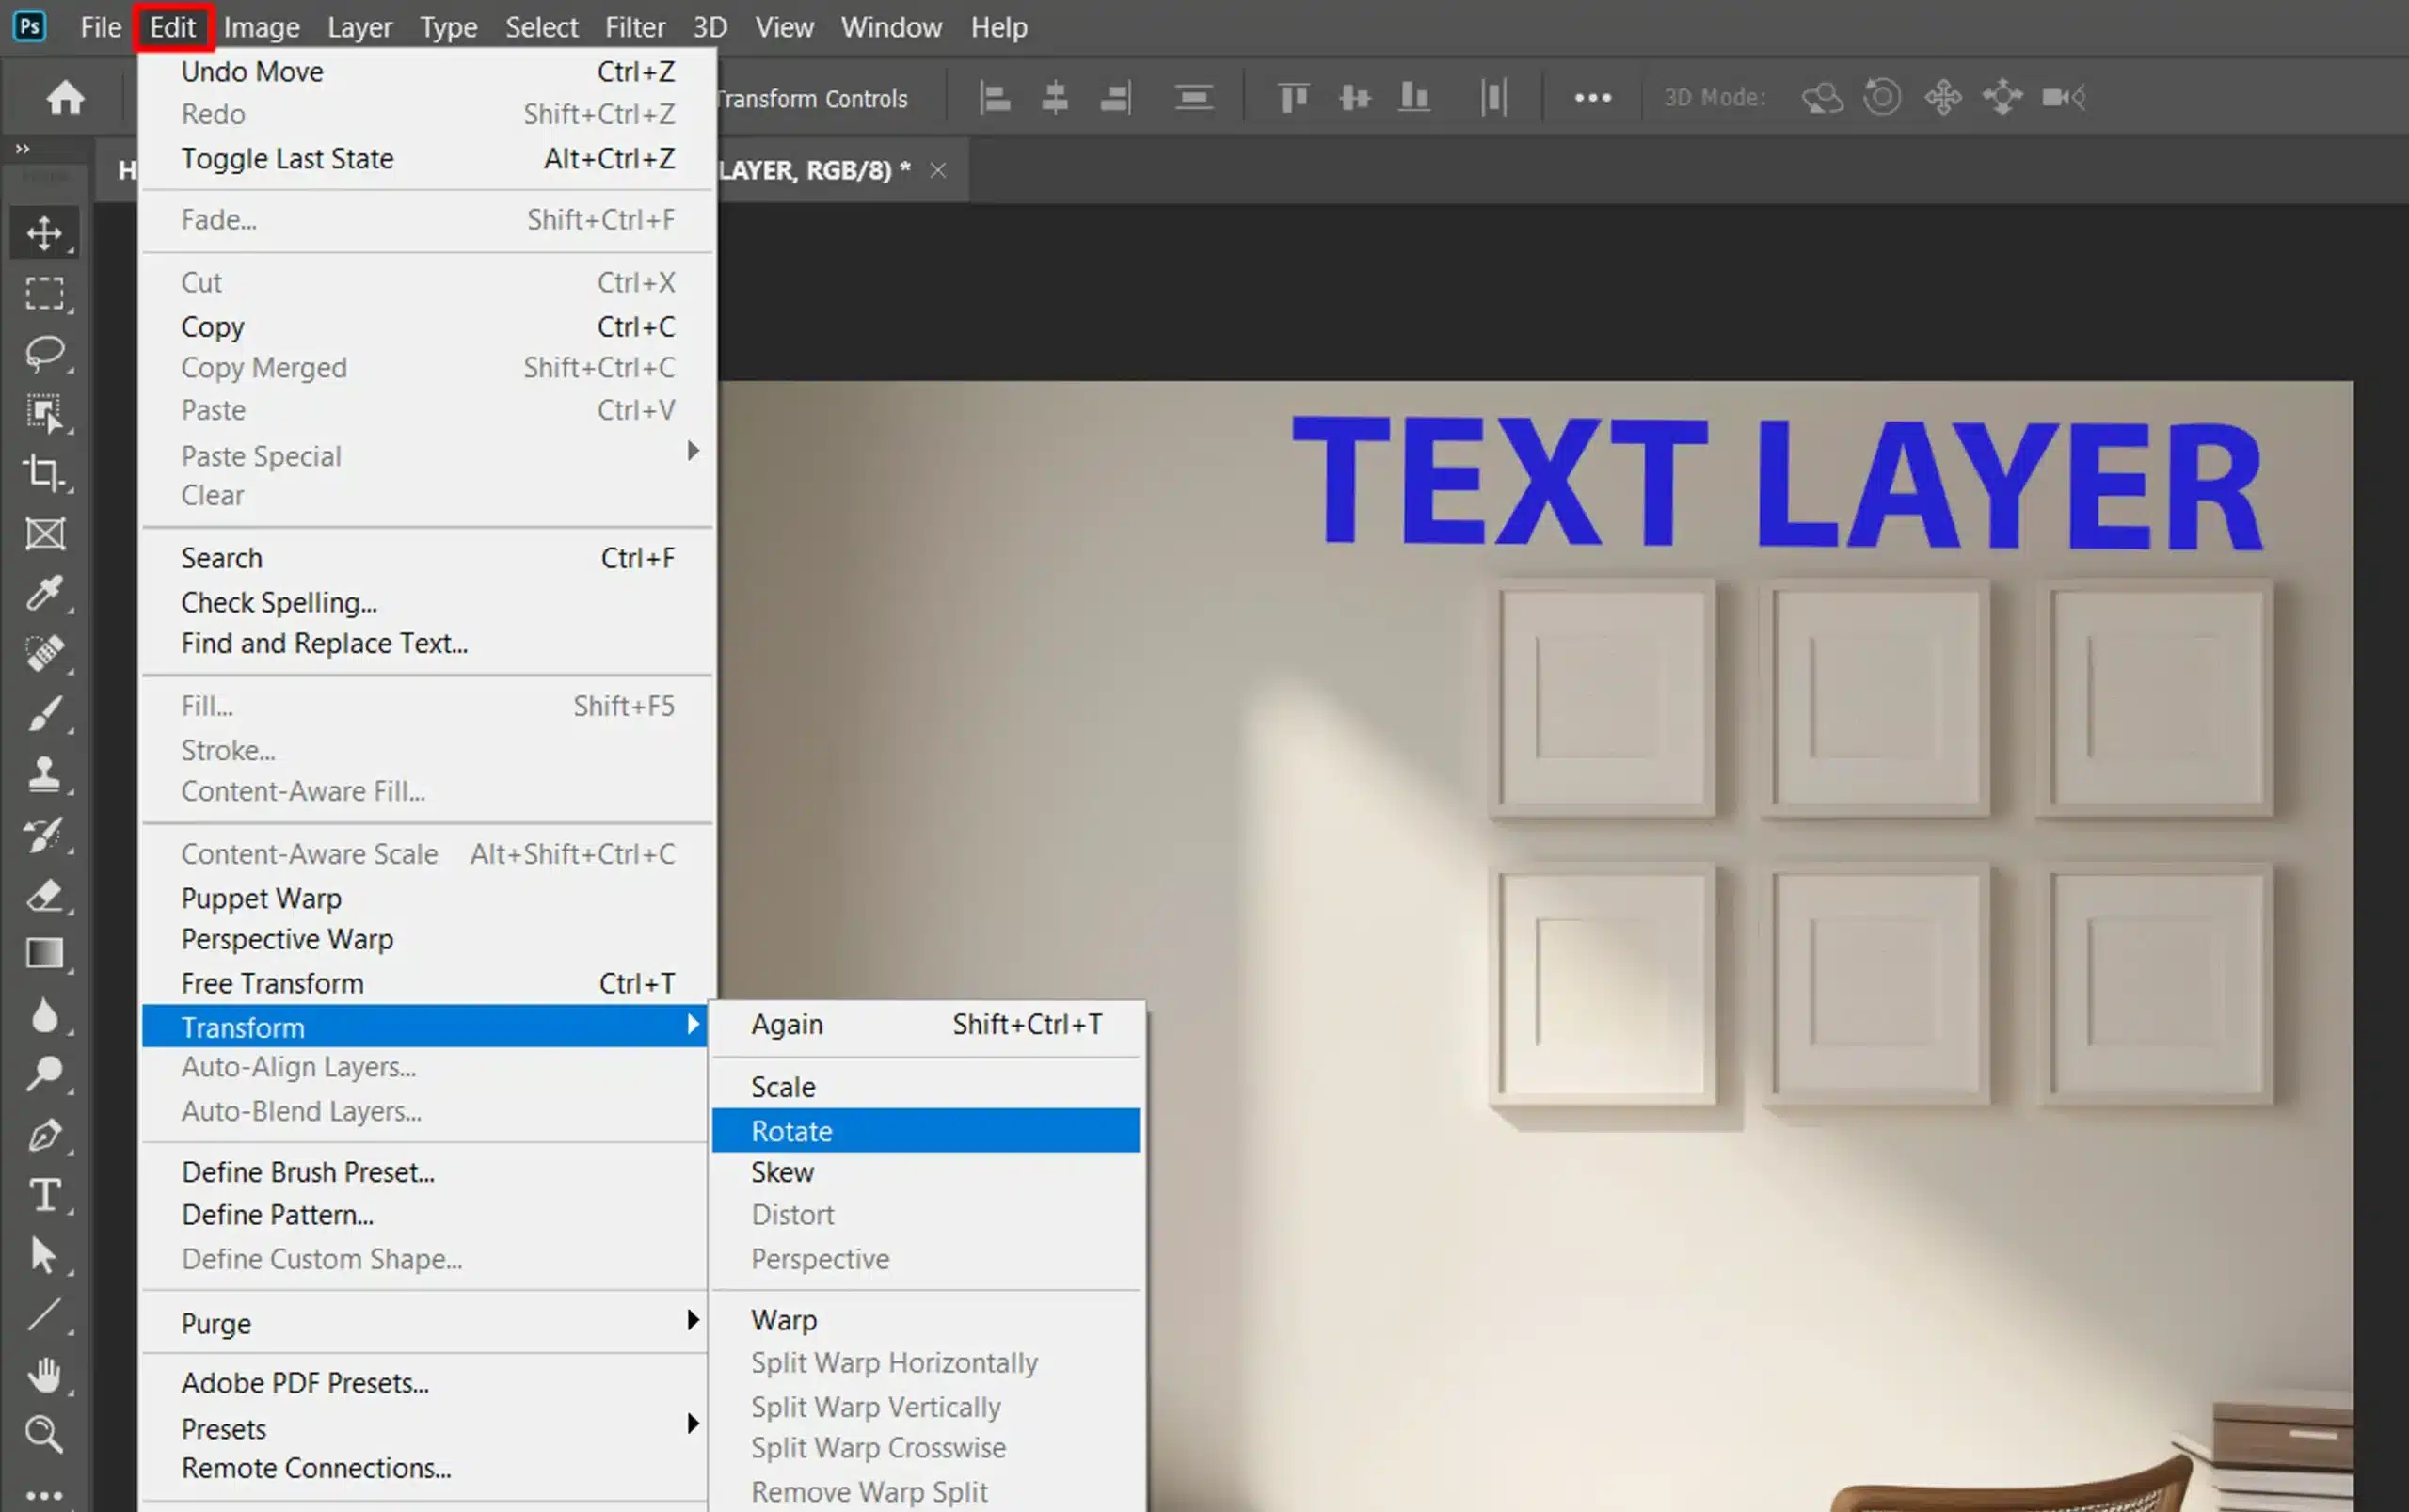
With the text layer selected, press Ctrl+T (Cmd+T on Mac) to enter Free Transform Mode in Photoshop.
You’ll notice a bounding box around your text. This box lets you manipulate your rotating text freely.
In this mode, you can move, scale, distort, and rotate text in Photoshop.
For now, we’ll focus on rotating the text. Rotate text opens up creative possibilities for your rotate text in Photoshop.
How to Rotate Text in Photoshop Precisely
To rotate text in Photoshop, position your cursor outside one of the corners of the bounding box.
The cursor will turn into a curved arrow. Click and drag to rotate text clockwise or counterclockwise.
If you need more control, hold down the Shift key while dragging to rotate in 15-degree increments. This trick helps you fine-tune the angle of your rotate text in Photoshop.
Once satisfied with the rotation, press Enter or click the Check Mark in the options bar to confirm the transformation. Your rotate text in Photoshop is now tilted!
Pro Tip: To add an extra layer of style, try combining tilted text with effects like Bevel & Emboss or experimenting with different fonts. This can make your designs truly stand out.
For an added layer of creativity, consider mimicking the effects of a tilt-shift lens by combining tilted text with a shallow depth of field and blurred background.
Advanced Techniques for Tilting Text in Photoshop
After covering the basics, let’s dive into some advanced techniques for tilting text in Adobe Photoshop.
We will explore using Warp Text, combining multiple transformations, and applying effects to tilted text.
Using Warp Text
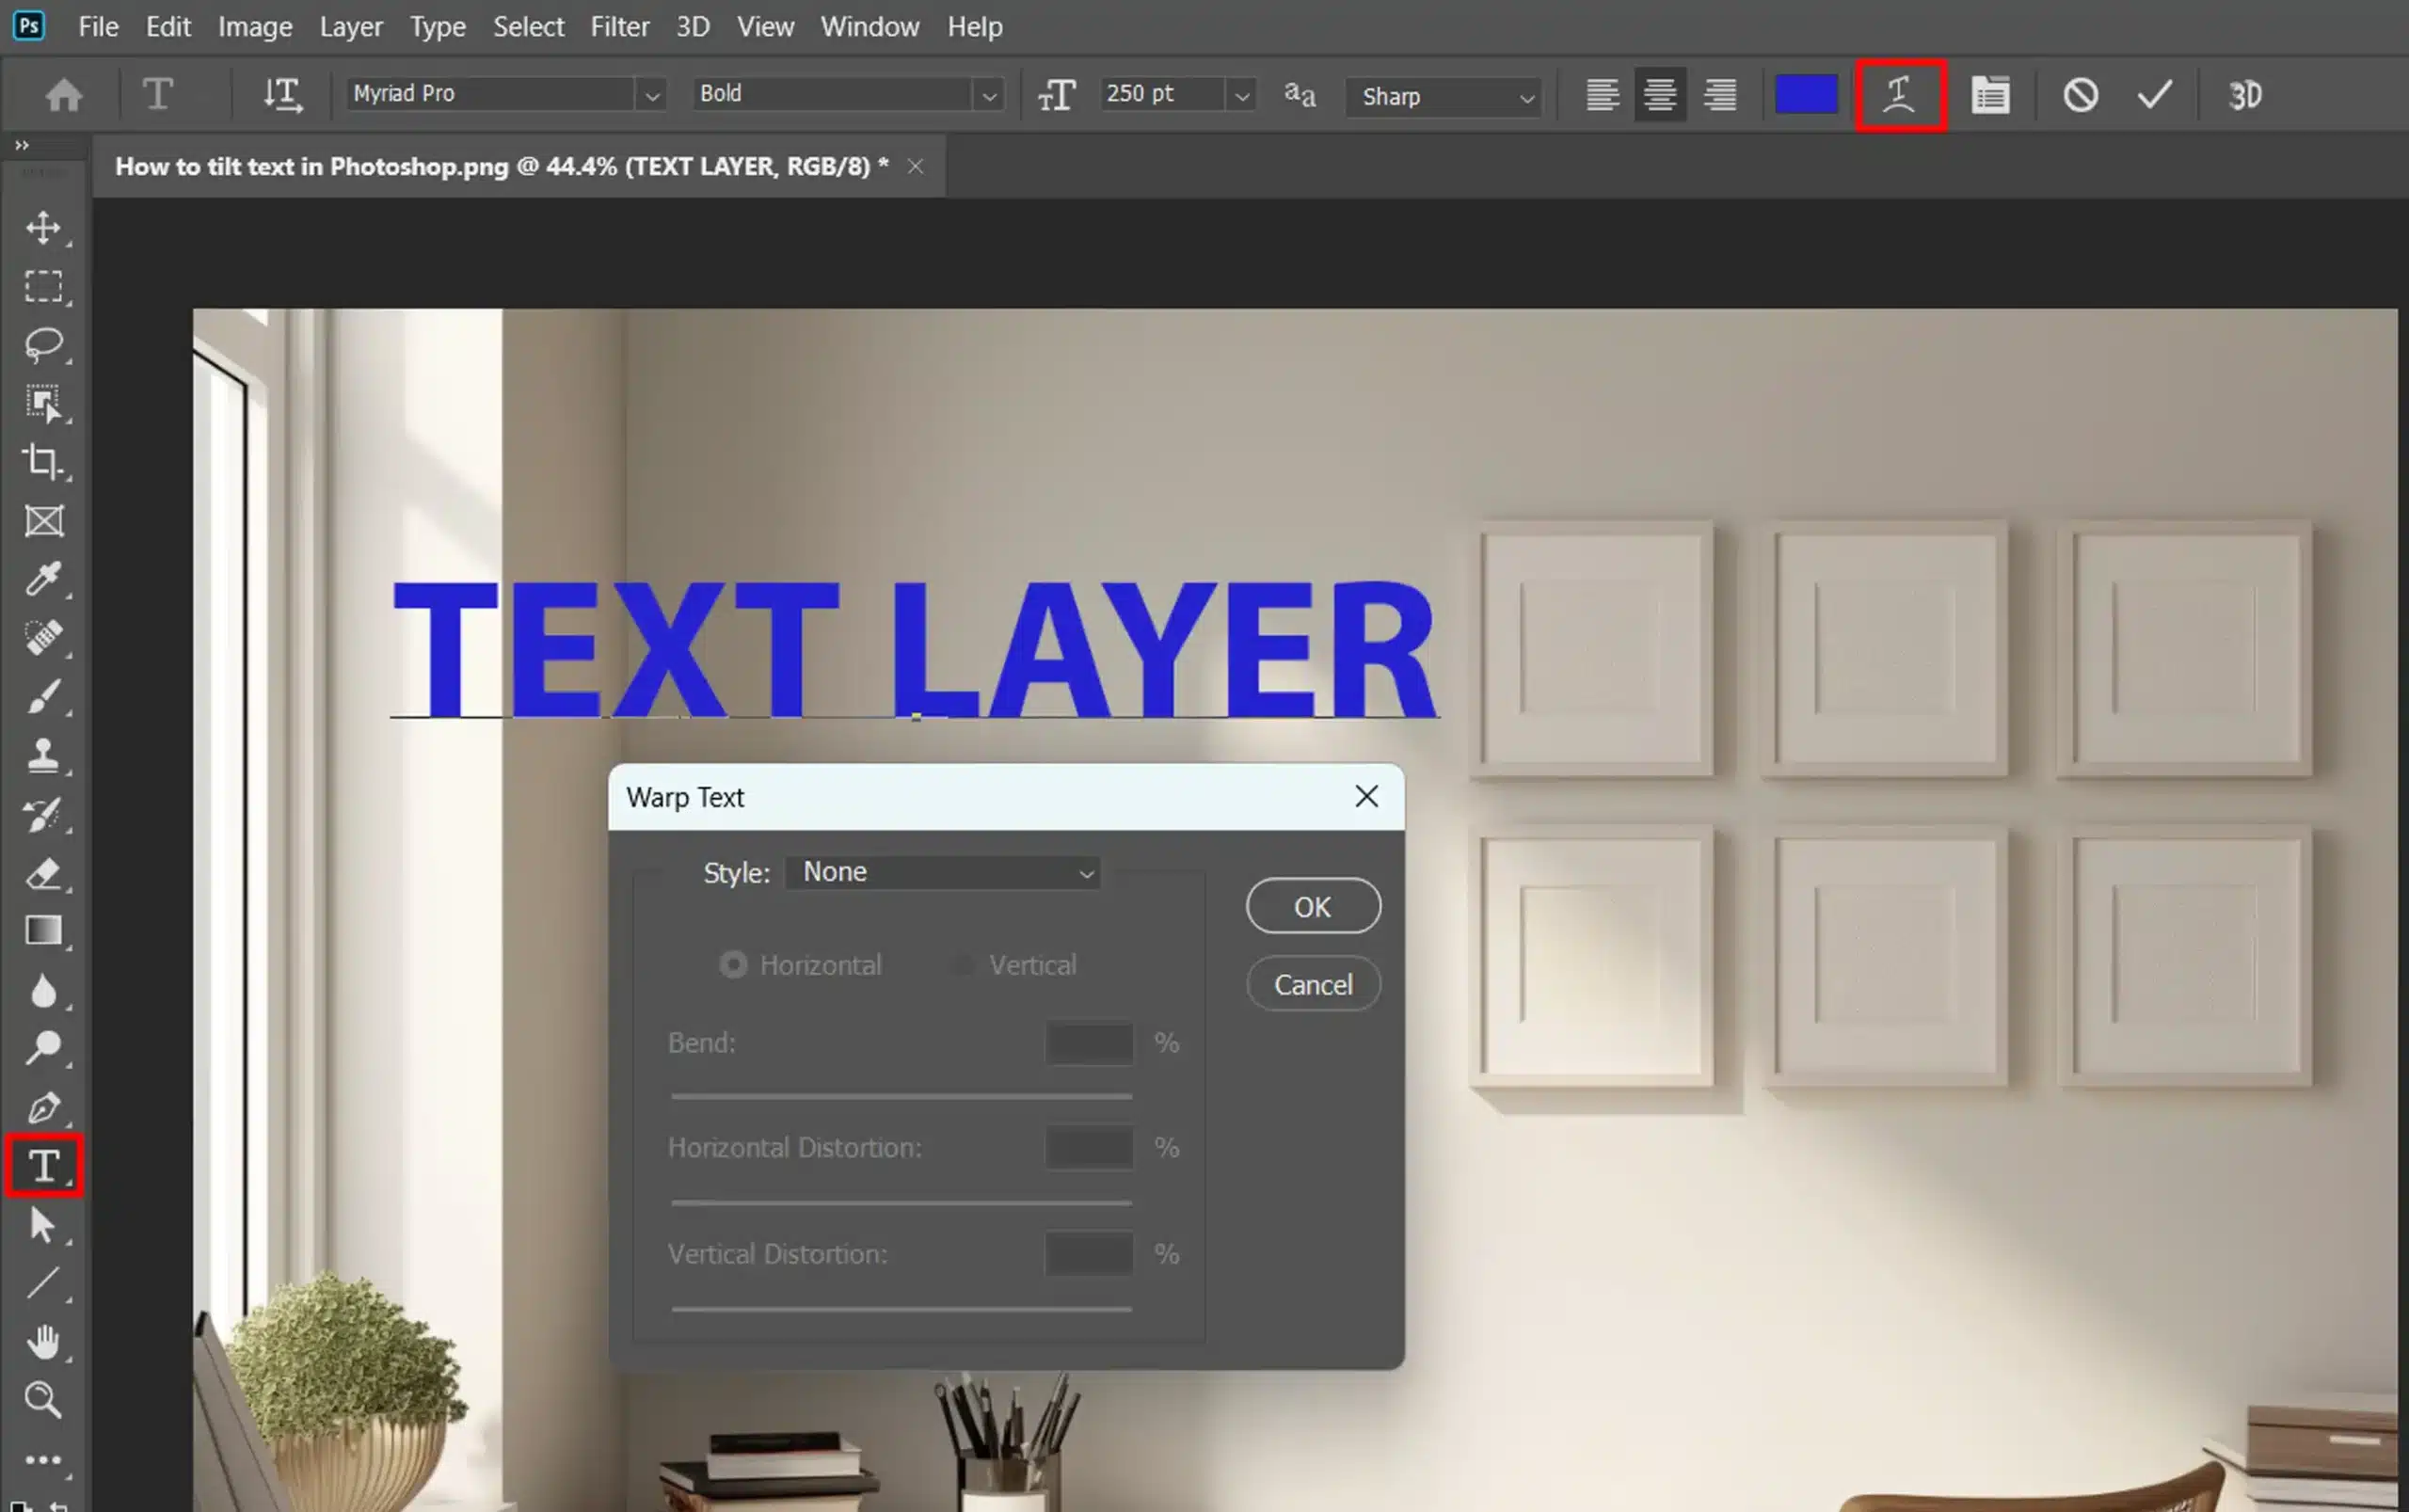
Warp text in Photoshop offers versatile control over text shapes. To access it, follow these steps:
Select the Text Tool in your document.
Create a new text layer and type your desired text.
Ensure the layer is selected, then click the Warp Text button in the Options Bar.
Choose the warp style from the dropdown menu and adjust the Bend and Distortion sliders to your liking.
To achieve unique effects, experiment with different warp styles.
Each warp style can dramatically alter the shape and appearance of your text. Don’t hesitate to play around!
For an advanced technique, combine tilted text with transparent text effects.
This allows you to overlay your tilted text on various backgrounds seamlessly, adding depth and complexity to your design.
Combining Multiple Transformations
Stacking transformations can add more depth to your text. Here’s a concise guide:
Use the Free Transform tool by pressing Ctrl+T (Cmd+T on Mac).
Rotate text by dragging the corner of the bounding box.
Next, select the Warp Text option and apply your desired warp.
Fine-tune your transformations by using the Free Transform tool again if needed.
This method is excellent for dynamic and creative text effects. Combining these techniques can produce visually engaging results.
Applying Effects to Tilted Text in Photoshop
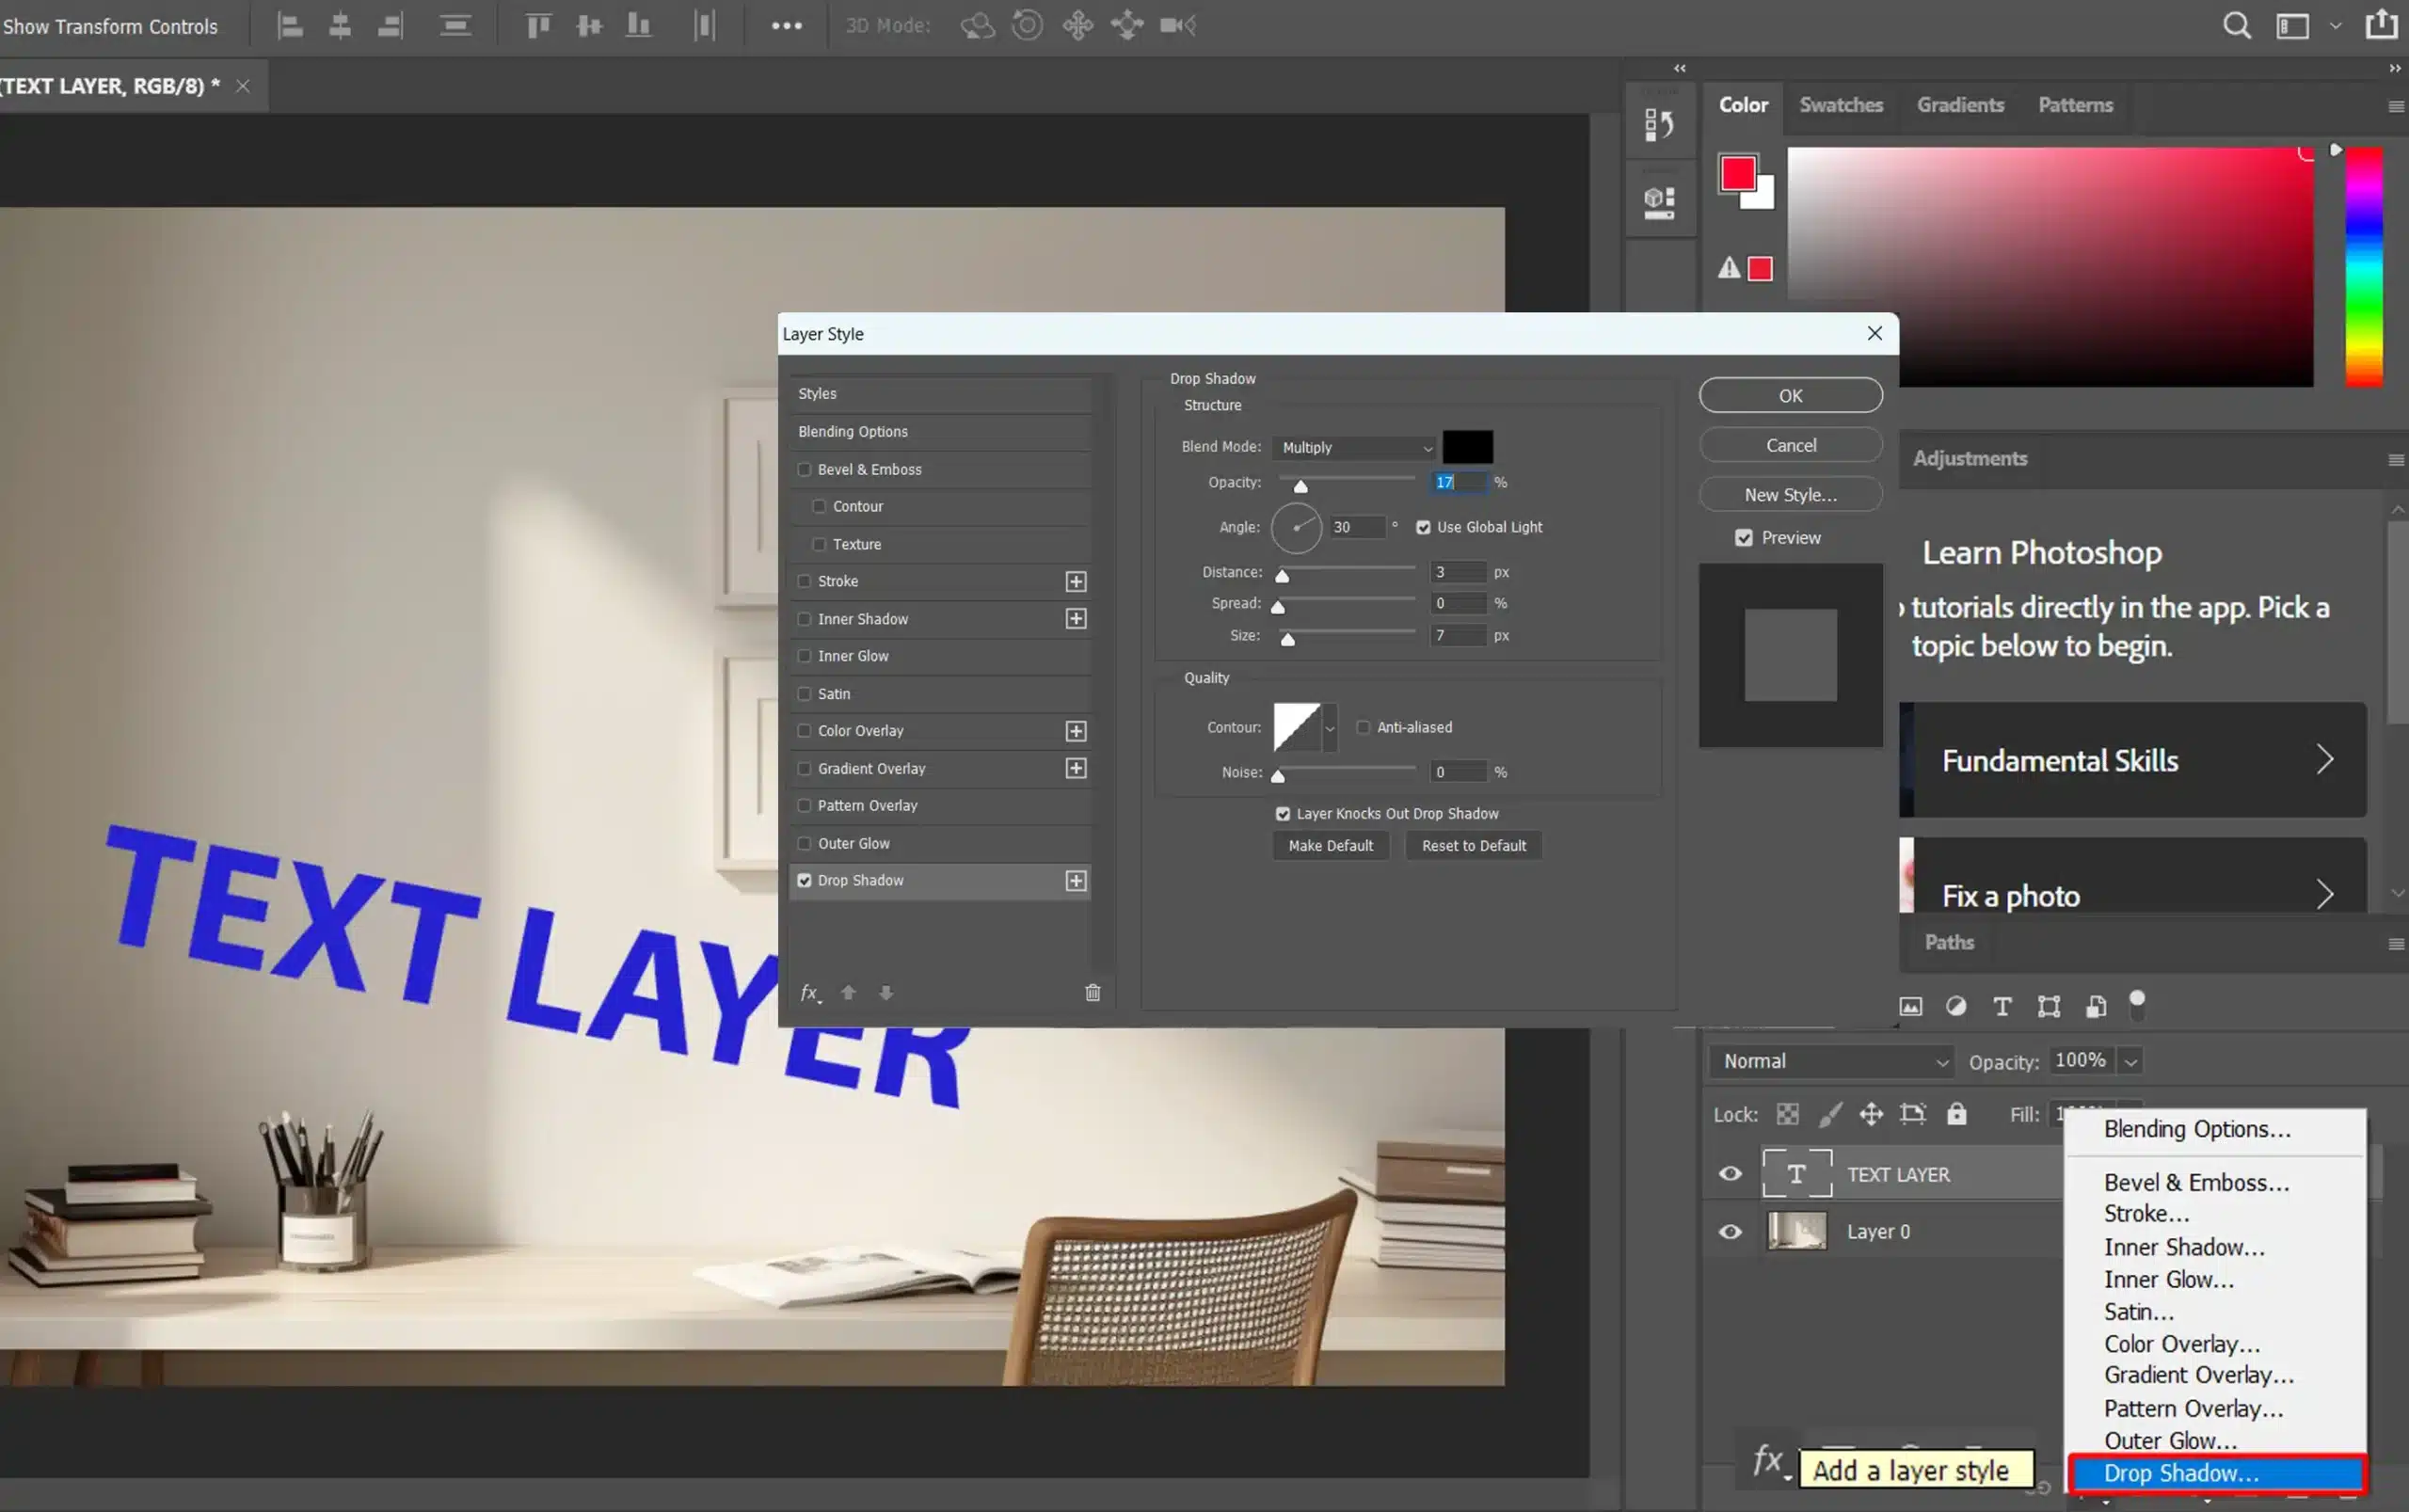
Enhancing your tilted text with effects like Outer Glow adds an eye-catching touch:
Create your text layer and rotate text as desired.
Click on the Effects icon at the bottom of the Layers Panel.
Choose your effect from the list, such as Drop Shadow or Bevel & Emboss.
Adjust the settings to fit the style you are aiming for, and press OK.
Adding effects makes the text stand out and gives it more dimension.
Combined with previous transformations, this technique enhances your text’s visual appeal.
Here’s a quick comparison table of popular text effects
Effect Name
Description
Best Used For
Drop Shadow
Adds a shadow behind the text
Creating depth and separation
Bevel & Emboss
Adds highlights and shadows for a 3D effect
Giving text a raised appearance
Outer Glow
Adds a glowing effect around the text
Making text stand out on dark backgrounds
Gradient Overlay
Applies a gradient effect over the text
Adding color transitions
Pro Tip: Use the Move Tool (V) to reposition your text after applying transformations and effects.
This simple step ensures perfect alignment and positioning within your design.
Additionally, using Lightroom in conjunction with Photoshop can enhance your workflow, and mastering Lightroom shortcuts and Photoshop shortcuts as well will make applying effects to tilted text even more efficient!
Common Issues and Troubleshooting
Handling common issues with text in Adobe Photoshop can save you time and frustration. Let’s tackle some frequent problems and their solutions.
Troubleshooting Issues with Rotating Text in Photoshop
Occasionally, you’ll find that your text layer isn’t rotating properly. This can be inconvenient.
Make sure you have the layer selected. You can achieve rotating text by clicking on the layer in the panel.
If it still doesn't work, go to the Edit Menu -> Transform -> Rotate Text. If you don't see the transform controls, press Ctrl+H (Cmd+H on Mac) to toggle their visibility.
If all else fails, try creating a new document and see if the issue persists. This ensures nothing in your current document is causing the problem.
Occasionally, you’ll find that your text layer isn’t rotating properly.
Make sure the text layer is selected. If it’s still not working, try using the “rotate canvas” option under the Image menu to see if rotating the entire canvas resolves the issue.
Text Distortion Problems
Text distortion in Photoshop happens when the rotated text looks warped or uneven. To manage this:
Ensure that the text layer is selected when using the Free Transform Tool.
Use the Warp Text function carefully. Don't overdo the adjustments, as this can lead to distortion.
Keep an eye on the text's aspect ratio. Press Shift while resizing to maintain proportions.
If the letters seem squished or stretched, undo the transformations and try again.
Maintaining Text Quality
When you rotate text in Adobe Photoshop, maintaining its quality is important for a professional look. To ensure text remains sharp:
Avoid excessive transformations. Multiple rotations and warps can degrade text quality.
Consider converting your text to Smart Object before transforming. This step helps preserve quality during edits.
For high-quality output, ensure your document has a sufficient resolution (at least 300 DPI for print).
For older folks learning Adobe Photoshop, I understand this can be a lot to absorb. Stick with it, and you’ll get the hang of it!
Pro Tip: Double-click the layer thumbnail to edit the existing text without redoing transformations. It’s a real time-saver!
These steps make working with text in Photoshop smoother and more efficient. Keep practising, and soon, these will become second nature!
Additionally, explore gradient techniques to enhance the visual appeal of your text while maintaining its quality.
Frequently Asked Questions
What's the process for slanting text in Photoshop?
Open your Adobe Photoshop project and select the Text tool.
Click on the text layer you want to slant in the Layers panel.
Go to the top menu, select 'Edit', then 'Transform', and choose 'Rotate'.
Click and drag outside the bounding box corners to slant your text. You can also enter a specific rotation angle in the top options bar for precise control.
Press Enter or click the checkmark in the options bar to apply the changes.
How do you make text tilt?
Start by selecting the Text tool and typing your text.
Select the layer text to adjust from the Layers panel.
Choose 'Edit' from the menu, then 'Transform', and click 'Skew'.
Drag the handles of the bounding box to tilt the text as desired.
Confirm the transformation by pressing Enter or the checkmark on the top bar.
What's the method for tilting in Photoshop?
Select the layer you want to tilt from the Layers window.
Navigate to 'Edit' in the main menu, then 'Transform', and pick 'Rotate'.
Move your cursor outside the transformation box that appears and drag to tilt your layer.
Hit Enter or the checkmark to finalize the tilt.
How do you do the tilt effect in Photoshop?
Open the image or text to which you want to apply the tilt effect in Photoshop.
Click on the layer that needs modification.
From the 'Edit' menu, select 'Transform', then 'Rotate'.
Adjust the angle by dragging outside the corner handles of the bounding box.
Press Enter or the checkmark to apply the tilt effect.
Learning how to tilt text in Photoshop has significantly improved my design projects. It has allowed me to add dynamic, engaging text elements that stand out.
Whether I’m creating a poster, a social media graphic, or a customized logo, this simple yet powerful technique has made my work more versatile and visually appealing.
If you’re eager to enhance your Photoshop skills, I highly recommend this comprehensive Photoshop course.
Additionally, mastering Lightroom can further elevate your photography and editing capabilities, so don’t miss out on this excellent Lightroom course.
Both resources have been invaluable in my creative journey, and I’m confident they’ll benefit you, too.
Happy editing!
If this article has helped you, then Like and Share it with your friends
$2,061.00Original price was: $2,061.00.$1,061.00Current price is: $1,061.00. 27584
Download Your Free Guide Now!
Discover the secrets of photography with our printable guide! Master essential techniques like aperture, shutter speed, and ISO to create stunning images. Get your free printable PDF now and start turning your snapshots into masterpieces!