Are you wondering how to open a photo in Photoshop?
This guide will walk you through various methods, from using the File Menu to leveraging Adobe Bridge and Lightroom.
Not only will you learn the basics, but I’ll also share some pro tips to streamline your workflow and troubleshoot common issues.
Let’s dive in!
Table of Contents
Using the File Menu And Dialog Box
When working on your projects, there are several methods for how to open a photo in Photoshop, each with its own advantages and drawbacks.
This comparison will help you choose the best approach based on your workflow needs, considering factors like simplicity, speed, workspace management, and integration with other software.
Method
Steps
Pros
Cons
File Menu
File > Open > Select File
Simple and direct
May be slow for multiple files
Drag and Drop
Drag file from explorer into Photoshop
Quick and easy
May clutter workspace
Adobe Bridge
Browse in Bridge > File > Open with Photoshop
Good for file management
Requires separate app
Lightroom Integration
Right-click in Lightroom > Edit in Photoshop
Seamless workflow integration
Lightroom license needed
Step-by-Step Guide
When opening files in Photoshop, there are several methods available, each with its own advantages and disadvantages.
The table below outlines the steps, pros, and cons of four common methods: File Menu, Drag and Drop, Adobe Bridge, and Lightroom Integration.
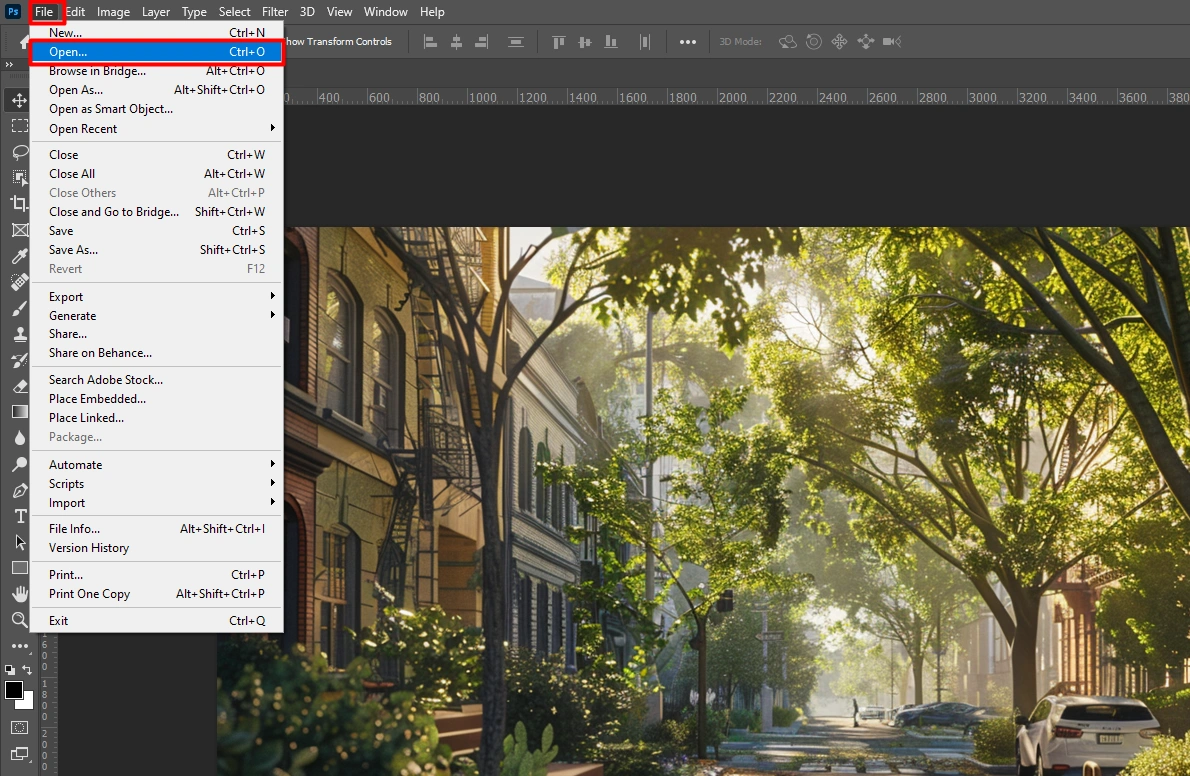
Let’s start with the basics. To open images in Photoshop, go to the File menu at the top.
Click on Open and a new dialog box will appear. You can navigate through your files here.
If you want to open multiple files at once, hold down the Ctrl key (Cmd on Mac) while selecting the images. Click Open, and voila!
For raw files, open them directly or use Adobe Bridge for enhanced file management. Adobe Bridge lets you import images easily.
Common Issues and Fixes While Opening Photos
Sometimes, you might face problems when you try to open images. If the file isn’t supported, check the file extension. Photoshop supports formats like PSD, JPG, and many others.
If the existing image looks odd after opening, it might be due to the pixel aspect ratio. Adjust it in the dialog box that appears when opening the file.
Another issue could be slow performance. Ensure your hard drive isn’t full and your system meets the operating systems requirements for Photoshop.
Quick tip: To save time, you can double click on the home screen to directly open recent files.
Pro Tip: To streamline your work, use Lightroom tips for initial edits before refining in Photoshop. It maximizes efficiency.
Using the File Menu
Alright, let’s get started. To open images in Photoshop, head to the File menu at the top of your screen.
Click Open and a dialog box pops up.
Navigate through your files, find your image, and click Open.
Need to open multiple files at once?
Hold down the Ctrl key (Cmd on Mac) while selecting your images. Then hit Open. Easy peasy!
Got raw files? You can open them directly or use Adobe Bridge for better file management. Adobe Bridge makes importing images a breeze.
Common Issues and Fixes
Ran into trouble opening an image? Check the file extension. Photoshop supports formats like PSD, JPG, and more.
If your image looks funny after opening, it might be the pixel aspect ratio. Adjust it in the dialog box that appears when you open the file.
Is Photoshop running slow? Make sure your hard drive isn’t full and your system meets the requirements for Photoshop.
Pro Tip: For more efficient editing tips and techniques, check out more selection tools.
Drag and Drop Method
Quick and Easy Steps
Alright folks, let’s dive into the drag and drop method.
This is your shortcut to opening images in Photoshop.
Step-by-Step Guide For Opening Photos
Navigate to your file explorer.
Find the image you want to work on, be it a raw file, psd file, or any other.
Click and hold your mouse button over the image.
Drag it towards Adobe Photoshop.
Let go of the mouse button and, like magic, your photo will open in Photoshop.
If you want to open multiple files, repeat the process with each file. Drag and drop them one by one into the Photoshop window.
They will each open in individual tabs.
Tips for Efficiency
Let’s make this faster. When you’re opening images, having your file explorer and Photoshop windows side by side helps.
This way, you can quickly drag and drop without constantly switching between applications.
Pro Tips
If you're working on recent files, you can simply double click from the Photoshop home screen. It’ll save you tons of time.
Use a dual monitor setup if possible. Have your file explorer on one screen and Photoshop on the other. This not only speeds up the drag and drop process but also keeps everything in view.
If you're dealing with a lot of images, try organizing them into a folder. By dragging the folder into Photoshop, you can openseveral files at once. This can be a game-changer, especially when you are editing several photos in a single session.
Keep in mind that using the drag and drop method works well for various file types, including camera raw files and jpg. It’s a versatile way to get your images into Photoshop quickly.
Pro Tip: Always use smart objects when dragging raw files into Photoshop. This retains maximum image quality for editing.
Using Adobe Bridge
Why Use Adobe Bridge?
Alright, let’s talk about Adobe Bridge. You have a bunch of images, and it’s hard to keep track. Adobe Bridge helps you organize them. Think of it as your photo library.
You might wonder why you need another program. Adobe Bridge makes it easy to browse, organize, and open images.
Plus, it’s free if you have Photoshop or Lightroom. No tricks, just organization.
Opening Photos from Bridge
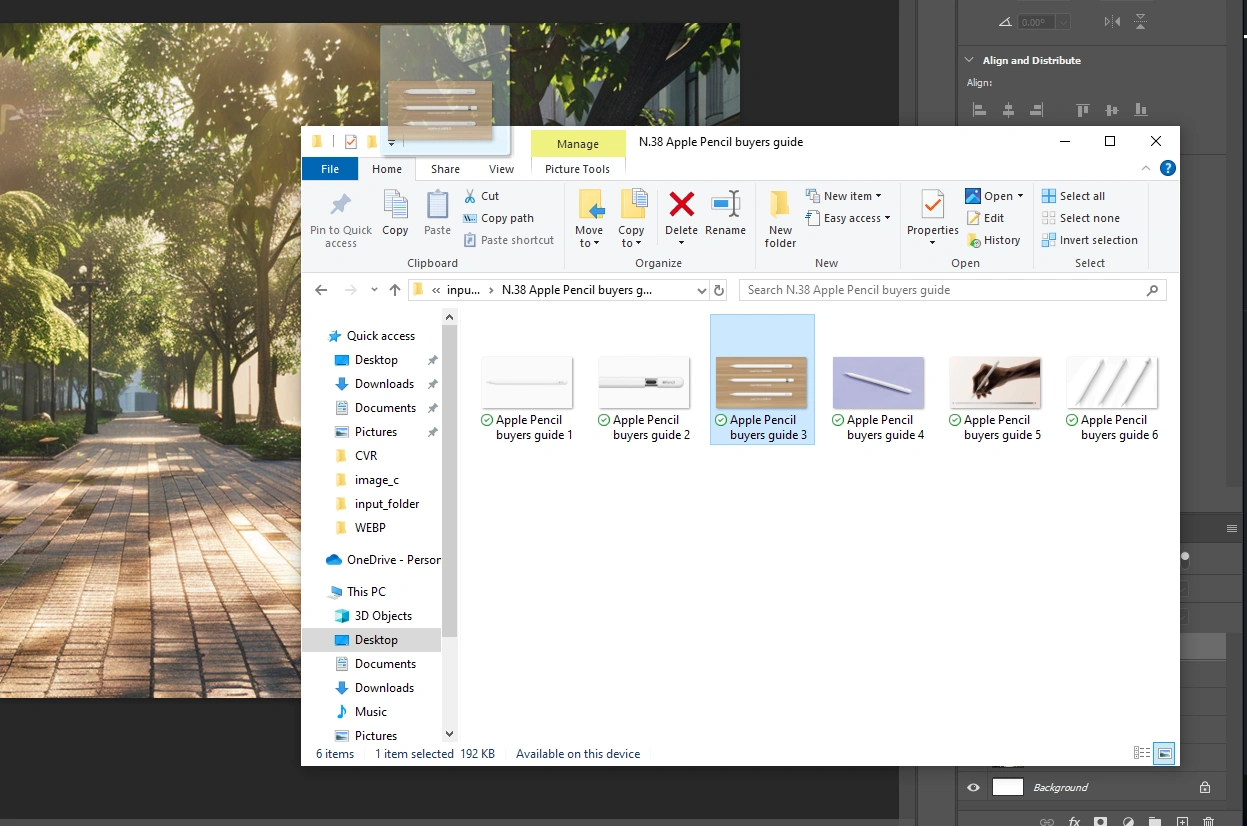
Now, let’s see how to open a photo in Photoshop using Adobe Bridge. It’s simple. Start Adobe Bridge. You’ll see thumbnails of your images.
Make sure they’re the ones you need and correct document size and image size.
Click on the image thumbnail you want to work with. Use Ctrl (Cmd on Mac) to select multiple images.
Go to the top menu bar. Click File, then Open with, and choose Adobe Photoshop.
Your single image(s) will now open in Photoshop. No fuss, no hassle.
Got a raw file? Bridge handles them easily. Double-click the raw file, and it opens in Camera Raw, then into Photoshop. This improves your efficiency and keeps everything in one place.
What about smart objects? Opening a raw file from Bridge as a smart object keeps your edits flexible. You can tweak them later if needed. It’s useful for detailed work.
If your photos look odd when you open them, check the pixel dimensions and color profile settings. Bridge shows this info clearly, so you can match them to Photoshop’s requirements. Easy fix.
Camera Raw and Raw File
Working with camera raw files in Photoshop unlocks their full potential. Raw files retain all sensor data, allowing extensive adjustments without quality loss.
Open a raw file via the File Menu or drag and drop to launch the Camera Raw dialog box for initial edits. Always save raw files as smart objects to ensure non-destructive editing.
Using Camera Raw ensures high-quality images and provides a strong foundation for further Photoshop edits.
Opening Photos from Lightroom
Seamless Integration
Alright, let’s dive in! The integration between Lightroom and Photoshop is fantastic for photo editing. You can open images from Lightroom directly into Photoshop for more advanced tweaks.
This seamless integration allows you to transition smoothly from basic edits to detailed enhancements.
When you’re done with your initial edits in Lightroom, you can open images into Photoshop with just a click.
This ensures all your Lightroom adjustments come along. Pretty cool, right?
So, you’ve got your photo all set up in Lightroom and want to use more advanced tools.
No problem. Just right-click on your image, go to “Edit In,” and select “Photoshop“. Boo
Step-by-Step Instructions
Now, let’s walk through the steps to open images from Lightroom into Photoshop:
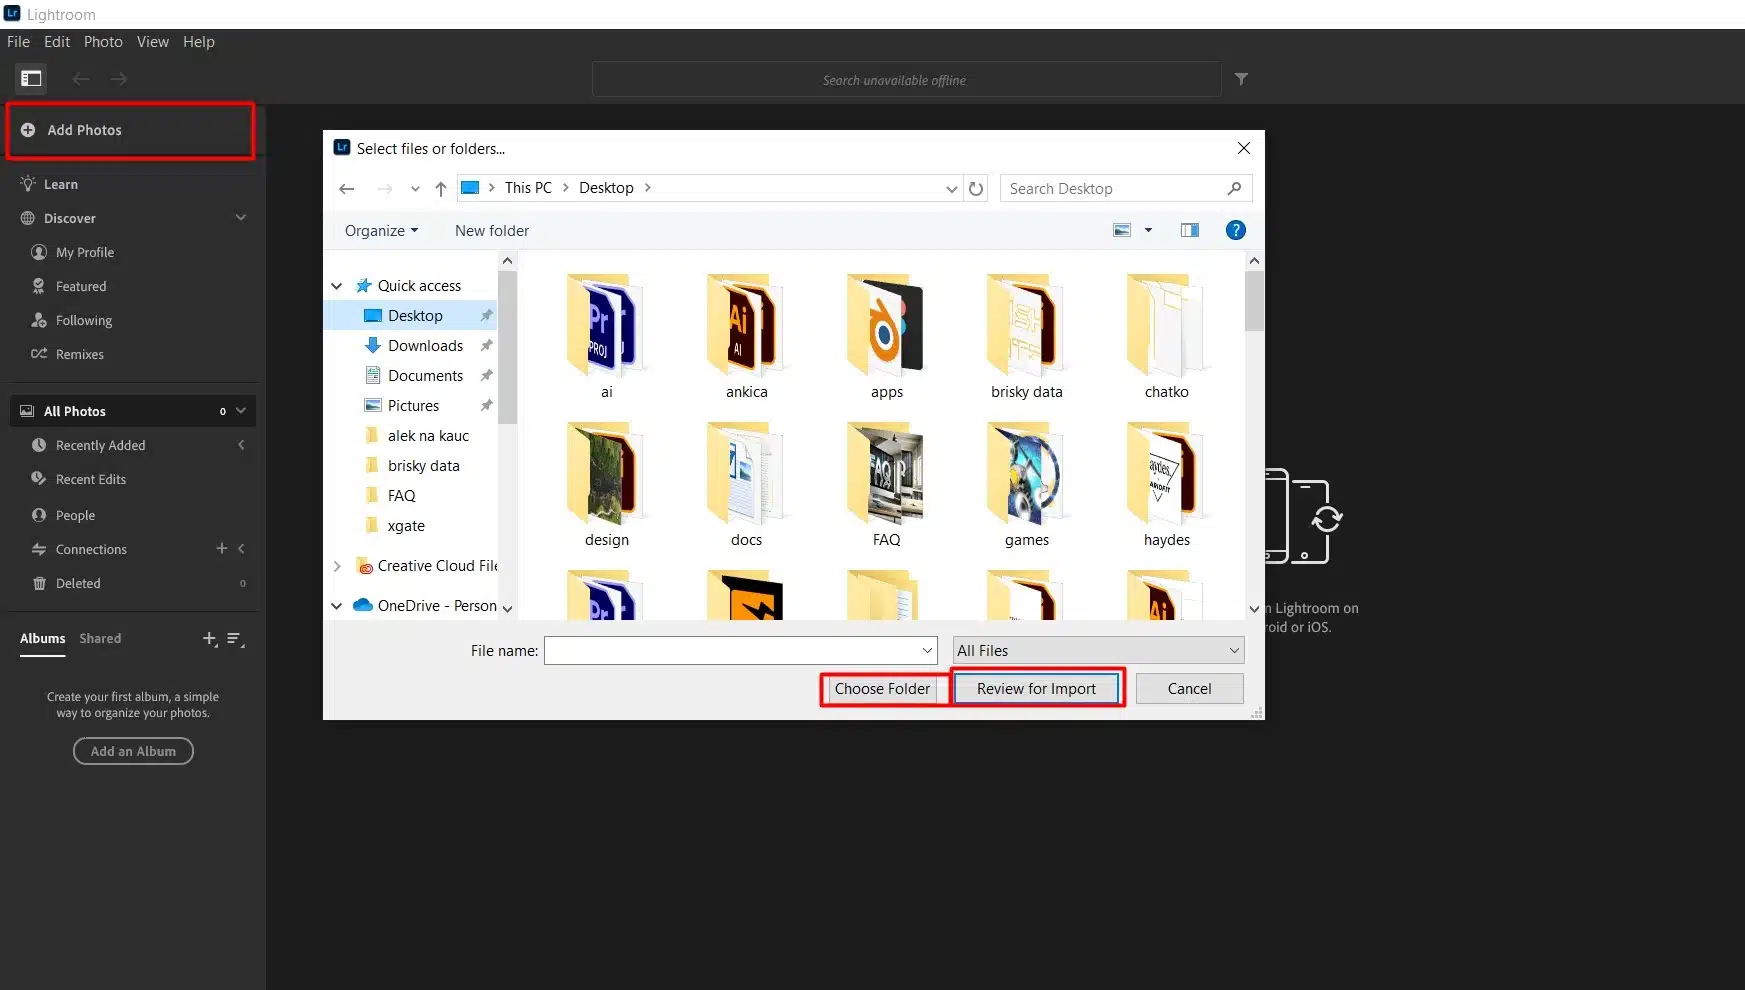
Open Lightroom and find the image you want to edit.
Right-click on the photo. A menu drops down.
Select "Edit In" and then choose "Photoshop". The photo will immediately begin to open in Photoshop.
Once in Photoshop, your open image appears as a new document. All your previous adjustments from Lightroom are intact.
That’s it! Easy-peasy, right? From here, you can use all the advanced tools Photoshop offers. Want to make your subject pop? Use background layer and masks.
Need to fix minor blemishes? The healing brush has got you covered.
To open more images, simply go back to Lightroom and repeat the steps. You can open several files and work on them in separate tabs within Photoshop.
Pro Tip: Always enable “Smart Object” when you open images from Lightroom into Photoshop. This keeps your edits non-destructive, letting you tweak them at any point in your workflow.
For those looking to streamline their workflow even further, learning some essential Lightroom shortcuts can save you a lot of time.
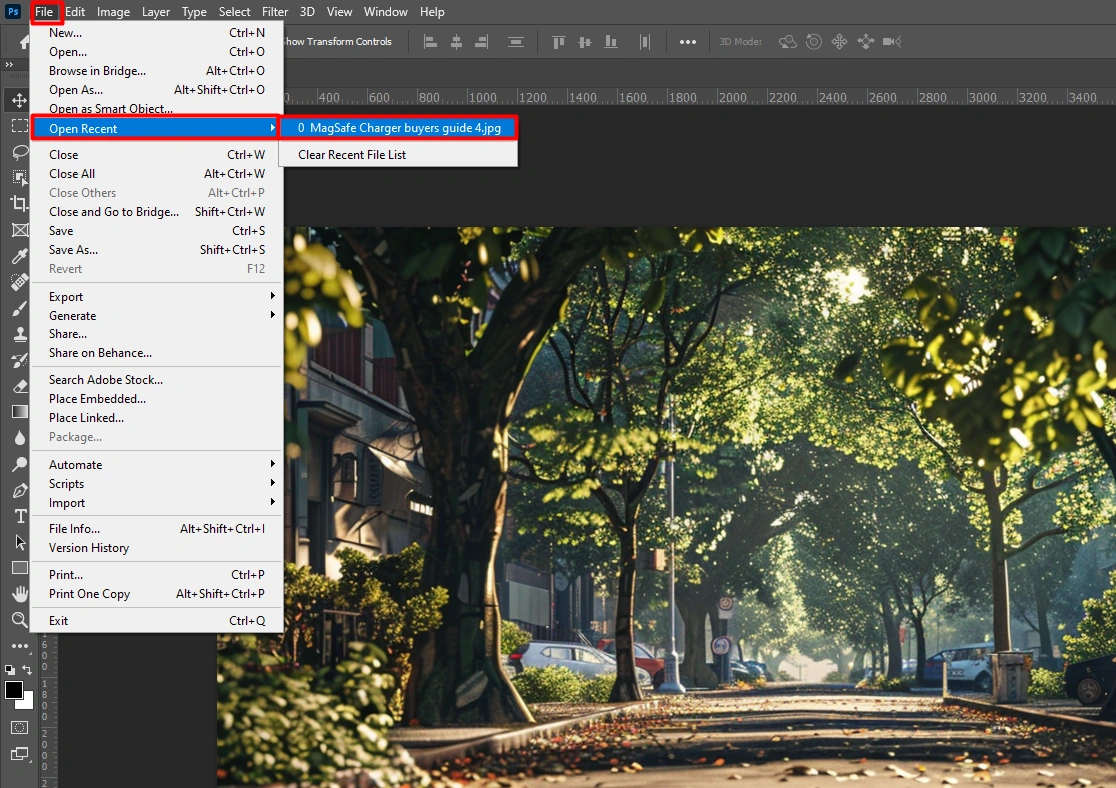
Let’s talk about finding your recent files in Photoshop. It’s like finding your keys without the hassle. Your home screen is where all the action happens.
When you open Photoshop, you’ll see thumbnails of your recent documents. Click on the one you need, and you’re back in business.
If you don’t see recent files, check the left sidebar. Click on the “Recent” tab. It shows everything you’ve been working on.
Managing Recent Files and Photos
Want to manage your recent files? Maybe clean up the clutter or mark your favorites?
To remove a file from the home screen, hover over the thumbnail, click the three dots, and select "Remove." This doesn't delete the file from your computer.
To star a favorite file, click the star icon next to the thumbnail. Starred files get their own section for easy access.
If you have too many recent files, use the search bar at the top of the home screen. Type in keywords related to your document's name to find it quickly.
Pro Tip: Create folders on your home screen to group files by project. This keeps you organized. There you go! Now you know how to access and manage your recent files in Photoshop.
Try it out and make your life easier! For more efficiency, consider learning some essential Photoshop shortcuts. They can save you a lot of time when navigating through your projects.
Additionally, if you’re interested in editing techniques, explore how to use the content–aware fill tool in Photoshop to seamlessly remove unwanted objects from your images.
Frequently Asked Questions
What are the steps to open pictures in Photoshop?
Start by launching Photoshop on your computer.
Click on 'File' in the top menu.
Select 'Open…' from the dropdown menu.
Browse your computer to find the picture you want to open, select it, and click 'Open'.
What is the process for getting my photo into Photoshop?
Open Adobe Photoshop.
Choose 'File' from the top left menu.
Click on 'Open…' and navigate to the location of your photo.
Select the photo and press 'Open' to load it into Photoshop.
How do I open an image in Photoshop as a layer?
Open Photoshop and create a new project or open an existing one.
Go to 'File' in the menu bar, then select 'Open As Smart Object'.
Find the image you wish to open and select it.
Click 'Open' to add the image as a new layer in your project.
How to open a jpeg image in Photoshop?
Launch Photoshop on your device.
Navigate to 'File' and click on 'Open…'.
In the file browser, locate the JPEG image you want to edit.
Learning how to open a photo in Photoshop is an essential skill that can enhance your editing process.
By using the File Menu, Adobe Bridge, Lightroom, or the drag and drop method, you can open your images easily and start editing right away.
From my personal experience, mastering these methods has made my workflow much smoother and more efficient. If you want to dive deeper into photo editing, consider checking out my Photoshop Course and Lightroom Course.
These courses offer step-by-step guides to help you improve your skills. For more tools and resources, explore more of Adobe’s products such as Lightroom.
Happy editing!
If this article has helped you, then Like and Share it with your friends
$2,061.00Original price was: $2,061.00.$1,061.00Current price is: $1,061.00. 27584
Download Your Free Guide Now!
Discover the secrets of photography with our printable guide! Master essential techniques like aperture, shutter speed, and ISO to create stunning images. Get your free printable PDF now and start turning your snapshots into masterpieces!