Are you curious about how to make an arrow in Photoshop? Whether you’re working on a graphic design project, creating a presentation, or simply adding a visual element to your images, knowing how to create arrows in Photoshop can be incredibly useful.
In this guide, I’ll walk you through the simple steps to design and customize arrows that can enhance your visuals.
I’ll grab your attention with easy techniques, stir your interest with creative tips, and drive you to take action by applying these skills to your projects.
Let’s dive in and unlock the potential of Photoshop to elevate your design game.
Table of Contents
How to Make an Arrow in Photoshop
When you’re looking to add arrows in Photoshop, it’s simple to get started. With the right tools, you can easily draw arrows and enhance your designs. Let’s dive into a quick guide to help you create arrows effortlessly.
Step-by-Step Guide Using the Line Tool
Follow these steps to create an arrow using the line tool:
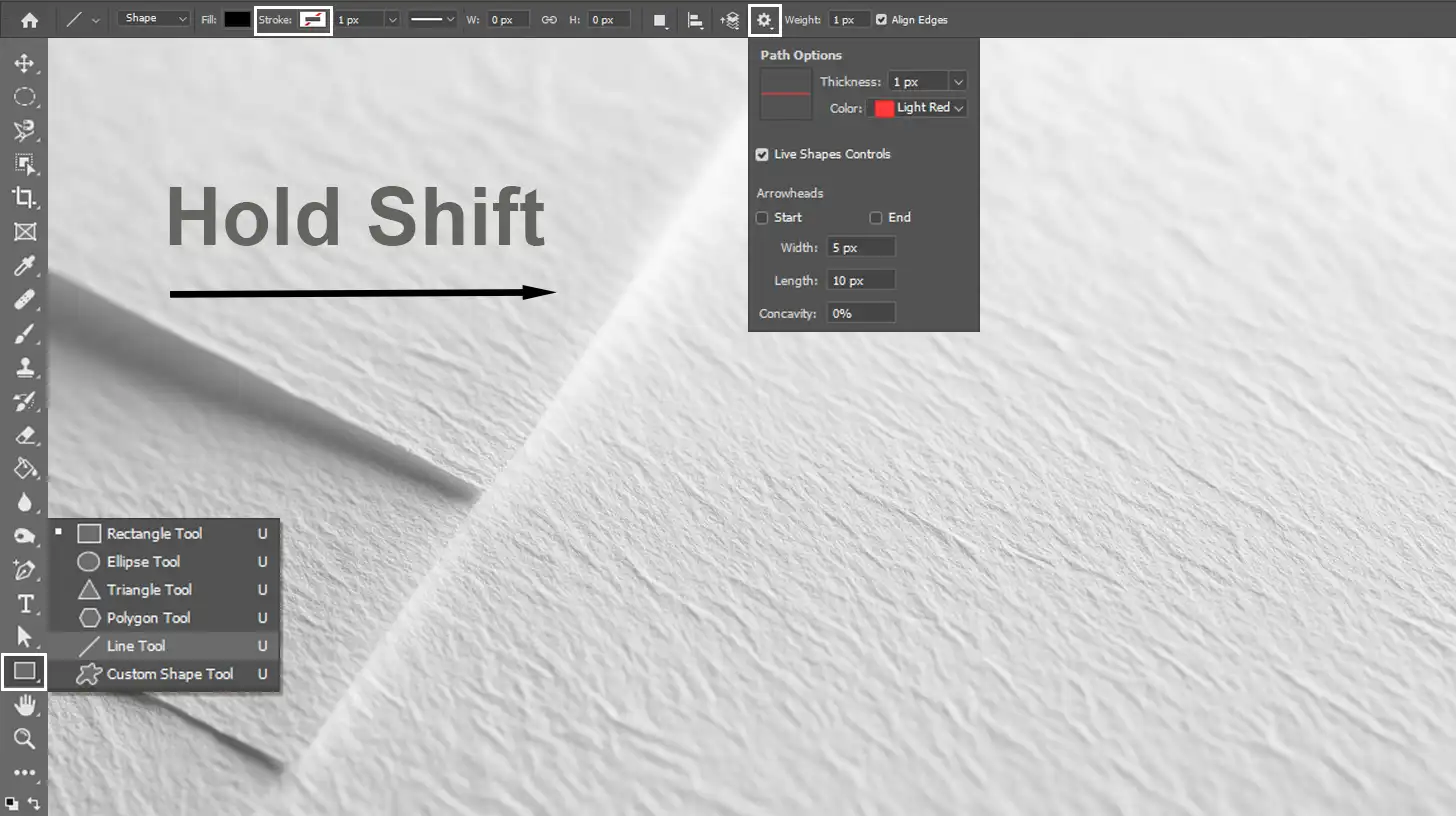
- Open Photoshop and create a new document.
- Select the Line Tool from the toolbar on the left.
- In the Options Bar, choose your Stroke Color to customize your line.
- Hold down the Shift Key while dragging the line for a Straight Line.
- To make the arrow, click on the line’s endpoint and continue dragging in the same direction to Draw an Arrow.
- Use the Move Tool to position the arrow if needed.
Creating Arrows with the Custom Shape Tool
Here’s how to create arrows and draw arrows using the Custom Shape Tool:
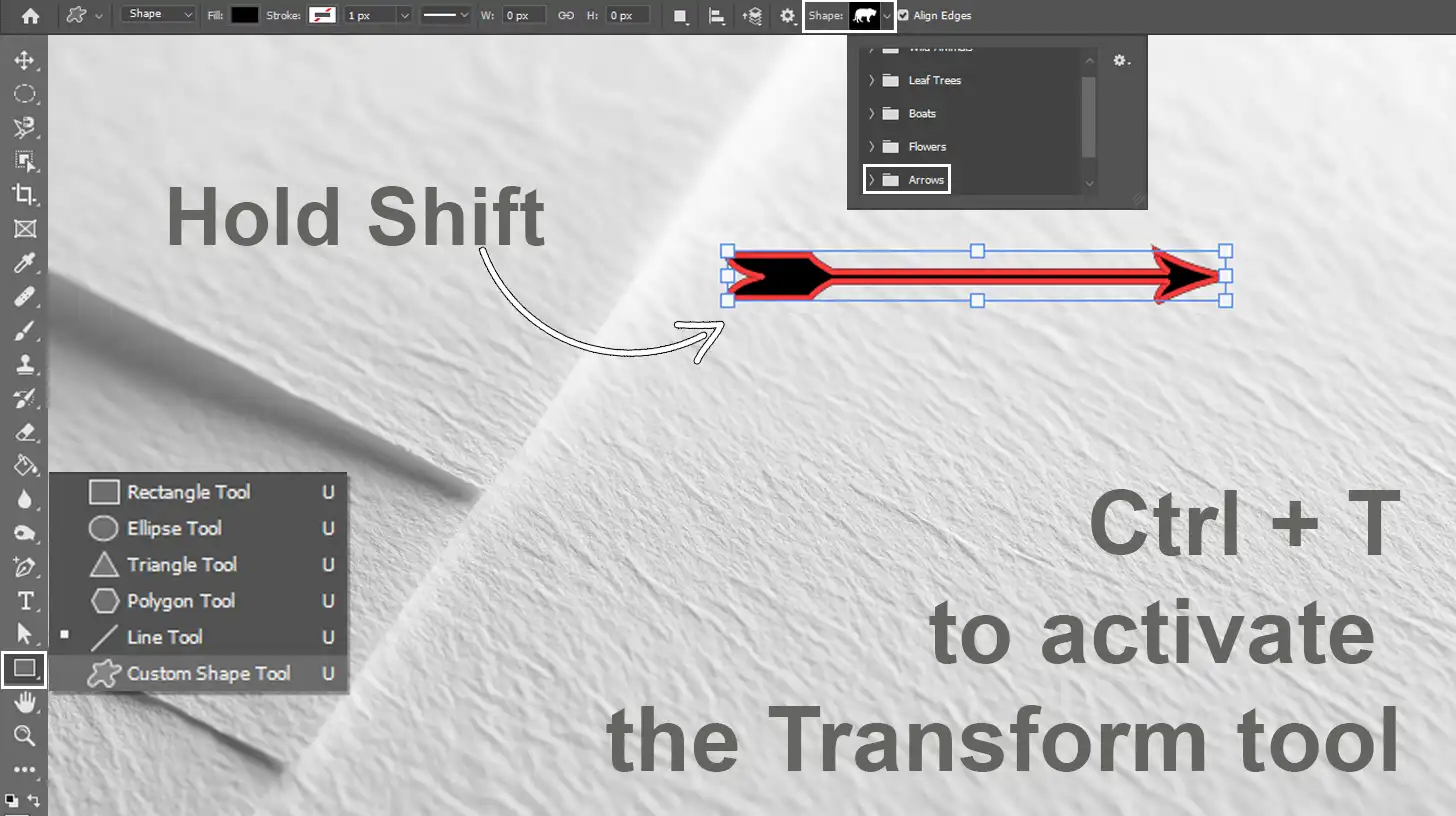
- Select the Custom Shape Tool from the toolbar.
- In the Options Bar, open the Shape Dropdown and look for arrow shapes.
- If no arrows are found, enable Legacy Shapes in the Edit Menu.
- Hover over the available shapes until you find the arrow shape, and click to select it.
- Drag onto your canvas to Create Arrows using the selected shape. Holding the Shift Key locks proportions for precision.
- Adjust size and positioning using the Transform Tool.
Tips for Perfecting Your Arrow Shape
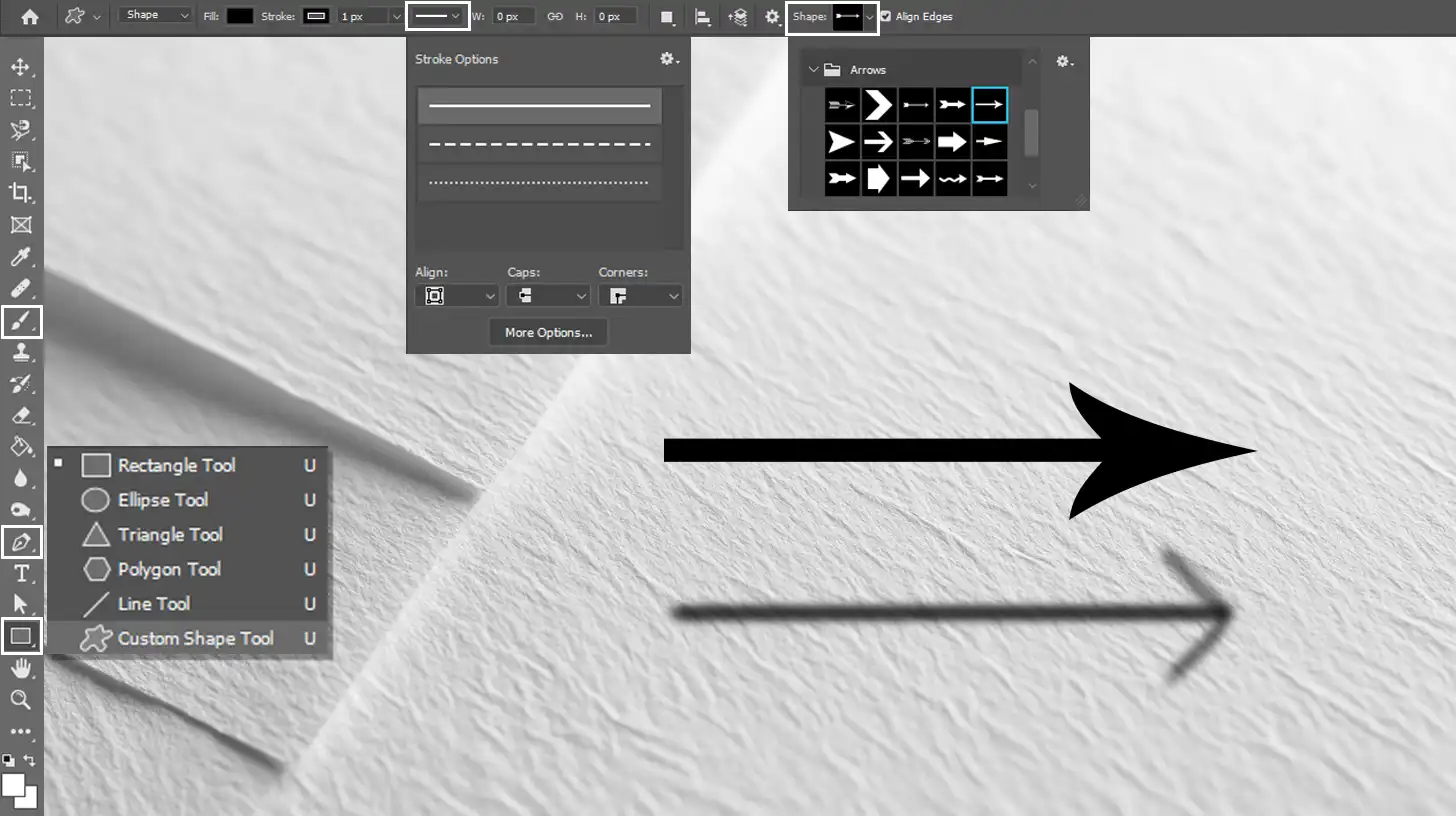
Consider these tips to refine your arrow designs:
- Experiment with different Custom Shapes from the Shapes Panel for varied arrow styles.
- Utilize the Brush Tool for a more artistic arrow freehand.
- Modify the appearance of your arrow using Stroke Options in the Options Bar.
- Adjust the thickness of your arrow by manipulating the stroke weight in the Options Bar.
- Use multiple tools like the Pen Tool for precision adjustments.
Pro Tip: To add more personality to your arrows, explore Legacy Default Shapes and mix them using the Shape Tools.
Adjust the Curved Arrows by tweaking the path points for a dynamic look distinct from other Arrow Shapes.
For more advanced editing, consider using the Photoshop masking guide to blend your arrows seamlessly into your design.
You can also streamline your workflow by utilizing both Photoshop shortcuts and Lightroom shortcuts, allowing you to switch between tools and adjust your designs more efficiently.
Exploring the Custom Shape Tool in Photoshop
Photoshop works like magic. It’s where ordinary photos become extraordinary. Let’s dive deep into arrow shapes. Arrows guide the eye, emphasize points, and organize layouts.
With practice, you’ll be able to draw arrows clearly and accurately. Incorporating arrows changes your work entirely.
Accessing Custom Shapes in Photoshop
Getting started is easy. Head to the menu bar. Find the Custom Shape tool under Shape tools.
The drop-down menu unveils legacy shapes. Remember, the goal is mastering how to make an arrow in Photoshop.
After clicking on Shapes, you’ll see a variety of designs, but we’re focusing on arrows. The gear icon provides more access to forgotten legacy shapes.
Unlock it, and you’re taking things to the next level. These hidden tools will boost your creativity.
Modifying and Creating Unique Arrow Shapes
So, now let’s modify. Modify or tweak shapes for uniqueness. Use the transform tool to alter size, rotation, or perspective. Modify arrow shapes as needed. It’s a walk in the park.
Next comes learning to use the line tool. The line tool helps build arrows in Photoshop. For straight perfection, hold down Shift. Using straight arrows in Photoshop is as easy as riding a bike with training wheels.
But if you’re aiming for more artistic flair, give the brush tool a try.
Try combining the rectangle tool with the custom shape. Here, fill and stroke options change looks entirely.
Pro Tip: Duplicate layers in the layers panel to experiment. This way, mistakes become opportunities, not downfalls.
For more detailed instructions, check out the Photoshop shape tool guide to help you navigate the tools effectively and easily add shapes in Photoshop without losing your original design.
Advanced Techniques for Arrow Creation
When you’re ready to move beyond simple shapes, creating a straight arrow with more precision becomes important. Let’s explore how advanced tools can help you draw arrows in Photoshop with greater accuracy, refining your arrow designs to the next level.
Using the Pen Tool for Precise Arrows
This tool is my go-to tool when I need to draw an arrow with precision. You can access it from the window menu.
Click to create anchor points and connect them with straight lines to form an arrow shape.
Want a curved line? Click and drag for curves! It’s a quick way to dive into the world of vector shapes, and don’t worry, Ctrl+Z is always there to help if something goes wrong.
Steps to Create Precise Arrows
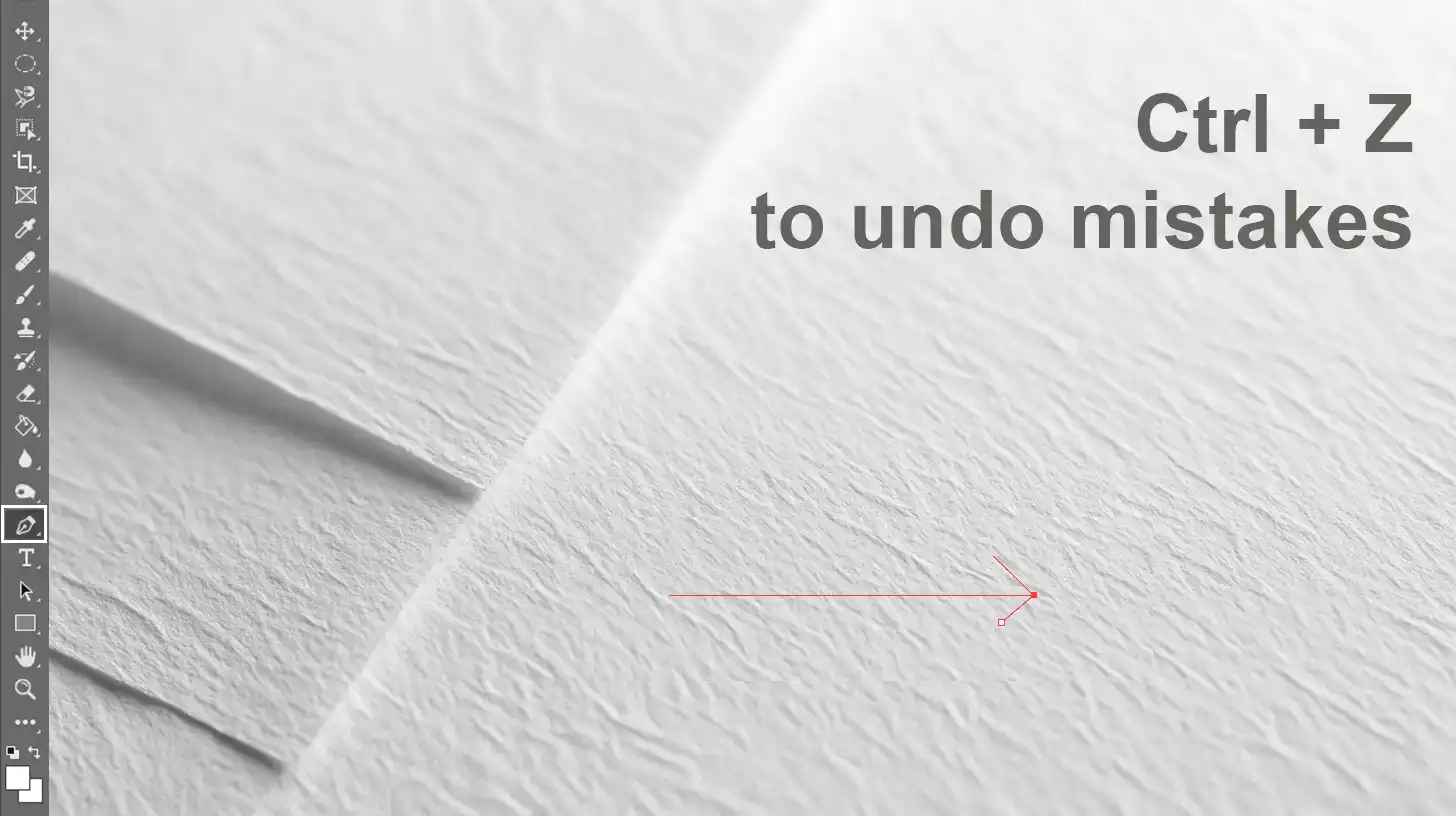
Here’s how to create precise arrows with the pen tool for full control over shape and style. Let’s begin!
- Select the Pen tool from the window menu.
- Click to create anchor points.
- Connect points with straight lines for a basic arrow shape.
- Click and drag for curved lines if desired.
- Use Ctrl+Z to undo any mistakes.
Pro Tip: If you want to create more dynamic designs, take the time to practice how to draw curved lines in Photoshop using the Pen tool.
This technique allows you to refine your arrow shapes and add unique, flowing elements to your work.
Incorporating Textures and Styles
When you draw an arrow in Photoshop, adding textures and styles can give it a unique look that stands out. Let’s dive into some tips to bring your arrows to life with creative flair.
Tips for Textures and Styles
Here are some quick tips to enhance your arrows with textures and styles for a more creative look.
- Explore gradients and patterns from the drop-down menu.
- Use the brush tool for a handmade appearance.
- Balance creativity and simplicity with shape tools.
Pro Tip: Always work on separate layers when creating or modifying your arrow shape. It gives you the flexibility to tweak without disrupting other elements in your project.
The goal of the effective use of shape tools is to find a balance between creativity and simplicity. Don’t forget to check out the drop-down menu for quick access to numerous shape options.
Understanding how to make an arrow in Photoshop will definitely enhance your design skills.
If you’re looking to expand your skills further, consider exploring the essential tools in Photoshop or learning about the difference between Photoshop and Lightroom to broaden your editing capabilities.
Practical Applications of Arrows in Design
Arrows play a powerful role in graphic design, guiding the viewer’s eye and emphasizing important elements.
Whether you’re creating a sleek website layout or building an engaging presentation, arrows help direct attention and create a clear visual flow. Let’s explore how they enhance infographics and presentations.
Below is a breakdown of how arrows can be applied effectively in different design contexts.
| Aspect | Overview |
|---|---|
| Arrows in Infographics | Arrows help clarify connections between data points, guiding the viewer through complex information with ease. |
| Arrows in Presentations | In presentations, arrows emphasize key points and illustrate progression, helping the audience follow the flow of information. |
| Enhancing Web Navigation | Arrows improve user experience by guiding users on where to scroll or click, enhancing the overall functionality of a website. |
| Improving E-Learning Platforms | In e-learning, arrows provide clear direction in tutorials, ensuring that learners navigate the content effectively. |
| Arrow Usage in Mobile Apps | Mobile apps benefit from arrows indicating clickable areas, improving user interaction and overall app usability. |
Arrows in Infographics and Presentations
Infographics and presentations make information more engaging. Arrows in Photoshop help by making connections clear.
Arrows guide the audience through complex data, offering a structured path readers can follow easily.
Imagine presenting data on climate change. Without arrows in your graphics, fundamental points might get lost. By drawing arrows, you highlight cause-effect relationships.
It helps keep the audience focused, similar to how the content-aware fill in Photoshop can seamlessly blend elements into your design.
Moreover, arrows in infographics suggest progression. From one year to another, they illustrate trends and transitions. Adding an arrow shape between two numbers shows growth or decline visually. It simplifies understanding for any audience.
Enhancing User Experience with Arrows
Arrows in web design are significant. They enhance navigation and improve user experience. Arrows indicate where to scroll or tap, guiding users efficiently. This increases interaction and retention on websites.
In e-learning platforms, arrows help learners proceed without confusion. An arrow in Photoshop, next to video tutorials, points users in the right direction. This clarity ensures users enjoy their learning journey.
Similarly, mobile apps benefit from arrows indicating clickable areas. Users quickly identify where to go next, enjoying a seamless app experience.
Pro Tip: Use consistent arrow styles. Consistency helps users recognize patterns and reduces cognitive load.
Frequently Asked Questions

What steps are needed to add an arrowhead to a line in Photoshop?
- Open your project and select the Line feature from the toolbox.
- Draw your line on the canvas where you want the arrow to appear.
- Go to the Options bar at the top and find the 'Arrowheads' section.
- Check the box to add an arrowhead at the start or end of the line.
- Adjust the size and shape of the arrowhead as needed.
How do you insert a down arrow in Photoshop?
- Select the Custom Vector feature from the toolbox.
- In the Options bar, click the shape thumbnail to open the shape picker.
- Find the down arrow shape or search for it if you have many shapes installed.
- Click on your canvas and drag to draw the down arrow.
What’s the process for creating an arrow in Photoshop?
- Pick the Line or the Pen feature from the toolbox.
- Draw the straight line of the arrow.
- For the Line feature, add arrowheads in the Options bar.
- For the Pen feature, manually draw the arrowhead by creating a triangle at one end of the line.
How to make a curved arrow in Photoshop?
- Select the Pen feature from the toolbox.
- Click to create a point and then click elsewhere to create another point; do not release the mouse button on the second click.
- Drag to curve the line between these points.
- Create the arrowhead manually at one end by drawing a small triangle or by using the Custom Vector feature.

Conclusion
By mastering “how to make an arrow in Photoshop,” I’ve been able to emphasize important elements and guide viewers’ attention effectively in my projects. This simple skill has added a professional touch to my presentations and visual content.
Whether you’re a beginner or looking to refine your skills, understanding how to draw clear, precise arrows is invaluable. I’ve found that experimenting with different styles and sizes of arrows can significantly change the dynamics of a composition.
If you’re looking to improve your design abilities, I highly recommend checking out the Photoshop Course and Lightroom Course. Both have been game-changers for me.
And if you want to explore the full potential of Photoshop and Lightroom, these tools can help take your projects to the next level.
Read more about Photoshop:


