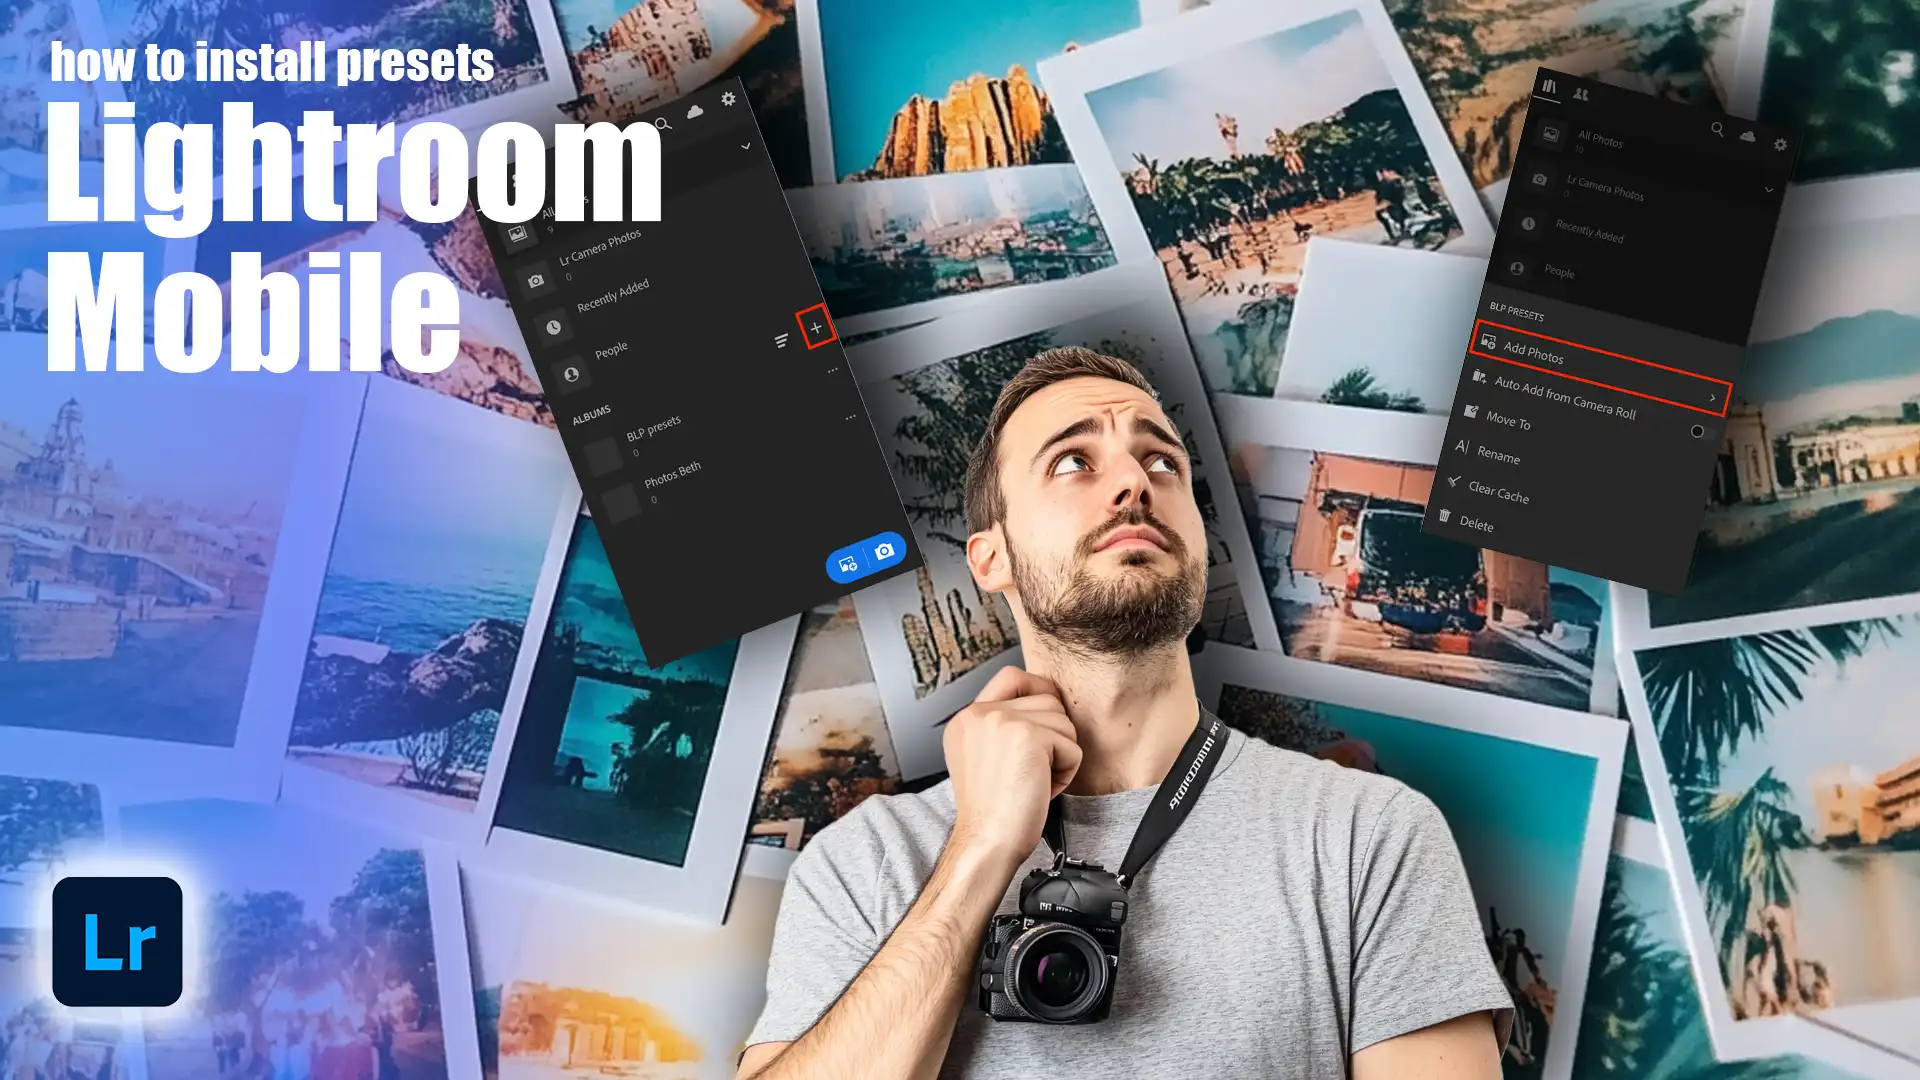
How to Install Presets in Lightroom Mobile: Quick Guide
How to Install Presets in Lightroom Mobile: Quick Guide
If you’ve been wondering how to install presets in Lightroom Mobile, you’re in the right place. In this guide, I’ll walk you through the straightforward steps to get those stunning presets onto your mobile device.
Imagine transforming your photos with just a few taps, achieving professional-looking edits effortlessly. Trust me, once you see the difference these presets make, you won’t want to go back.
So, let’s dive in and unlock the full potential of your mobile photo editing!
Table of Contents
Understanding Lightroom Mobile Presets
These presets streamline photo editing. They save time and ensure consistency. If you love photo editing, these tools enhance your workflow efficiently.
Learning how to install presets in Lightroom Mobile can elevate your editing process by allowing quick and consistent photo enhancements.
What are Lightroom Presets?
Lightroom presets are pre-defined settings that adjust colors, tones, and other photo attributes. With just one click, they modify the look of your photos. Presets come from professional photographers or self-made adjustments.
They work on both the desktop and Lightroom smartphone app. Installing presets in any Lightroom version can transform your photos quickly without needing extensive editing skills. There are different types of preset files, such as .xmp and DNG files.
Benefits of Using Presets in Lightroom Smartphone Application
Presets offer several advantages:
Efficiency: Quickly apply professional looks to your photos.
Consistency: Ensure that all photos share a similar style.
Versatility: Use on Lightroom mobile app and desktop versions.
Learning: Understand editing techniques by dissecting presets.
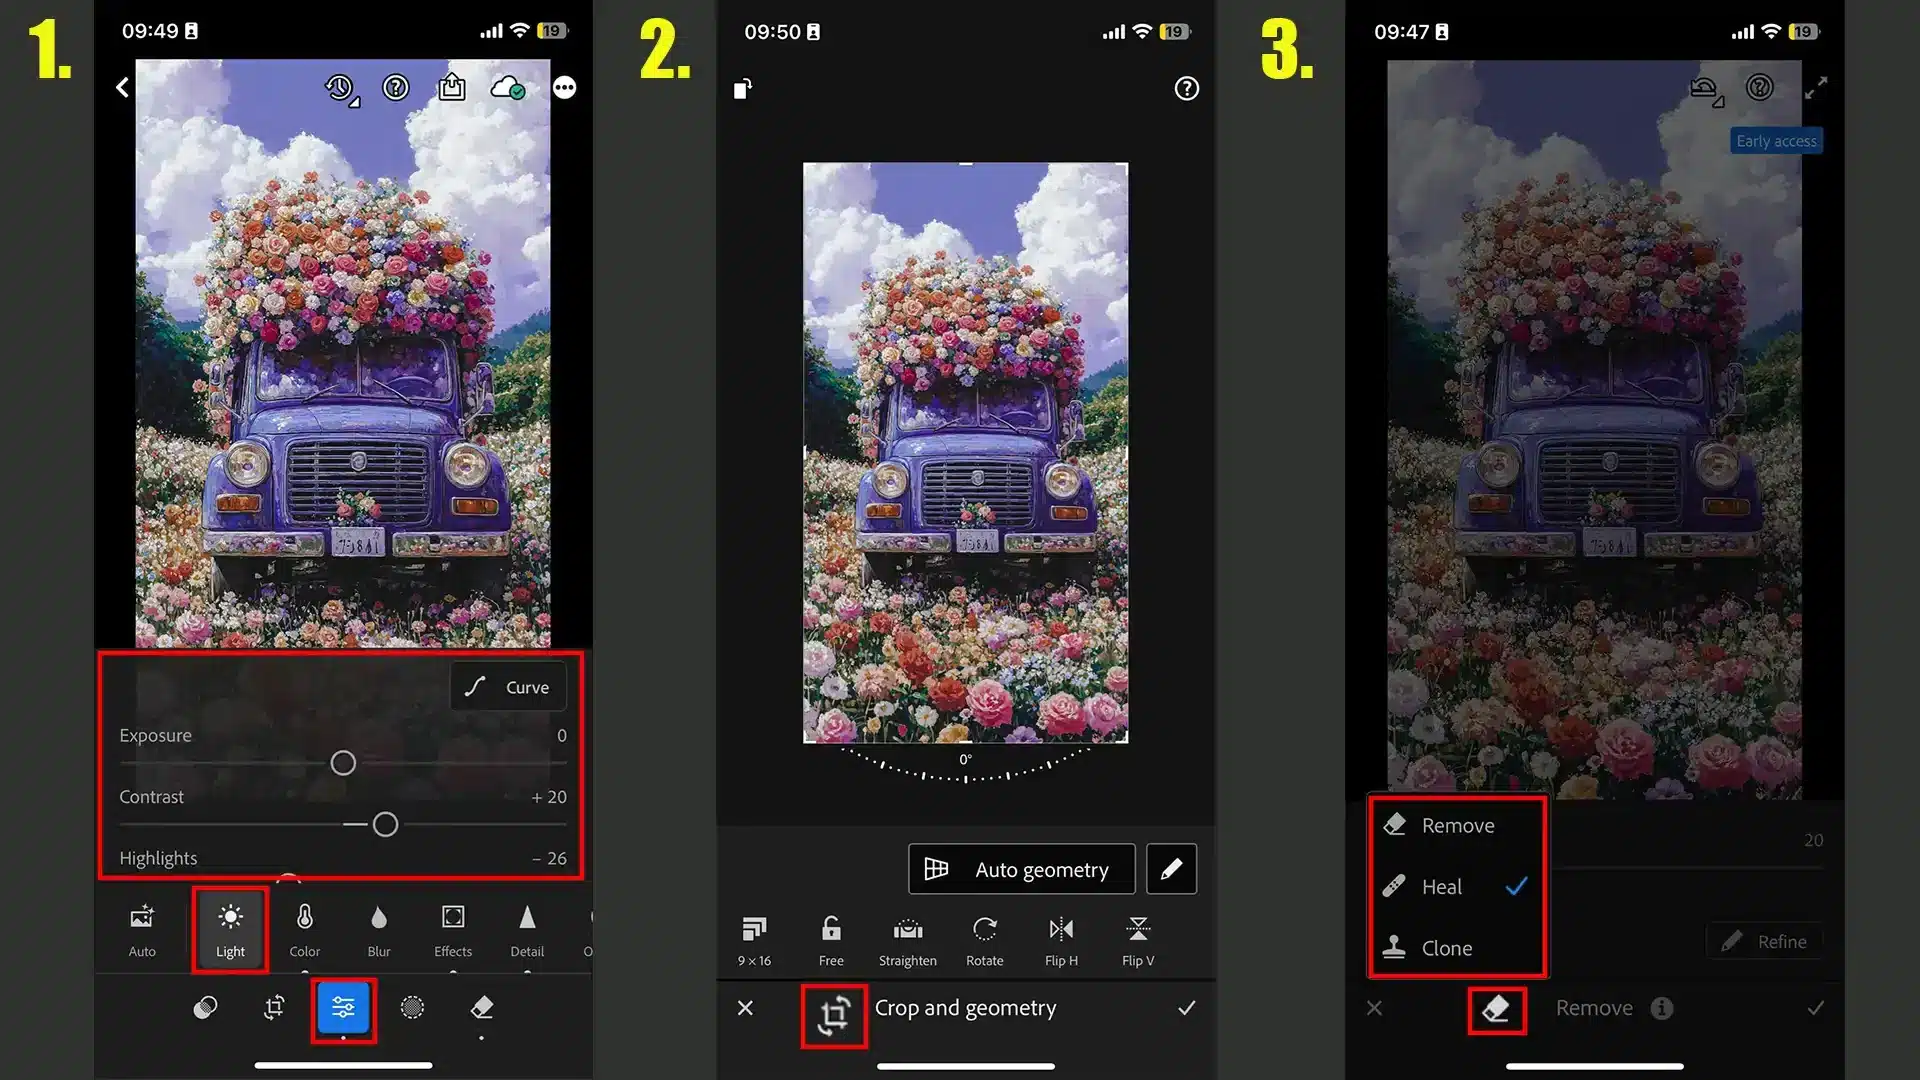
How to Set Up Presets on Lightroom Mobile
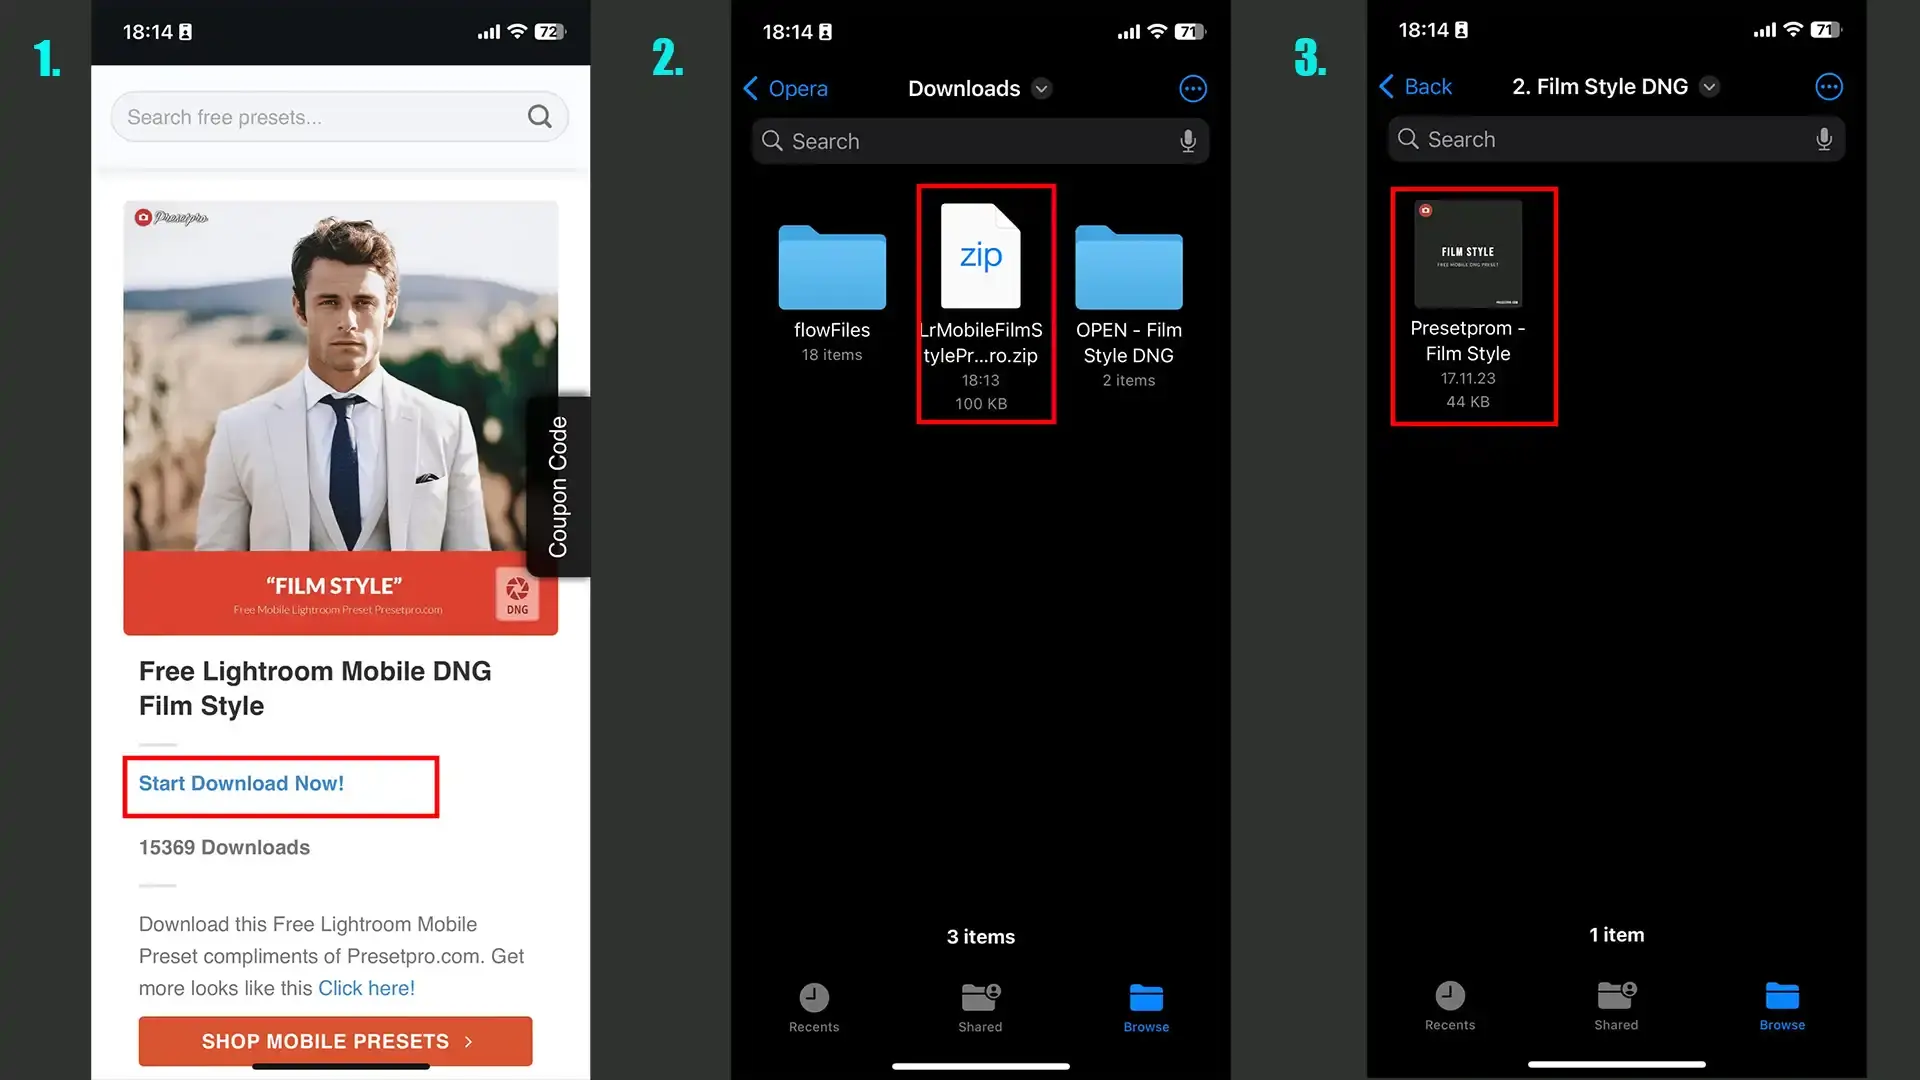
Download preset files (usually .zip or dng files).
Unzip the zip file if necessary.
Open the Lightroom smartphone app and import the dng files.
Go to the library and tap on the imported preset image.
Open the presets panel and select Create.
Save it as a new preset.
Once installed, you can find them in the preset group within the app. Every subsequent photo edit will be streamlined.
Pro Tip: When installing presets into Adobe Lightroom , try making your own custom tweaks. This way, you can create Lightroom presets that suit your unique style.
How to Install Presets in Lightroom Mobile
If you’ve dipped your toes into photo editing, you know that presets can be game changers. Let’s dive into installing presets in Lightroom mobile in the simplest way.
Step-by-Step Guide to Installing Presets
Here’s a concise guide to help you start:
Step 1: Download Preset Files - First, grab the preset files. Usually, they come in a zip file or as individual dng files.
Step 2: Unzip the File - If they come zipped, unzip the zip file. Easy, right?
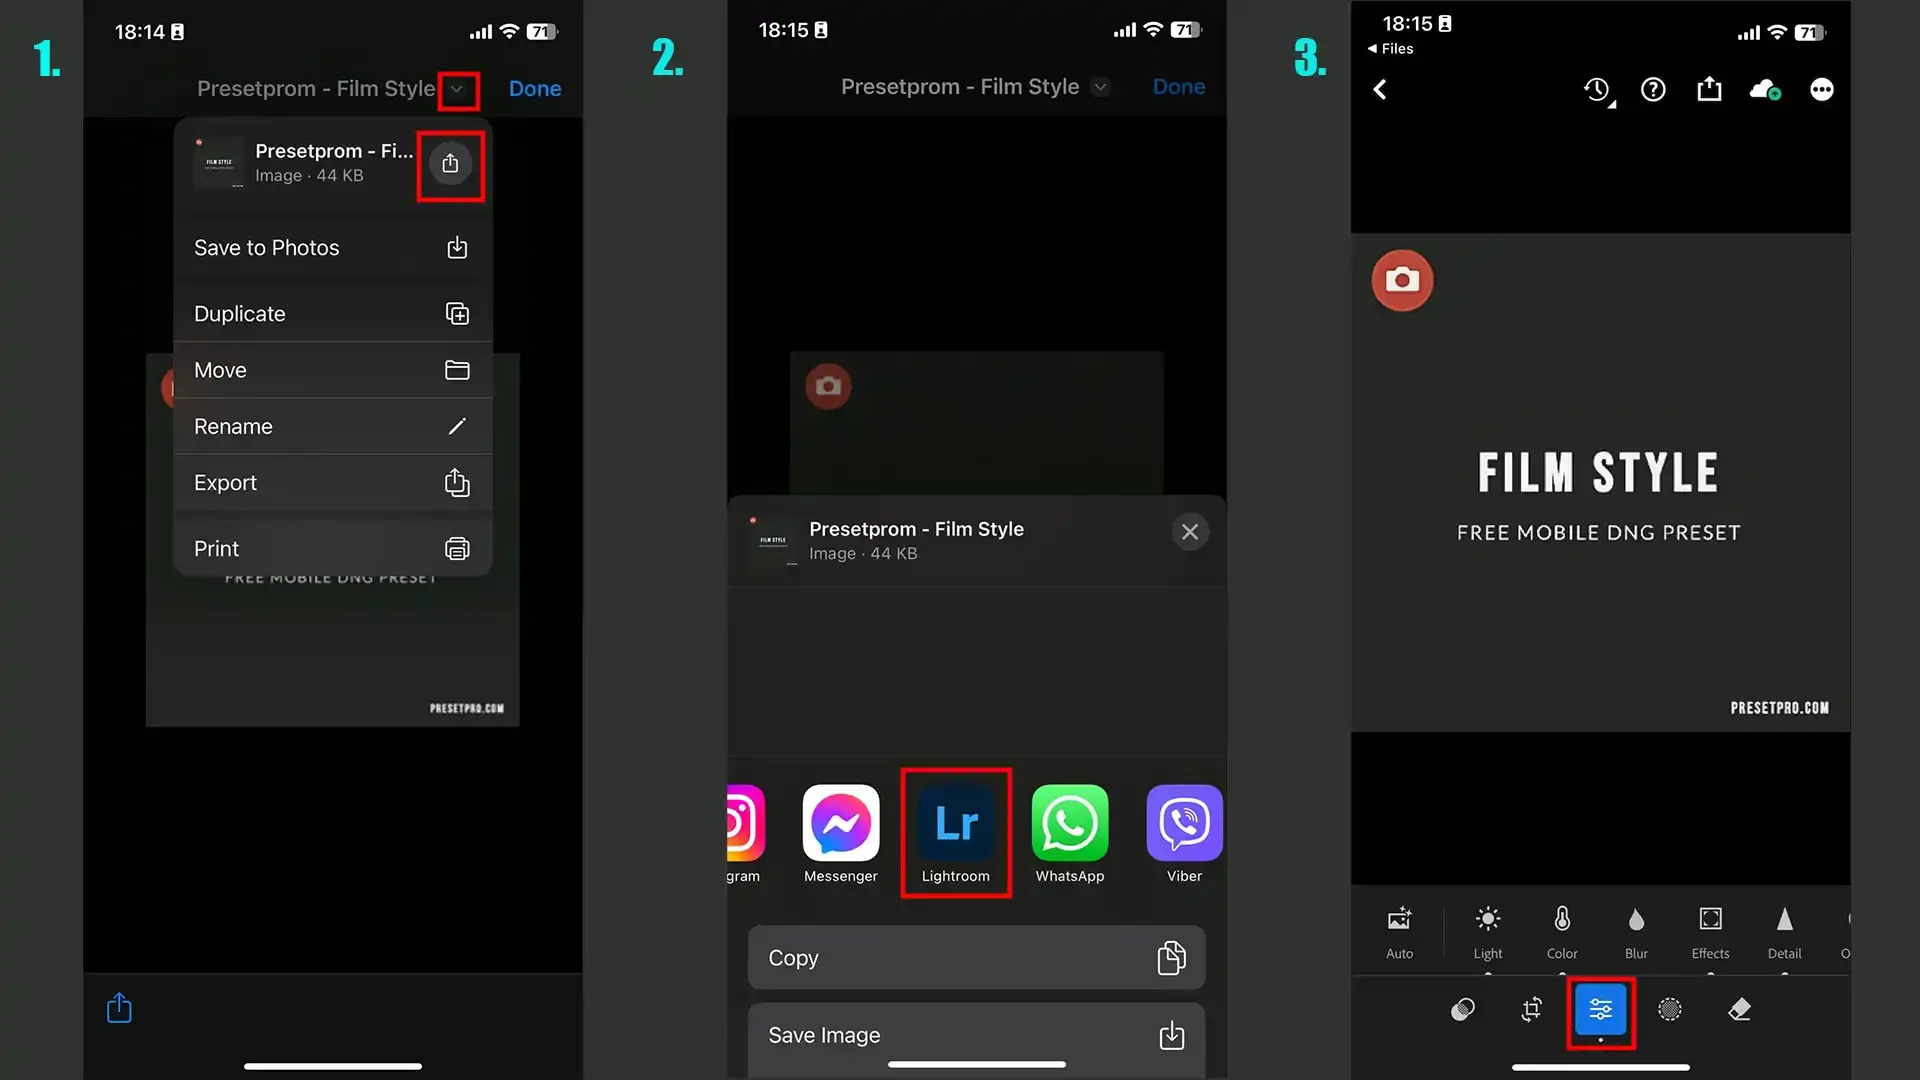
Step 3: Import Presets - Open the Lightroom mobile app and import the dng files. Go to “Add Photos,” choose “From Files,” and pick the files you unzipped.
Step 4: Select the DNG Image - Tap on the imported image in the library. The magic is about to happen!
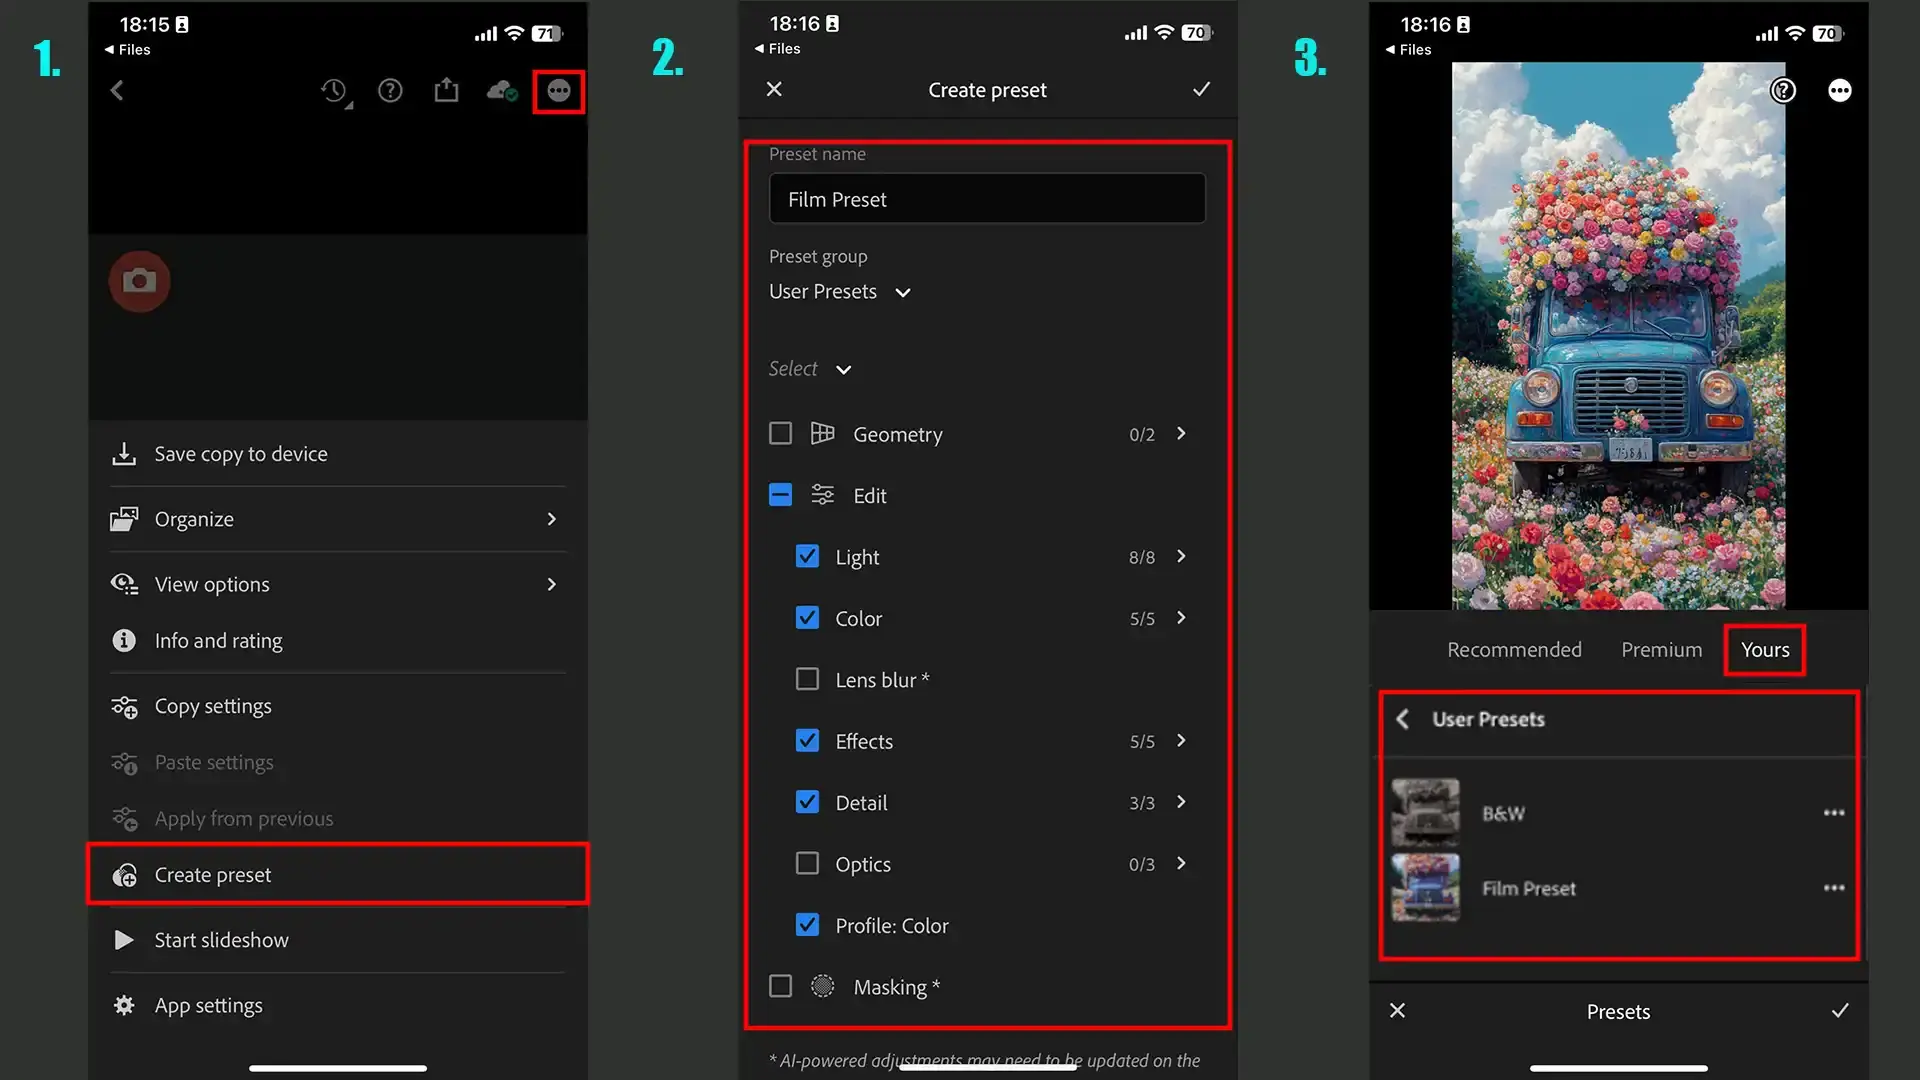
Step 5: Establish Preset - Tap the three dots on the top right, select “Create Preset,” and save it under a new name.
Step 6: Apply the Preset - Go to your photos, open any photos, and go to the presets tab. Apply your newly created Lightroom presets!
Troubleshooting Common Installation Issues
Sometimes, things might not go as smoothly as we planned. Here are some common issues and how to fix them:
Presets Not Showing Up - First, double-check that you’ve followed each step accurately. If it’s still not showing up, restart Lightroom. This often fixes the issue.
Wrong File Format - Make sure you’re using DNG files, not any other format. Only DNG files are compatible with the mobile app.
Update Lightroom - Sometimes, an outdated version of the app can cause issues. Ensure your app is updated to the latest version.
Storage Problems - Verify that you have enough storage on your device. Lack of space might prevent you from importing files.
Tips for Organizing Your Presets
Keeping your presets organized will make future edits smoother:
Use Folders - Create folders for different types of presets. For example, have separate folders for portrait, landscape, and black and white edits.
Name Them Wisely - Give your presets clear, descriptive names so you can easily remember their effects.
Delete Unused Presets - If you find yourself not using certain presets, delete them to keep your collection tidy.
Backup Your Presets - Always keep a backup of your presets. Store them on a cloud service or external drive.
Using these tips, you’ll be a pro at managing your Lightroom mobile presets.
Pro Tip: Experiment with the settings within a preset and tweak them to create your unique style. The beauty of Lightroom is that changes automatically sync across your devices, making editing more efficient than ever.
How to Navigate the App Interface
Understanding the interface is important to making the most of the Lightroom application. Here’s a brief guide:
Navigation Tips:
Home Screen: The home screen displays your recent photos and offers shortcuts to various features. It’s your starting point.
Library Tab: Located at the bottom, this tab organizes your photos. Here, you can import images, create folders, and manage your photo library.
Edit Tab: This is where the magic happens. Use various tools to adjust the light, color, and details of your photos.
Presets Tab: Apply Lightroom presets with a single tap. Access this from the edit screen to quickly enhance your photos.
Share Tab: Found at the top right, this allows you to export and share your edited photos.
For a smooth editing process, ensure your presets are organized. Create folders like a develop presets folder or user presets folder to manage them effectively.
Pro Tip: When importing a preset, ensure it’s in PNG file format and not a zip file. This avoids format compatibility issues. And always keep your Lightroom folder tidied up. It’ll make your editing workflow seamless, especially when you need to quickly load file and start editing.
Lightroom application makes editing photos a breeze, but creating your own presets elevates it to the next level. Let’s dive into how you can create and share your custom presets with just a few taps on your device.
How to Create Custom Presets
Creating your own preset in the free Lightroom mobile app is simpler than you think. Here’s how:
Open the Lightroom application on your device.
Select a photo you want to edit from your library.
Apply your desired edits using the various tools available: exposure, contrast, color, and so forth.
Once you're happy with the edit, tap the three dots icon at the top right of the screen.
Choose "Create Preset" from the dropdown menu.
Name your preset, choose relevant groups, and hit "Save."
Now you’ve got your custom preset ready for future use!
Sharing Presets with Others
Sharing your custom presets can be equally straightforward and satisfies that communal urge:
Select a photo you’ve already edited and where you’ve applied your custom preset.
Tap on the three dots icon, select 'Export As,' then choose 'DNG' as the file type.
Share the DNG file with your friends or any photo editing community.
Recipients can install Lightroom presets by importing your DNG file into their Lightroom application.
This makes sharing editing magic as simple as sharing a photo!
Pro Tip: Always name your presets clearly so you can easily find them later and keep your Lightroom folder organized. This way, your workflow remains smooth and efficient.
By creating and sharing your own presets, you add a personal touch to your photography and help others along the way. For more advanced editing, you might also explore Lightroom shortcuts to speed up your workflow.
Advanced Tips for Using Lightroom Mobile
Once you’ve mastered how to install presets in Lightroom Mobile, you can dive deeper into advanced techniques to elevate your photo editing. The app offers powerful tools that can enhance your photos with greater precision and creativity.
This table highlights advanced editing tools and features available in Lightroom Mobile, showcasing their functions and how they can enhance your photo editing experience
Aspect
Overview
Selective Tool
Target specific areas in your photo to adjust exposure, contrast, and color for precise edits.
Healing Brush
Remove blemishes or unwanted objects effortlessly by brushing over them to make them disappear.
Geometry Tool
Correct crooked or uneven horizons and straighten images using the ‘Upright’ function.
Curves
Adjust highlights, mid-tones, and shadows to fine-tune lighting and enhance photo quality.
Using Photoshop
Export photos from Lightroom to Photoshop for advanced edits like content-aware fill and sync back seamlessly.
Sharing on Social Media
Export and share edited photos directly to Instagram, Facebook, and more, with optimized settings.
Syncing Across Devices
Keep your edits up-to-date across devices by syncing between Lightroom versions on mobile and desktop.
Enhancing Photos with Advanced Editing Tools
So, we’ve mastered the basics. Now, let’s dive into the advanced tools.
Selective Tool
First, use the ‘Selective‘ tool. With this, you target specific areas in your photo. Adjust exposure, contrast, and color. Simple stuff, but the results will surprise you.
Healing Brush
Next, try the ‘Healing Brush.’ Tap and brush over blemishes or unwanted objects. Lightroom does some magic here, making things disappear. It’s like they were never there.
Geometry Tool
Another powerful feature is the ‘Geometry‘ tool. Do you have an uneven horizon? Fix it using the ‘Upright’ function. Your scenic photos look perfectly leveled. No more tilting seas or crooked buildings with this.
Curves
Finally, don’t shy away from ‘Curves.’ This feature allows you to fine-tune the light in your photos. Start by adjusting the highlights, mid-tones, and shadows. The precision you’ll get is matchless.
Integrating Lightroom with Other Apps
Great news! Adobe Lightroom integrates smoothly with other apps. Let’s explore how.
Using Photoshop
Do you want to use Photoshop’s advanced features? Easy. Export your photo directly from Lightroom to Photoshop. Make detailed edits and save.
Changes sync back to Lightroom. This is especially useful for tasks like using the content-aware fill in Photoshop to remove complex objects seamlessly.
Sharing on Social Media
Need to share your edits on social media? Lightroom plays nice with Instagram, Facebook, and others. Just tap ‘Export‘ and share directly from the app.
No need to jump through extra hoops. For optimal results, consider using the best Lightroom export settings for Instagram to ensure your photos look their best online.
Syncing Across Devices
For those who work on desktops too, syncing between Lightroom versions is seamless. Start your edit on a computer, and continue on mobile. Everything is kept up-to-date across devices.
Pro Tip: Always name your presets clearly in the Lightroom photo editor. This practice saves time and ensures a smooth workflow across different projects.
To make the most of these advanced tools and integrations, consider following a comprehensive Lightroom training guide. This will help you master the software and take your photography to new heights, making editing a breeze.
Additionally, if you’re looking to enhance your mobile photography skills, explore guides on how to take professional photos with a phone. Combining advanced editing in Lightroom with strong photography techniques will elevate the quality of your images even further.
To make the most of Lightroom Mobile, following some best practices can improve your editing experience. Whether it’s organizing your presets or customizing them, small adjustments can lead to more efficient workflows and better results.
Best Practices for Using Presets
Using presets is like having a secret weapon in your editing toolkit. They save time and ensure a consistent look across your images.
Here’s how to make the most of them:
Select Import Presets
Start by choosing the right presets for your style. When you open the Lightroom application, browse through the available presets and select to import them that fit your desired aesthetic.
Keep your preset library organized by naming them clearly.
Customize to Fit Your Needs
Once you’ve applied a preset, it’s good practice to tweak settings. Adjust exposure, contrast, and color balance to match the specific needs of your photo.
Remember, presets are a starting point, not the end-all-be-all solution.
Batch Processing
One of Lightroom’s most powerful features is batch processing. Apply presets to multiple photos at once to maintain a cohesive look.
This is especially useful for series or collections where uniformity is significant.
Utilize the Free Lightroom App
If you’re new to Lightroom, the free Lightroom app is a great place to start. It offers many of the same powerful features as the desktop version, making it easier to edit on the go.
Plus, it’s a good way to get comfortable with presets without spending any money.
Save and Share Your Presets
Create your own presets by adjusting settings and saving them for future use. Share your custom presets with others, or download popular presets from community creators to expand your editing repertoire.
Pro Tip: Use the same preset or a similar style of presets across your images to maintain a cohesive look and feel for your brand or project. It makes your work more recognizable and professional.
Lightroom Shortcuts
To speed up your workflow even further, familiarize yourself with important Lightroom shortcuts.
These can help you navigate the software more efficiently, making your editing process quicker and more enjoyable.
How to Install Lightroom Presets
Installing Lightroom presets is straightforward. Simply download the preset files, import them into Lightroom, and start applying them to your photos.
This can greatly enhance your editing capabilities and streamline your workflow.
Frequently Asked Questions
How do I upload presets into Lightroom mobile?
Open the Lightroom app on your mobile device.
Navigate to the Presets section located in the editing controls menu.
Tap on the three dots to access the options and choose 'Import Presets'.
Select the preset files from your device storage to import them into the app.
How do I install preset in Lightroom mobile app?
Visit the App Store (iOS) or Google Play Store (Android).
Search for the Lightroom app by Adobe.
Tap 'Install' to download and install the app on your mobile device.
Once installed, open the app and sign in or create an Adobe account to start using presets.
Why are my presets not showing on the Lightroom Mobile iPhone?
Ensure that the Lightroom app is updated to the latest version.
Check if the presets were correctly imported; try re-importing them.
Verify that you are looking in the right section of the app under 'Presets' and not 'Profiles'.
If the issue persists, restarting the app or your iPhone might help.
How do I add presets to all photos in Lightroom mobile?
Select a photo and apply the desired preset.
Once applied, tap on the three dots to open additional options and select 'Copy Settings'.
Go back to your photo library and select the other photos you want to edit.
Open each photo, tap on the three dots again, and select 'Paste Settings' to apply the preset.
Conclusion
Learning how to install presets in Lightroom Mobile has truly transformed my photo editing process. It has made my workflow more efficient and allowed me to achieve consistent, professional-looking results with ease.
Whether you’re a beginner or an experienced photographer, mastering this skill can significantly enhance your mobile editing capabilities.
If you’re eager to dive deeper into photo editing, I highly recommend checking out this Photoshop course and this Lightroom course. Both have been invaluable in elevating my editing game and can do the same for you.
If this article has helped you, then Like and Share it with your friends
$2,061.00Original price was: $2,061.00.$1,061.00Current price is: $1,061.00. 27584
Download Your Free Guide Now!
Discover the secrets of photography with our printable guide! Master essential techniques like aperture, shutter speed, and ISO to create stunning images. Get your free printable PDF now and start turning your snapshots into masterpieces!