How to Clear Scratch Disk Photoshop: A Quick and Easy Guide
How to Clear Scratch Disk Photoshop: A Quick and Easy Guide
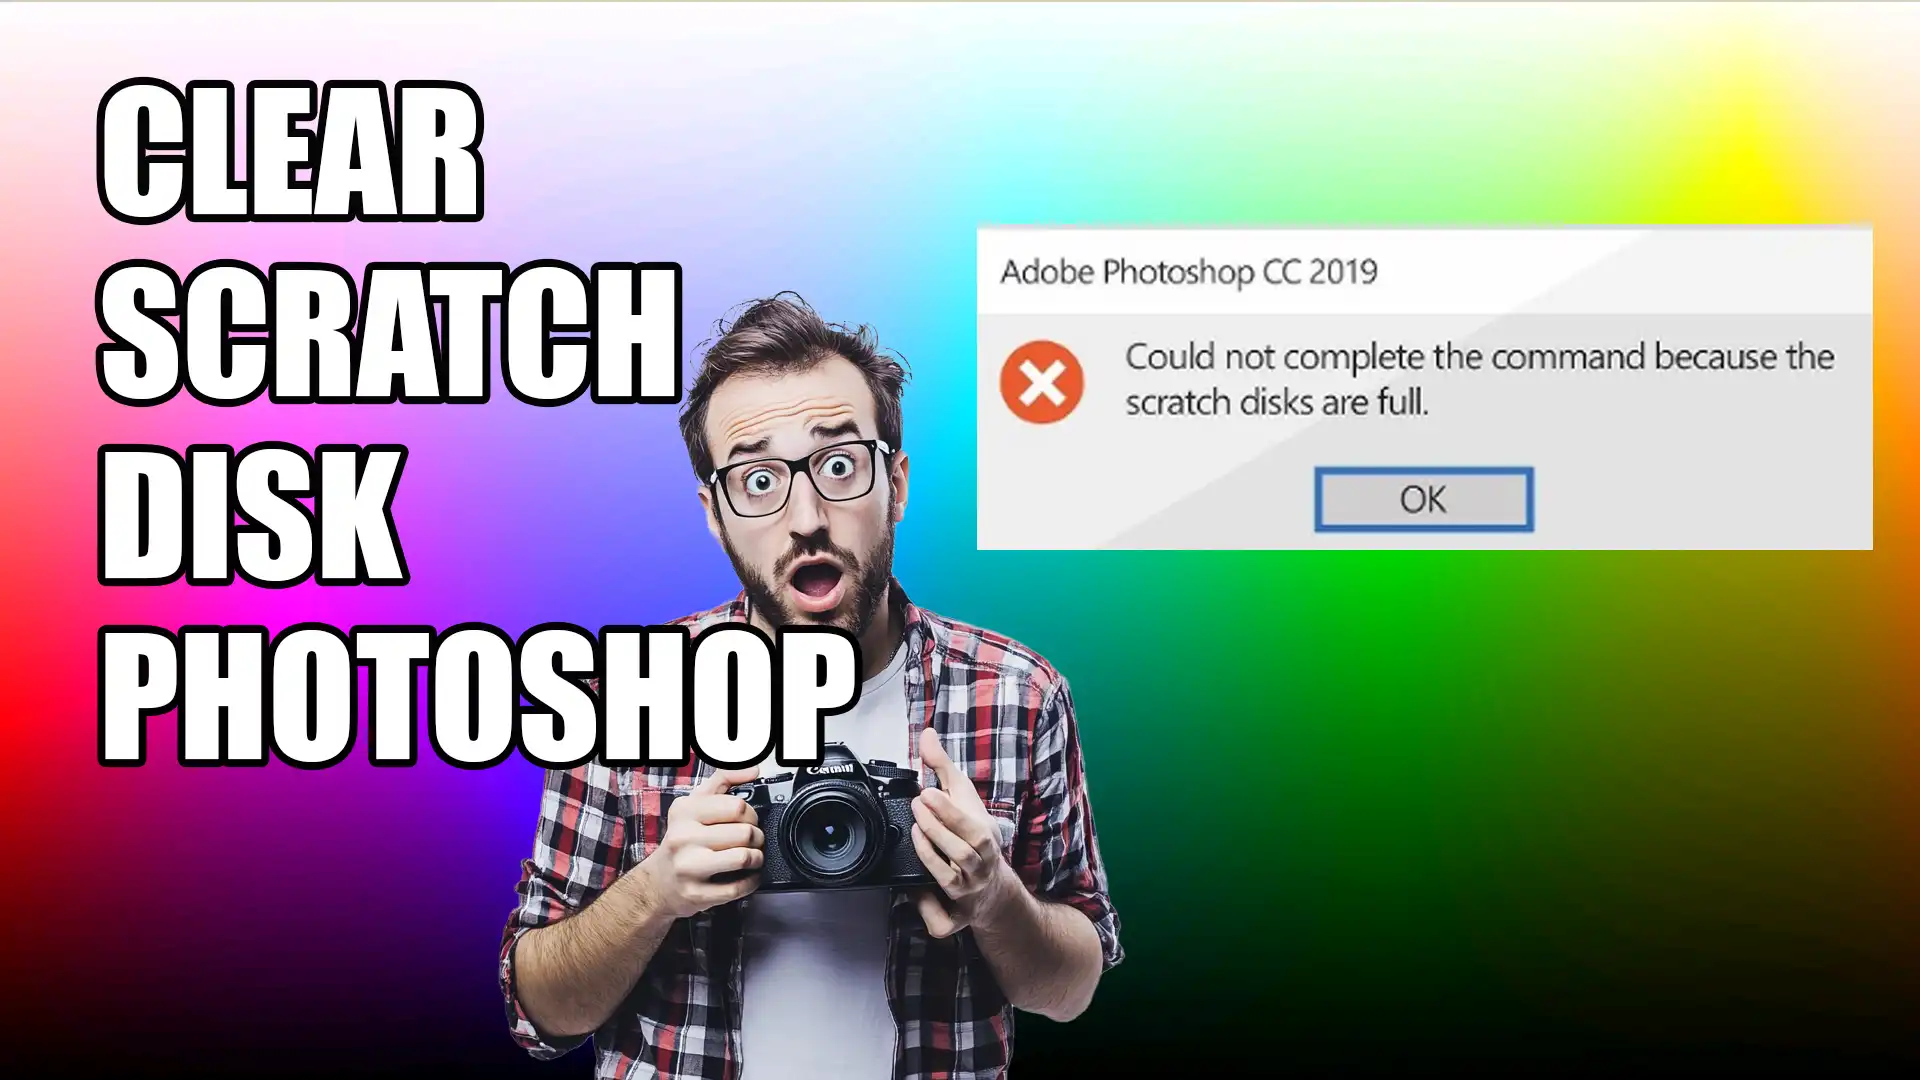
Have you ever encountered the dreaded scratch disk full error while working on your projects in Photoshop? If so, you’re not alone. In this article, I’ll guide you through how to clear the scratch disk in Photoshop, ensuring smoother and more efficient editing sessions.
We’ll explore practical steps and tips to free up space, so you can get back to creating without any interruptions.
Stay with me, and let’s tackle this common issue together!
Table of Contents
What is a Scratch Disk?
Photoshop uses a scratch disk to store temporary project files when there isn’t enough RAM available.
This allows you to continue working smoothly even if you’re working on a file with tons of layers or high resolution.
Essentially, it’s an overflow area that helps manage the heavy lifting your computer might not be able to handle in real-time.
Let’s dive deeper into why Photoshop needs these scratch disks and how you can manage them effectively.
Why Does Photoshop Use Scratch Disks?
When Photoshop performs tasks like opening large files or applying filters, it often runs out of RAM.
To keep things running smoothly, Photoshop uses scratch disks as a temporary storage solution.
These disks essentially act as a placeholder for information your computer can’t store in RAM.
Scratch disks help prevent slowdowns and crashes by providing extra space for data processing.
When comparing Photoshop vs. Illustrator, it’s important to consider how each handles resources, such as the scratch disk.
While Photoshop often relies heavily on the scratch disk for temporary files, Illustrator manages memory differently.
Understanding these differences can help optimizeperformance and avoid issues with the scratch disk.
Enable the auto save feature in Photoshop with your Photoshopscratch disk to protect your work and optimize performance by managing temporary files efficiently.
Common Issues with Scratch Disks
Here are some common issues with scratch disks:
Full Disk Errors: A frequent issue where the allocated space is maxed out due to large files or long sessions.
Insufficient Space: When there's not enough disk space available, performance takes a hit.
Unexpected File Sizes: Temporary files can grow unexpectedly, chewing up scratch disk space.
Hidden Files: These can clog up space without you noticing.
Managing Your Scratch Disks Efficiently
Change Scratch Disk Location: This can often help if your current drive is getting full.
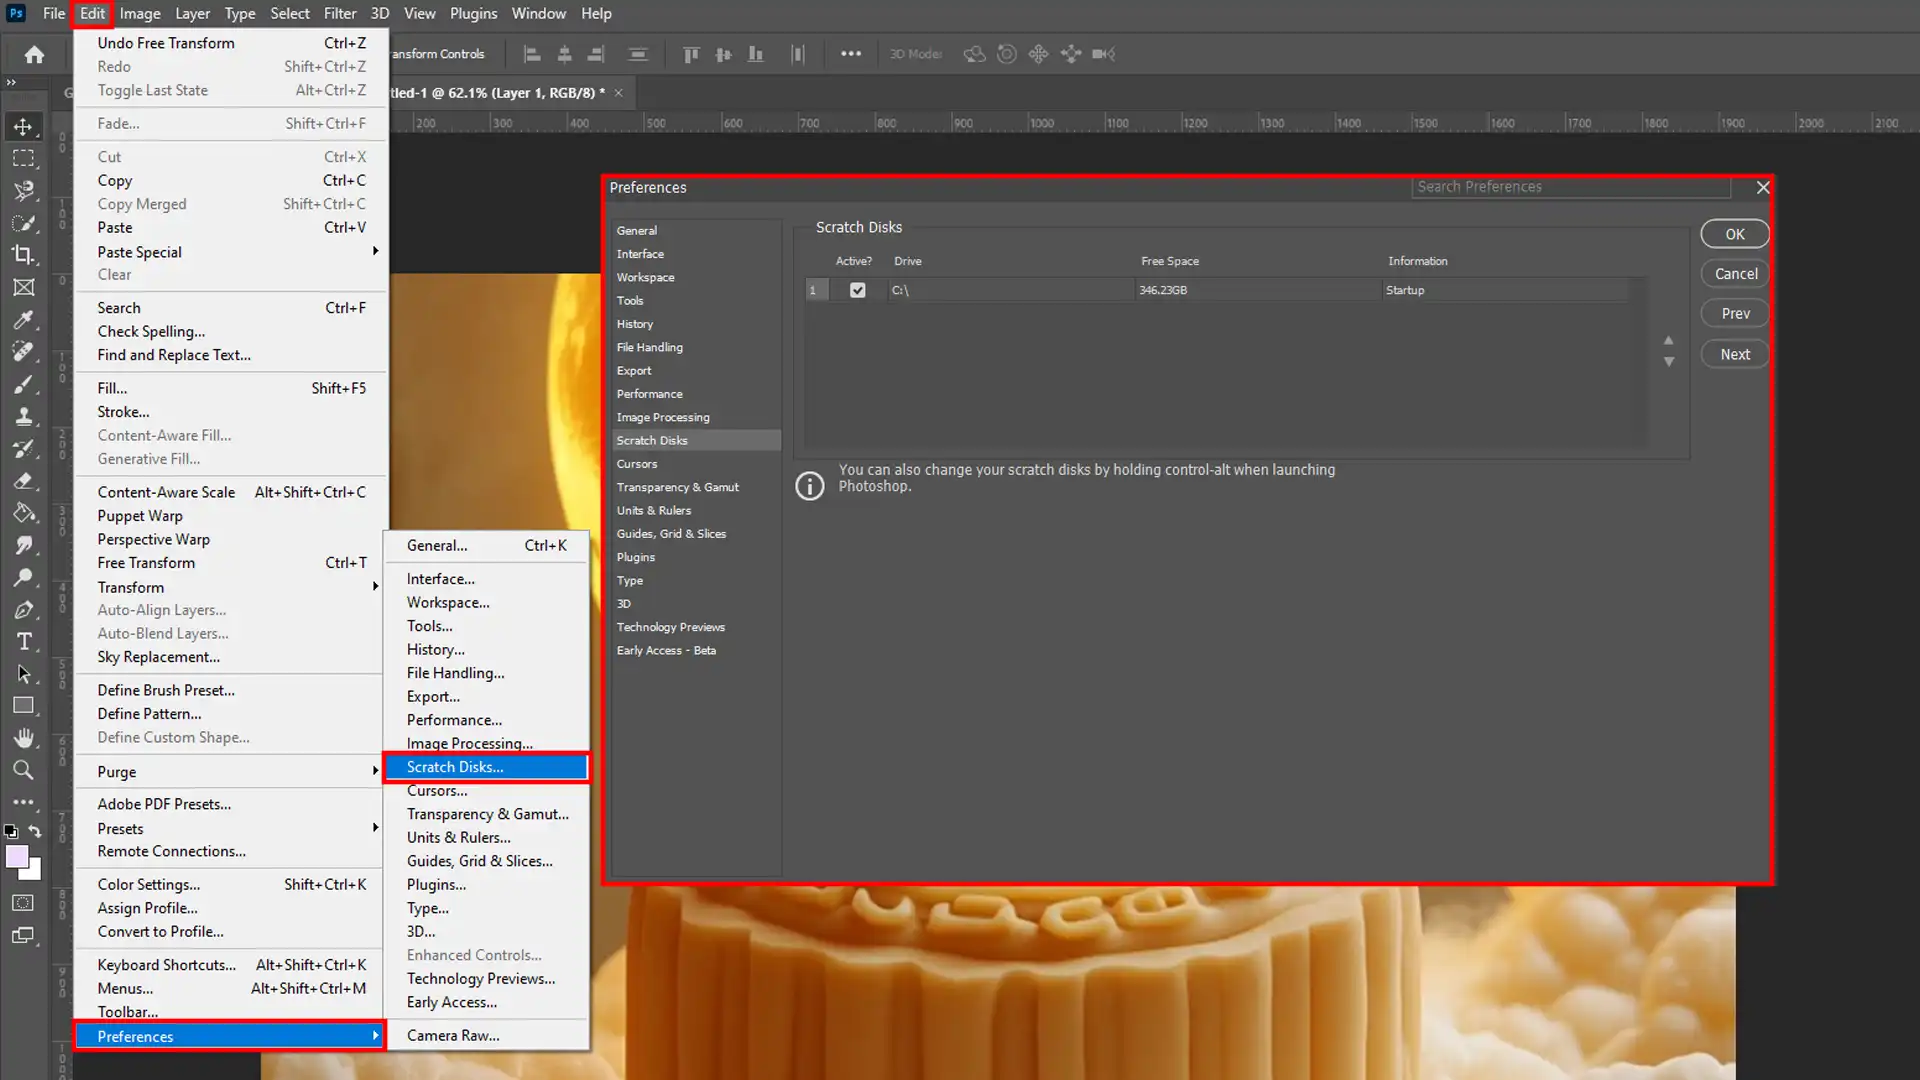
Clear Scratch Disk: Regularly deleting temporary files can free up a lot of space. Go to Edit > Preferences > Scratch Disks to adjust settings.
Free Space on Drive: Remove hidden Photoshop files or unnecessary files to create more room.
Steps to Optimize Scratch Disk Usage
Open Photoshop and navigate to Edit > Preferences > Scratch Disks.
Select a different drive with more free space.
Clear out unnecessary files and junk files regularly.
Consider using an external drive dedicated solely as your blemish disk.
How to Clear Scratch Disk in Photoshop
Clearing the blemishdisk can resolve a number of performance issues. Go to your operating system’s file management tool, locate the Photoshoptemp files, and delete them.
This frees up valuable disk space and can dramatically improve Photoshop’s efficiency.
Pro Tip: To avoid gash disk full errors, regularly delete hidden Photoshop files and prevent accumulating too many temporary files.
Also, increase Photoshop’s RAM allowance if possible to reduce reliance on scratch disks.
Understanding how to remove background in Photoshop is essential for clean edits. Mastering this technique allows you to focus on your subject, improving overall image clarity and impact.
Step-by-Step Guide to Clearing Scratch Disk in Photoshop
Experiencing Photoshop scratch disk errors can disrupt your workflow, especially when the scratch disk is full.
To resolve a scratch disk error, navigate to Photoshop’s preferences and free up space on your designated Photoshop scratch disk by deleting unwarranted files or changing the scratch disk location.
Step 1: Understand the Scratch Disk
We need to understand that a scratch disk is just temporary storage. Photoshop uses it to store files when your computer’s RAM is full.
Scratch disks play a crucial role in managing large files and intricate projects.
Step 2: Identify the Problem
You might notice a slowdown or see an error message like “scratch disks are full.” This happens when there’s not enough storage space on your hard drive to handle the temporary files.
Step 3: Change Scratch Disk Location
To change the location of your scratch disk:
Open Photoshop.
Go to the Photoshop menu.
Select Preferences followed by ScratchDisks.
Choose a different drive with more space.
Step 4: Clear Scratch Disk
Sometimes, we need to clear the scratch disk ourselves.
Here’s how you do it:
Close Photoshop.
Open your file explorer (use the windows computer search if necessary).
Navigate to the temp files folder.
Delete temp files and other junk files.
This will create space and solve scratchdisk full issues.
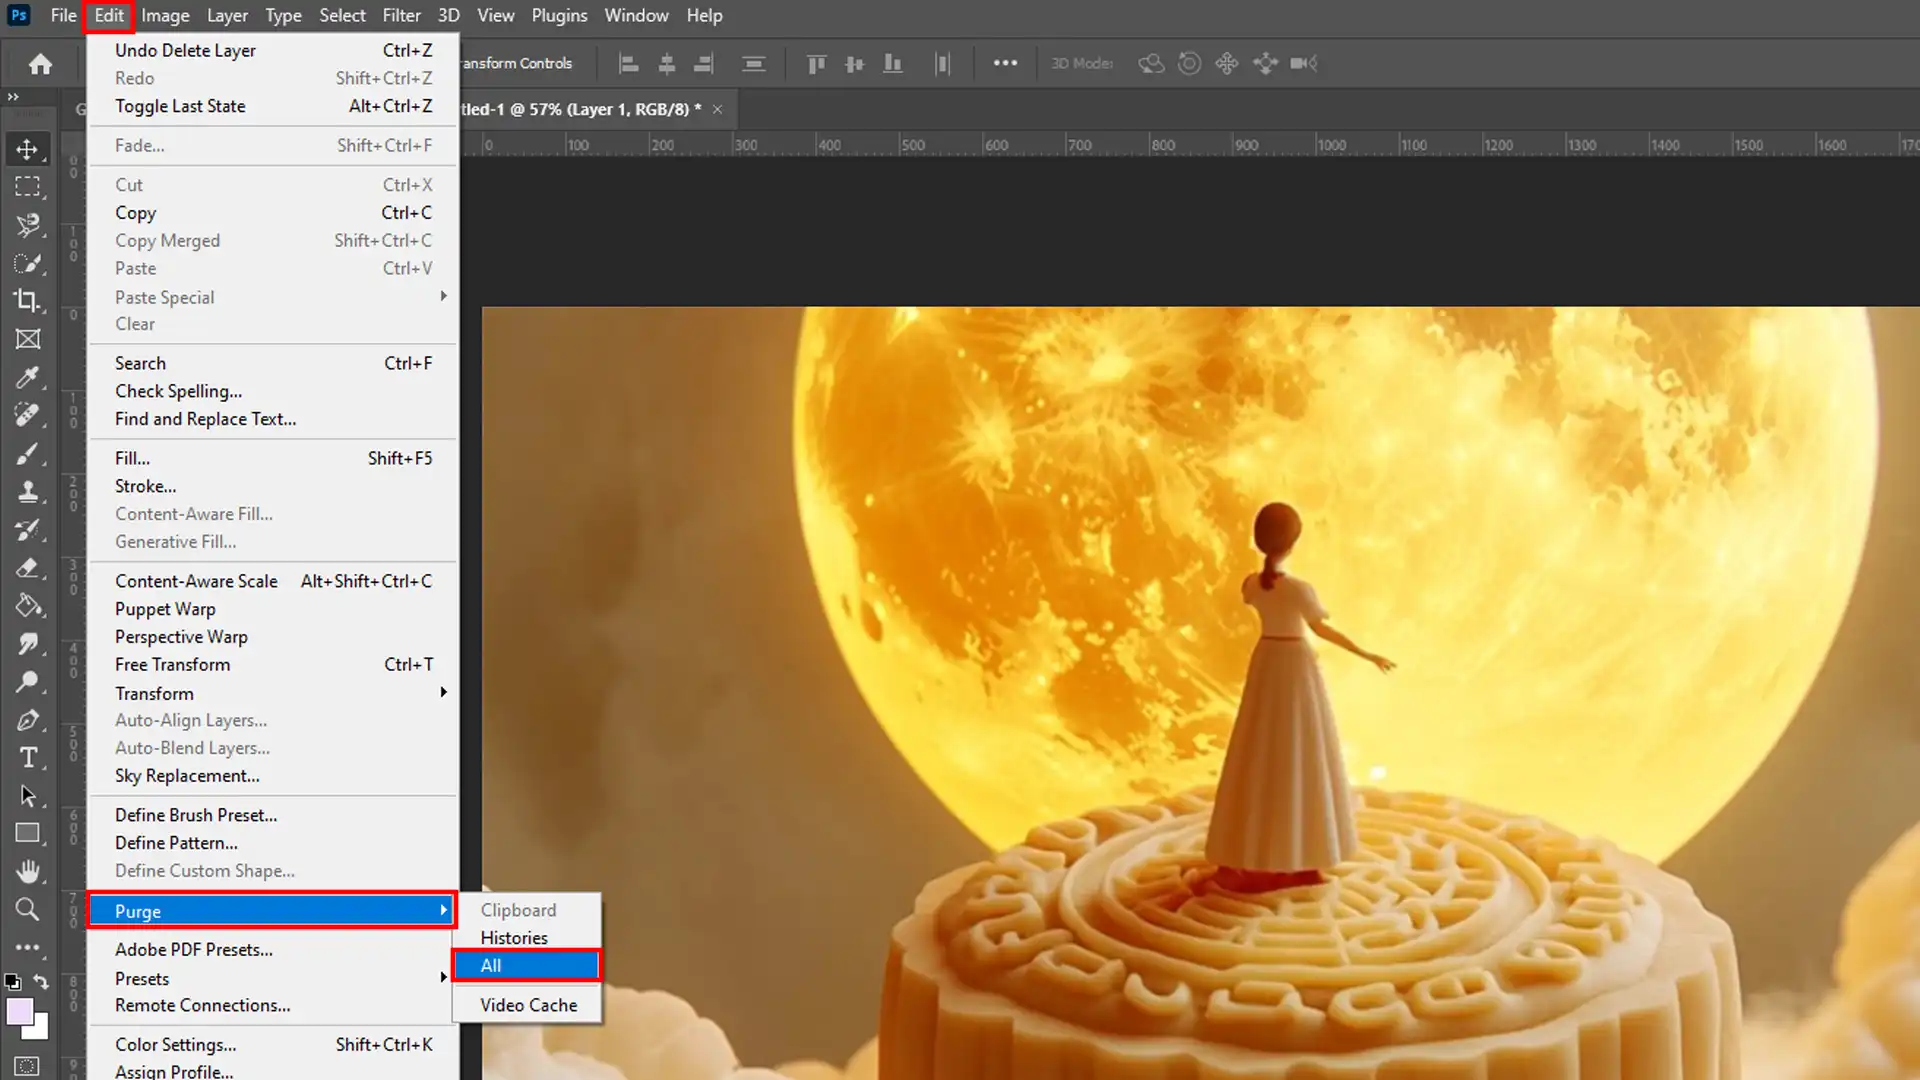
Step 5: Manage Photoshop Cache
To manage and clear Photoshop cache:
Go back to the Preferences menu.
Select Purge.
Click on All to clear temporary files.
This keeps your disk space free from unneeded cache files.
Step 6: Increase Photoshop's RAM Allowance
Increasing Photoshop’s RAM allowance helps prevent scratch disk space errors:
Again, visit the Preferences menu.
Select Performance.
Move the slider to increase the RAM allocated to Photoshop.
Step 7: Use an External Drive
Using an external drive can help your main drive stay clear:
Plug an external drive into your computer.
Set it as the scratch disk in your Photoshop scratch disk preferences.
This provides more space and helps you manage large files effectively.
Pro Tip: Regularly delete hidden Photoshop files. These files often take up valuable disk space without you realizing it.
Additionally, consider using essential tools in Photoshop like the content-aware fill to manage your projects more efficiently.
In the debate of Photoshop vs. GIMP, one key difference is how they handle the scratchdisk. Photoshop relies heavily on a dedicated scratch disk for temporarydata, while GIMP uses a different approach for memorymanagement.
Understanding these distinctions can help optimize your workflow and avoidscratchdiskissues.
How to Clear Scratch Disk Photoshop on Different Systems
You’re busy working on a project, and suddenly you see that dreaded “scratch disk full” error message.
it happens to the best of us. Clear your scratch disk space and get back to creating stunning artwork.
Efficient photo management reduces clutter, improving your editing speed and overall efficiency.
Clearing Scratch Disks on Mac
To clear scratchdisks on Mac, open Photoshop’s Preferences, navigate to the “Scratch Disks” tab, and either select a different drive or freeup space on the current scratch disk to maintain optimal performance.
Steps to Clear Disk Space:
First, close Photoshop.
Open Finder.
Head to Applications, then Utilities, and launch Disk Utility.
Select your hard disk from the list on the left.
Click "Erase Free Space" to clean up.
Clear Temporary Files:
Go to Finder, press Shift + Command + G.
Type "~/Library/Caches/Adobe/Photoshop/Temp" and hit Enter.
Delete unnecessary files.
Clearing Photoshop Scratch Disks on Windows
When the Photoshop scratch disk becomes full, you may encounter Photoshop scratch disk errors that interrupt your workflow.
To resolve a scratch disk full issue, go to Photoshop’s preferences and either free up space on the current scratch disk or select a different drive as your scratch disk.
Steps to Clear Disk Space:
Close Photoshop first.
Open File Explorer.
Navigate to the C: Drive, or your designated drive for scratch disk.
Look for the Temp folder under Users and delete unwarranted files.
Clear Temporary Files:
Navigate to your Photoshop folder, usually found in C:\Users\[Your User Name]\AppData\Local\Temp.
Remove unwanted temporary files.
Optimizing Photoshop Settings
Optimizing Photoshop settings can help manage situations when scratch disks are full.
By adjusting memory usage and cache levels, you can reduce the likelihood of encountering issues when scratch disks are full, ensuring a smoother workflow.
Mastering Photoshop shortcuts can significantly speed up your workflow. By learning these time-saving commands, you’ll enhance efficiency and streamline your editing process.
Adjust Scratch Disk Settings:
Open Photoshop and navigate to Edit > Preferences > Performance.
Under the "Scratch Disks" section, choose a drive with more space.
Consider using an superficial drive to avoid full scratch disk errors.
Increase RAM Allocation:
Navigate to the Preferences menu.
Increase the RAM allocation. More RAM means fewer trips to the scratch disk in Photoshop.
Manage Photoshop Cache:
Remember to manage your Photoshop cache by purging temporary files every so often.
Additional Tips for Photoshop Users
Explore these extra tips to enhance your Photoshop skills, streamline your workflow, and achieve more professional results with every project.
Use Essential Tools in Photoshop:
Familiarize yourself with essential tools like the patch tool in Photoshop to enhance your workflow and efficiency.
Lightroom vs. Photoshop:
Understand the difference between Photoshop and Lightroom to choose the right software for your specific needs. Both have unique features that can help you manage and edit your photos effectively.
Pro Tip: Regularly maintain your scratch disk space by deleting unneeded files and temporary files. Small tweaks can prevent scratch diskerrors and keep your workflow smooth.
Common Scratch Disk Full Errors
You’ll likely see error messages like “scratch disks are full” or “could not initialize Photoshop because the scratch disks are full.” `
These errors mean the designated drive is out of space, and you can’t save new data.
Updates can resolve these issues, ensuring smoother performance and fewer disruptions in your workflow.
How to Fix Scratch Disk Full Errors?
There are several ways to fix these errors:
Delete Photoshop Temp Files: Go to the designated temp folder and delete Photoshop temp files.
Adjust Scratch Disk Location: Change your scratch disk settings in the Photoshop menu to another drive with more space.
Increase RAM Allocation: Allocate more memory to Photoshop through the Performance section in the preferences menu.
Remove Hidden Files: Some hidden files take up space. Reveal and remove them using your file manager settings.
Regular Cleanup: Use a dedicated cleanup tool or manually delete files you don't need, including Photoshop documented files.
Pro Tip: Regularly clean up your scratch space and always have at least 20% free space on the scratch disk to avoid these headaches.
Additionally, learning some essential Photoshop shortcuts can help streamline your workflow and reduce the load on your scratch disk.
So, there you have it! Managing your scratch disk might seem like a chore, but it’s critical for letting Photoshop run smoothly.
Keep your workspace tidy, and you’ll find it easier to follow through our tutorials and perfect those photos like a pro.
Using Lightroom accessories for improved workflow and efficiency can enhance your editing speed. These tools streamline tasks, making your new version of Lightroom experience more productive and effective.
Preventing Scratch Disk Full Errors
Freeing up disk space is the first step to handling those pesky full scratch disk messages.
Start by opening your Photoshop menu and look for the section where you allocate resources.
Method
Advantages
Disadvantages
Freeing Up Disk Space
Quick and easy, no additional hardware needed
Limited if disk space is insufficient or filled quickly
Using External Drives
Provides additional space, improves performance
Requires purchasing and managing an external drive
Regular Maintenance
Prevents long-term issues, improves overall system health
Requires ongoing effort and monitoring
Now, if your current disk is loaded with junk, it’s time to clean up.
Delete files you don't need.
Check your Photoshop folder for old temp files.
Make sure Photoshop automatically deletes unwarranted files after closing.
Simple tactics can often solve your biggest headaches. An organized disk is a happy disk!
Using External Drives
Consider using external drives to manage where Photoshop stores its temporary data. Swap the crowded internal disk for a spacious externaldrive by adjusting settings under the options.
Trust me, it’s as simple as pie!
Plug in an external drive.
Go to the Photoshop menu.
Select a different drive for the Photoshop scratch disk.
This small tweak can make a big difference when working on larger projects.
Regular Maintenance Tips
Maintaining your Photoshop setup makes a world of difference for those heavily engaged users. Spend a few minutes every week tidying up your workspace and resources.
Defragment your hard drive regularly.
Keep your operating system updated.
Backup important files, especially large project files.
These small steps prevent errors and dramatically extend the life of your working drives.
Pro Tip: Always keep at least 20% of your scratch disk space free. This ensures optimal performance and keeps those annoying errors at bay!
Frequently Asked Questions (FAQs)
How do I empty the scratch disk in Photoshop?
Open Photoshop and go to Edit in the menu bar.
Select Preferences and then Scratch Disks.
Check which drives are listed as scratch disks and note their paths.
Exit Photoshop to free up the space used.
Use your file explorer to go to the scratch disk location and manually delete temporary files.
Why is my scratch disk full in Photoshop?
Photoshop uses scratchdisks to store temporary files when there is not enough RAM. If you frequently work on large files or many files simultaneously, the scratch disk can fill up quickly.
Having limited storage space or a small designated scratch disk can lead to this issue.
How do I disable the scratch disk in Photoshop?
Disabling a scratch disk completely is not possible as Photoshop needs at least one.
To change your scratch disk settings, go to Edit > Preferences > Scratch Disks. Uncheck the drives you prefer not to use and select another drive as your primary scratch disk.
Restart Photoshop for the changes to take effect.
Where are Photoshop scratch disks stored?
Scratch disk locations depend on your settings in Photoshop.
Go to Edit > Preferences > Scratch Disks to see the designated drives.
The default is usually the system drive (C: on Windows or Macintosh HD on macOS).
Learning how to clear scratch disk Photoshop has made a big difference in my workflow. I remember the frustration when Photoshop would slow down because the scratch disk was full.
By following the steps in this guide, I was able to fix those issues and keep my projects running smoothly.
These courses taught me valuable tips and tricks that saved me a lot of time. Using tools like Adobe Photoshop and Adobe Lightroom has been essential in creating amazing digital art projects.
Mastering these techniques has opened up new creative opportunities for me, and I hope it does the same for you.
Happy creating!
If this article has helped you, then Like and Share it with your friends
$2,061.00Original price was: $2,061.00.$1,061.00Current price is: $1,061.00. 27584
Download Your Free Guide Now!
Discover the secrets of photography with our printable guide! Master essential techniques like aperture, shutter speed, and ISO to create stunning images. Get your free printable PDF now and start turning your snapshots into masterpieces!