How to Change Eye Color in Photoshop: A Comprehensive Guide
How to Change Eye Color in Photoshop: A Comprehensive Guide
Have you ever wondered how to change eye color in Photoshop?
It’s actually easier than you might think! Imagine having the power to transform a photo with just a few clicks, giving your subject a striking new look.
Whether you’re a seasoned photographer or just dabbling in photo editing, learning this skill can add a whole new dimension to your work.
In this guide, I’ll walk you through the simple steps to achieve stunning, natural-looking results. Don’t miss out on this chance to elevate your photo-editing game and impress your friends and clients alike.
Ready to get started?
Let’s dive in!
Table of Contents
Step-by-Step Guide: How to Change Eye Color in Photoshop
Changing eye color in Photoshop is straightforward and can greatly enhance your photos.
Let’s start by opening your image in Photoshop.
Opening Your Image in Photoshop
First, you must open your image in Photoshop. Click ‘File‘ and then ‘Open‘. Choose your photo. It’s important to use a high-quality photo for best results.
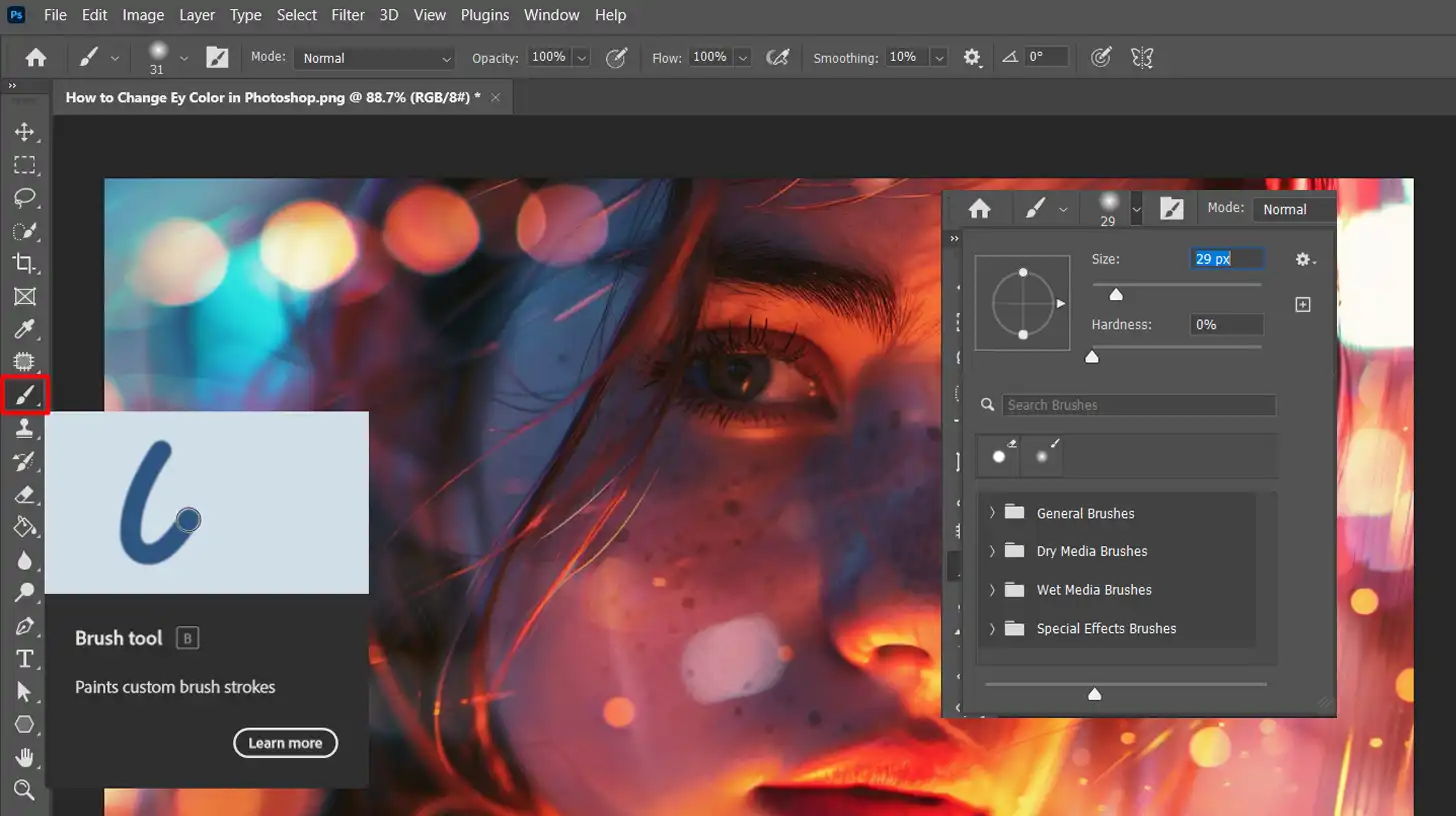
Using the Brush Tool
Now, select the Brush Tool from the toolbar. You should adjust the brush size, making the brush smaller than the iris. This way, you’ll have more control over the eye color change.
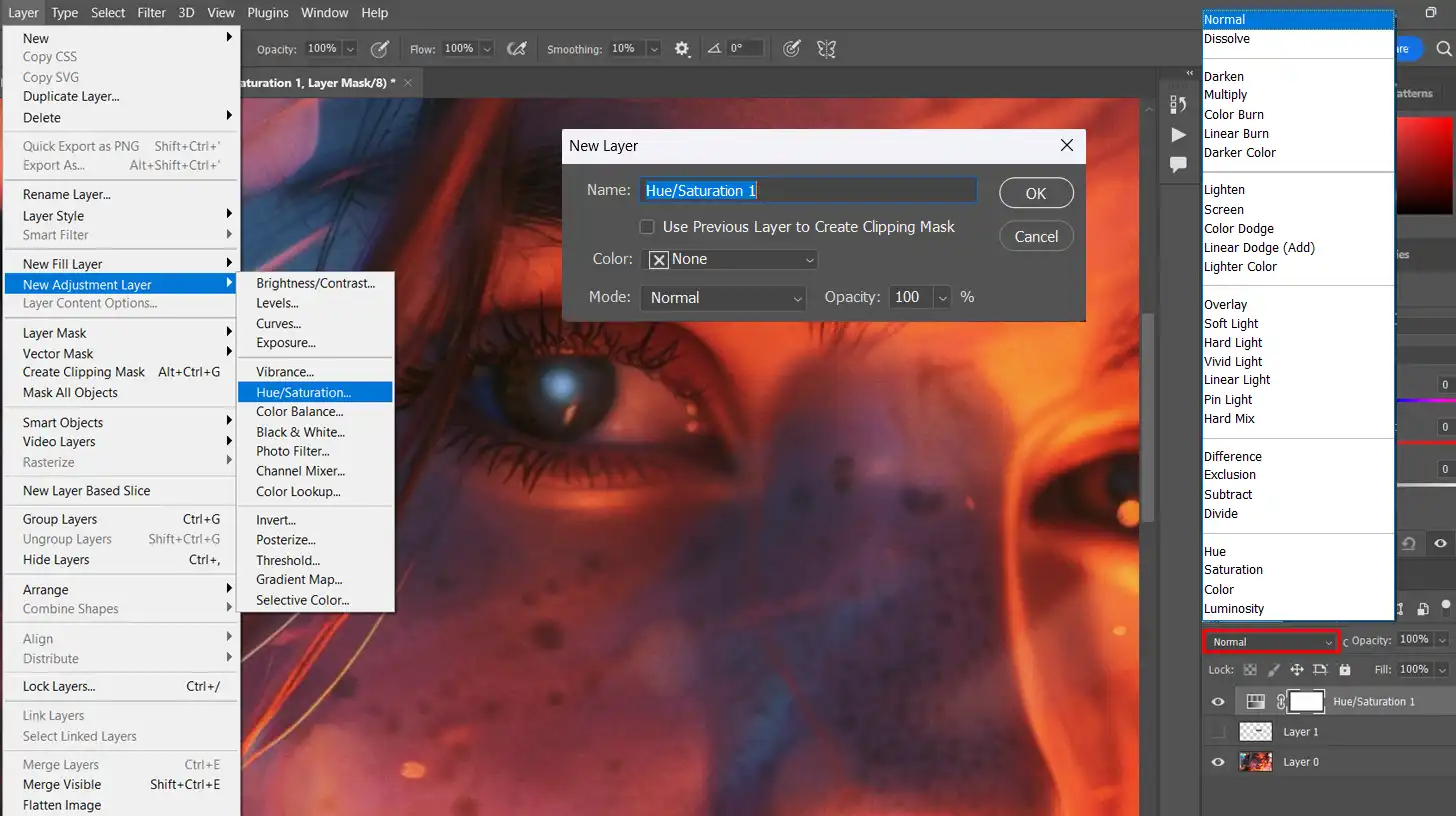
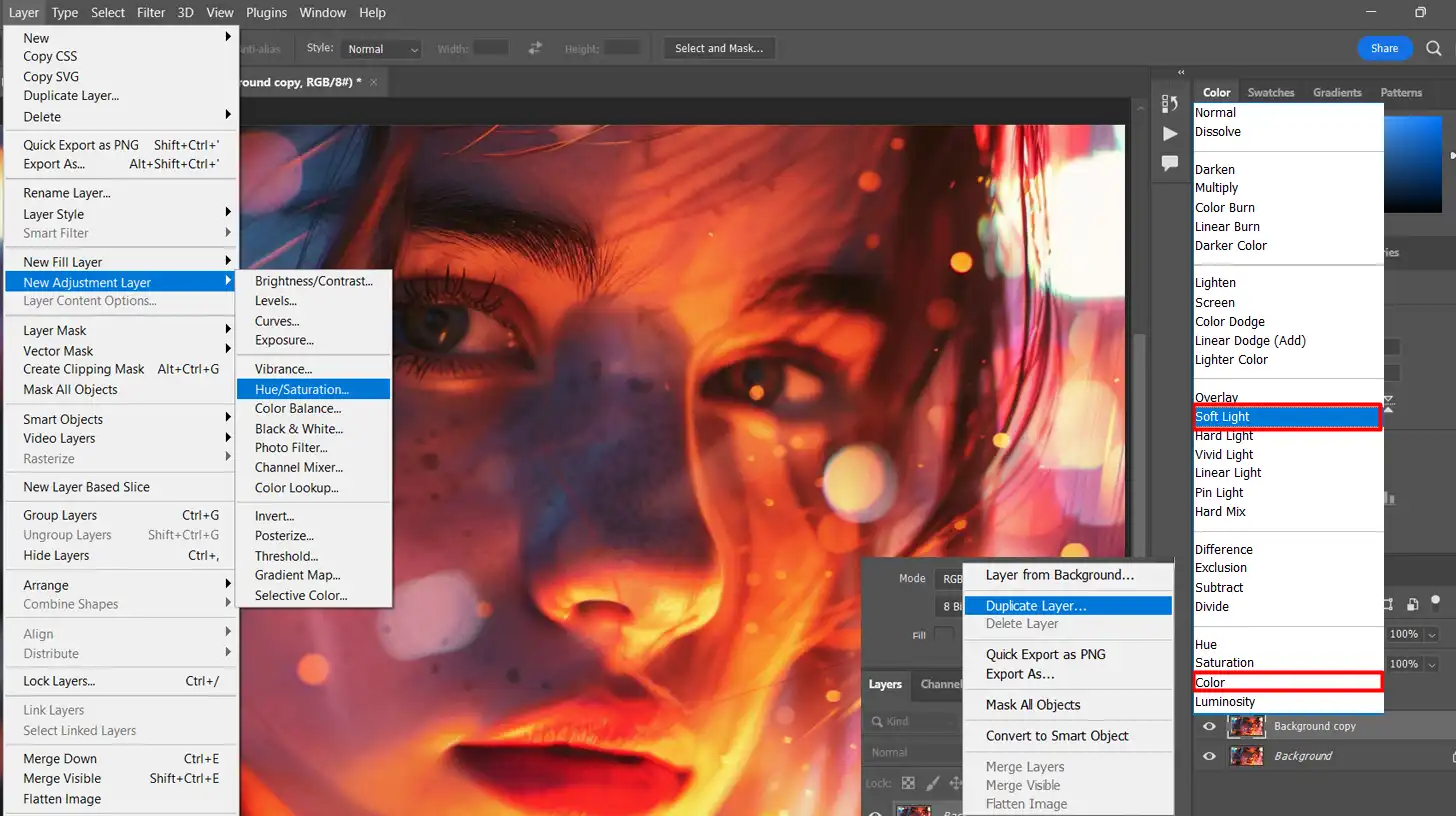
Creating an Adjustment Layer
Next, create an adjustment layer:
Go to the 'Layers Panel' and click 'New Adjustment Layer'.
Choose 'Hue/Saturation’. This adjustment layer will help you modify the eye color without affecting the original detail.
Applying the Layer Mask
After creating the adjustment layer, apply a layer mask over it:
In the Layers Panel, click on the layer mask icon.
Make sure the foreground color is set to black.
Use the brush tool to paint over the other eye, this reveals changes only in this area.
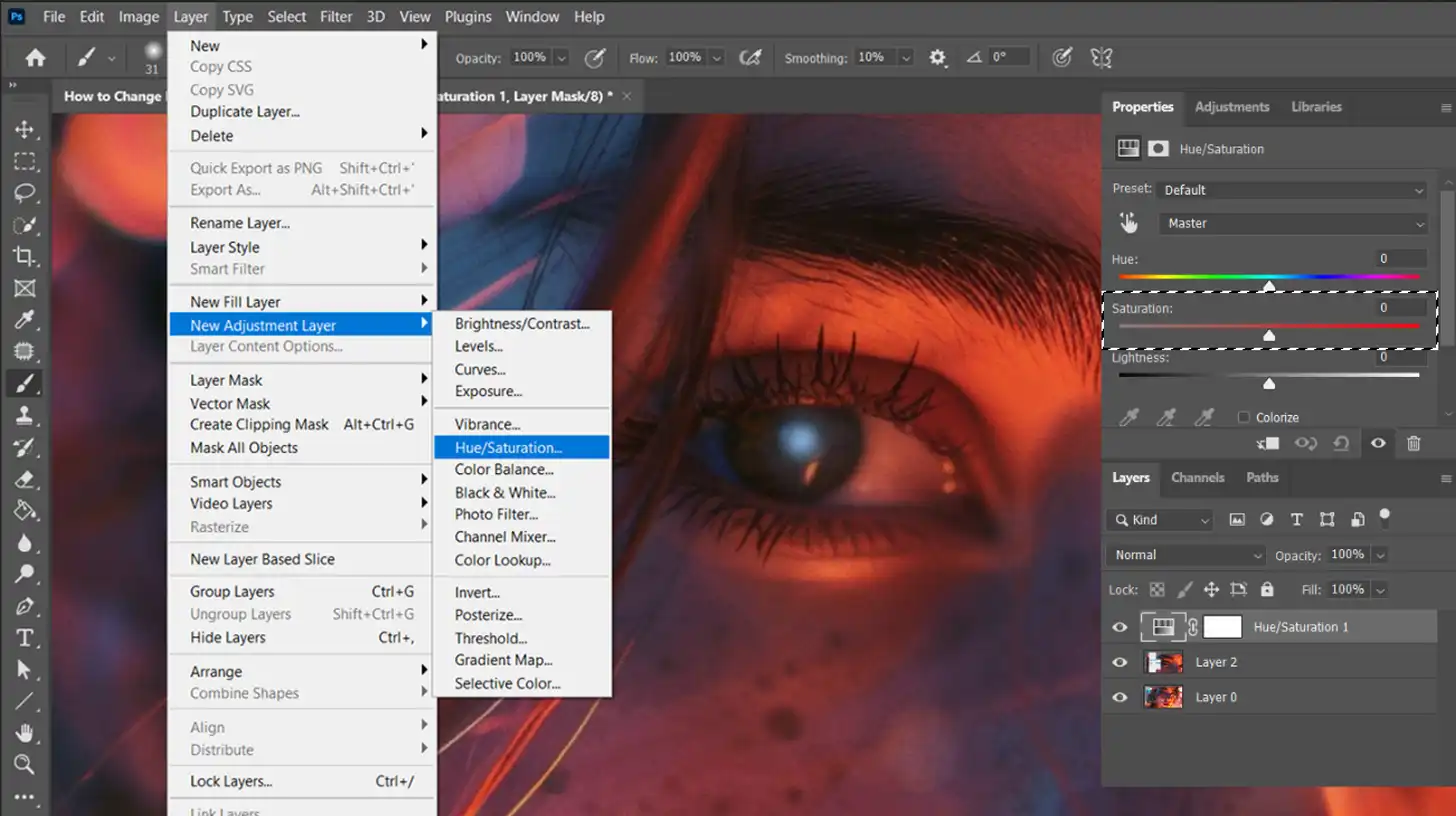
Fine-Tuning the Change Color
To refine the change eye color process:
Use the hue slider in the Adjustments Panel.
Play with saturation and lightness sliders to achieve a natural look.
Make sure to zoom in using the Zoom Tool for precise adjustments.
Pro Tip: If you want to add a touch of realism, try adding a slight white highlight border inside the iris. It gives the eyes a three-dimensional effect.
To refine the color change, use the quick selection tool to precisely select the iris before making adjustments. The quick selection tool ensures a more accurate and natural look.
Advanced Techniques for Changing Eye Color in Photoshop
For more precise and creative results, try advanced techniques for changing eye color.
Before diving into the advanced techniques, let’s compare the different methods you can use to change eye color in Photoshop.
This table highlights significantfeatures and best use cases for each technique, helping you choose the most suitable approach for your project.
Technique
Description
Hue/Saturation Adjustment
Changes the hue and saturation of the eye color for a different look.
Blending Modes
Uses modes like ‘Overlay’ and ‘Soft Light’ to blend colors naturally with the original eye texture.
Multiple Adjustment Layers
Combines different layers for fine-tuning color, brightness, and contrast separately.
Using the Hue/Saturation Adjustment
Let’s dive right in. To change eye color in Photoshop, start with the hue/saturation adjustment. Open your image.
Then, select an adjustment layer. Click on ‘Hue/Saturation‘. Now, here’s where the magic happens. Use the color sliders to alter the eye color.
Keep this handy tip in mind: play around with the saturation and lightness levels. These adjustments make a different color pop or look more natural.
Blending Modes for Realistic Results
Alright, let’s talk about blending modes. They provide realistic results when changing eye color.
After you apply the hue/saturation, go to the blending modes drop-down menu in the Layers Panel.
Try modes like 'Overlay' or 'Soft Light'. These blend modes mix the new color with the original eye texture.
Remember, a subtle touch creates natural-looking results.
Here’s a quick check: is the color too intense? Drop the opacity until it looks just right.
Combining Multiple Adjustment Layers
Don’t stop at one layer. Combining multiple adjustment layers adds depth. After the first hue/saturation adjustment, create another one. Use this layer to fine-tune details, like brightness or contrast.
Multiple layers let you experiment without losing the original changes. This method is flexible.
Let’s put this into perspective: you can change new eye color, add shadows, and highlight details all in different layers.
Pro Tip: Use the lasso tool to select the iris before applying adjustments. Lasso tool keeps the changes precise and avoids affecting other areas.
When combining multiple adjustment layers in Photoshop, consider the principles of composition photography to ensure that the final image has a balanced and aesthetically pleasing look.
For even more control, consider using the Photoshop masking feature to isolate the iris and make your edits non-destructive.
Common Mistakes and How to Avoid Them while Changing Eyes in Photoshop
Changing the new eye color in photos can be tricky.
Many times, beginners make common mistakes that can be easily fixed with a bit of knowledge.
Over-Saturation
One of the most common issues is over-saturation. You might be tempted to saturate colors too much to make them stand out. However, this can make the eyes look unnatural.
To avoid this:
Use the hue saturation adjustment layer sparingly
Adjust the saturation slider carefully
Ensure the eye color blends well with the rest of the image
Unnatural Eye Colors
Choosing an eye color that doesn’t match a person’s appearance can lead to unrealistic results. To maintain a natural look:
Select eye colors that are close to natural shades
Avoid using highly saturated or neon colors
Use the color slider to fine-tune to a natural shade
Ignoring Lighting and Shadows for Changing Eye Color in Photoshop
Lighting and shadows play a significant role in making the eye color look believable. Ignoring this factor is a common mistake. To address this:
Match the light source direction when applying color
Use blending modes like Overlay or Soft Light for a realistic effect
Check the surrounding area for shadows and highlights
Pro Tip: Use non-destructive edits by creating a new layer for your eye color changes. This allows for easy adjustments without affecting the original image.
When ignoring lighting and shadows, you can use the change the color of a layer option to adjust the overall look and ensure the new eye color blends seamlessly with the existing lighting.
And when changing eye color in Photoshop, ignoring lighting and shadows can result in an unnatural look; instead, apply Lightroom editing techniques to ensure the changes blend seamlessly with the surrounding lighting
With these simple tips and techniques, you’re on your way to mastering how to change eye color in Photoshop and Lightroom. By avoiding these common mistakes, your photos will look more professional and realistic in no time!
Tips and Tricks for Better Results on How to Change Eye Color in Photoshop
To achieve more natural and appealing eye color changes, follow these tips and tricks. Let’s start with matching eye color with skin tone.
Matching Eye Color with Skin Tone
Eye color should complement skin tone. Darker skin tones suit browns and hazels, while lighter skin tones go well with blues and greens.
For more natural looks, always consider the relationship between skin and eye color in Photoshop. Using tools like the Hue Saturation adjustment layer can help you achieve the perfect match.
Using Reference Images
Find a high-quality photo to use as a reference. Analyze how the light hits the eyes, and notice the subtle gradients and shadows.
Use these details when editing. It’s like following a recipe; each step matters, ensuring realism.
Experimenting with Different Colors for Changing Eye Color in Photoshop
Before settling on a final color, try different shades. Want to see how you’d look with green eyes? Go for it.
In Photoshop, keep a duplicate background layer to compare different edit versions. This simple trick saves time and boosts creativity. Additionally, using the replace color tool in Photoshop can make this process even more efficient.
Pro Tip: Use the hue saturation adjustment layer for quick tweaks. Create a new layer, change its blend mode to “color” or “soft light,” and paint with a low-opacity brush color. This method ensures a natural outcome.
Important Steps to Change Eye Color in Photoshop with Different Colors:
Select the foreground color you'd like to apply, especially if you're focusing on face editing. Remember, subtle changes can make significant differences in the overall look.
Ensure to work on a new layer to avoid altering your original image directly.
Change blend mode to see immediate effects. Soft light and overlay are excellent starting points.
By carefully matching colors, using reference images, and testing different hues, you’ll achieve realistic and stunning results in no time.
Following these guidelines, there’s nothing stopping you from mastering how to change eye color in Photoshop effortlessly.
Frequently Asked Questions
What steps can I take to change my eye color?
Choose a photo with a clear view of the eyes.
Select the 'Hue/Saturation' adjustment layer from the layers panel.
Use the 'Hand Tool' from this layer to click on the eye color.
Adjust the hue slider to change the color.
How do I edit an eye in Photoshop?
Open your image in Photoshop.
Zoom in on the eye you want to edit.
Select the 'Lasso Tool' to outline the eye area.
Make adjustments using tools like 'Brightness/Contrast', 'Exposure', or 'Vibrance' to enhance the eye.
How to paint eyes in Photoshop?
Create a new layer to keep your painting separate from the original image.
Select the 'Brush Tool' and choose a soft round brush.
Pick the base color for the eye and paint the iris.
Use darker shades to add depth and highlights for reflections.
What is the method to change red eye in Photoshop?
Open the image with the red eye issue.
Select the 'Red Eye Tool' from the toolbar.
Double-click on the red eyes in the image to correct the color automatically.
If needed, fine-tune the correction using the 'Healing Brush Tool'.
$2,061.00Original price was: $2,061.00.$1,061.00Current price is: $1,061.00. 27585
Download Your Free Guide Now!
Discover the secrets of photography with our printable guide! Master essential techniques like aperture, shutter speed, and ISO to create stunning images. Get your free printable PDF now and start turning your snapshots into masterpieces!