How to Add Texture to Text in Photoshop for Creative Designs
How to Add Texture to Text in Photoshop for Creative Designs
Ever wondered how to add texture to text in Photoshop to make your designs stand out?
Whether you’re designing a poster, creating a social media graphic, or just experimenting with your creativity, adding texture to your text can bring a whole new dimension to your work.
Imagine transforming plain text into something that grabs attention and holds it.
In this guide, I’ll walk you through the simple steps to how to add texture to your text in Photoshop, making it both eye-catching and memorable.
Stay tuned, because by the end of this article, you’ll be able to enhance your projects with textures that pop!
Table of Contents
Preparing Your Text Layer
Working with text in Photoshop, you must first get yourtext layerset up. It’s significant for the rest of the process.
We will walk through it step by step.
Creating a New Document
Open Photoshop and go to File > New. You create a new document here.
Width and height are important; remember, higher resolution means more details.
For print, aim for 300 dpi. For web, 72 dpi works well.
Adding and Formatting Text
Once your document is ready, grab the Text Tool. Click anywhere within the document to create a text box.
Type your desired text.
Use the options bar to select font style, size, and color.
Bold or italicize to highlight parts of your text.
Use the Layers Panel to manage your typography layer. Unlock it if necessary.
Applying Texture to Your Text
To give your text some flair, you need to learn how to add texture to text in Photoshop.
This makes the text visually appealing.
How to add a Texture to an Image
Start by selecting your preferred texture image. Go to File > Place Embedded and navigate to your texture file.
Make sure the texture extends over your entire text.
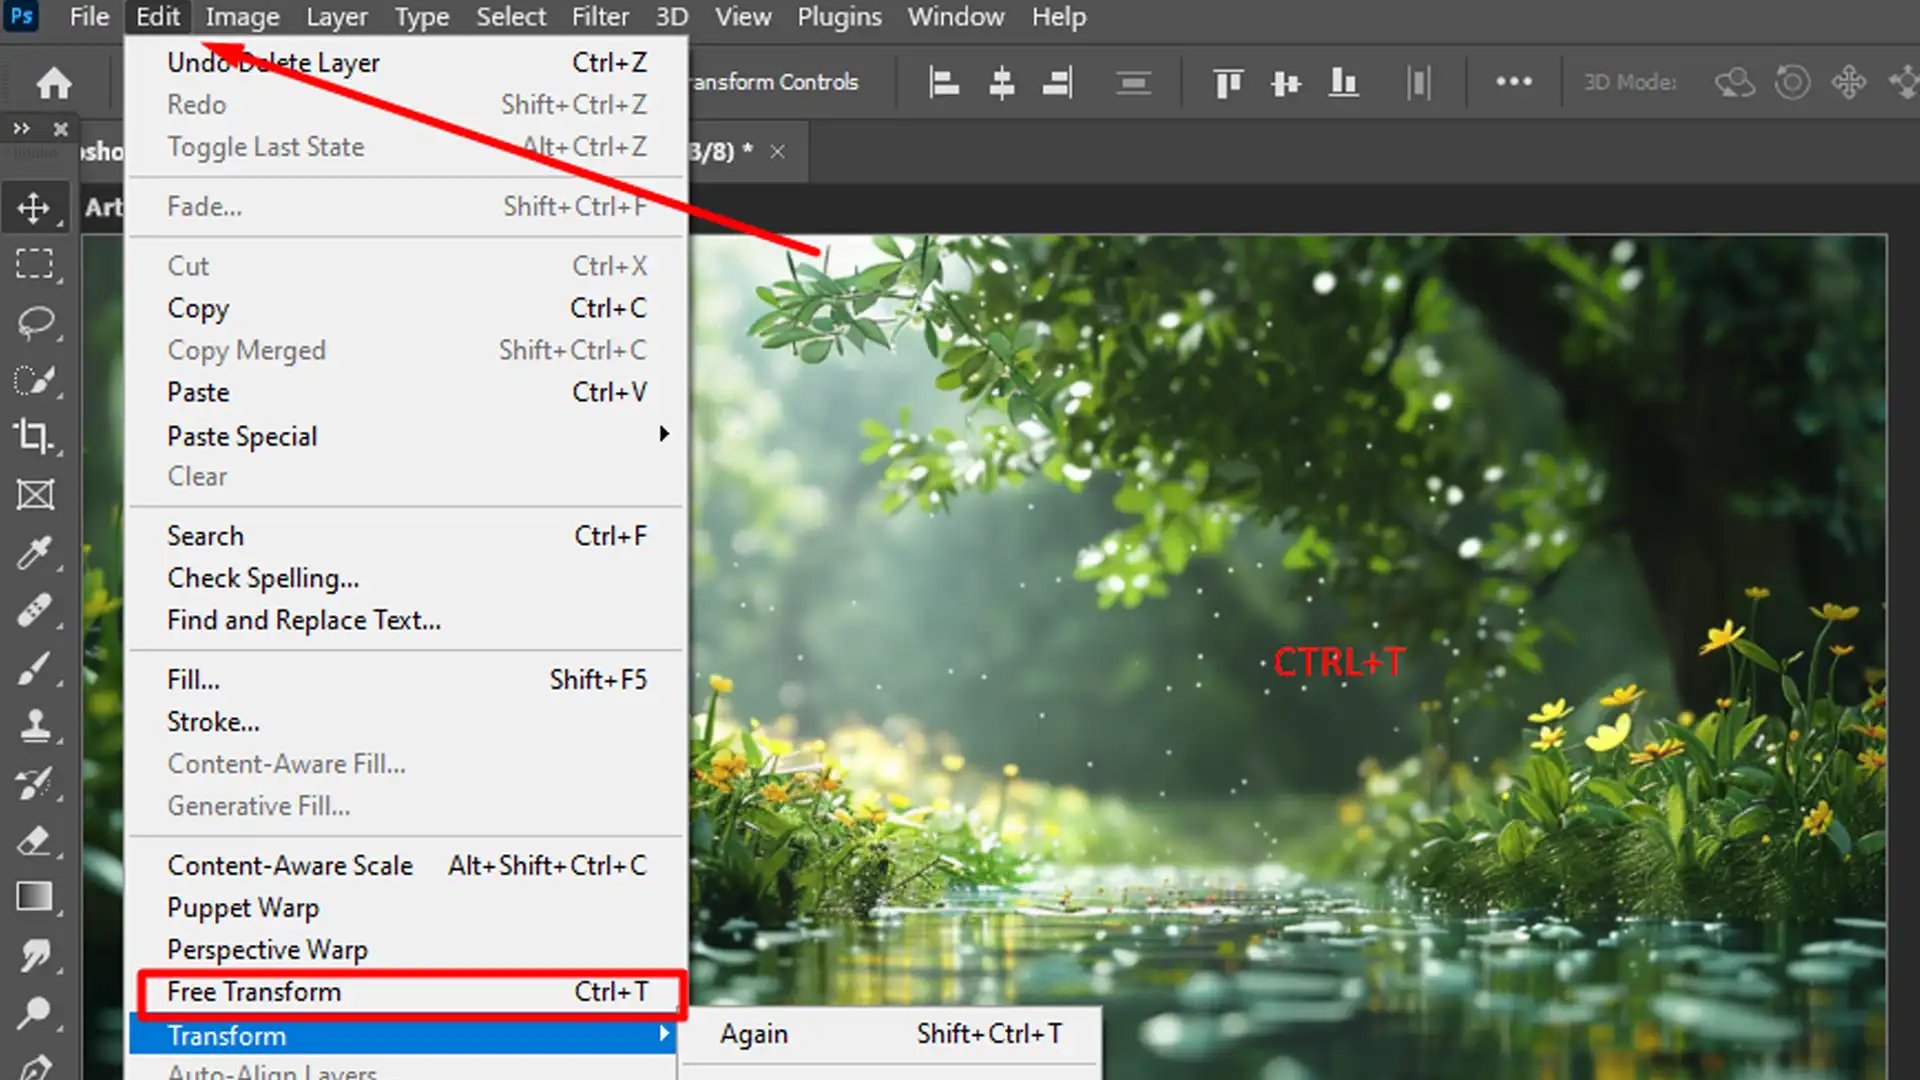
Use Free Transform (Ctrl + T) if resizing is required.
Creating Clipping Mask
With your texture selected, place it directly above the text layer. Right-click the texture and select create clipping mask.
This confines the texture within the text boundaries.
Observe how the texture conforms to your text edges.
Use multiple different textures to add more dimension.
Refining the Texture
Blending and refining make your typography layer even more compelling. It involves subtle tweaks that make a big difference.
Adjusting Blending Modes
Highlight your textured layer in the Layers menu.
Try different blending modes until you find one that suits your design.
Soft Light and Hard Light are good starting points.
Experimenting with Opacity
Sometimes the texture might be overpowering. Adjust the opacity slider to make it subtler.
Located right above the Layers Panel.
Lower values make effects softer while higher ones make them pronounced.
Final Adjustments for Adding Texture Effects to Text in Photoshop
Complete your text layer by applying final touches. This ensures everything looks polished and professional.
Using Layer Masks
These masks help control where your textures appear.
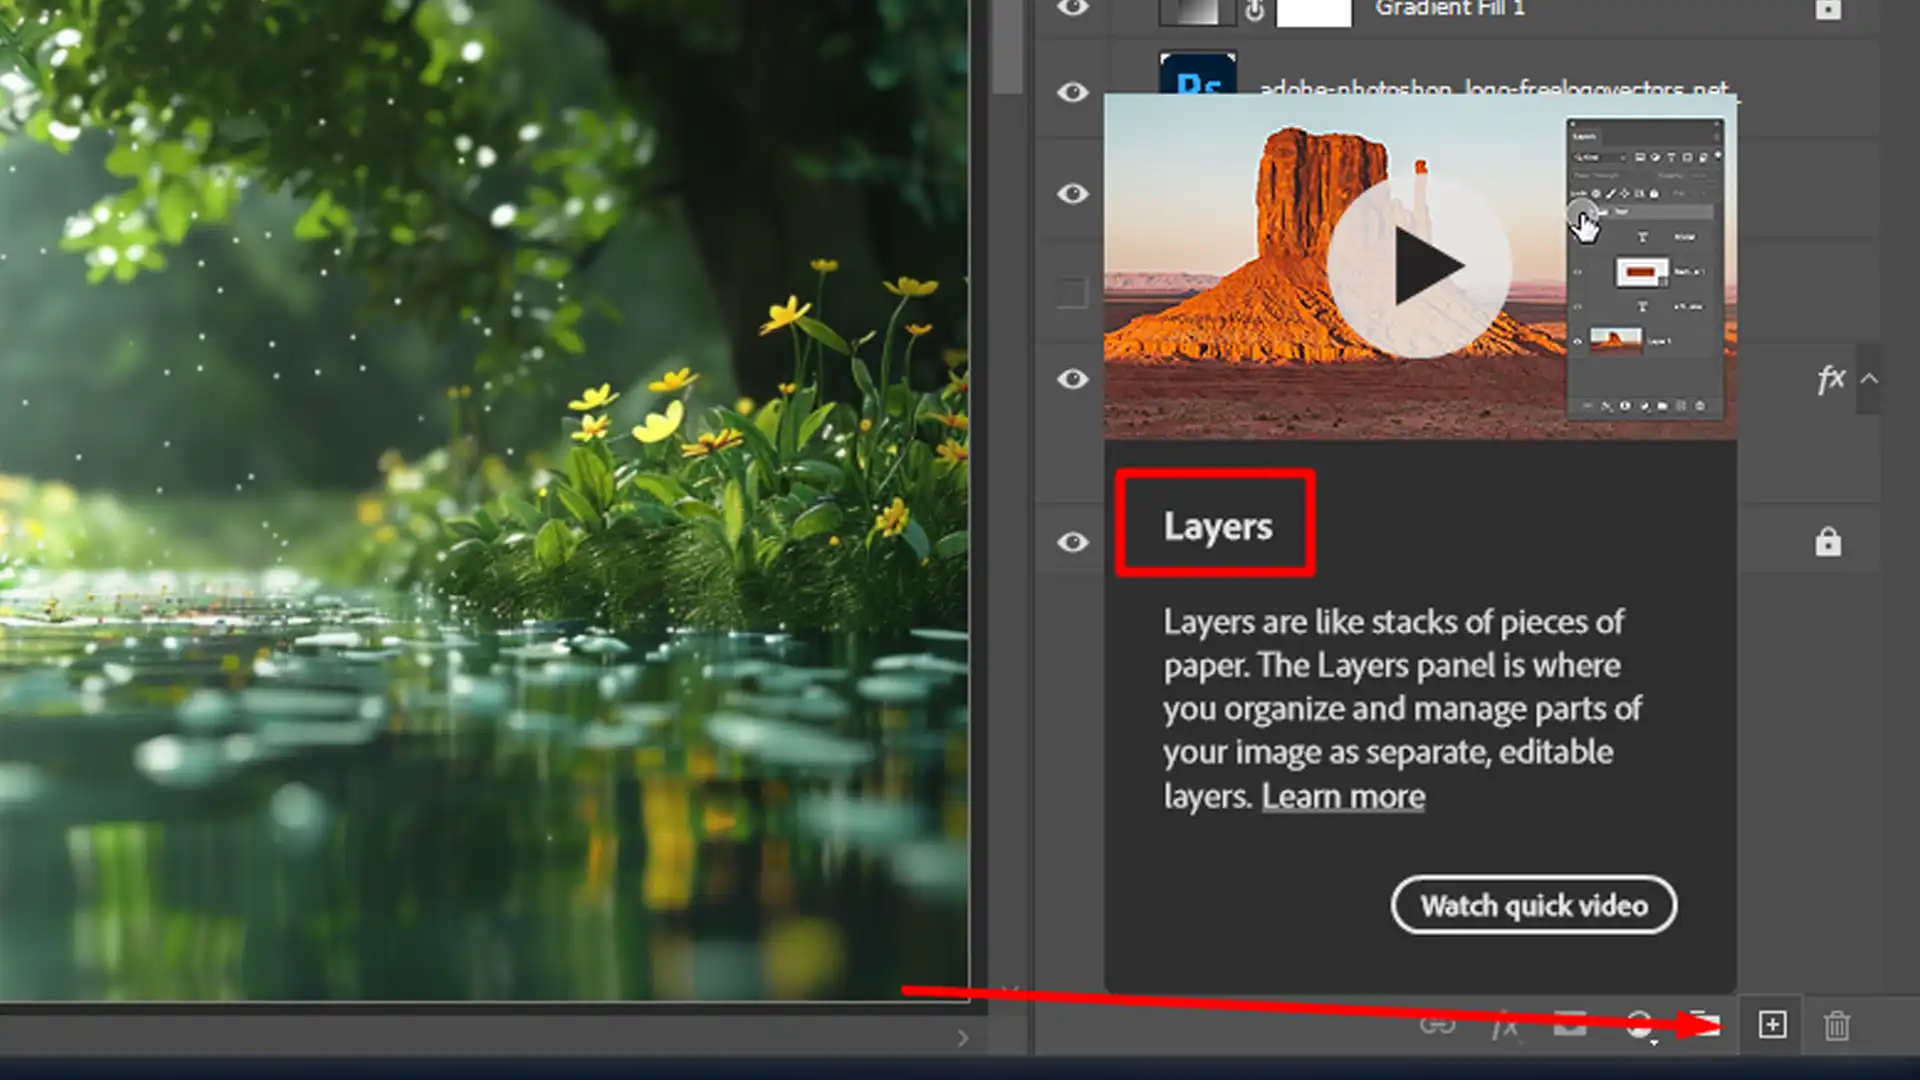
Click the Layer Mask Icon at the bottom of the Layers Panel to add a mask to your texture.
Paint black on the mask to hide parts of the texture.
Use a soft brush for gentle fades, hard one for sharp lines.
Saving Your Work
Saving comes last. Go to File > Save As, and save your file as a Photoshop file for future edits or as a PNG file for a shareable format.
Consider using a transparent background if saving as PNG.
Pro Tip: Always duplicate your original document before making major changes. This allows an easy undo if things don’t go as planned.
Choosing and Adding a Texture Layer
In this section, we’ll guide you on how to select and incorporate the perfect texture to enhance your designs.
Selecting the Right Texture
Understanding how to add texture to text in Photoshop is not difficult. The first step involves selecting the right texture. You can choose from a variety of textures like watercolor texture, grunge, or even fabric.
When you’ve made your choice, ensure it matches the mood and message of your project. Open Adobe Photoshop and create a new document.
Keep in mind that starting with a white background layer helps you see changes clearly.
Importing the Texture into Photoshop
Use smart objects for your texture layers. They keep the quality intact when you resize, making your workflow much smoother.
Step
Description
Import Texture
First, import your chosen texture. Go to File > Place Embedded and select your texture image. The texture will appear as an additional layer above your background layer. Use the Free Transform tool to adjust the texture size and position. Hit Enter to apply the changes.
Create Clipping Mask
Create a clipping mask by placing your textured layer above the typography layer. Right-click on the layer and select “Create Clipping Mask.” This confines the texture within the boundaries of your text. If you want more texture to the text, you can duplicate the textured layer and adjust its blending.
Refine Texture
Refine the texture by adjusting the blending of your textured layer. Soft Light and Hard Light often work well. You can play around until you achieve the desired effect. Adjust the opacity slider for a subtler look.
Add Layer Masks
To make parts of your texture disappear, add layer masks. Click on the “Add Layer Mask” icon at the bottom of the Layers menu. Use the Brush Tool to paint black on areas you want to hide. You can use different brush sizes and shapes to refine the edges.
Save Your Work
Save your work. It’s always a good idea to save in both the PSD format for future edits and as a PNG file if you need a transparent background.
Using the Layers Panel while Adding Texture Effects to Text in Photoshop
The Layers Panel is your control center in Photoshop. Let’s explore how to use this tool to enhance your workflow and creativity.
Mastering Layer Techniques
Layers are like sheets of paper stacked on top of each other. Each layer can have different elements like photos, text, or colors.
These layers help you edit parts of your image independently. Think of them as a way to keep your work organized.
Layers allow you to see what’s on top and what’s beneath. The top layer is visible first, but you can change which layers show by rearranging them in the Layers Menu. To move a layer, simply drag it up or down in the panel.
To create a new layer, click the “New Layer” button at the bottom of the Layers menu. You can delete the existing layer by selecting it and pressing the delete key.
It’s important to keep your layers organized. Name each layer according to its content. To rename a layer, double-click on the layer’s name and type the new name.
Enable the visibility of a layer by clicking the eye icon next to it. Hide it by clicking the eye again. This helps focus on one part of your project at a time without distractions.
Another useful feature in the Layers menu is the Clipping Mask:
Place a texture appearing layer above your image and create a clipping mask. This confines the texture to the limits of the underlying layer. It’s perfect for adding texture only where you want it.
Smart objects offer flexibility in editing:
Convert a raster layer to a smart object by right-clicking and selecting “Convert to Smart Object”. This maintains the quality of the layer during resizing. It also allows non-destructive editing.
Layer styles add effects to your layers:
Select a layer and click the "fx" button at the bottom of the Layers Menu. You can add shadows, glows, and more. These styles help make your layers more visually appealing.
For precise adjustments, use vector masks:
They work similarly to layering masks but offer sharp, clean edges using paths. Create a vector mask by clicking the button next to the layer mask button.
To undo a mistake, use the Undo Tool or press “Ctrl+Z“. It’s a quick way to correct errors without affecting your entire image.
Pro Tip: Use smart objects for texture layers. This keeps the quality intact during resizing and transformations. Happy creating!
Applying Texture to the Text Layer
Ready to take your text layers to the next level? Let’s dive into two effective methods that will elevate your designs in Adobe Photoshop.
Clipping Mask Method
I call this the ‘Sandwich Trick,’ because, like making a sandwich, you have to stack your elements correctly.
First, write your text.
Then, place your textured layer above the typography layer.
Right-click on the layer and choose “Create Clipping Mask.” Your texture will automatically “clip” to the shape of your text. Simple, right?
If you need to adjust the texture, just use the transform tool (Ctrl + T or Cmd + T). You can move it around, resize it, or rotate it. Once happy, hit Enter to apply the changes.
Blending Mode Method
The second trick is the Blending Mode Method, and it’s as easy as pie.
First, place the texture layer directly above the typography layer.
Select the texture layer and look for the drop-down menu labeled “Normal” on the Layers Menu. This is where the magic happens!
Change the blending. I often use “Overlay” or “Multiply.” Experiment with different options to see what fits your design best. This method keeps your layers separate, which is helpful if you want to make adjustments later.
Extra Tips for Both Methods
Layer Mask: Adding a layer mask to either method allows you to refine which parts of the texture show through the text.
Double Click: When applying effects or styles, click twice on the typography layer to access Layer Styles such as Drop Shadow or Stroke.
Smart Object: Convert your typography layer to a smart object to preserve quality and make non-destructive edits.
Pro Tip: Need a crisp, clean edge on your textured text? Use a vector mask instead of a raster mask for the sharpest results.
To enhance your design further, consider using the warp text feature to create unique effects and better integrate the texture with your text layer
Adjusting the Texture Effect
Now that we understand the basics, let’s talk about fine-tuning our texture effects. It’s like cooking, you want to get that perfect balance of flavors. In Photoshop, that means tweaking a few settings to make your text look just right.
Fine-Tuning the Blending Mode
This mode is your best friend when it comes to making your text pop. You can find it in the Layers Menu on the top left. Just click on the drop-down menu and you’ll see a list of options. Each mode changes the way your texture blends with the typography layer:
Overlay: It adds a soft, subtle blend.
Multiply: Makes the texture more dominant.
Screen: Gives a brightening effect.
Experimenting with these modes only takes a second, but it makes a big difference. Simply select one and see how your texttransforms. Just like changing spices in a recipe, small adjustments lead to amazing results.
To refine the texture effect, you can adjust the opacity of the texture layer to achieve a more subtle look, allowing for a transparent text effect that blends seamlessly with your background.
Using Adjustment Layers while Adding Texture Effects to Text in Photoshop
Adjustment layers are like secret ingredients, they add that extra magic touch. Click on the Adjustment Layer icon at the bottom of the Layers Panel.
Options like Brightness/Contrast and Hue/Saturation let you tweak the texture without changing the original image.
Go to the Layers Panel.
Click the Adjustment Layer icon.
Select Brightness/Contrast or Hue/Saturation.
Adjust sliders to see instant changes.
Pro Tip: Don’t forget to use the bounding box when resizing your texture. Hold Shift to maintain proportions, ensuring your texture looks crisp and clean. If you want sharp edges, consider adding a vector mask.
And there you have it! Follow these steps, and you’ll master the art of applying textures in Photoshop.
What's the Process for Applying Texture to Text in Photoshop?
Open your project and select the text layer you want to modify.
Go to the Layers panel, right-click on the layer, and choose 'Blending Options.'
In the Layer Style dialog box, click on 'Pattern Overlay' on the left-hand menu.
Choose a pattern that suits your design from the pattern library or import your own.
Adjust the scale and opacity of the pattern to blend it naturally with your text.
Click 'OK' to apply the texture.
How Do I Add Grainy Texture to a Text in Photoshop?
Select the typography layer by clicking on it in the Layers panel.
Go to 'Filter' in the top menu, then select 'Noise' > 'Add Noise.'
In the Add Noise dialog box, choose the amount of noise and select the distribution type (Uniform or Gaussian).
Check the 'Monochromatic' box if you want the noise to be in grayscale.
Click 'OK' to apply the grainy texture to your text.
How to Rough Up Text in Photoshop?
Ensure your typography layer is selected in the Layers panel.
Go to 'Filter' > 'Distort' > 'Ripple' to give the text a rough appearance.
Adjust the settings in the Ripple dialog box to achieve the desired roughness.
Experiment with other distort filters like 'Displace' or 'Wave' for different effects.
Apply the changes and fine-tune by adjusting the layer's opacity or blending if needed.
What's the Method for Adding Texture Effects to Text in Photoshop?
To add texture effects to text in Photoshop, start by typing your text and converting it to a shape layer. Then, import your desired texture image and position it above the text layer.
Apply a clipping mask to the texture layer to confine it within the text. Adjust the texture’s size, opacity, and blending mode to fit your design.
Enhance the effect with layer styles and adjustment layers as needed. Finally, save your work in the desired format.
In conclusion, learning how to add texture to text in Photoshop has significantly elevated the quality of my designs.
It’s a simple yet powerful technique that can make your work stand out.
By experimenting with different textures and blending modes, I’ve been able to create visually striking text that captures attention and conveys the intended message more effectively.
If you’re eager to enhance your Photoshop skills, I highly recommend checking out my Photoshop course for more in-depth tutorials.
Additionally, if you’re interested in mastering Lightroom, be sure to explore my Lightroom course.
Happy editing!
If this article has helped you, then Like and Share it with your friends
$2,061.00Original price was: $2,061.00.$1,061.00Current price is: $1,061.00. 27584
Download Your Free Guide Now!
Discover the secrets of photography with our printable guide! Master essential techniques like aperture, shutter speed, and ISO to create stunning images. Get your free printable PDF now and start turning your snapshots into masterpieces!