High Resolution Images Size: Optimal Size and Quality Guidelines
High Resolution Images Size: Optimal Size and Quality Guidelines
When it comes to working with high resolution images size, understanding the fundamentals is key.
These images are crucial for capturing fine details and ensuring clarity, whether for print or digital use.
In this article, I’ll explain what makes an image high resolution, how to determine its quality, and the best practices for optimizing and utilizing these images effectively.
Whether you’re a photographer, designer, or just curious, you’ll find valuable insights to enhance your workflow and image quality. Let’s dive in!
Table of Contents
What is a High Resolution Image?
A high image resolution packs more pixels into the same space. Think of it as cramming more tiny squares (pixels) into an inch. More pixels mean clearer and sharper images.
This is important because higher resolution means more detail.
You can see tiny details without the image getting blurry.
Core Concepts
Main consideration to keep in mind:
More pixels per inch
Clearer and sharper images
Higher detail visibility
Common Uses of High Resolution Images
High resolution images are used in many fields:
Printing: Posters and brochures need high resolution images to look crisp and clear.
Digital Art and Graphic Design: Ensures no details are lost.
Professional Photography: Provides the best details.
Pro Tip: Always save a copy of your original image before editing. This way, you won’t lose your high-quality work. Additionally, consider using tools like Lightroom or Photoshop for editing to maintain the integrity of your images. These platforms offer essential tools and Photoshop shortcuts that can enhance your workflow.
Utilize Photoshop Upscale to enhance the quality of images for common uses like detailed prints and digital displays. This tool ensures your high-resolution images meet exacting standards.
How to Determine High Quality Images Resolution
Determining the resolution of high-quality images is crucial for ensuring that they meet the required standards for specific uses, such as printing, professional publishing, or high-definition displays.
Resolution, often measured in pixels per inch(PPI), directly affects the clarity and detail of an image.
Understanding Pixels and DPI
Every digital image is made up of tiny squares called pixels.
More pixels mean higher resolution.
Simple enough, right?
Now, DPI stands for dots per inch. It measures how many dots fit into one inch of an image when printed.
DPI: Dots per inch are important for print quality.
Higher DPI means more detailed prints.
Lower DPI means low-resolution prints.
Tools to Check Image Resolution
So, how do we check if our image has high resolution? You can use various tools and software.
For instance, Adobe Photoshop and Lightroom both show the resolution of your image.
Open your image in an editing program, and you’ll see options like DPI and total pixels listed clearly.
Additionally, knowing how to use Lightroom shortcuts can speed up your workflow significantly.
Top Tools
Here are some top tools for editing images and photos:
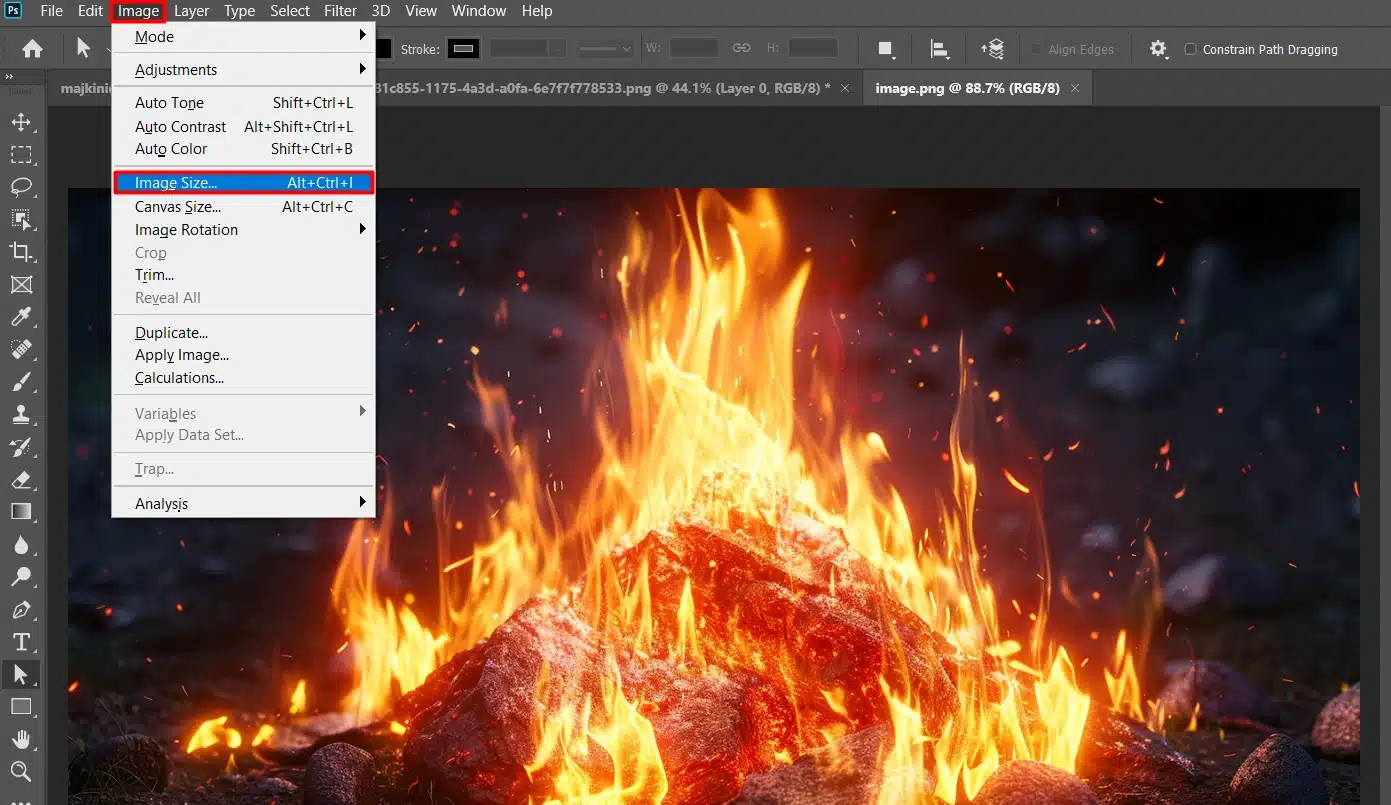
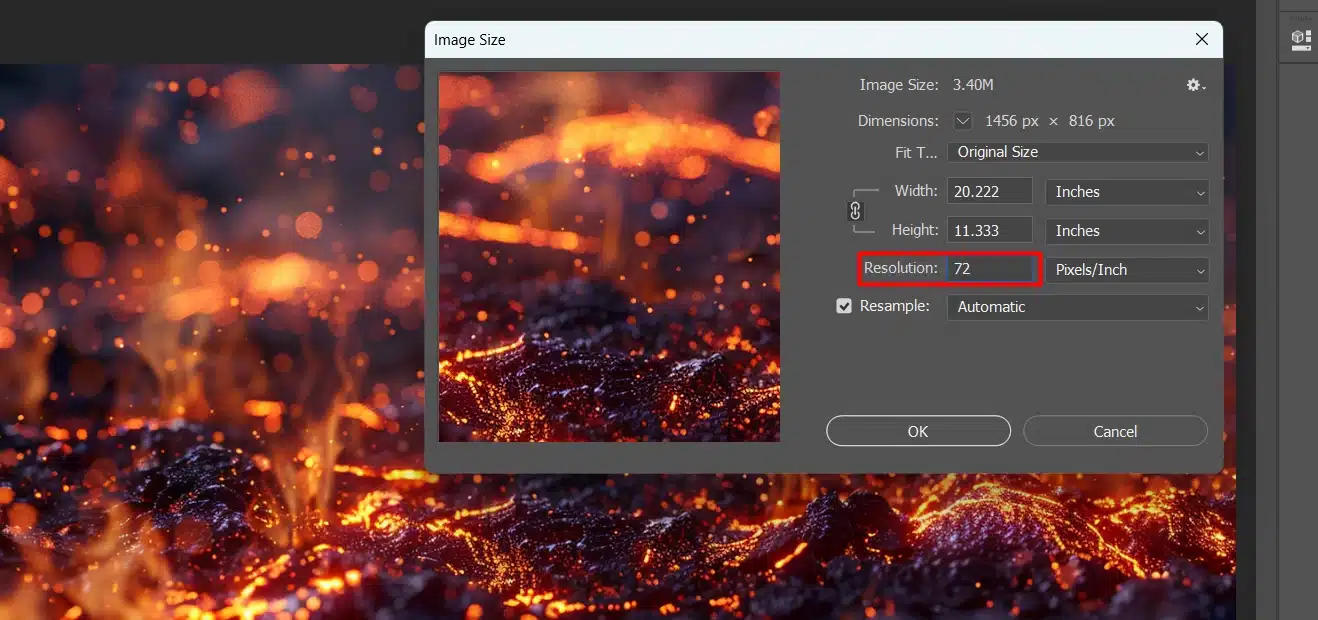
Adobe Photoshop: Go to 'Image'> 'Image Size' to check pixel dimensions and DPI.
Lightroom: Check under 'File' information for similar details.
Online Tools: Websites like 'ImageMagick' can also help you verify resolution details.
Pro Tip: Always save a copy of your original file before making any edits. This keeps your high-resolution photo untouched, so you can always return to the original if needed.
Also, the aim is to produce 300 DPIs for printing high-quality images; this is generally considered high resolution for printed media. If you’re working with large batches of images, learning how to batch edit can be a real time-saver.
Ideal High Resolution Images Size
When working with high-resolution images, it’s crucial to understand the ideal dimensions and resolutions for different use cases. Here’s a quick guide to help you determine the best settings for print, web, and social media:
Use Case
Resolution (dpi)
Ideal Dimensions (pixels)
Notes
Print
300
4800×3200 or higher
Best for posters, brochures, books
Web and Online
72
1920×1080 (HD), 1280×720 (SD)
Quick load times, good quality
Social Media
96
1080×1080 (Instagram square)
Balanced detail and load times
Print vs. Digital
When you deal with high-resolution images size, one size doesn’t fit all.
Think about where you’ll use the image:
Print
Higher resolution is a must for print. Posters, brochures, and books need 300 dpis (dots per inch).
This gives you clear picture elements that don’t get blurry.
Digital
For digital images on screens, you can lower the resolution. Usually, 72 dpi works fine for online use.
Computer screens show fewer pixels than print, so high resolution isn’t necessary.
Remember that high-resolution images look great but take up a lot of storage space.
Recommended Resolutions for Different Uses
Optimal image resolutions tailored for various applications:
Photos for print: Aim for 300 dpi. This gives you the best detail. Brochures, posters, and other printed images will look great. Remember, higher resolution means larger file format sizes. This is important when storing or sharing high-resolution images.
Images for web and online use: 72 dpi is your magic number. It ensures good quality without long load times. Your website will still look sharp and clean while keeping file your high-resolution images size manageable. If your website loads quickly, it's a bonus for user experience.
Social media: A resolution of 96 dpi often works well. It keeps enough detail to make your photos pop without slowing loading times. Plus, platforms like Facebook and Instagram compress images anyway.
Pro Tip: Always save an original copy of your high-resolution photos before you resize or edit them.
Trust me; nothing is worse than needing that high-quality image later and realizing you saved it.
How to Resize Layers in Photoshop
When working with high-resolution images, resizing layers in Photoshop can be crucial.
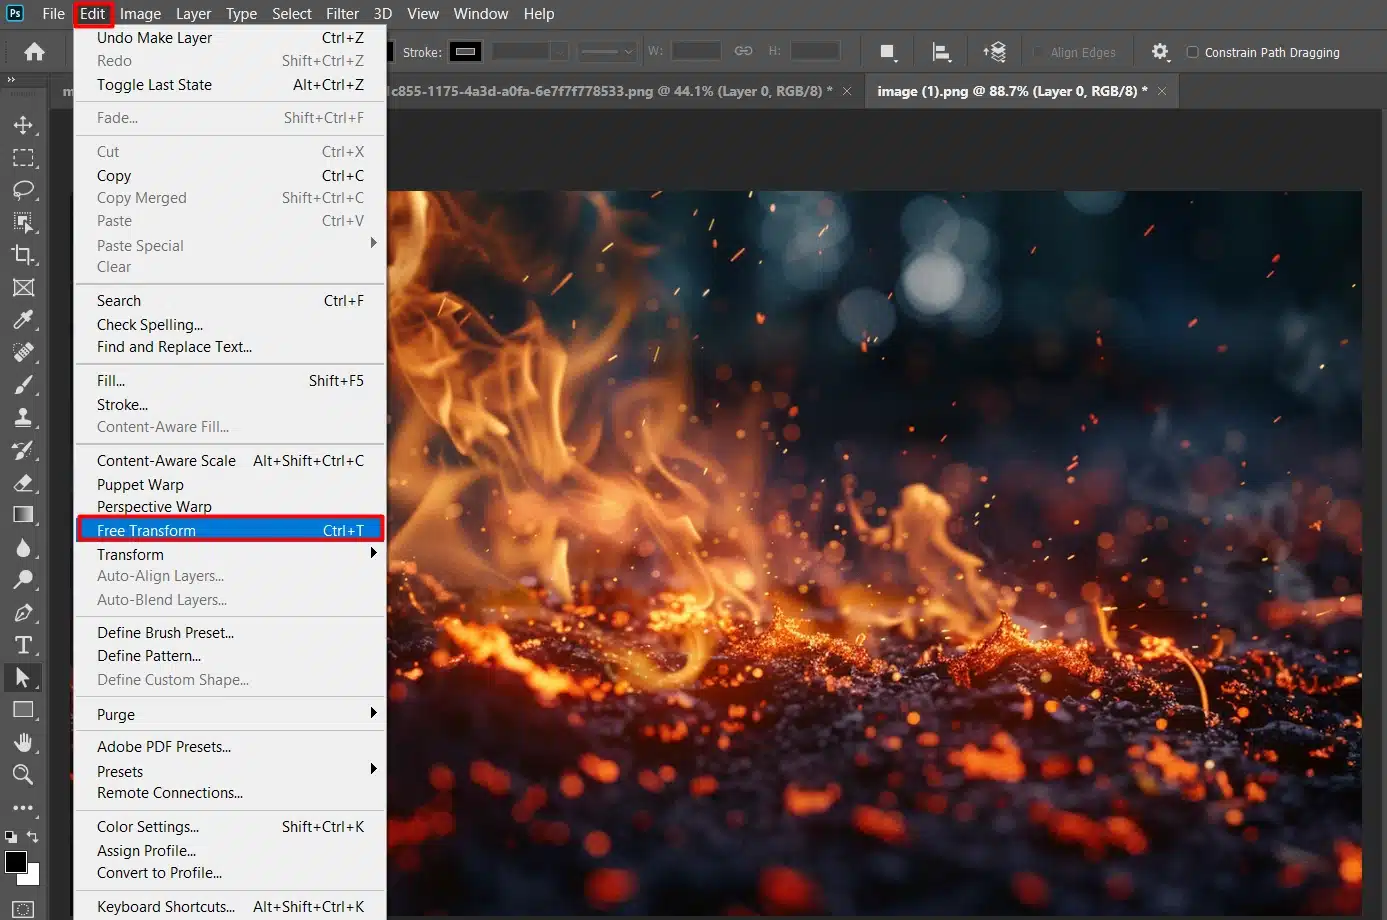
To resize a layer, go to Edit > Free Transform, and then drag the corners while holding the Shift key to maintain the aspect ratio.
This ensures your images remain sharp and clear for print or digital use.
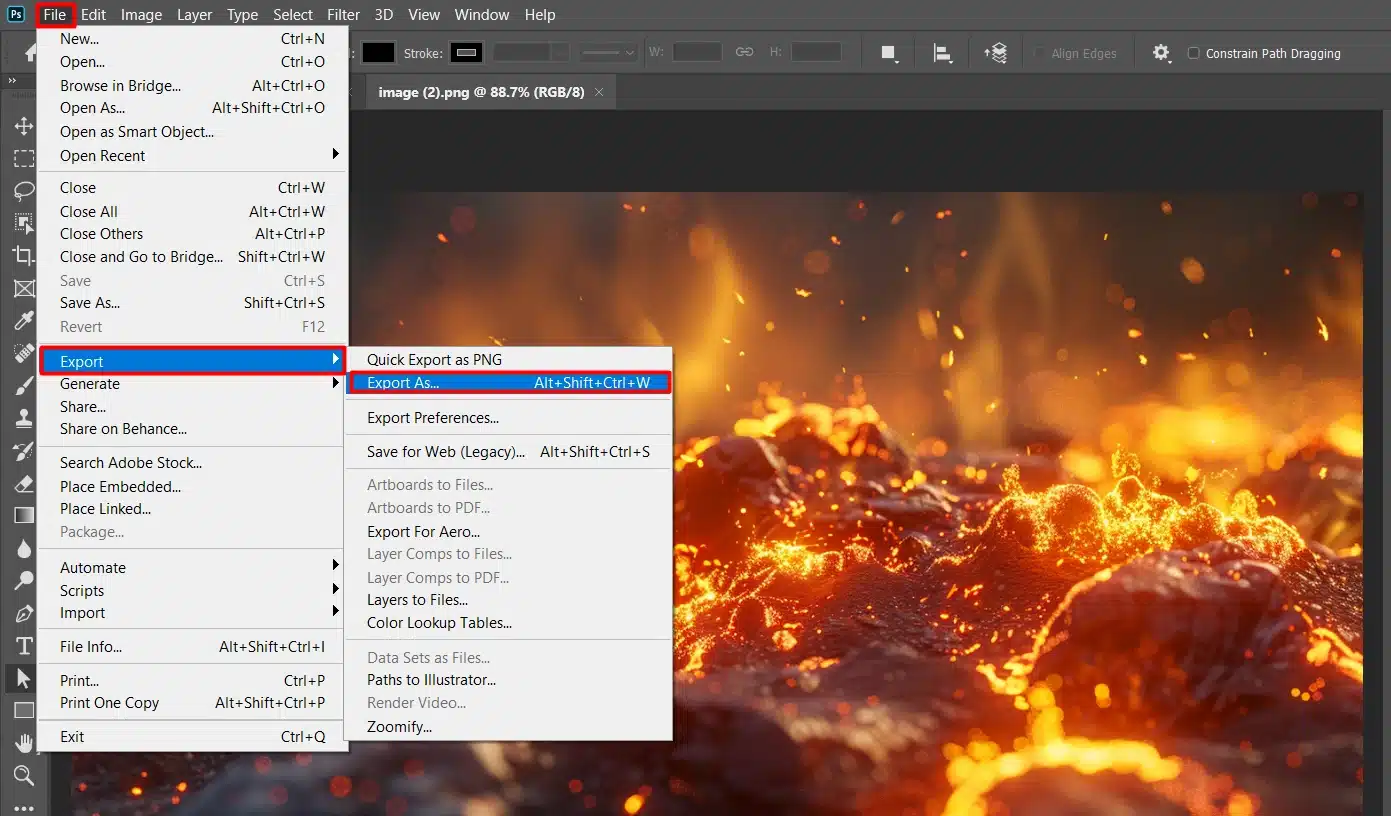
Best Lightroom Export Settings for Instagram
If you’re exporting images for Instagram, using the best Lightroom export settings can make a big difference.
To resize an image, set the resolution to 96 dpi and the longest edge to 1080 pixels.
This keeps your images crisp and ensures quick load times on social media platforms.
Creating high-resolution images involves understanding and utilizing the right tools and techniques to ensure that your visuals are sharp, detailed, and suitable for both digital and print media.
This section will guide you through the process of selecting the appropriate settings for your camera or design software, enhancing images through pre and post processing
Using Professional Cameras
A good camera is key for high resolution images. A camera with 20 megapixels captures more detail than one with 10.
This means your photos will have higher camera resolution and won’t get blurry when enlarged.
More pixels in your camera sensor mean clearer images, especially in printed photos.
Use a good lens; it affects photo quality too. Set your camera to capture RAW files to retain all the data for high quality image.
Pro Tip: Always carry extra memory cards. These images take up more space, so you’ll need the extra storage.
Editing Software Tips
Taking high resolution images is half the battle; now let’s talk editing. Use professional software like Photoshop or Lightroom to fine-tune your images without losing quality.
Import your photo into the software and adjust brightness, contrast, and color balance.
Always check the resolution settings before saving to keep the highest resolution possible.
Save your file in high resolution JPG to maintain quality while keeping the file high-resolution images size manageable.
Effective Strategies
Always use non-destructive editing. Work on a copy of the original file.
Resize your image only if necessary. Keep an eye on pixel dimensions to avoid low resolution images
Export your images with the right settings. Aim for at least 300 dpi (dots per inch) for these images.
Pro Tip: Leverage Lightroom’s presets to speed up your workflow. Save your commonly used settings and apply them to multiple photos at once.
Optimizing High Resolution Images for Web
Optimizing high-resolution images for web use is essential to balance visual quality with website performance.
This section discusses techniques to reduce file sizes without compromising the clarity of your images, ensuring they load quickly and look great on various devices.
Balancing Quality and Load Time
We all love clear images, but high resolution files can slow your website. Why does this matter? Imagine waiting forever for a page to load. Frustrating, right?
So, how do we balance quality and speed? Simple: compression.
High quality images don’t always need to be huge. By reducing the high resolution images size, you keep the image resolution high while making it faster to load. It’s a win-win.
Use the right file format to optimize your images. For the web, formats like JPEG or PNG are your best friends.
They offer a good balance between high resolution and smaller file sizes. Choose wisely, and your visitors will thank you.
Your screen displays fewer pixels than a printed image, so you can afford some compression without losing much detail. Remember, every pixel counts when optimizing for speed.
Best Formats for High Resolution Images Online
Alright, let’s talk formats. JPEG, PNG, and sometimes even GIF.
These are the go-tos for web images. Why? Because they maintain quality while offering flexibility. These images don’t always have to be in their original massive formats.
Compressing them into these web-friendly formats keeps your site speedy.
JPEG is excellent for photos and detailed images. It provides a high-resolution photo with a smaller file size.
PNGs work well for graphics with couple of pixels and transparent backgrounds. These formats brace you for any web display challenge.
Optimizing means ensuring your images look great without dragging down your site’s performance. Keep those file sizes manageable, and your web experience will remain flawless.
Pro Tip: Always make a backup of your high-resolution images before compressing. You never know when you might need that original quality!
Common Mistakes and How to Avoid Them
This section delves into the common pitfalls encountered when dealing with high-resolution images and provides practical advice on how to avoid them.
From excessive file sizes that slow down website performance to improper scaling that can degrade image quality,
Overcompression
We’ve all done it. You want your website to load faster, so you compress your images.
But sometimes, we go too far and end up with blurry images.
High-resolution photos lose their magic when overcompressed.
How to Find the Balance
Use an image editing program like Photoshop or Lightroom. These tools let you compress images without ruining the quality. Aim for a balance between low file size and high resolution.
When in doubt, check the image’s resolution before hitting save. A high-resolution JPEG is usually best for online sharing.
Monitor the pixel dimensions to ensure they fit the screen without being too heavy.
Incorrect DPI Settings
Alright, let’s talk about DPI or “dots per inch.” This number can make or break your print quality. For digital use, 72 DPI is generally fine for most screens.
But if you’re thinking of printing, always aim for 300 DPI. Anything less, and you’ll see those dreaded low-resolution images printed out.
Low resolution images often have a handful of pixels per inch, which can result in images that appear blurry or pixelated, especially when viewed at a larger size or printed.
How to Avoid DPI Issues
Using the wrong DPI setting leads to problems with both high and low-resolution images.
Think of DPI as the number of pixels that fit in one inch of your photo. More dots mean more detail. If you’re setting up a project in Photoshop or Lightroom, always double-check your DPI settings.
An easy way to fix common mistakes: look at the intended use. Is it for web or print? Your computer screen needs far fewer dots than a glossy magazine.
So, set your images accordingly!
One last thing, be cautious about changing DPI after editing. Always set it correctly from the start to avoid rework.
Pro Tip: Save your original high-resolution photos before you start any edits. This way, you always have an untouched version to go back to. It’s a lifesaver when things don’t go as planned!
Hi-res images are characterized by a high pixel count, offering greater detail and clarity than their counterparts. Hi-res images are ideal for print media, professional photography, and applications where quality cannot be compromised.
Frequently Asked Questions (FAQs)
What size is a high resolution JPEG?
A high resolution JPEG is typically around 300 dpi (dots per inch).
The dimensions could vary, but standard sizes include 4800x3200 pixels for large prints.
How many MB is a high resolution photo?
The file size can range from 1 MB to several MBs, typically between 2 and 8 MB.
File size depends on the dimensions and the compression level used.
What size is the image HD resolution?
HD resolution for images is generally 1920x1080 pixels.
This is also known as 1080p.
How can I tell if an image is high resolution?
Check the image properties for dimensions and DPI.
A DPI of 300 or higher and large dimensions (like 4800x3200 pixels) indicate a high resolution.
In conclusion, working with high-resolution images has significantly improved my projects.
By understanding image quality and DPI, and using tools like Photoshop and Lightroom,
I’ve been able to achieve better results. Always save an original copy before editing, it has saved me many times.
For those looking to improve their skills, check out this Photoshop course and this Lightroom course. Adobe Photoshop and Adobe Photoshop Lightroom are great tools for high-resolution image editing.
If you found this article helpful, please like and share it with your friends on Facebook, Twitter, LinkedIn, and Pinterest. For more information on Photoshop, you can explore these Adobe products: Photoshopand Photoshop Lightroom.
By applying these tips and using the right tools, you’ll be able to enhance your workflow and achieve high-quality images.
Happy editing!
If this article has helped you, then Like and Share it with your friends
$2,061.00Original price was: $2,061.00.$1,061.00Current price is: $1,061.00. 27584
Download Your Free Guide Now!
Discover the secrets of photography with our printable guide! Master essential techniques like aperture, shutter speed, and ISO to create stunning images. Get your free printable PDF now and start turning your snapshots into masterpieces!