With fire effects in Photoshop, that transformation is not only possible, it’s within your reach.
Whether you’re a budding designer or just love experimenting with visuals, Photoshop’s magic allows you to ignite your creativity and set your projects ablaze.
We’ll dive into some easy steps and cool tricks to help get your designs glowing with fire-themed tricks.
Let’s light up our digital canvas and make those ideas sizzle!
Table of Contents
Resizing Images in Photoshop for Fire Effects
Resizing images correctly is crucial when working with fire effects in Photoshop. It ensures that your flame text appears sharp and vibrant.
Adjusting Resolution for Optimal Display
Adjusting the image resolution is necessary to display fire effects accurately.
This helps maintain quality without pixelation.
First, open your image in Photoshop.
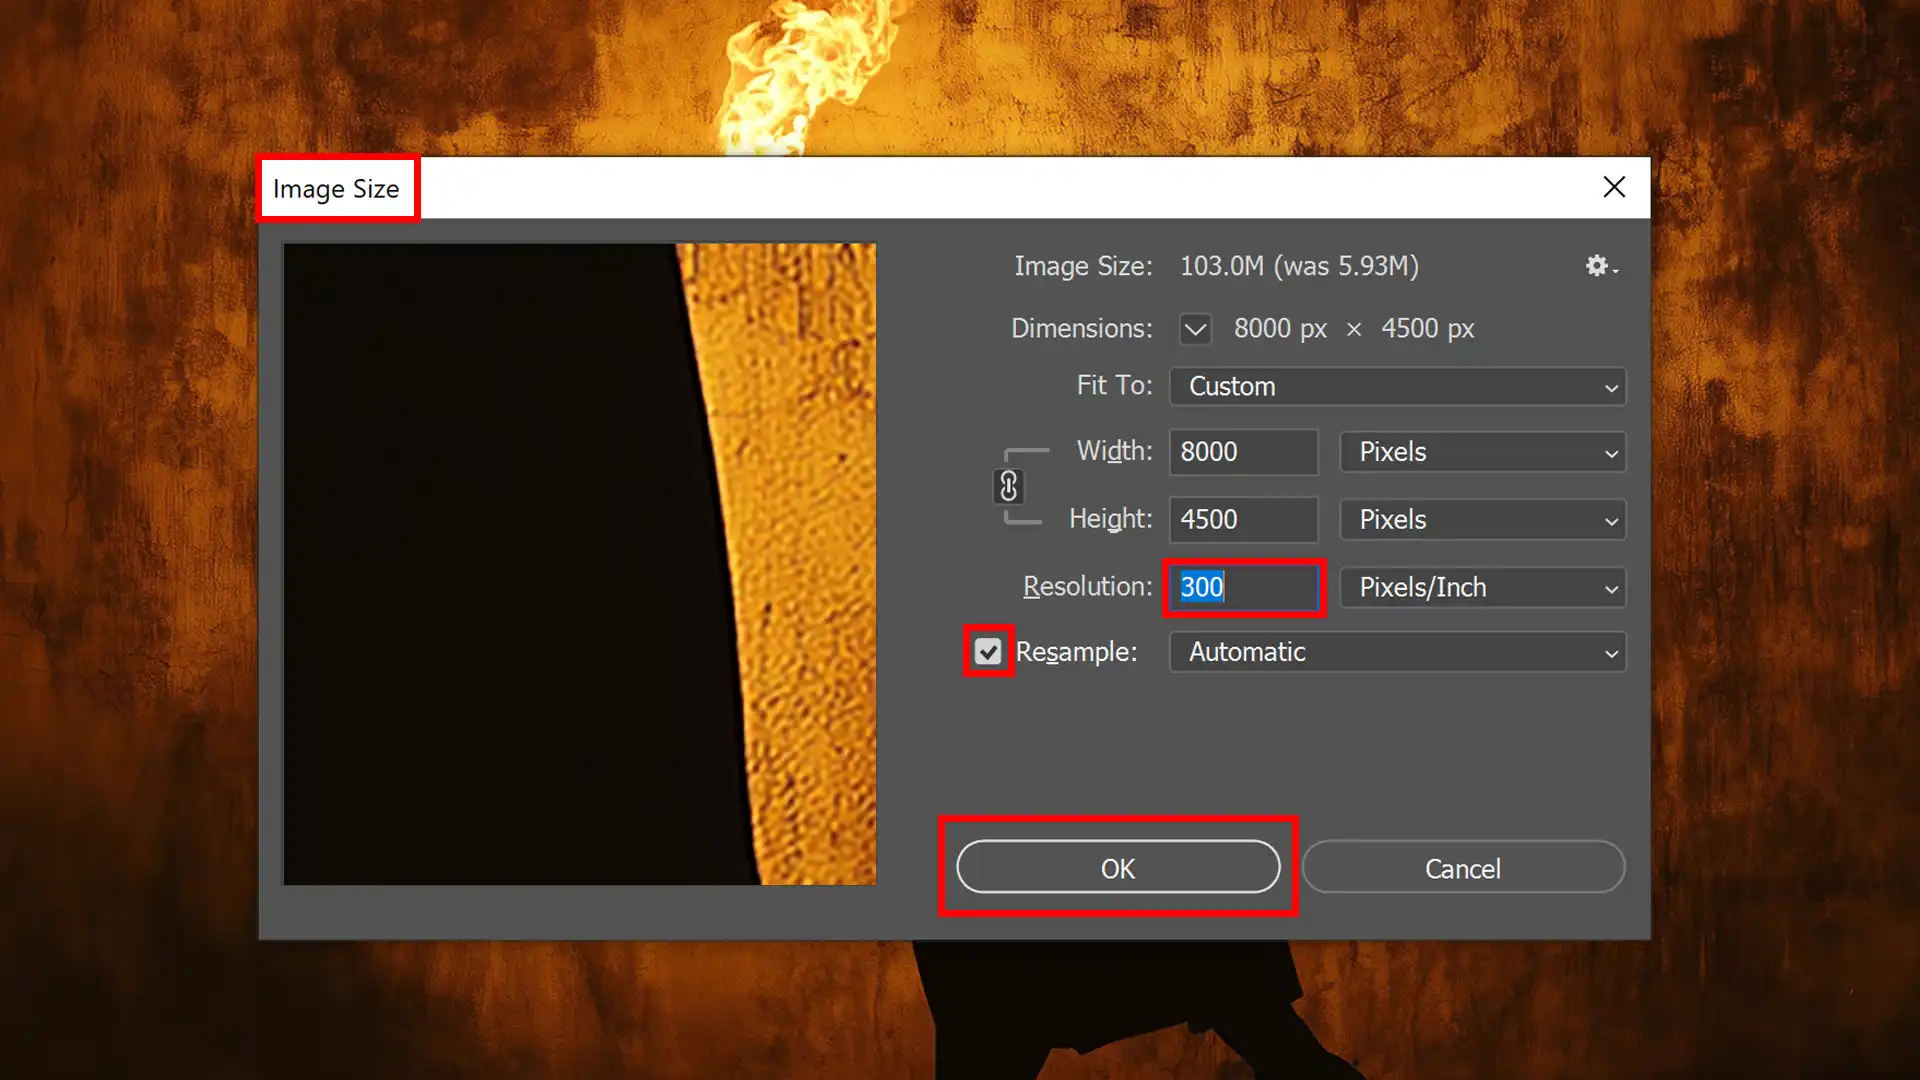
Second, navigate to the Image Menu and select Image Size.
Third, input the desired resolution (e.g., 300 PPI for print).
Then, ensure the resample option is checked to avoid distorting the image.
Lastly, press "OK" to apply changes.
By adjusting the resolution, you can achieve sharper realistic flames that look great on any screen.
If you want a reference for a fire, the best solution is to capture it yourself; it’s important to know how to clean the camera lens to ensure sharp images.
Cleaning the lens ensures clear references for your fire Photoshop effects, making your final design more accurate and vibrant.
To resize an image in Photoshop, it’s crucial to adjust the resolution for optimal display. This ensures your image maintains quality while fitting the desired dimensions seamlessly.
Using Smart Objects to Maintain Quality
Using smart objects in Photoshop is another way to resize images while maintaining their quality for fire effects.
First, right-click on your layer and select Convert to Smart Object.
Then, use the Free Transform tool (Ctrl+T or Command+T) to resize your smart object layer as needed.
Lastly, apply transformations by pressing Enter or Return.
Smart objects allow nondestructive resizing, meaning you won’t lose quality even if resized multiple times.
For example, I created a stunning fire image using these techniques and added detailed layers without losing any details due to resizing constraints.
Top Fire Photoshop Tips
Use a black background when working with fire effects - it makes colors pop!
Integrate a variety of blending modes like Screen Blending Mode or Soft Light for more depth.
Always use high-quality images from reliable sources for the best results.
Keep practicing these steps and experimenting with different settings for unique results!
By doing this consistently, you’ll master creating incredible fire Photoshop art quickly!
Creating Realistic Flames with Brush Tools
Creating realistic flames in Adobe Photoshop can elevate your design projects.
Using the brush tool, you can simulate lifelike fire effects that captivate viewers.
Choosing the Right Brushes
To start, selecting the proper brush is crucial. Brushes designed for creating flame effects are available online or within Photoshop’s standard library.
These specialized brushes mimic the natural flow of fire and make capturing its essence easier.
Recommended Brushes:
Flame-specific brushes
Soft round brush with varying opacity
Scatter and Spatter brushes for texture
By experimenting with different brushes, you will find one suitable for your project that gives your flames an organic look.
Customizing Brush Tool Settings for Fire
Once you have chosen a brush, adjusting the settings fine-tunes it to create more realistic flames.
Steps to Customize Brush Settings:
Open the Brush Settings Pane: First, access this from the Layers Panel by double-clicking on your selected brush.
Shape Dynamics: Second, adjust the size jitter to randomize brush stroke sizes.
Scattering: Increase scatter to add randomness to flames.
Transfer: Then, change opacity jitter to vary transparency across strokes.
Color Dynamics: Lastly, set foreground/background jitter to blend colors naturally between shades of yellow, orange, and red.
I once created a digital illustration where I needed to draw multiple flames on a dragon’s breath using customized scatter and spatter brushes for natural texture variation, achieving an impressive fiery effect!
Finally, remember to use the adjustment layer icon from the layers panel if you need to make extra tweaks after brushing.
By carefully customizing each setting, you enhance realism in fire texts or any other flaming designs effectively!
Applying Layer Styles for a Fiery Appearance
Using layer styles effectively can give your text and images a dynamic fiery look.
Adding Outer Glow and Inner Glow will enhance the fiery quality of your design.
Here’s how:
First, select the text layer.
Second, go to "Layer" > "Layer Style" > "Outer Glow."
Third, choose an intense color like dark red from the Color Picker.
Then, adjust the spread and size to create a glowing flame effect.
Lastly, repeat with Inner Glow, but choose a lighter shade near yellow or orange.
To get a more realistic effect:
Experiment with different blend modes like "Color Dodge".
Play with settings in both glows to match the desired intensity of fire Photoshop effects.
Adding Color Overlays
Color overlays add depth and realism to your flames or fiery text.
With your text layer selected, go to "Layer" > "Layer Style" > "Color Overlay."
Pick vibrant colors like hot pink or bright yellow.
Adjust opacity as needed.
You can also use an adjustment layer for further fine-tuning:
Create a new layer by selecting the Layers panel options.
Use Brightness/Contrast and Levels settings to adjust interval shades for more detailed highlights and shadows.
Following these methods provides flexibility while ensuring each step enhances your previous enhancements through consistent layering techniques.
While you’re here, here’s how you can clean your camera lens.
Implementing Motion Blur to Simulate Fire Movement
Adding motion blur can enhance the fire effect in your image, making it appear more dynamic and realistic.
This technique works excellently with flames and other fiery elements.
Mastering blur in Photoshop involves techniques like implementing motion blur to simulate fire movement. This effect adds dynamic realism to your flames, making them appear more fluid and natural.
Settings for Dynamic Motion Fire Effects
To start, ensure you have a visible flame on your canvas.
Follow these steps:
Convert the flame layer to a Smart Object. This will allow non-destructive editing.
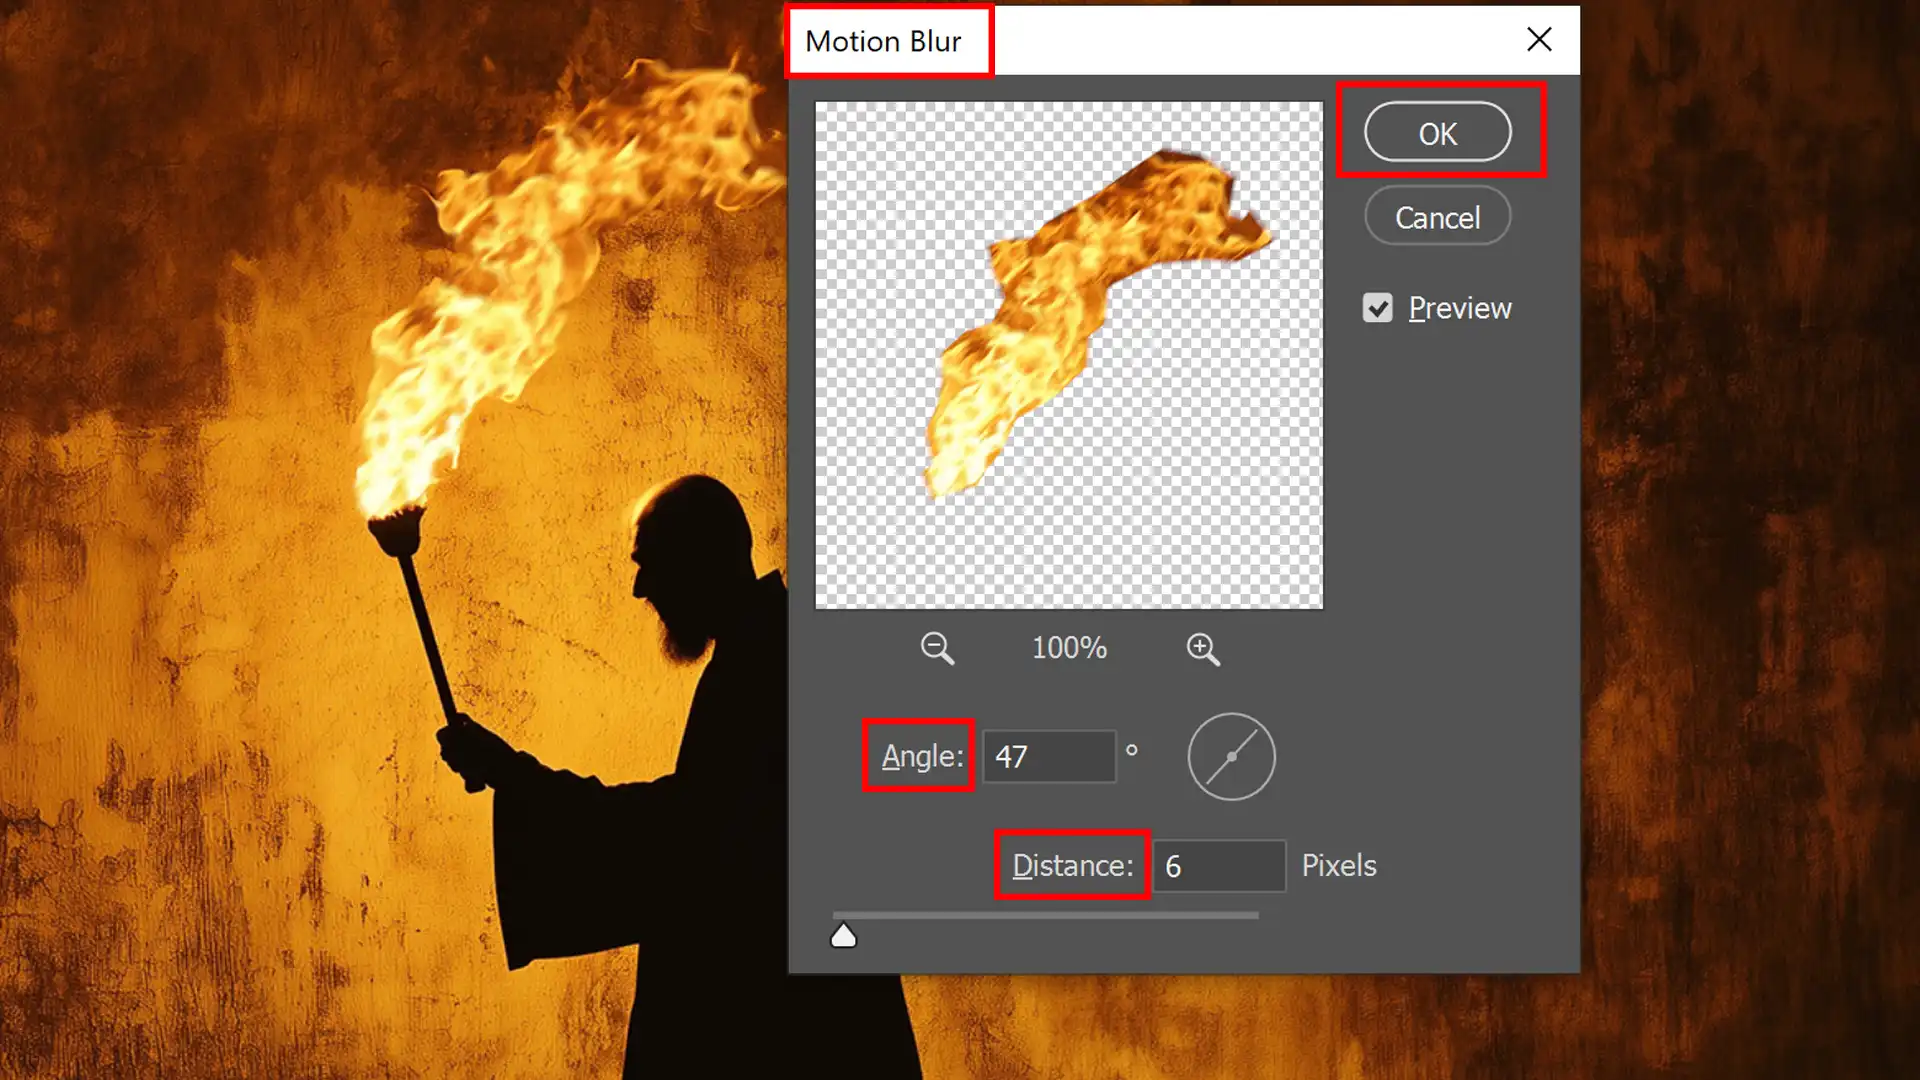
Go to the Filter Menu, select "Blur," then choose "Motion Blur."
Adjust the Angle and Distance settings:
Angle: It should match the direction of the flame’s movement.
Distance: Increase for longer motion trails.
For instance, on my last project, I used a 45-degree angle and a distance of 20 pixels, which provided an authentic movement feel.
Combining with Other Filters with the Adjustment Layer Icon
Motion blur alone might not be sufficient to achieve full realism. Combining other filters like gaussian blur in Photoshop or smudge tool can make a significant difference.
Add an adjustment layer before applying additional effects:
Select "New Adjustment Layer" from the Layers menu.
Choose "Levels" or "Curves" to tweak brightness and contrast.
Use the Smudge Tool:
Set its strength between 10-20%.
Draw flames softly across the edges for a natural blend.
If necessary, add a secondfilter:
For extra depth, consider using Gaussian Blur at low settings (Radius: 2-4 pixels).
By following these steps, you’ll create compelling fire movement effects in Photoshop effortlessly!
Adjustment Layer icon, you can fine-tune your images, achieving stunning and professional-quality results seamlessly.
How to Create a Fire Texture with Displacement Maps?
Displacement maps can significantly enhance fire textures, adding realism and depth.
Below is a guide on preparing and applying your displacementmap to fire layers in Photoshop.
Preparing Your Displacement Map
You need to create one efficiently before you can apply the displacement map.
Create a New Document: Open Photoshop and create a new document (File > New). Set the size according to your project needs.
Apply Filters: To add texture, use filters like Noise and Gaussian Blur (Filter > Noise/Add Noise).
Gradient Technique: Add a gradient overlay effect for smooth transitions from light to dark areas. Adding the gradient overlay will enhance the depth and realism of the flame text.
Applying the Map to Fire Layers
Using displacement maps on fire layers enhances the fiery texture richness.
Duplicate Fire Layer: Start by duplicating your existing fire layer (Ctrl + J).
Convert for Smart Filters: Right-click on the duplicate layer and select "Convert for Smart Filters".
Apply Displacement Filter: Navigate to Filter > Distort > Displace. Load your saved displacement map file.
Follow these additionalsteps:
Adjust parameters within the Properties Panel
Ensure subtle adjustments for natural effects
Here’s an example:
First, duplicate the fire layer
Second, convert filter
Then, apply to displace the filter
Lastly, load your map
By applying displacement maps correctly, the final look of your Fire Photoshoptransformation will be extraordinary.
For best results, maintain high precision while tweaking settings, ensuring each step achieves realistic flame textures.
You may also want to apply displacement maps selectively using a layer mask, enabling more control over specific areas needing enhancement.
Adding such sophisticated touches ensures that both professional photographers and casual editors can easily create compelling flame text effects or dynamic scene elements!
Adjusting Color Balance for Warmer Fire Effects Tones
Adjusting the color balance is crucial for achieving warmer fire tones in your Photoshop projects.
This section will help you fine-tune shadows and highlights and select custom presets.
Manipulating Shadows and Highlights
When adjusting shadows and highlights, begin by working on a new layer. This helps preserve the original background layer.
To do this:
Create a new layer.
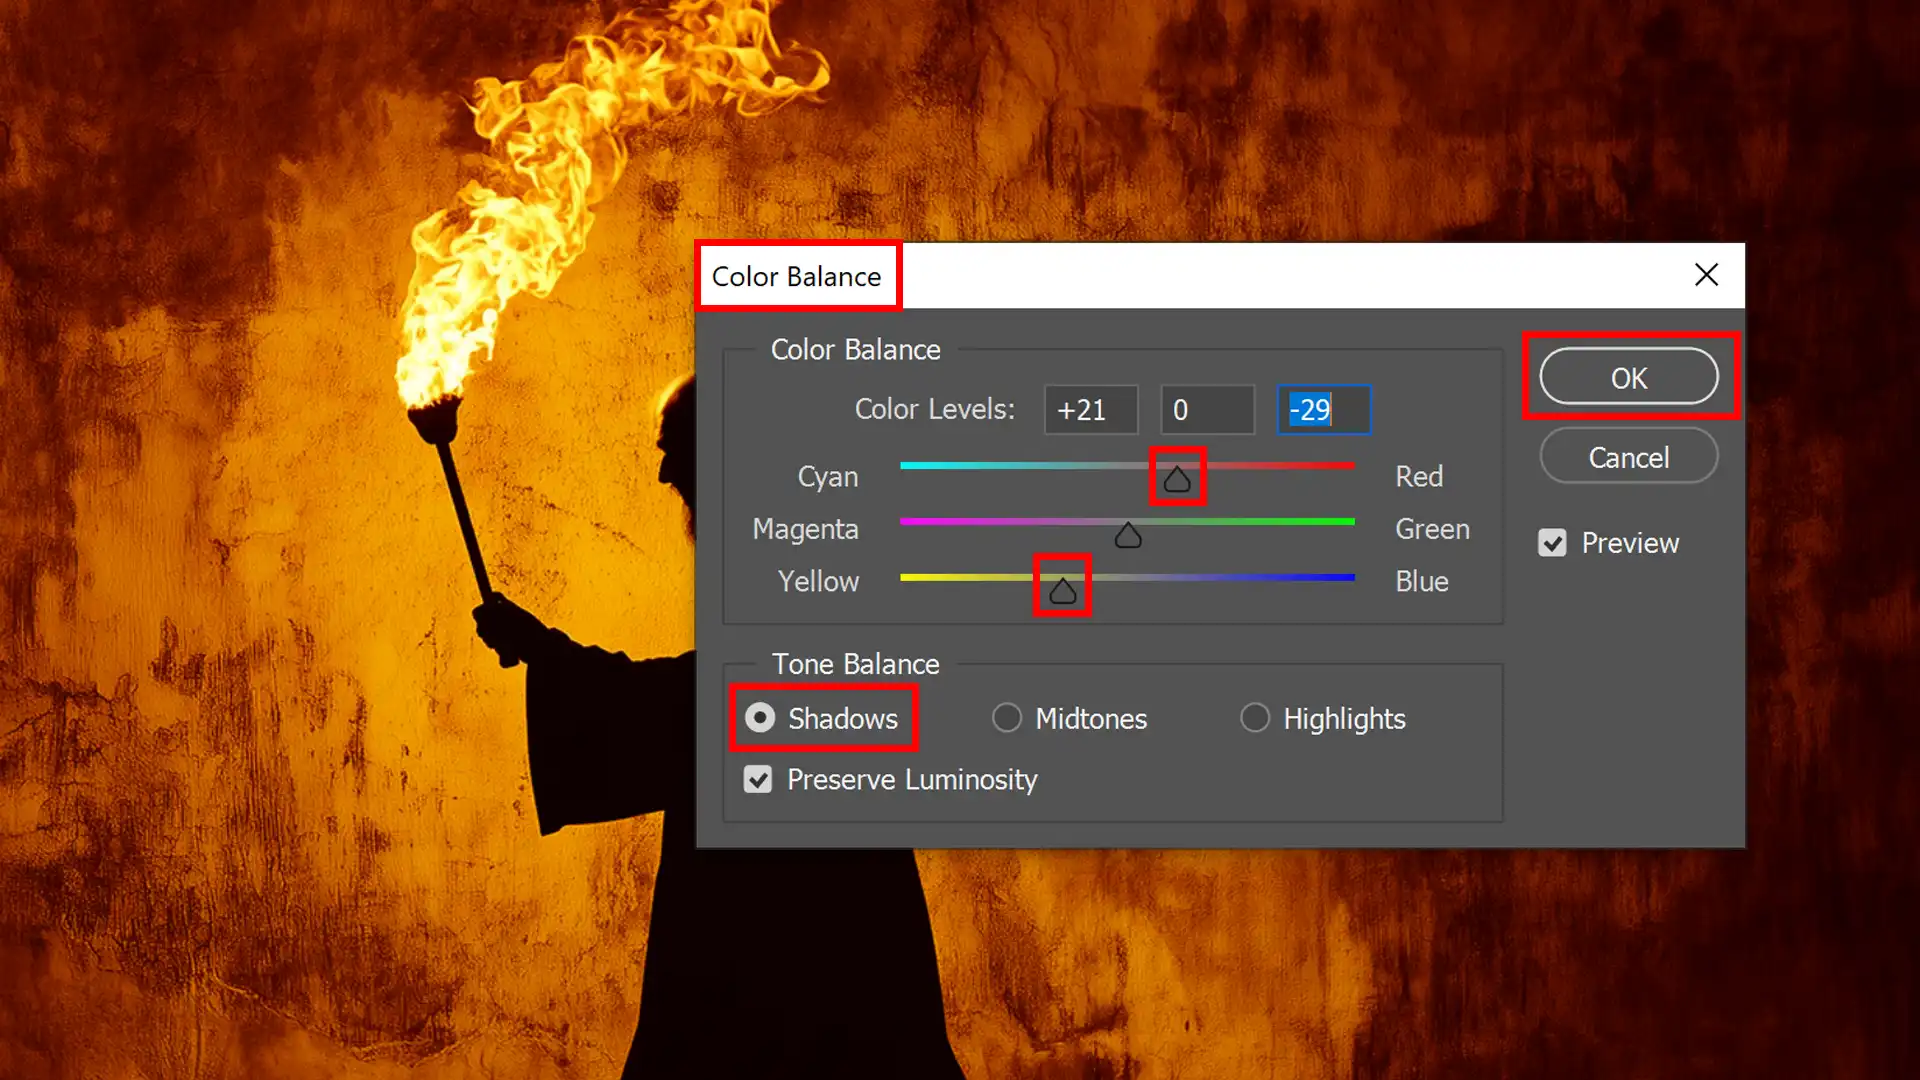
Navigate to Image > Adjustments > Color Balance.
In the dialogue box, adjust the sliders for shadows towards red and yellow tones.
By manipulating these settings, you can enhance the warmth in your images.
For example:
Increase Red: +25
Increase Yellow: +10
Remember, subtle adjustments are important for natural-looking flames.
Additionally, consider using the screen blending mode on this layer to keep colors vibrant without overwhelming the image’s overall tonality.
Selecting Custom Color Presets
Using custom color can save time and provide consistency across projects involving flames or fire effects.
Start by creating your preset:
Open the color pickertool.
Select warm colors like oranges and reds.
Save these presets for future use by clicking "Save Preset."
Here’s an example of a good preset:
Foreground Color: #FF4500 (orange-red)
Background Color: #FFD700 (golden yellow)
To apply these presets:
Create a new layer.
In the properties panel, load your saved preset.
Fine-tune as needed by slightly tweaking the foreground color slider until satisfied with the warmth of your fire tone.
These steps ensure every project benefits from customized adjustments without starting from scratch each time.
By following these simple yet effective adjustments, you can consistently create stunning fire effects tailored to your specific visual style!
Working with Particle Systems for Enhanced Fire Effects
To make your fiery scenes more realistic, particle effects can be essential.
This guide delves into creating particles from scratch and integrating them seamlessly into your fire layers.
Creating Particles from Scratch
Creating particles involves precise steps to ensure they integrate well with fire effects.
Here’s a detailed walkthrough.
Create a New Layer: Create a layer above your existing fire layer.
Select Brush Tool: Choose the soft brush to draw small dots representing particles.
Apply Scatter Effect:
Open the Brush Settings panel.
Set the Scatter and Shape Dynamics parameters to create random particle placement.
Adjust Blend Mode: For a glowing effect, change the blend mode of the particle layer to hard light or linear dodge.
For one of my projects, I wanted to scatter embers around a campfire scene. Using these steps, I scattered tiny orange dots to mimic embers drifting in the air.
With generative AI expanding in Photoshop, you can easily start creating particles from scratch. This advanced feature enhances your design flexibility by generating complex, detailed elements seamlessly.
Integrating Particle Effects with Fire Layers
Integrating particle effects enhances realism by blending them seamlessly into your fire imagery.
Positioning Particles:
Use the “Free Transform” tool (Ctrl+T) to adjust particle positions dynamically.
Blend Modes Integration
Change each particle layer blend mode for seamless integration.
By following these techniques, your work will achieve strikingly realistic enhanced fire effects making every detail pop vividly off the screen!
Compose, experiment, and learn.
Each project brings new insight into mastering visual storytelling through Photoshop’s powerful tools, like layering and blending modes, your creativity truly has no bounds!
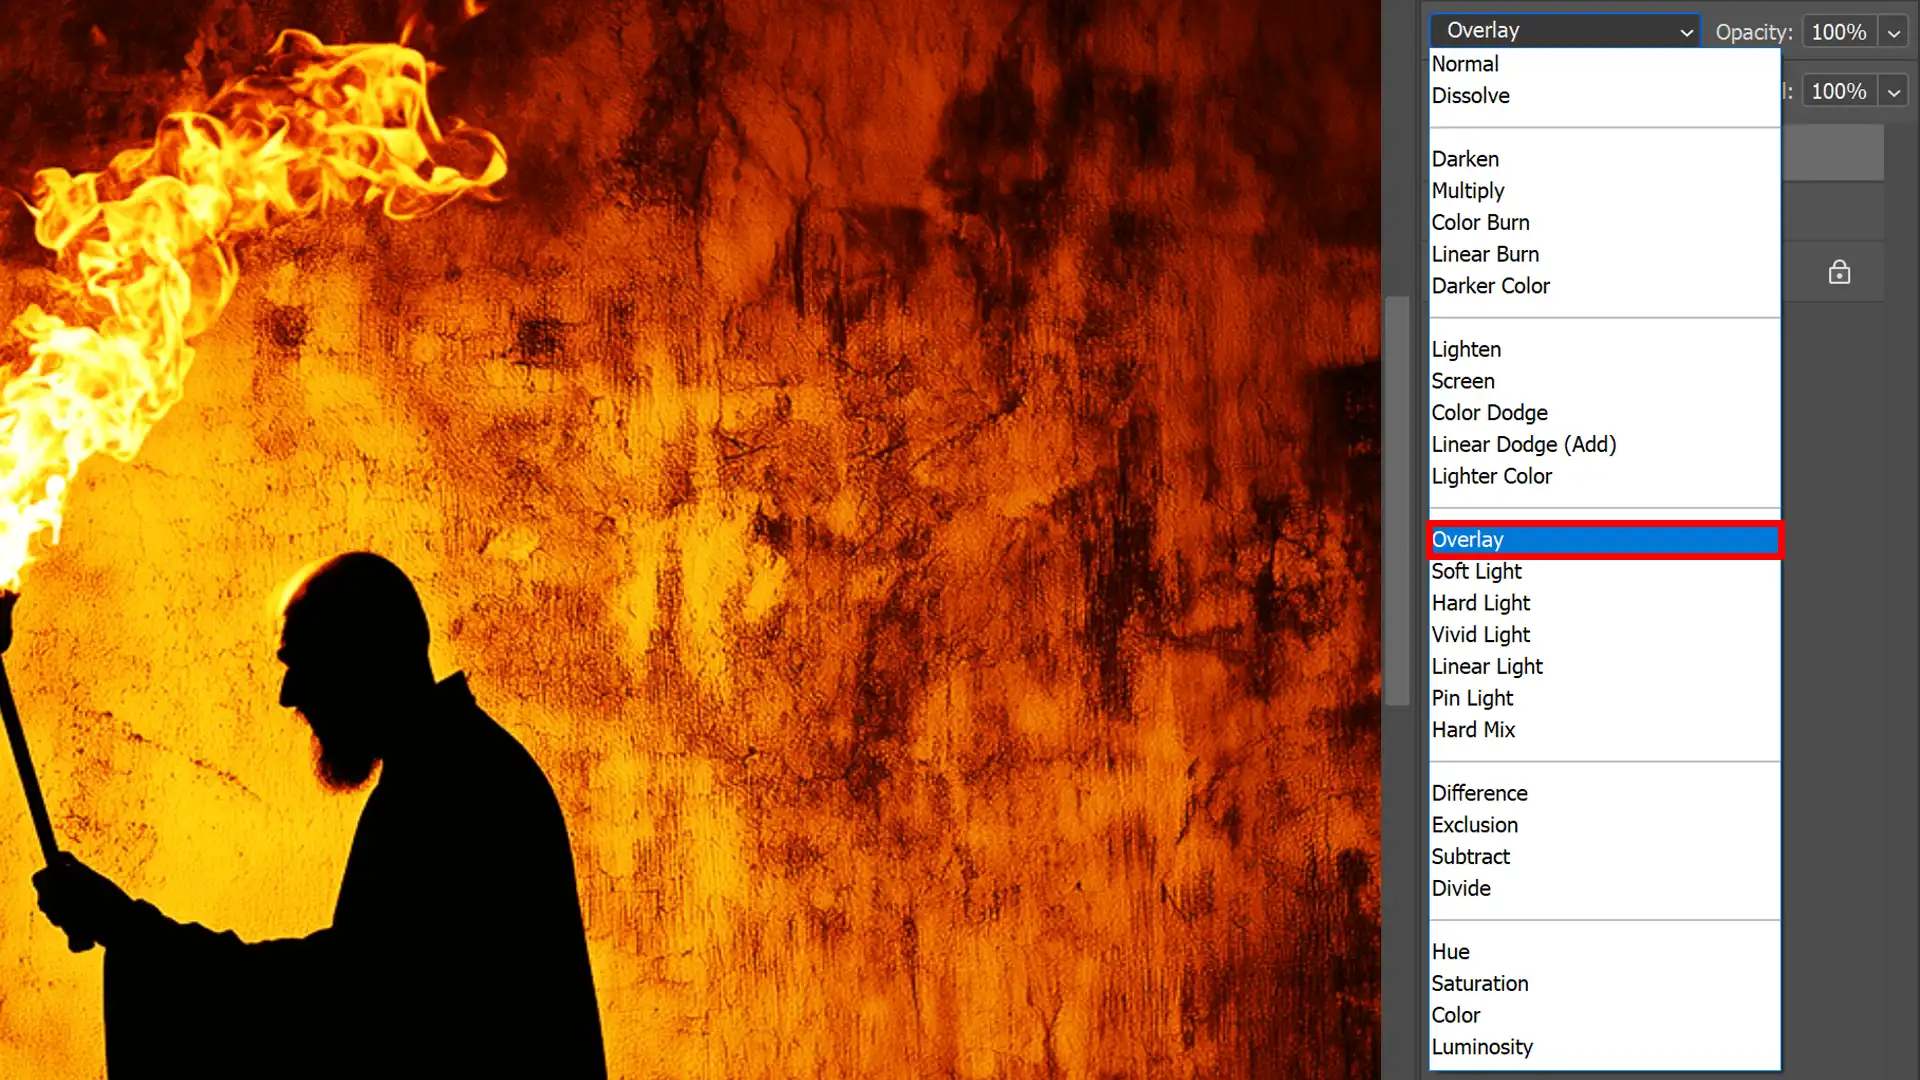
Using Blend Modes for Seamless Fire Integration
Integrating fire into your Photoshop projects requires precise techniques. Blend modes allow you to merge elements smoothly, creating realistic effects.
Blend Mode
Effect
Best Use Case
Overlay
Enhances highlights and shadows
Enhancing flames over dark backgrounds
Screen
Lightens the image
Softer flames, maintaining background
Multiply
Darkens underlying layers
Intense flame integration
Experimenting with Different Blend Options
Various blending options can achieve different visual outcomes. Testing these will help find the most natural result.
Overlay Blending Mode
Enhances highlights and shadows
Great for enhancing flames over dark backgrounds
Screen Blending Mode
Useful for lightening the image, perfect for softer flames
Keeps the background intact
Multiply Blending Mode
Darkens underlying layers
Ideal for intense flame integration
In my last project, I used screen mode to blend flames onto a black background efficiently.
Layering Tips for Realistic Fire Effects
Layer arrangement plays a crucial role in achieving lifelike fire effects.
Use Multiple Layers
Start with a base layer containing your principal images.
Add another layer with your flame elements.
Create adjustment layers as needed (e.g., hue, saturation).
Employ New Layer Masking Techniques
A smooth transition with Photoshop masking is important when working with fire:
Apply a layermask to hide or reveal parts of the flame layer.
Use a soft brush to paint on the mask gradually, making sure to adjust opacity if necessary.
I recently applied this technique by adding a subtle smoke effect, which merged seamlessly using masks and screen mode.
Enhance Details with Layer Styles
Add depth and realism with a customized layer style:
Double-click on the flame text layer.
Choose appropriate bevel and emboss settings.
Implementing these tips ensures each layer blends perfectly, contributing to overall realism in your work.
By experimenting and refining, you’ll master integrating seamless fire into any project!
To effectively use blend modes for seamless fire integration, understanding how different settings interact is important.
For more detailed techniques, check out our text portrait Photoshop tutorials and enhance your fire Photoshop projects with ease.
Completing Your Fire Photoshop Effect
After crafting your stunning fire effect in Photoshop, let’s finalize it to ensure your creation is perfect.
To complete your fire Photoshop effect, check out our Photoshop layering tutorials. They offer important techniques for managing layers and enhancing your final design.
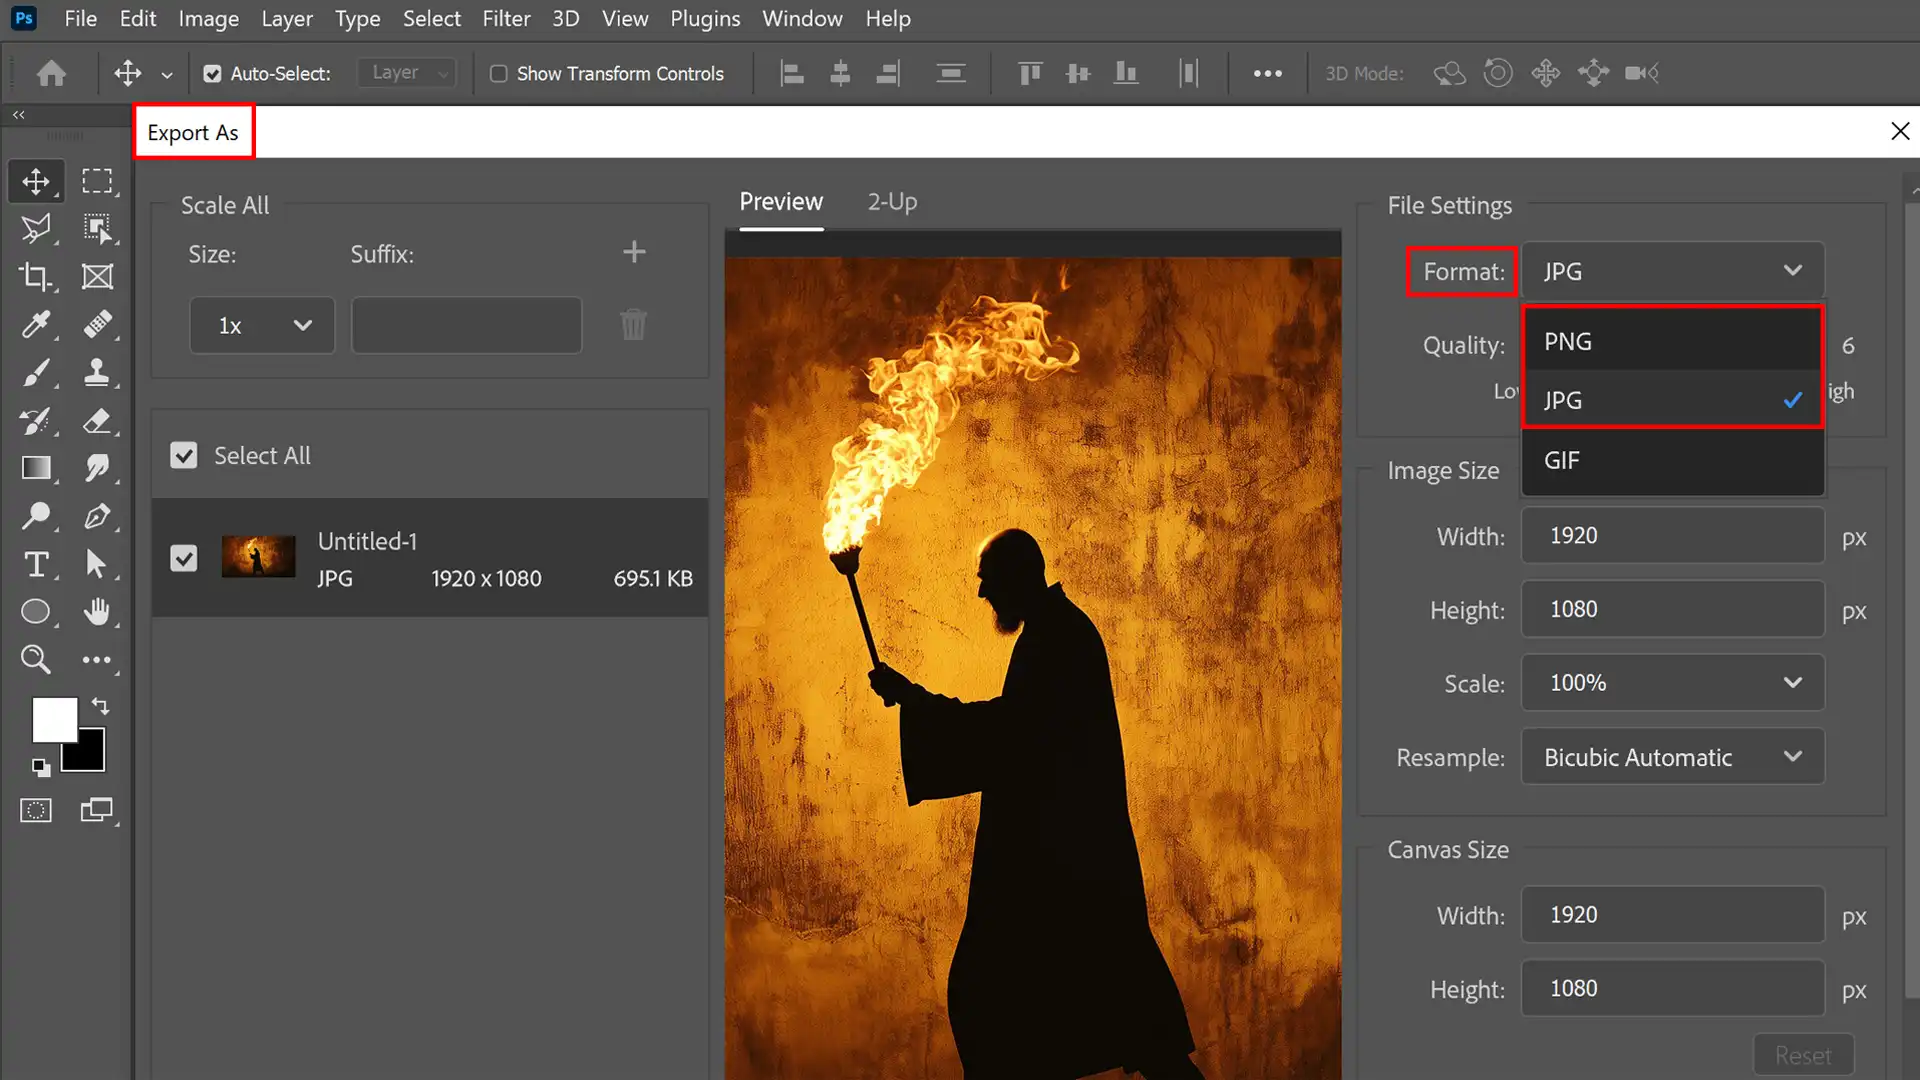
Saving and Exporting Your Fire-Themed Design
Too often, we forget the importance of properly saving and exporting our projects.
To ensure your fire effect looks great on any platform, save your work as a PSD file and a high-resolution image.
Save as PSD: Keep this version for future edits.
Export as Image: Use formats like JPEG or PNG for sharing online.
Remember to check the layers panel before saving to ensure all layers are intact.
Final Touches Before Completion
Before wrapping up, add some final touches to enhance the realism of your design.
This includes minor adjustments using multiple tools available in Photoshop.
Checking Layers Panel and Effects
Ensure each effect and layer mask from the “Add Layer Mask” icon adds to the overall quality.
Here’s what to check:
Activate the necessary adjustment layers.
Confirm the correct use of blending modes like screen blending mode.
Ensure any added elements, such as a text layer or smoke effects, are placed correctly within the composition.
To bring out more depth:
Revisit the brush tool settings if needed.
Create another new layer if any last-minute additions are needed.
Previewing on Different Devices
Finally, it’s crucial to see how your design appears across different screens.
Save low-res versions for quick previews.
View these saved images on various devices (e.g., phones, tablets).
This ensures no detail is lost regardless of where your design is viewed.
Completing these steps will help you achieve an outstanding fire text effect in Photoshop sure to impress viewers everywhere!
For more advanced techniques and next-level tips, visit our section on creating flame effects.
Frequently Asked Questions
How to do a fire effect in Photoshop?
To create a fire effect in Photoshop, start by opening your image and adding other layers.
Then, select the Brush tool, choose a soft round brush, and set the foreground color to a bright yellow or orange.
Use the Paint Bucket tool to paint over the area where you want the fire to be. Change the layer's blend mode to Screen or Color Dodge to make it look more like realistic flames.
Enhance the effect by duplicating the layer and tweaking the opacity as needed.
How to make a burn effect in Photoshop?
For a burn effect, start with another layer above your fire image.
Use the Brush tool with a soft round brush to draw areas where you want the burn effect to appear. Set the blend mode to Multiply to darken these areas.
Double-click the layer to access the Layer Styles window. Then, apply Outer Glow in dark red to enhance the burnt look.
Play with the layer opacity to achieve the desired effect.
How to cut fire in Photoshop?
Cutting fire in Photoshop involves selecting the fire portion from one image to insert into another.
Use the Lasso Tool to make a rough selection around the flames. For precise edges, refine the selection with the Quick Selection Tool or Select and Mask workspace.
Copy the selected fire and paste it into the desired image. Utilize blend modes like Screen to make the fire blend seamlessly with the new background.
To ensure a seamless integration, adjust the opacity and apply blend modes like Screen, allowing the fire to harmoniously merge with the background contents.
How do you select fire in Photoshop?
Selecting fire in Photoshop can be done effectively using the Color Range command.
Go to Select > Color Range and use the Eyedropper Tool to click on the fire's color in the image. Adjust the Fuzziness slider to expand the selection to include flames.
Once selected, you can copy the fire to another layer, apply adjustments, or use it to composit with other images.
Creating fire effects in Photoshop has been a game-changer for my projects. I remember the first time I added realistic flames to a design; it made everything come alive!
Using the steps and tips I shared, you can also make your images look amazing with fire Photoshop techniques.
Don’t be afraid to experiment and try different tools to see what works best for you.
If you want to learn more and improve your skills, check out our Photoshop Course and Lightroom Course. These courses offer detailed lessons that can help you master not just fire effects but many other cool techniques too.
$2,061.00Original price was: $2,061.00.$1,061.00Current price is: $1,061.00. 27584
Download Your Free Guide Now!
Discover the secrets of photography with our printable guide! Master essential techniques like aperture, shutter speed, and ISO to create stunning images. Get your free printable PDF now and start turning your snapshots into masterpieces!