
If you’re looking to master Adobe Lightroom for dummies, you’ve come to the right place.
Have you ever wondered how professionals make their photos look so stunning? With Lightroom, you can easily transform your images from ordinary to extraordinary.
In the following article, I’ll guide you through the basics, helping you understand the significant tools and techniques that can elevate your photography.
Whether you’re a beginner or just looking to refine your skills, you’ll find practical tips and insights that are simple to grasp. Keep reading to unlock the full potential of your photos and see the world through a new lens.
Table of Contents
Getting Started with Adobe Lightroom Classic
Ready to dive into the world of digital pictures editing with Adobe Lightroom for dummies? Let’s break it down step by step.
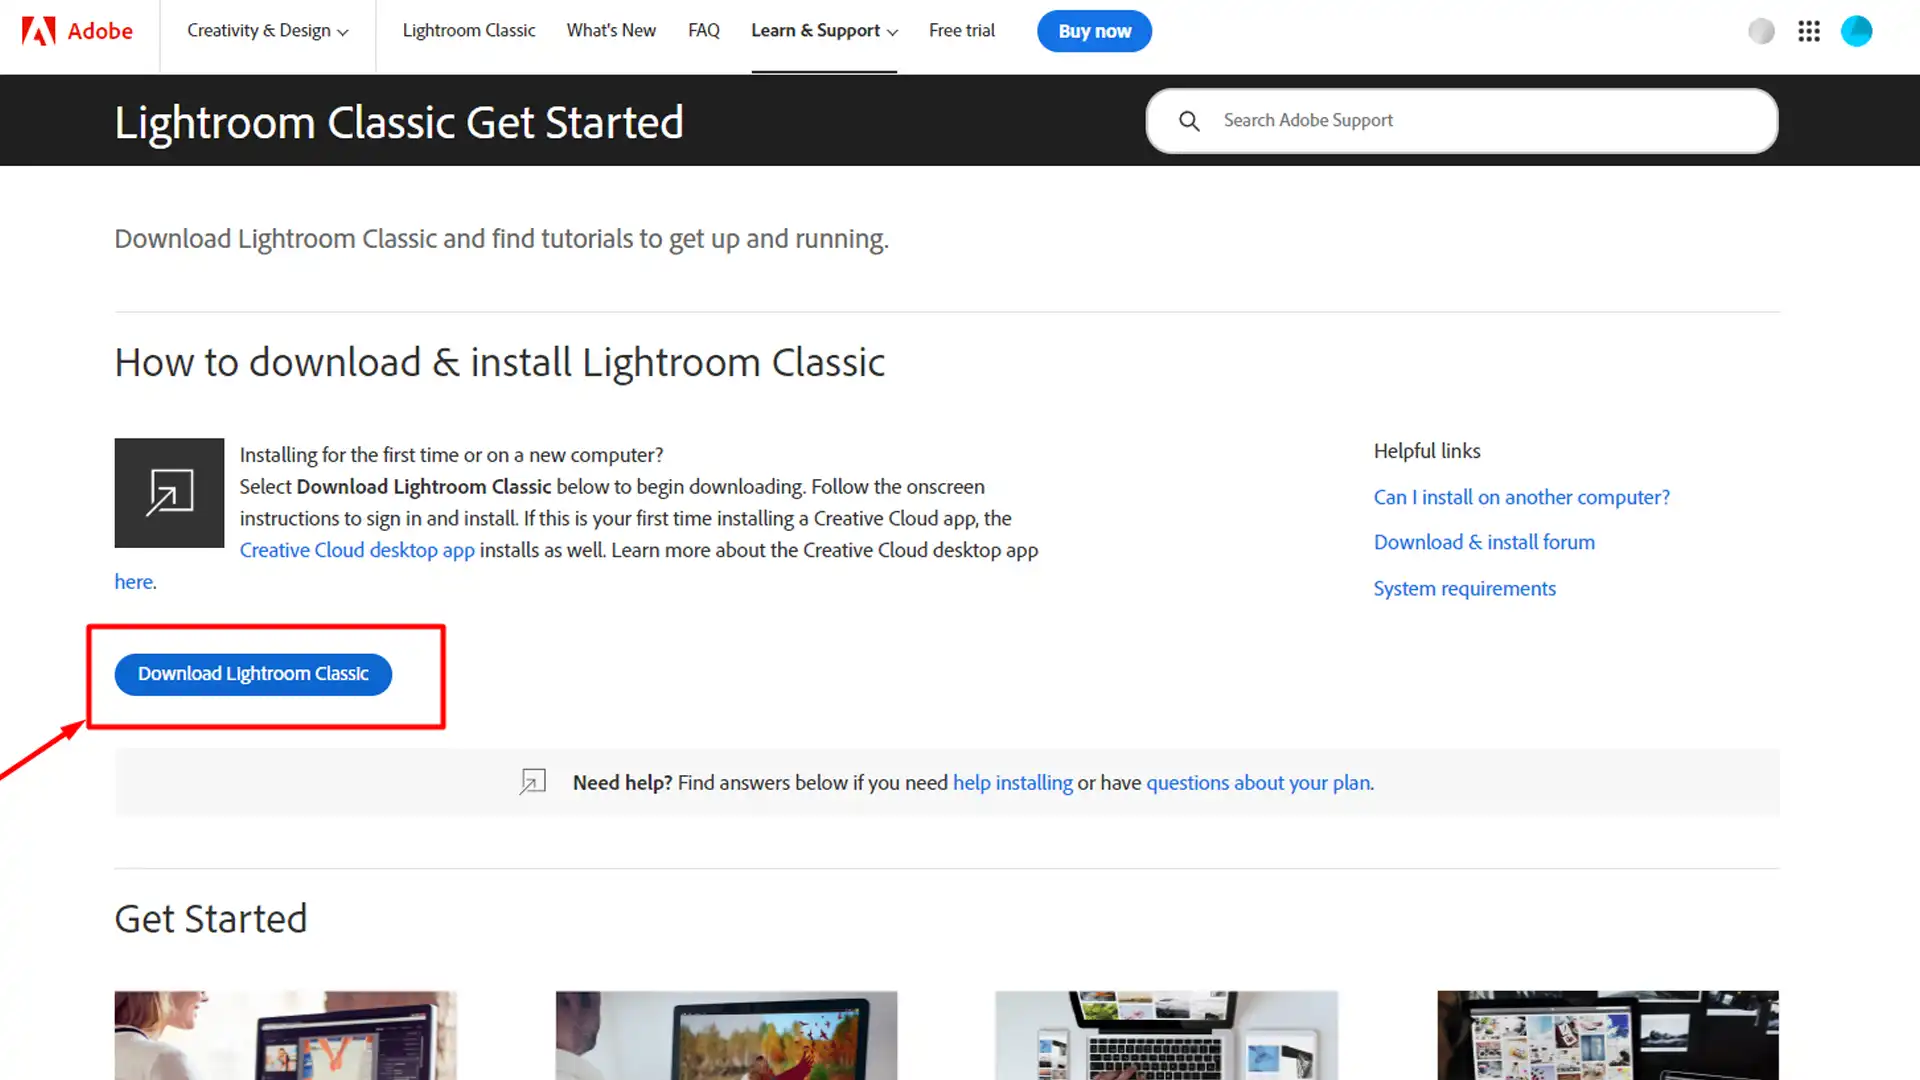
Installing Adobe Photoshop Lightroom Classic
First, download and install Adobe Lightroom Classic from Adobe’s official website. Follow the easy-to-follow prompts to complete the installation.
Once installed, open Lightroom Classic and log in with your Adobe ID. Now you are ready to start mastering Adobe Lightroom Classic!
Setting Up Your Workspace
When Lightroom Classic opens, you’ll see various panels and modules. The library module is where you’ll manage your photos.
Customize your workspace by arranging these panels to suit your workflow. Familiarize yourself with the interface. This step helps streamline your learning experience.
Importing Photos into Adobe Lightroom Classic
To import photos, click on the ‘Import‘ button in the library module. Choose your memory card or folder as the source. You’ll see a preview of the images. Pick the ones you want to import and click ‘Import‘.
Lightroom photo editor creates a catalog to organize your photos without altering the original file. It’s efficient and keeps your digital photo collection intact.
Pro Tip: Use Lightroom shortcuts to speed up your editing process. They save time and make your post-processing workflow smoother. For instance, press ‘R‘ to crop immediately or ‘D‘ to jump to the Develop module window.
Basic Editing in Adobe Lightroom
Navigating the vast world of photo editing can be daunting, especially with tools such as Adobe’s powerful consumer software.
Fortunately, Adobe Photoshop Lightroom Classic offers a robust platform for everyone from aspiring photo editors to seasoned pros. Let’s dive into the important features and functionalities of Adobe Lightroom for dummies.
Understanding the Develop Module
The Develop module is where the magic happens. This is the heart of Lightroom Classic. You can adjust your images here to bring out their best features. Start by navigating to the Develop module on the top right.
You’ll see various panels on the right, such as Basic, Tone Curve, and HSL/Color. Every change you make gets recorded, so don’t worry about ruining your original photo. Click the “Reset” button if you want to start over.
Basic Adjustments: Exposure, Contrast, and More
In the Basic panel, you find tools to adjust Exposure, Contrast, and other significant attributes of your image. Adjust the Exposure to brighten or darken your photo.
Move the Contrast slider to add depth. Use Highlights, Shadows, Whites, and Blacks to refine the tonal range.
Temperature and Tint allow you to correct color balance. Increase or decrease Clarity for midtone contrast. Adjust Vibrance to enhance dull areas without oversaturating. Saturation affects all colors equally; use it carefully to avoid artificial looks.
Using Presets for Quick Edits
Presets are pre-configured settings that apply a specific look to your photos instantly. You find them in the left panel of the Develop module. Adobe provides default presets.
You can also create your own or download third-party options. To apply a preset, simply click on one. Lightroom applies the settings immediately. It’s an easy-to-follow way to experiment with different styles.
Pro Tip: Save time by using Lightroom keyboard shortcuts for frequent actions. For instance:
- Pressing "R" activates the Crop tool.
- Pressing "D" takes you to the Develop module instantly.
Advanced Editing Techniques in Adobe Lightroom Classic
If you’ve been navigating the basic adjustments in Adobe Photoshop Lightroom Classic, you might be wondering what’s next.
We’ll start by exploring some compelling features such as the Tone Curve, Color Grading and HSL Adjustments, and Detail Enhancements.
Using the Tone Curve
The Tone Curve gives you precise control over the brightness and contrast of your desktop image. Think of it as a more advanced version of the basic sliders.
- Point Curve: You can manage the lights, darks, and midtones independently. Drag points on the curve to adjust brightness.
- Region Curve: This mode lets you adjust different parts of the tonal range using sliders.
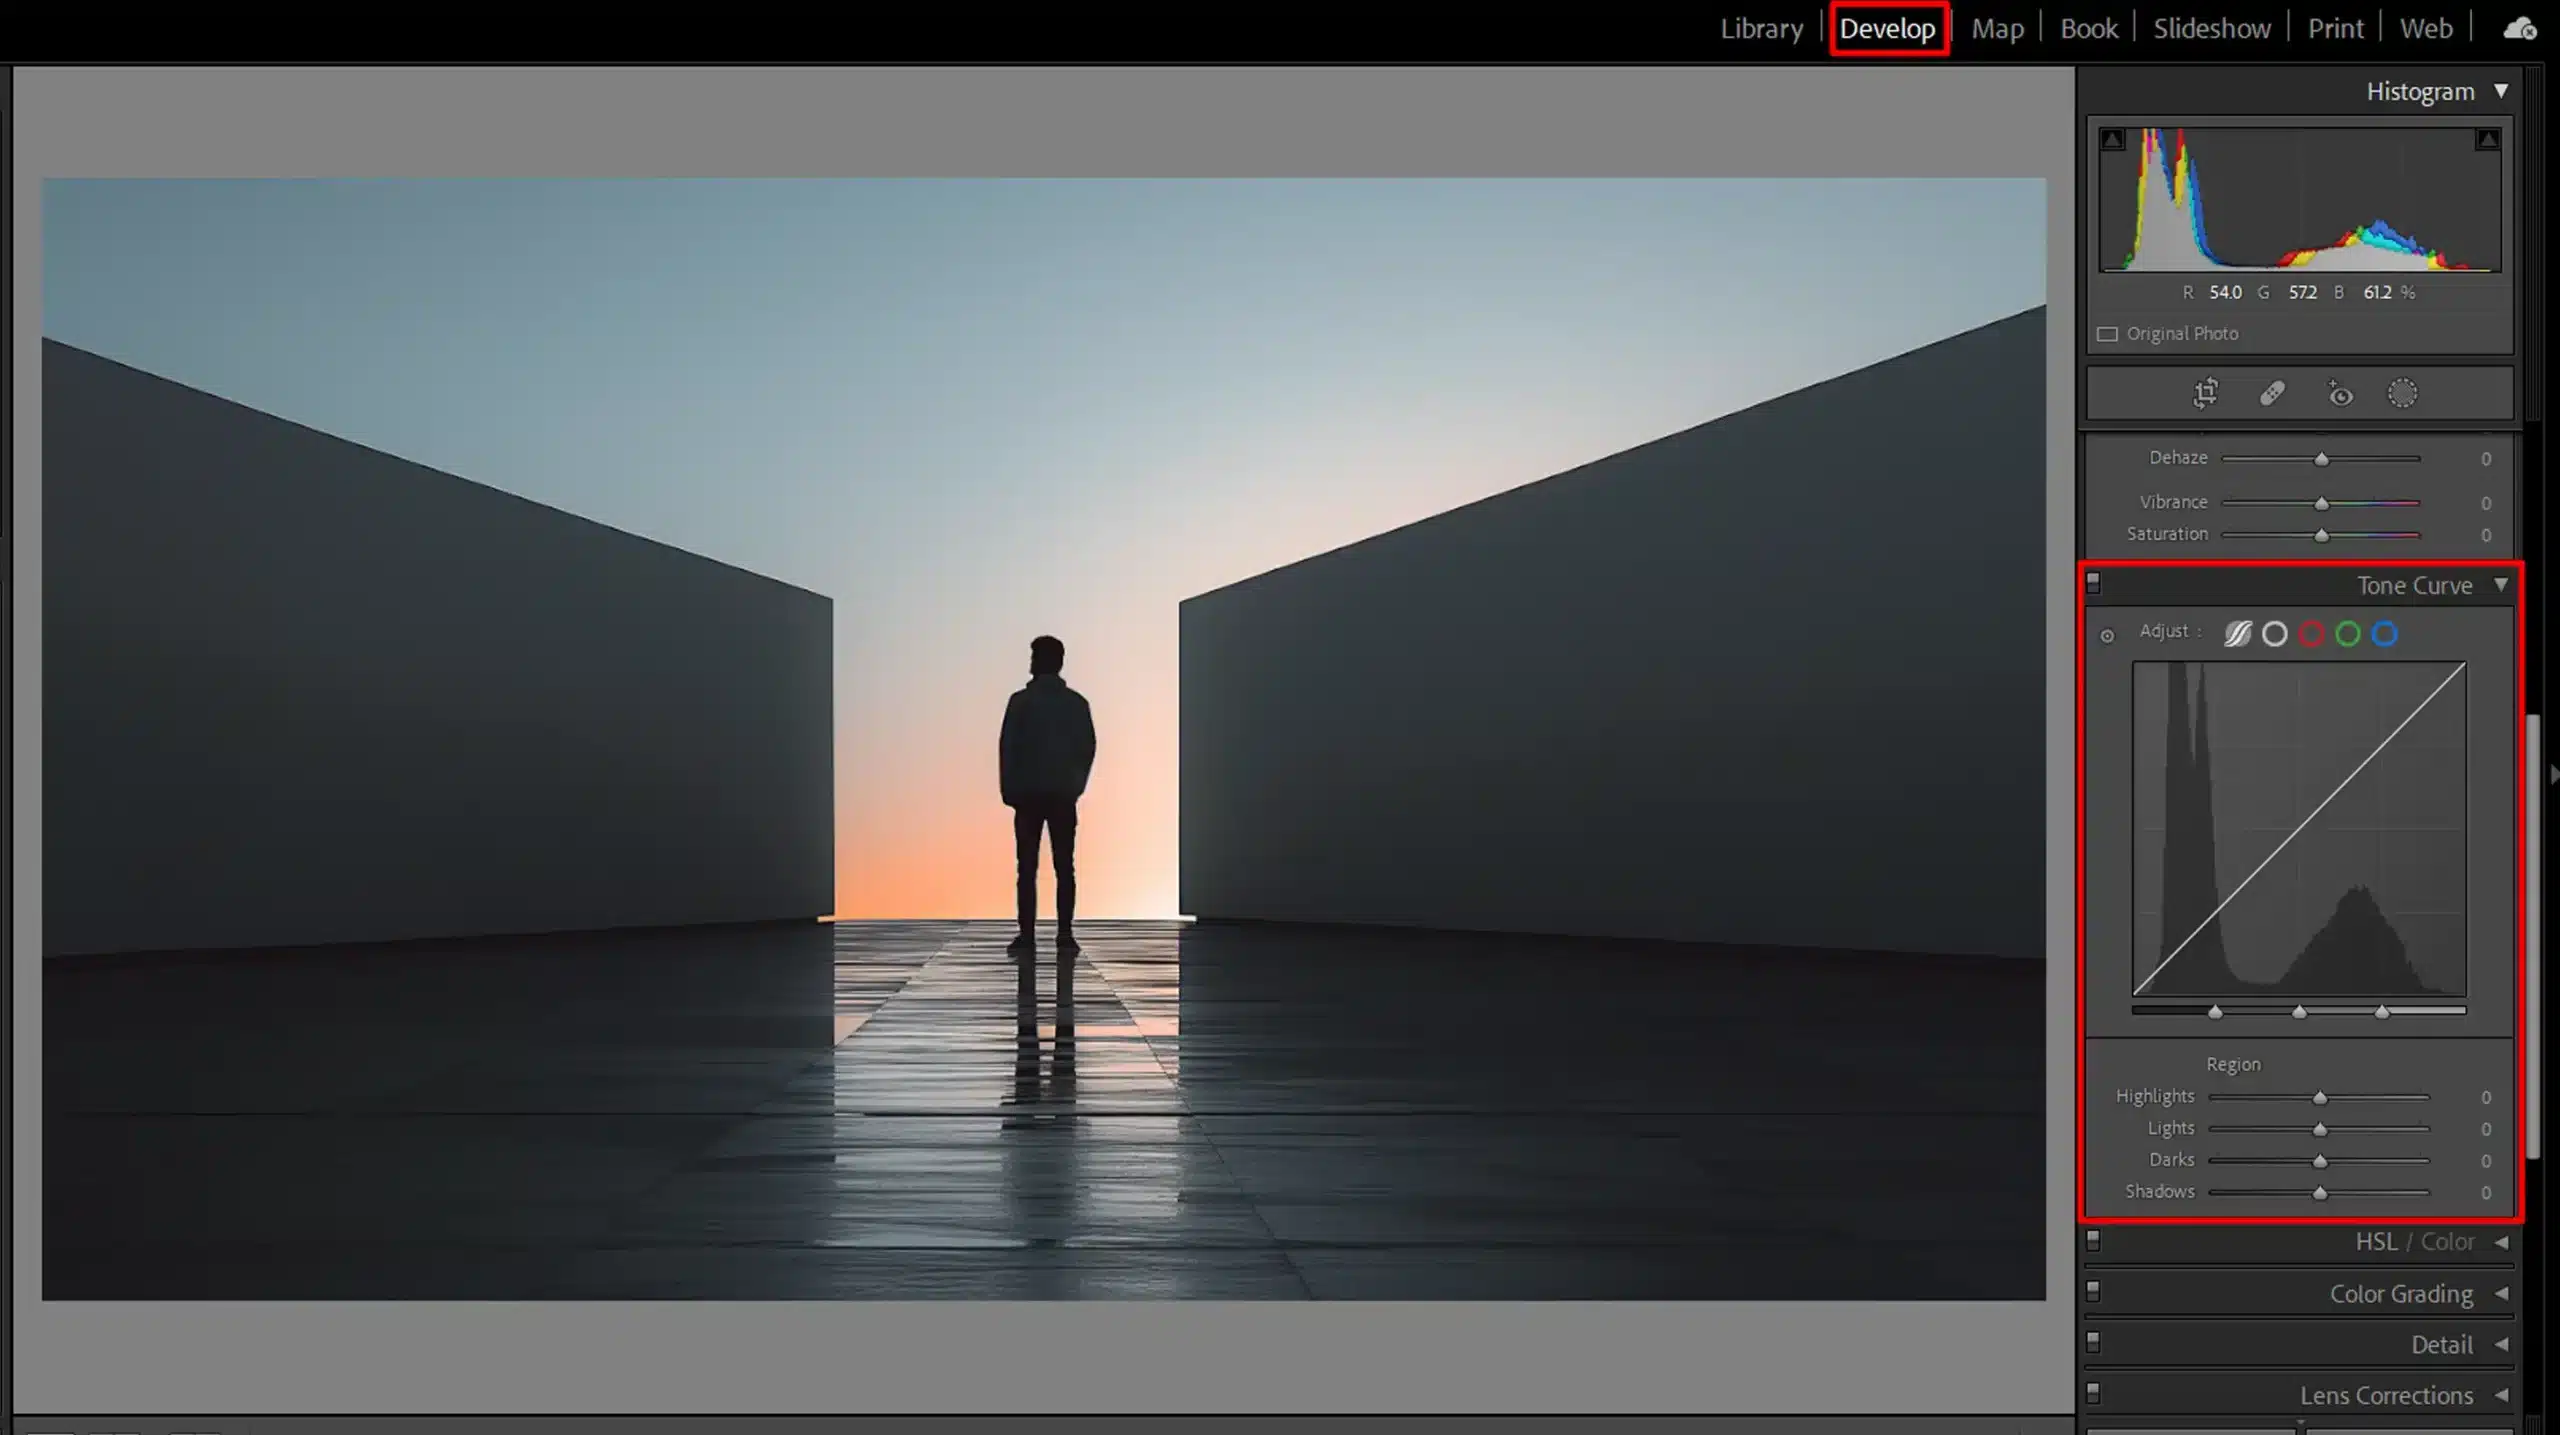
Remember, small changes can make a significant difference. Take your time experimenting with the points and sliders.
Color Grading and HSL Adjustments
Advanced users often rely on the Color Grading and HSL (Hue, Saturation, Luminance) panels. Color Grading allows for independent control of shadows, midtones, and highlights.
- HSL Panel: Adjust individual color channels. Want the sky bluer? Move the blue slider!
- Color Grading: Add tints to shadows, midtones, and highlights separately. It enhances mood and style.
Detail Enhancements: Sharpening and Noise Reduction
Sharpening and Noise Reduction come under the ‘Detail‘ tab and are important for refining images.
- Sharpening: Enhances the details, making them crisper. Be cautious though, over-sharpening can lead to an unnatural effect.
- Noise Reduction: This feature helps eliminate the grainy texture from high-ISO photos. Balance Luminance and Color sliders for best results.
Mixed properly, these settings will make your final photo pop without looking over-processed.
Pro Tip: Always review your work from a duplicate of the original image to compare all the edits you make and avoid irreversible mistakes.
Mastering these advanced techniques in Adobe Photoshop Lightroom Classic will elevate your editing experience. By the time you’ve explored these features, you’ll be creating stunning digital photos worthy of any pictures library or lightroom catalog.
If you ever feel stuck, don’t worry. Adobe Lightroom training delivers easy-to-follow help, making it a must-have walkthrough for anyone in need.
Organizing Your Photos in Adobe Lightroom
When working with a large number of photos, keeping them organized can feel overwhelming. Adobe Lightroom offers simple tools like collections and folders to help you sort and manage your images effectively.
Using Collections and Folders
Are you swamped with photos on your computer? Using collections and folders in Adobe Lightroom will save you tons of time. Lightroom’s library module is the heart where all your images are stored.
You can create folders that mirror your actual folder structure on your hard drive. Drag and drop photos into new folders effortlessly. Collections, however, offer more versatility.
Create a collection to group photos for a specific project. This won’t affect your folders. The best part? You can have one photo in multiple collections without duplicating files.
For family photos, why not create a “Family” folder and various collections for events like birthdays and holidays? This way, you can easily locate any photo with minimal effort. Use this method to streamline your workflow and keep your photos organized.
Keywording and Metadata
Metadata is like the DNA of your photos. Keywords make searching quick and easy. With Lightroom’s powerful keywording feature, you can tag photos with relevant terms. This might seem tedious at first, but it’s a real time-saver.
Open the “Keyword List” panel situated on the right side. Tagging a photo is as simple as typing a word and hitting Enter. Keep it straightforward. For example, if you have beach photos, keywords can include: beach, sand, ocean, summer.
Let’s talk about metadata. It stores details about each photo, like camera settings and the date taken. Metadata is automatically generated when you import images. You can add custom info, making it easier to find specific images later.
Rating and Flagging Photos
How do you pick the best shots from hundreds of photos? Adobe Lightroom has rating and flagging tools to help you sift through images quickly. Here’s how to get started:
- Use the “Pick” and “Reject” flags while reviewing imported photos. Hit "P" to pick and "X" to reject. Simple keyboard shortcuts speed up the process.
- Want to mark your absolute favorites? Use star ratings (1-5) by pressing the corresponding number keys.
Tags and ratings help you to find your starred images quickly. Think of it as shortlisting your best shots. Don’t forget color labels! Tag your photos with colors to fit themes or projects. Combined with collections, keywords, and metadata, finding any photo becomes a breeze.
Pro Tip: Batch editing is a lifesaver. Apply changes to multiple photos at once. Adjust exposure, white balance, or add keywords to a selected group of photos. Saves loads of time!
Adobe Photoshop Lightroom Classic provides the tools to stay organized and efficient. Embrace these steps and you’ll master your photo library in no time.
Exporting and Sharing Your Photos
Once you’ve perfected your photos in Lightroom, it’s time to share them with the world. Here’s an easy-to-follow guide on different methods you can use to export and showcase your images.
We’ll cover exporting settings, crafting slideshows and web galleries, and printing directly from Lightroom.
Here’s a quick comparison of key aspects of Adobe Lightroom to help you streamline your workflow and enhance your editing process.
| Aspect | Overview |
|---|---|
| Export Settings and Formats | Learn how to set appropriate formats, resolution, and destination folders for your exported photos. |
| Creating Slideshows and Web Galleries | Easily build slideshows and web galleries with customizable options such as transitions, music, and design templates. |
| Printing Photos from Adobe Lightroom | Learn how to adjust print settings such as color management, resolution, and paper types to create high-quality prints. |
| Lightroom Keyboard Shortcuts | Use simple keyboard shortcuts to speed up your editing workflow in Lightroom and enhance productivity. |
| Time-Saving Tips | Implement presets, customize your workspace, and organize your Lightroom catalog to optimize your photo editing process. |
| Common Mistakes to Avoid | Avoid pitfalls like over-editing, ignoring lens corrections, and failing to back up your work to ensure the best results. |
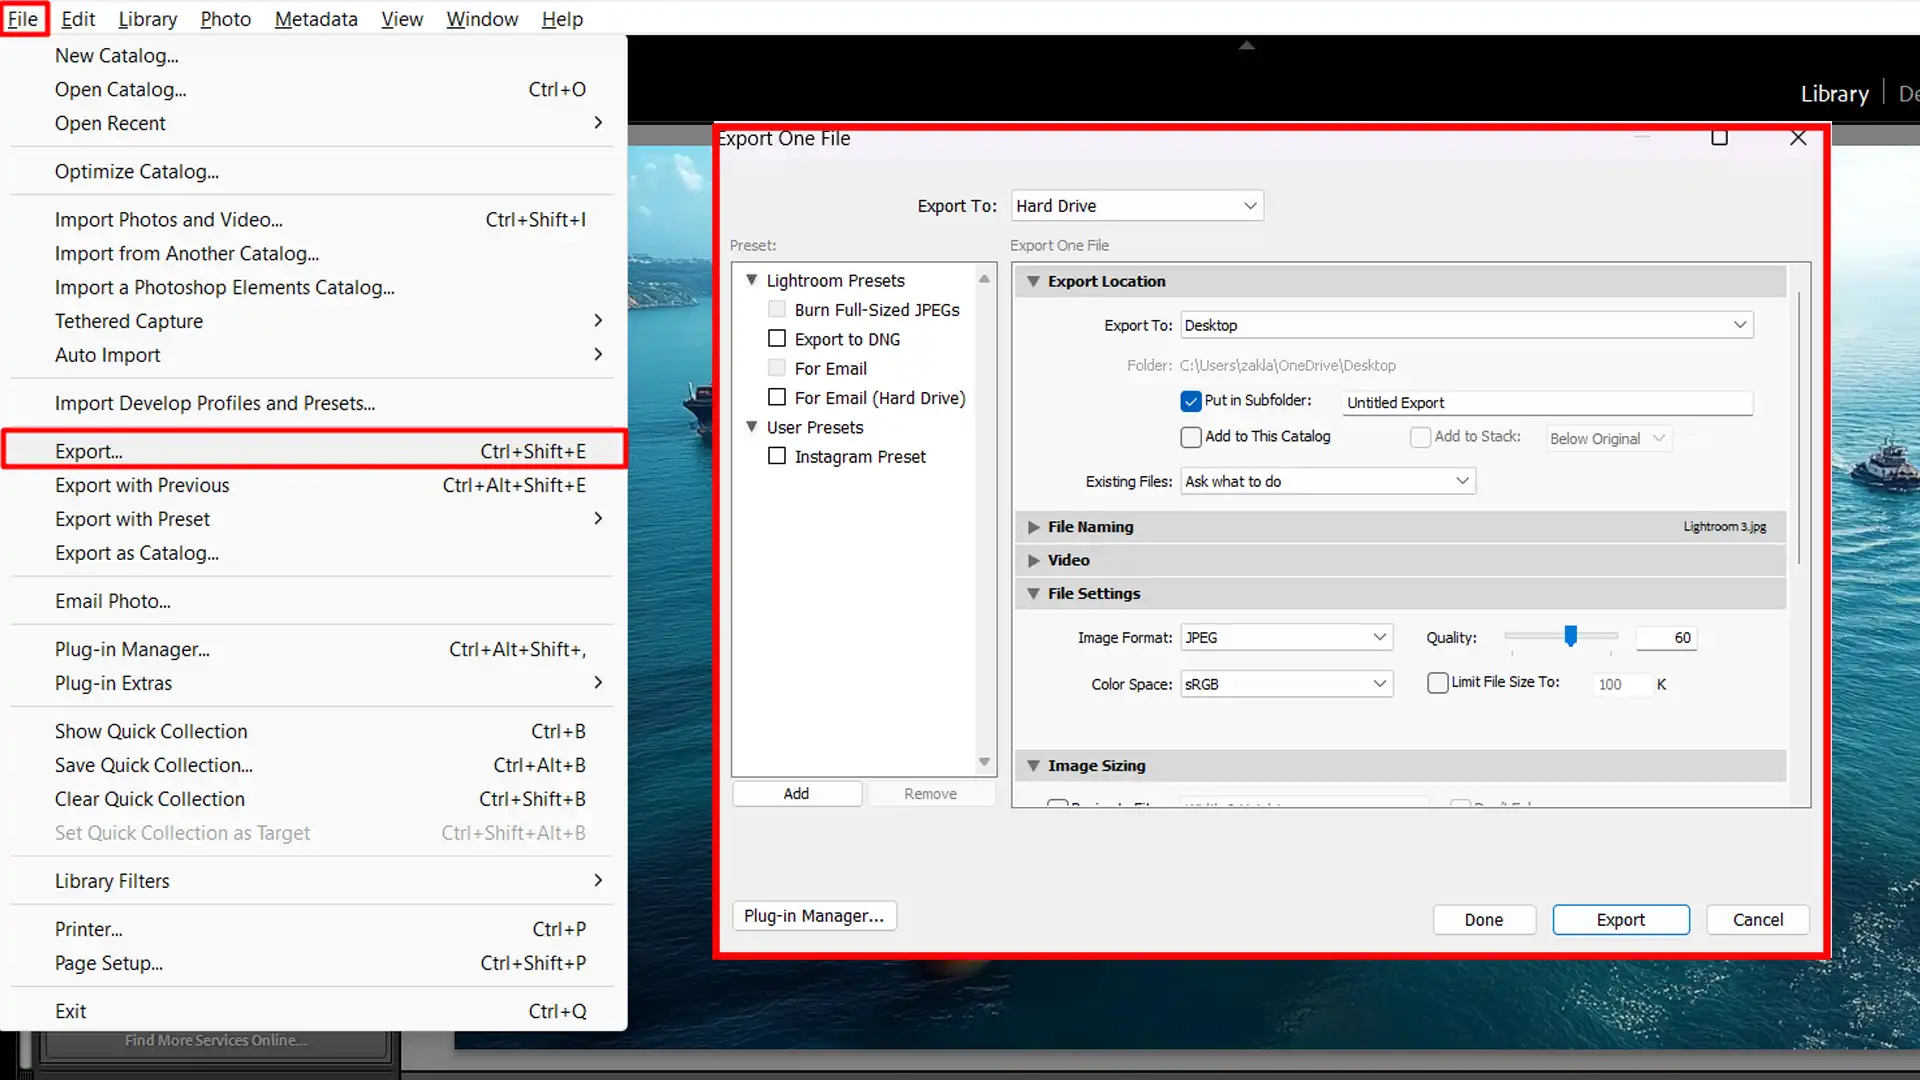
Export Settings and Formats
Choosing the right export settings and formats can make all the difference in how your final images are displayed. Let’s explore how to adjust these settings for the best results
Steps to Export Photos
To export your photos from Adobe Lightroom, follow these simple steps to ensure the correct format and resolution for your needs. Here’s how to do it:
- Select your photos and click on the Export button located in the Library module.
- Choose from a wide range of formats such as JPEG, TIFF, and DNG to fit your needs. Deciding between NEF or JPEG format can also be important depending on your workflow.
- Set appropriate resolution and compression levels for your specific use case.
- Select the destination folder where you want your pictures saved.
- Hit Export again to finalize the process.
Choosing the Right Format
When deciding on the right format for your photos, it’s important to choose based on your intended use. Here’s a quick guide to help you select the most suitable option:
- JPEG: Ideal for most sharing purposes due to its balance of quality and file size.
- TIFF: Best for preserving quality for further editing.
Creating Slideshows and Web Galleries
Slideshows and web galleries are a fun way to showcase your photos. Let’s dive into how you can create them step by step for a polished presentation.
Constructing Slideshows
Did you know constructing slideshows in Lightroom is as easy as pie? Switch to the Slideshow module, where you can add your selected photos into a cohesive presentation.
Customize it with slide durations, transitions, and even background music if desired.
Creating Web Galleries
Create web galleries easily, too! Switch to the Web module, and Lightroom provides you with templates to choose from. Simply drag and drop your photos, tweak the design, and upload directly to your website.
These galleries are perfect for showcasing your work to clients or sharing memorable events with friends and family.
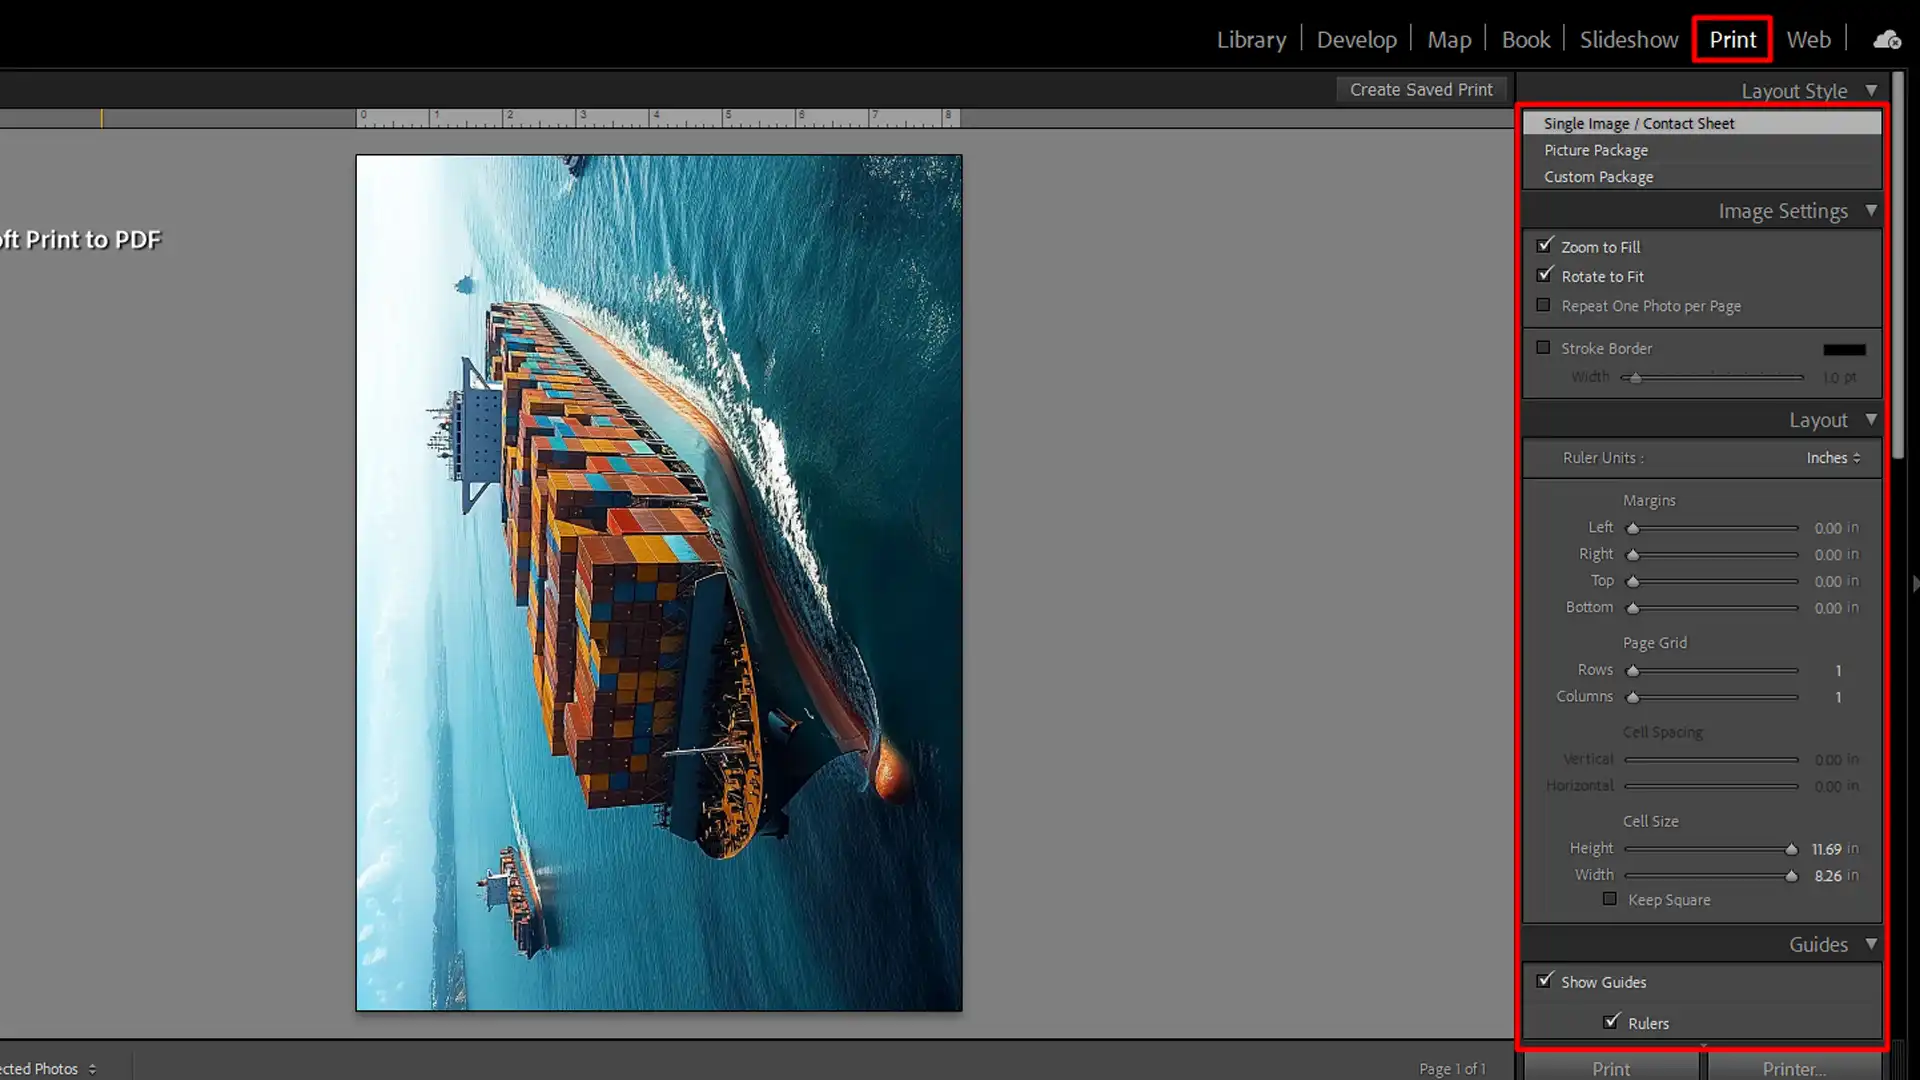
Printing Photos from Adobe Lightroom
Printing your photos directly from Adobe Lightroom is a straightforward process. Here’s a quick guide to help you get started and produce high-quality prints.
Steps to Print Photos
To ensure your photos look their best when printed, follow these steps to optimize your settings for the highest quality results:
- Select a template that fits your paper size and layout preference in the Print module.
- Adjust print settings like color management, print resolution, and sharpening.
- Choose the right paper type in your printer settings to avoid unexpected results.
- Click Print to produce stunning prints immediately from Lightroom.
Pro Tip: Always check your print settings twice before hitting print to avoid wasting ink and paper. Adjusting print resolution and sharpening can make a big difference in final output quality.
With these steps, begin learning to export and share photos effortlessly using Adobe Photoshop Lightroom Classic. Whether you’re preparing snapshots for social media or professional galleries, Lightroom offers a comprehensive platform to fulfill all your needs without fuss.
Tips and Tricks for Learning Adobe Lightroom Classic
Here are some useful tips and tricks to help you get the most out of Adobe Lightroom Classic, making your editing process smoother and more efficient.
This is the basics of Adobe Lightroom for Dummies, ideal for beginners aiming to master photo editing.
Lightroom Keyboard Shortcuts
We all aim to get things done quickly. Hence, knowing Lightroom keyboard shortcuts can save you a heap of time. Let’s start with some basics:
- Press 'D' to jump directly into the Develop module.
- Use 'G' to pop back to the Grid view.
- Want to compare two images? Hit 'C'.
These are just a few shortcuts, but using a keyboard shortcut is a crafty way to navigate the software without moving your mouse constantly. Try to practice them. They become second nature over time.
Time-Saving Tips
One surefire way to save time is by using presets. Presets can apply a series of edits to your photo in one click. Follow these steps:
- Create a go-to preset that suits your style.
- Save it.
- Apply it.
This speeds up your post-processing workflow. Also, always organize your photos in a well-structured Lightroom catalog.
Remember, great organization leads to an efficient workflow. Don’t hesitate to customize your workspace. Rearrange panels to keep your most-used tools closest at hand. This sounds tiny, but it’s substantial in saving time.
Common Mistakes to Avoid
Jumping into editing without a plan often mars the result. Take a moment. Consider carefully what you want to enhance before touching those sliders.
Another common misstep is ignoring lens correction. Every lens, especially those on digital cameras, introduces some distortion. Use the Lens Corrections panel.
Lightroom will correct these on its own if you enable the checkbox. Over-editing is another pitfall. Less is often more. Preserve the authenticity of the scene, especially in digital photography.
Store your work not only on your memory card but also on an external drive or cloud storage. Data loss is heartbreaking.
Pro Tip: Develop your own editing style. Consistency can make your work recognizable. It’s like your visual signature!
Resources for Mastering Adobe Lightroom
Online Tutorials and Courses
Online tutorials and courses provide an extensive resource base. These platforms offer a range of content from beginner to advanced levels. Many websites host tutorials that include video content, making it easier to grasp concepts through visual representation.
Websites like Udemy, LinkedIn Learning, and YouTube cover every aspect of Lightroom and make them simple to grasp. They often provide step-by-step instructions and run through common scenarios, helping you to get hands-on experience.
For complete novices, there’s no better series than “Adobe Lightroom for Dummies.” This series starts from the basics and walks you through everything you need to know about Lightroom.
For a deeper dive into mastering the software, consider courses like the ultimate Adobe Lightroom Training, which covers everything from fundamental tools to advanced techniques.
Some courses also address prior photography knowledge, giving you a more rounded learning experience. By following these online tutorials, you develop the design skillset needed for effective image editing. Trust me, these resources are handy, and nothing beats practicing with guided help.
Books and Guides
For those who prefer learning through books, there are plenty of guides available. Titles such as “The Adobe Photoshop Lightroom Classic CC Book for Digital Photographers” by Scott Kelby are widely recommended in the community.
These books outline methods comprehensively and systematically, covering many more advanced topics too. Unlike the abundance of mouse ways shown in videos, books often include specific Lightroom shortcuts, making your workflow more streamlined.
A book is a great reference tool. You can mark pages, write notes, and easily flip back when you need to double-check something. It offers a different experience from online tutorials but can be equally effective for solidifying your understanding of the software.
Companies often release official guides that include updates and new features of the software, ensuring you’re always working with the latest information. If you’re an avid reader and love learning at your pace, picking up a book or two may be what you need.
Community and Support
Never underestimate the power of the community when learning new software, especially with the rise of AI-powered software.
Various forums and online groups serve as platforms to ask questions, share experiences, and receive straightforward guidance. Resources like “Adobe Lightroom for Dummies” can be an excellent starting point, but the community can further enhance your understanding with real-world tips.
The Adobe support community is particularly active, covering most areas of Lightroom. Interaction with experienced users provides insights that you won’t find in structured learning environments.
They often share tips, troubleshooting problems, and workflow enhancements that simplify tasks.
Joining a community can also be motivating. Seeing how others create, edit, and tackle problems encourages you to do the same.
Facebook groups, Reddit threads, and specialized photography forums, all contribute to a robust support system. Don’t shy away from asking questions. People are generally willing to help.
And participating regularly can cement your own understanding as you explain and help others.
Pro Tip: Spend some time each day exploring different tools and features in Lightroom. The more you experiment, the more confident you become.
Frequently Asked Questions (FAQs)

What is Lightroom and what does it do?
Adobe Lightroom is a powerful image editing and management software. It helps photographers and visual artists organize, edit, and share their photos. Here’s what Lightroom offers:
- Photo Organization: Lightroom provides tools to sort, tag, and categorize photos, making it easy to manage large collections.
- Editing Tools: It includes a variety of editing options, from basic adjustments like exposure and contrast to advanced edits like spot removal and gradient adjustments.
- Presets: Users can apply presets to enhance photos quickly or create their own for a consistent look.
- Sharing Capabilities: Lightroom allows easy sharing to social media, websites, and other platforms directly from the software.
How Do You Troubleshoot Lightroom Classic?
If you’re experiencing issues with Lightroom Classic, here are some common solutions:
- Update Software: Ensure your version of Lightroom Classic is up-to-date as updates often fix bugs and improve performance.
- Check System Requirements: Verify that your computer meets the minimum system requirements for running Lightroom Classic.
- Optimize Preferences: Adjusting your Lightroom preferences can enhance performance. Consider setting the Camera Raw cache higher and optimizing catalog settings.
- Rebuild Previews: Corrupted previews can cause issues. Try rebuilding the previews to resolve display or performance problems.
Contact Support: If problems persist, reaching out to Adobe support can provide more personalized troubleshooting assistance.
How Can Adobe Lightroom for Dummies Help Beginners?
Adobe Lightroom for Dummies provides easy, step-by-step guidance for new users. It simplifies Lightroom’s tools and features, helping beginners edit and organize photos with ease.
- Breaks down complex tools into simple steps
- Helps organize and manage photo libraries
- Teaches basic photo adjustments like exposure and contrast
What’s the Difference Between Adobe Lightroom Classic and Adobe Lightroom for Dummies?
Adobe Lightroom Classic is professional software with advanced features, while Adobe Lightroom for Dummies is a beginner’s guide, making it easier to learn the basics.
- Lightroom Classic: Advanced tools for pros
- Lightroom for Dummies: Simplified guide for beginners
- Focuses on core skills to help new users
- Classic has a steep learning curve; Dummies breaks it down

Conclusion
Using Adobe Lightroom for Dummies has made editing my photos so much easier. Before finding this guide, I was lost in all the tools and features that Lightroom offers.
But with the simple instructions and helpful tips, I quickly felt confident in enhancing my images. It became a fun and enjoyable process, even though I’m not a tech expert.
If you’re in the same boat and want to improve your editing skills, I recommend checking out this Photoshop Course and this Lightroom Course. They’ve really helped me level up my editing. If you’re interested in exploring Adobe products further, you can check out Photoshop or Photoshop Lightroom directly from Adobe.
These resources have been a huge part of my journey in mastering photo editing, and I believe they can do the same for you, too.
Give them a try, and you’ll see your photography skills grow in no time.
Read more about Photoshop:


Course

Light Effect Photoshop


Lightroom Course 2025

Adobe Photoshop Course 2025

Photo Editing Course


