When working with large volumes of images, Adobe Bridge is a powerful tool that can simplify your workflow. It acts as a media manager, helping you organize, browse, and manage your creative assets efficiently.
Imagine having all your files at your fingertips, neatly organized, and easily accessible. Whether you’re a professional photographer or a casual hobbyist, mastering Adobe Bridge can save you time and effort. Intrigued?
Let me show you how this tool can transform the way you handle your digital files. Read on to discover the significant features and tips to make the most out of Adobe Bridge.
Table of Contents
Overview of Adobe Bridge
Adobe Bridge helps streamline your workflow. We will dive into what Adobe Bridge offers and its benefits for photographers and designers.
What is Adobe Bridge?
Adobe Bridge is a powerful file management application from Adobe. It lets you manage files, organize assets, and access them easily from other Adobe Creative Cloud apps. Opening Bridge for the first time might feel like stepping into a new world, but don’t worry.
Its interface is easy to get used to. The Bridge interface has a clean look that displays not just images but also videos, audio files, and even Adobe InDesign files.
Use Adobe Bridge to import multiple images using the photo downloader tool. It allows you to view all your creative assets in one place. This is helpful if you need to group images or use multiple files at once.
Benefits of Using Adobe Bridge
Opening Bridge for the first time reveals many features. Here are some main benefits:
- Better Organization: Adobe Bridge quickly organizes multiple files into folders. You can use keywords, labels, and ratings. The filter panel provides more detail to find specific assets.
- Batch Processing: Rename, batch import, and export files efficiently. This feature saves time by processing multiple images simultaneously.
- Integration with Creative Cloud: Adobe Bridge seamlessly integrates with Adobe Creative Cloud, giving easy access to Adobe Photoshop, Lightroom, and other creative tools. take full advantage of these integrations, and ensure you're signed in with your Adobe ID, allowing you to sync settings and assets across different devices and applications
- Compatibility: Handle various file formats, including RAW files, videos, and more. It supports multiple keywords and other metadata options.
- Workspace Customization: Personalize the Bridge interface to suit your workflow. Save configurations and switch between different setups effortlessly.
Remember to install Bridge today and explore its full potential. This tool can improve your productivity significantly.
Pro Tip: Use keyboard shortcuts in Adobe Bridge to speed up your workflow and save valuable time. Additionally, integrating Adobe Bridge with Lightroom can further enhance your photo editing process by giving you quick access to essential tools in Lightroom for advanced adjustments.
How to Use Adobe Bridge
Adobe Bridge is a powerful tool for managing and organizing your creative assets. Before diving into its features, you’ll need to download and set it up properly.
This guide will walk you through the initial steps to get Adobe Bridge up and running smoothly on your system.
Installation and Setup
Starting with Adobe Bridge is easy. First, ensure you’ve signed up for a Creative Cloud subscription. Next, download and install Adobe Bridge from the Adobe website. Once installed, launch the application. You will need to sign in with your Adobe ID. This ensures all functionalities are accessible and linked to your account.
Begin by setting file destinations for the documents folder or any preferred location. Access preferences through Edit > Preferences, and customize your defaults like thumbnail size and camera settings.
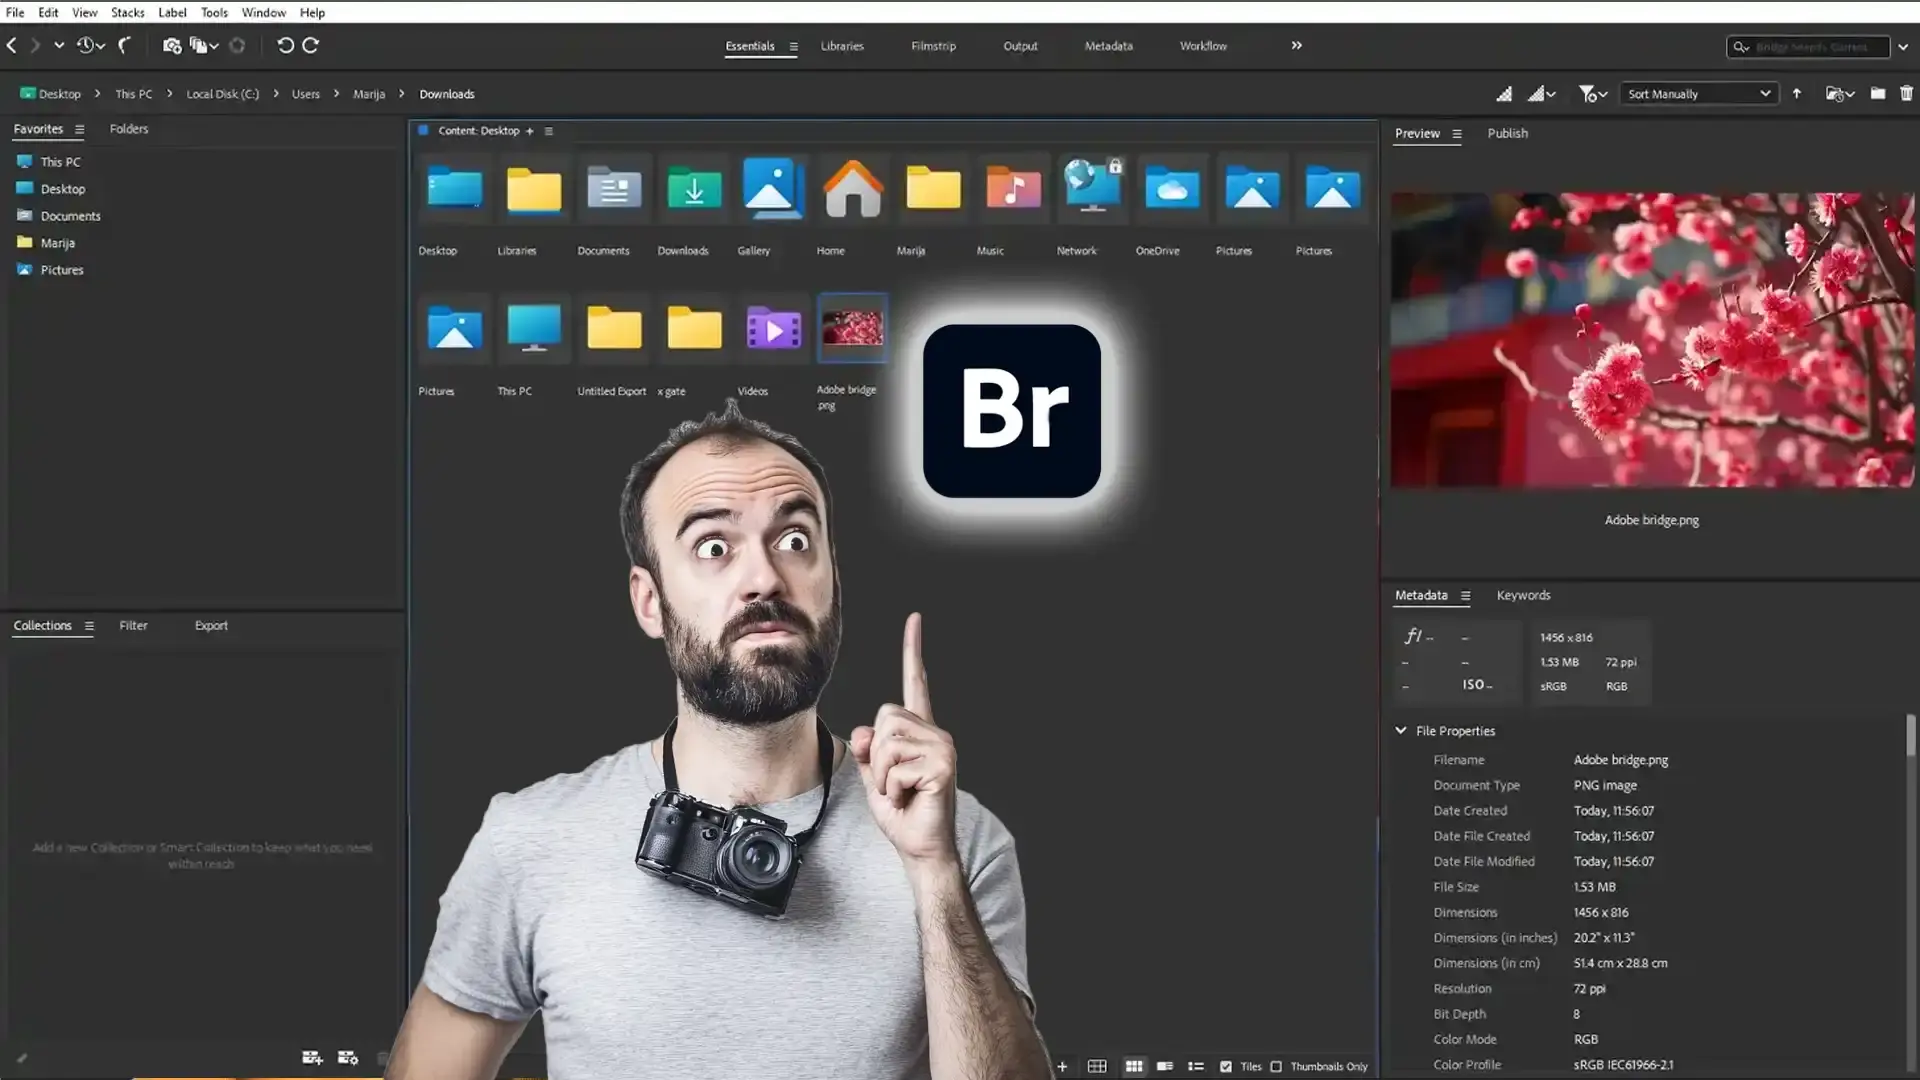
Navigating the Interface
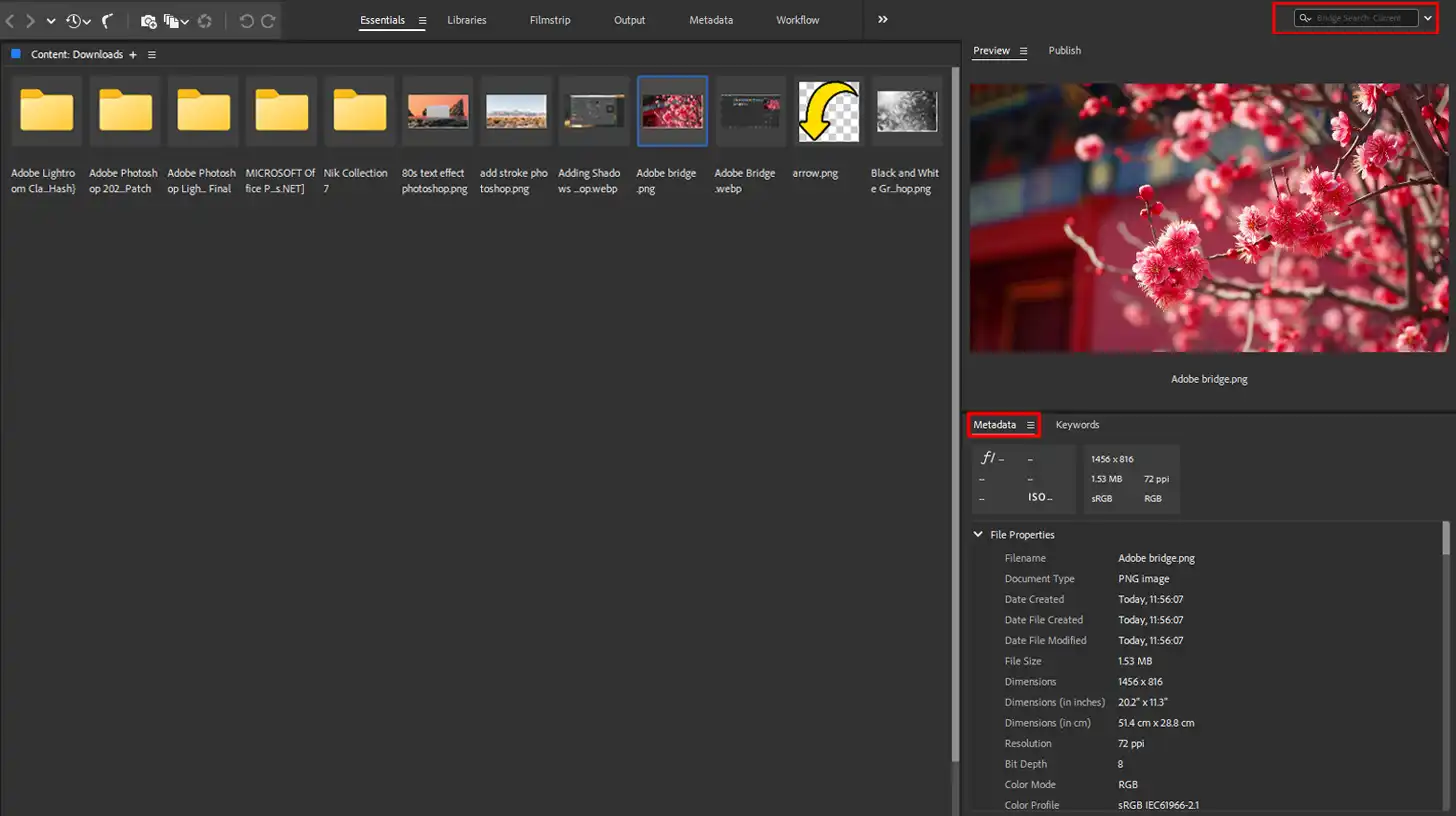
Understanding the Bridge interface is significant. On launching, the interface presents the main panel, a filter panel, and a content panel.
The left side houses the folders. Click through to access images and documents. The central panel displays thumbnails, while the filter panel assists in sorting by star ratings or keywords. If you ever feel lost, use the keyboard shortcut (Ctrl+F) to locate files.
Customizing Adobe Bridge
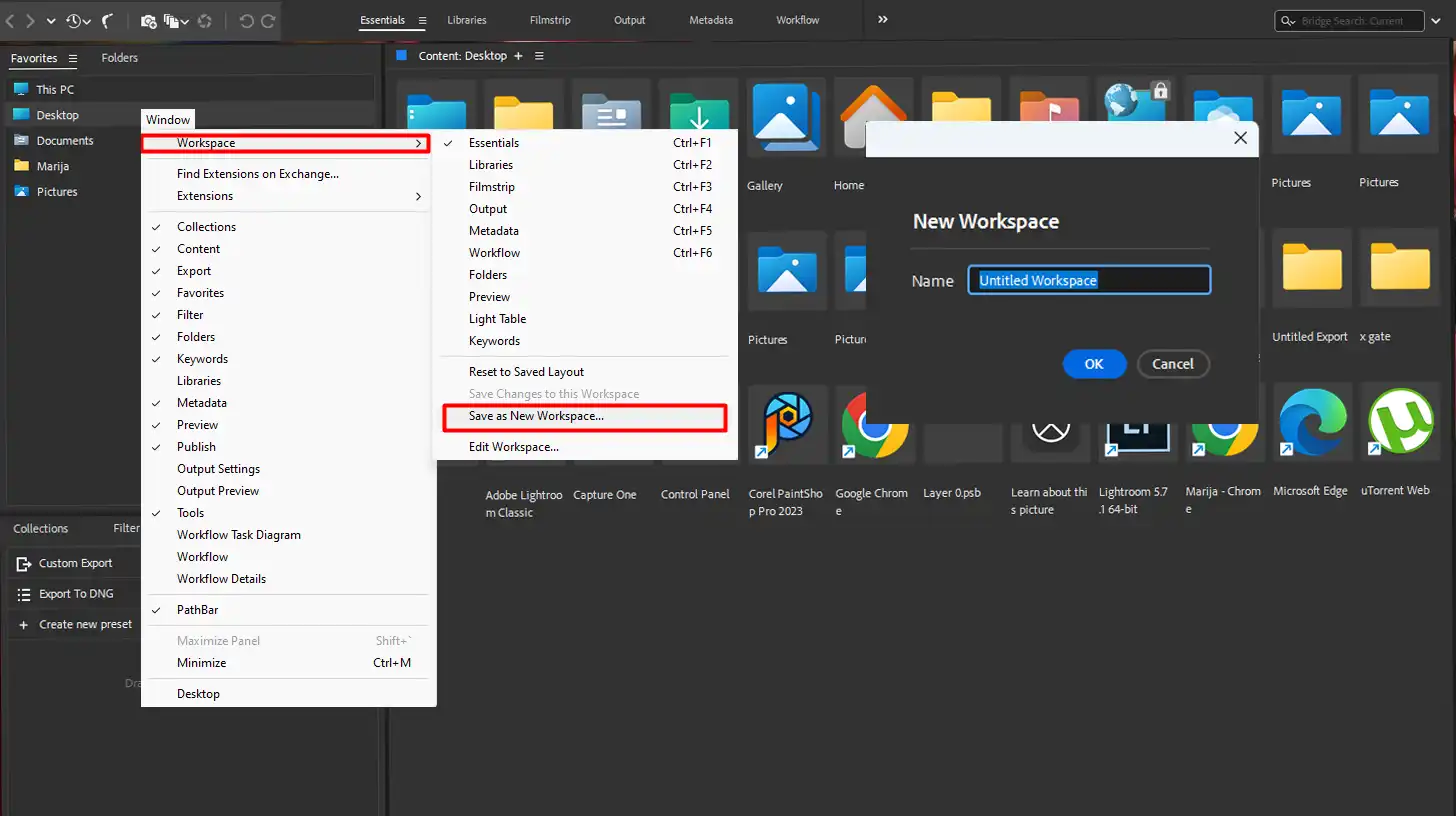
Customization is important to efficiency. Adjust the workspace by dragging panels to preferred positions. Save it by selecting Window > Workspace > Save as a New Workspace. This tailored setup ensures optimal productivity.
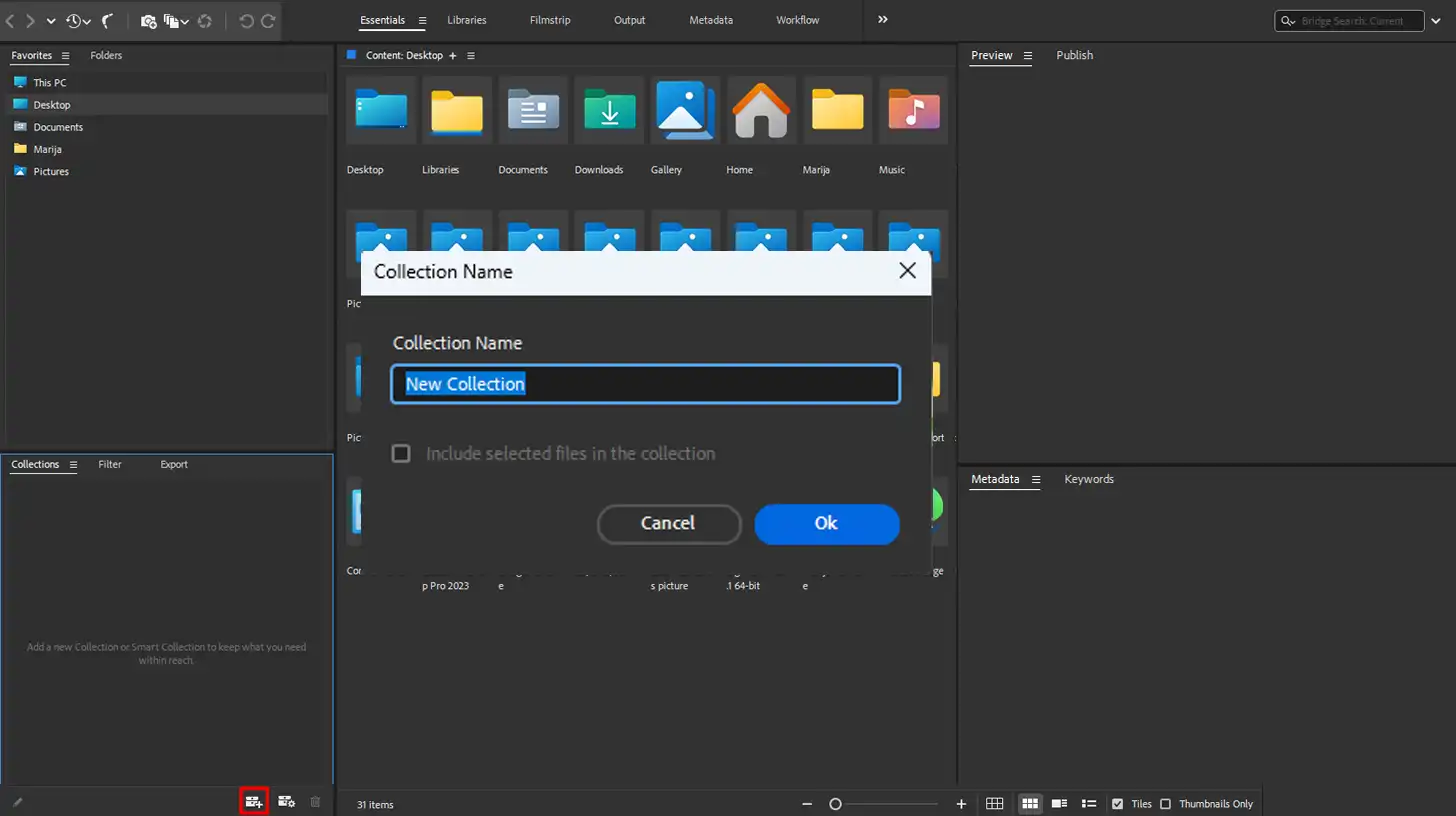
Utilize smart collection to group files based on certain criteria. Access the Collection panels by clicking the icon to create a new Smart Collection and define your parameters. This enhances file retrieval and management.
Leveraging the creative suite integration, you can batch rename, rate, and label, streamlining your workflow.
Pro Tip: Streamline your workflow by using batch processes for Bridge.
How to Use Adobe Bridge to Organize Photos
Adobe Bridge serves as a powerful tool for managing your photo collection. It integrates seamlessly with other Adobe software, making it an important component of your digital workflow.
Using Folders and Collections
Organizing your files in Adobe Bridge can be done through folders and collections, helping you manage your projects more efficiently. Let’s look at how to set up and use these features to keep everything in order.
Setting Up Folders
The first step in organizing with Bridge is setting up folders. Create specific folders for different events or dates. For instance:
- One folder can hold your vacation photos.
- Another folder can store a wedding album.
Creating Collections
Collections help in grouping files based on certain criteria. Think of collections as virtual albums. They don’t physically move your files but make them easily accessible.
Tagging and Rating Your Files
Tagging and rating files in Adobe Bridge helps you find and manage your assets more efficiently. Learn how to apply tags and ratings to streamline your workflow and keep your projects organized.
Tagging
Tagging is an efficient way to streamline your photo management. Use keywords to tag your images, making future searches straightforward.
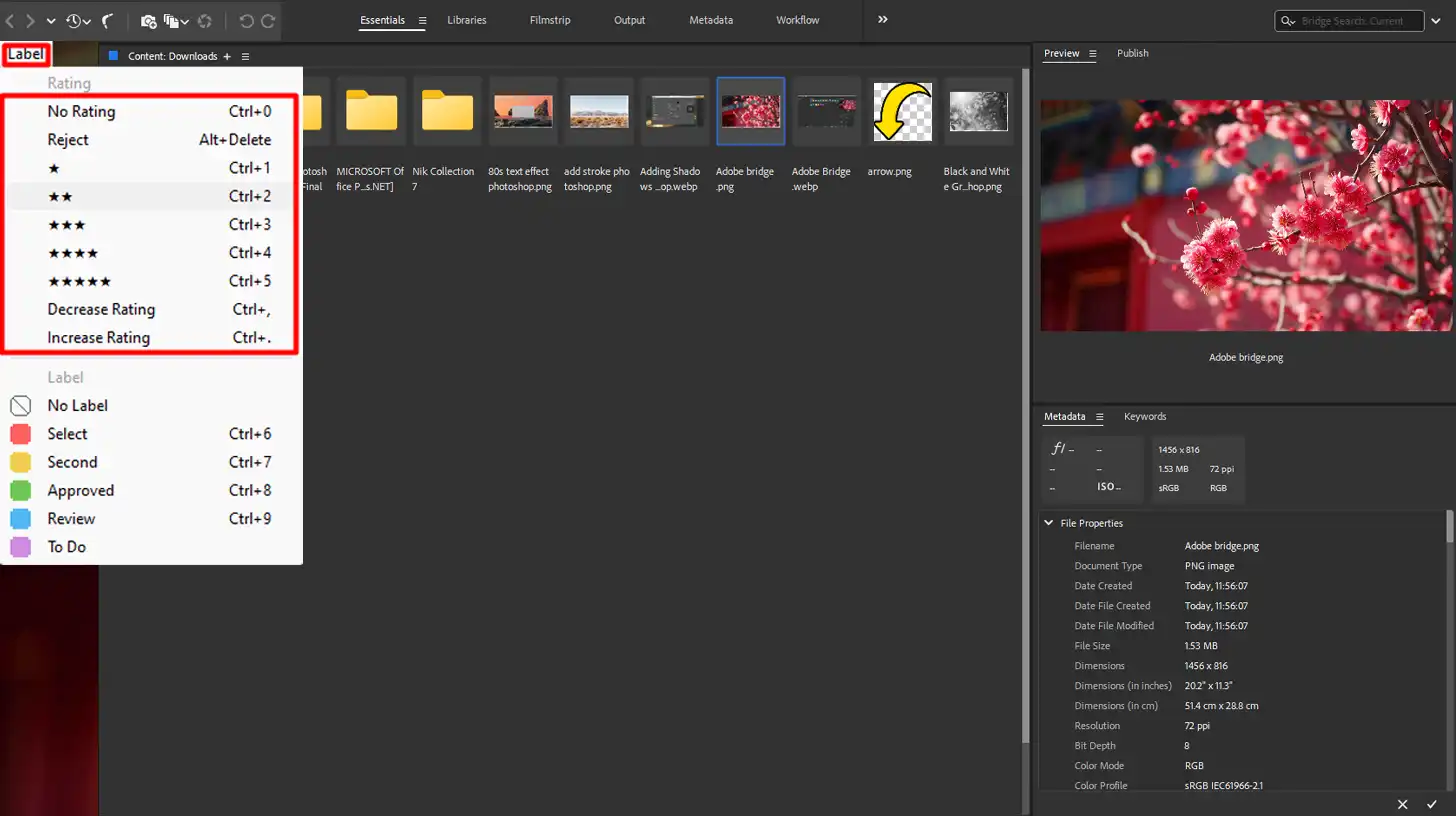
Rating
Ratings add another layer of organization. Assign stars or labels to your favorite shots or those requiring edits.
This method is especially useful when working with images you frequently use. You can later filter these tags and ratings to locate the exact file you need quickly.
Batch Renaming
One of the strongest features of Adobe Bridge is batch renaming. Select numerous files, click Tools, then Batch Rename in the menu. This function allows you to rename hundreds of files simultaneously.
No more tedious, individual renaming. Just set your naming pattern and let Bridge do the work. This feature can save you from repetitive strain injuries!
Pro Tip: Use the Photo Downloader tool to import images directly from your digital camera. It helps you organize and tag your photos during the import process, making it easier to manage large volumes of images efficiently.
Integrating with Lightroom
For those who use Lightroom for editing, Adobe Bridge can be a great companion. After organizing your photos in Bridge, you can easily import them into Lightroom for further editing.
This seamless integration between Adobe Bridge and Lightroom ensures a smooth workflow from organization to post-processing.
Using Keywords for Efficient Searches
In addition to tagging, using keywords effectively can make your photo searches even more efficient. Keywords like “vacation,” “wedding,” or “portrait” can help you quickly locate specific types of photos, especially when dealing with large collections. This is particularly useful for professional photographers who need to manage extensive libraries.
Another feature worth mentioning is the use of high-quality thumbnails for browsing through your collection. Thumbnails give you a quick visual reference, making it easier to sift through extensive folders.
If you’re dealing with high-cost software solutions, Adobe Bridge stands out due to its robust capabilities without additional software cost.
For specific needs, you can utilize plugins to enhance Bridge’s utility further. For example, some plugins allow for detailed metadata editing, and others help in batch processing workflows.
You can even browse through online directories using Bridge, making it a versatile tool for many photographers.
How to Make a Contact Sheet in Adobe Bridge
Adobe Bridge offers many useful features for organizing your photos, and one of those is creating a contact sheet. This feature comes in handy when you want to preview multiple images at once without opening each one individually.
Why Create a Contact Sheet?
Creating a contact sheet is a great way to review many photos together, making it easier to select the best shots. To make a contact sheet in Adobe Bridge, follow these simple steps:
Select the Images
- Open Adobe Bridge on your computer.
- Navigate to the folder containing the photos you want to include in the contact sheet.
- Select the images by holding down the Ctrl key (Cmd on Mac) and clicking on each photo.
Create the Contact Sheet
- Go to the Output workspace by clicking on the Output tab in the upper right corner of the Bridge interface.
- Choose PDF from the top menu under Output.
- In the Output panel on the right, set your desired layout options like rows, columns, and spacing between images.
- Click on the Refresh Preview button to see how your contact sheet will look.
- Once satisfied, click on Save to save your contact sheet as a PDF file.
Customization Options
You can also customize your contact sheet by adding headers, footers, and page numbers.
- In the Output panel, scroll down to find these options in the PDF Settings section.
- Check the boxes to include these elements, then enter your text and presets.
Managing Images and Metadata
While creating your contact sheet, it’s important to manage your images and their metadata properly. Adobe Bridge allows you to search for specific images using metadata filters.
To do this:
- Use the search bar located in the upper right corner of the Bridge window.
- Enter keywords related to the metadata of the images you're looking for.
Sharing and Organizing
After creating your contact sheet, you can easily share it with others. The PDF format makes it simple to send via email or download from a cloud storage service.
This saves space by combining multiple images into a single file and ensures that the recipients can view the thumbnails without needing specialized software.
Whether you’re on a Windows system or a Mac, Adobe Bridge’s contact sheet feature is a versatile tool for both professional photographers and casual users.
Pro Tip: Use keywords effectively in Adobe Bridge. Tagging your images with relevant keywords like “vacation” or “wedding” makes it easier to find specific photos later. This is especially useful if you handle a large photo library.
Additional Benefits
Adobe Bridge and other Adobe software, such as Adobe Creative Suite, offer various tools for photographers. With the latest release of Adobe’s Creative Cloud, these tools are integrated seamlessly for a smooth workflow.
Whether you’re transferring files to a new computer or working with raw files, Adobe Bridge ensures your images are well-organized and easily accessible.
By leveraging the full potential of Adobe Bridge, you can enhance your productivity and streamline your photo management tasks efficiently. Additionally, understanding the difference between Photoshop and Lightroom can further optimize your editing process, as each software offers unique capabilities tailored to different aspects of photo editing.
For those looking to delve deeper into Adobe’s offerings, exploring Lightroom shortcuts can significantly speed up your workflow, making photo editing more efficient and enjoyable.
Working with Adobe Creative Suite
Adobe Bridge works seamlessly with other Adobe design tools applications, enhancing your creative workflow. Discover how to integrate Bridge with programs like Adobe Photoshop for a smoother editing experience.
Integration with Adobe Photoshop
Whether you’re a passionate hobbyist or just a curious soul, understanding how Adobe Bridge integrates with Adobe Photoshop opens up a universe of creative possibilities. Bridge serves as an efficient file manager within the Adobe ecosystem, allowing you to collect, sort, and preview your images before conducting any edits.
Imagine you have hundreds of photos from a recent family reunion; using Bridge to sift through these images helps you identify the best shots quickly.
Once you’ve made your selection, seamlessly switch to Photoshop for detailed edits. This workflow improves efficiency and ensures that only the most promising images undergo substantial editing.
The integration between Bridge and Photoshop maximizes your creative potential, effectively minimizing time wasted on less favorable shots. Additionally, learning Photoshop shortcuts can further speed up your editing process, making your workflow even more efficient.
Using Adobe Camera Raw
Adobe Camera Raw is another powerful tool that is accessible directly from Bridge. If you’re diving into advanced photography, developing your RAW images becomes important. Through Bridge, you can open your raw files directly in Adobe Camera Raw for immediate adjustments.
This pre-editing stage is important because it allows for corrections like exposure and white balance before sending the images to Photoshop for further refinement.
Moreover, Adobe Camera Raw operates seamlessly within Bridge, ensuring you have maximum control over every pixel. By leveraging the power of Adobe Camera Raw, you elevate the quality of your images significantly.
Think of it as setting the foundation before constructing your creative masterpiece. For those who prefer Lightroom, knowing how to use lens correction in Lightroom can also be beneficial during this stage.
Not Just Images: Handling Different File Types
While it’s easy to associate Bridge only with images, its reach extends beyond that. The platform supports various file types, enabling comprehensive management of your media assets. From PDFs and videos to documents, Bridge ensures your creative assets remain organized.
For instance, if you’re working on a complex project involving different file types, Bridge keeps everything under one roof. No more shuffling between different software.
Have you started a video montage for a family event? Use Bridge to collate your video clips, project files, and audio tracks, then export them to Premiere Pro for editing.
This versatility makes Bridge an important component of the Adobe Creative Cloud. It simplifies project management, making your creative process more streamlined and efficient.
If you’re working on a new computer. Adobe Bridge is especially handy in organizing and setting up your creative environment from scratch.
You can also save space by keeping only important files and using Bridge’s advanced search and filter options to find what you need without clutter.
Pro Tip: When using Adobe Camera Raw, consider whether you want to work with RAW or JPEG format. RAW provides more flexibility for post-processing adjustments, while JPEGs take up less space and are quicker to work with
Use keywords to tag your images in Adobe Bridge. This practice enhances searchability, making it easier to locate specific images later.
Advanced Features of Adobe Bridge
Adobe software users, especially those diving deep into Photoshop and Lightroom, often overlook Adobe Bridge. It’s a powerful tool that helps streamline your workflow.
Let’s explore some advanced features of Bridge that can make your creative process smoother.
Creating and Managing Workspaces
When working with Adobe Bridge, organizing your workspace is important. I like to set up my workspace to optimize my efficiency. With Bridge, you can customize your workspace layout. First, go to the “Window” menu and select “Workspace“.
You can choose from predefined layouts such as “Essentials” or “Filmstrip“. If you’re like me and want a personalized touch, simply move, close, or resize panels. Once you’ve got your layout just right, save it:
- Click on "Window"
- Select "Workspace"
- Click on "New Workspace"
This way, whenever you open Bridge, your preferred layout is ready to use.
Automating Tasks with Scripts
Automation can save time. In Bridge, you can automate repetitive tasks using scripts. Go to the “Tools” menu and select “Script“. For instance, if you need to bulk rename files or apply metadata, there’s a script for that.
It’s a real-time saver, especially when handling many images. Scripts are straightforward to use. After selecting the script, follow the prompts to apply it to your chosen files. This step reduces manual errors and speeds up your workflow.
Utilizing Metadata
Metadata is like the DNA of your files. In Adobe Bridge, you can add and manage metadata to keep track of your assets efficiently. Select an image, then go to the “File Info” panel where you can add keywords, descriptions, and copyright information.
Organizing files by metadata ensures easy searchability later. For the next project, instead of hunting through folders, filter by keywords. It’s this functionality that makes Bridge included in the Creative Cloud so valuable.
Pro Tip: Before starting a new project, use Bridge to set up a well-organized workspace and automate initial file handling. It keeps you focused on the actual creative process.
Tips and Tricks for Adobe Bridge
Adobe Bridge offers a variety of features to help you work smarter and more efficiently. Explore these tips and tricks to streamline your workflow and make the most out of this powerful tool.
To help you make the most of Adobe Bridge, we’ve compiled a comparison table highlighting important aspects and tips for optimizing your workflow and managing your digital assets efficiently
| Aspect | Overview |
|---|---|
| Improving Workflow Efficiency | Organize your workspace in Adobe Bridge by arranging panels and saving layouts to keep your environment neat and efficient. |
| Advanced Filtering and Searching | Use advanced filtering options such as keywords, ratings, and metadata to quickly locate specific images or files. |
| Batch Processing for Speed | Set up batch processes for tasks like renaming files or applying metadata to save time and maintain consistency. |
| Troubleshooting Common Issues | Clear the cache or update Bridge to fix performance issues or problems with displaying metadata or thumbnails. |
| Enhancing Productivity with Shortcuts | Utilize keyboard shortcuts to navigate more efficiently, such as toggling the preview pane or launching batch rename. |
| Managing Metadata | Add, edit, and manage metadata to organize files effectively and streamline search and filter processes. |
| Windows and Adobe Bridge | Ensure Adobe Bridge is compatible with your Windows OS by keeping it updated to avoid potential performance issues. |
Improving Workflow Efficiency
Using Adobe Bridge effectively can enhance your workflow significantly. First, organize your workspace to suit your needs. Arrange panels, save your layout, and create custom workspace options. This saves you time and keeps your environment neat.
Navigating through only images can be made easier by leveraging the Filter panel. You can also set up batch processes to handle repetitive tasks like applying keywords or renaming files. These steps optimize your workflow and keep it consistent across projects.
Advanced Filtering and Searching
To make your experience more efficient, utilize advanced filtering and searching features in Adobe Bridge. Use the Filter panel to narrow down images by various criteria, such as keywords, rating, and metadata.
This makes finding specific images or files faster and more effective. You can also use the search functionality to quickly locate images or other assets in large collections.
Batch Processing for Speed
Adobe Bridge allows you to handle repetitive tasks such as renaming files, applying metadata, or converting file formats through batch processing.
Set up customized batch processes to save time and maintain consistency across projects. This feature is particularly useful for large projects with multiple files.
For those who edit their photos, you can organize your files in Bridge and then easily move them to Lightroom to batch edit in Lightroom, speeding up your editing workflow significantly.

Troubleshooting Common Issues
Encountering issues with Adobe Bridge is common, but easily rectified. If you find Bridge running slow, clear the cache. This prevents performance issues and enhances speed. Sometimes, metadata might not display correctly. Refreshing the panel or restarting Bridge usually resolves this.
If your thumbnails do not appear, ensure you have the latest version of Bridge installed. Additionally, check if there is sufficient space on your computer. Freeing up space can solve many performance-related problems.
Enhancing Productivity with Shortcuts
Keyboard shortcuts are a game-changer in Adobe Bridge. For instance, pressing “Ctrl + L” toggles the preview pane, and “Ctrl + U” launches the batch rename dialog. Simple commands like these drastically reduce the time spent navigating through mouse clicks.
For those looking to quickly filter only images, using shortcuts to access the Filter panel can be invaluable. It narrows down your search efficiently and improves your productivity.
Pro Tip: Always start your new computer with a clean installation of Adobe Bridge to avoid compatibility issues from previous versions. This ensures smooth performance and better handling of Photoshop tutorial assets.
Managing Metadata
Metadata plays an important role in organizing your files. Adobe Bridge allows you to add, edit, and manage metadata easily.
This helps categorize and locate files efficiently. Always ensure that your images and files have the necessary metadata to make your search and filter processes smoother.
Windows and Adobe Bridge
For Windows users, make sure Adobe Bridge is fully compatible with your operating system. Regular updates and patches might be required to maintain optimal performance.
Ensure that Windows is up-to-date to avoid any potential issues.
Downloading and Installing
If you need to download and install Adobe Bridge, visit the official Adobe website. Follow the instructions carefully to avoid any installation problems.
Once installed, explore the settings to configure Adobe Bridge to your preferences.
Best Practices for Using Adobe Bridge
Always keep Adobe Bridge updated to the latest version. Regular updates from Adobe include performance improvements and bug fixes.
Regularly back up your settings to avoid losing custom layouts and preferences. Utilize Adobe Bridge’s capabilities to streamline your workflow and enhance productivity.
Frequently Asked Questions (FAQs)

How is Adobe Bridge used?
- Adobe Bridge is a digital asset management app that provides a unified interface for working with media files. It helps organize, browse, and locate the assets you need for your projects.
What is Adobe Bridge best for?
- Adobe Bridge is particularly useful for visualizing, organizing, and batch processing large sets of images, videos, and other media. It's great for photographers, designers, and other creative professionals who need to manage their digital assets efficiently.
What has replaced Adobe Bridge?
- While Adobe Bridge has not been officially replaced and is still actively supported by Adobe, some users opt for other digital asset management tools like Adobe Lightroom for more intensive photo management and editing features.
Is Adobe Bridge still free?
- Yes, Adobe Bridge is still available as a free download from Adobe. It does not require a paid subscription, unlike many other Adobe products.

Conclusion
Adobe Bridge has been an invaluable tool in my creative workflow. It has streamlined the way I organize and manage my photos, saving me countless hours that I can now spend focusing on what truly matters – creating stunning images.
I remember struggling to keep my files in order, but Adobe Bridge transformed that chaos into a well-structured system.
If you’re looking to elevate your photo editing skills, I highly recommend checking out my Photoshop course and Lightroom course.
These resources will guide you through mastering these powerful tools, just as Adobe Bridge has helped me refine my process.
Read more about Photoshop:


Course

Light Effect Photoshop


Lightroom Course 2025

Adobe Photoshop Course 2025

Photo Editing Course


