As a photographer, I know how significant it is to have the best tools at your disposal. Recently, I discovered how using WebP in Lightroom can streamline my workflow and improve image quality.
In this article, I’ll share why WebP is gaining popularity among photographers and how you can easily incorporate it into your Lightroom process.
You’ll learn about the benefits, step-by-step instructions, and some tips to make the most out of this powerful format. Stick around to find out how this can elevate your photo editing game to the next level.
Table of Contents
Overview of WebP and Lightroom
WebP is an image file type developed by Google. It allows for high-quality pictures at smaller output sizes. The data type includes both lossless and lossy compression options.
A lossless image retains all the original data, while lossy compression reduces output size by discarding some data.
Many users find WebP useful for web applications as it ensures faster website loading times due to its smaller compressed output capacities.
Why Use WebP for Lightroom?
WebP documents in Lightroom improve your workflow. The smaller document capacities save disk space and improve software performance.
With WebP, you can export images at high quality without consuming much storage. This document format is ideal for maintaining image quality while reducing document size.
Lightroom Classic now supports WebP natively.
Advantages of WebP
Smaller document capacities without compromising quality
Faster upload and download speeds
Efficient for web use and compatible with most modern browsers
Reduced storage requirements
WebP offers several advantages, including superior compression and quality compared to traditional formats.
You can download compressed WebP documents and create high-quality pictures with smaller data sizes, which is ideal for faster web loading times.
Using WebP in Lightroom
Importing image into Lightroom is straightforward. After editing, choose “Export.” In the Export window, select WebP as your document format.
Adjust settings to balance quality and document size. Lower quality will yield smaller files, but test to find your sweet spot. Click “Export,” and Lightroom will create WebP files.
Pro Tip: Try batch exporting pictures to WebP for efficiency. Lightroom allows batch processing, saving time and effort.
Remember, high-resolution pictures may benefit from a slight increase in quality settings during export.
Lightroom Shortcuts for Efficiency
To further streamline your workflow, consider using Lightroom shortcuts. These can significantly speed up your editing process, allowing you to focus more on creativity and less on navigation.
For example, pressing “D” takes you directly to the Develop module, while “G” returns you to the Library module.
Mastering these shortcuts can make your Lightroom experience much more efficient.
Difference Between Photoshop and Lightroom
While both Photoshop and Lightroom are powerful tools for photographers, they serve different purposes.
Lightroom excels in managing and editing large batches of photos quickly, making it ideal for photographers who need to process many pictures efficiently.
Photoshop, on the other hand, offers more advanced editing capabilities, such as retouching and compositing, making it suitable for detailed, high-end photo manipulation.
Setting Up Lightroom for WebP Export
To set up Lightroom for Web export, first configure the export settings to create Web documents by selecting the appropriate document type.
For Windows members, ensure you download any necessary plugins for compressing pictures effectively and utilize them to manage WebP file sizes.
Installing WebP Plugins in Lightroom
Let’s kick things off with installing the WebP plugins in Lightroom. This plugins is significant for converting your pictures into the WebP type.
Steps to Install the WebP plugin:
Open Lightroom on your computer.
Go to the Help menu and select Find Add-Ons.
Type "WebP" in the search bar and find the relevant plugin.
Click install and wait for the process to complete.
Configuring Export Settings
After installing the plugin, you’re ready to configure the export settings.
Steps to Configure export settings:
Select the photos you want to export in Lightroom.
Go to File, then choose Export from the dropdown menu.
In the export settings, select WebP from the file format dropdown.
To maintain image quality, choose a higher-quality setting.
If reducing document size is critical, adjust the compression settings accordingly.
Set the export destination folder.
Click the Export button to finish the process.
Pro Tip: When exporting for different platforms, such as Instagram, it’s essential to adjust the Lightroom export settings for Instagram alongside your WebP settings to ensure optimal quality and size. This helps maintain the visual appeal of your photos while keeping them web-friendly.
Also, batch exporting can be used to save time. Selecting multiple pictures allows you to export all at once, keeping your workflow efficient.
For those looking to enhance their Lightroom experience, consider exploring Lightroom Shortcuts to speed up your editing process. Engaging in Lightroom training can also provide valuable insights into advanced features and techniques.
Working with pictures can be tricky, especially when it comes to loading them on a website. We have a process to help make this easier using WebP type in Lightroom.
When you use WebP, you maintain high image quality while reducing file size. Follow these steps for optimized web images.
Choosing the Right Resolution
Selecting the right resolution is important. A high resolution increases file size, which can slow down your website.
Lower resolutions load faster but might lose quality.
Most of your audience will view pictures on monitors or phones, not 4K screens.
Balance between resolution and quality. Lower the resolution to fit the screen without losing much detail.
Use trial and error: Export, upload, and see how images look on your website.
Adjusting Quality Settings
The balance between quality and file size is important. In Lightroom, you can adjust the quality slider when exporting WebP documents.
Notice that higher quality results in larger output.
Start around 75-80 on the quality scale. This usually offers a good balance.
If your web images are slow to load, lower the quality a bit.
Remember: Users care more about speed than perfect quality.
Using Lightroom Presets for WebP
Presets streamline your workflow by applying the same settings to multiple images. In Lightroom, you can create presets specifically for WebP exports.
Steps to create Presets:
Set your preferred resolution, compression, and export folder.
Archive these settings as a preset. Name it something like "Web Export" for easy access.
Apply this preset to all images you plan to export for the web.
Batch exporting saves lots of time. Batch editing with Lightroom presets brings consistency to your images. Your website will benefit from quick-loading and high-quality images.
Pro Tip: Use Lightroom shortcuts to speed up your editing process and export workflow. Additionally, consider using the best plugins for Lightroom to further enhance your editing capabilities.
Exporting WebP Images from Lightroom
To export your images as WebP from Lightroom, follow these simple steps:
Open the image you want to export in Lightroom and make your desired edits using the available tools.
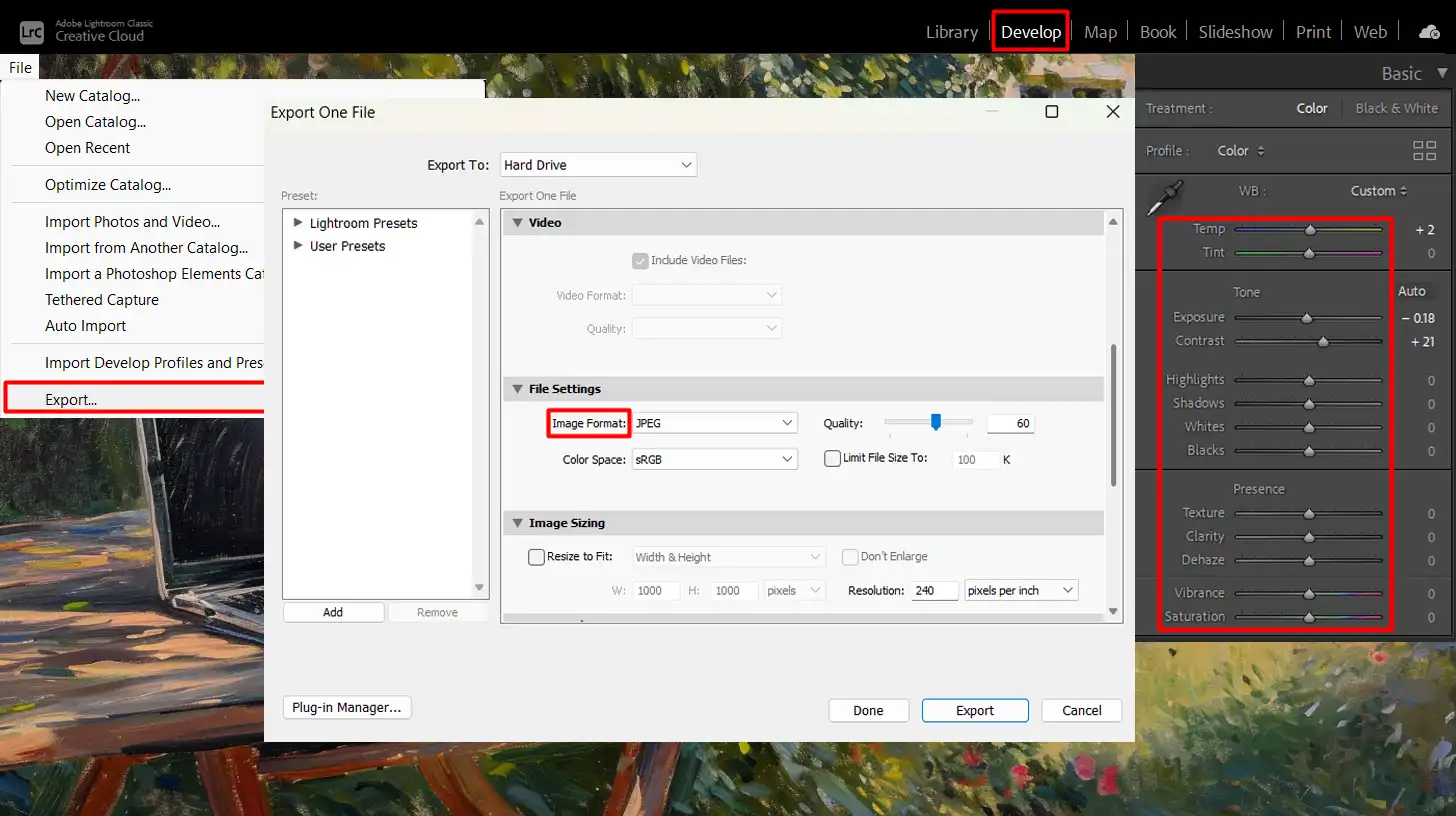
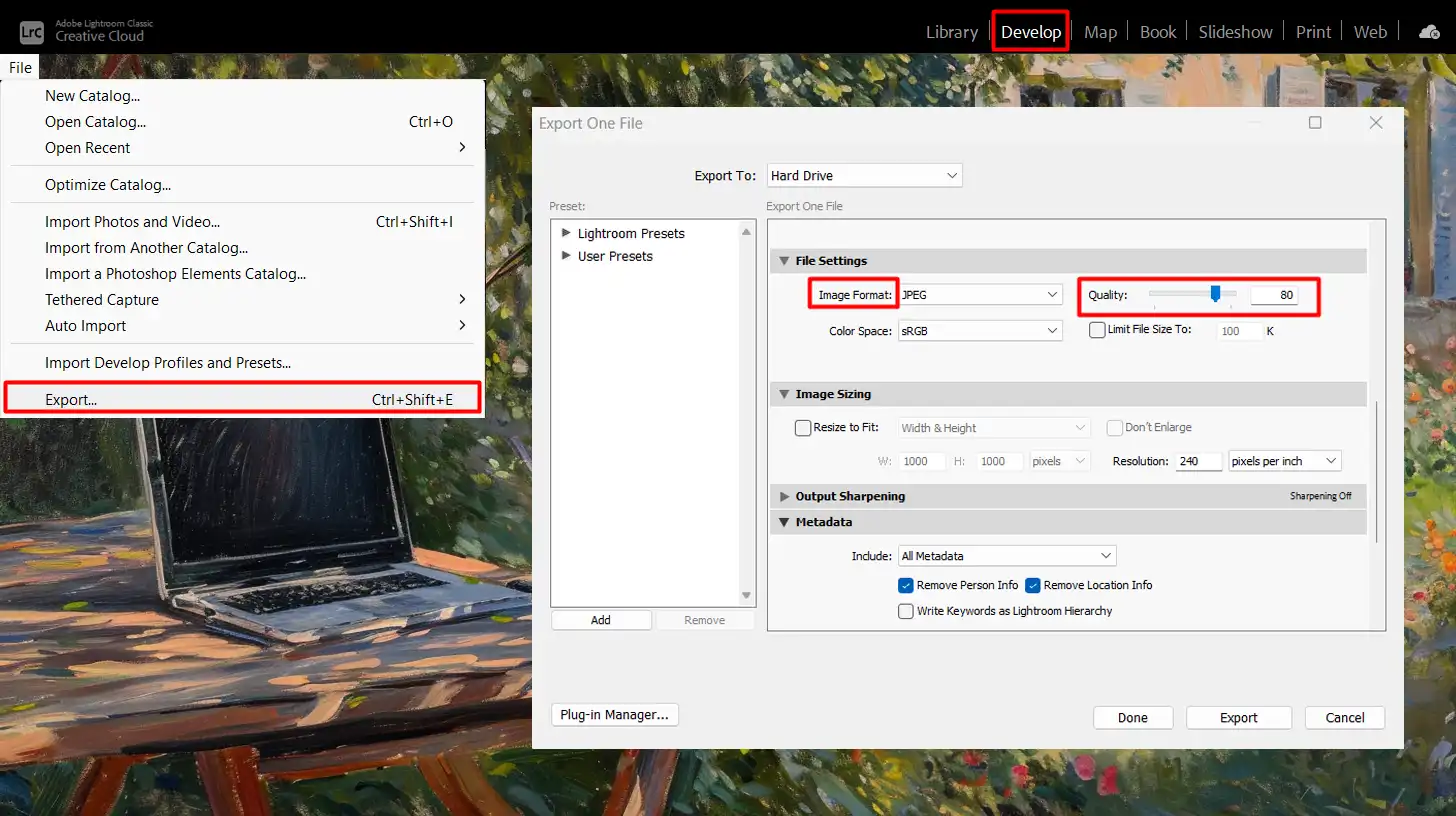
Navigate to the 'File' menu and select 'Export'. The export settings window will open up.
Under 'File Settings', choose WebP as the image type. Adjust the quality slider to your preferred level, typically around 75-80 for a good balance between quality and file size.
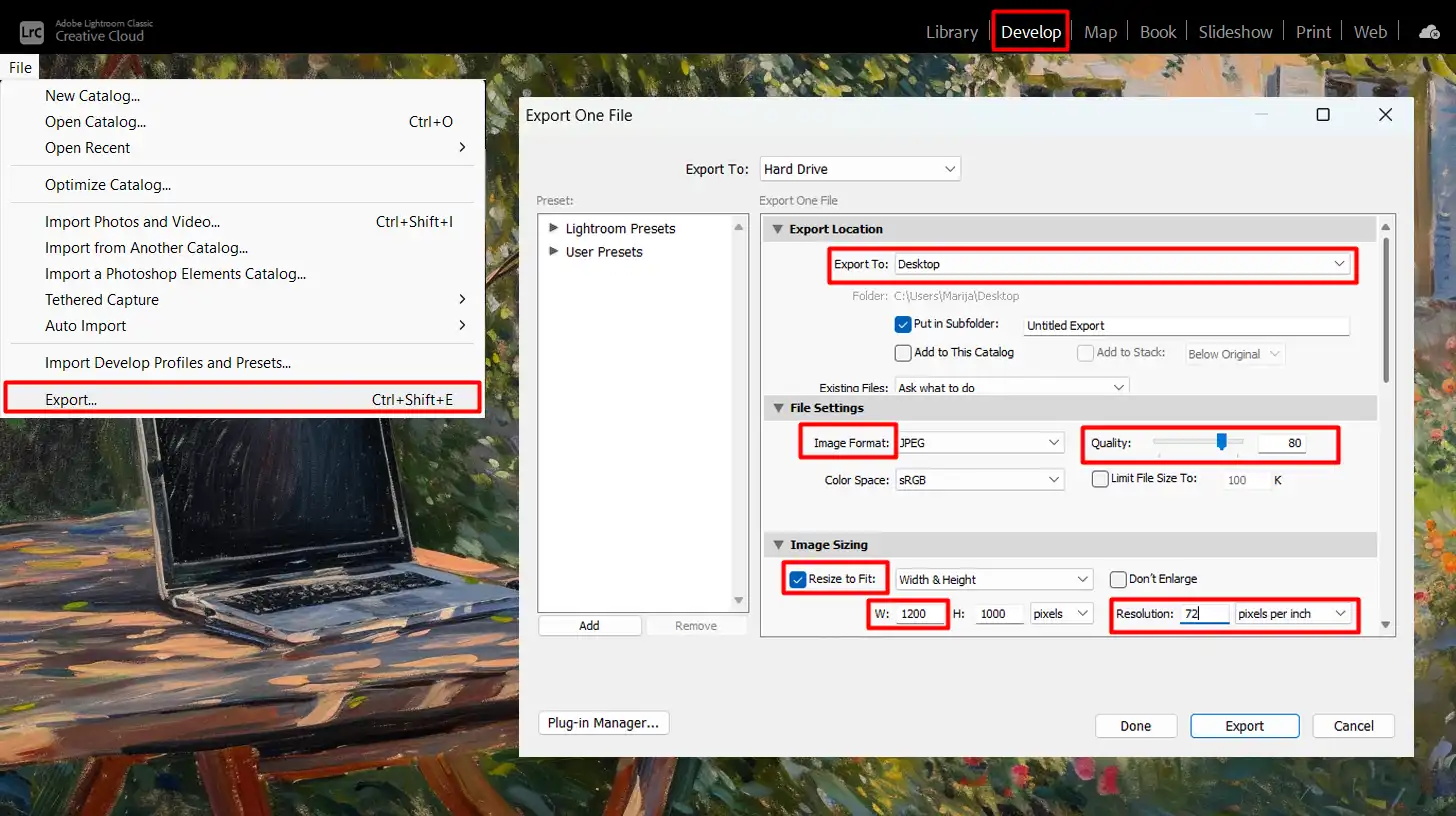
Set the image resolution to match your intended use. For web pages, a resolution of 72 PPI (pixels per inch) is usually sufficient. You can also resize the dimensions of your image; a width of 1200 pixels often works well for web uploads.
Choose a destination folder for your saved photo. Creating a specific folder for exported web images can help keep things organized.
Click on 'Export' and wait for Lightroom to process and output your file. Your image will now be in the WebP file type, ready for uploading or further use.
Common Export Issues and Fixes
Sometimes, members encounter issues when extracting images. Here are some common problems and their solutions:
File size too large: Lower the image resolution or the quality setting to reduce file size and improve web page load times.
Color profile mismatch: Ensure you're extracting in the sRGB color space, which is standard for web images. This ensures consistent colors across different devices.
Image not appearing correctly: Double-check that WebP is supported by the web browser or platform you're uploading to. For platforms like WordPress, ensure you have the necessary plugins to handle WebP images.
Pro Tip: When batch extracting multiple images, use Lightroom presets to preserve time. Set your preferred settings and save them as a preset for future use.
This allows you to consistently output high-quality WebP images effortlessly.
Best Practices for Using WebP Images
Using WebP pictures effectively involves balancing quality and compression to ensure optimal performance and visual appeal across different platforms.
Here’s a quick comparison of best practices for using WebP images in Lightroom, including browser compatibility, balancing quality and file size, and maintaining image metadata.
Aspect
Overview
Ensuring Browser Compatibility
Check browser support for WebP images and implement fallback formats like JPEG or PNG to ensure all users can view your images.
Balancing Quality and File Size
Adjust the quality slider to maintain visual quality while keeping file sizes manageable. Commonly, a quality ratio of 75-80 is used.
Maintaining Image Metadata
Ensure your export settings preserve metadata like copyright and photographer information when exporting images.
Using Lightroom Shortcuts
Speed up your editing workflow by utilizing Lightroom shortcuts and presets for batch processing.
Ensuring Browser Compatibility
When it comes to using WebP images, browser compatibility is important. WebP offers great compression and quality, but not all browsers support it.
You must check whether the target browsers can display WebP documents efficiently.
Pro Tip: For those browsers that don’t support WebP, it’s useful to have fallback formats like JPEG or PNG.
This ensures that all members can view your images without problems. For those browsers that don’t support WebP, it’s useful to have fallback formats like RAW or JPEG format. This ensures that all users can view your images without problems.
Steps to ensure compatibility:
Check browser support for WebP.
Implement fallback formats.
Test your website across different browsers.
Balancing Quality and File Size
One of the important advantages of WebP lies in its ability to balance image quality and file size. Adjusting the quality slider on your settings determines how much compression is applied to optimize web image quality.
A quality ratio of 75-80 is commonly used because it maintains good visual quality while keeping the file size manageable. If your images are too large, try reducing the resolution.
For web use, 72 PPI (pixels per inch) usually suffices. Resize dimensions based on your needs; for instance, a width of 1200 pixels is often enough.
Maintaining metadata is important, especially if you want to keep detailed information like copyright, creation date, or the photographer’s name.
WebP allows for preserving metadata, unlike some other formats that strip this information away. To ensure your metadata stays intact, make sure your export settings in Lightroom or Photoshop are configured correctly.
Steps to maintain Metadata:
Check the box for “Include Metadata” before extracting. This ensures that all important details remain attached to your image.
Pro Tip: Automate your process by using Lightroom presets for export.
These presets can help you batch-process multiple images, ensuring consistent settings and saving you time in the long run.
Configure export settings in Lightroom.
Check the "Include Metadata" box before extracting.
Use Lightroom presets for batch processing.
Frequently Asked Questions (FAQs)
Does Lightroom support WebP?
Yes, Lightroom does support WebP file type. You can import and work with WebP documents in Lightroom without any issues.
How to export WebP in Lightroom?
To export images as WebP in Lightroom, go to the Export dialog box.
Choose 'WebP' from the file type dropdown menu.
Adjust any additional settings as needed and click 'Export' to archive your image as a WebP file.
Can you make a WebP into a JPG?
Open the WebP document in an image editor that supports the file type.
Save or export the image as a JPG.
Is WebP better than JPEG?
WebP often provides better compression than JPEG, which means similar-quality images at smaller file sizes.
This can be particularly useful for web purposes where loading speed and bandwidth usage are considerations.
Using WebP in Lightroom has truly streamlined my process, making my editing process more efficient and my final images sharper.
The compatibility with this file type has allowed me to maintain higher-quality images while reducing document sizes, which is important for quick loading times and storage management.
$2,061.00Original price was: $2,061.00.$1,061.00Current price is: $1,061.00. 27584
Download Your Free Guide Now!
Discover the secrets of photography with our printable guide! Master essential techniques like aperture, shutter speed, and ISO to create stunning images. Get your free printable PDF now and start turning your snapshots into masterpieces!