In this article, I’ll show you how to use the tilt shift Lightroom technique to create stunning images that stand out. Are you ready to transform your photos with a captivating miniature effect?
Imagine turning a bustling cityscape or a serene landscape into a whimsical scene that looks like a tiny model.
Intrigued?
In this guide, you’ll discover the step-by-step process and tips to master this fun and creative effect.
Stay with me, and let’s dive into the world of tilt shift in Lightroom!
Table of Contents
Creating Tilt Shift Effect in Lightroom
Creating a tilt shift effect in Lightroom is a fun way to add a unique, miniature look to your photos. Let’s walk through the simple steps to achieve this creative effect.
Designing a Miniature Model Look in Lightroom
So, you want to design that cool tilt shift effect in Lightroom? Well, you’re in the right place. Let’s dive in and keep it simple:
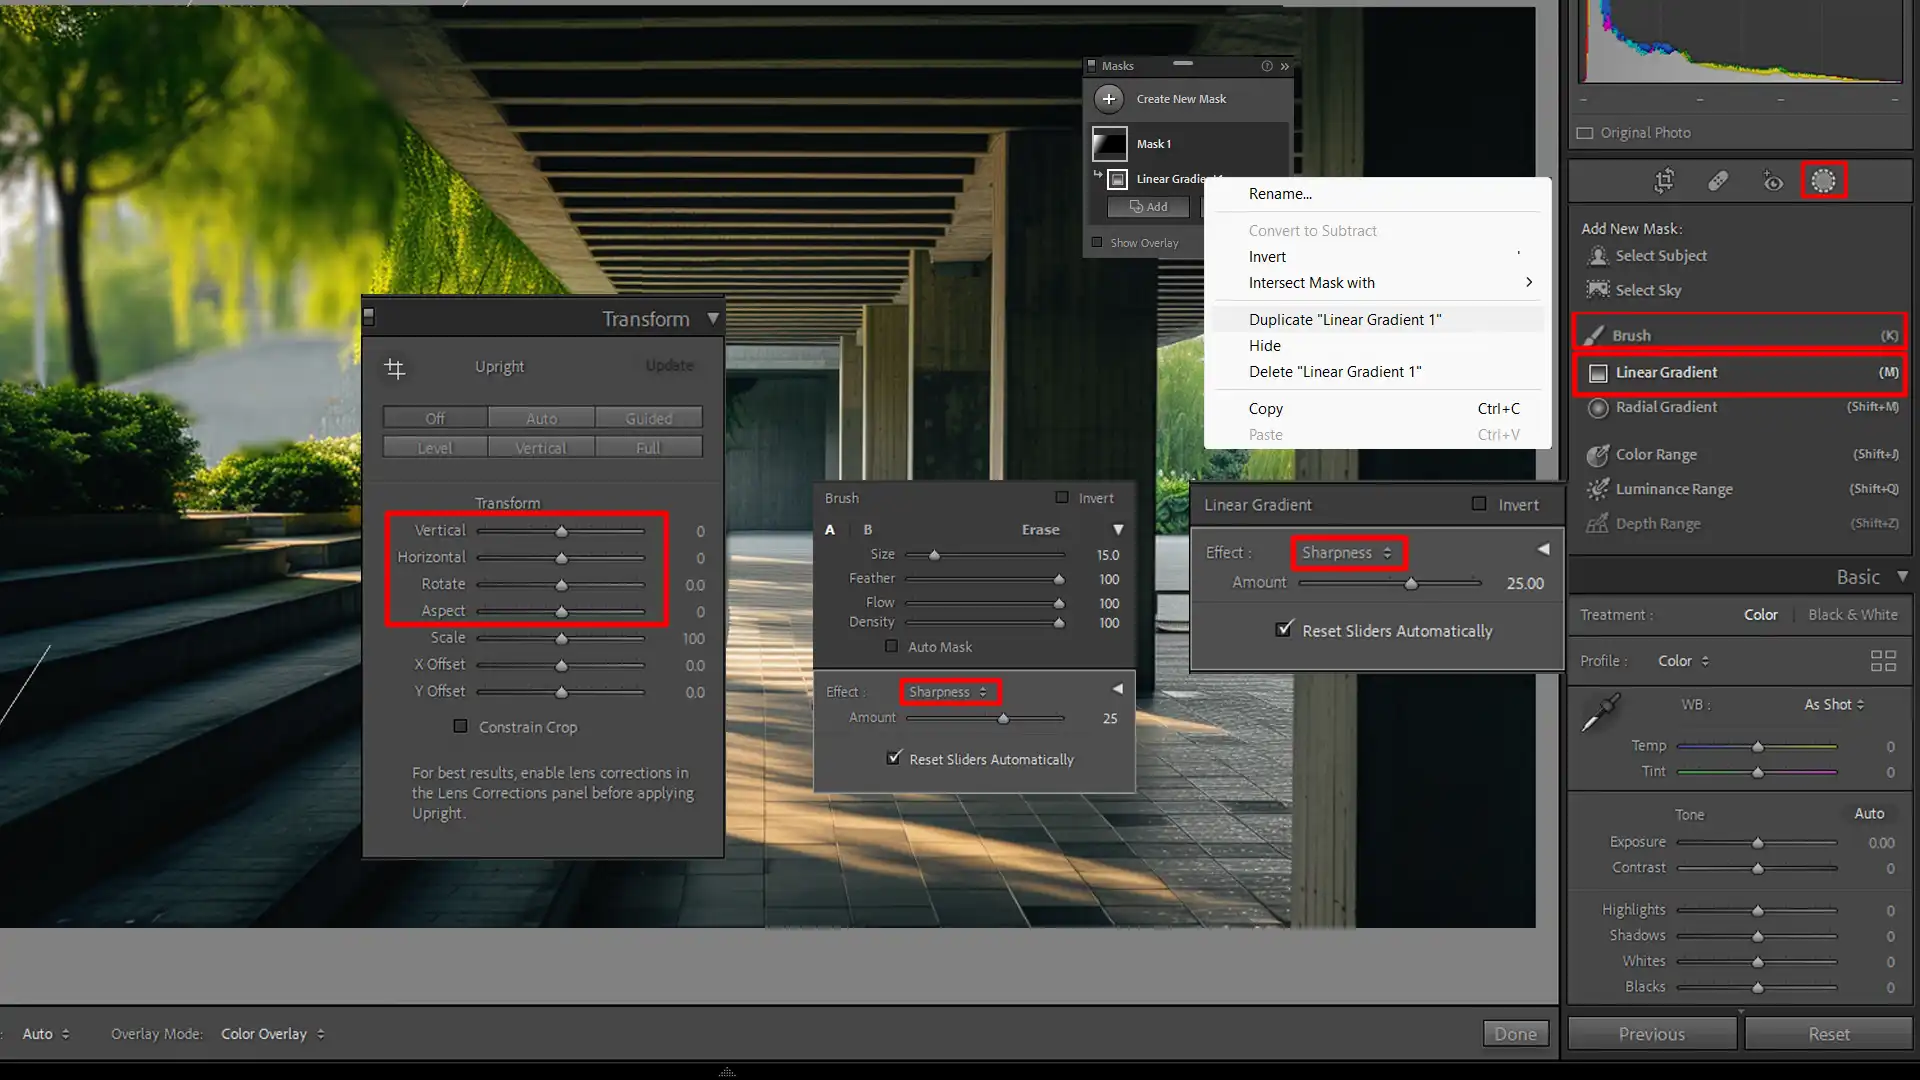
Open your Lightroom Classic and select the Graduated Filter.
Drag across your image to create the blur effect. You can adjust the intensity using the sliders provided. If you need to apply the same effect to another area, choose Duplicate from the menu and adjust as necessary.
Next, grab the Adjustment Brush to fine-tune areas needing specific tweaks. This ensures certain parts of the image remain sharp.
Remember, the goal here is creating a miniature model effect by making parts of the photo appear out of focus while keeping the subject clear.
Lastly, double-check your work. You can always use the Transform Panel to ensure it looks natural and engaging.
With a few clicks, your image transforms into a captivating scene with the tilt shift effect.
Simulating Miniature Depth with Lens Blur
Another way to achieve the tilt shift effect is by using lens blur. Follow these steps:
Open your photo editing software and select the normal lens option.
Start adjusting the blur amount, simulating what tilt shift lenses do.
Focus on creating depth by blurring the edges more than the center. This gives the impression of looking at a miniature model.
Play with the camera's sensor settings within the software to better simulate real-life tilt shift lenses. Small adjustments with a tilt shift lens make a significant impact on the overall look of the image.
Common Mistakes and How to Avoid Them
Let’s talk about some common mistakes. Many beginners fall into these traps when attempting tilt shift effects:
Overblurring - It makes the image look less natural using the lens correction in Lightroom. Use a subtle touch with the graduated filter.
Incorrect focal plane - Ensure the focal plane aligns properly to get the right focus areas.
Ignoring the effect in Lightroom tools - Don't forget about useful tools like the keyboard shortcut for quick adjustments. This saves time and improves accuracy.
Pro Tip: Always look at your image from two points different angles and distances in Lightroom to spot any unnatural-looking areas.
Advanced Techniques for Tilt Shift
Exploring advanced techniques can take your tilt shift effect to the next level. Let’s see how combining it with color grading can enhance your photos even further.
This table provides a quick overview of various techniques and tips to help you master the tilt shift effect in Lightroom and other related editing tools. Use this guide to enhance your photography by applying these creative methods.
Aspect
Overview
Combining Tilt Shift with Color Grading
Enhance your tilt shift photos by adding color grading to create a more dynamic and visually appealing image.
Using Lens Blur for Depth
Apply lens blur to mimic the effects of tilt shift lenses, creating depth by blurring edges more than the center.
Tilt Shift in Landscape Photography
Use tilt shift lenses to create miniature model effects in landscape photography, adding depth and focus to distant scenes.
Tilt Shift in Architectural Photography
Apply tilt shift techniques to architectural images, emphasizing focal points and adding dramatic effects to buildings.
Advanced Tilt Shift Editing Techniques
Combine tilt shift effects with vignettes, grain, and color grading for a polished, professional finish.
Mastering the Art of Blur
Perfect the balance between focus and blur to create a harmonious and engaging image using tilt shift techniques.
Creating Tilt Shift with Color Grading
Tilt shift lends a unique, eye-catching effect to your photos. But let’s take it a step further by incorporating color grading.
Begin by selecting your image in Lightroom Classic.
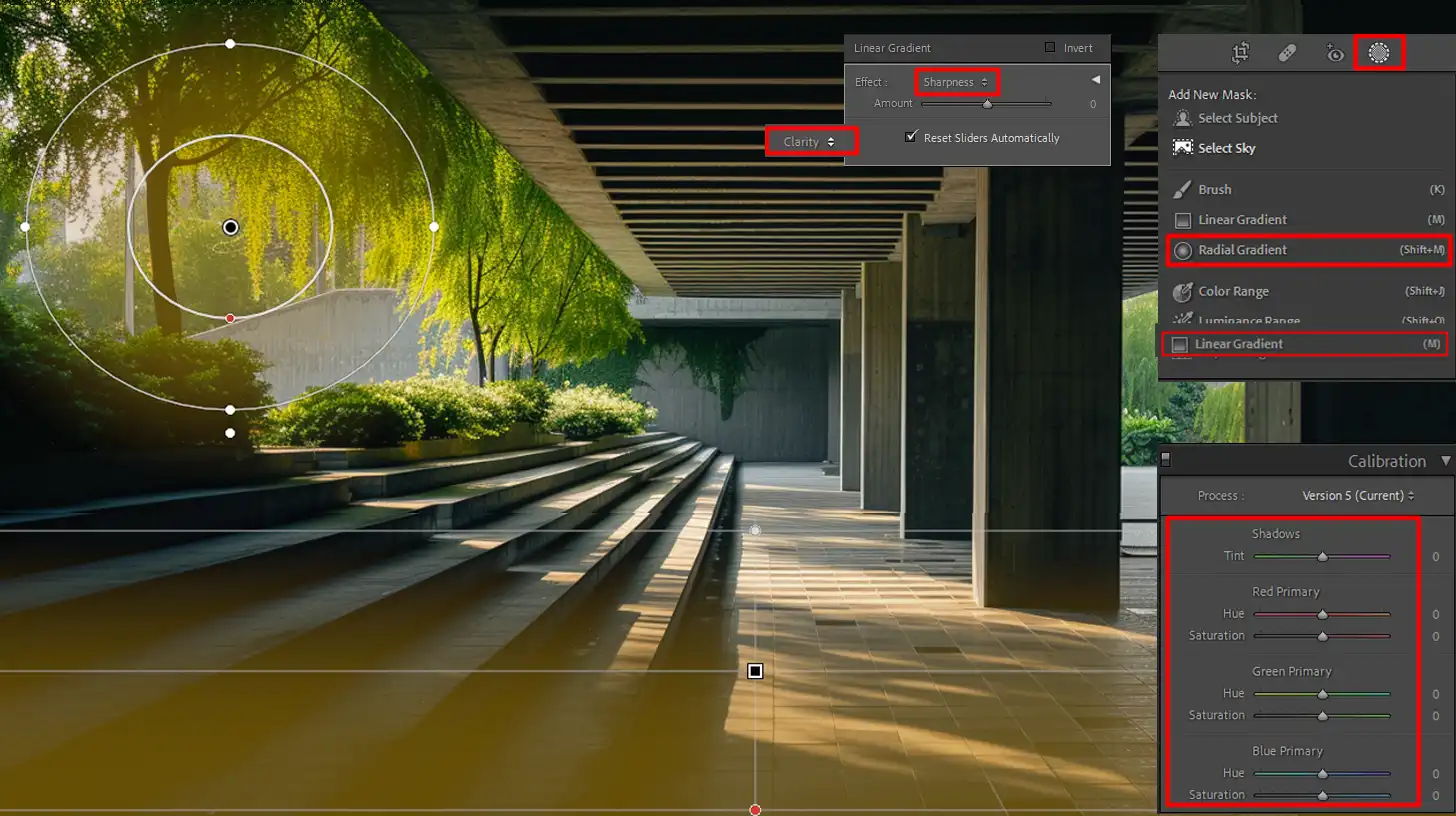
Apply the linear graduated filter tool or the radial filter to control the focus area.
Use the color grading sliders to add some flair:
Start by adjusting the highlights and shadows.
Change the hue and saturation to guide the viewer’s eyes where you want.
Remember, balance is significant. Overdoing colors can distractinstead of enhance. Keep it subtle for a professional touch.
If you’re working with more complex edits, like combining tilt shift effects with other techniques, consider trying this in Photoshop by using Photoshop’s new layer shortcut (Ctrl+Shift+N) to create a non-destructive workflow.
This allows you to stack and adjust your effects with greater flexibility
Combining Tilt Shift with Other Effects
Why stop at tilt shift effects? Combine them with other photo-editing techniques for breathtaking results.
Set your manual focus first if you use real tilt shift lenses.
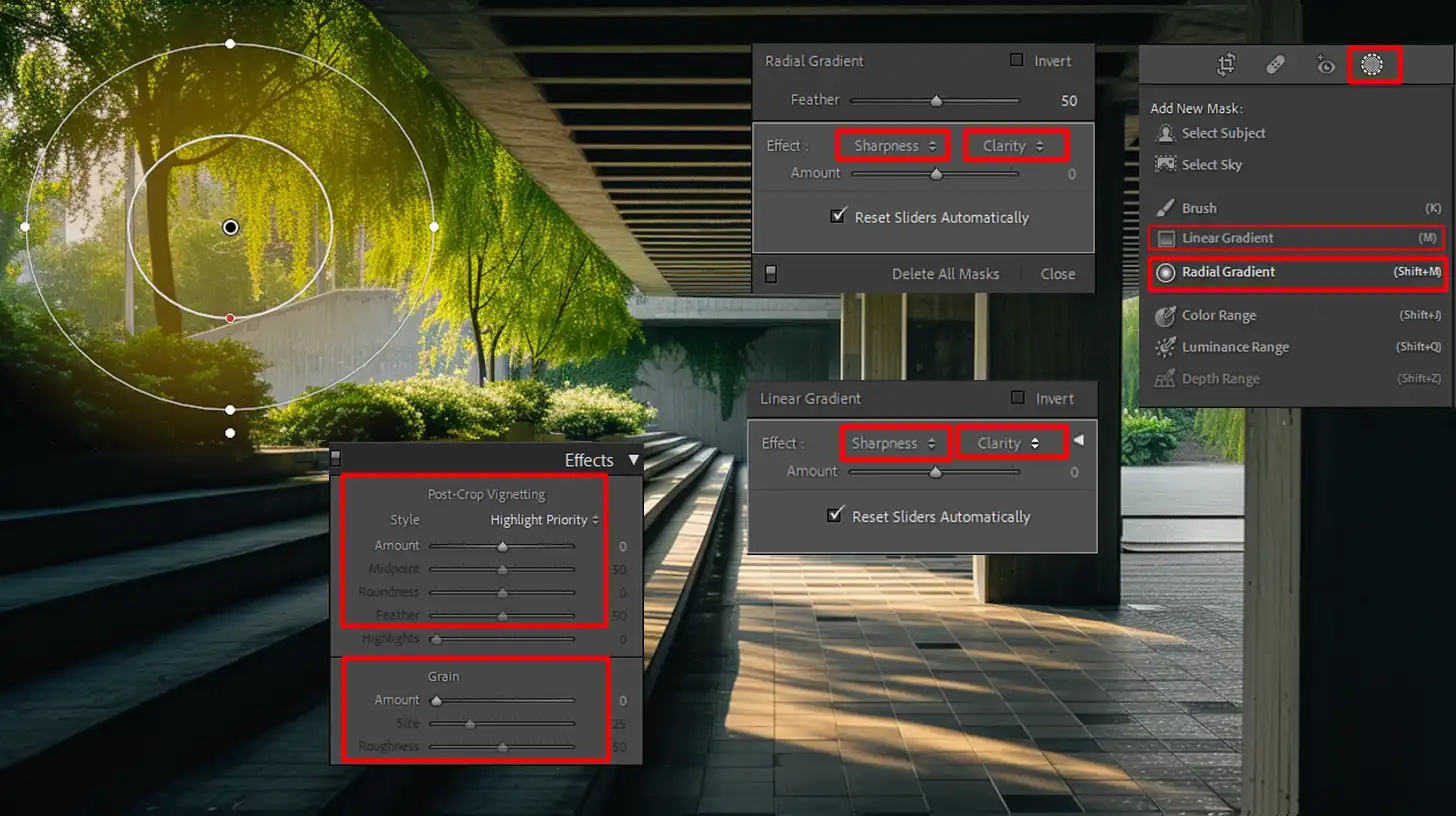
Consider adding vignettes or grain effects:
Start with a basic landscape photography shot.
Apply the tilt shift to blur the edges, giving a miniature effect like a toy town.
Follow this up with a slight vignette to darken the corners and focus even more on the central subject.
Using the transformation panel, check your work to ensure the image circle is accurate. Ensuring harmony between focus and blur areas keeps your photo from looking overly edited.
Pro Tip: Use keyboard shortcuts for speed. For instance, pressing the “V” key quickly toggles the view modes, saving your clicks during editing.
Now, go ahead and try these techniques. Apply them creatively, and you’ll see a marked improvement in your images.
Practical Applications of Tilt Shift Effect
Tilt shift photography offers a creative way to transform your images. Let’s explore how this effect can be practically applied, starting with landscape photography.
This effect adds an intriguing twist. Even urban landscape photos often seem flat and lack focal depth. With a tilt shift lens, you control focus across different distances.
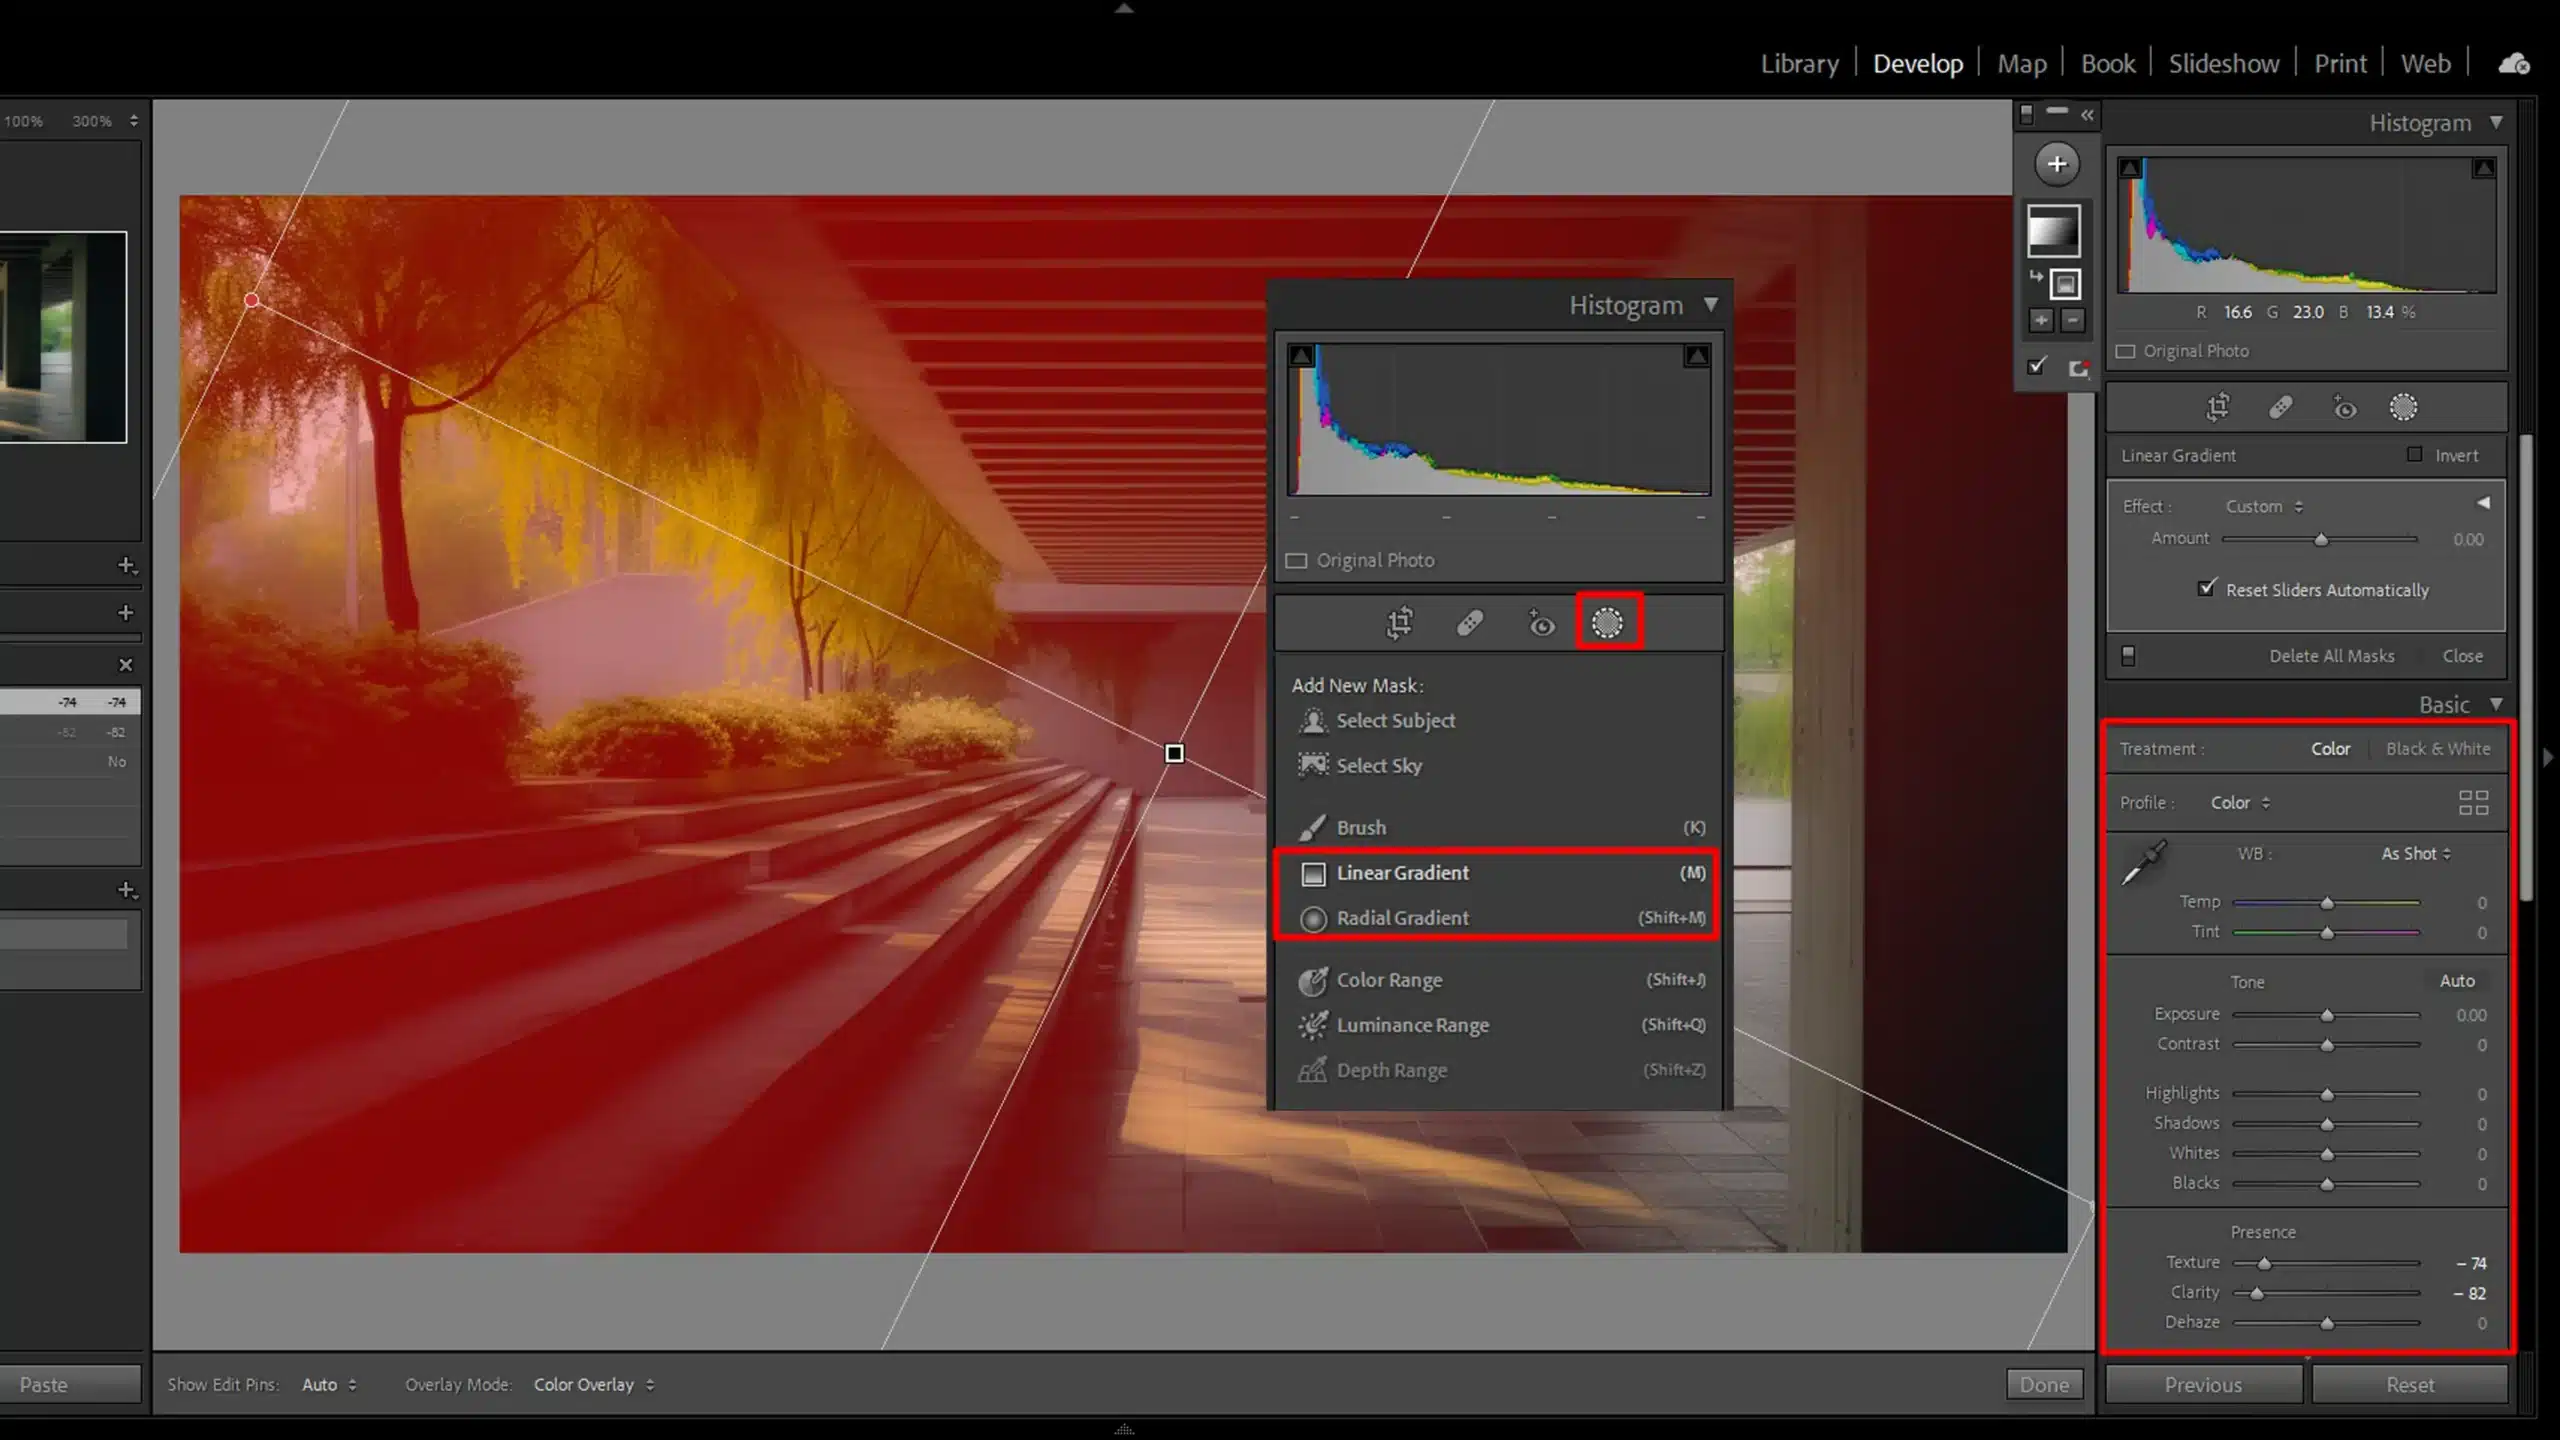
Start by selecting your image in Lightroom Classic. From there, apply adjustments with the graduated filter. This ensures specific areas gain or lose focus.
Simpleadjustments of highlights and shadows also help.
The goal?
Emphasize certain parts while keeping other parts subtly blurred. This not only adds creativity but drives attention right to where it’s needed.
Tilt shift lenses work great here. They add a dramatic flair andenhance the sky, mountains, and fields. The process might feel tricky at first.
Double click your image in the library module to review changes holistically. This ensures the focus and blur areas remain harmonious.
Tilt Shift in Architectural Photography
Now, let’s talk architecture. Buildings look stunning through tilt shift lenses. This technique is perfect for cityscapes. Say you’re photographing a skyscraper.
Normally, you get everything in focus. Sometimes this can be great. But other times, adding a focal point can drive more attention. That’s where tilt shift comes in.
Choose an architectural image to edit in Lightroom Classic. Apply the radial filter here. Focus on the most important element.
All adjustments happen quickly by simply dragging sliders. It includes emphasizing the focus and creating soft blurs for what’s around. This gives your buildings a dramatic look, making viewers notice details more.
This is where you can truly master the art of blur making your buildings stand out dramatically and drawing viewers’ attention to the details that matter.
Add vignettes to darken the corners. This trick helps in highlighting the central subject. Ensure harmony with the transformation panel.
This balances the focus and blurred regions. Utilizing keyboard shortcuts speeds up the process. Press “V” to toggle view modes when necessary.
Pro Tip: To balance light and shadow perfectly, use a tilt shift lens combined with Lightroom Classic’s color grading options. This achieves a professional, polished look every time.
Tips and Tricks for Perfect Tilt Shift Photos
Mastering the tilt shift effect involves more than just the technique it’s about knowing the right tricks to make your photos stand out.
Let’s start with choosing the right subject.
Choosing the Right Subject
Tilt shift photography shines when applied to the right subject. First, consider landscapes. Wide, open spaces with distinct elements work best. Why?
They offer clear points for focus and blur. Next, cityscapes. Think of tall buildings with intricate architecture. These subjects benefit from the depth the tilt shift effect provides.
Lastly, don’t forget everyday scenes. Vehicles on a busy street or people in a park can transform into miniature models with the right technique.
Best Camera Settings for Tilt Shift
Getting the perfect tilt shift photo begins with camera settings:
1. Start with a narrow aperture. Aim for f/8 and higher. This leads to sharper images.
2. Use a tripod. A stable base prevents motion blur, which is important for clarity.
3. Experiment with the tilt shift lens. Adjust both tilt and shift options to see what works best.
Don’t rely solely on guesswork. Instead, study your scene and adapt the settings accordingly.
Post Processing Magic
After taking your photos, post-processing is important. Use Lightroom Classic: Begin with basic adjustments. Brightness, contrast, and saturation matter.
Employ the graduated filter. It’s great for emphasizing specific areas. Modify highlights and shadows for depth. Keep it subtle. Too much can ruin the effect.
Mastering the tilt shift Lightroom technique has truly changed how I edit photos. This effect lets me create cool miniaturized scenes and really focus on key parts of my images.
If you’re serious about improving your photo editing skills, I highly recommend checking out these Photoshop course and this Lightroom course. They have been super helpful for me.
Using Adobe tools like Photoshop and Lightroom has made this process even smoother. These programs give you all the tools you need to create stunning images with the tilt shift effect and beyond.
Give them a try and see how they can take your photography to the next level.
Happy editing!
If this article has helped you, then Like and Share it with your friends
$2,061.00Original price was: $2,061.00.$1,061.00Current price is: $1,061.00. 27584
Download Your Free Guide Now!
Discover the secrets of photography with our printable guide! Master essential techniques like aperture, shutter speed, and ISO to create stunning images. Get your free printable PDF now and start turning your snapshots into masterpieces!