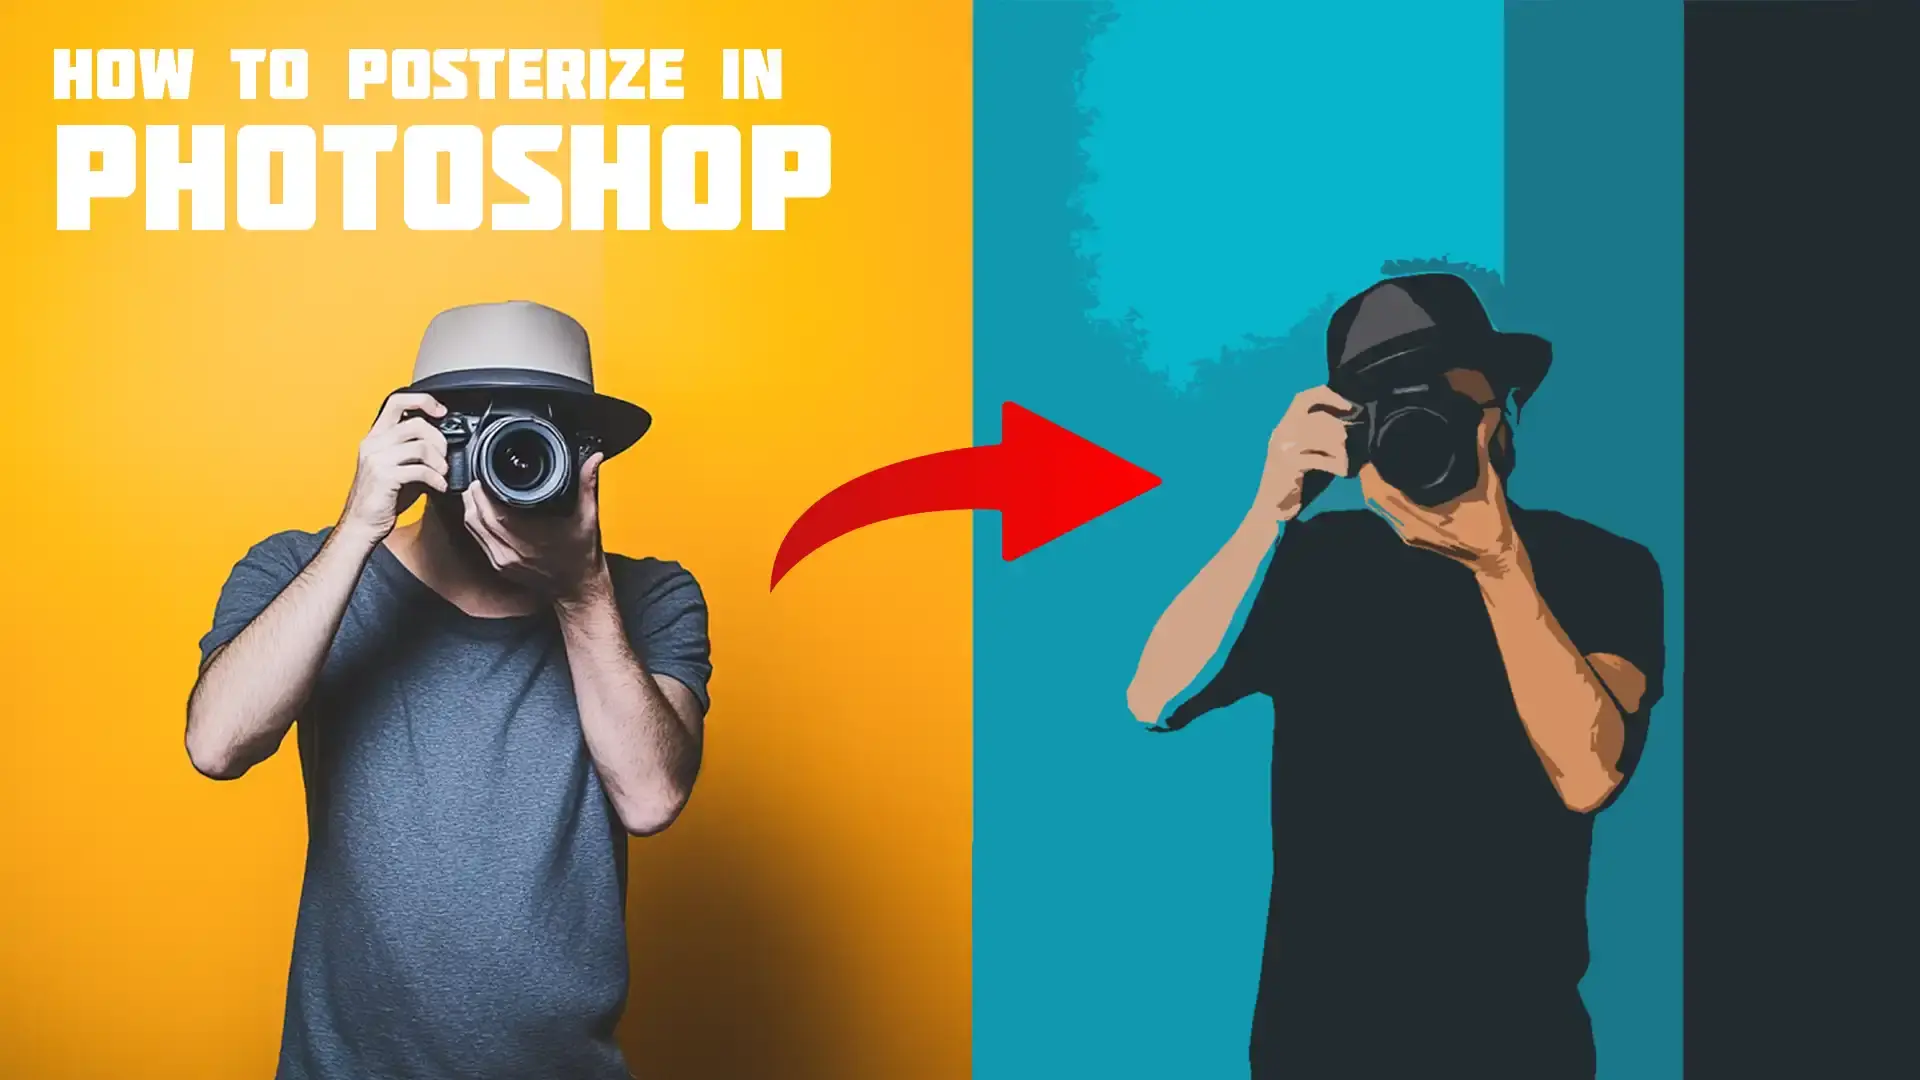
Have you ever tried to posterize an image using Photoshop to create stunning graphics and posters?
This amazing technique transforms ordinary photos into striking pieces that command attention.
Whether you’re a budding designer or just want to enhance your creative projects, mastering the art of posterizing in Photoshop can open up a world of possibilities.
In this guide, we’ll walk through easy steps and some fun tips to get you started on turning your images into visual art that stands out!
Table of Contents
Posterazing a Photo in Photoshop
After applying the posterize effect in Photoshop and Lightroom, use a layer mask to selectively refine the effect on crucial areas of your project, including the background.
It’s important to make final tweaks to ensure that your artwork perfectly communicates the visual statement you intend.
This stage is crucial for enhancing the quality and impact of your posterized image.
Fine-Tuning Colors with Adjustment Layer Mask
First, review your work in the layers panel to ensure all adjustments are correctly layered.
At this point, add a layer mask to your adjustment layers to isolate adjustments to specific parts of the image and fine-tune the overall tones and colors in your photo without permanently altering the picturedata.
Apply a layer mask on your adjustment layer to selectively apply contrast enhancement and color balance tools to emphasize any darker or lighter tones crucial for highlighting important subjects or features.
For further refinement:
- Drag the slider on the posterize tool to modify how many color levels are visible, allowing for stricter or more gradual transitions between them.
- Experiment with different blend modes such as 'Multiply' or 'Overlay' by adding a new adjustment layer for each mode to specifically enhance areas without dramatically affecting others, allowing for subtle or dramatic changes depending on the selected blend mode.
Fine-tuning colors with adjustment layer masks is key to perfecting your images. This Photoshop masking guide shows how to use masks for precise color adjustments, blending techniques seamlessly.
Saving Your Posterized Image
Once you’re satisfied with the visual outcome, use an adjustment layer to finalize your settings before saving.
Before saving, refine the edit with a layer mask to ensure optimal quality without altering other areas:
- Save a copy of your file by navigating through File > Save As. Before saving, apply a layer mask to ensure that only the desired areas are affected by the final adjustments.
- To maintain editability, ensuring layers remain intact and separately adjustable later, refer back to saving another PSD document if changes are anticipated in future projects dealing with similar stylizations.
- For sharing online or printing purposes, save another copy as JPEG or PNG, depending on usage needs; these formats are broadly compatible but consider file size and compression effects on overall clarity extensively.
By adhering closely to these post-production steps when posterizing an picture in Photoshop, you hone not only technical skills but also cultivate a keen eye for aesthetic detail that characterizes compelling digital artistry.
Resizing an Image in Photoshop: A Complete Guide
Resizing an picture using Adobe Photoshop is an important skill for photographers, graphic designers, and digital artists.
This guide will demonstrate, using the layers panel, how to use a layer mask with an adjustment layer to selectively apply resizing effects to walk you through the process of adjusting your photos without compromising on their quality.
Resizing an image in Photoshop is simple when you know the essential tools in Photoshop.
Using options like the Image Size dialog and the free transform tool, you can adjust image dimensions without losing quality, making resizing an important skill to master.
Understanding Image Resolution and Size
Before resizing, understand the resolution and size enhancements Photoshop adds. Resolution, measured in pixels per inch (PPI), indicates image detail.
To selectively modify the resolution on key areas, add a layer mask to your resolution, which is represented by pixels per inch (PPI).
In the layers panel, use a layer mask on the adjustment layer to focus resolution changes on key areas of the image.
On-screen pictures are typically displayed at 72 PPI, while printed images require a much higher resolution to maintain clarity.
Important Points:
- Resolution: Pixels per inch (PPI) indicates the detail level.
- Size: Refers to the physical dimensions of the image.
Here’s how you can check and change these settings using an adjustment layer to manage resolution and dimensions efficiently:
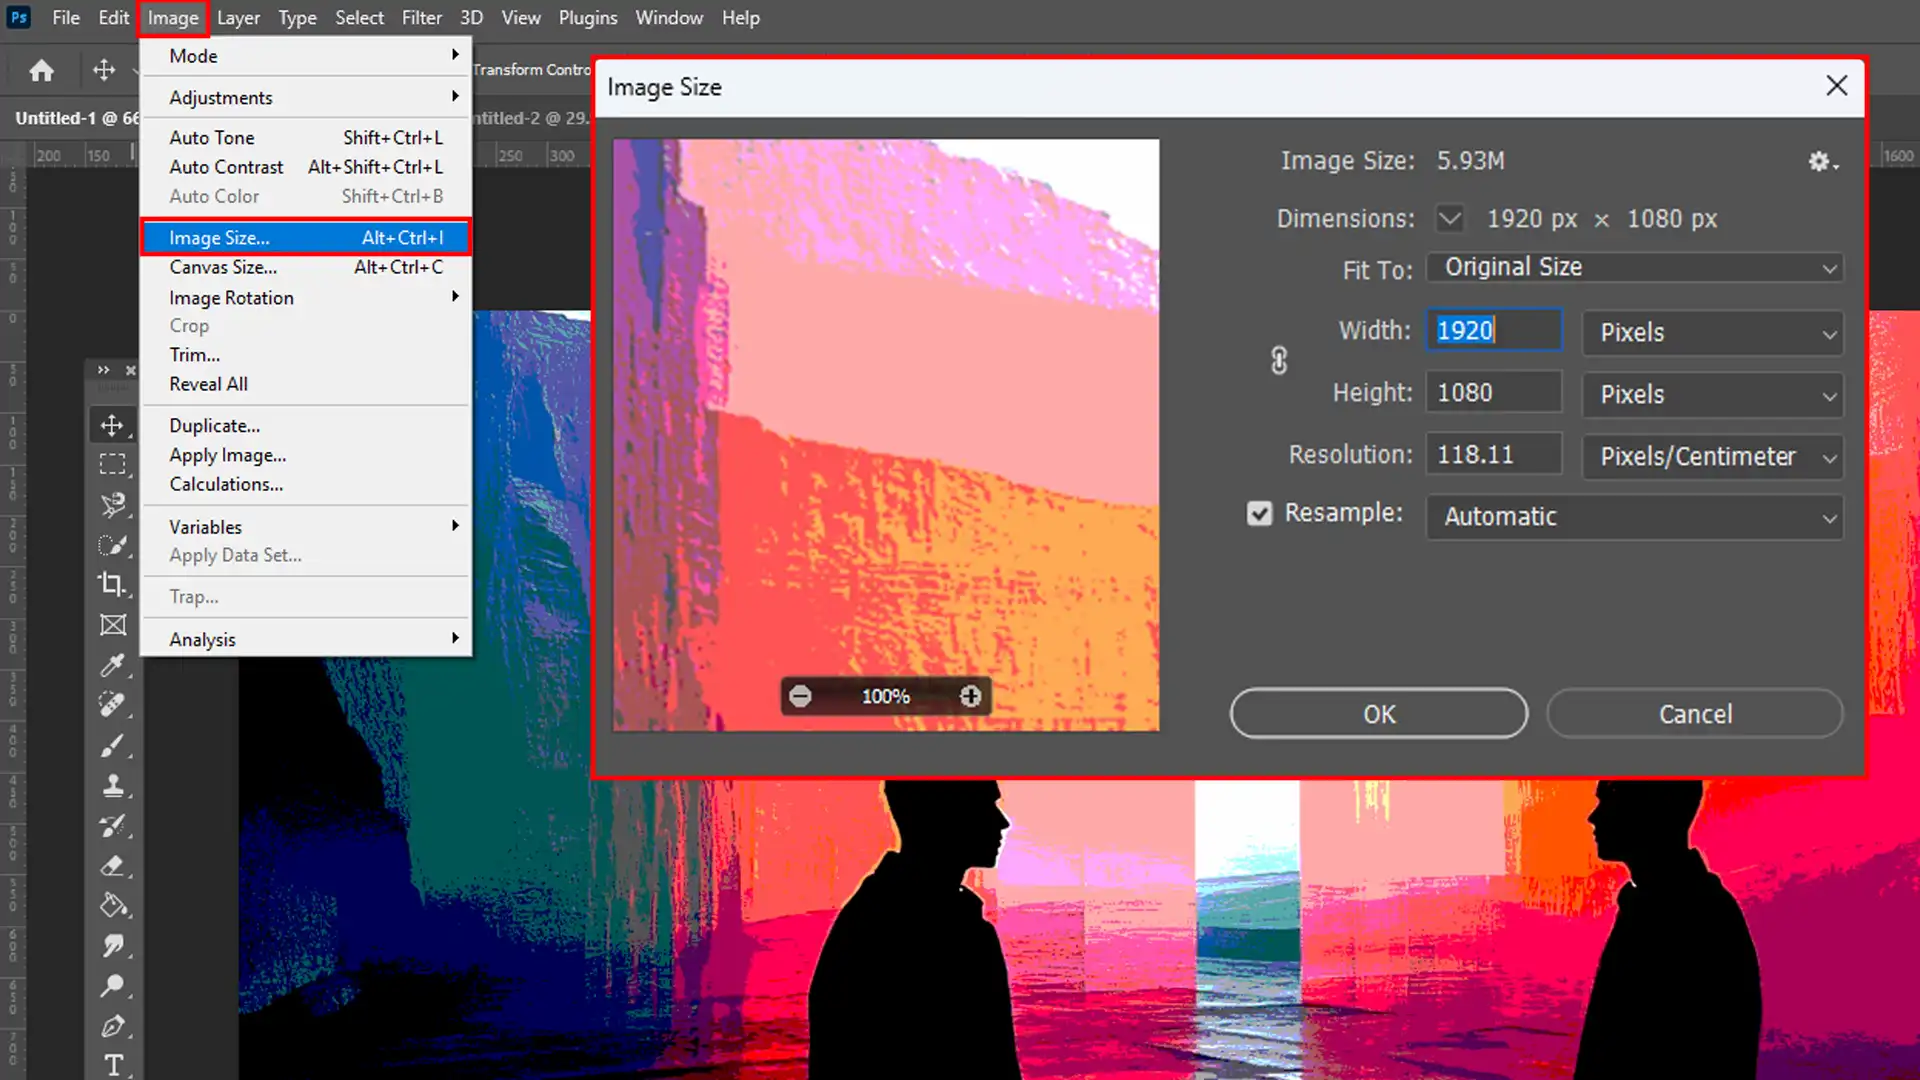
- Open your image in Photoshop and access the layers panel to modify layer settings.
- Navigate to ‘Image’ > ‘Image Size’.
- View or change the values in ‘Resolution’ and ‘Dimensions’.
These adjustments affect both the quality and usability of your project across various mediums.
Learn how to resize a photo in Photoshop to fit your project needs without losing quality. Photoshop offers powerful tools to adjust image dimensions while maintaining clarity and resolution, making it perfect for print or web use.
Steps to Resize Image Without Losing Quality
When resizing an image in Photoshop, maintaining quality is paramount.
Here’s a straightforward process to achieve high-quality results:
| Action | Details | Purpose |
|---|---|---|
| Open Project | Open your project in Photoshop. | Prepares the image for resizing. |
| Access Resize Settings | Go to ‘Image’ > ‘Image Size’. | Brings up the dialog box to modify image dimensions and resolution. |
| Maintain Proportions | Ensure ‘Constrain Proportions’ is checked. | Prevents distortion by maintaining the aspect ratio of the image during resizing. |
| Selective Dimension Changes | Utilize a layer mask to apply dimension changes selectively. | Allows specific parts of the image to be resized, preserving the integrity of key areas. |
| Choose Resampling Method | Add an adjustment layer before selecting ‘Resample’. Choose ‘Preserve Details 2.0’ for enlarging or ‘Bicubic Sharper’ for reducing. | Optimizes image quality during resizing. ‘Preserve Details 2.0’ enhances detail in enlargements, while ‘Bicubic Sharper’ maintains sharpness in reductions. |
| Fine-Tune Image | Using the layers panel, adjust the ‘Reduce Noise’ slider if necessary. | Minimizes noise that can be introduced during the resizing process, ensuring a clean and clear result. |
By understanding how “layers,” “adjustment layers,” and “layer masks” interact within Photoshop, you enhance not just design accuracy but also workflow efficiency.
Exporting Resized Photos for Different Use Cases
Once you have resized your image, it’s crucial to properly export it based on how it’ll be used:
For web use:
- Use a layer mask to selectively modify the quality settings on the background and other focus points before exporting, considering the blend mode settings that may affect how colors and details are compressed when saved.
- Use a layer mask with the adjustment layer to localize color corrections before exporting, then File > Save As > Choose JPEG format; set quality around 60%.
- Ensure that the sRGB color profile is selected for consistent colors across all browsers.
For print:
- Focus on high resolution with no compression artifacts.
- File > Save As > Choose TIFF format; enable LZW compression if file size is a concern.
- Use an adjustment layer to finalize color settings, then confirm CMYK color mode as per printer specifications.
Different platforms may require specific formats or resolutions, so always tailor your export settings accordingly.
By following these specific steps within Photoshop, especially involving appropriate use of layers panel” features like adjustment layers.
Users can manage projects efficiently while maintaining control over each aspect of image manipulation, ensuring that every outputted image serves its purpose without quality loss.
Exploring the Layers Panel for Posterization Techniques
Exploring this technique from new angles can significantly elevate your digital artwork. When harnessing the power of layers, additional control and creativity are at your fingertips.
When diving into a Photoshop layering tutorial, understanding the Layers Panel is crucial. It’s especially useful for posterization techniques.
By mastering layer adjustments, you can create stunning posterized effects and control color levels for unique results in your edits.
Preserving the Original Image with Enhanced Layer Control
The use of multiple layers can make a world of difference in refining the posterize effect.
Start by adding a layer mask to your adjustment layer, ensuring the original picture remains untouched to preserve the integrity of your project.
This method allows you to experiment with the background without altering the base image directly.
Navigate through the layers panel, using the layers panel tools to add an adjustment layer to manage each layer’s visibility and effect independently.
Employ a layer mask when using the layers panel to isolate effects on specific areas during adjustments or applying other enhancements.
Using different blend mode on the layer can profoundly influence the overall composition’s depth and tone, allowing for more dynamic and visually appealing results.
Next, integrate a layer mask into your workflow. Layer masks are crucial for selectively modifying parts of your image without impacting the whole picture, allowing you to apply changes precisely where needed without altering the rest of the Photoshop mask.
In the layers panel, for instance, if you wish to apply the posterize effect more intensely on specific areas such as shadows or highlights, simply paint over those areas on the mask with black or white.
Utilizing a combination of these resized layers – each with its distinct purpose – enables precise adjustments while maintaining maximum editability throughout your creative process.
Mastering image quality is essential for both print and web projects. Understanding the balance between resolution and file size ensures clarity in any format.
Blending Modes: Adding Depth to Posterization
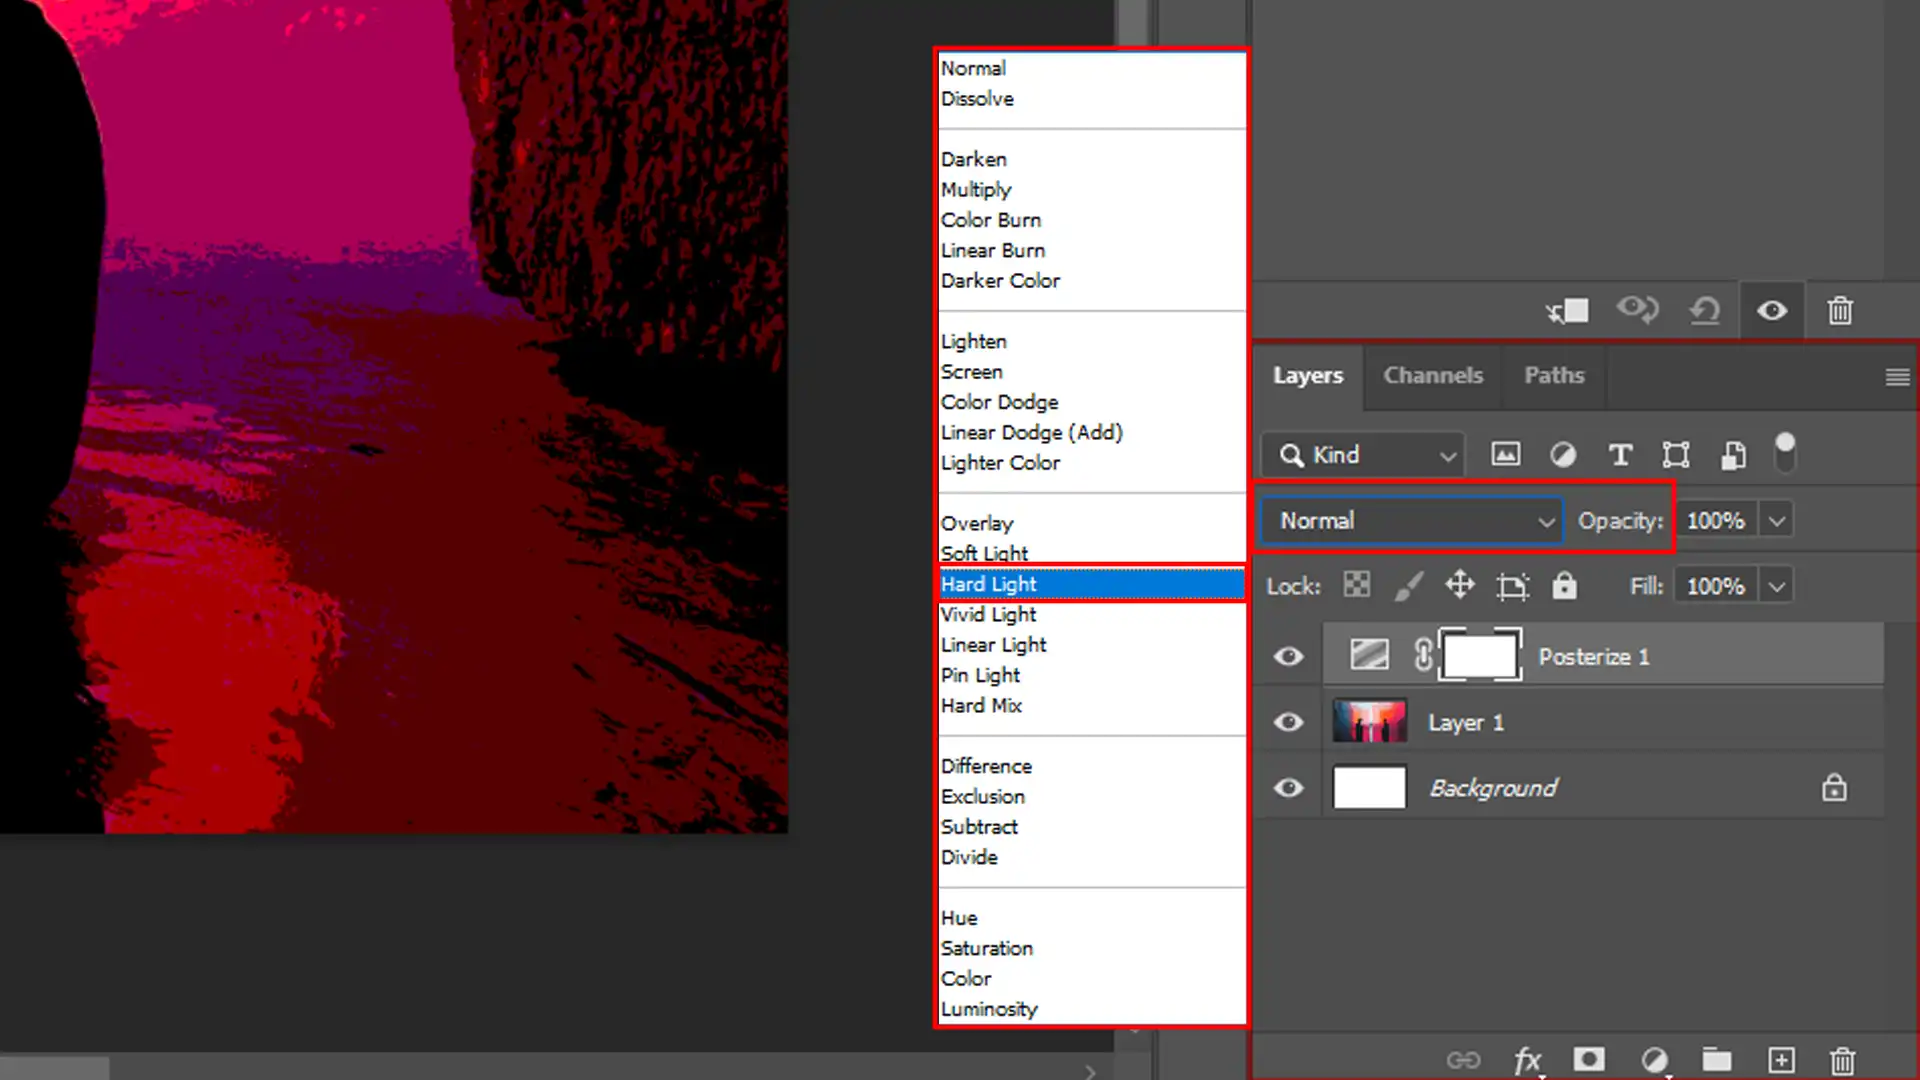
Changing up the blend mode in Photoshop of your adjustment layers offers a new dimension in manipulating how the llayer interact with one another visually.
Exploring various blend modes, like ‘Soft Light’ or ‘Hard Light,’ can enhance clarity or creatively mix colors, adding intriguing effects to the final look of your posterized image.
Utilizing layers effectively is key to achieving a nuanced posterize effect. Start by making multiple adjustment layers and drag them into your workspace to experiment with different settings.
Use the slider controls within each adjustment layers to fine-tune aspects such as brightness, distinction, and color balance.
By carefully managing each layer and its corresponding adjustments, you can construct complex visual effects that enhance the overall composition of your posterized picture.
Using the layers panel, apply a layer mask to each blend mode adjustment layer to fine-tune how each mode affects the background and other parts of the image, providing unique artistic outcomes.
For example, applying a ‘Multiply’ blend mode on a new adjustment layer could deepen darker tones within a color image, adding richness and vibrancy that wasn’t initially apparent.
Similarly, using an “Overlay” mode might brighten the majority of colors while maintaining detailed brightness values, allowing for a balanced disparity.
By carefully selecting appropriate blend modes and layering them strategically, photographers and designers alike can make complex visual textures that are both striking and harmonious, a testament to the powerful capabilities found in Photoshop’s toolkit.
Using these advanced techniques allows you not just to apply but truly integrate posterization into your project seamlessly, creating artworks that stand out both technically and aesthetically.
Adjusting Color Levels for Optimal Posterize Effect
In the world of digital art and photography, achieving the perfect posterize effect involves more than just a object selection tool; it requires precise manipulation of color levels using an adjustment.
Posterization intentionally reduces the number of colors in an image to create a graphic effect that’s both eye-catching and distinctive.
Mastering this technique with the help of an adjustment layer in Photoshop can transform a standard original photo into an artistic statement.
Mastering the Color Settings for Posterization
Starting with the right color settings is crucial for effective posterization. To achieve this, the first step is to add an adjustment layer specifically designed to modify colors.
To effectively highlight the main subject of your picture using the posterize effect, leverage the power of layer and adjustment layer.
Integrating the posterize effect seamlessly requires thoughtful layer management and precise adjustments.
Begin by stacking multiple layer dedicated to different color ranges, allowing you to apply the posterize effect selectively.
Utilize adjustment layers to fine-tune each layer impact, ensuring that the transitions between color blocks are smooth and intentional.
This layered approach not only enhances the depth of your picture but also provides greater flexibility in modifying the posterize effect as your project evolves.
By making separate layer for different aspects of your picture, you can use the slider in your adjustment layers to control the intensity of the posterization.
This allows you to emphasize key elements without affecting the entire picture, providing a balanced and professional finish to your artwork.
The use of an adjustment layer allows you to experiment without altering the image data, providing flexibility in your workflow.
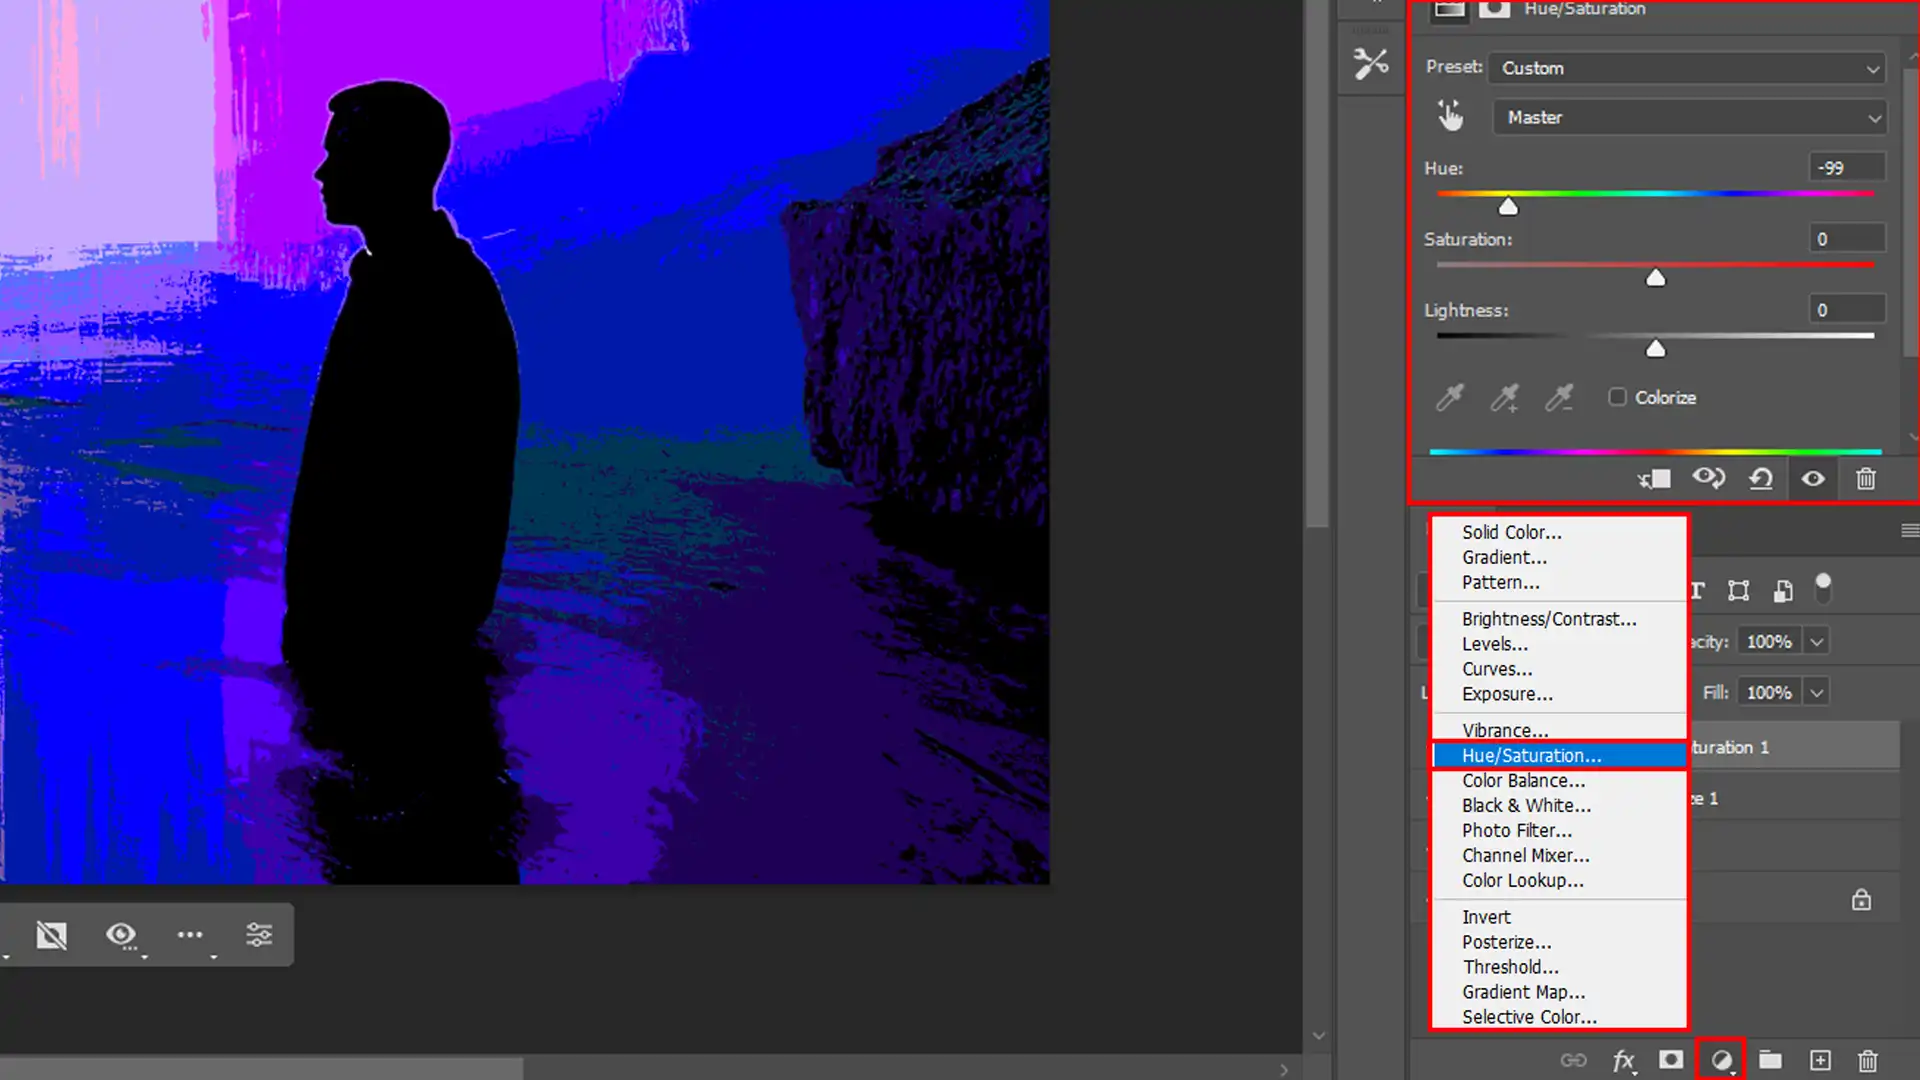
- Open your layers panel.
- Choose an 'Adjustment Layer' for 'Hue/Saturation'
- In the layers panel, change the saturation slider to enhance or reduce color intensity.
Through these adjustments, you directly control how subtle or dramatic the posterize effect becomes by influencing how colors merge and separate in your final picture.
Using Photoshop's Advanced Color Tools
Drag through the color settings in the advanced tools Photoshop adds, like selective color in Photoshop or Curves, allowing precise control over color channels.
Add an adjustment layer with Selective Color or Curves for much finer control over specific color channels and can be key to achieving a high-quality result.
Steps for Using Curves:
- From your layers panel, add a 'Curves' adjustment layer.
- Target individual color channels like red, green, or blue to tweak their outputs subtly.
- In the layers panel, drag the bezier curves and adjust blend modes to refine transitions between posterized tones, particularly in the background, enhancing the visual interaction between colors and making the effect more striking.
Optimizing these tools isn’t just about achieving stylistic effects but also ensuring that each section of your project maintains depth and detail despite reduced color complexity.
It allows you, whether tweaking background hues or emphasizing main subjects, to sculpt with light and shadow minutely.
By implementing these techniques strategically within Photoshop, you fine-tune not only colors but also how the layer interact across various elements of your composition.
This ultimately enhances both realism and artistic flair in your projects, where the posterize effect stands out prominently rather than feeling arbitrarily applied.
Using Photoshop Filters to Enhance Posterization
To elevate your posterize effects and give your image a striking visual appeal, leveraging Photoshop filters can make all the difference.
Utilizing the correct filters not only enhances the detail and color dynamics but also ensures that the posterize effect stands out in your composition.
Exploring the power of generative AI in Photoshop, you can take posterization to the next level. Using Photoshop filters to enhance posterization allows for dynamic and creative image transformations that truly stand out.
Choosing the Right Filter to Posterize Photoshop
When aiming to intensify the posterize effect, consider adding an adjustment layer specifically tailored for posterization.
This adjustment layer in Photoshop allows you to fine-tune the effect without permanently altering the original image data.
Add an adjustment layer and then experiment with filters like ‘Cutout’ or ‘Dry Brush’ for more controlled artistic effects.
These choices can emphasize edges and textures, making them ideal for bold, graphic looks. Always start by assessing how these filters affect your main subject within the background.
For more detailed control, especially when adjusting the background through various layers, don’t overlook using an adjustment layer over your chosen filter.
This setup allows you to tweak effects, particularly in the background, without altering the original layer directly, preserving your project’s flexibility.
Customizing Filters for a Unique Look
Enhancing a posterize effect isn’t just about choosing a filter; it’s also about customizing it to fit your unique aesthetic goals.
Here’s where your knowledge of blend modes becomes essential.
Add an adjustment layer before applying a filter for easier adjustment and better results; try adjusting its intensity with different blend modes, such as Multiply or Screen, depending on whether you want to darken or lighten the areas affected by the filter.
To further tailor these effects, incorporate blend modes into your layer mask strategy.
Adjusting blend modes while using a layer mask allows you to selectively apply enhancements or tone-down effects, providing refined control over how the visual elements interact.
By painting black on a mask, you effectively hide parts of the adjustment; painting white reveals it again. This nuanced control lets you emphasize specific features while keeping other areas untouched.
Mastering Photoshop filters requires experimentation and an understanding of how various tools like adjustment layers, masks, and blend modes interplay within your creative canvas.
With practice, these tools will enhance not just posterize effects but also expand your overall Photoshop skills repertoire.
Common Mistakes to Avoid While Posterization
When utilizing the posterize effect in digital picture processing, it is imperative to avoid excessive reduction of color levels within the posterize parameters.
Over-posterization through the posterize can strip away critical details and nuances, rendering your picture excessively flat and devoid of depth.
The posterize operates by reducing the number of tonal values in the picture, and if the posterize is not calibrated properly.
The resulting picture may suffer from a lack of visual interest due to the oversimplification of gradients and textures caused by the posterize .
Improper Use of Layer Masks for Posterized Images in Photoshop
Another prevalent mistake is the improper use of layer masks in conjunction with the posterize. Layer masks are essential for selectively applying the posterize to specific areas of an picture, allowing for a more controlled and balanced composition.
Neglecting to use layer masks effectively when employing the posterize effect can lead to uneven application of the posterize, causing discordance within the visual elements and detracting from the overall aesthetic intended with the posterize Photoshop.
Failure to Fine-Tune Adjustment
Moreover, a common oversight is the failure to fine-tune the adjustment after the initial application of the posterize.
The initial application of the posterize is rarely perfect; it often requires subsequent refinements to achieve the desired artistic outcome.
Fine-tuning parameters such as the number of levels in the posterize effect, discrepancy adjustments, and color balance is crucial for enhancing the quality and polish of the final picture when using the posterize Photoshop.
Failure to fine-tune adjustment can leave your photos looking less than their best.
Using the Lightroom selection tool allows you to make precise edits, ensuring each adjustment enhances your image effectively.
Ignoring Color Harmony
Additionally, one must consider the interaction between the posterize and the image’s inherent color harmony.
The posterize can significantly alter color relationships within the picture, potentially disrupting the visual coherence if not managed carefully.
Failing to account for these changes introduced by the posterize effect can result in a picture that feels disjointed or visually jarring due to the posterize.
Ignoring color harmony can lessen your photo’s appeal. To ensure vibrant results, explore these tips for Lightroom editing that focus on maintaining color balance.
To avoid ignoring color harmony in your edits, it’s important to master color matching in Photoshop, ensuring a balanced and professional look in your images.
Overlooking Picture Resolution and Quality
Applying the posterize Photoshop without considering the original image’s resolution and quality is another pitfall.
Low-resolution pictures may exhibit undesirable artifacts when subjected to the posterize, such as pixelation or banding, which can compromise the intended artistic effect of the posterize Photoshop.
When you resize an image for printing, overlooking picture resolution and quality can lead to blurry or pixelated results. Ensuring proper dimensions and resolution is key for sharp, professional prints.
Neglecting Tonal Range and Dynamic Contrast
Furthermore, ignoring the impact of the posterize effect on the tonal range and dynamic discrepancy of the picture can lead to suboptimal results.
The posterize effect inherently reduces the tonal variations, so it’s important to compensate for this by adjusting levels or curves to maintain a balanced discrepancy after applying the posterize.
By being cognizant of these potential missteps associated with the posterize effect, you can leverage the posterize more effectively.
Ensuring that your artwork retains its vibrancy and impact even after applying the posterize effect.
Mastery of the posterize effect involves a nuanced understanding of how the posterize effect interacts with various elements of digital imaging.
And careful attention to detail can significantly enhance the quality of your compositions when utilizing the posterize effect.
Frequently Asked Questions

How to posterize a photo with Photoshop?
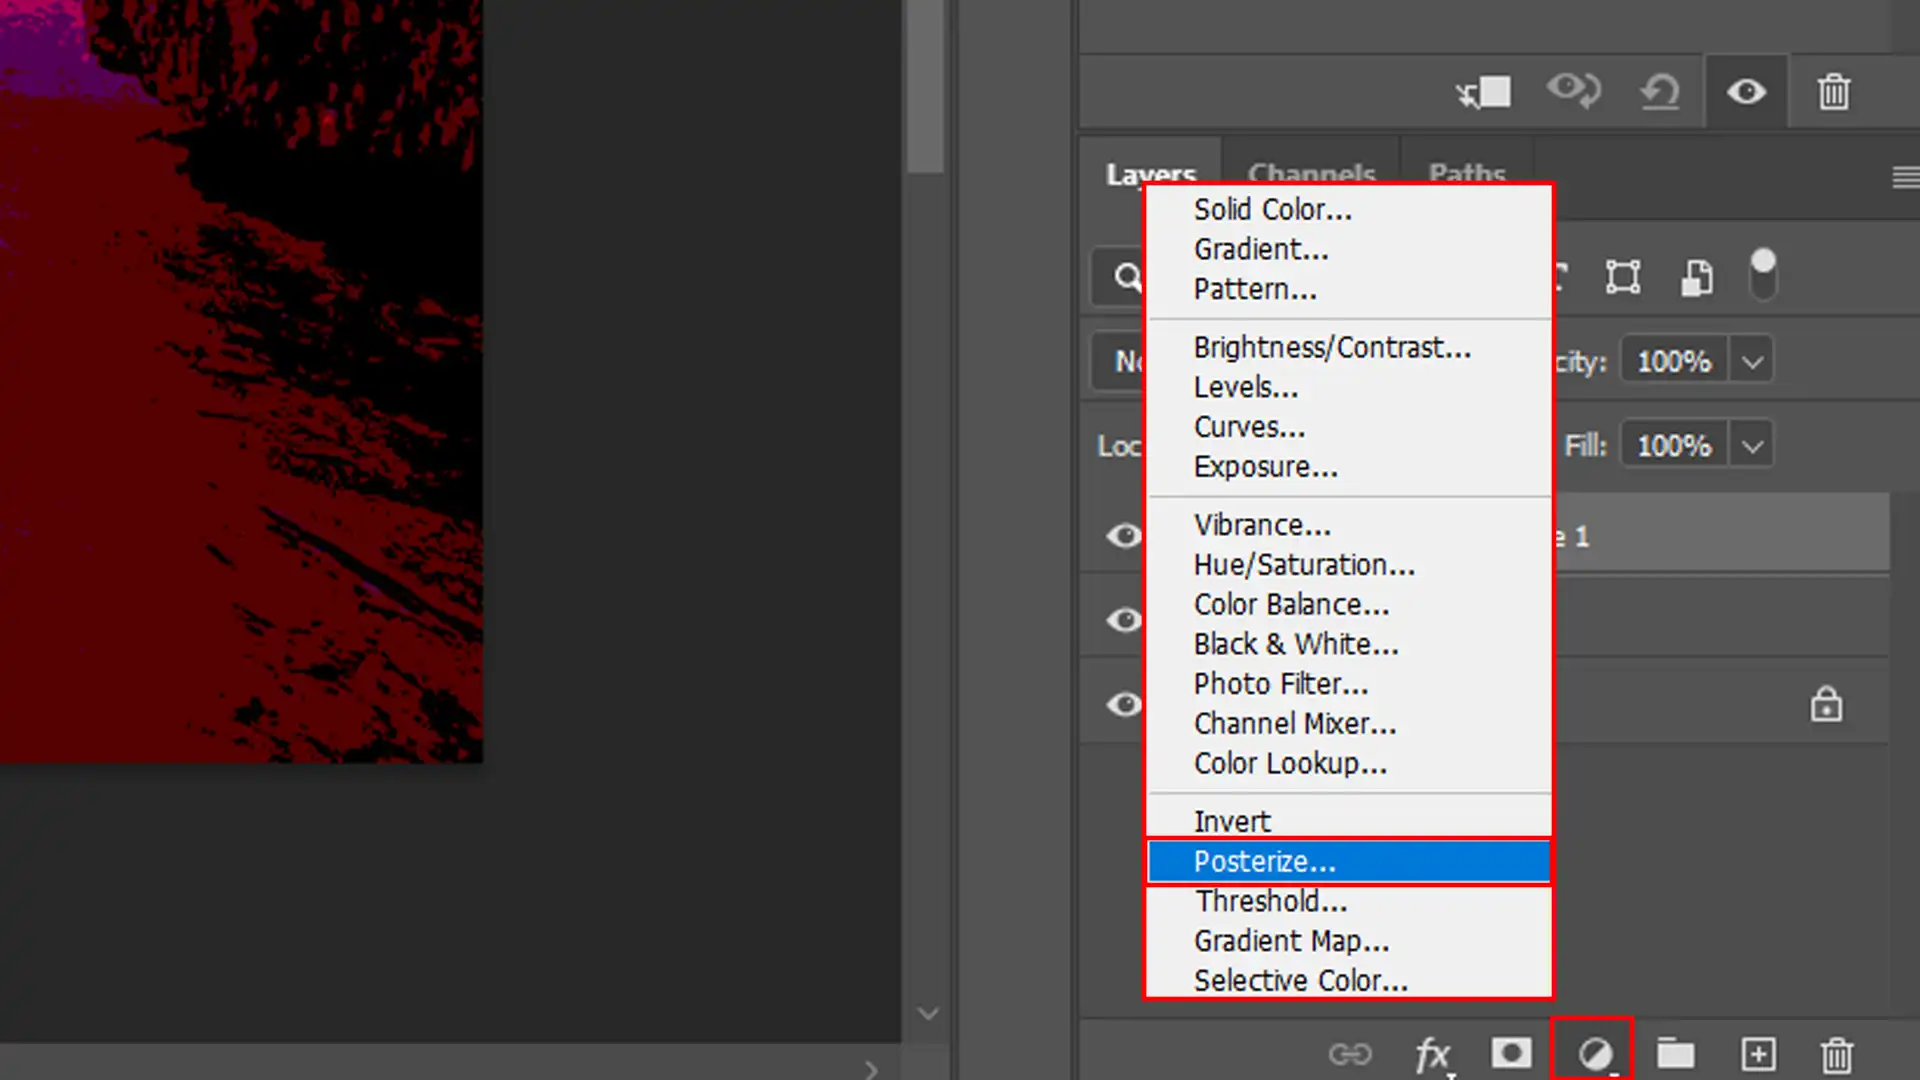
Open your project in Photoshop, focusing on the background layer, and go to the Image menu.
Select Adjustments, then click on Posterize.
Use the Slider to adjust the level of posterization you prefer, which will reduce the number of color shades in your photo.
What does it mean to posterize an image?
To posterize an image means to simplify it by reducing the number of colors or brightness values, creating a striking graphic effect.
This digital effect makes photos look more like a series of color or grayscale blocks, emphasizing the main features while discarding finer details.
How to posterize a photo for free?
Many online tools allow you to posterize photos for free. Upload your image to a free photo editing website, look for a Posterize tool or feature, and adjust the settings to your preference.
These platforms often provide instant results, requiring no software download.
What is the effect of the poster edges in Photoshop?
The poster edges effect in Photoshop accentuates the edges of your subject and adds distinction, giving your project a hand-drawn, artistic look.
It simplifies the color palette like posterization but focuses more on making outlines and textures stand out, akin to a poster print.

Conclusion
In my experience using the posterize Photoshop effect, it’s important to keep a few things in mind. If you reduce color levels too much, the picture can lose important details and look flat.
I’ve made this mistake before and learned that it’s key to fine-tune the settings. Also, using layer masks wisely helps control where the effect is applied, making the final picture more balanced and interesting.
Remember to always modify the settings after applying the effect to get the best result.
If you want to learn more about creating impactful pictures, check out this Photoshop Course and our Lightroom course for in-depth tutorials.
If you’re looking to get Adobe software, consider trying Adobe Photoshop for detailed editing or Adobe Photoshop Lightroom for a more streamlined workflow. With these tools and some practice, you can create unique posterized pictures that stand out.
Read more about Photoshop:


Course

Light Effect Photoshop


Lightroom Course 2025

Adobe Photoshop Course 2025

Photo Editing Course


