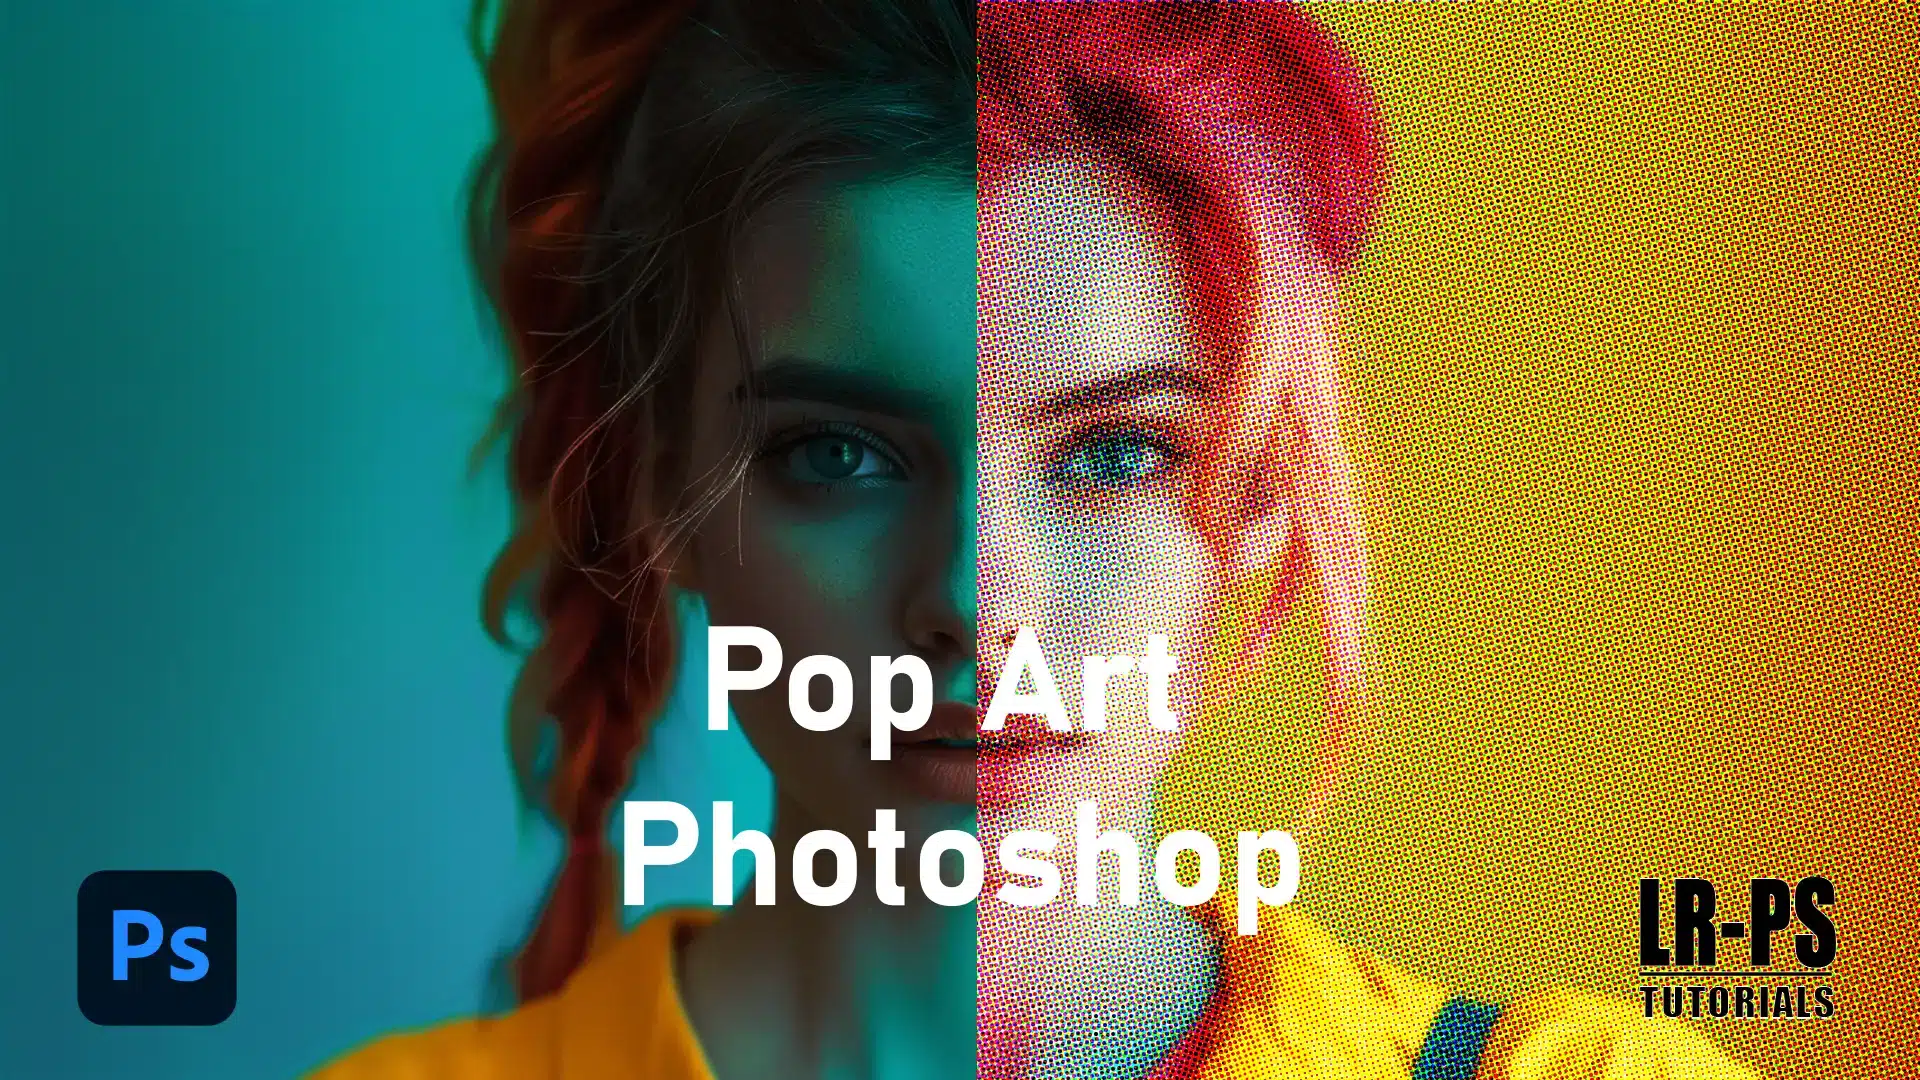
In this guide, I’ll show you how to create stunning pop art Photoshop effects that breathe new life into your images.
Imagine turning your favorite pictures into bold, colorful works of art that grab attention. With just a few simple steps, you can replicate the iconic style of pop art legends.
Whether you’re a beginner or a seasoned pro, this tutorial will provide the tools and techniques to elevate your photo editing skills.
So, are you ready to transform your ordinary photos into vibrant, eye-catching masterpieces?
Let’s dive in and unleash your creativity!
Table of Contents
Getting Started with Pop Art Photoshop
Pop art in Photoshop can transform your images with vibrant colors and bold patterns.
Before diving into the creative process, let’s ensure your workspace is set up for optimal efficiency and creativity.
Setting Up Your Workspace
Let’s begin by setting up your workspace in Photoshop:
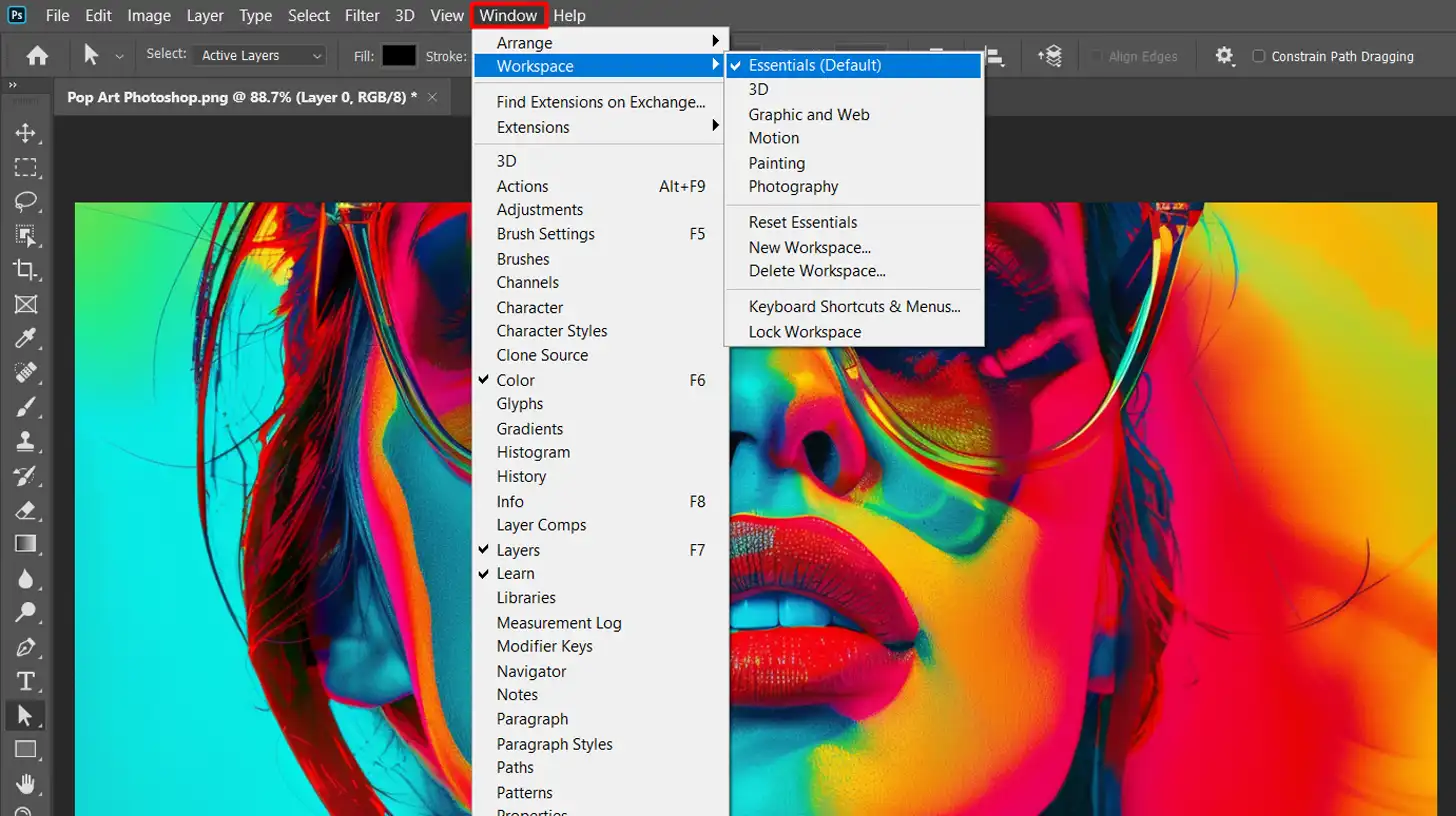
- Open Adobe Photoshop and go to the "Window" menu.
- Select "Workspace" and choose "Essentials" for a clean slate.
- Arrange the layers panel on the right side of your screen. This will be frequently used as you build your pop art masterpiece.
Remember, the layers panel is your best friend for managing each element of your work.
All the layers you create will be displayed here, making it easier to edit specific parts without affecting others.
Pro Tip: Familiarize the Photoshop shortcuts and Lightroom shortcuts to make your workflow more efficient.
Choosing the Perfect Image for Pop Art
Now, let’s dive into choosing the right image for your pop art project:
- A clear, high-contrast photo works best. A simple portrait is ideal as it stands out nicely after applying the pop art effect.
- Open your chosen image in Photoshop by navigating to "File" and then "Open," selecting your file from the folder. This will form the base of your pop art creation.
- Ensure the image quality is good. Blurry or low-resolution images may not yield the desired pop art effect. So, choose wisely to get vibrant results.
Adding the Pop Art Effect
For the Warhol effect, create a new layer above your background.
This helps add vibrant pop art details while keeping your original image intact.
Creating a New Layer on Top of a Background Layer
Here are the steps on how to create a new layer on top of your background layer:
- Press "Ctrl + Shift + N" to do this quickly. This new layer will help you work non-destructively, meaning you can edit without altering the original image. If you need to remove a background, ensure your new layer is positioned correctly.
- With your new layer selected, use the Paint Bucket Tool to fill it with a solid color. Choose something bold, like red, blue, or yellow. It sets the pop art tone right from the start.
Making A Threshold Adjustment Layer
The next step involves a threshold adjustment layer:
- Go to "Layer," then "New Adjustment Layer," and select "Threshold." This will convert your image into a stark black and white graphic, ideal for pop art.
- Adjust the slider to increase or decrease the detail in your image. Find a balance where important features stand out clearly. Once you're happy with the result, click "OK."
Highlighting Details with Clipping Masks
Add another new layer above your threshold layer:
- Make sure this new layer is selected, and go to "Layer" then "Create Clipping Mask." This will allow you to add color selectively without affecting the rest of the image under the threshold layer.
- Use the Pen Tool to trace areas you want to highlight. For instance, trace around the eyes, lips, hair, etc. Once traced, right-click and choose "Make Selection" to keep your selection active.
Applying Color For a Better Enhancement
Applying color in Photoshop can dramatically enhance your pop art projects.
Let’s start by exploring how to adjust hue and saturation to make your colors pop and stand out.
Adding Hue Saturation
To add color, apply a Hue/Saturation adjustment layer:
- Go to "Layer," then "New Adjustment Layer," and select "Hue/Saturation."
- Tweak the sliders until you achieve vibrant colors. Your work should now start showing distinctive pop art characteristics.
Using Gradient Maps
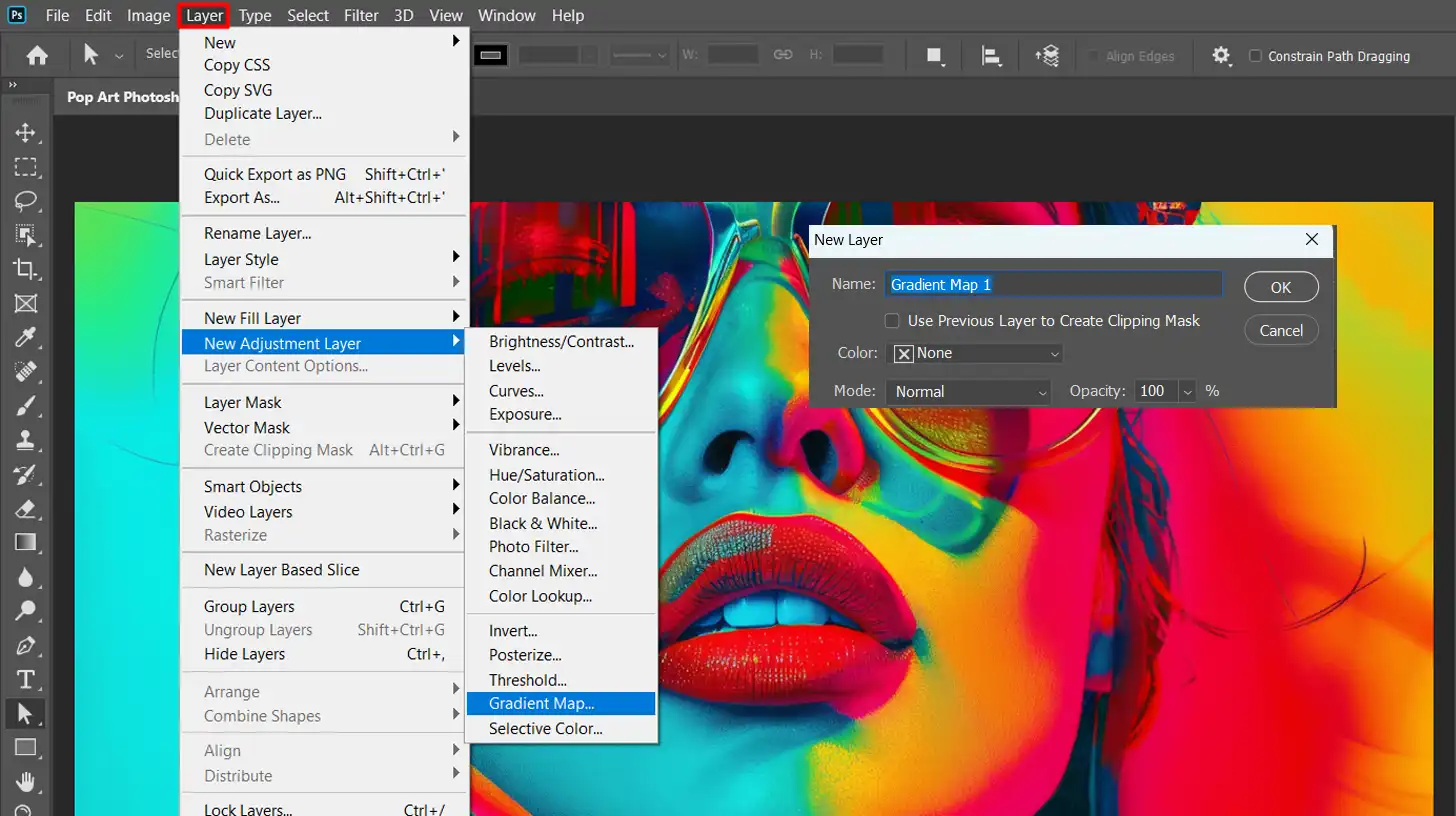
Apply a gradient map adjustment layer to add a smooth transition between colors:
- Go to "Layer," then "New Adjustment Layer," and select "Gradient Map."
- Experiment with the gradient options to see what suits your image best.
Easy Tricks for Pop Art Effects
Easy tricks can bring your pop art effects to life, making your designs vibrant and eye-catching.
One popular technique inspired by Andy Warhol is adding halftone patterns.
For those interested in fine art photography, experimenting with these patterns can elevate your pop art projects to a new level of sophistication.
Let’s explore how to achieve this iconic effect.
Adding Halftone Patterns
For a classic pop art vibe, add a halftone pattern effect:
- Go to "Filter," then "Pixelate," and select "Color Halftone."
- Adjust the settings to get the dot size and screen angles you prefer. This trick ties your creation together, giving it that iconic pop art poster feel.
Using Blend Modes
You can also play with blend modes to give your image different looks:
- Select the layer you want to blend and experiment with options like "Overlay," "Multiply," or "Screen."
- Each blend mode will interact differently with the layers beneath, making unique effects that contribute to your pop art style.
Final Check and Wrapping Up
Before we wrap up, let’s quickly ensure everything looks perfect.
Make any final adjustments and save your work correctly.
Reviewing and Saving Your Work
As you wrap up, make sure to review your work:
- Check if some areas need more color or adjustments. Small tweaks can make a big difference in the outcome.
- Don't forget to save your work both as a Photoshop file (.psd) and an image file (like .jpg or .png). This way, you can always return and make further edits if needed.
Pro Tip: Use a smart object in Photoshop to keep your work flexible.
Convert layers to smart objects by right-clicking the layer and selecting “Convert to Smart Object.”
This allows you to resize and transform without losing quality.
For even more creative flexibility, consider learning Lightroom to enhance your photo editing skills further.
And there you have it! You are now ready to create pop art using Photoshop. Happy editing!
Achieving the Pop Art Effect
The allure of pop art lies in its vibrant colors and striking patterns.
Now, I’ll walk you through how to create pop art in Photoshop.
Detailed Instructions for Creating Pop Art
Here’s a quick comparison of creating pop art with Photoshop versus other methods:
| Aspect | Photoshop | Other Methods |
|---|---|---|
| Tools | Advanced tools like Gradient Map, Halftone, Clipping Masks | Basic filters and adjustments |
| Flexibility | High flexibility with non-destructive editing | Limited flexibility, often destructive |
| End Result | Professional, high-quality pop art | Amateur, less polished pop art |
Follow these steps to transform your image into pop art:
- Start by opening your image in Photoshop. You want a high-quality image.
- Duplicate the original layer using "Ctrl + J". This step ensures we can always go back to our original.
- Click on the duplicated layer and select "Filter"> "Pixelate"> "Color Halftone". This gives your image the classic dotted look.
- Use the Paint Bucket Tool to create a layer and fill it with a bright color.
- Move this colored layer below the halftone layer in the layers panel. You've now set your background.
- Add a "Gradient Map" adjustment layer above your image. You'll see an instant change in the colors.
- Create a new layer for each color area. Use the Pen Tool to outline these areas for your eyes, lips, and hair.
- Use clipping masks to apply color only to specific areas in these new layers.
- Experiment with different blend modes like "Overlay" or "Multiply" for varied effects.
Pro Tip: Just as in NFT art and photography, where unique elements bring your work to life, applying these pop art techniques with an eye for composition rules in photography can elevate your design.
Remember, even small adjustments and thoughtful composition can make a big difference in the outcome!
Using Filters and Adjustments
Filters and adjustment layers can transform your base image. Explore the filter gallery under “Filter” in the top menu.
Adjustments like “Hue/Saturation” can make your colors pop.
Use “Smart Objects” to keep your transformations non-destructive.
This way, you can quickly revert any changes.
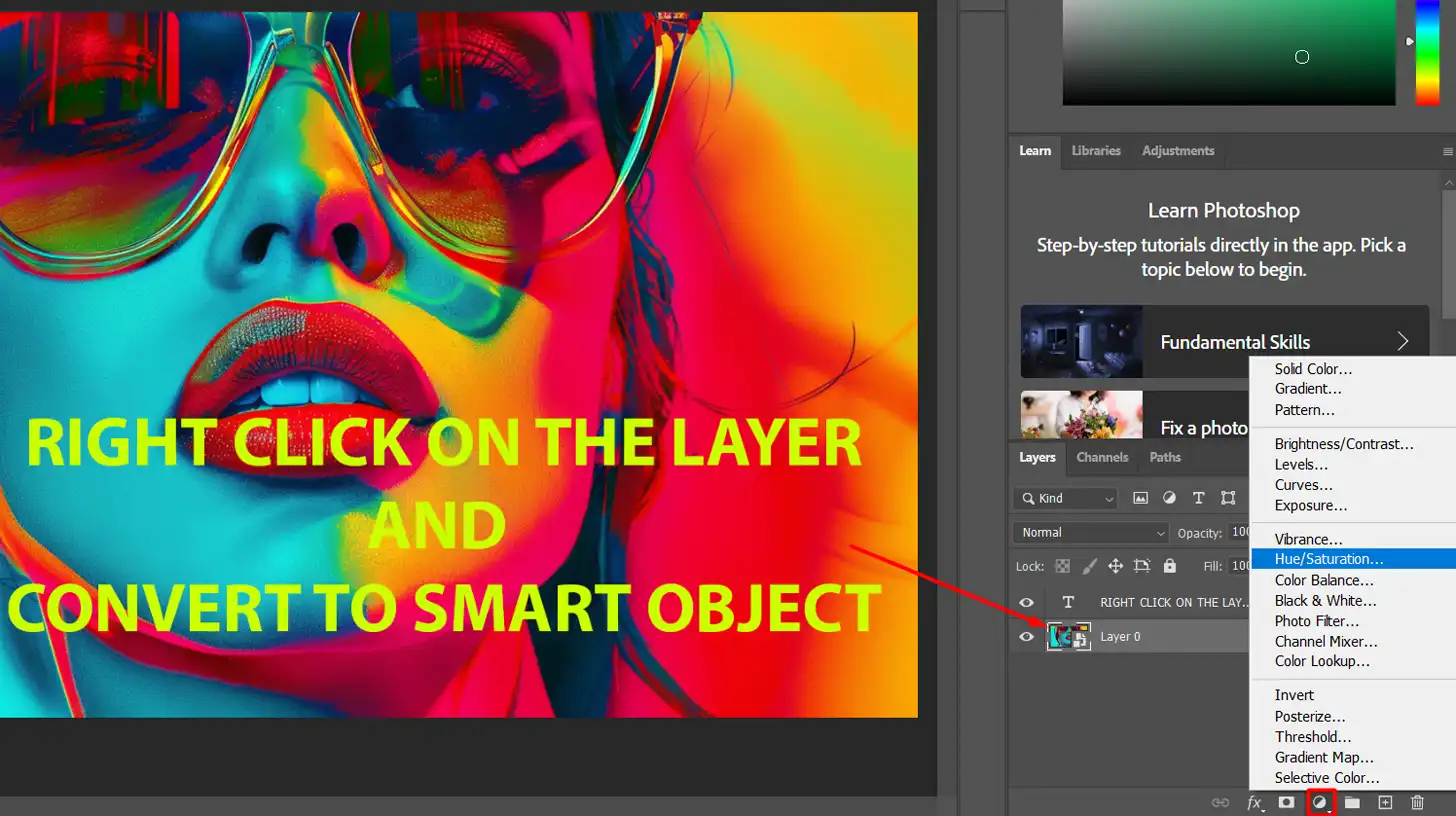
Adding Bold Colors and Patterns
Bold colors define pop art in Photoshop.
Choose bright hues for your subject layer.
Apply these using clipping masks. Add patterns through the Fill or Filter menu for texture.
Remember, patterns and colors should be fun and attention-grabbing.
Pro Tip: Use Photoshop actions to save time; actions automate repetitive tasks, freeing up time for creativity.
Advanced Techniques for Pop Art Photoshop
Designing pop art in Photoshop can seem confusing, but with a few advanced techniques, you’ll master it quickly.
Let’s break the down step by step.
Working with a Background Layer
The background layer is where it all starts.
Follow these steps:
- Select your image and ensure it's high-quality.
- Duplicate your layers to protect your original work using the Ctrl key + J.
- Click on the layer thumbnail to select it.
- Use the Pixelate filter for a halftone effect, which gives that classic Andy Warhol look.
Designing Custom Brushes
Custom brushes, such as the healing brush and spot healing brush, make your pop art unique.
Here’s how to create one:
- Create a new document.
- Choose a simple shape or pattern for your brush.
- Use the selection tool to define your brush area.
- Go to "Edit"> "Define Brush Preset" and name your new brush.
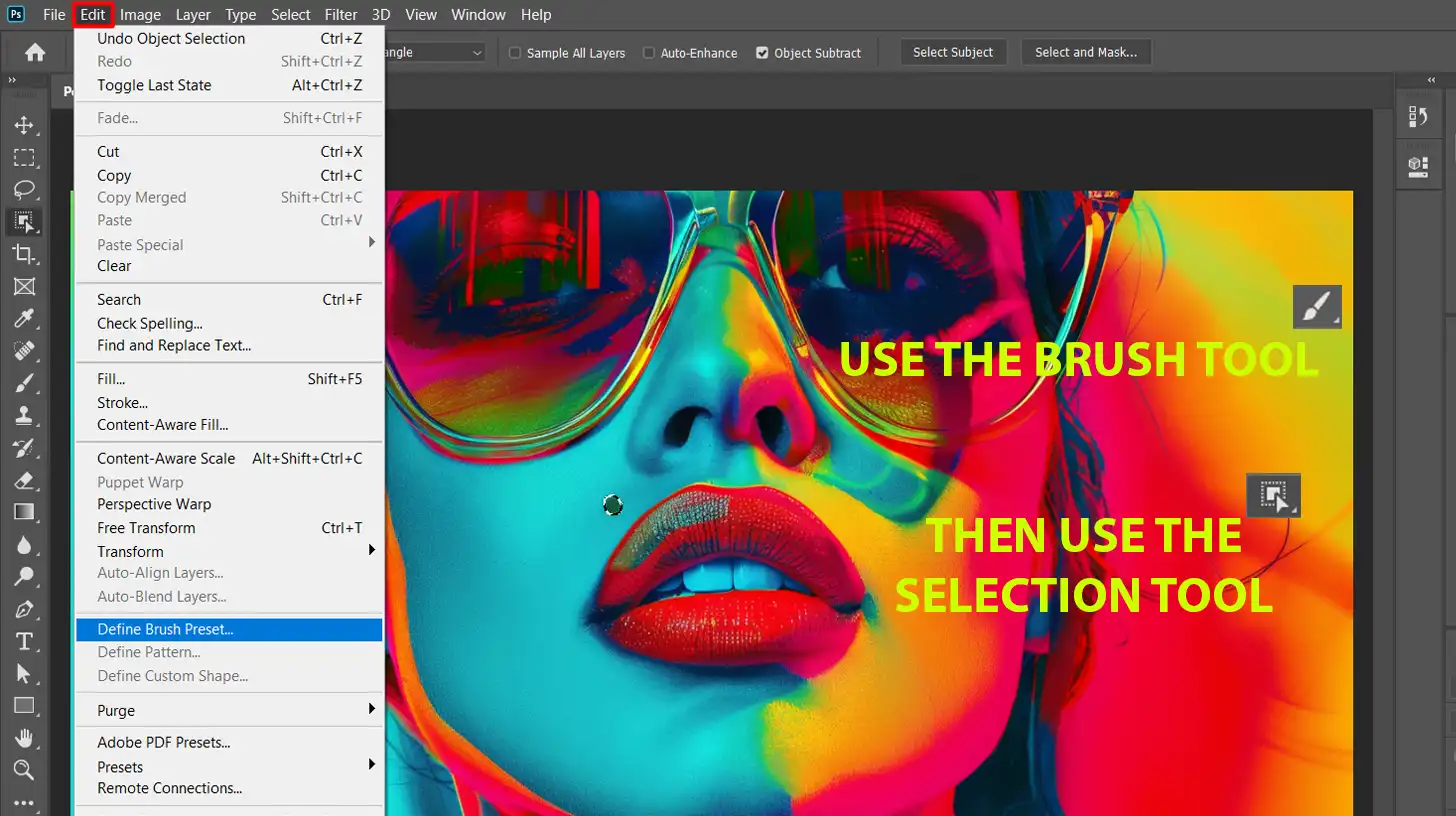
Now, select your subject layer. Click on the brush tool and pick your custom brush.
Experiment with jitter, spacing, and other settings until you get the desired effect.
Using Photoshop Actions for Pop Art
Photoshop actions save time. To use them effectively:
- Create a new action from the Actions panel.
- Record the steps as you go through various effects, like hue/saturation adjustments or changes in blend mode.
This saves time for repetitive tasks and ensures consistency across your art pieces.
Pro Tip: Utilize smart objects; they keep transformations non-destructive and help quickly revert changes. Happy editing!
Tips and Tricks for Perfect Pop Art
Creating pop art is fun but tricky. Let’s dive into some important tips to up your game.
Common Mistakes to Avoid
Even Andy Warhol had his moments of missteps.
To avoid common pitfalls and keep your work on track, let’s look at how simplifying your approach can make a big difference.
Avoid Overcomplication: Stick to Bold Colors and Simple Patterns
A lot of folks make the mistake of overcomplicating things. Keep it simple.
Pick bold colors and stay consistent. Don’t use too many patterns; it confuses the eye.
Embrace White Space: Let Your Important Elements Shine
Avoid overcrowding your piece. White space is your friend. It highlights the exciting parts.
Find Inspiration: Borrow Ideas and Make Them Unique
Running low on creativity’s OK. Look at other images for inspiration, but make it your own.
Enhancing Your Pop Art Effect
To make your pop art pop, adjustment layers are your go-to.
They let you tweak colors and contrasts without changing your original work.
Embrace Adjustment Layers
They help you tweak hue saturation without changing your image.
Use a smart object so you can go back and fix mistakes later without hassle.
Experiment with Tools
Experiment with the free transform tool. Resize elements to fit your needs.
Use these tools for a pop art poster that stands out.
Pro Tip: Learning the differences between the essential tools in Photoshop and essential tools in Lightroom can help make your workflow even more efficient.
Highlight Important Features: Use Bold Colors for Impact
With your model layer, focus on important areas like eyes and lips.
This grabs attention. Drop in bold colors as your foreground color to make them pop.
Incorporating Text and Graphics
To perfect the Warhol effect in your design, the clipping mask technique helps blend text and graphics seamlessly.
Let’s see how this method can elevate your work.
Use Clipping Mask Technique
Use the clipping mask technique to layer text on images.
Make it part of the artwork.
Don’t just slap it on top. Integrate it.
Choose Readable Fonts
Make sure your text is bold and readable. Stick to sans-serif fonts.
They are easier on the eyes.
Simplify Graphics
Graphics should be simple.
Icons and shapes work best.
Consider the Background
To blend everything seamlessly, think about the background. It sets the stage. Bright or neutral, make sure it complements your elements. Play around with one or two backgrounds to see what fits.
Pro Tip: Always keep a duplicate layer of your work for easy corrections. It saves time and nerves!
Just as top 10 NFT artists often maintain multiple versions of their digital art, doing this ensures you can easily adjust your pop art creations.
And remember, even Andy Warhol started with the basics.
Frequently Asked Questions (FAQs)

How to do pop art in Photoshop?
- Open your image.
- Select a bold color palette.
- Use the Poster Edges filter for a stylized look.
- Apply the Cutout filter to simplify details.
- Adjust brightness and contrast for a vibrant effect.
How do you pop an image in Photoshop?
- Begin with a high-contrast image.
- Use the Levels or Curves tool to enhance contrast.
- Isolate the subject by removing the background.
- Experiment with color overlays for a pop effect.
What are the steps to turn an image into pop art?
- Choose an image with simple, precise subjects.
- Apply a thick outline around the subjects.
- Convert the image to a limited color palette.
- Add text or other graphic elements typical of pop art.
What program is used to create pop art?
- Adobe Photoshop is widely used for creating digital pop art.
- GIMP is a free alternative that also offers robust features.
Conclusion
In conclusion, diving into pop art Photoshop has been a game-changer for my creative journey.
Pop art’s vibrant, bold aesthetics have allowed me to transform ordinary photos into striking, eye-catching pieces that captivate viewers.
Through experimenting with various techniques, I’ve honed my skills and discovered new ways to express my artistic vision.
If you want to elevate your photo editing prowess and explore the dynamic world of pop art, I highly recommend this comprehensive Photoshop course.
Additionally, for those who want to enhance their skills further, this Lightroom course offers invaluable insights and techniques.
Embrace the power of pop art Photoshop and watch your creativity soar!
Read more about Photoshop:


