Polaroid Effect in Photoshop: Creating Vintage Photos
Polaroid Effect in Photoshop: Creating Vintage Photos
Are you looking to add a nostalgic touch to your photos? In this guide, I’ll show you how to create a stunning polaroid effect in Photoshop.
Imagine transforming your digital images into classic, vintage memories with just a few simple steps. This effect not only enhances your photos but also gives them a timeless appeal.
Ready to dive in and give your pictures that retro charm?
Let’s get started!
Table of Contents
How to Create a Polaroid Effect Photoshop
One of my favorite nostalgic effects to apply to photos is the Polaroid effect.
This technique mimics the classic look of instant Polaroid prints, complete with the iconic white border and slightly faded colors.
It’s a great way to add a vintage touch to your images.
Step 1: Open Your Image in Photoshop
First, make sure you have your image ready.
Open Photoshop, go to File > Open, and double-click your image file.
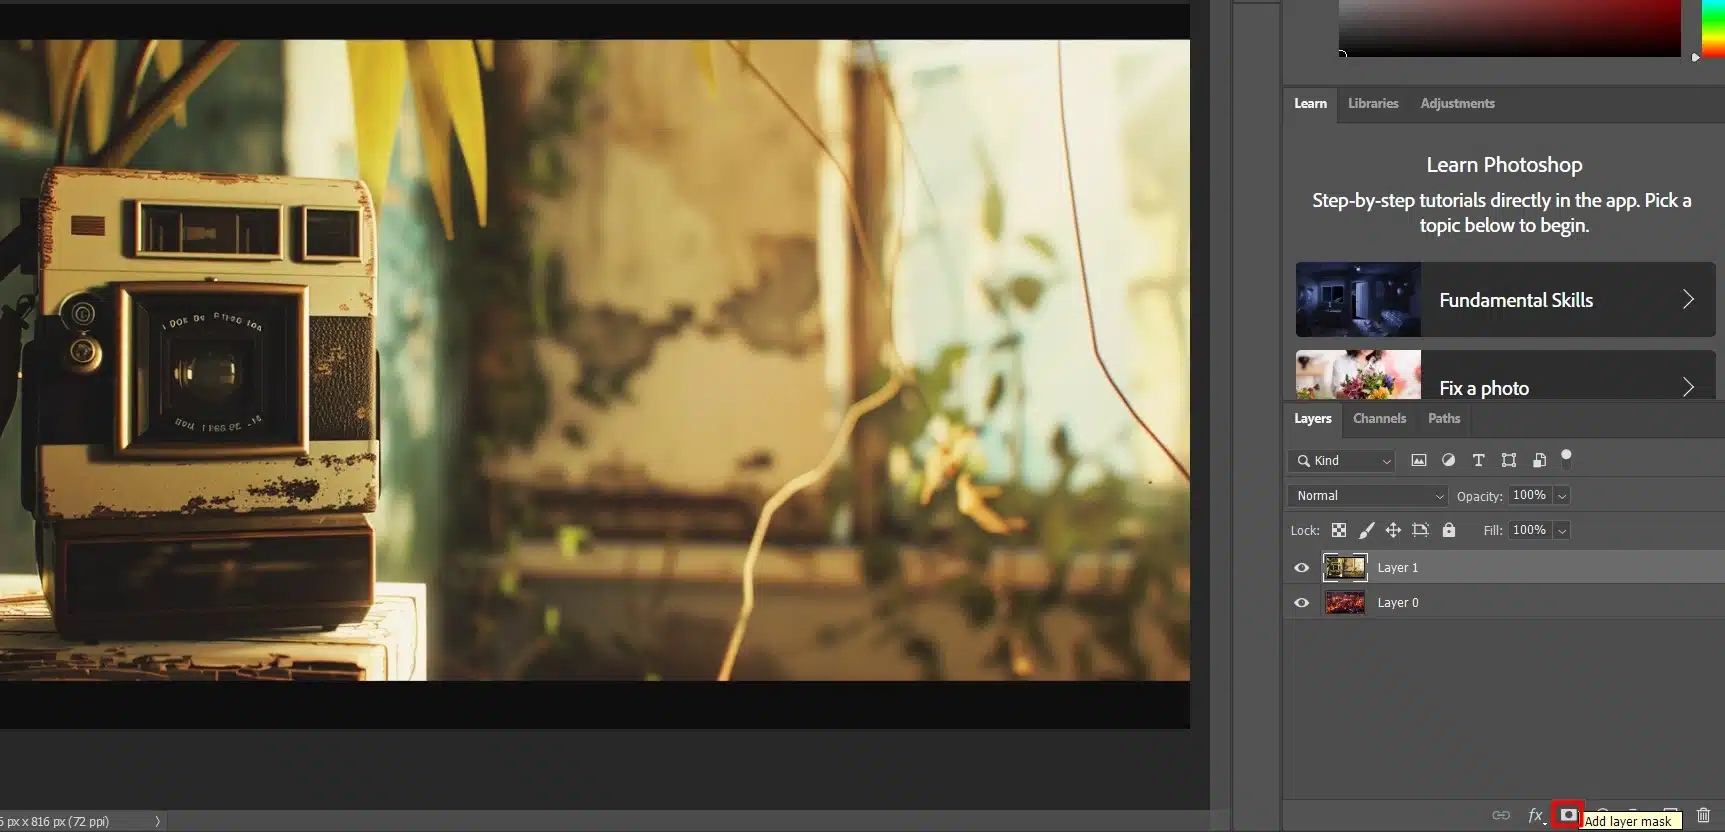
Step 2: Create a New Layer
Once your photo is open, head to the Layers panel. Click on the “New Layer” icon at the bottom.
This keeps your edits organized.
Step 3: Add a White Border to Define the Polaroid Frame
Select the rectangle tool in Photoshop from the toolbar. Draw a rectangle around your photo.
Fill it with white to create that classic Polaroid border.
Learn how to adjust white balance when adding a white border. Proper white balance ensures colors are accurate, enhancing the white border and giving your images a clean, polished, professional look.
Enhance your projects with the frame tool in guide Photoshop to addawhiteborder that defines the Polaroidframe. Learn to use this feature for clean, stylish photo borders.
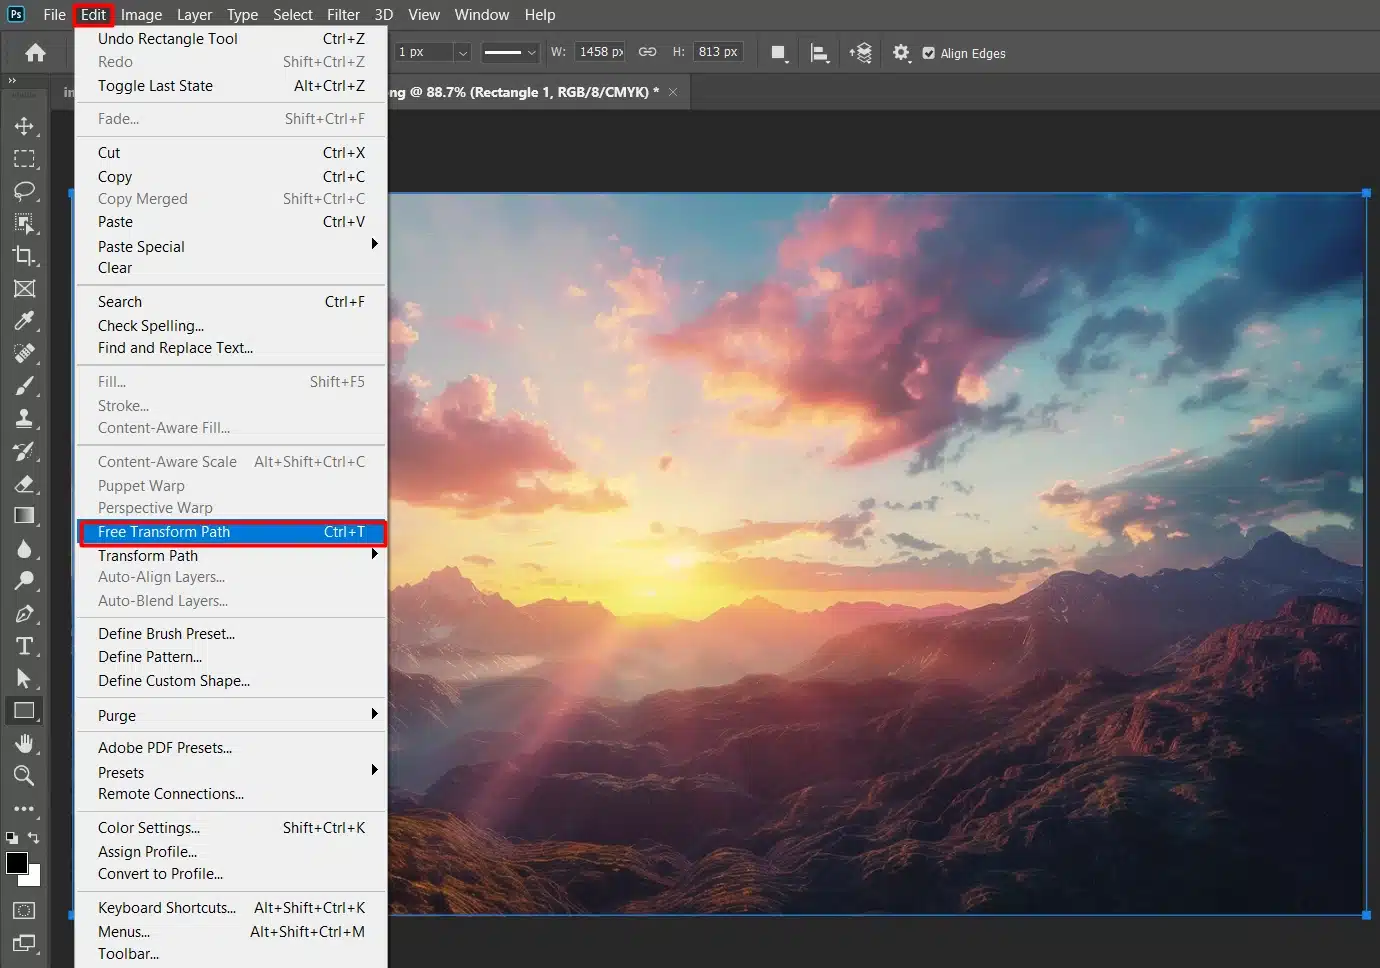
Step 4: Adjust the Image Size
Click on your photo layer. Press Ctrl+T (Cmd+T on Mac) to free transform.
Resize the photo within the white border to look like a Polaroid.
Hold Shift to keep proportions.
Step 5: Apply a Vintage Filter
Time for some vintage flair! Go to Image > Adjustments > Photo Filter.
Choose Sepia or another vintage effect.
Adjust the density until it looks just right.
Step 6: Add a Drop Shadow
Give it some depth by adding a drop shadow. Right-click your background image layer.
Select Blending Options and check Drop Shadow. Tweak the settings until it looks natural.
Mastering Photoshop shadows by following addadropshadow. This step guides you to enhance your designs with realistic shadows, adding depth and a professional polish to your projects.
Master removing shadows in Photoshop while learning to addadropshadow. Enhance your images by controlling shadoweffects, achieving a polished and professional look with these essentialtechniques.
Step 7: Final Adjustments for the Polaroid Photo
Take a final look at your project. Ensure the photo and white border are balanced.
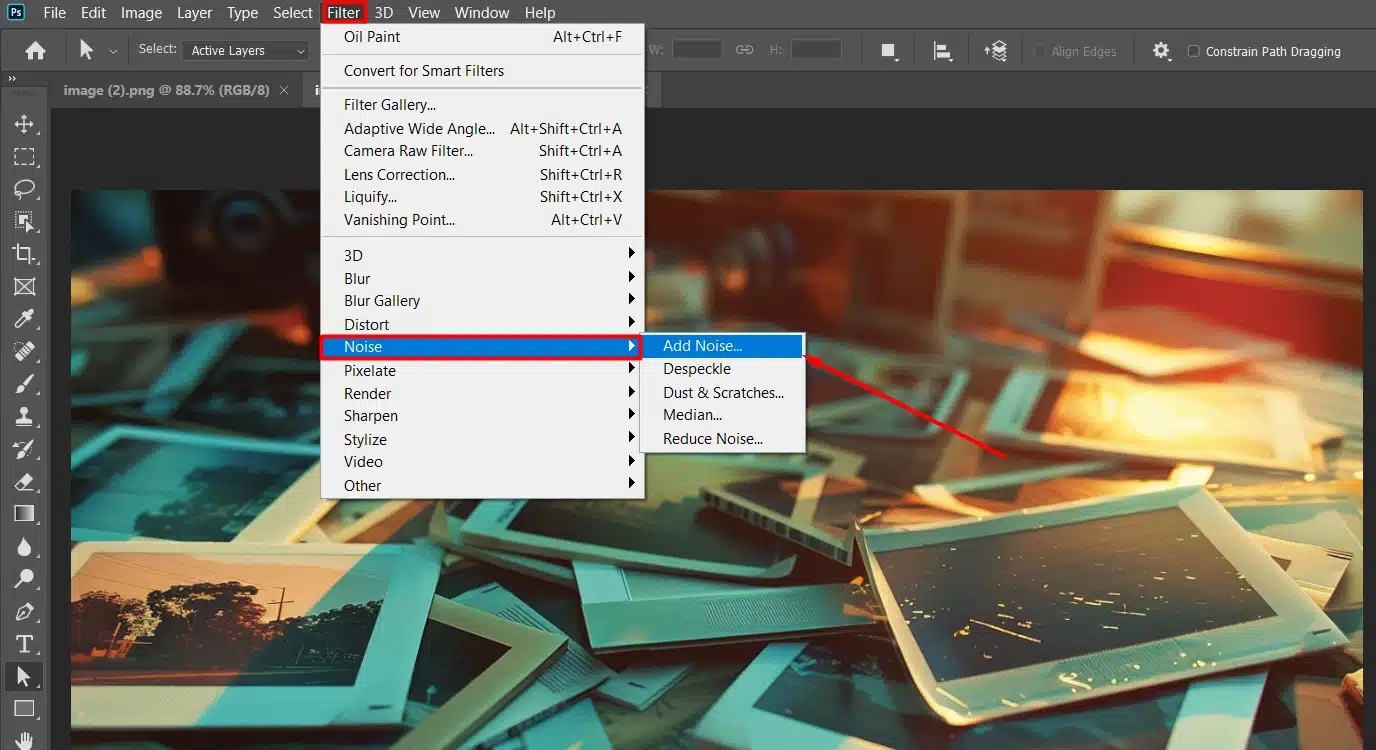
Adjust brightness and contrast if needed. Add some noise to mimic the Polaroid film look.
Enhance your photos by learning how to add noise in Photoshop for a perfect noise for Polaroid effect. This technique introduces subtle grain, giving your images a nostalgic, vintage Polaroid aesthetic and timeless charm.
Pro Tip: Save your layers and work as a template. This way, replicating the Polaroid effect in future projects is a breeze.
Additional Tips: If you’re looking to enhance your editing skills further, learning Photoshop shortcuts can significantly speed up your workflow and increase your efficiency while editing images.
The Polaroid effect is one of my favorites because it instantly evokes a sense of nostalgia and charm.
It gives photos a vintage look that can make even the most modern scenes feel timeless.
Nostalgia Factor
The polaroid style takes you back to simpler times.
It gives your photos that vintage look.
It’s fun and makes your images pop on Instagram.
Enhance your designs with old paper texture in Photoshop to add a nostalgia factor. Use vintage textures to evoke memories and give your projects a timeless, authentic feel.
Creative Appeal
Adding a polaroid frames turn pictures into something special.
Even ordinary scenes come alive.
Easy to Do
With a few clicks in Photoshop, you can turn regular photos into polaroid photo. It’s a great way to use Photoshop tools.
You learn while having fun.
Who said learning Photoshop can’t be enjoyable?
How to Get Started
To get started with creating the Polaroid effect in Photoshop, follow these steps:
Open your image in Photoshop.
Create a new layer to keep edits separate from the background layers.
Use the Rectangle Tools to create a white border around your image.
Resize your image using the Free Transform option. Hold the Shift key to keep the proportions right.
Apply a vintage filter, like Sepia, for that old-school feel.
Finish with a drop shadow to add depth. Tweak the Layer Style settings for the best final result.
Extra Tips for Using Clipping Mask
Use the clipping mask tool to design better polaroid style photos. It helps you place your image perfectly inside the frame without worrying about overlapping edges.
Pro Tip: Save your work as a template. This way, you can reuse it for future projects, making your workflow faster and easier.
Ready to give your digital photos that polaroid film touch? Follow this simple Photoshop Tutorial and see how it breathes life into your pictures. Happy editing!
Also, knowing about blurring background layers in Photoshop can help emphasize the main subject of your photo, creating a more professional and focused image.
Tips for Perfecting the Polaroid Effect Photoshop
Here are some of my besttips for perfecting the Polaroid effect in Photoshop, ensuring your images have that authentic vintage charm.
Managing and Creating a Layer for the Polaroid Effect Photoshop
Create a new layer to keep your edits separate from the original image.
Click the ‘New Layer’ icon at the bottom of the Layers panel or press Shift + Ctrl + N.
Advanced Techniques for a White Border to Polaroid Effect Photoshop
Select the rectangle tool and draw a rectangle around your image to create a white border. This forms the classic Polaroid frame.
In addition, it is crucial to adjust the white balance in your photos to ensure accurate color representation under different lighting conditions.
This resource offers valuable tips and techniques to improve your photography and editing.
Tuning the Vintage Filter
Go to Image > Adjustments > Photo Filter and choose Sepia for a retro look.
Enhance your projects with old photo tone to evoke a timeless feel. Apply vintage tones and textures to give your photos a nostalgic, authentic appearance.
Enhancing Depth with Shadows on the Background Layer
Add a drop shadow for depth. Select your background layer, go to Layer > Layer Style > Drop Shadow, and tweak the settings to your liking.
Using a Clipping Mask for a Real Polaroid Style
Create a clipping mask in Photoshop by right-clicking on your photo layer and selecting ‘Create Clipping Mask‘ to ensure your image fits perfectly within the white border.
Adding Paper Texture for Authenticity
To make it look like a real Polaroid photo, add a paper texture.
Go to File > PlaceEmbedded, select your texture file, and adjust its opacity for a subtle effect.
Final Adjustments on the Polaroid Effect Photoshop
Tweak the brightness, contrast, and color balance to get the right look.
Add a bit of noise by going to Filter > Noise > Add Noise for a vintage feel.
Saving as Template
Save your work as a template. This way, you don’t have to start from scratch every time you want to create another Polaroid effect. Just replace the original image with a new one.
Pro Tip: Learn some Lightroom shortcuts to speed up your workflow. They might seem tricky at first, but they’ll save you a lot of time. Use paper texture for more like a real polaroid.
Follow these easy steps to turn your pictures into classic Polaroids. Dive in and make your photos look like a Polaroid!
For beginners, learning Lightroom editing tips can significantly enhance the quality and impact of their photographs.
Common Mistakes to Avoid
When deciding between Photoshop and Lightroom for your photo editing needs, it’s essential to understand their key differences and strengths.
This table provides a concise comparison to help you choose the right tool for your workflow.
Photoshop excels in detailed image editing and creative design, while Lightroom is perfect for photo management and quick edits.
To avoid these mistakes, Lightroom photo editor training can teach you how to effectively use the software’s tools and techniques, resulting in higher quality and more professional-looking photographs.
Feature
Photoshop
Lightroom
Primary Use
Detailed image editing and manipulation
Photo management and basic enhancements
Learning Curve
Steeper, more features
More intuitive, easier to navigate
Polaroid Effect Creation
Extensive tools for custom effects
Limited to preset filters and adjustments
File Handling
Handles layers and complex files
Optimized for handling large photo libraries
Cost
Subscription-based
Subscription-based (often bundled with Photoshop)
Best For
Advanced editing and creative design
Quick edits and photo batch processing
Alright folks, let’s dive in. We all love the vintage feel of polaroid photos.
But starting out, there are some mistakes you should avoid.
So, Adobe Lightroom classic training provides comprehensive instruction on photo editing and management. This enables you to enhance your photography skills and streamline your workflow.
This resource offers detailed guidance and tips to make the most out of Lightroom’s features.
Avoid These Mistakes
Learning from these missteps can save you time and help you achieve a more polished look.
First, don't ignore the canvas size. Begin with a square-sized photo. If you're ready to edit but your picture is rectangular – rookie mistake. Make it square.
Second, don't skip the rectangle shape. Use it for creating that classic frame. Making a polaroid photo without a white border is like eating a burger without buns. Don't do it.
Third, avoid overdoing filters. Less is more. Balancing brightness and contrast can make the final result stunning. A subtle vintage filter usually does the trick.
Create a template of your polaroid effect Photoshop masterpiece. This way, next time, you can quickly turn ordinary images into something special.
If you handle these basics well, you won’t end up with a mess. Your photos will look like a Polaroid. And who knows – you might even impress your Instagram followers.
Pro Tip: When creating shadows for depth, slightly reduce the shadow’s opacity. This makes it look more natural and less like you drew it with a marker.
Frequently Asked Questions
What are the steprs for creating a Polaroid Effect in Photoshop?
Open your image in Photoshop.
Select the 'Rectangular Marquee Tool' from the toolbox to create a border around your photo. Adjust the border size to mimic a Polaroid frame.
Fill the selected border area with white color to enhance the Polaroid frame effect.
Apply a filter for a vintage look. Go to Filter > Noise > Add Noise. Choose an amount that gives a subtle grain, resembling a classic Polaroid.
Optionally, you can adjust the color balance and saturation to make the colors pop like those in a Polaroid photo.
Whate steps can help me to get the Polaroid Photo Effect?
Load your image into Photoshop.
Use the 'Crop Tool' to cut your photo into a square shape, as traditional Polaroids are square.
Create a new layer for the frame and draw a white rectangle around the photo to simulate the Polaroid border.
Add a slight blur to the edges of the photo to mimic the soft focus of old cameras.
Enhance the photo's contrast and brightness for a more dramatic effect typical of Polaroids.
How to Make Pictures Look Like Polaroid?
Start by opening your picture in Photoshop.
Create a new layer and draw a large white border around the image to represent the Polaroid's distinctive border.
Adjust the image's aspect ratio to a square format to reflect the classic Polaroid style.
Apply a vintage filter or manually adjust the photo's color settings to achieve muted tones and a washed-out look.
How to Make a Photo Look Like Film in Photoshop?
Open the desired image in Photoshop.
To simulate a film effect, add a new layer and apply a grain filter. Go to Filter > Noise > Add Noise and adjust it to a fine grain.
Alter the photo's contrast and play with the curves (Image > Adjustments > Curves) to mimic the dynamic range of film photography.
For a more authentic film look, consider adding a subtle vignette around the edges of the photo.
Wrapping up, mastering the polaroid effect in Photoshop has been a game changer for my photo editing. It’s a fun and simple way to give a vintage touch to any photo, making it perfect for sharing on social platforms like Instagram.
Throughout my journey, I’ve relied on several resources to sharpen my skills.
If you’re keen to dive deeper into photo editing, I highly recommend checking out this Photoshop Course and this Lightroom Course. Both have been incredibly helpful.
Also, for those looking to get their hands on Adobe’s software, here are direct links to Adobe Photoshop and Adobe Lightroom. Each tool offers unique features that can elevate your photo edits even further.
If this article has helped you, then Like and Share it with your friends
$2,061.00Original price was: $2,061.00.$1,061.00Current price is: $1,061.00. 27582
Download Your Free Guide Now!
Discover the secrets of photography with our printable guide! Master essential techniques like aperture, shutter speed, and ISO to create stunning images. Get your free printable PDF now and start turning your snapshots into masterpieces!