Pixels Inch for Print: Ensuring High-Quality Results
Pixels Inch for Print: Ensuring High-Quality Results
When it comes to ensuring top-notch quality in your prints, understanding “pixels inch for print” is crucial.
I’ve been through the confusion and frustration of blurry or pixelated images, and I know how disappointing it can be.
Imagine holding a print of your favorite photo, expecting it to shine, only to find it’s a letdown.
But don’t worry, I’m here to help you avoid that disappointment.
In this article, we’ll dive into the essentials of pixel density and how it impacts your print resolution.
By the end, you’ll have a clear path to achieving crisp, vibrant prints every time.
Ready to elevate your printing game?
Let’s get started!
Table of Contents
Understanding Pixels per Inch (PPI)
Pixels per Inch (PPI) measures pixel density in digital images. It tells how many pixels fit in an inch of the image.
For example, an image with 72 PPI means there are 72 pixels in an inch.
Simple, right?
Active professionals use PPI to gauge image quality before printing.
Why PPI Matters for Print Quality
PPI affects print resolution. More pixels per inch means a clearer and sharper image.
Think of it like this: higher PPI leads to big-quality printing. This is essential when you want your prints to look precise.
If PPI is too low, your image becomes blurry and pixelated when printed.
Ideal PPI for printing varies, but 300 pixels per inch is a common industry standard to aim for better quality prints.
Common Misconceptions About PPI
Many people confuse PPI with dots per inch (DPI). PPI measures pixels per square inch in an image, while DPI measures ink dots on a printed page.
Though related, they serve different roles in printing. Another misconception is thinking a high PPI will always give better print resolution.
Image file size and dimensions also matter a lot. Don’t get fooled. Understand that balancing PPI with your project and specific print size helps achieve detailed graphics and superior higher resolution.
How to Calculate Print Size from PPI
Use a print size calculator. Enter your image’s pixel dimensions and PPI. It will show you the print dimensions, ensuring your prints turn out as expected.
To achieve high–quality prints, it’s important to know how many pixels your image contains and to set the correct dots per inch (DPI) for optimal resolution.
The best ppi for an image is 300 ppi, as it provides the highest quality for printing at the largest size without losing detail.
Pro Tip: For the cleanest, most professional results, always check your image resolution before starting a project.
Ensuring higher print resolution first can save you time and rework later!
This way, you enjoy first-time success with your print projects.
Combining Lightroom and Photoshop techniques can significantly enhance your print resolution.
Image File Resolution and Its Importance
Understanding image file resolution is key to mastering high-quality printing.
Let’s dive into what it means and why it matters.
Defining Image Resolution
Resolution refers to the number of pixels per inch in a digital file.
The more pixels per inch, the higher the pixel density, leading to sharper images.
Often confused with DPI (dots per inch), PPI strictly deals with screen output, not Print resolution.
When you’re working on image quality, always aim for clarity and detail.
How Resolution Affects Print Quality
Print resolution directly influences the final Print resolution. High pixel density ensures that print images appear crisp and clear.
On the other hand, low resolution can result in blurry, pixelated prints.
When you set your print resolution, typically 300pixels per inch is considered optimal for most projects.
This level avoids the common pitfall of low resolution which can lead to disappointing results.
Optimal Resolution for Different Print Sizes
Different print sizes require varying resolutions. Generally, larger prints need higher resolutions.
For instance, printing a billboard requires a lower PPI because it’s viewed from a distance. Conversely, smaller prints like photographs demand higher resolutions to maintain image quality when viewed up close.
You can use a print size calculator to figure out the best resolution for your print project specifically. Make sure to keep an eye on the pixel dimensions of your digital files.
To achieve the optimalresolution for different printsizes, it’s Important to resize your image accurately. By using the right PPI and adjusting dimensions properly, you ensure clear, vibrant prints.
Pro Tip: Before starting any print project, always double-check your image to prevent rework and wasted resources. Ensuring correct print dimensions beforehand saves both time and money.
When considering image resolution, choosing between RAW or JPEG format can make a big difference. RAW files offer higher quality and detail, crucial for maintaining optimal resolution.
Enhancing Image Quality for Print
To make sure your print projects look sharp, you need to understand a few crucial concepts. Let’s enhance your image quality for high-quality printing.
To enhance image quality for print, understanding pixel dimension is essential. Higher pixel dimensions ensure clearer prints, directly impacting the final output.
Tips for Improving Image Quality
Understanding the tools and techniques available for image enhancement can make a significant difference in print and digital outputs.
This table compares important features of popular image editing tools to help you choose the best option for your needs.
Aspect
Photoshop
Lightroom
Online Resizers
Print Size Calculators
Resolution Check
Yes, via “Image Size”
Yes, via export settings
No
No
Adjust PPI
Yes, customizable
Limited, for export only
No
No
Resize Images
Yes, with precise control
Yes, with batch editing features
Yes, quick and simple
No
Pixel Density
Adjustable, for detailed control
Basic, with export options
Limited, often default settings
No
Batch Editing
Yes, via actions and scripts
Yes, with batch processing tools
No
No
Print Size Calculation
No
No
No
Yes, specialized tools available
Check Image Resolution
Always verify the resolution of your image file before sending it to print.
This ensures clarity.
Set Proper PPI
Use 300 PPI(pixels per inch for print) as your default resolution for most projects to get clear prints.
Adjust Image Dimensions
Crop and resize your image to fit the intended print size without losing quality.
For tiny prints, increase the pixel density. This ensures every detail is sharp.
Tools and Software for Image Enhancement
Here are some tools that can help you enhance your images:
Photoshop and Lightroom: These are the go-to tools for most image editing needs. You can adjust everything from exposure to color balance. Additionally, Lightroom offers essential tools for batch editing and fine-tuning multiple images at once.
Online Resizers: Plenty of online tools can help you resize pictures without losing quality. Simple and efficient!
Print Size Calculators: Tools that help determine the optimal file resolution for your print size.
Tools for Calculating PPI
We’re not always armed with calculators. Luckily, tools like Photoshop and Lightroom do the heavy lifting:
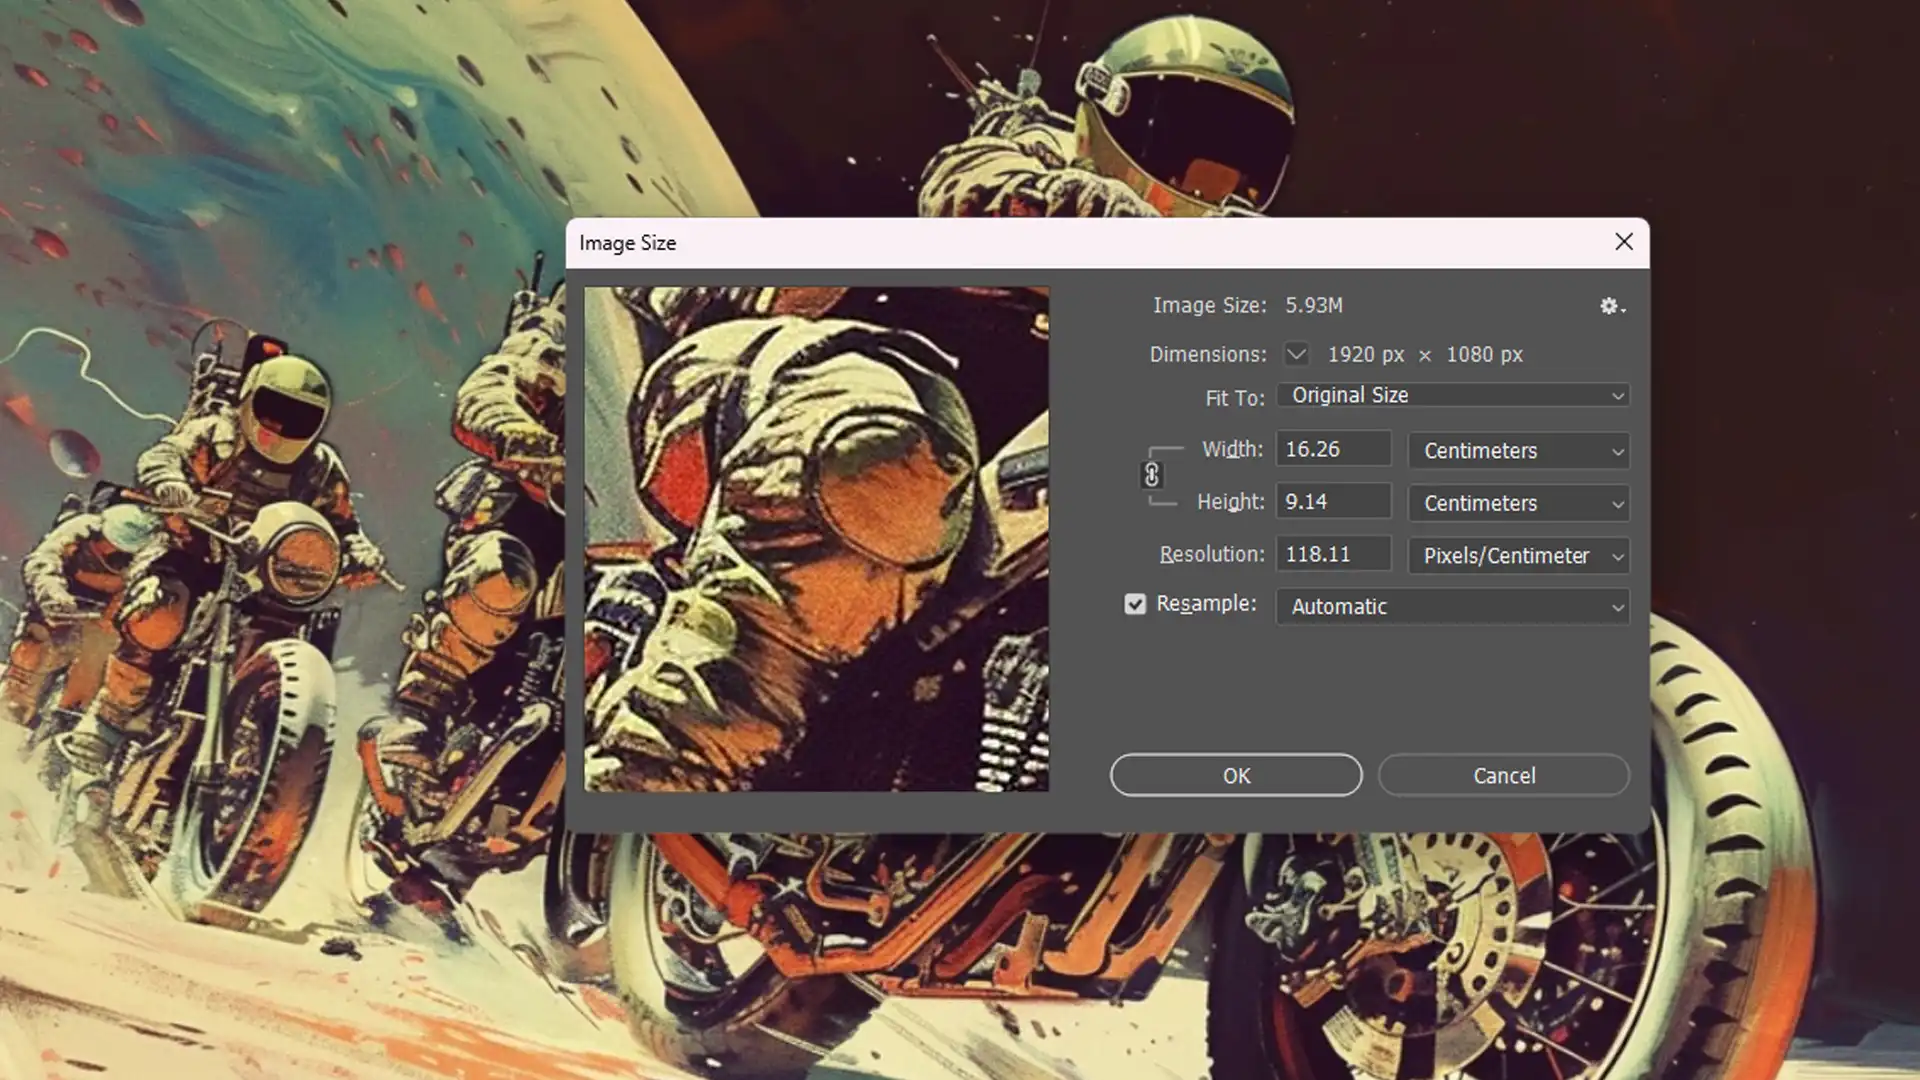
In Photoshop, go to “Image Size” and adjust dimensions and resolution fields. This is one of the essential tools in Photoshop for ensuring your prints come out perfectly.
Lightroom also offers handy features to see how your images will look in various sizes. You can even use Lightroom shortcuts to speed up the process.
There are other tools too. Online PPI calculators can help. You simply input your image dimensions and desired print size, and voila! Instant results without the math headache.
For enhancing image printing, applying a sepia filter can add a timeless, artistic touch to your prints.
This effect can enrich the final output, giving it a unique, vintage feel.
Adding shapes and effects to your prints can elevate their visual appeal, creating dynamic and engaging designs.
Experimenting with these elements helps customize your prints, making them stand out and capture attention.
Frequently Asked Questions
What is the best pixel size for print?
To best pixel size for printing, it highly depends on your specific requirements. Generally speaking, a higher pixel dimension results to a better print quality.
Is 72 pixels per inch good for printing?
72 pixels per inch (PPI) considered suitable for basic web images but is quite low for printing purposes.
For high-quality prints, a resolution of, say, 300 PPI is recommended.
How do I convert pixels to inches for printing?
To convert pixels to inches, you divide the pixel dimensions by the resolution (PPI) of your image.
For example, an image that’s 2400 pixels wide at 300 PPI would be 8 inches wide (2400 pixels / 300 PPI = 8 inches).
Is 240 pixels per inch good?
Yes, 240 PPI is considered a good resolution for high-quality prints, particularly for images to be viewed.
In conclusion, understanding how pixels per inch (PPI) impacts print quality is crucial for getting great results. From my own experience,
I’ve seen how a higher PPI can make all the difference in producing sharp, vibrant prints.
By ensuring your images have the right pixel density and using tools like Photoshop and Lightroom, you can avoid common pitfalls and achieve professional-looking results.
$2,061.00Original price was: $2,061.00.$1,061.00Current price is: $1,061.00. 27584
Download Your Free Guide Now!
Discover the secrets of photography with our printable guide! Master essential techniques like aperture, shutter speed, and ISO to create stunning images. Get your free printable PDF now and start turning your snapshots into masterpieces!