Elevate Your Designs with Photoshop's Rainbow Gradient Technique
Elevate Your Designs with Photoshop’s Rainbow Gradient Technique
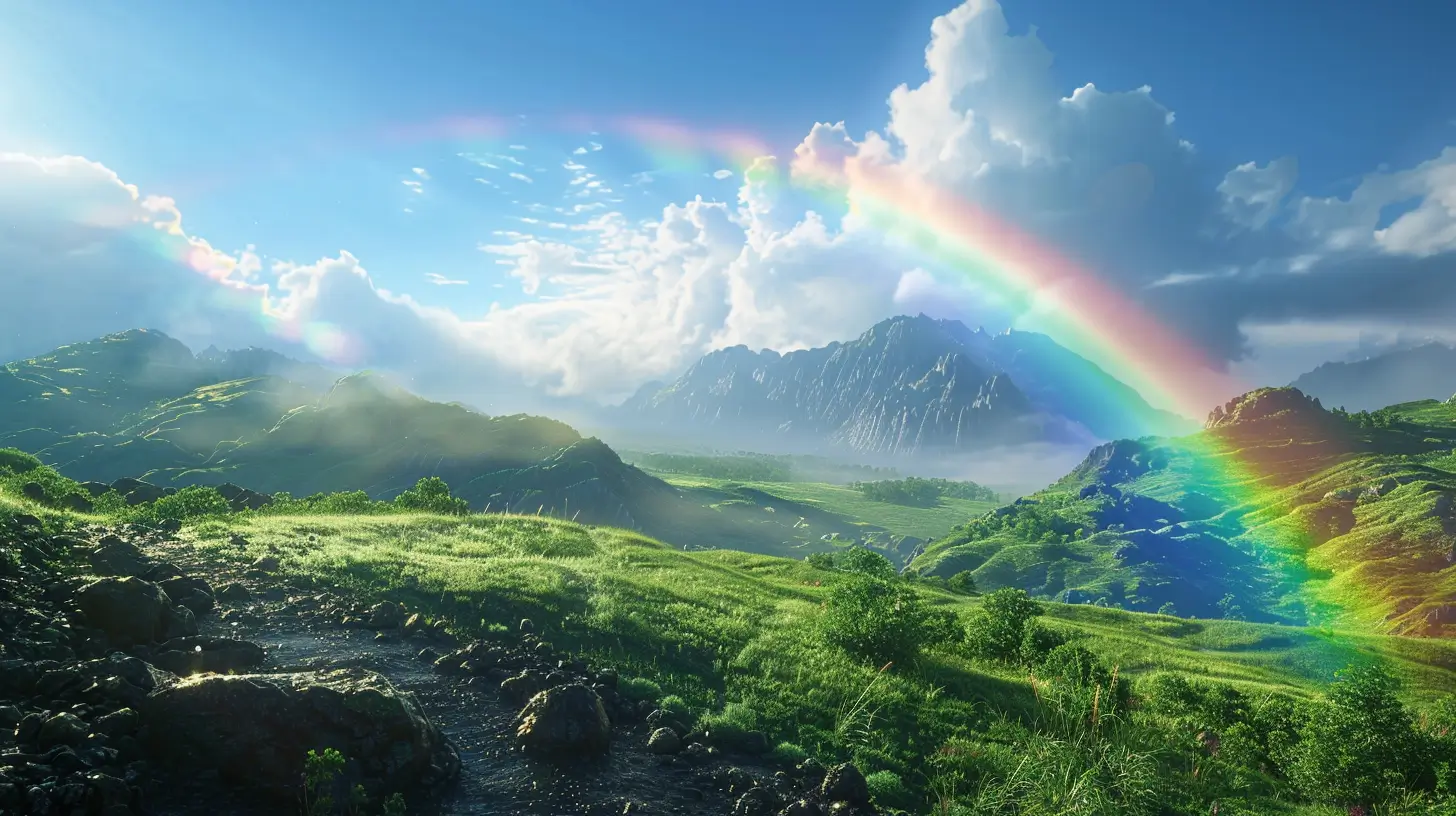
Creating a rainbow gradient can transform your designs in exciting ways. In this guide, I’ll walk you through the steps to achieve vibrant, colorful effects that pop.
Dive in and see how easy it is to incorporate this colorful element into your projects.
Let’s get started!
Table of Contents
Implementing the Photoshop Rainbow Gradient Effect
Alright, let’s create a rainbow gradient in Photoshop on your image. It’s simpler than you think.
Follow thesesteps, and you’ll be done in no time.
Step 1: Select Your Layer
Open your image in Photoshop. Select it where you want to create a rainbow gradient.
You can find this in the Layers Panel on the right.
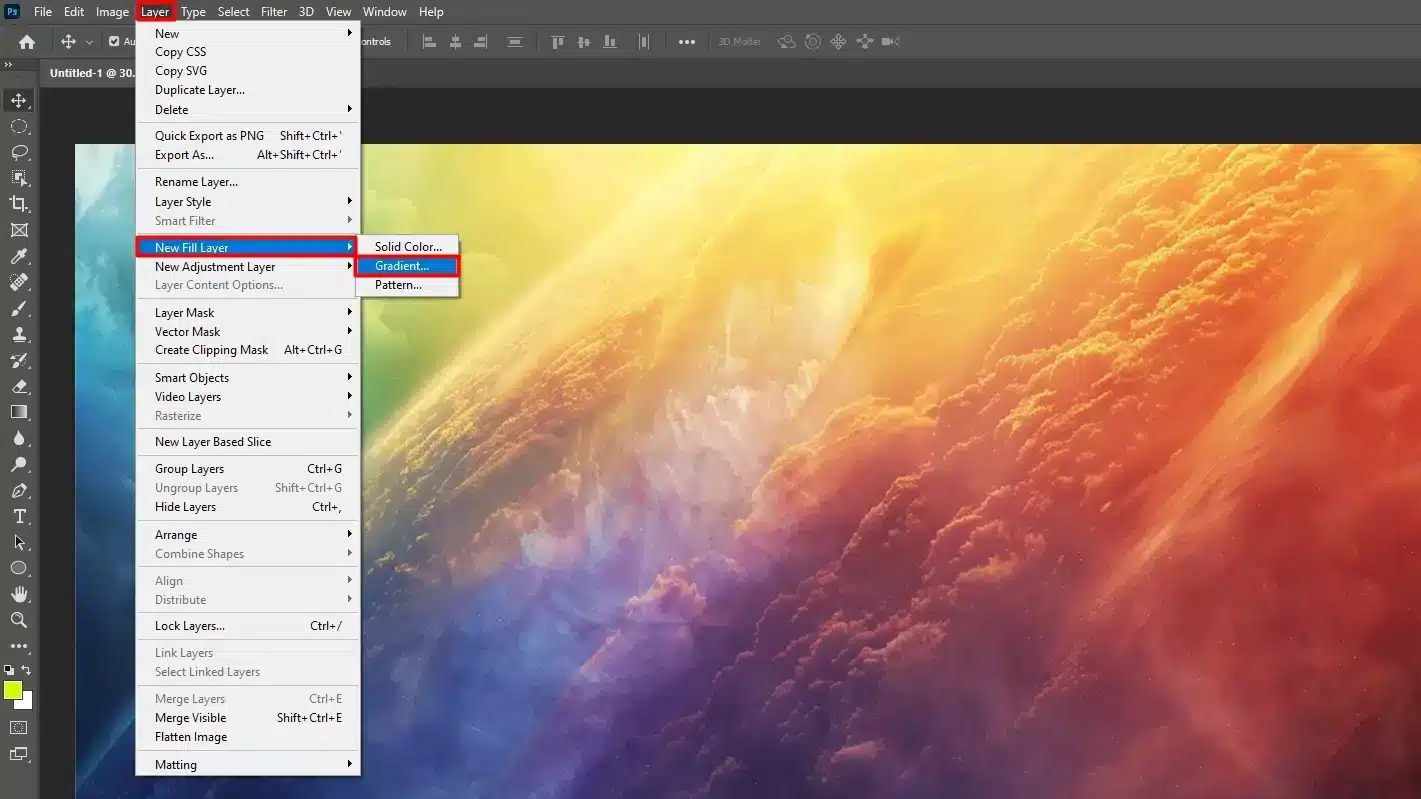
Step 2: Open the Gradient Fill Layer
Go to the top menu. Click ‘Layer,’ hover over ‘New Fill,’ and select ‘Gradient Fill.’ A dialog box will pop up.
Step 3: Select Your Gradient Style
Look at the dialog box. Find the rainbowgradient you created in Photoshop.
It should be under ‘Rainbow Gradient‘ or the name you gave it.
Click to select it.
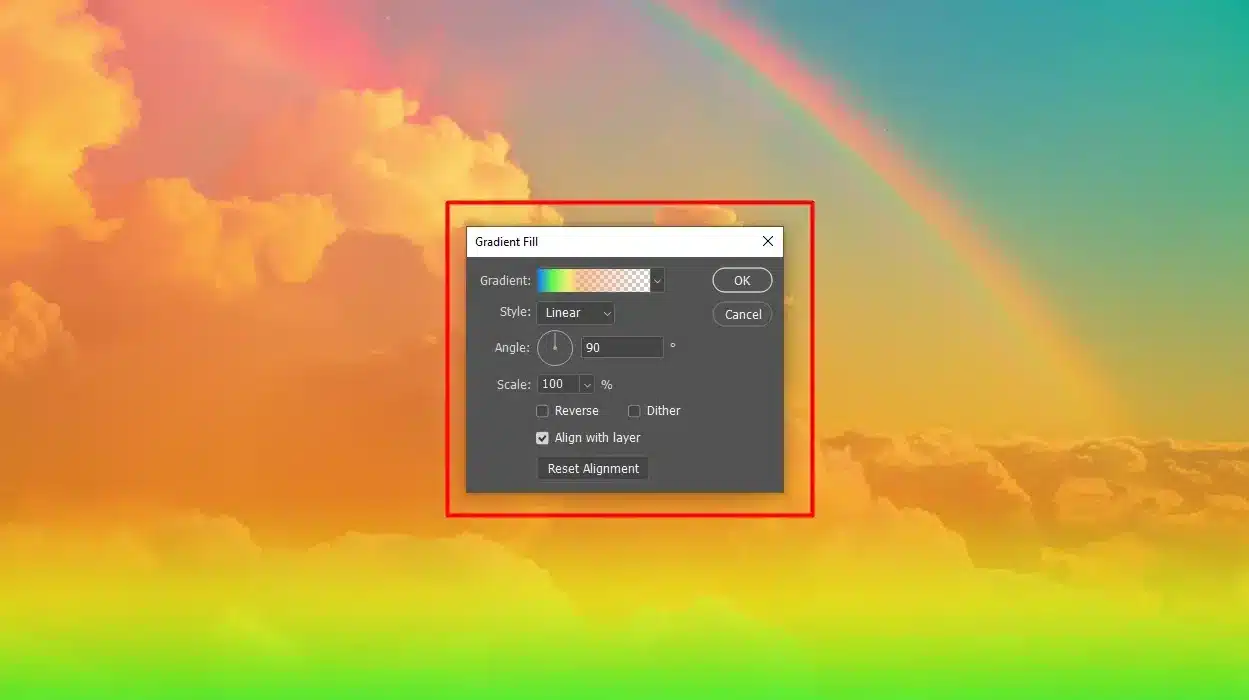
Step 4: Adjust the Gradient Settings
Fine-tune your rainbow gradient in Photoshop:
Angle: Rotate the rainbow gradient. A 45-degree angle gives a diagonal gradient.
Scale: Change the size of the rainbow gradient. A larger scale makes wider bands of color swatch
Opacity: Adjust transparency. Lower opacity creates a subtle effect; higher opacity makes it bold.
Experiment until you like how it looks.
There’s no wrong way to do this!
Step 5: Apply the Rainbow Gradient
Click ‘OK’ when you’re satisfied to create a rainbow gradient. Your rainbow gradient in Photoshop is now on your image.
Easy, right?
Extra Tips and Tricks
Try different rainbow gradient types:
Linear gradients work well for backgrounds.
Radial gradients focus attention on a central point.
Reflective gradients mirror colors for balance.
Diamond gradients add a geometric touch.
Pro Tip: Save different versions of your rainbow gradient. This saves you time for future projects.
You’ve got this! Keep practicing, and you’ll be a pro soon.
For professional mobile photo editing, the Lightroom Photo Editor stands out with its advanced features.
To start your journey in designing a rainbow gradient, you’ll need to access the necessary tools within Photoshop. Let’s begin by navigating to the Gradients Panel, where you can explore and customize your gradient options.
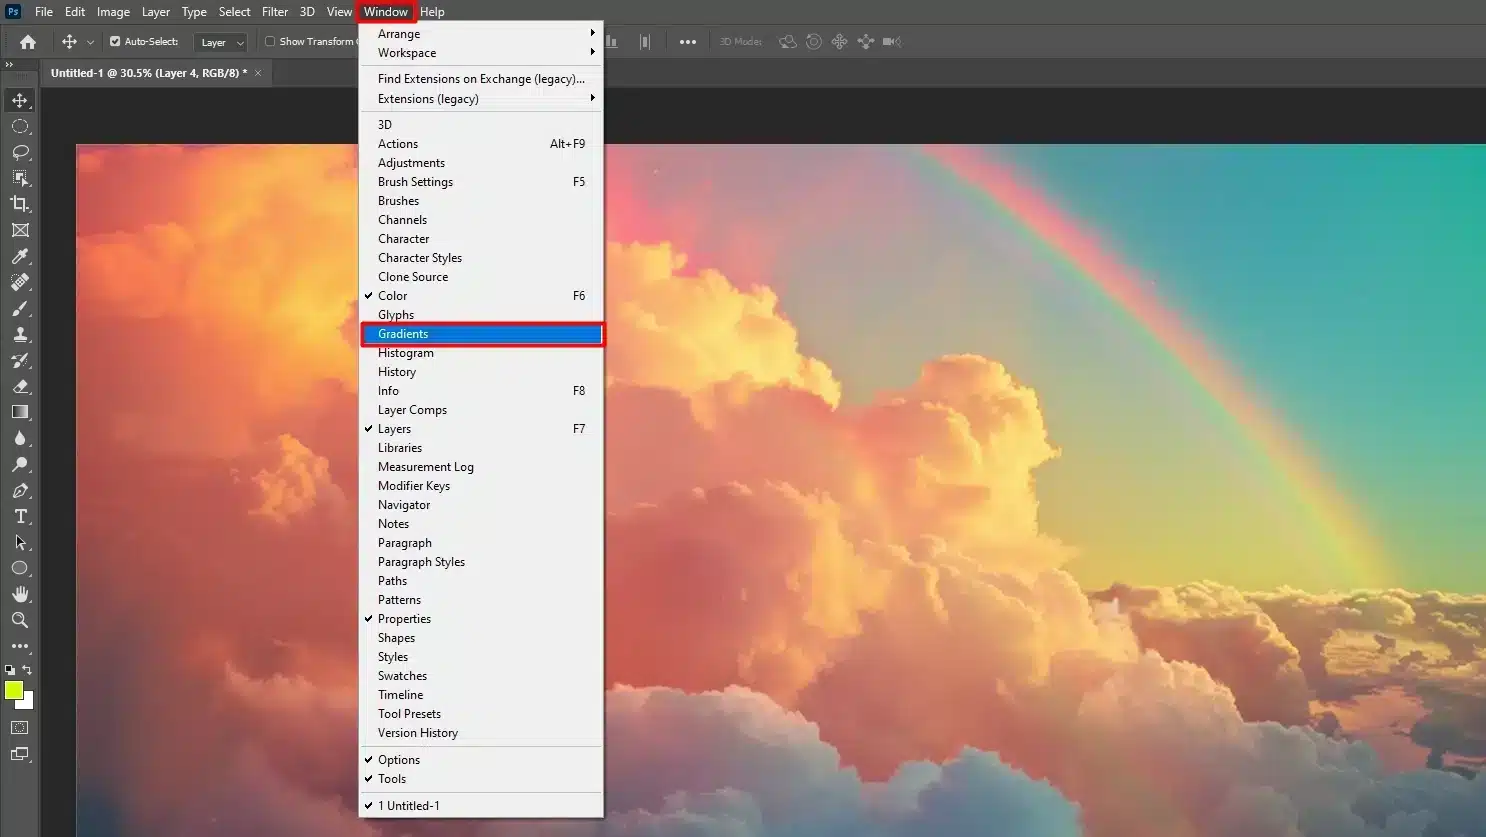
Opening the Gradients Panel
First, open Photoshop and head to the “Gradients Panel”. It’s usually on the right.
If you can’t find it, go to Window at the top menu and select Gradients panel.
Create a New Rainbow Gradient
In the gradientspanel, you’ll see a rainbow gradient color swatch.
To create a rainbow gradient, click the “+” sign at the bottom of the gradients panel.
This opens a dialog box.
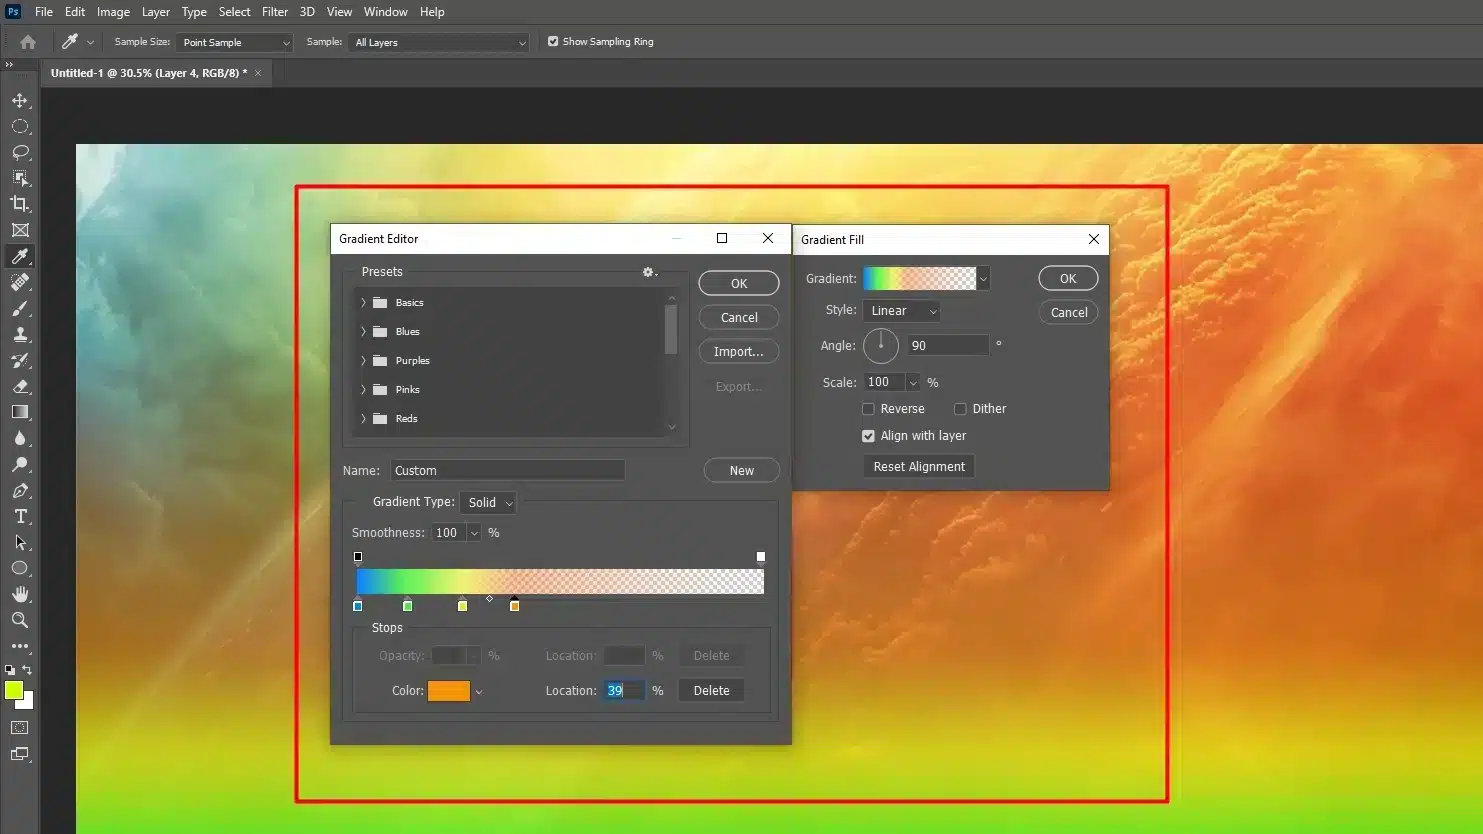
Using the Photoshop Gradient Editor
This box is the “Gradient Editor”. Click the “Gradient Preview Bar” at the top.
This bar shows your current rainbow gradient.
You’ll add new color stop here to create a rainbow effect.
Adding Photoshop Color Stops
Click twice on the left side of the preview bar to add a new color stop. A window will pop up. Use the color picker to choose your first color swatch. Start with a yellow color stop or a black color stop.
Drag the new color stop to position it. For a balanced rainbow, place each color stop at equal intervals. The location value shows its position along the preview bar.
Repeat for orange, yellow, green, blue, indigo, and violet color swatch. Click twice, use the color picker, and position each color swatch stop the same way.
Adjust the color stops to smooth out the transitions. Even spacing makes a smoother rainbow gradient.
Pro tip: Don’t forget to click “OK” to save your gradient. Name it “Rainbow Gradient” to find it easily later.
Also, don’t forget to organize your saved gradients into folders if you have many, which will help keep your workspace tidy and efficient.
Incorporating and Blending the Rainbow Gradient Effect
Select a layer in the Layers Panel.
Go to "Layer" > "New Fill" > "Gradient Fill."
Choose your new gradient swatch from the panel.
In the gradient tool fill dialog box, adjust the angle, scale, and opacity to get the look you want.
Click "OK", and you've got a rainbow gradient on your image.
Pro Tip: Save your favorite white gradient to make future projects faster.
Steps to Open the Gradient Editor
Alright, let’s jump into the “Gradient Editor” This tool is where you make your gradients panel in Photoshop.
It’s simpler than it sounds, trust me!
Click the "+" sign to create a new gradient overlay, and a dialog box pops up. This is the "Gradient Editor." You'll see this term often. The editor gives you control over the gradient's look. It's like being an artist with virtual colors.
Notice the new gradient preview bar at the top. This bar shows your current gradient. You can add color stops to customize your gradient overlay. Click on the gradient preview bar, and a little arrow appears.
Next to the arrow, you'll see a square box, the color stop. Click twice on this box, and a color picker tool appears. Use this tool to pick your desired color swatch. Click "OK" to set this as a color stop on your white gradient.
Adding new color stops is easy. Click the gradient tool preview bar again, and a new arrow appears. Click twice on that arrow, and the color picker tool opens. With the color picker choose another color swatch, like blue. Your goal is to create a rainbow, so add green, yellow, a. Each color will show as another arrow on the gradient bar.
To make smooth transitions between colors, space the color stops evenly. Drag each arrow to its place across the white gradient bar. Aim for balanced intervals. The location value shows the position of the new color stop along the preview bar.
The Gradient Editor lets you view the final version of your gradient on the preview bar. When satisfied, hit "OK" to save your new gradient. Name it something memorable, like "New Rainbow Gradient."
Designing with a Rainbow Gradient
Cool, now your rainbow gradient is ready!
But, how do you apply it?
Let’s go step by step.
Select the layer in the Layers Panel in Photoshop where you want to apply the gradient colors. Go to "Layer" > "New Fill Layer" > "Gradient Fill Layer" A dialog box appears.
In the dialog box, choose the rainbow gradient you created from the panel. Adjust the angle to change its direction. Rotate your gradient to make it more dynamic. Play around with the angle until you're happy with the look.
Use the scale option to adjust the gradient size. A larger scale makes the bands of color wider. A smaller scale makes them narrower. Experiment to find what you like.
Adjust the opacity if needed. Sometimes you want a softer, transparent gradient. Other times, a strong, vibrant gradient works better.
Once satisfied, click "OK" Congrats, you've applied a beautiful rainbow gradient to your image! in Photoshop
Choosing the Gradient Type
Alright, now that we’ve got our gradient ready, let’s talk about choosing the right gradient type. In Photoshop, there are several types you can use, and this choice can change the look of your project completely.
Color swap in Photoshop can transform your images by changing hues with precision. When choosing the gradienttype, consider how it complements your design.
Understanding the Basic Types
Gradients are a powerful tool in design, adding depth and dimension to visuals. Understanding the types and their applications can significantly enhance your design projects.
Here’s a quick overview of the common rainbow gradient types and their uses:
Gradient Type
Description
Common Uses
Linear
Colors blend in a straight line.
Backgrounds, smooth transitions.
Radial
Colors radiate from a center point.
Spotlight effects, highlighting central elements.
Angle
Colors sweep around in a circular manner.
Circular designs, dynamic visuals.
Reflected
Mirrors colors on either side.
Symmetrical designs, balanced visuals.
Diamond
Colors spread in a diamond shape.
Geometric patterns, unique backgrounds.
Adobe Photoshop offers a few basic gradient swatch types. You’ve got linear, radial, angle, reflected, and diamond panel.
Each one adds a unique touch to your design.
Linear gradients: Blend colors in a straight line. It's simple and often used for backgrounds. Think of a sunset transitioning from orange to blue.
Radial gradients: Spread out from a center point. They're perfect for spotlight effects or creating glowing objects.
Angle gradients: Sweep around a circle. They’re ideal for circular designs or pie charts.
Reflected gradients: Mirror the colors on both sides. They’re good for symmetrical designs.
Diamond gradients: Make shapes with a diamond pattern. They’re fun but can be tricky to use.
Pro Tip: Understanding how to useLightroom and its shortcuts alongside Photoshop for editing ensures you can seamlessly enhance photos with vibrant rainbow gradients, achieving professional-quality results in both color swatch correction and creative effects.
How to Choose the Right Type Of Rainbow Gradient
Choosing the right rainbow gradient type depends on your image and your goal.
Let’s break it down:
If you're trying to create a subtle background, a linear gradient might be your best bet. Its simplicity blends smoothly and won’t distract from the main theme.
If you need a focal point, say, for a product highlight, a radial gradient helps draw attention exactly where you want it.
Using an angle gradient can add an interesting twist for logos or circular texts, making them look dynamic.
A reflected gradient works wonders if you’re after symmetry. It gives a balanced look instantly.
Practical Application For Rainbow Gradient
Let’s put this into practice. Suppose you’re making a flyer for a summer festival. You want it bright and appealing. Start with a linear gradient in the background, moving from a warm yellow to a cool blue.
This gives the sky-at-dusk effect without overwhelming the text effects or images you’ll add later.
Now, perhaps you have a call-to-action button in the middle. A radial gradient colors from the center makes that button pop, ensuring people notice it.
By mixing rainbowgradient types and techniques in Photoshop, you create an engaging layout that draws the viewer’s eye naturally.
Additionally, you can combine them with other effects, such as the metallic effect, to transform your projects into stunning visuals.
Start Simple for Better Results
When experimenting with gradients panel, remember that simple is often better. Too many flashy elements can distract more than enhance.
Start with basic types and gradually build complexity as you get the hang of it. Aim for harmony, not chaos.
Adding Colors to Your Gradient tool
Alright, folks, now comes the fun part – adding colors to your rainbow gradient! This is where we turn a boring rainbow gradient into a vibrant rainbow gradient. Trust me, it’s easier than you think.
Step-by-Step Process
First, you need to head over to the “Gradient Editor”. You’ve got your gradient set up, so click that area. You’ll see a bar showing the transition between your colors.
To start adding colors, click twice on the new color stop. A window with the color picker pops up. This is where the fun begins. Let’s begin with blue.
A color filter can dramatically enhance your images by adding depth and mood. When adding colors to your Gradient tool, incorporating a color filter ensures vibrant and cohesive results.
Select a shade of blue and click “OK”. The bar now starts with blue. Continue adding colors in this order:
Red
Orange
Yellow
Green
Blue (again)
Indigo
Violet
Space Your Colors Evenly For Rainbow Gradient
Placing these colors evenly is important. Drag each new color stop across the gradient bar. You’ll see location value numbers below the bar, helping you measure their positions. Aim for balanced intervals.
Adjust and Fine-Tune For Rainbow Gradient
Sometimes, gradients might not look smooth initially. Adjust each stop slightly by dragging it left or right. The goal is to create a seamless blend between colors.
You might also want to adjust colors if they don’t match as expected. Click twice on any stop, reopen the color picker, and pick a new shade.
Integrate Other Color Stops
If you need more colors, simply add, let’s say, for example, a yellow color stop by clicking below the gradient bar.
Tip: Keep your primary colors in mind, but feel free to get creative.
The replace color tool in Photoshop is great for transforming your images with new hues. Adjust and fine-tune for rainbow gradient effects to create vibrant visuals.
You could drop in a magenta or cyan to spice things up.
Want a black color stop at the end to give a dramatic effect? Simply click twice on the new color stop, change it to a black color stop, and see how it looks.
Saving and Using Your Gradient
Once satisfied with your gradient, click "OK" to save it. You’ve now got a new rainbow gradient!
To use it, select any layer in the Layers Panel and apply it as needed. You can use it as a background, gradient overlay, or even fill shapes.
Frequently Asked Questions (FAQs)
Is there a rainbow gradient in Photoshop?
Yes, Photoshop includes pre-made gradients panel, including rainbow options, which you can find in the panel.
How do you get a rainbow effect in Photoshop?
Open the gradient tool from the toolbar.
Select a rainbow gradient from the gradient editor.
Apply the gradient to your desired layer by dragging it across it.
What tool makes rainbows in Photoshop?
The Gradient Tool is primarily used to create a rainbow effect. You can customize the color swatch to make different types of rainbows.
How to add a rainbow in Photoshop 2024?
Select the Gradient Tool from the toolbar.
Choose a rainbow gradient or create a rainbow gradient in the new gradient editor.
Apply the gradient on a new layer and adjust the mode and opacity for a more natural look
In conclusion, mastering the rainbow gradient in Photoshop has been a game-changer for my design projects. The ability to effortlessly add vibrant color swatch and dynamic effects has allowed me to create eye-catching visuals that stand out.
$2,061.00Original price was: $2,061.00.$1,061.00Current price is: $1,061.00. 27584
Download Your Free Guide Now!
Discover the secrets of photography with our printable guide! Master essential techniques like aperture, shutter speed, and ISO to create stunning images. Get your free printable PDF now and start turning your snapshots into masterpieces!