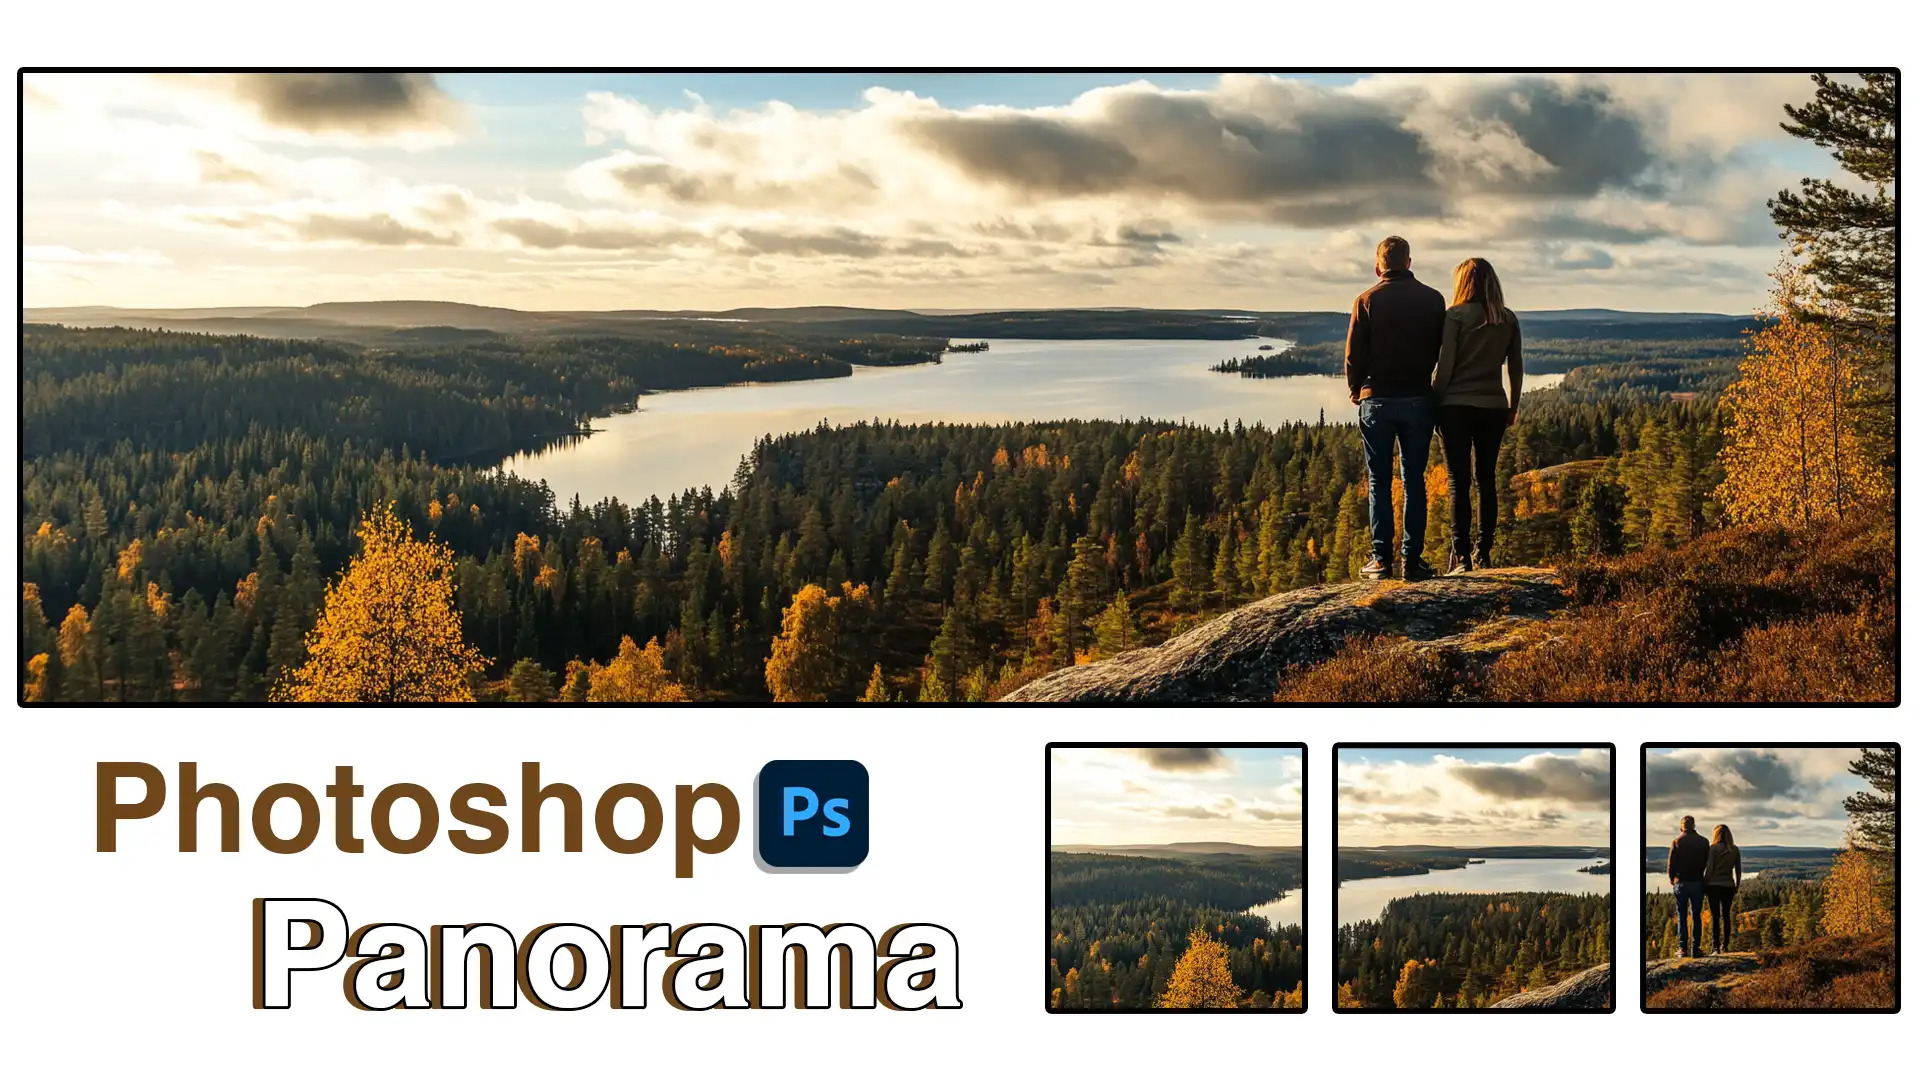
Creating a stunning “Photoshop panorama” can transform an ordinary series of photos into a breathtaking wide-angle masterpiece. Are you intrigued by the idea of expanding your creative horizons with this technique?
With the right tools and guidance, you can create captivating panoramas that resonate with viewers and leave a lasting impression.
Let me guide you through the process of stitching photos together in Photoshop, ensuring each piece aligns perfectly for a professional finish.
Ready to dive into the world of panoramic photography and elevate your skills? Let’s explore the step-by-step methods to master the art of creating flawless panoramas in Photoshop.
Table of Contents
Introduction to Photoshop Panorama
The art of creating a panoramic image involves several important steps. We embark on this journey to explore how these vast scenes come to life using Adobe Photoshop.
What is a Photoshop Panorama?
A Photoshop panorama combines several photos into one sweeping view. This technique covers a larger geographical area than a standard photo would.
Through this process, you generate a panoramic scene that tells more of the story than a single photo can capture.
Creating Panoramic Images with Photoshop
Creating panoramic images with Photoshop lets you capture stunning views. Here’s a quick step-by-step guide to using the Photomerge feature to combine your photos effortlessly. Let’s dive in.
Step-by-Step Guide to Using Photomerge
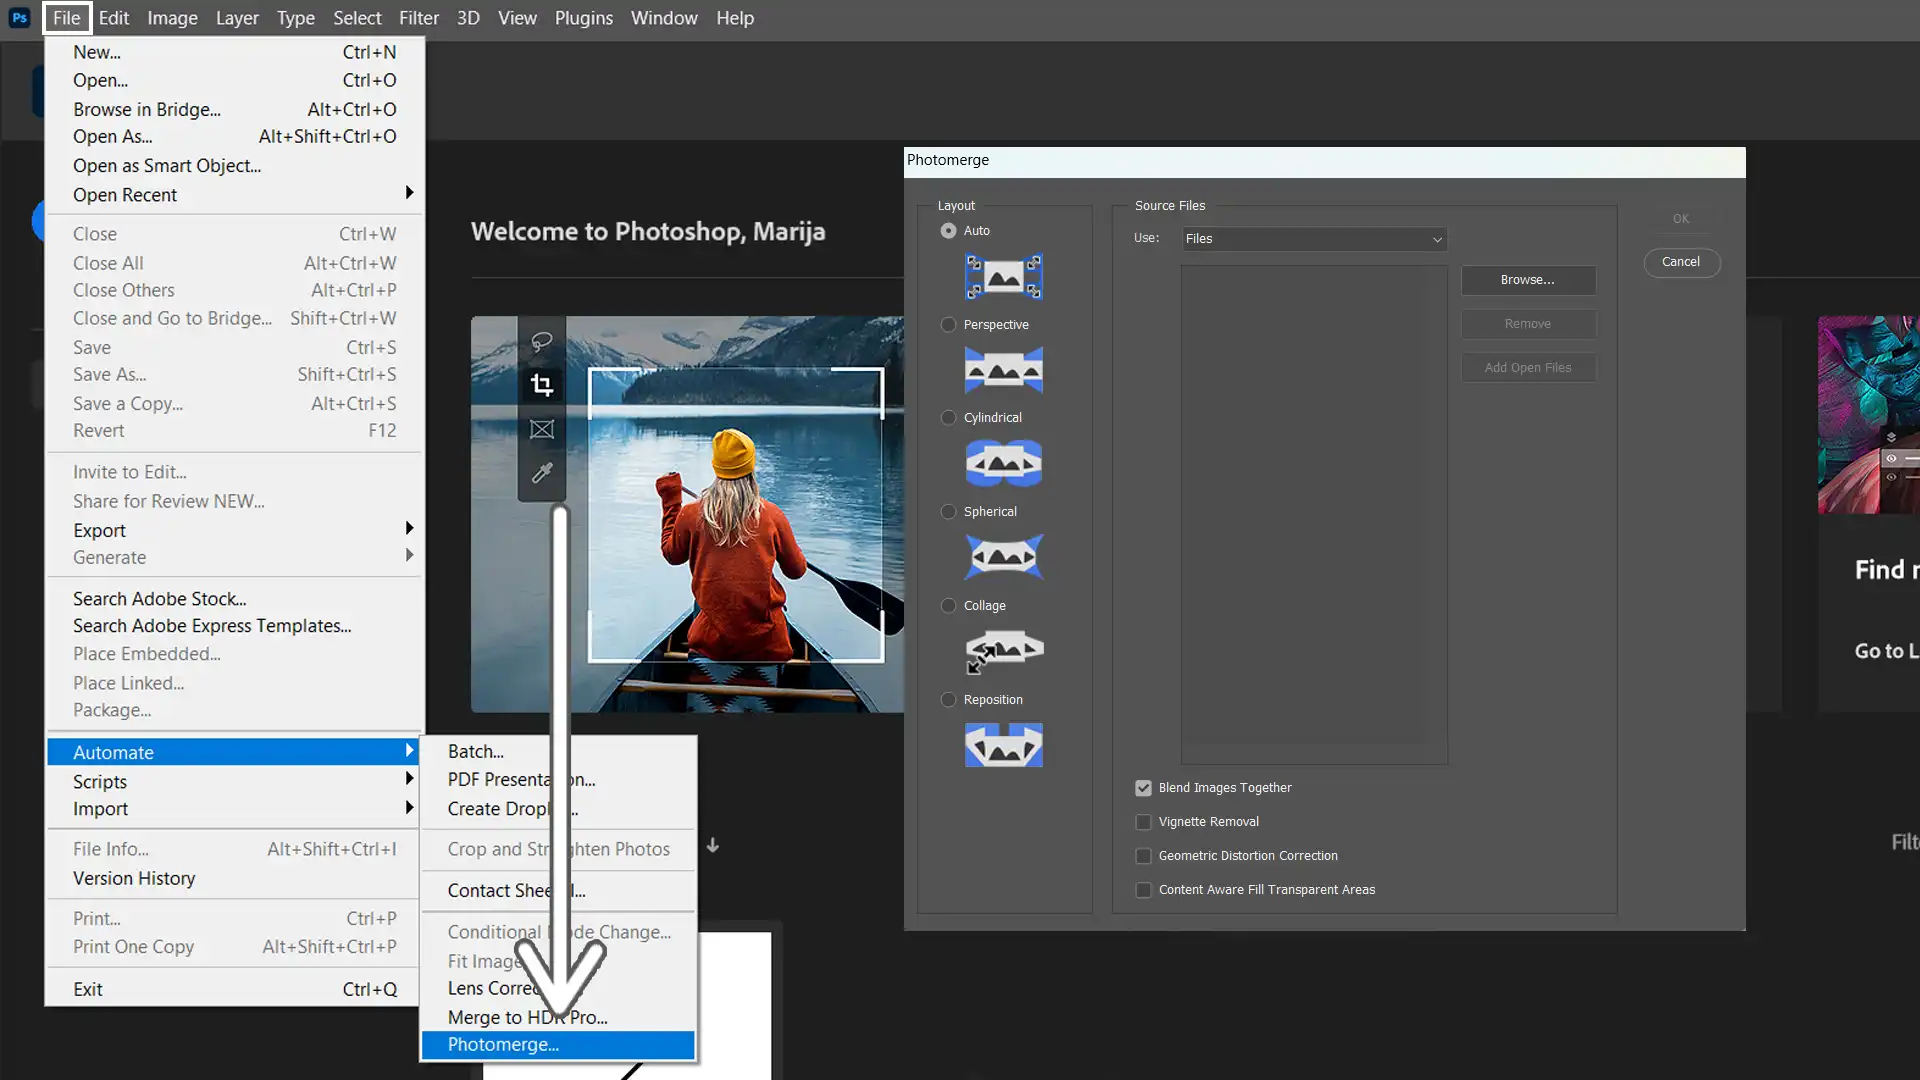
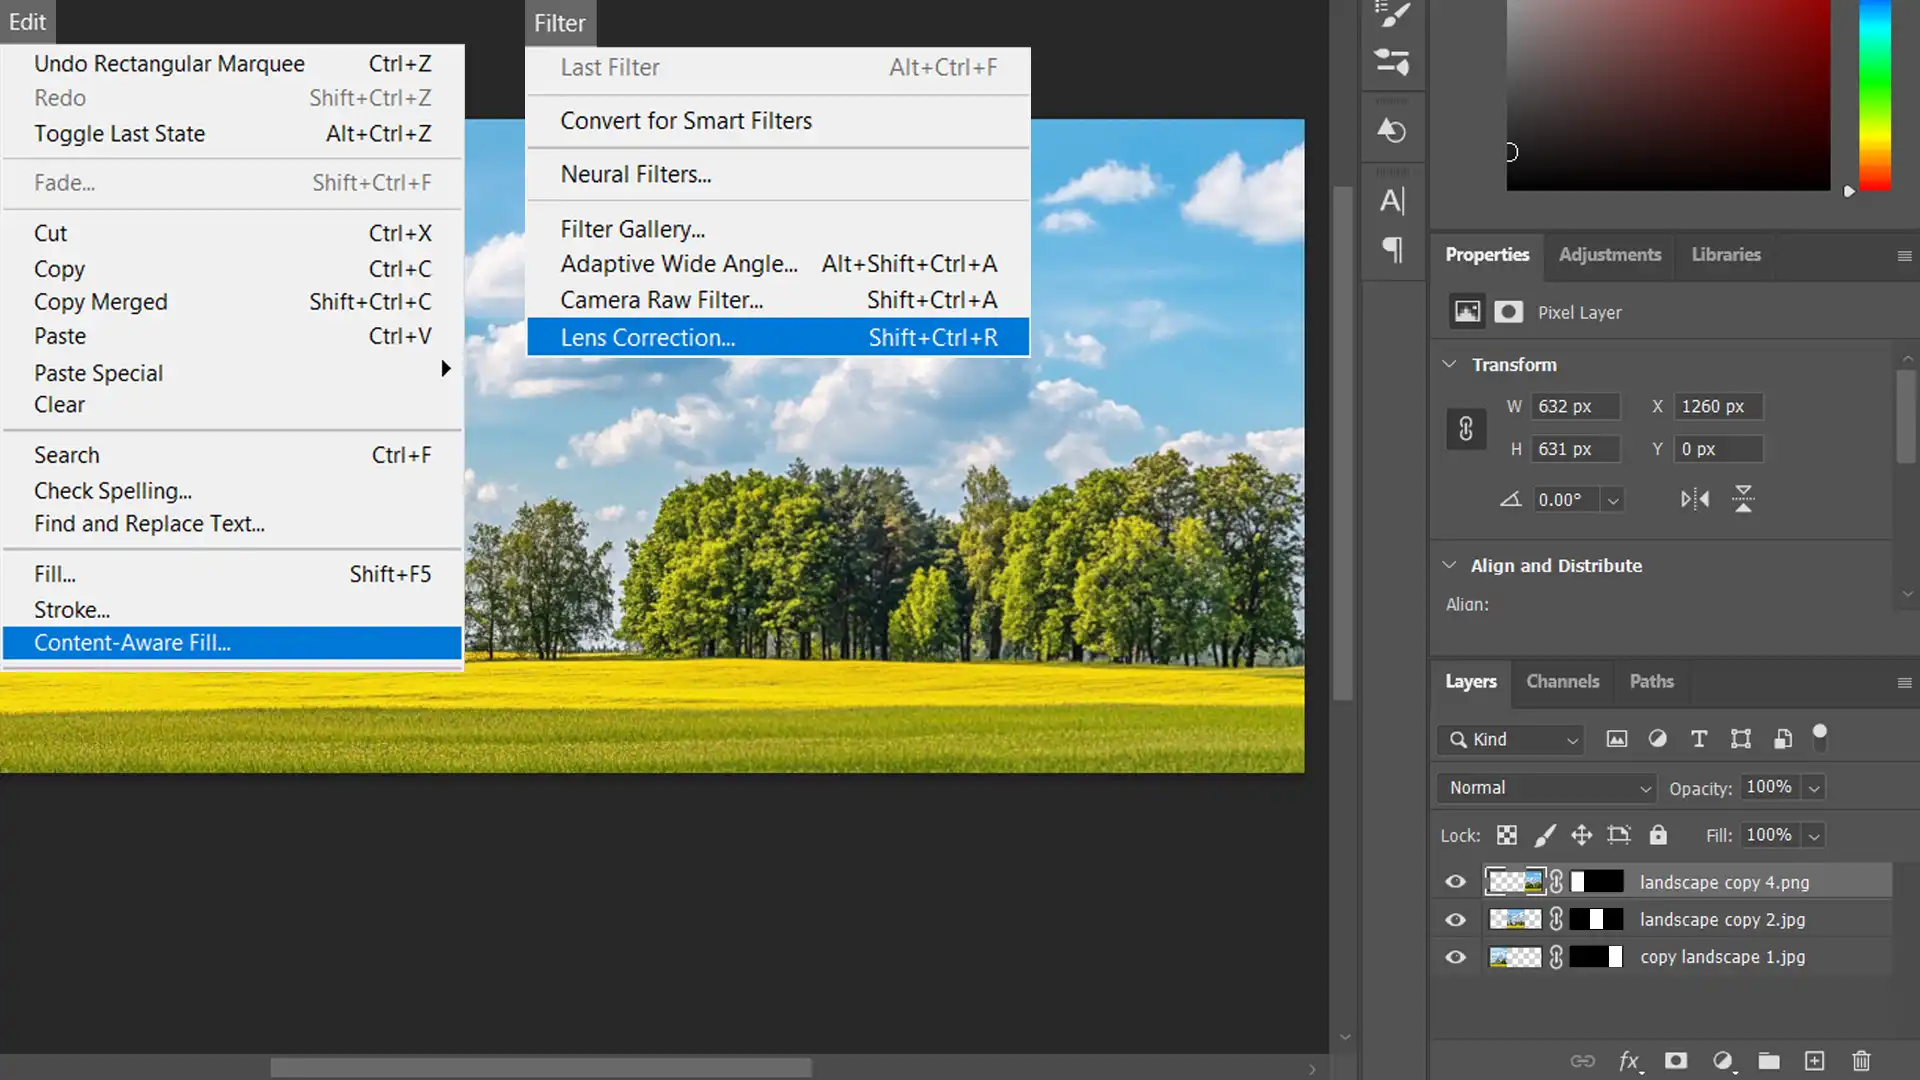
To create a stunning panorama using Photoshop’s Photomerge feature, follow these straightforward steps:
- Open Photoshop and select the Photomerge command from the File menu.
- Ensure all the images you want to use are saved on your computer.
- In the photomerge dialog box, upload your source images. These will be what Photoshop uses to create a panorama.
- Choose a layout option that best suits your needs. Options might include Auto, Perspective, or Cylindrical.
- Once you've selected your layout option, click OK. Photoshop will start blending images.
- After it finishes, review the composite image. Use tools like the content-aware fill in Photoshop to adjust any empty spaces created.
- Correct any lens flaws or geometric distortion correction resulting from the photomerge process. This step ensures a seamless and realistic panoramic image.
Tips for Successful Panoramic Photos
To create a stunning panoramic image, follow these significant tips. Ensuring consistency and attention to detail will help you blend multiple shots into one continuous image seamlessly.
- Maintain the same exposure settings across all shots when shooting images for a panorama. This helps blend all the images together without visible edges.
- Turn off auto-focus to keep camera settings consistent. Set the focal length manually for each shot in your sequence.
- Adjust slight rotations in multiple photos. Ensure that overlapping photographs have enough overlapping content to stitch seamlessly.
- Consider fisheye distortion if you're using particularly wide lenses. This ensures your scene remains natural-looking.
- Vignette removal can help address darkened edges caused by improper lens shading.
Pro Tip: To avoid overlaps and mismatches, use a tripod for increased stability during shooting. Always ensure your camera’s exposure settings match to prevent inconsistencies in lighting.
Advanced Techniques
As we dive deeper into creating panoramic images, the fun begins! We’ve learned the basics, but now it’s time to blend images seamlessly and deal with those pesky distortions, including vignette removal.
Blend Images Seamlessly
Creating a seamless image involves more than just pressing a button. Adobe’s Photomerge command can only take you so far. Instead, mastering this requires a creative touch and a little bit of patience.
Techniques for Blending Images
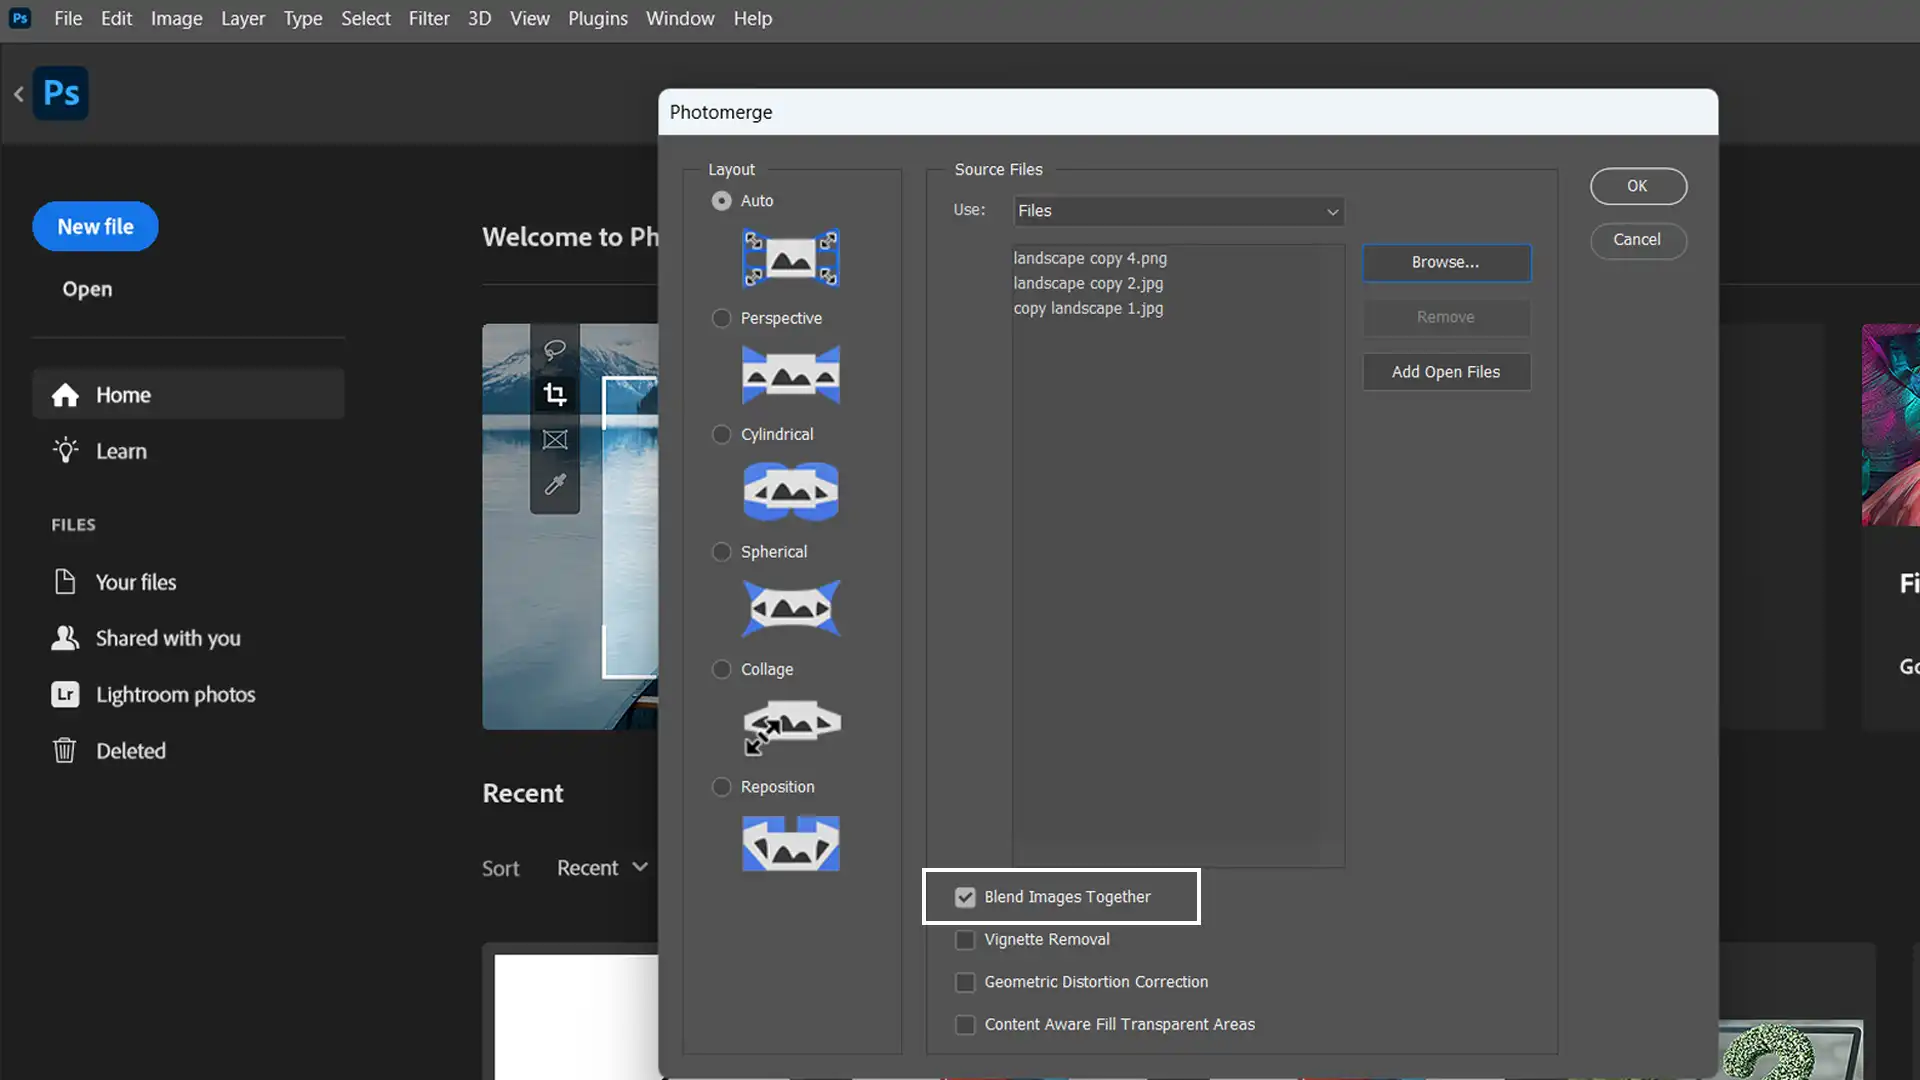
To achieve a seamless blend of images in your panorama, follow these techniques carefully.
- Align all the images inside the photomerge dialog box carefully.
- Ensure camera settings are consistent to match overlapping content.
- Apply exposure adjustment to achieve the same exposure and prevent jarring transitions.
Blending goes beyond just dealing with logistics; it’s about making sure your continuous image feels unified.
That’s where Adobe’s magic touch comes in with tools like content-aware fill in Photoshop.
Correcting Geometric Distortion
Distortion can significantly affect the quality of a panorama, but correcting geometric distortion is straightforward. Seeking efficient solutions, I aim to simplify this process for you. Let’s clarify how to address it effectively.
Understanding Geometric Distortion
To manage geometric distortion in panoramas, focus on these fundamental points:
- Recognize distortions often caused by lens focal length variations.
- Understand individual images may process slight rotations differently.
It’s all about creating one continuous image without shaky lines that distract us from our masterpiece.
Tools for Correction in Photoshop
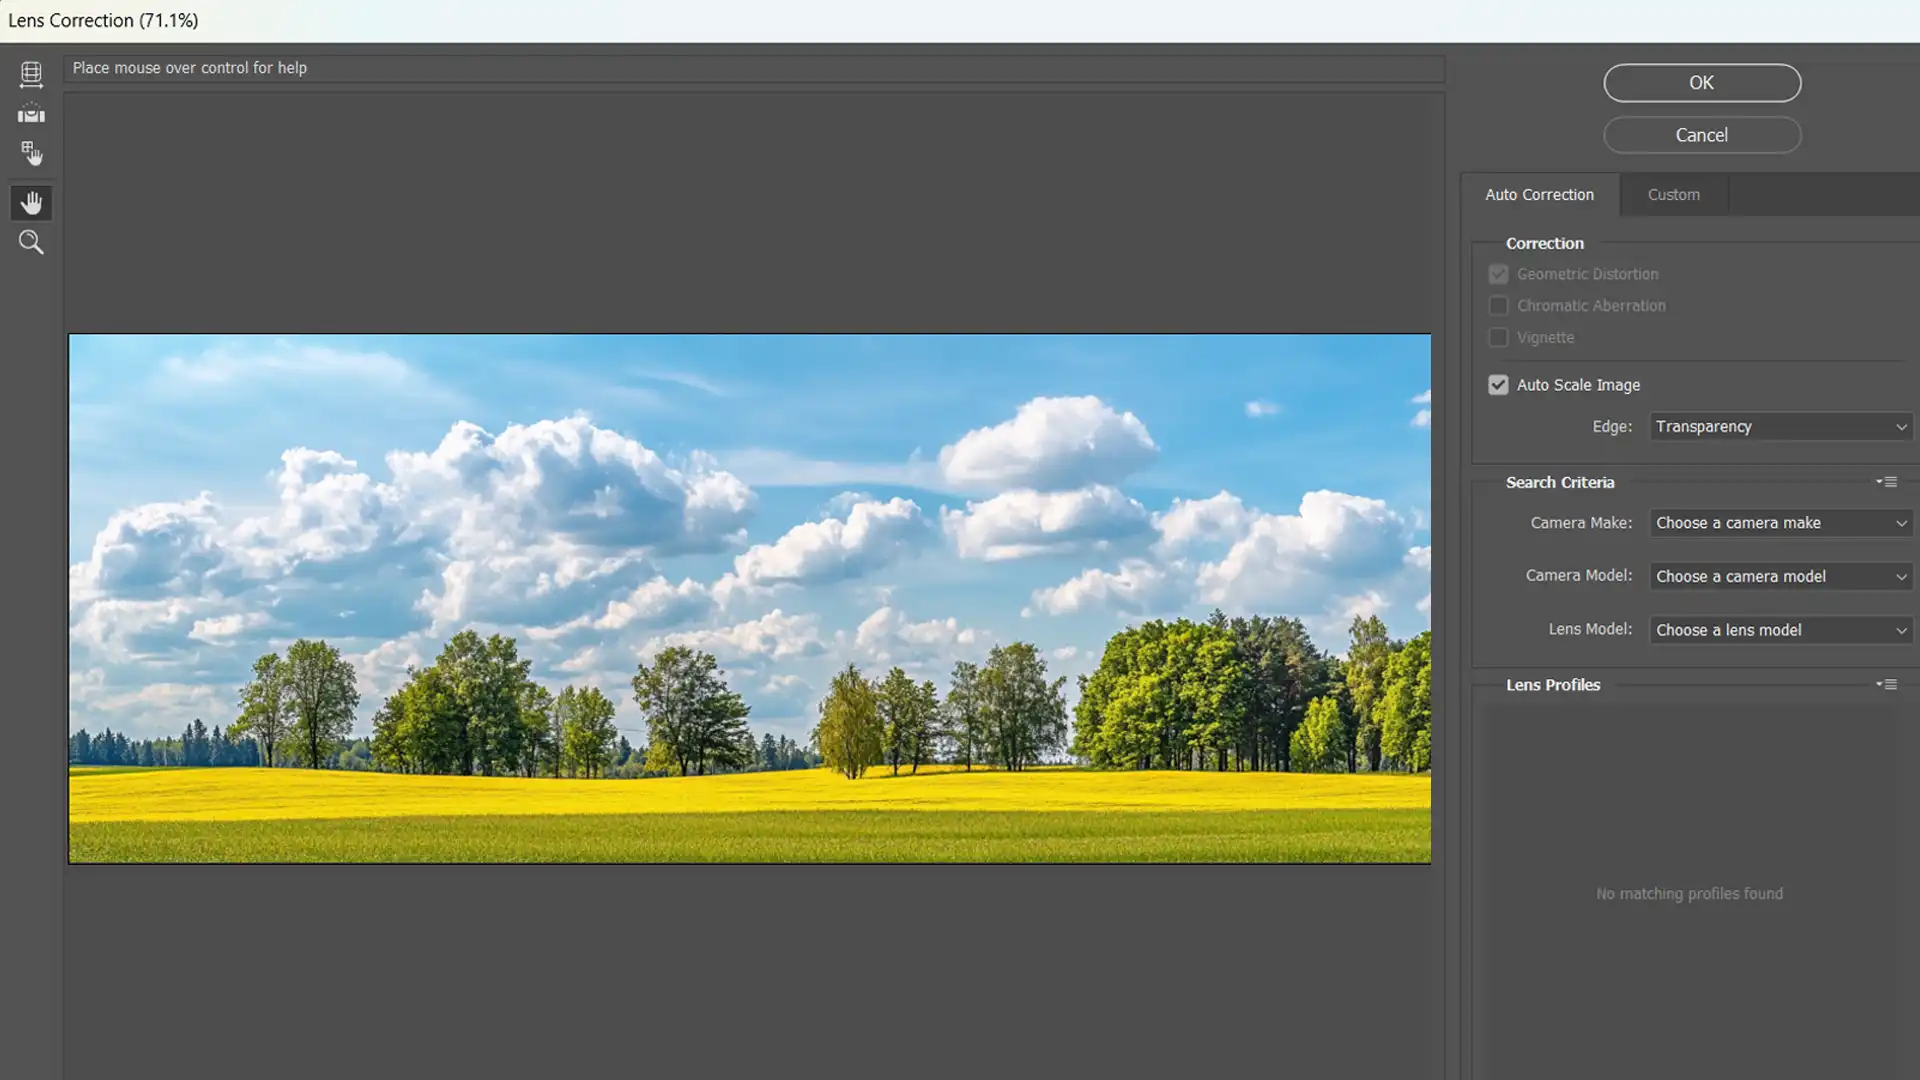
For effective correction of distortions in Photoshop, consider these tools:
- Use lens correction filters in the photomerge dialog box for precision.
- Manipulate perspective controls to correct any skewed portions.
Enhancing Panoramic Photos
Let’s create a panorama that stands out! Enhancements can elevate your images from good to great. Engage with these methods to delight your audience even more.
Color Correction Techniques
To enhance your panoramic images, utilize these color correction techniques:
- Adjust color balance using the exposure compensation tool.
- Perform tonal adjustments manually for exact control over hues.
Get the colors popping and the textures crisp. These make panoramic shots stand out beautifully!
Adding Effects to Panoramic Images
To elevate your panoramic images, consider these techniques for adding effects:
- Utilize filters for dramatic flair.
- Layer effects judiciously to maintain natural aesthetics.
Pro Tip: Always double-check your work in the photomerge dialog box for potential overlaps before finalizing.
This is important for understanding image distortion and how to fix it effectively.
For additional adjustments, consider using lens correction in Lightroom or Lightroom perspective correction to enhance the overall quality of your images. It saves time and prevents the need to start from scratch.
Exporting and Sharing Your Panoramas
Once you’ve created your stunning panorama, the next step is exporting and sharing it. Here are some best practices to ensure your images look their best when shared with the world.
Best Practices for Exporting
When you decide to export your panoramas, start by considering the format of the image files.
JPEGs are great for social media sharing, while TIFFs retain more detail for printing purposes. In Photoshop, you want to ensure that your panorama maintains its original quality.
The intention here is to provide clarity without oversized files.
- Choose a resolution that's appropriate for your intended use, whether it’s online sharing or print.
- Double-check the image dimensions and consider any need for resizing.
- Open the dialog box in Photoshop to adjust these settings effortlessly.
- Apply content-aware fill to address any blank areas left from stitching.
Sharing Photoshop Panoramas on Social Media
Social media thrives on engaging visuals, so you’re in luck when you create a panorama. Once exported, select the platform you wish to share on.
Facebook loves wide images, while Instagram might require some cropping. When uploading, ensure that your image aligns well with social media’s display settings to avoid unwanted crops or low resolution.
It’s important to understand that when you create a panorama on social media, the attention span of viewers is short.
Use intriguing descriptions or funny captions to pull them in. Be mindful of how the panorama looks in the thumbnail preview.
The focus should be on ease of viewing and maximum engagement with overlapping images creating a seamless flow.
When you create a panorama in Photoshop, you can utilize a spectrum of tools, like geometric distortion correction, to smooth out perspectives effortlessly. It perfectly matches overlapping content to make sure everything’s aligned.
Pro Tip: Always back up your source images before editing or exporting. If you want to make adjustments later, you can easily export from Photoshop to Lightroom. This might save you a lot of time if you want to go back and try something different later.
For those using Lightroom, remember to explore the best Lightroom export settings for Instagram to optimize your images for social media platforms.
Additionally, understanding the difference between Photoshop and Lightroom can enhance your editing workflow, allowing you to choose the right tool for specific tasks, whether it’s detailed retouching or batch processing.
Troubleshooting Common Issues: Photoshop Panorama
I know it can be frustrating to face problems when trying to create a stunning panorama in Photoshop. Don’t worry! I’ve been there, too, and I’m here to help make the process smoother.
Below, you’ll find some of the main aspects and practical solutions to help you overcome challenges like stitching errors and image quality concerns.
| Aspect | Overview |
|---|---|
| Dealing with Stitching Errors | Ensure images overlap enough and use the Auto-Align Layers feature to match content. |
| Improving Image Quality | Check image resolution, adjust layout settings for web use, and use content-aware fill if quality is lacking. |
| Managing Exposure Levels | In Lightroom, use exposure compensation to ensure consistent brightness across images. |
Dealing with Stitching Errors
Stitching errors often happen if source images don’t overlap enough. Here are some tips to help you:
- Ensure your camera performs slight rotations between shots.
- Use the "Auto-Align Layers" feature in Photoshop to match overlapping content with precision.
- If you find gaps in your panorama, try the content-aware fill tool to fill those tricky blank areas with ease.
- Ensure your source images are well-aligned from the start for better results.
Improving Image Quality
Achieving high-quality images isn’t always simple, but it’s important. Consider the following:
- Check the resolution of your image files; bigger isn't always better.
- For web use, adjust the layout option settings for faster loading.
- In Lightroom, check the exposure levels in your source images. Lightroom performs exposure compensation to bring all images to a similar brightness.
- Don't hesitate to use the content-aware fill again if the quality isn't as crisp as expected. It fills in details while maintaining the overall look.
Pro Tip: Always use vertical images when shooting panoramas, as they provide more area to crop and fix errors.
If you’re looking to expand your skills further, consider learning how to merge photos in Lightroom for even better results.
Frequently Asked Questions

How to Create a Panorama in Photoshop?
- Open Photoshop and select the images you want to combine.
- Go to 'File', then 'Automate', and choose 'Photomerge'.
- In the Photomerge window, select the 'Auto' layout and click 'OK'.
- Photoshop will automatically stitch your photos together.
- Use the 'Crop' tool to trim any uneven edges.
How Do I Stitch Photos Together in Photoshop?
- Start by loading all your individual images into Photoshop.
- Navigate to 'File', select 'Automate', and then click on 'Photomerge'.
- Choose the appropriate layout from the options in Photomerge.
- Click 'OK' to allow Photoshop to merge the photos.
- Adjust the merged image as necessary, then crop for a clean finish.
What is a Panorama in Photoshop?
- A panorama is a wide-angle view or representation of a physical space.
- In Photoshop, it's created by merging multiple images together that overlap.
- This technique is used to show a broader perspective than a single image can provide.
How to Turn a Photo into a Panoramic Photo?
- Select a series of photos that have overlapping elements.
- Load these images into Photoshop.
- Use the 'Photomerge' feature under 'Automate' in the 'File' menu.
- Choose a suitable layout and merge the images.
- Finalize by cropping and adjusting the panoramic photo as needed.

Conclusion
Creating a stunning “Photoshop panorama” can truly elevate your photography projects. I’ve personally experienced how this feature can transform a series of images into a seamless, breathtaking vista.
The ability to stitch photos together effortlessly in Photoshop has allowed me to capture expansive landscapes and urban scenes that a single shot could never do justice to.
If you’re interested in mastering this skill, I highly encourage you to check out my Photoshop Course and Lightroom course. Both resources offer practical tips and insights that can significantly improve your editing skills.
Additionally, you can find the tools you need to create stunning imagery by exploring Adobe’s offerings. Check out Adobe Photoshop and Adobe Lightroom to enhance your creative projects.
Embrace the power of Photoshop panorama, and watch your photography come to life.
Read more about Photoshop:


