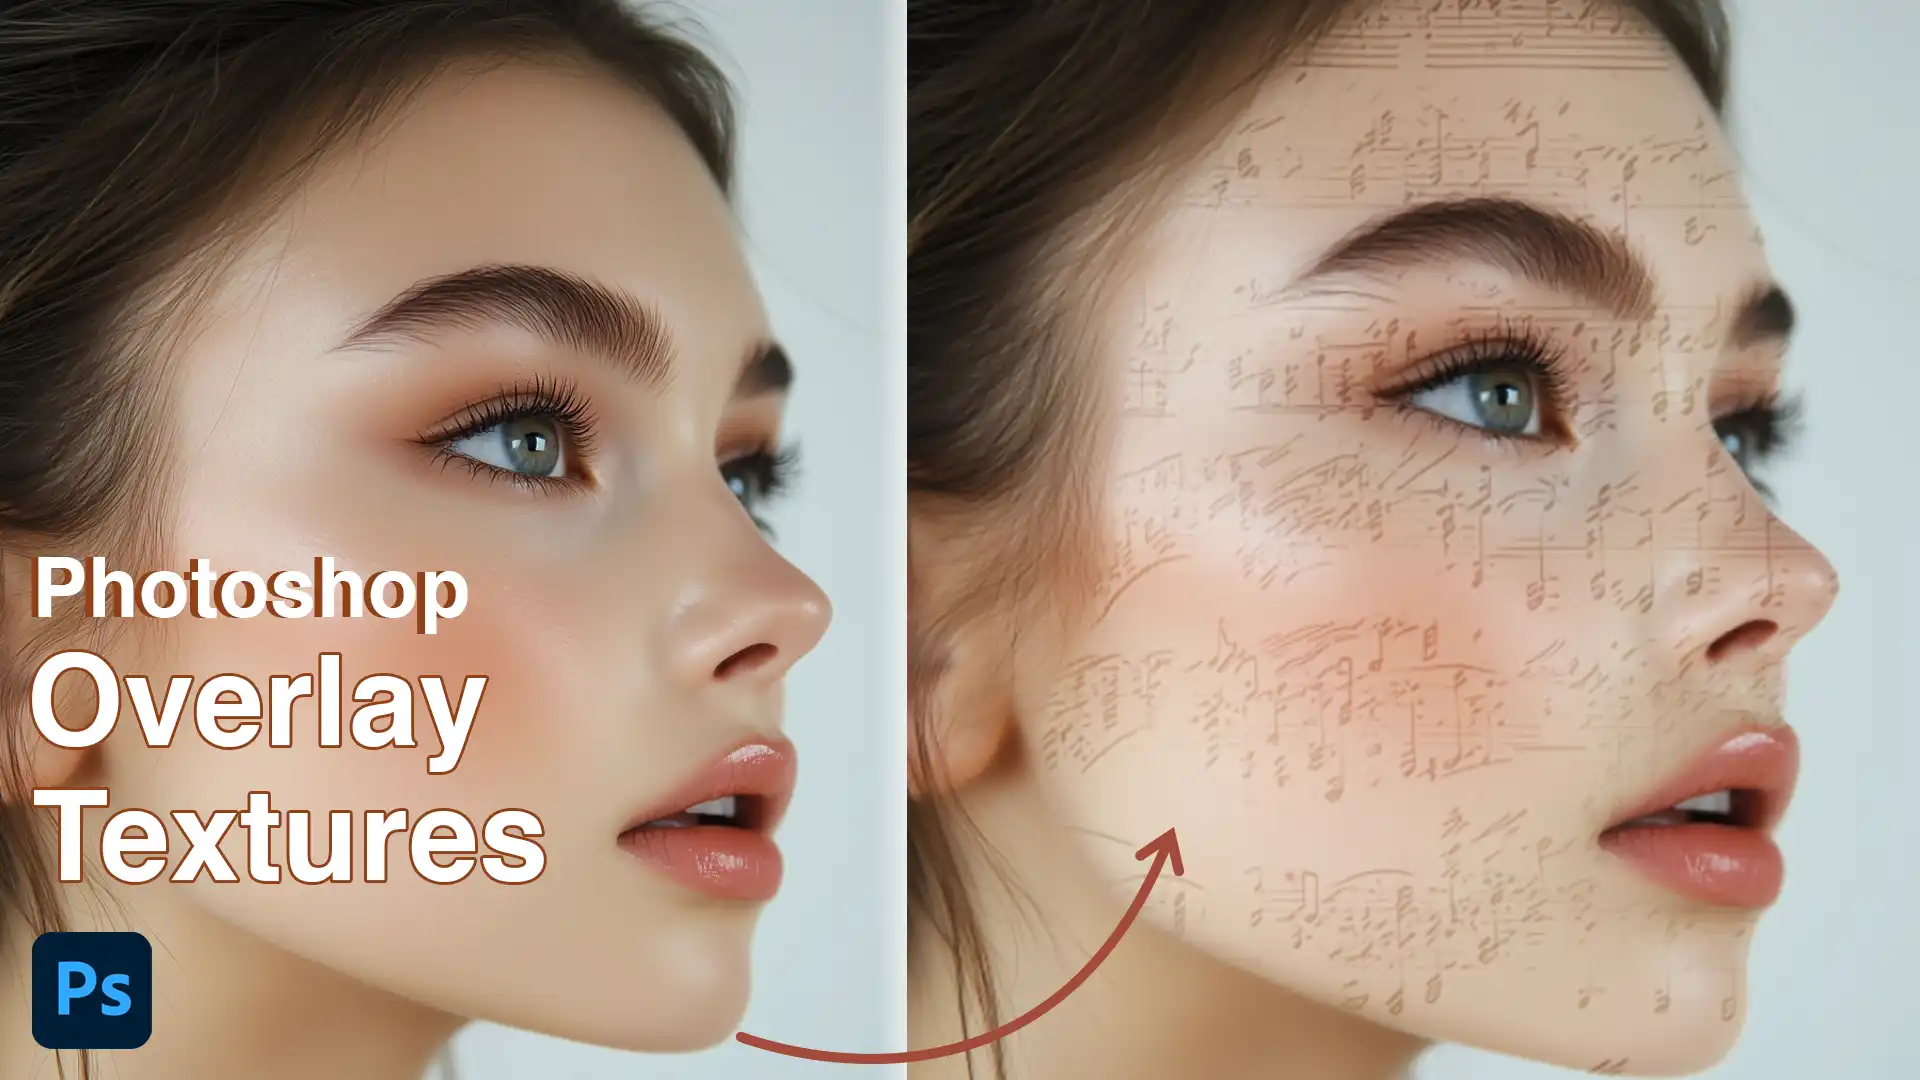
When it comes to enhancing your images, using Photoshop overlay textures can make a world of difference. Imagine transforming a simple photo into a masterpiece with just a few clicks. That’s the power of overlay textures.
In this article, I will guide you through the steps to use overlay textures effectively in Photoshop. You’ll discover how they can elevate your work, making your images stand out in the sea of digital content.
By the end, you’ll be equipped with the knowledge to captivate your audience and make your visuals unforgettable. So, are you ready to dive in and unlock new creative possibilities? Let’s get started!
Table of Contents
What are Photoshop Overlay Textures?
Photoshop overlay textures are layers that add depth and interest to your images, making them perfect for your next creative project.
With these Photoshop textures, you can change the whole look of a photo with just a few clicks. They lay over your main image, transforming it into something unique.
Benefits of Using Overlay Textures
Here’s how overlay textures can enhance your images and expand your creative options
- Enhance your photos by adding complexity.
- Help in covering any unwanted elements.
- Allow for creative freedom without needing extra technical skills.
You simply choose a texture and see its magic unfold on the screen.
Types of Overlay Textures
The types of overlay textures available are varied:
- Grunge Textures: Offer an aged or rugged look.
- Paper Textures: Bring a classic feel.
- Subtle Textures: Provide that little touch of mystery or mood.
Each texture type offers different possibilities for your creative project.
Working with Texture Layers
Texture layers are important for designing striking effects in photos. To effectively work with them, use blend mode options and adjust opacity levels.
This ensures the texture integrates smoothly with your main photo. Masking layers refine this further, allowing precise control over which areas display the texture.
Pro Tip: Understanding the difference between Photoshop and Lightroom can help you decide which tool is best suited for your specific editing needs.
For those looking to delve deeper, learning Photoshop shortcuts can streamline your workflow and enhance your efficiency.
How to Use Texture Overlay in Photoshop
Photoshop overlay textures can change the whole vibe of a photo. Whether you’re going for moodiness or adding character to your images, texture overlays are important.
Overlays bring dimension that can shift an image from ordinary to extraordinary. Let’s dive into how texture layers are applied and what you need to watch out for.
Step-by-Step Guide to Applying Texture Overlays
Here’s a step-by-step approach to effectively apply texture overlays to your images.
Choose Your Texture Overlay
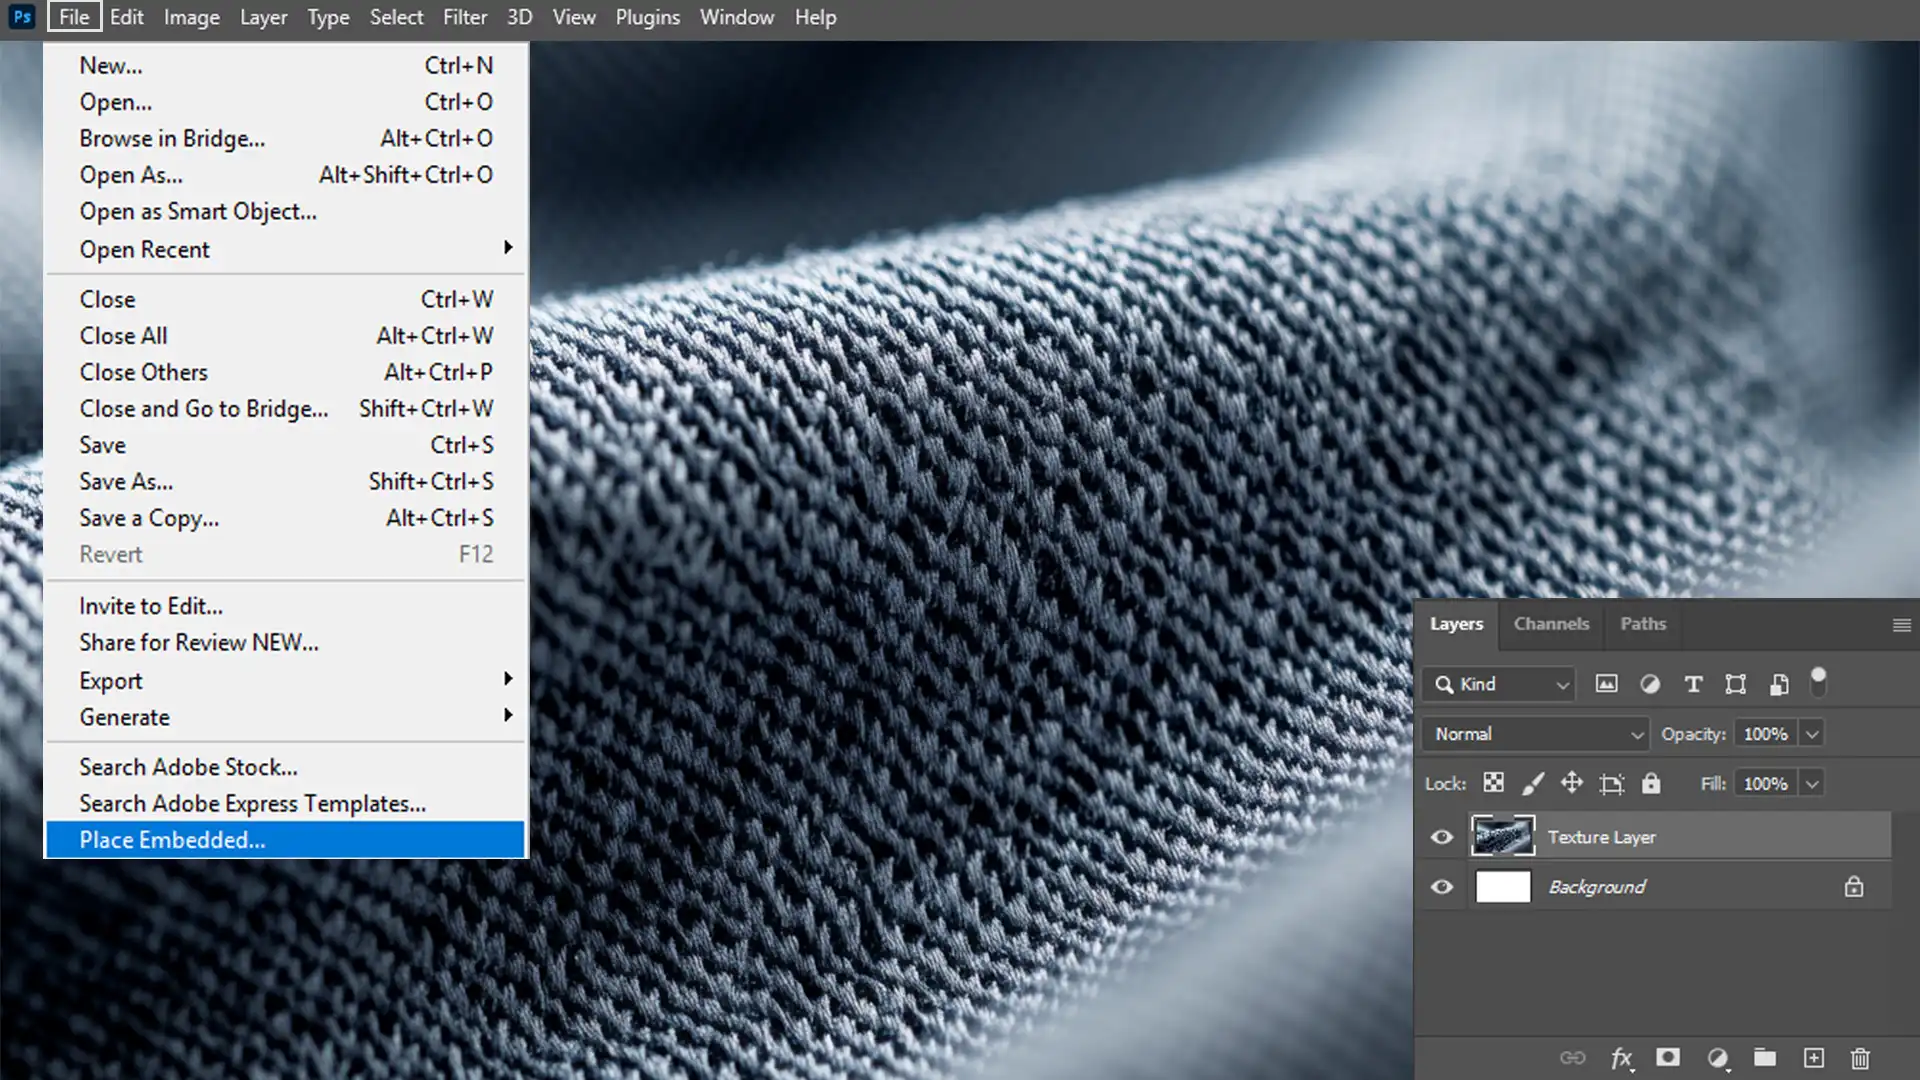
Download or create your texture. Open your photograph in Photoshop and add the texture as a new layer. Ensure the layer covers the entire background and photo.
Adjust the Blending Mode
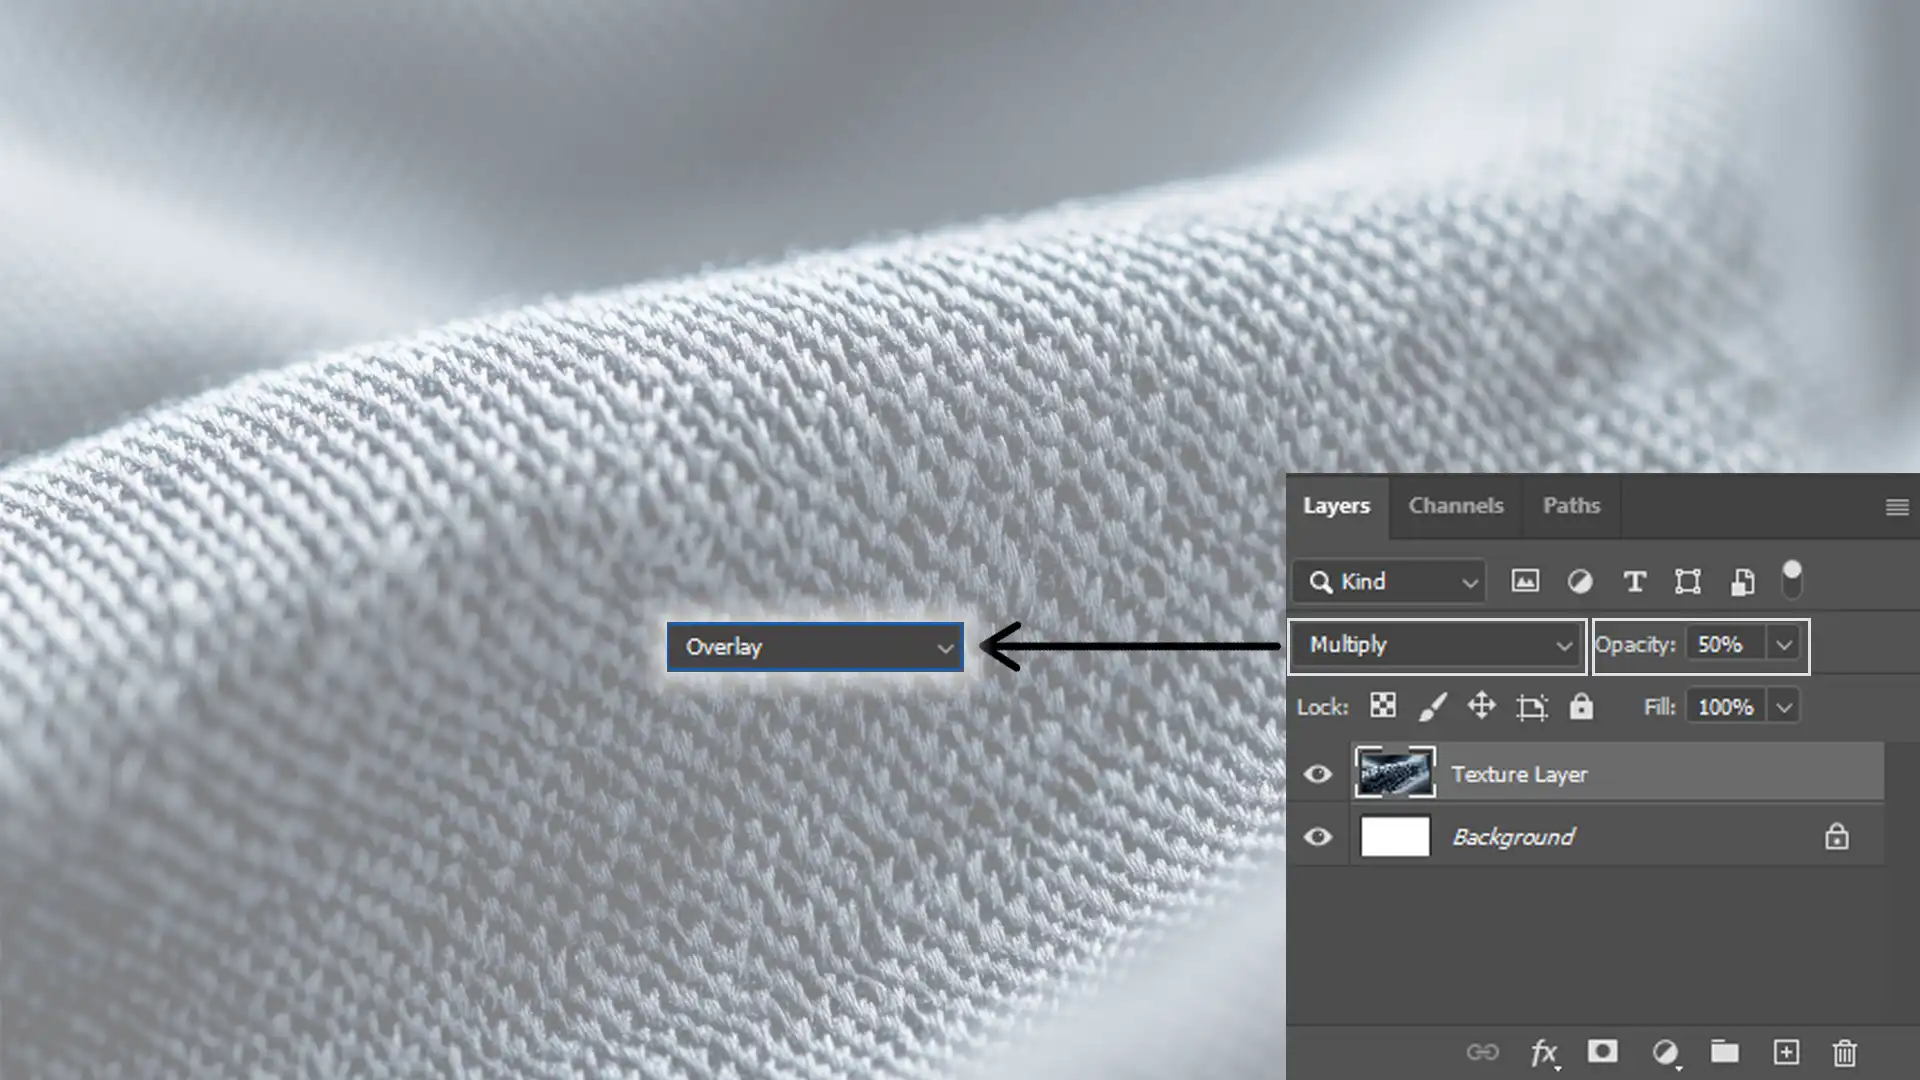
Change how your texture interacts with the original image. Options like Multiply and Overlay often work best. Experiment with each mode to find the unique effect you desire.
After setting a blend mode, tweak the opacity to control the intensity. Aim for enhancement, not overpowering.
Use a Layer Mask
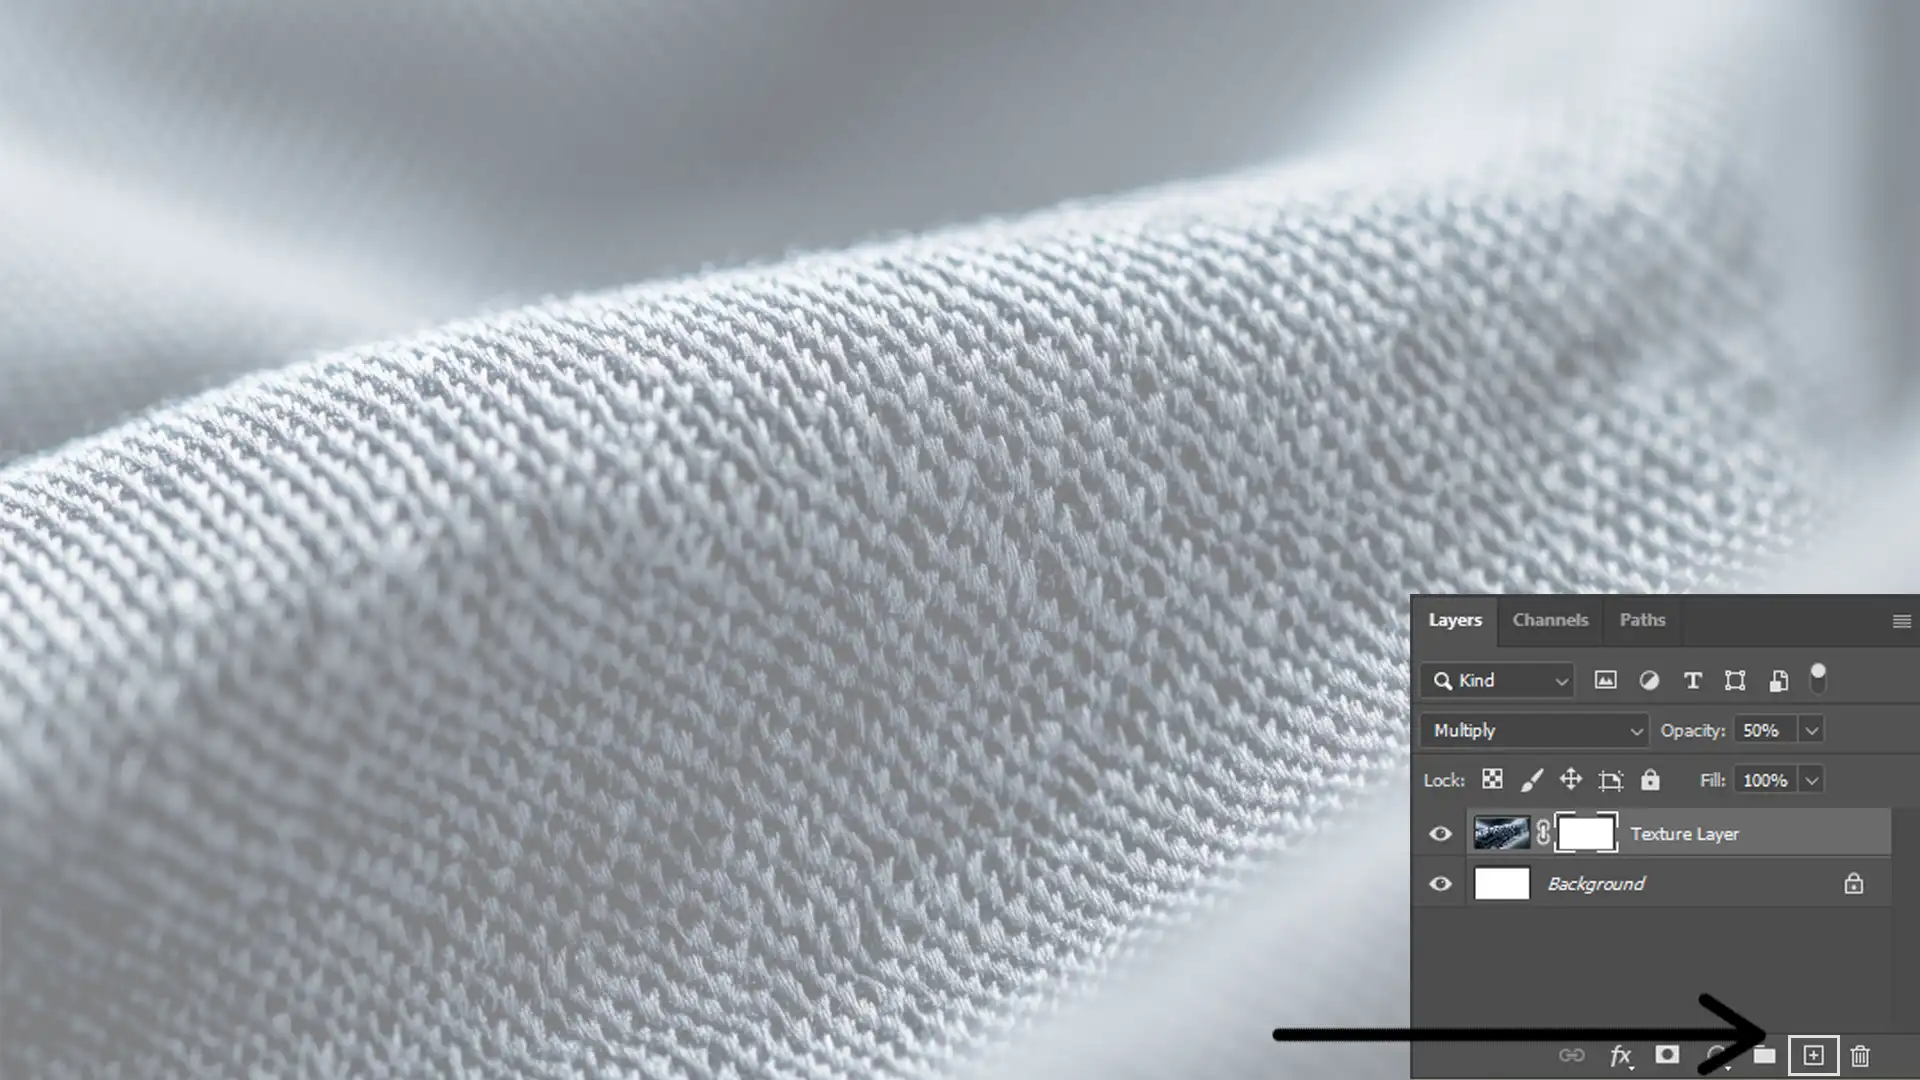
If the texture covers parts you don’t want to be affected, use a layer mask. It allows you to hide or reveal sections of the texture without deleting anything. This step is important for precision.
Common Mistakes and How to Avoid Them
Here are common mistakes to watch out for when applying texture overlays and how to avoid them:
- Overdoing It: Too much texture can distract from the main photo or overwhelm the background. Adjust the opacity of the texture layer to ensure subtlety.
- Neglecting Blending Mode Exploration: Spend time exploring different modes to find the most natural look for the photograph.
- Forgetting the Layer Mask: Use it to prevent textures from applying where they're not wanted. Careful use ensures the final look remains clean and professional.
Tips for Creating Stunning Effects
Different textures yield different moods. Old paper textures add nostalgia; grunge brings intensity. Textured brushes can add unique details, an overlay isn’t the only option.
Avoid the common trap of Photoshop textures appearing flat on the background they’re applied to. Consider the image’s light source and adjust the texture to match.
Using these techniques can add creativity and depth, especially if you’re experimenting with quarantine photography, which captures everyday moments at home in new and artistic ways.
Pro Tip: Save frequently used textures and blend modes as presets. Tutorials on how to add texture in Photoshop and how to add texture to text in Photoshop can guide you in creating these presets for efficient workflows, helping you achieve polished, professional results with ease.
Additionally, consider using the patch tool in Photoshop to seamlessly integrate textures with your images, ensuring a polished and professional finish.
Exploring Blending Modes for Texture Overlays
Blending modes in Photoshop are fascinating tools that allow you to mix Photoshop overlay textures, transforming the look of your photo much like mixing colors on a palette.
The result always alters the original photo in intriguing ways, and the guide below will help you choose the best settings to enhance your images.
| Aspect | Overview |
|---|---|
| Understanding Blending Modes | Blending modes in Photoshop enable unique ways to mix texture overlays with your images, creating effects similar to blending colors on a palette. |
| Using Blending Modes | Add a texture layer, then explore the dropdown menu of blending modes. Hover over each mode to preview its effect on your photo. |
| Common Blending Modes | Modes like “Multiply” can darken, while “Screen” can lighten, and each mode interacts differently with your image’s background and tones. |
| Choosing the Right Mode | Experiment with blending modes to find the effect that best complements your Photoshop textures, adding depth or subtlety as needed. |
| Top Modes for Textures | “Overlay” sharpens and brightens, ideal for adding energy, while “Soft Light” provides gentle enhancements without overpowering the image. |
| Pro Tip for Enhanced Effects | Combine multiple textures and blending modes with Photoshop layer styles for creative possibilities and a more layered effect. |
How to Use Blending Modes in Photoshop
In Adobe Photoshop, these modes offer a variety of choices. Start by opening a file, adding a texture layer, and locating the dropdown menu above the layers panel. This is where your journey begins. Hover over each mode to see its effects.
For instance, “Multiply” can darken or blend seamlessly with your photo’s background, while “Screen” lightens in unexpected ways.
After selecting a mode, modify the opacity to fine-tune the effect. Each mode offers something unique, and each photo may favor a different mode.
Best Blending Modes for Textuare Overlays
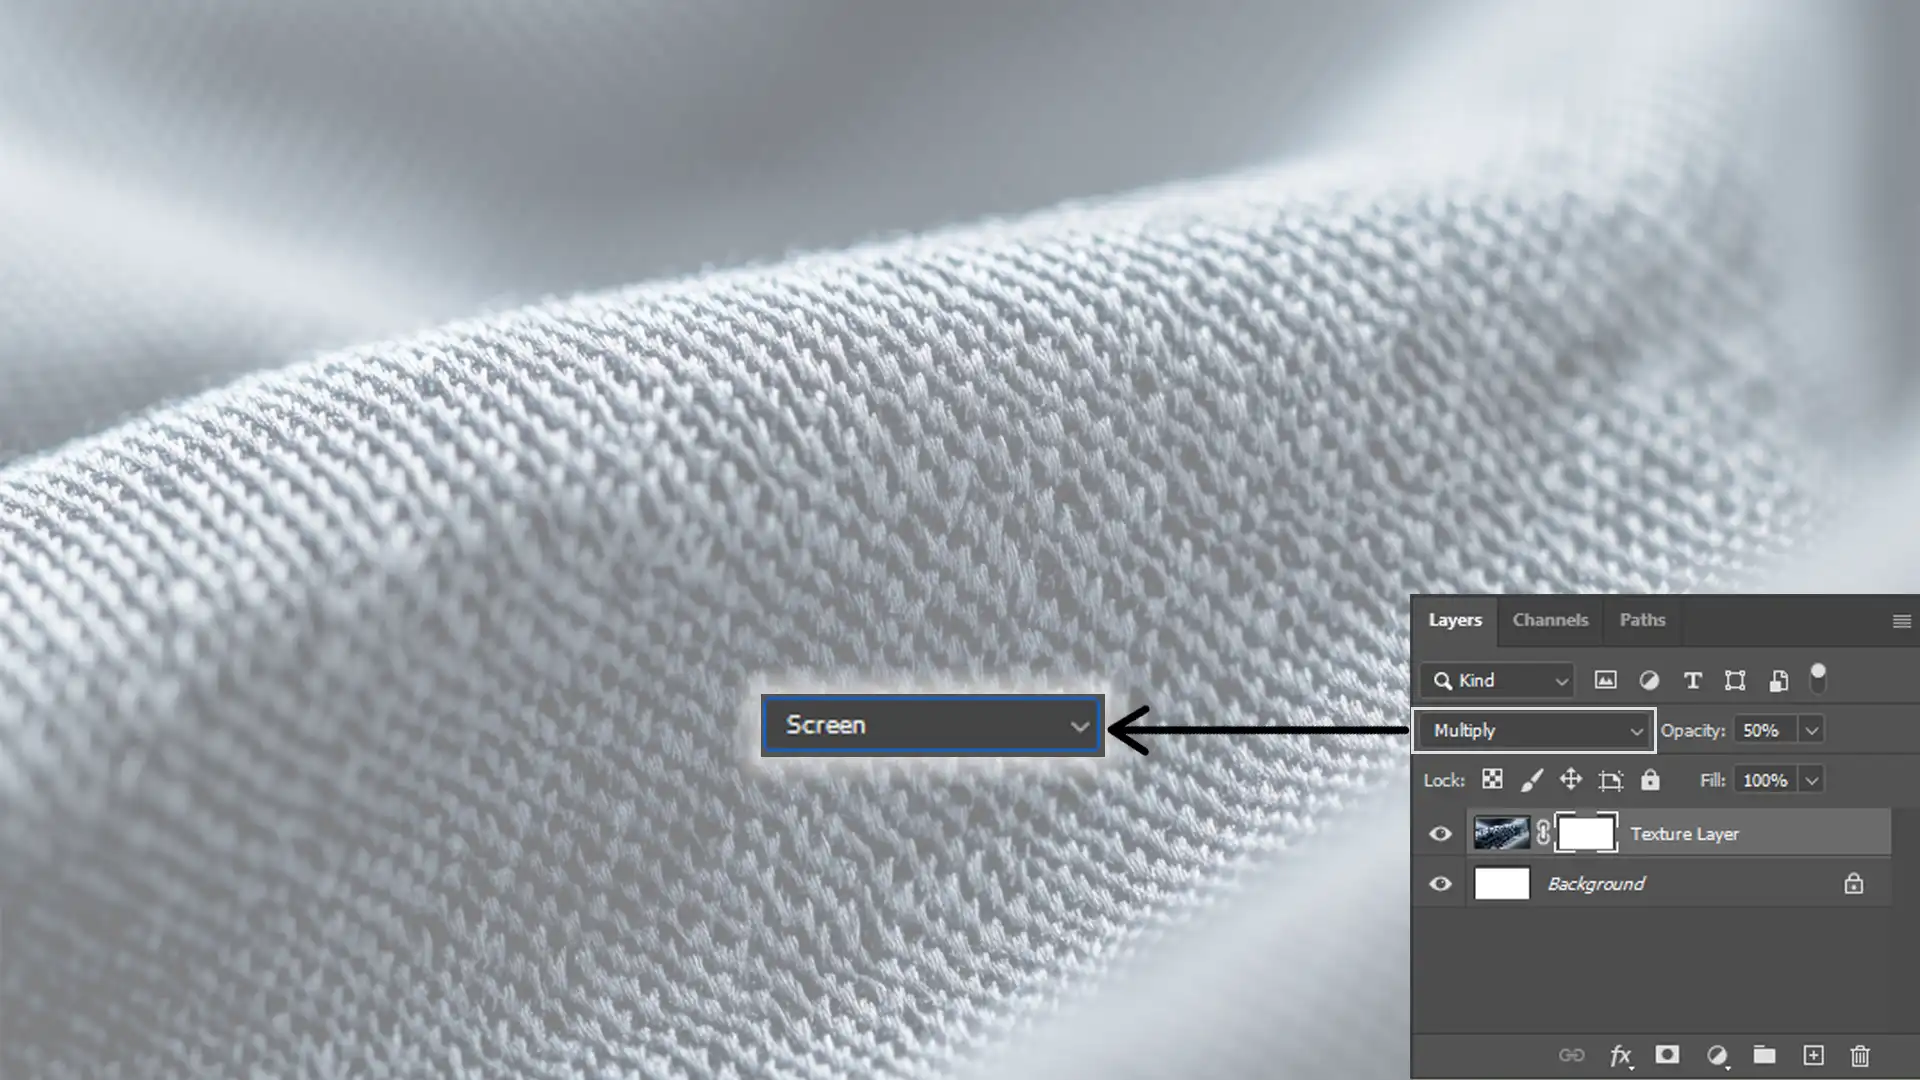
Choosing the right blending mode is important. Some modes work better with specific Photoshop textures.
“Overlay” can sharpen and brighten, making it ideal for enlivening dull images. “Soft Light” offers a subtle effect, adding a gentle enhancement without overwhelming the image.
Not every image pairs well with the same mode, so testing different modes with your texture layers can push boundaries and reveal new possibilities.
Pro Tip: Consider using multiple textures, blending modes, and Photoshop layer styles together. This combination can create unique effects and add depth to your images, expanding creative possibilities.
Frequently Asked Questions
How do you overlay textures in Photoshop?
- Open your base image in Photoshop.
- Drag and drop the texture file onto your base image. This will create a new layer.
- Resize the texture to fit your photo by pressing Ctrl+T (Cmd+T on Mac), and dragging the corners.
- Change the blending mode to Overlay (found in the Layers panel).
- Modify the opacity of the texture layer until you achieve the desired effect.
- Use the eraser tool to remove or soften any parts of the texture as needed.
What is an overlay texture?
- An overlay texture is an image applied on top of another image.
- It usually adds visual elements like patterns, grit, or grunge to enhance the aesthetic of the base image.
- Overlay textures can affect the color, lighting, or overall mood of an image.
How do I create a layer texture in Photoshop?
- Open the image you want to use as a texture in Adobe Photoshop.
- Select the entire image by pressing Ctrl+A (Cmd+A on Mac).
- Copy the image by pressing Ctrl+C (Cmd+C on Mac).
- Go to the image where you want to apply the texture and press Ctrl+V (Cmd+V on Mac) to paste it as a new layer.
- Modify the layer's blending mode and opacity to create the desired textured effect.
How do you overlay objects in Photoshop?
- Open the main image where you want to overlay objects.
- Open the image of the object in a new tab and select the object using selection tools like the Quick Selection Tool.
- Copy the selected object by pressing Ctrl+C (Cmd+C on Mac).
- Paste the object into your main image by pressing Ctrl+V (Cmd+V on Mac).
- Move and resize the object as needed using the Transform tool (Ctrl+T or Cmd+T).
- Modify the object layer’s blending mode and opacity to integrate it smoothly into your main photo.

Conclusion
Incorporating Photoshop overlay textures has been a game-changer in my creative workflow. These textures have allowed me to add depth, mood, and a unique touch to my images, transforming ordinary photos into captivating works of art.
The journey of mastering this technique has been both rewarding and exciting, as I’ve been able to express my artistic vision more vividly.
If you’re ready to elevate your skills, I highly recommend checking out my Photoshop Course and Lightroom course. These resources have been essential to my growth, packed with practical tutorials and insights that will help you get the most out of Photoshop overlay textures.
For those new to these tools, Adobe’s Photoshop and Photoshop Lightroom are great software options to start creating and editing with impact.
Using these techniques has improved my work and deepened my passion for photography and digital art.
Read more about Photoshop:


