
Creating the perfect Photoshop layout can be a game-changer for your design projects. Imagine transforming your ideas into visually stunning masterpieces with just a few clicks.
In this article, I’ll guide you through tips that will elevate your Photoshop skills to a whole new level.
Whether you’re a beginner or a seasoned designer, you’ll find valuable insights that will captivate your audience and make your workflow more efficient.
Ready to unlock the secrets of exceptional design?
Let’s dive in!
Table of Contents
Getting Started with Adobe Photoshop Layout
So, you want to dive into the world of Adobe Photoshop?
The journey starts here.
Whether you’re looking to adjust a photo or create stunning graphics, understanding the basics sets you up for success.
Setting Up Your Workspace
The first step is getting comfortable with your workspace. When you open Photoshop, the interface might seem intimidating, but don’t worry.
Setting up Photoshop’s workspace helps you get organized and improves productivity
Steps to Set Up Your Workspace:
- Open Photoshop: When you launch Photoshop, you see the default settings. To personalize, go to the window menu.
- Choose Workplace: Under the workspace section, you have multiple options. If you're into photography, choose the 'Photography' workspace.
- Panels: Each panel serves a unique purpose. The tools panel contains most of the necessary tools you need for editing images. The layers panel displays your layers in the project.
Experiment with the workspace until you find a flow that suits you. The trick is to make it your own, so everything you need is within reach.
Understanding the Photoshop Interface
Grasping the Photoshop CC interface is essential. Each component has a role that helps streamline your work.
Components of the Interface
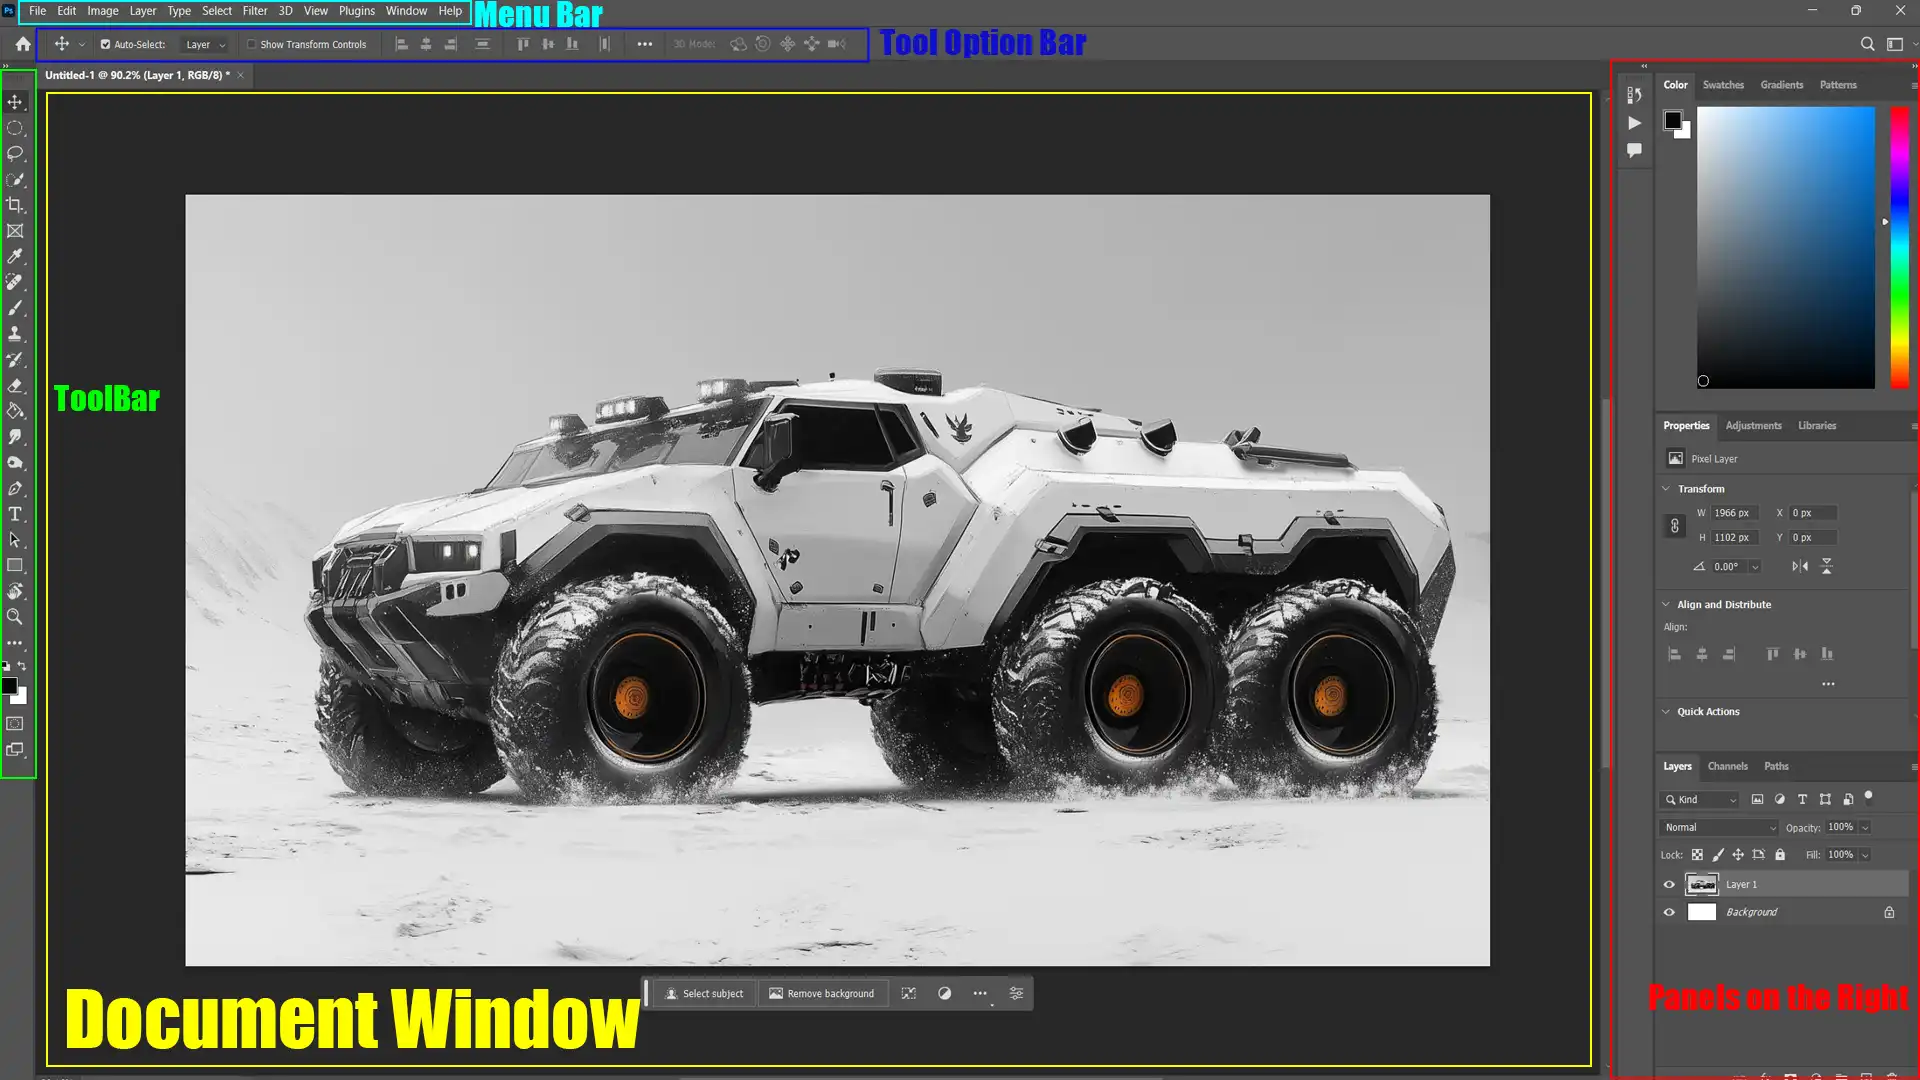
Here are some important components of the interface:
- Menu Bar: The menu bar sits at the top of the screen, housing file options such as 'File', 'Edit', and more specialized tools under 'Layer' and 'Filter'.
- Document Window: This is where your photoshop document resides. The larger this window, the more space you have to work with your image.
- Tools Panel: Located on the left of the screen, the tools panel includes essentials like the gradient tool, brush, and move tool. Hover over each icon to see what it does.
- Panels on the Right: These include properties, adjustments, and the layers panel. You can collapse panels and expand them based on what you need at any given moment.
Take your time to explore these areas. Familiarity with Photoshop’s interface makes using the software less daunting and far more enjoyable.
Moving Panels
Moving panels lets you customize your workspace by repositioning floating or docked panels like tools and layers.
Simply click and drag a panel to adjust its location, creating a photoshop layout that suits your workflow and enhances productivity.
This flexibility helps optimize your design process in software like Photoshop, allowing you to organize various elements efficiently.
You can also temporarily hide panels to focus on your work without distraction.
Adjustments to brush size and other tools can be made more accessible by moving the panels, improving your overall efficiency.
Document Bounds
In design and graphics software, document bounds refer to the outer edges or limits of the document or canvas area.
It defines the area within which all elements of the design, such as text, images, and shapes, are contained.
Document bounds mark the edges of the printable or viewable area of the document. Anything outside these bounds may not be visible or may not print.
If you set negative values for margins or guides, they will still be constrained within the document area.
Use the view menu to adjust your workspace to better visualize the document bound and ensure all important elements are properly placed.
The view menu also offers additional options to manage how document bound are displayed, helping you fine-tune your photoshop layout.
Pro Tip: The frame tool in Photoshop allows you to easily create and manage image placeholders, while understanding document bounds ensures that your frames and content stay within the printable or viewable area of your design.
Use existing guides to create precise layouts. Open the window menu and select ‘Guides’. From there, you can create layouts to split your document window into equally spaced columns and rows.
This makes alignment a breeze and ensures everything looks professional!
Keep practicing these basics, and soon you’ll move on to more advanced techniques with confidence.
For a deeper dive, consider exploring how to remove shadows in Photoshop for cleaner images.
Creating a Guide Photoshop Layout
Guide layouts are grids you use in Photoshop to help align elements quickly. They make it easy to place text, images, and other design components accurately.
Imagine them as invisible rulers.
Pro Tip: Learn how to make photo grids in Lightroom as well for an even better skillset.
Step 1: Open Photoshop
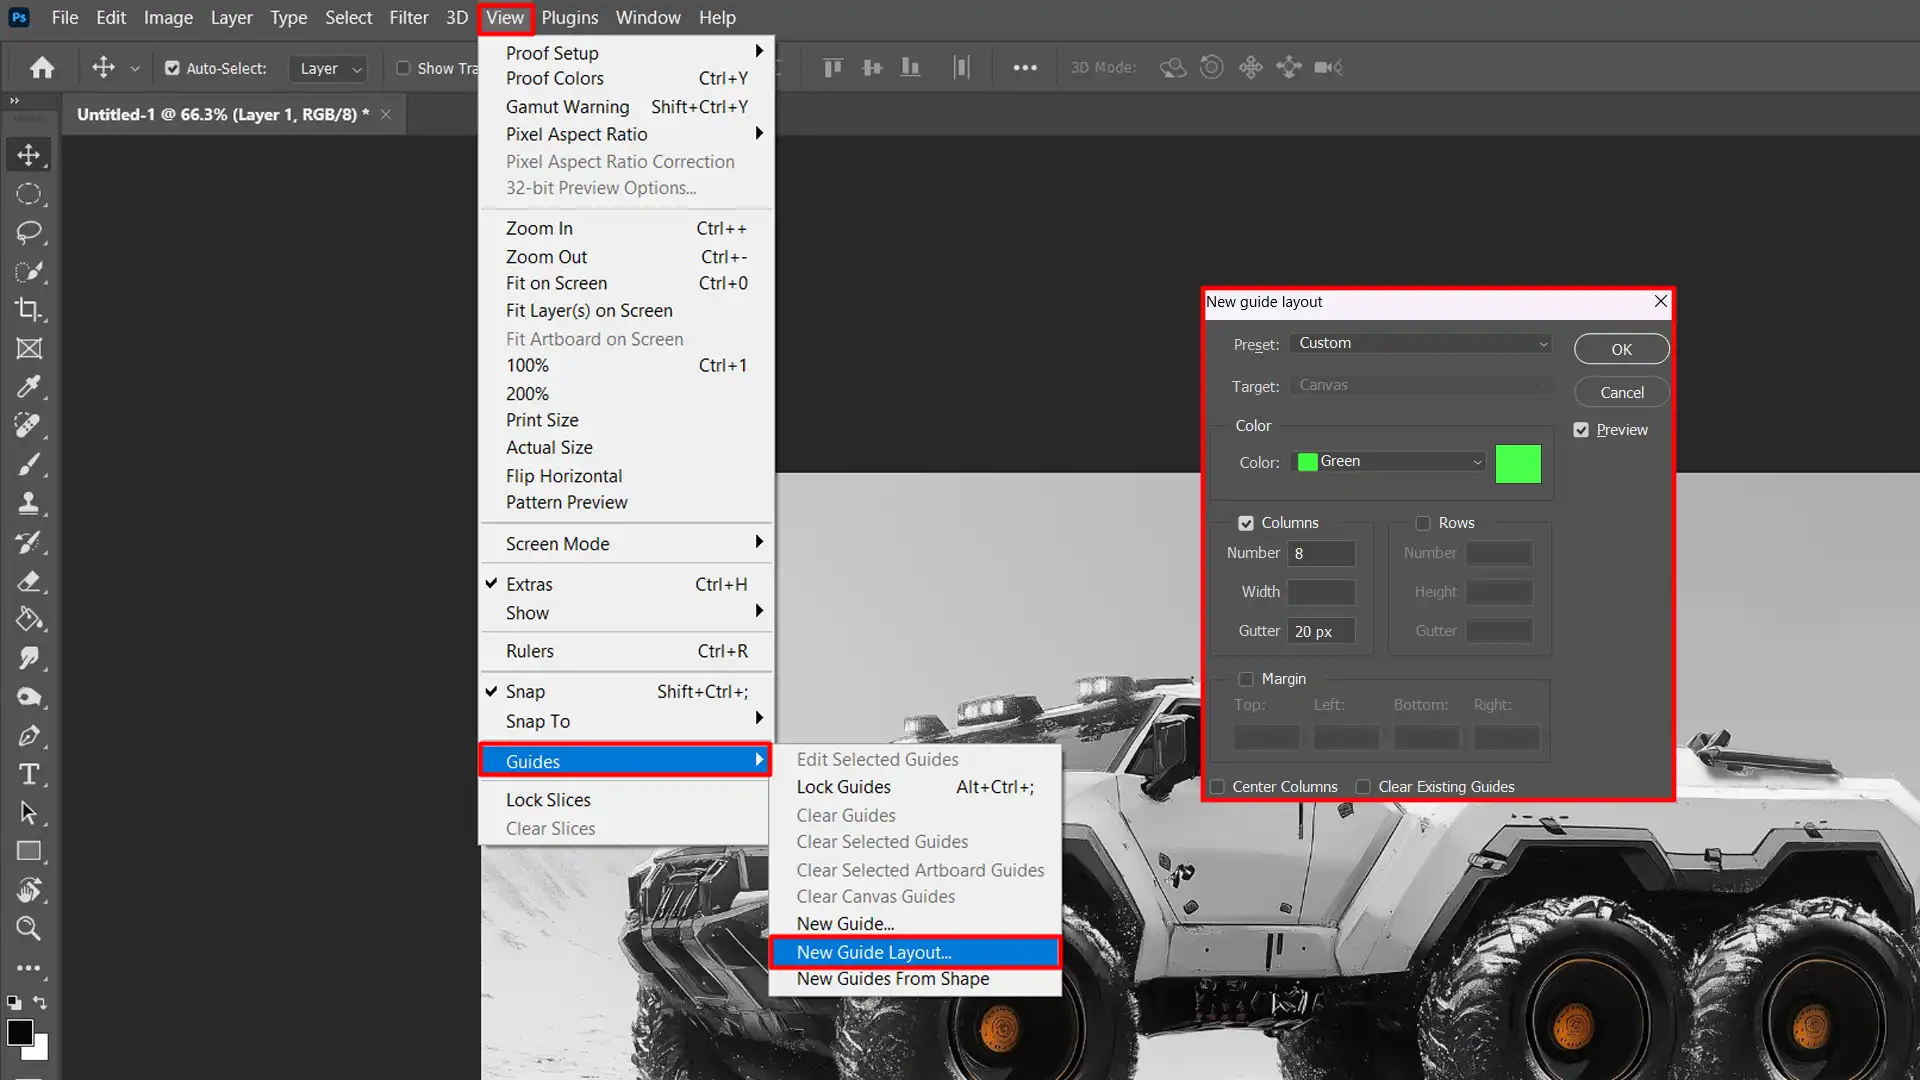
First, open Photoshop and go to the View menu. There, select New Guide Layout…. This option opens a dialog box where you set your guides.
Step 2: Adjust Settings in the Dialog Box
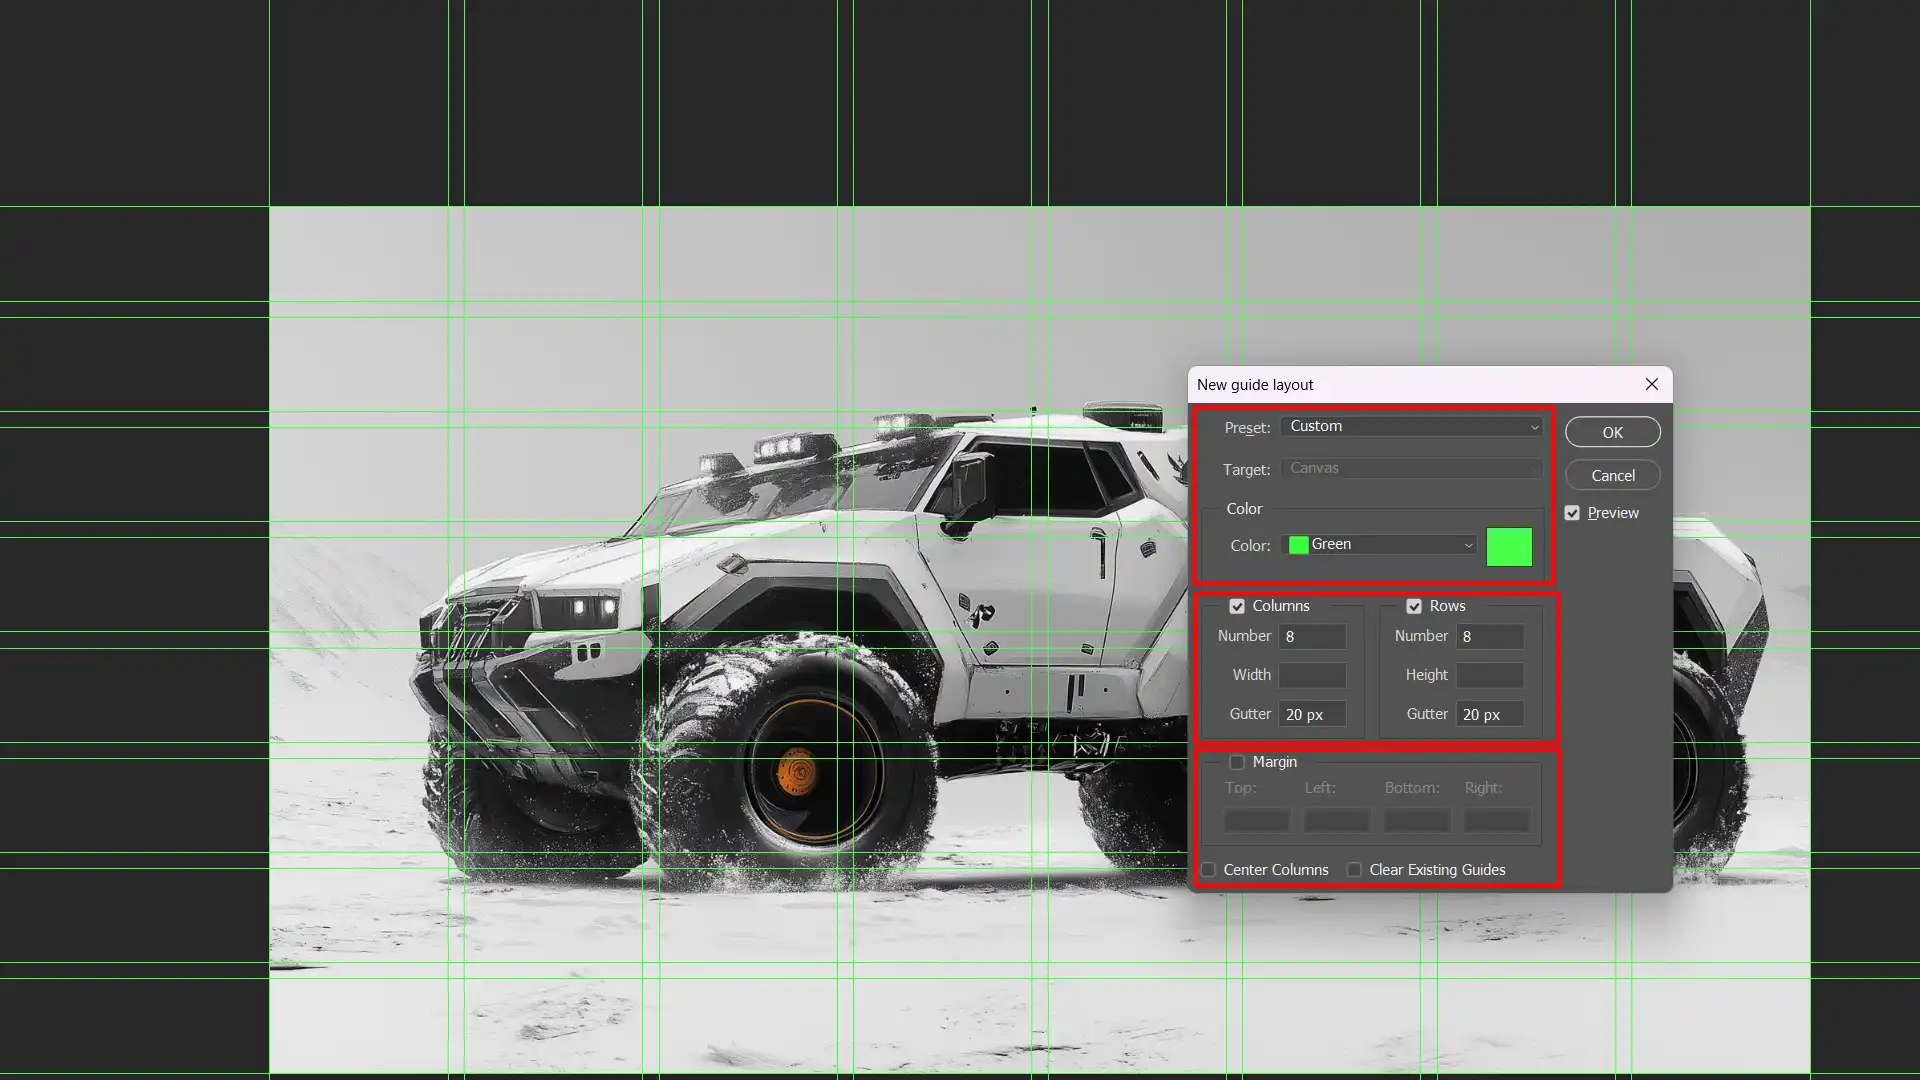
In the dialog box, you will see various options for rows and columns. Adjust these settings as per your needs:
- Enter the number of rows.
- Specify the number of columns.
- Set the column width and exact width in pixels or percentages.
- You can also set gutters (spaces between guides).
Step 3: Apply the Guide Layout
Once you are satisfied, click OK. The guide layout appears on your document, helping you align objects perfectly.
Using the New Guide Photoshop Layout Feature
The new guide layout feature in Photoshop CC is a real gem. It simplifies the process of creating photoshop layouts.
Open the New Guide Layout dialog box if you haven’t already. It allows you to customize how many guides appear and where they are placed.
Customizing Your Guide Layout
To use the guide layout feature, enter the number of guides you need, for example you want eight columns, set their spacing, and adjust their location.
You can set up center columns or focus on a particular design aspect by tweaking rows and columns individually.
Saving Your Guide Setup
This is the best part, you can save your guide setup as a custom preset. This feature is especially useful if you’re working on similar projects and need consistent guidelines.
Simply save your guide configuration by clicking the Save Preset button in the dialog box.
This will allow you to easily save preset configurations for future use.
It’s not just about creating custom layouts, it’s about making your workflow smoother and quicker.
Pro Tip: Use the Guide Photoshop Layout feature to set up a vertical guide and a horizontal guide. This move helps align elements with surgical precision, saving you a ton of time.
For more advanced editing, consider exploring Lightroom shortcuts and Photoshop shortcuts to enhance your efficiency.
Creating a collage and designing a guide layout both require skillful arrangement of elements and layers to ensure a cohesive and visually engaging final result.
Pro Tip: Learn how to make a collage in Lightroom and check out these Lightroom collage techniques as well for an even deeper skillset.
Working with Dialog Boxes
Working with dialog boxes involves interacting with pop-up windows to adjust settings and make precise adjustments and streamlining your workflow in Photoshop.
Introduction to Dialog Boxes
Dialog boxes are the small windows that pop up when you perform certain actions in Photoshop.
They guide you through various options and settings.
Understanding how to use them effectively can speed up your workflow and make editing more precise. We will cover common dialog boxes and customization options.
Common Dialog Boxes in Photoshop
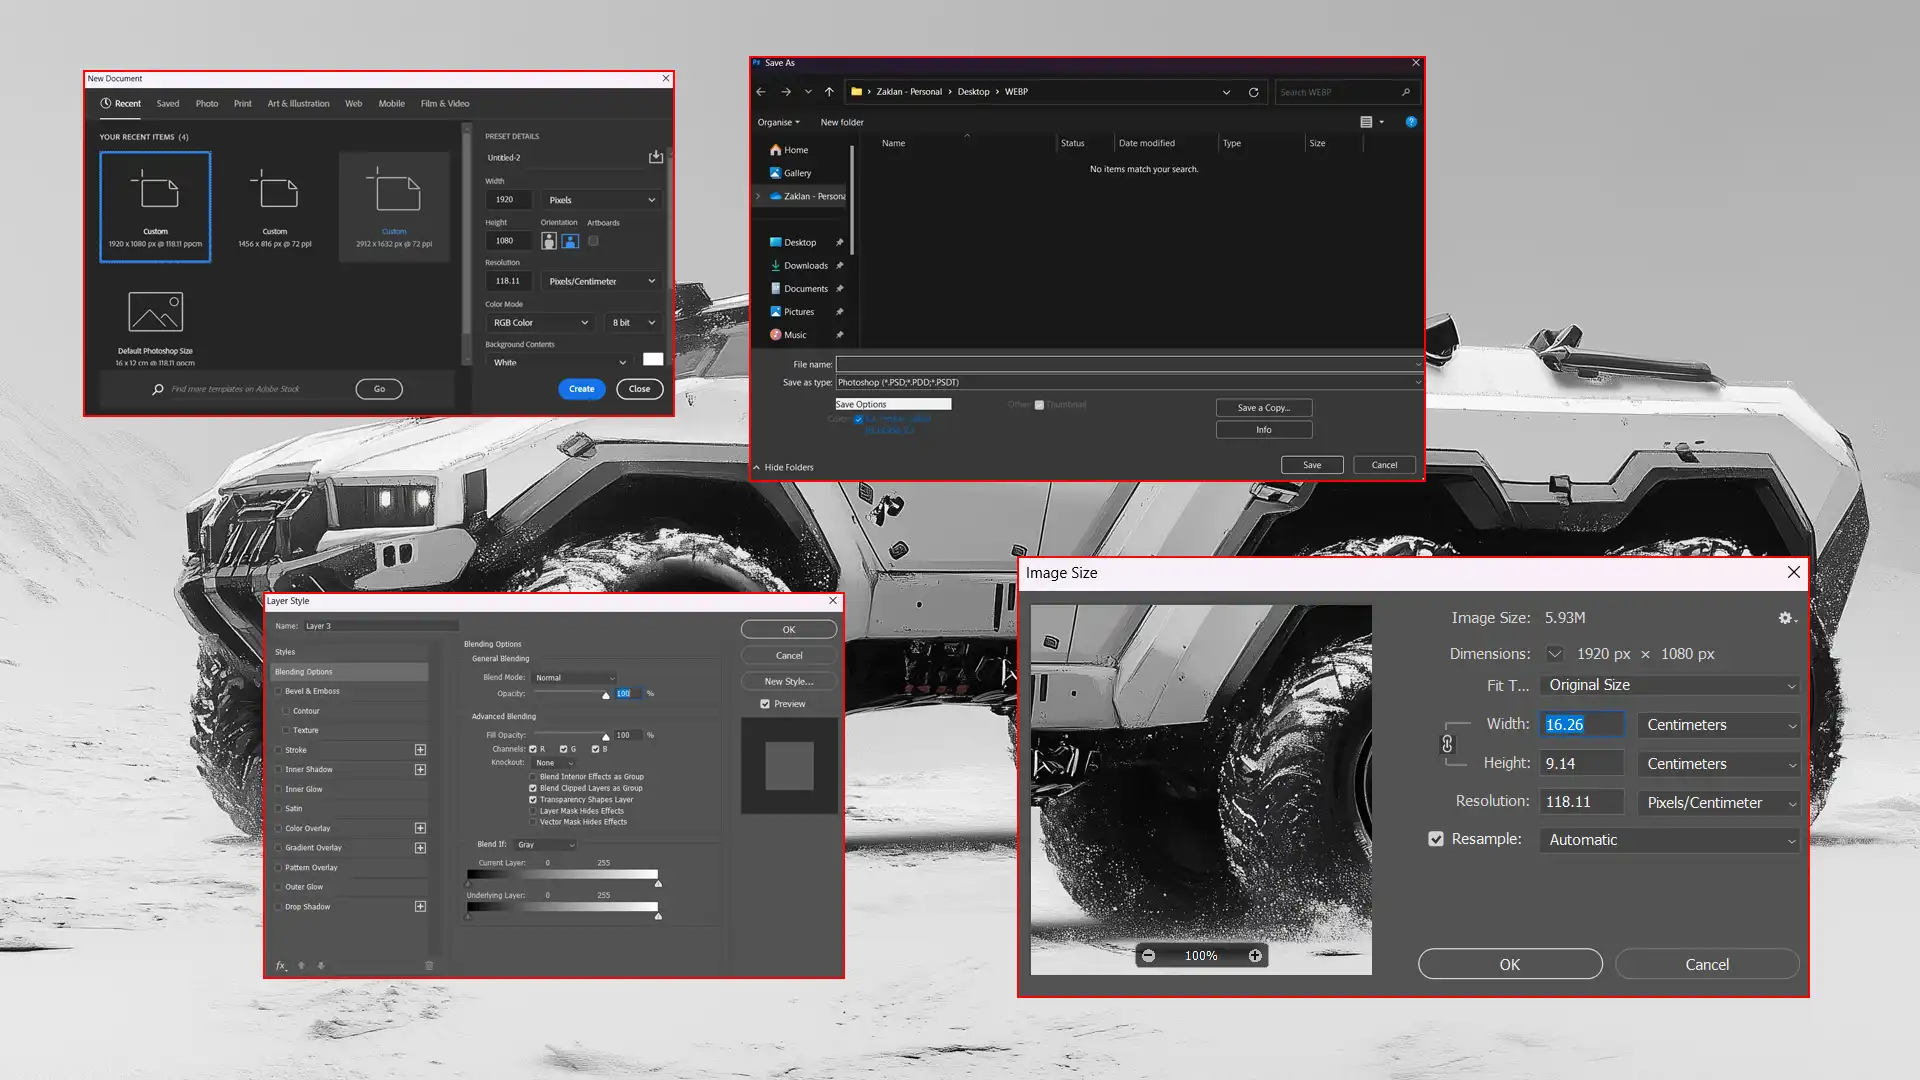
Photoshop CC features several dialog boxes that you will often encounter:
- New Document: This dialog box allows you to create a new file by setting dimensions, resolution, and background content.
- Save As: You can save your work in various formats like JPEG, PNG, or PSD using this dialog box.
- Layer Styles: Here, you can add effects like shadows, glows, and overlays to your layers. This dialog lets you tweak each effect's settings.
- Image Size: When resizing an image, this box appears to let you input new dimensions and resolution settings. For instance, you can change your image's width, height, or resolution.
These dialog boxes often come with default settings, but knowing how to tailor these can enhance your projects.
Customizing Dialog Boxes
Customizing dialog boxes is about making Photoshop work for you.
To illustrate:
- Presets: You can save custom presets to quickly apply common settings. This is handy for repetitive tasks.
- Guide Photoshop Layout Options: When setting up a guide layout, you can define your rows and columns or adjust the gutter space. If you frequently use a specific "custom layout", saving a preset will save you time in future projects. The ability to center columns is particularly helpful when designing symmetrical layouts.
- Font Size Adjustments: Dialog boxes often include options to change the font size within your text layers. This specific adjustment comes in handy for creating standout text elements.
These steps help you make the tool match your needs. If you need precise design elements, like adding custom text from the text box or adding images, utilizing guide layouts effectively makes a difference.
Pro Tip: Double-click the currently selected tool icon to reset its settings quickly. This saves time when switching between tasks.
Creating and Managing Photoshop Documents
Creating a new document in Photoshop shouldn’t feel daunting. Start by opening Photoshop CC and clicking on “File” in the top menu. Select “New” from the dropdown options.
Now, you’re in the New Document dialogue box.
Here, you can set up your document’s dimensions, resolution, and background:
- For print projects: choose a resolution of 300 pixels per inch.
- For web projects: stick to 72 pixels per inch.
This ensures clarity and quality for different mediums. Don’t forget you can save these settings as a custom preset.
Saving and Exporting Documents
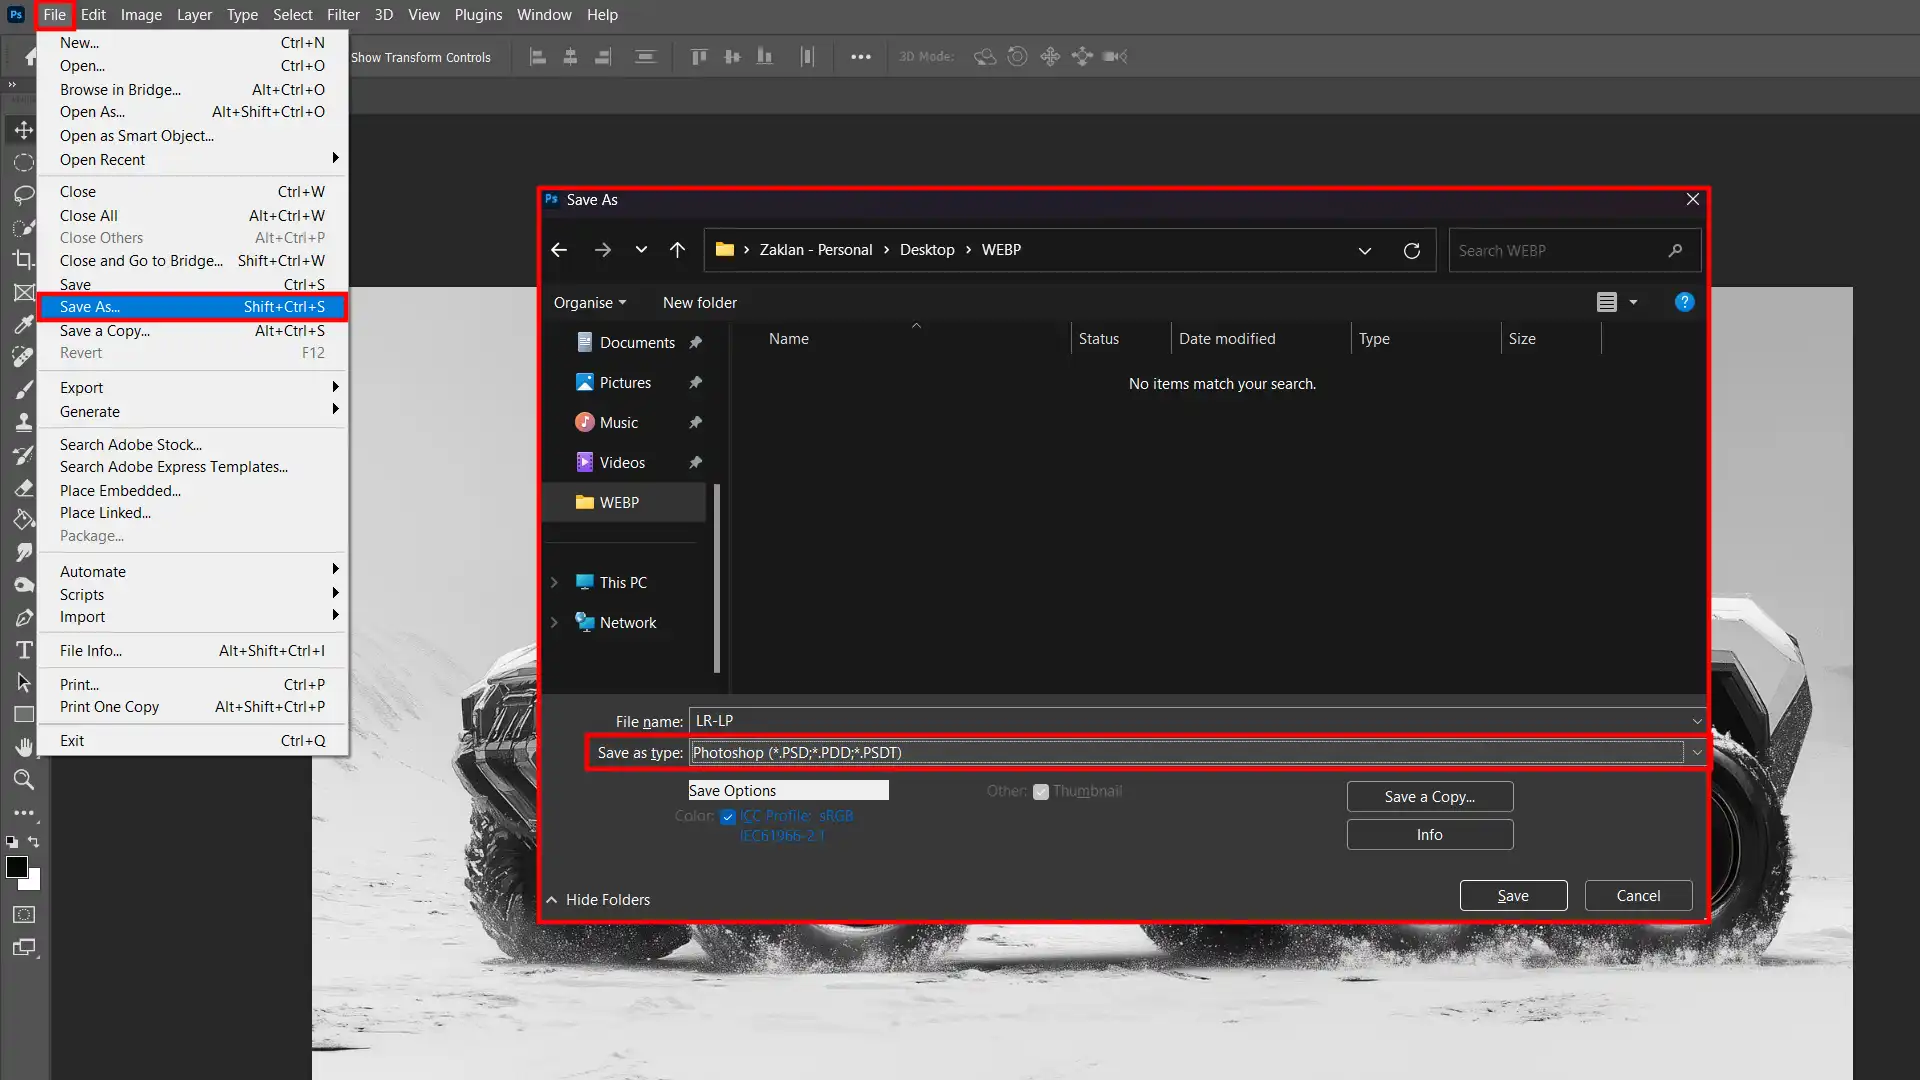
No one wants to lose their hard work. Thus, saving your document is vital. Go to “File” and click “Save As” Choose your desired file format such as PSD, JPEG, or PNG:
- PSD is best if you plan to edit the file later.
- JPEG and PNG are more suitable for final versions.
Adjust the settings based on your needs, and hit “Save”.
Exporting documents allows for various usages. In the top menu, select “File” then “Export” You’ll see options like “Quick Export as PNG” and “Export As”. These are useful for getting your project ready for different platforms and purposes.
Managing Document Settings
You can always refine document settings later. In the top menu, click on “Image” and then “Image Size” or “Canvas Size”.
Here, you can adjust dimensions if your project’s scope changes.
Another area is the “Guide Layout” feature. To access guide layout, go to “View” and select “New Guide Layout”.
This tool helps you create precise layouts with rows, columns, and gutters. Define your parameters accurately for a clear and effective design structure. It can significantly help in maintaining consistency in your project.
Additionally, remember to utilize “Preferences” under the “Edit” tab. You can adjust units, rulers, and existing guides to match your workflow.
Pro Tip: Always name your layers clearly. It makes managing your project much easier down the line.
For more advanced editing, you might want to explore crucial tools in Photoshop like the content-aware fill and the patch tool.
These features can help you remove unwanted elements and seamlessly blend areas, ensuring a polished final product.
Efficient Working With Photoshop Layout Design
Mastering the layout design in Photoshop involves organizing your workspace effectively and using panel arrangement to boost efficiency and streamline your workflow.
| Tip | Description | Benefit |
|---|---|---|
| Organize Panels | Arrange panels for quick access to tools and settings. | Enhances workflow efficiency. |
| Use Custom Workspaces | Save and switch between custom workspace setups. | Tailors the layout to specific tasks. |
| Utilize Shortcuts | Learn keyboard shortcuts for common actions. | Speeds up repetitive tasks. |
| Set Up a Grid | Use the grid tool for precise alignment of elements. | Ensures accurate placement and spacing. |
Keyboard Shortcuts
Master keyboard shortcuts to speed up your work. You will save valuable time with just a few clicks. Press “Ctrl key + N” to easily create a new document, “Ctrl key + S” to save your work, and “Ctrl key + Z” to undo mistakes.
These simple commands make using Photoshop CC feel like second nature.
Additionally, learning the essential tools in Photoshop and the essential tools in Lightroom as well can significantly enhance your workflow efficiency.
Best Practices for Layout Design
Creating effective layouts involves good organization:
- Use layers for every element.
- Name each layer clearly for easy navigation.
- Group related layers into folders. This makes it simple to find what you need.
- Utilize grids and guides for aligning content. Layouts tend to look more professional and appealing with proper alignment.
Common Mistakes to Avoid
Steer clear of cluttered designs. Too much information can overwhelm viewers.
Keep it simple and clean.
Ensure text is readable, avoid using overly fancy fonts or illegible colors.
Pay attention to image quality.
Blurry or pixelated images reduce the overall impact of your layout design.
Familiarize yourself with these common photo editing mistakes to avoid compromising your design’s quality.
Pro Tip: Utilize smart objects in Photoshop CC. Smart objects allow you to make non-destructive edits and maintain your image’s original quality, making your layout adjustments more flexible and efficient.
Frequently Asked Questions

How to Make a Layout in Photoshop?
Making layout in few steps:
- Open Photoshop and select 'File' from the top menu, then choose 'New' to create a new document.
- Set your document size and resolution, then click 'OK'.
- Use the toolbar to add shapes, text, and images to your canvas.
- Arrange your elements by clicking and dragging. Use 'Layer' from the top menu to organize layers.
How Do I Get My Photoshop Layout Back to Normal?
To get your layout back to normal, follow these steps:
- To reset your workspace, go to 'Window' in the top menu.
- Hover over 'Workspace' and select 'Reset Workspace' from the drop-down menu.
- Choose the default workspace option or the one you previously used.
How Do I Customize My Photoshop Layout?
To customize your Photoshop layout, follow these steps:
- Navigate to 'Window' in the top menu and check or uncheck panels you wish to show or hide.
- Drag and drop other panels to rearrange them according to your preference.
- To save your layout, go to 'Workspace', select 'New Workspace', name it, and save.
How Do I Create a Grid Layout in Photoshop?
To create a grid layout in Photoshop, follow these steps:
- Open your document and go to 'View' in the top menu.
- Select 'Show' and then 'Grid' to toggle the grid on.
- To customize the grid, go back to 'View', select 'Grid and Guides' settings under 'Preferences', and adjust as needed.
Conclusion
Creating the perfect Photoshop layout can really change how you work on your projects. From my own experience, adjusting your workspace to fit your needs makes a big difference in productivity.
Whether you’re just starting or looking to refine your skills, taking time to set up your Photoshop layout can help you work more efficiently and comfortably.
I’ve found that personalizing your workspace with the right panels and tools makes it easier to focus on your designs. If you’re looking to dive deeper, check out my Photoshop course and Lightroom course.
These courses offer step-by-step guides that can help you get the most out of Photoshop and Lightroom.
For the latest software, you can visit Adobe Photoshop and Adobe Lightroom.
Happy designing!
Read more about Photoshop:


