Options Bar in Photoshop: Essential Tips and Techniques
Options Bar in Photoshop: Essential Tips and Techniques
Have you ever gotten lost exploring the vast Adobe toolbar options, specifically the options bar in Photoshop?
This area is a treasure chest for photo editing enthusiasts, letting you tailor your workspace to your preferences.
This article will explore how this powerful tool is your secret ally in transforming ordinary images into stunning artwork.
Whether you’re a beginner or looking to polish up your skills, understanding and mastering this part of Photoshop will significantly elevate the quality of your projects.
Let’s unlock all its potential together!
Table of Contents
Step-by-Step Guide to Resizing Images in Photoshop Using the Options Bar
Resizing images in Adobe Photoshop and Lightroom can transform basic visuals into professionally adjusted works that fit perfectly within your project’s requirements.
Achieving this precision involves using the options bar, a powerful tool panel in Photoshop that allows for meticulous adjustments.
Here’s how you do it:
Accessing the Options Bar for Image Resizing
To get started, you need to access the options bar at the top of the Photoshop interface after activating a specific resizing tool. The options bar is not only helpful for resizing but also for other tasks like creating shapes or adjusting other design elements with precision.
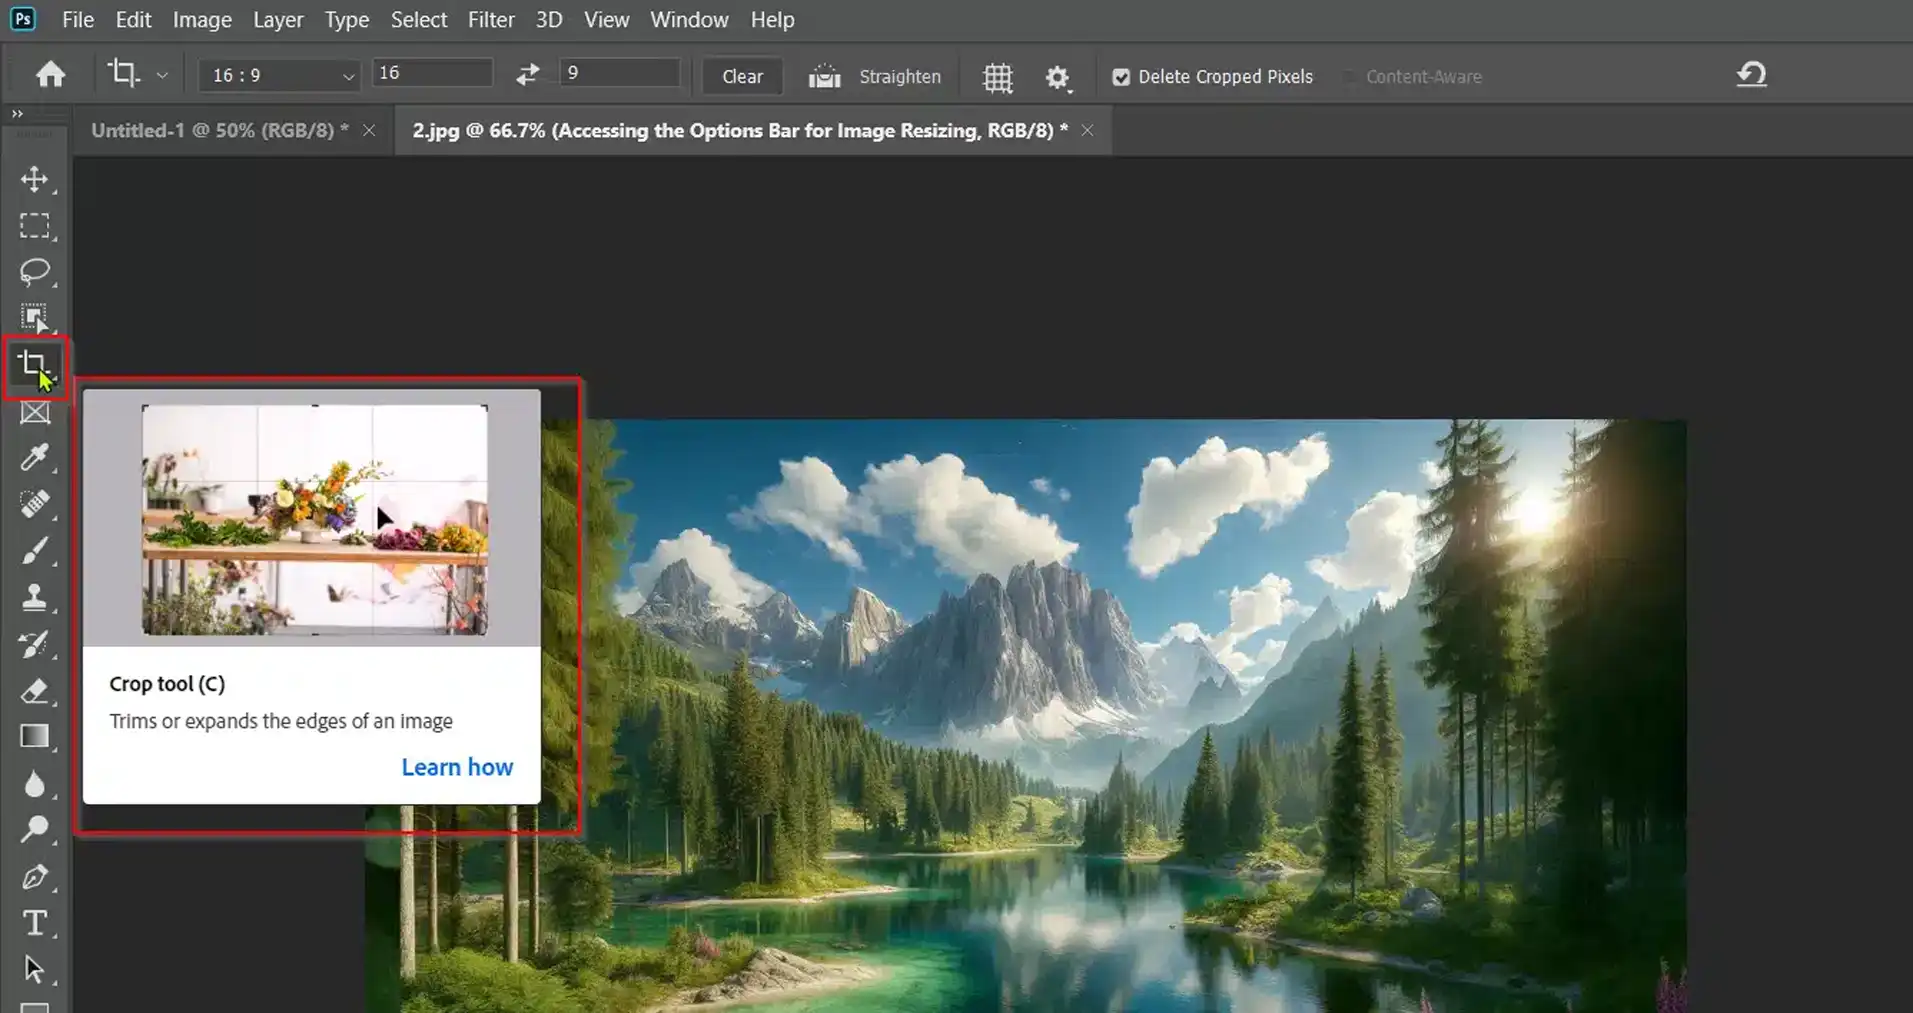
The ‘Crop Tool’ or ‘Rectangular Marquee Tool’ is typically used for image resizing.
Open your image in Photoshop.
Select the 'Crop Tool' from the toolbar or press [C] as a keyboard shortcut.
Once selected, notice how the options bar changes its settings to correspond with your preferred tool, providing different options related to cropping and resizing.
For a clearer view while making these adjustments, consider switching to full screen mode by pressing the [F] key to maximize your workspace, allowing for better control over the details during the resizing process.
Setting Image Dimensions and Resolution
Now that you’ve accessed relevant tools through the options bar adjust important image properties like dimensions and resolution:
In the options bar, locate fields labelled as Width and Height.
Enter your desired dimensions. Entering values here will keep the aspect ratio intact if linked.
For adjusting resolution:
Navigate to ‘Image’ on the menu bar, then select ‘Image Size.'
Insert desired pixel density (pixels per inch) within the Resolution field for precise control over output clarity.
Using these adjusted settings, ensure correct dimension input for tailored results based on the intended use, whether web-based graphics or print-quality photographs!
Applying and Saving Changes
The final steps involve applying changes made via customized settings on your options bar:
Press Enter or click outside cropping border set during previous steps; this applies size adjustments.
To save an altered file:
Go to ‘File’ on the top horizontal menu.
Click ‘Save As’ to ensure the use of a new filename to retain the original image unchanged.
Accurately executing saving operations utilizing file settings altered through respective contextual menus initiated by activity-based within comprehensive Photoshop UI ensures the initial preservation of qualitative aspects envisaged.
Mastering the resize layers function through dynamic operations enhances proficiency and optimizes output among digital editing enthusiasts!
Understanding the Functionalities of the Photoshop Options Bar
The Options Bar in Photoshop is a powerful component that allows you to adjust and fine-tune various tools within the program.
This bar provides quick access to settings specific to the active tool, making it significant for both beginners and advanced users.
Overview of Tools Linked to the Options Bar
When you select a tool from the Toolbox, the Options Bar at the top of Photoshop automatically updates to display settings relevant to that tool, including tools like the Type Tool. This dynamic bar adapts to most tools available in Photoshop, providing a streamlined workflow. The Options Bar includes settings like brush size, opacity, mode, and other tool-specific features.
For instance, selecting the Brush Tool reveals the brush size and hardness controls on this bar, while the Type Tool shows text formatting settings, including options for handling transparent pixels when working with text layers
Commonly used tools linked with this dynamic bar and Lightroom presets include:
Tool
Options Available
Description
Rectangular Marquee Tool
Feathering, Aspect Ratio
Adjust the softness of the edges (feathering) and the selections’ proportions (aspect ratio).
Type Tool
Font Family, Weight, Style, Size, Alignment
Set the typeface, thickness, style, size, and text alignment directly from the options bar.
Customizing the Options Bar Layout
You can customize which options are visible within your Photoshop workspace’s Options Bar for a more personalized workflow.
By right-clicking on a blank part of this bar or navigating through Edit Menu → Toolbar, you can add or remove certain features or commands based on your preferences and project needs.
For example, the Preset manager can help manage brushes, gradients, and patterns, allowing easy access to customized settings.
Adding functions like ‘screen modes’ can be handy in full-screen mode or when comparing before/after versions of edits without distractions.
Here’s how you might personalize your layout:
Add frequently used feature shortcuts.
Arrange secondary options according to workflow priority.
Hide less commonly used features to create a cleaner workspace.
Resetting Preferences in the Options Bar
Suppose you find yourself overwhelmed by changes or prefer Photoshop’s default settings. In that case, there is a quick method to reset preferences related directly to sessions working with various tools via this menu.
To reset all settings back to default, hold down Alt (Windows) / Option (Mac) while launching Photoshop. When you see a prompt to reset preferences pop up, click “Yes” with your mouse button. For targeted resets affecting only current gadget adjustments, found under:
The "Window Menu" tab
Select "Tools."
Opt for 'Restore Defaults'
This process does not change general preferences likefile handling but reverts modifications, such as brush sizes or feather edges, allowing experimentation without permanent changes.
It preserves settings even after reopening applications, maintaining user error margins.
This approach supports informed decision-making and responsible, efficient, and professionalwork, optimizing individual and collective talents to achieve desired outcomes without compromising quality, security, or privacy.
Navigating Through the Options Bar to Enhance Workflow
The Options Bar in Photoshop is a powerhouse for boosting productivity. Located right at the top of your workspace, it changes dynamically as you switch between tools, offering specific settings for each active tool.
Learning to master this bar will speed up your project workflow and enhance your overall editing precision.
Learning to master this bar will speed up your project workflow and enhance your overall editing precision.
For instance, while working with the brush tool, you can temporarily switch to the eyedropper tool by holding the Alt key (Option key on Mac). This allows quick colour sampling, a tip that often appears in tooltips.
Additionally, familiarize yourself with the context-sensitive nature of the Options Bar.
This feature displays options relevant to the currently selected tool, making it easier to adjust settings without exploring other menus.
Learning and using these shortcuts ensures that your hands rarely leave the keyboard, speeding up your workflow dramatically.
Check out our guide on Photoshop shortcuts for detailed techniques and examples of employing these keyboard shortcuts for various tools in Photoshop.
Pro Tip: Mastering the layer shortcut in Photoshop is another important aspect that can save you a lot of time. For instance, pressing Ctrl +J (Cmd + J on Mac) quickly duplicates a layer, allowing you to work on new elements without altering the original.
Adobe provides numerous shortcuts to streamline your workflow; learning these can make a significant difference in both speed and productivity when working on complex projects.
Tool Tips - Specific Options for Improved Functionality
Each tool in Adobe Photoshop comes with a set of unique settings displayed in the Options Bar, allowing for enhanced functionality tailored to specific tasks.
Take selective adjustments when using adjustment layers or creating nuanced edits with tools like the Healing Brush, for example.
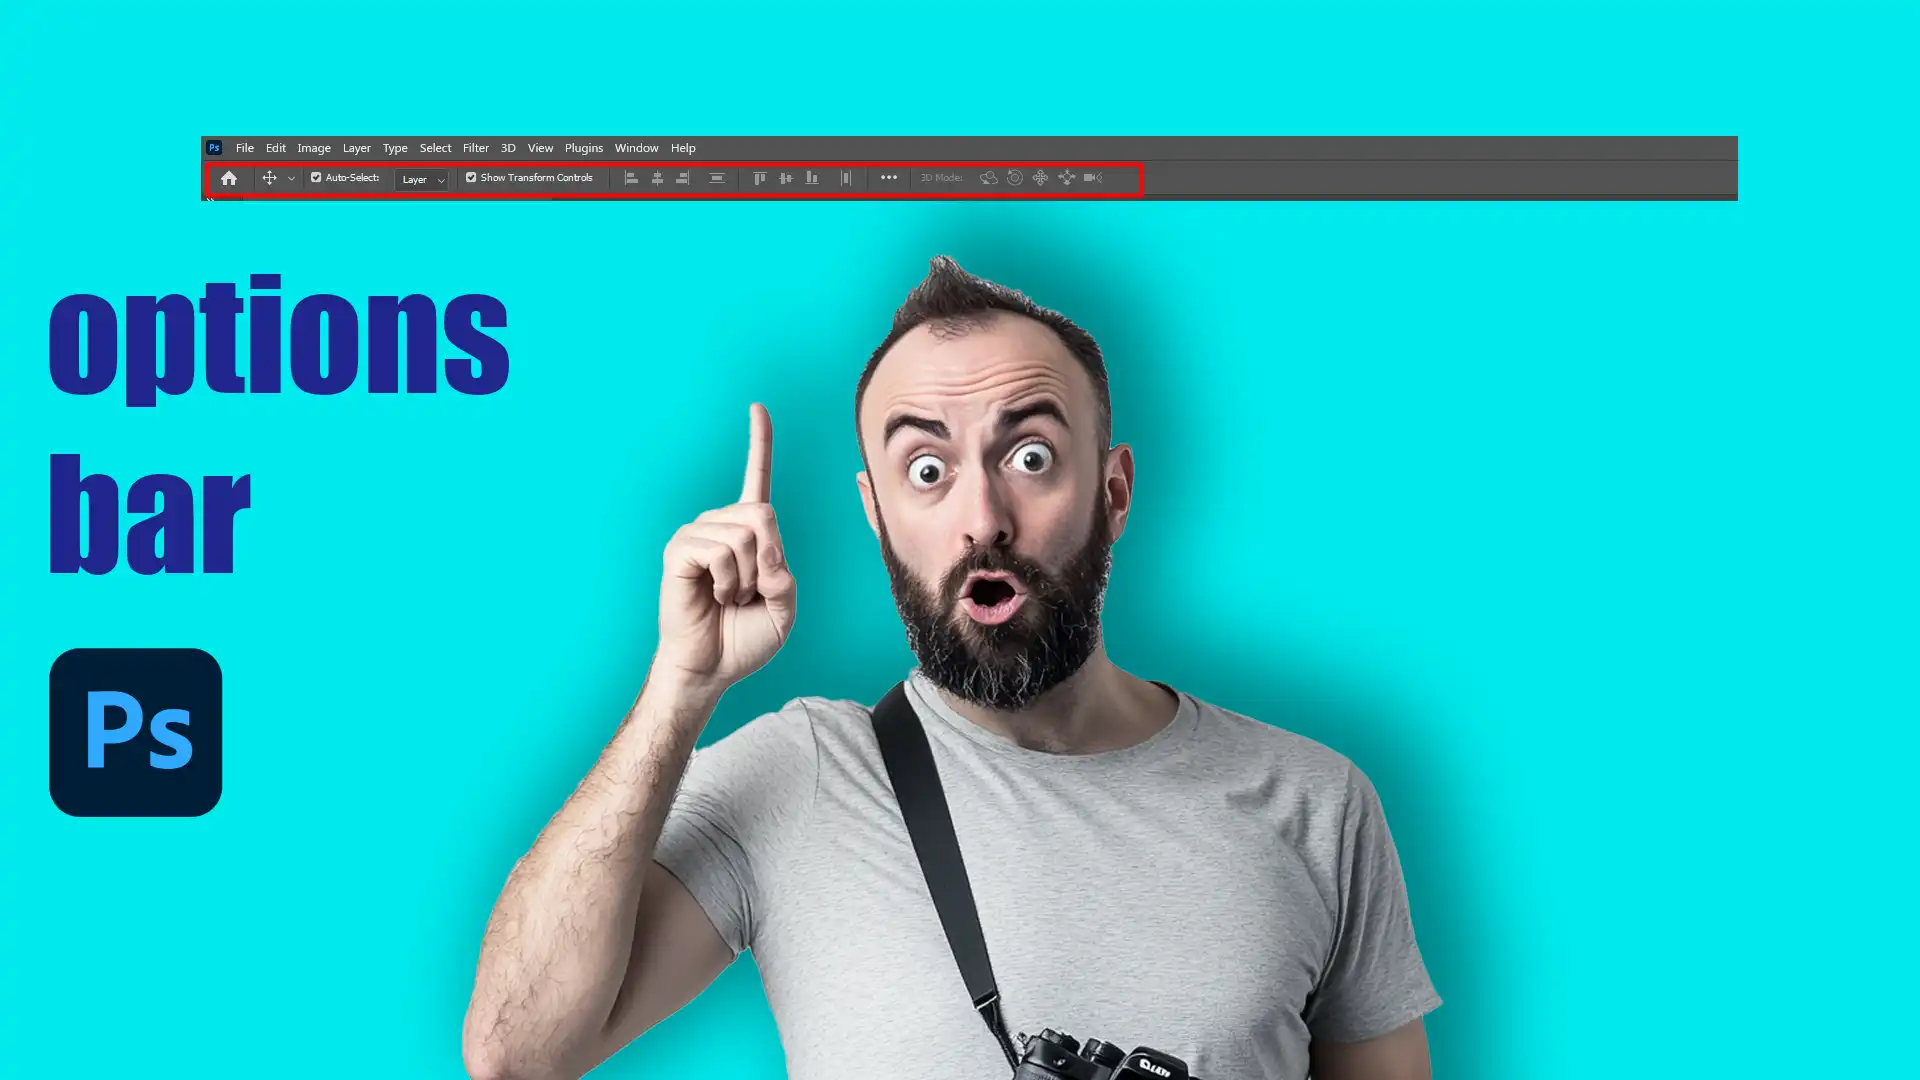
One notable feature within many tool options is “Auto–Select,” which can be enabled via a checkbox.
This function allows users to automatically select layers or groups by simply clicking on them in the canvas, drastically streamlining layer management.
Moreover, understanding how different tools function and interact through their control options helps deepen customization possibilities like:
Modifying brush size dynamically using bracket keys or leveraging pressure sensitivity options available through more advanced input devices such as graphics tablets.
For more information on optimizing individual Photoshop tools and their extensive capabilities via Options Bar adjustments and enhancing artistic workflows, check our dedicated article about essential tools in Photoshop.
Exploring tailored functionalities through wise usage of tool-specific options significantly boosts both creative possibilities and professional output quality while efficiently utilizing resources available right within your workspace’s toolbar area.
Advanced Techniques in Options Bar for Professional Results
The Options Bar in Photoshop plays an important role, especially when pushing the boundaries of professional image editing.
Understanding how to manipulate this tool can significantly enhance your workflow and improve your project outcomes.
Leveraging Layer Styles through the Options Bar
Layer styles are fundamental components that enhance visuals directly from the Options Bar.
To access these styles in Photoshop, you must select a layer and then explore the different styling options bar.
This method allows for rapid adjustments, such as adding drop shadows, bevels, or glows, which are significant for creating image depth and texture.
For example, if you’re working on promotional material and need to make text stand out, leveraging the drop shadow effect from this bar will provide immediate enhancement without complex navigations.
Also, integrating knowledge from other areas, like the Toolbox, or using specific tool icons can further refine your use of layer styles.
In-depth Adjustment of Hidden Tools Settings
Adjusting individual tool settings via the Options Bar also allows for precise control over each element in your artwork.
Each tool has context-sensitive options that appear as soon as it is selected; this adaptive feature is commonly known as the “context-sensitive options bar.”
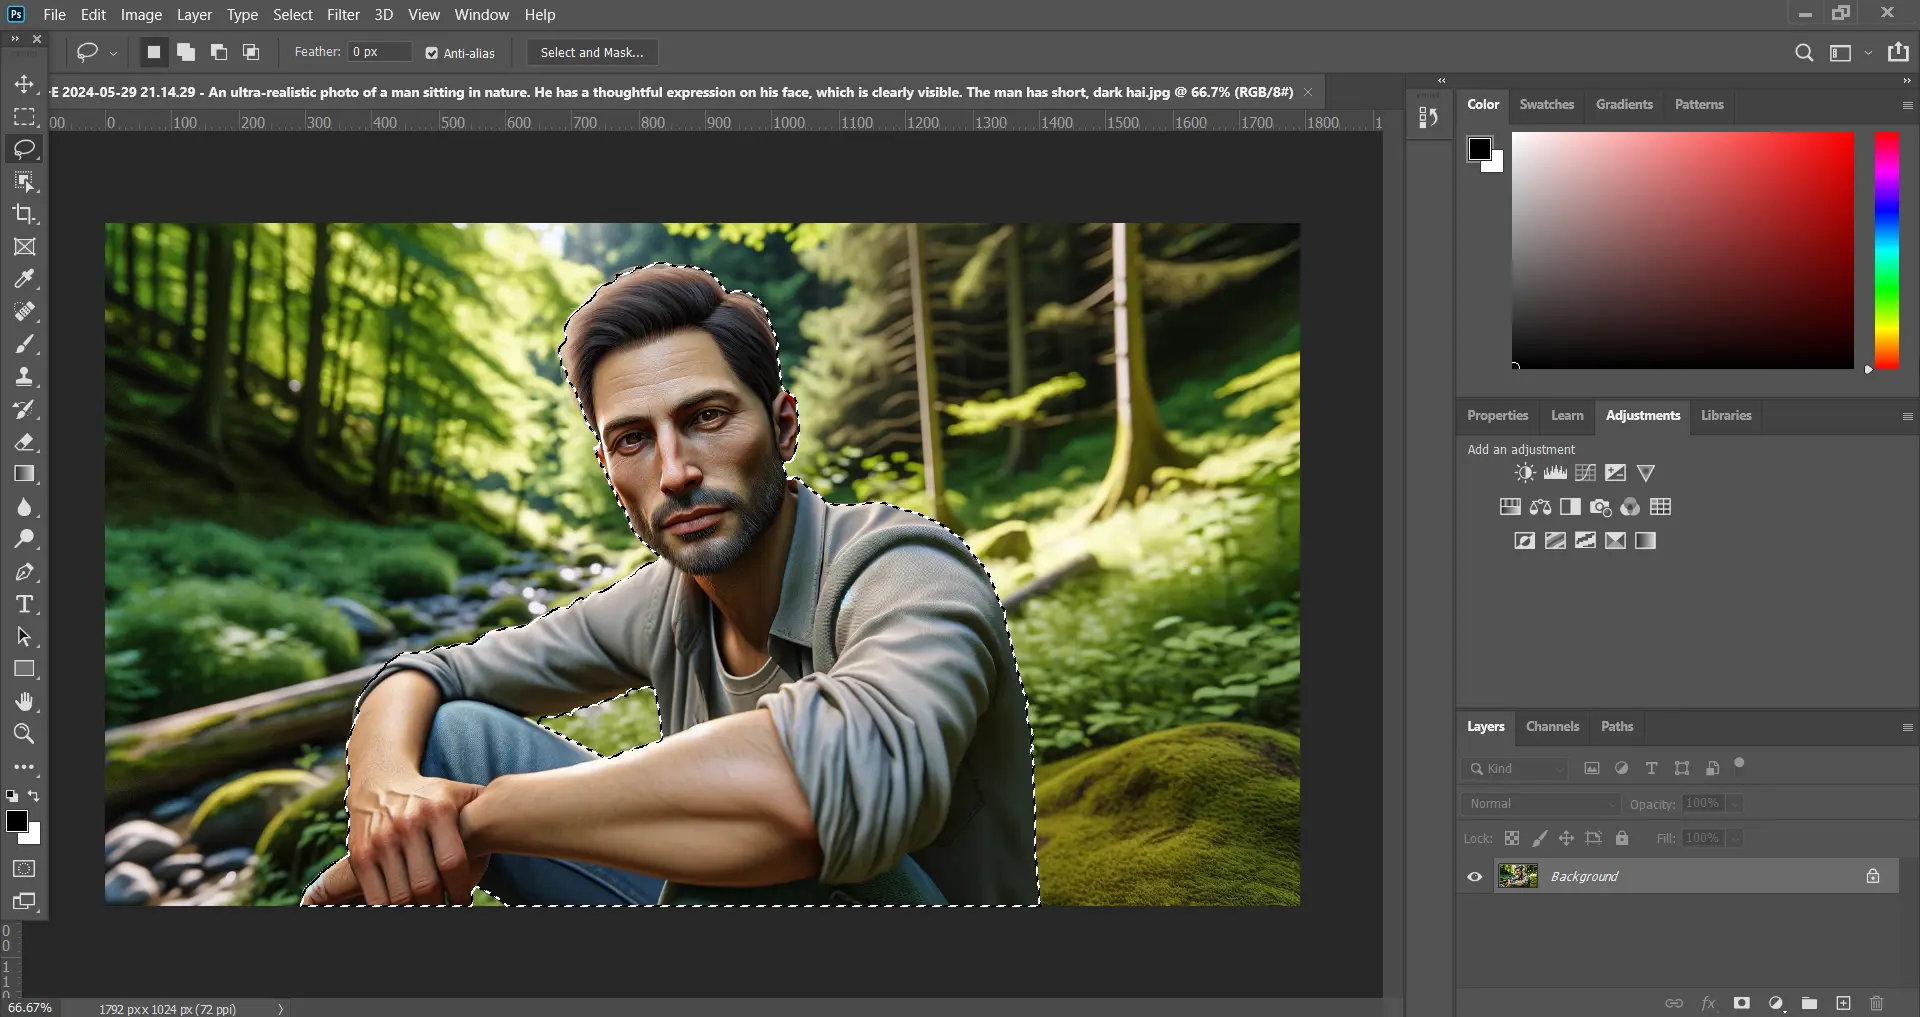
Take the example of selecting the Elliptical Marquee Tool.
The options bar immediately becomes available with choices like ‘Feather,’ ‘Anti–alias,’ or ‘Aspect Ratio.’
Here, you can create perfect selection tools and adjust attributes that make them blend seamlessly with the rest of your design.
Moreover, advanced users can utilize keyboard shortcuts accessible through this bar to toggle between settings rapidly, a technique that saves time during intensive editing sessions.
You forge paths toward more professional and polished final products by mastering these elements within Photoshop’s framework and repeatedly engaging with various tools through their dedicated options.
Troubleshooting Common Issues in Photoshop’s Options Bar
The Options Bar in Photoshop is important for streamlining your workflow. It offers quick access to tool options tailored to the active tool.
However, it’s common to encounter issues such as tool inactivity or altered settingsthat can disrupt your creative process.
Resolving Tool Inactivity and Glitches
Often, tools within the Options Bar become inactive or behave unexpectedly due to simple oversights or minor glitches.
Here are some steps and tips on how to address these efficiently:
Check Layer Compatibility: Ensure the layer you're working on supports the operation of the current tool. Some tools do not work with specific layers, such as adjustment or locked layers.
Reset Tool Settings: Click on the tool icon while holding the Alt key (Option key on Mac), then reset the tool to its default settings. Sometimes, issues arise when hidden tools are accidentally activated or their settings are altered.
Tool Tip Check: Hover over different tool icons with your mouse; sometimes, a quick tooltip reminder provides valuable hints that may solve your issue. The tool tip can also help you discover hidden tools and understand their functionality better.
Restart Photoshop: If all else fails, close and reopen Photoshop. Some glitches can only be resolved with a fresh start.
By incorporating these strategies into your troubleshooting routine, you can effectively manage most issues related to inactive or glitching tools in the Options Bar.
If you want to start using these sophisticated tools immediately, you can acquire your own copy of Photoshop or Lightroom today.
Recovery Tips for Misplaced or Altered Settings
Accidentally altering settings or misplacing toolbar elements, like lens flare, can slow down your projects significantly.
Here’s how you can restore your workspace swiftly:
Use Keyboard Shortcuts: Learn and utilize keyboard shortcuts regularly. For instance, pressing "F" cycles through various full-screen modes and pressing the Shift key with other shortcuts can quickly help regain a familiar work presentation without navigating through menus.
Reconfigure Workspace: Go to the Window menu bar and select 'Workspace' > 'Reset Workspace' to revert to default settings, including resetting misplaced elements in the options bar.
Edit Menu Utilization: Dive into the Edit menu for preferences related specifically to interface tweaks and performance enhancements, which could indirectly recover other altered settings by systematizing general performance.
Implementing these techniques will help maintain a practical tool layout and ensure a smooth workflow in your design process within Adobe Photoshop.
Frequently Asked Questions
Where is the Options Bar in Photoshop?
The Options Bar in Adobe Photoshop is located at the top of the screen, directly beneath the menu bar. This bar dynamically changes to display options related to the active tool.
How do I reopen the option bar in Photoshop?
To reopen the Options Bar in Photoshop, go to the Window tab menu bar and select Options. This action ensures the Options Bar is visible again and seamlessly integrates into your workspace.
How to Get the Top Menu Bar Back in Photoshop?
If your Photoshop toolbar vanishes while you’re working, you can restore it through the Window menu.
Scroll to the bottom of the Window menu and select the” Tools” option. A checkmark should appear next to Tools, and your Photoshop toolbar will reappear.
How do I add a menu bar in Photoshop?
1. Open Photoshop: Launch Adobe Photoshop.
2. Access Menu Customization: Go to Edit > Menus.
3. Customize Menus:
Use the checkboxes to show or hide menu items.
Click on the colour box next to a menu item to assign a colour.
Use the Application Menus tab for the main menu bar and the Panel Menus tab for panel-specific menus.
4. Open Photoshop: Launch Adobe Photoshop.
Click the Keyboard Shortcuts button in the Menus dialog box to assign or modify shortcuts.
5. Save Customizations: Click OK to apply changes. Save your settings by clicking the Save button.
6. Restore Defaults: Click Restore Defaults to revert to the original menu settings.
Exploring and mastering the Options Bar in Photoshop has significantly enhanced my editing capabilities, making my projects more professional and polished.
The Options Bar has become indispensable in my creative workflow. Whether I’m adjusting image dimensions, fine-tuning tool settings, or troubleshooting common issues, it provides me with the precision and control I need to achieve the best results.
For those looking to deepen their understanding and expand their skills, consider enrolling in our comprehensive Photoshop course.
Our Lightroom course offers detailed instructions and expert tips for enhancing your photo editing workflow with additional software.
Embrace the full potential of your creative tools by joining our courses today. Let’s unlock new possibilities together and bring your artistic visions to life!
If this article has helped you, then Like and Share it with your friends
$2,061.00Original price was: $2,061.00.$1,061.00Current price is: $1,061.00. 27582
Download Your Free Guide Now!
Discover the secrets of photography with our printable guide! Master essential techniques like aperture, shutter speed, and ISO to create stunning images. Get your free printable PDF now and start turning your snapshots into masterpieces!