
Working with multiple images in Photoshop can be a game-changer for your creative projects.
Imagine being able to blend, layer, and manipulate several photos to design a stunning masterpiece.
Whether you’re a photographer looking to touch up a series of shots or a graphic designer combining elements from different pictures, mastering this skill opens up a world of possibilities.
In this article, I’ll walk you through essential techniques and tips to effectively manage and edit multiple images in Photoshop, ensuring your workflow is both efficient and enjoyable.
Ready to elevate your editing game?
Table of Contents
Introduction to Multiple Images in Photoshop
Using multiple images in Photoshop allows us to develop captivating designs. Combining various images provides versatility and creativity in our work.
Why Use Multiple Images in Photoshop
Using them lets us achieve outcomes that one image alone cannot deliver. We blend different scenes, objects, and effects seamlessly together.
For instance, using the content-aware fill in Photoshop can help in seamlessly integrating different elements.
Creating Cohesive Stories
Are you working on a complex project? You can put photos together to produce a cohesive story.
This makes the design process dynamic and limitless.
Tools like the patch tool in Photoshop are invaluable for ensuring smooth transitions between photos.
Benefits of Combining Images
- Diverse Elements: We take parts from various photos to form a single unified design.
- Enhanced Creativity: Combining pictures opens up new paths for imagination and visual storytelling.
- Time-Saving: It saves hours as you no longer need to recreate elements. Instead, pick from other photos.
- Improved Quality: Adding elements from quality image documents enhances the overall visual output.
Understanding how to merge multiple photos in Photoshop transforms our approach to digital creativity. With each combined element, we enrich our design.
Pro Tip: Always keep your layers organized. It reduces mistakes and speeds up the editing process.
How to Open Multiple Images in Photoshop
Start with Photoshop open on your screen.
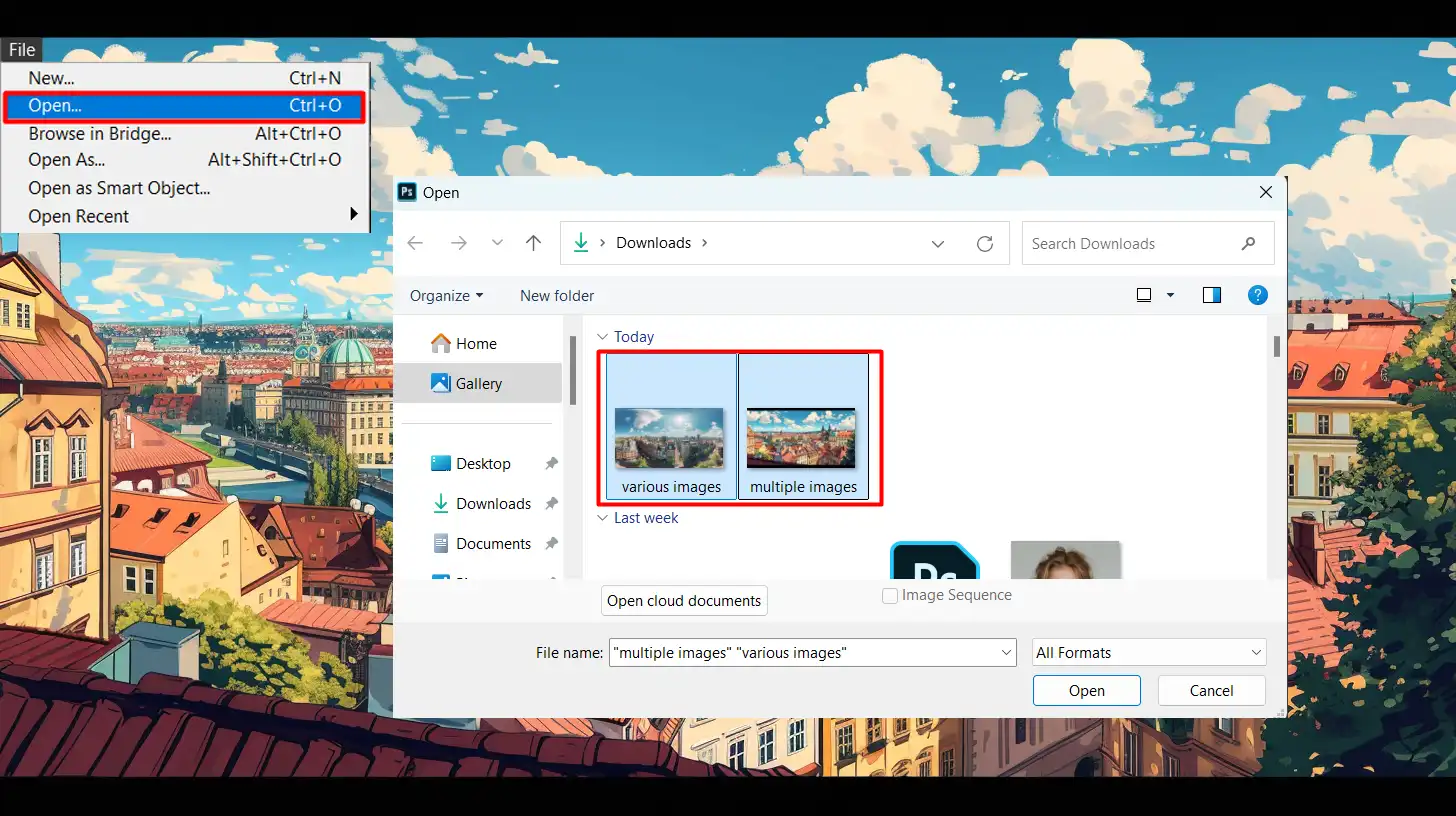
- Navigate to the File menu. Click "File" and select "Open". A dialog box appears.
- Hold down the Ctrl key (Cmd on Mac) and click each image file you want. After selecting, click "Open".
- Photoshop will open each image in its own tab. You can switch between them by clicking on the tabs at the top.
If you want all images in one document, use the “Load Files into Stack” feature:
- Go to File > Scripts > Load Files into Stack.
- Select your files in the upcoming window and click "OK".
All chosen images will open as layers in a single Photoshop document.
Common Issues and Solutions
- Sometimes, the app might not display pictures correctly. Ensure that your Photoshop is updated to its latest version.
- Documents not opening might mean they are unsupported types. Stick with JPG or PNG formats to avoid this.
- A frequent mistake is opening an image as a background layer by default. This can limit editing capabilities. To solve this: Double-click the layer, then hit OK, converting it into a regular one.
- To rearrange layers, simply drag them up or down in the layers panel. Adjusting their order can help with visibility and organization.
- If your images come out resized incorrectly, make sure to check the image size settings while opening them. Set the proper parameters in the "Image Size" dialog box.
- If dealing with numerous pictures, keeping layers organized using groups saves time for future edits.
Pro Tip: Use layer masks to hide portions of one image, letting another appear beneath. Masks allow non-destructive editing, crucial for experimentation.
Combining More Than One Image
To achieve a seamless blend, align the images carefully by placing them along a central line. Release any clipping masks or guides you may have used, and generally ensure that each image is in the center to maintain a cohesive look.
Techniques for Combining Photos
Combining multiple photos can enhance your creative projects.
I will walk you through two popular techniques: using layers and using layer masks.
Both methods rely on stacking photos into one document.
Implementing Layers
Using layers is straightforward:
- Open each image.
- Copy and paste them into a single document.
- You'll see all pasted pictures as separate layers in the layers panel, making it easy to organize and edit each image individually.
Using Layer Masks
A more advanced technique involves layer masks:
- Masks allow you to hide parts of an image without deleting them.
- This non-destructive method makes it easier to make modifications later on.
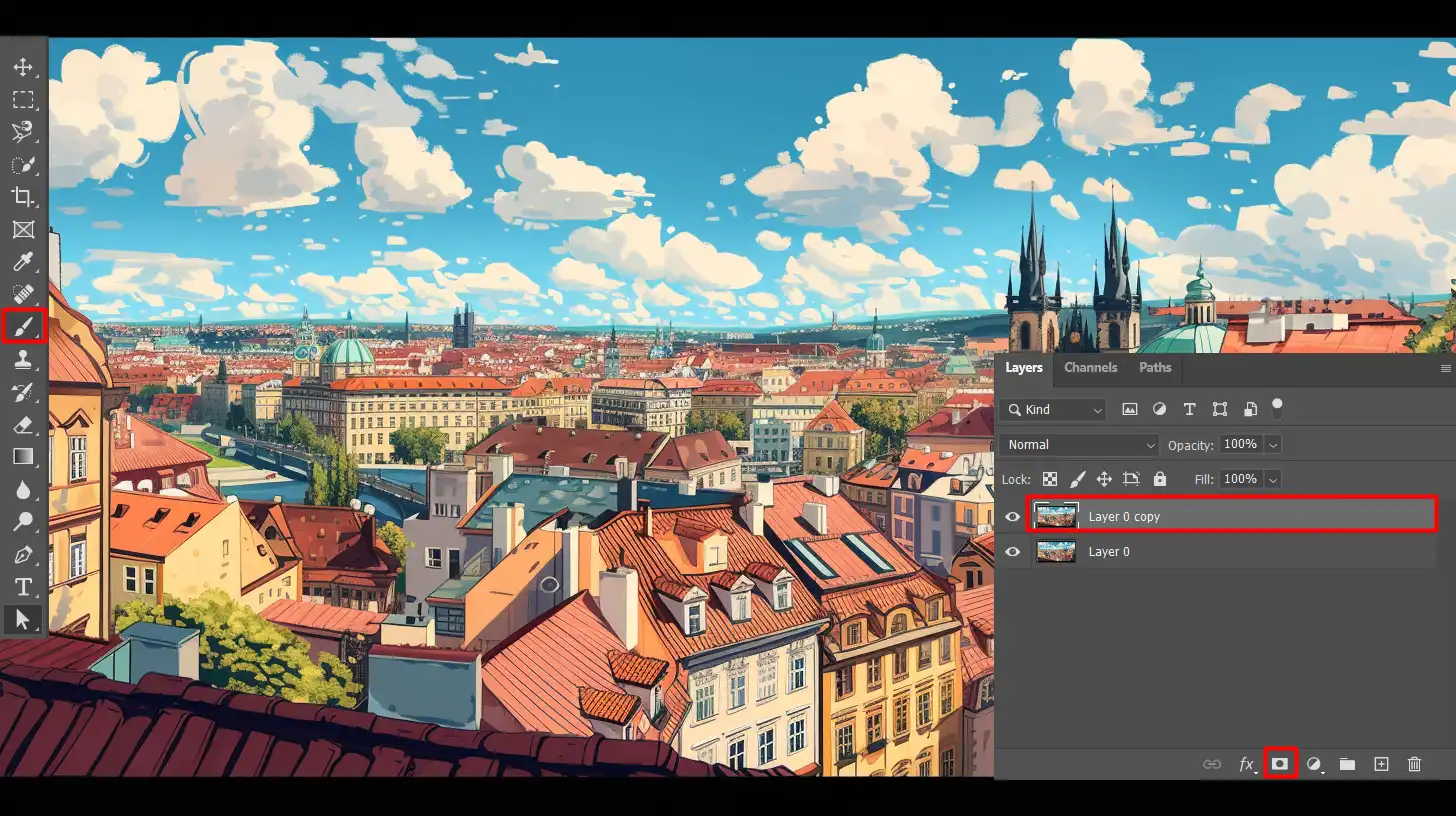
- For example, use the brush tool to adjust which parts of the image are visible.
Utilizing Layers to Merge Other Images
Layers let you stack images on top of each other:
- Start by opening your images in Photoshop.
- Select an image, copy it (Ctrl+C), then open your target document and paste it (Ctrl+V).
- To move a layer, click on it in the layers panel, then drag it to the desired position with your mouse. Ensure that your mouse is over the layer’s thumbnail to reposition it accurately within the workspace.
- You can modify layers by selecting the move tool and dragging the corners while holding Shift to keep the aspect ratio intact.
Blending Images
If you need to blend images seamlessly, use layer masks:
- Apply a mask to a layer by clicking the Add Layer Mask icon in the Layers panel.
- Use a black brush to hide parts of the image and a white brush to reveal them again.
Pro Tip: Use Layer Groups to keep layers organized. To form a group, select multiple layers, right-click, and choose ‘Group from Layers’.
Editing and Enhancing Multiple Images
Editing multiple photos can be a daunting task, but with the right tools and techniques, it becomes manageable.
We’ll break down the core elements of both basic and advanced editing methods.
This way, you can enhance your images efficiently and effectively.
Basic Editing Tools
The journey begins with mastering the basics. These tools are the bread and butter of image editing, and knowing how to use them is crucial:
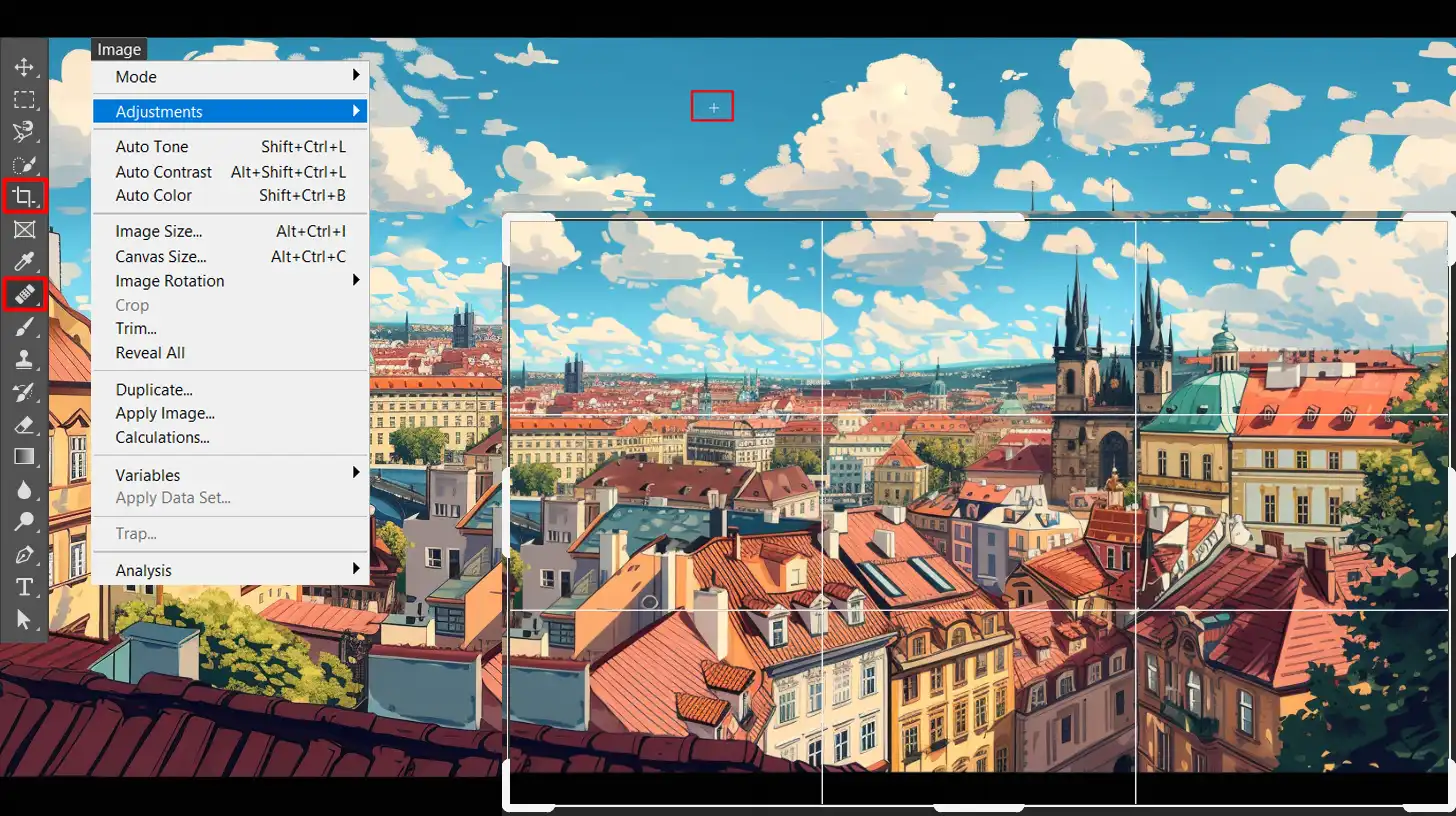
- Crop Tool: This tool allows you to trim unwanted areas from your image. Simply select it, drag the edges, and hit 'Enter'. By default, the tool will maintain the original aspect ratio unless you hold down the Shift key while you drag, allowing you to adjust the trim area precisely on the page.
- Adjustments: You can modify brightness, contrast, and color balance. These adjustments help pictures pop. Navigate to 'Image' > 'Adjustments' on the menu.
- Healing Brush: Erase blemishes by sampling nearby pixels. Click and drag over the imperfection.
- Save Your Work: Always save your file in an editable format like PSD before making final edits.
Advanced Editing Techniques
Once you’ve got the basics down, it’s time to move into advanced territory.
These techniques allow for creative freedom and precision:
- Layers: Use multiple layers to manipulate different parts of your image separately. This technique keeps your main image intact while you experiment.
- Layer Masks: Camouflage and reveal parts of image without deleting them. Add a mask, then use the Brush Tool to paint over areas you want to adjust.
- Blending Modes: These settings change how layers interact with each other. Try different modes like 'Multiply' or 'Screen' to see various effects.
- Smart Objects: Convert layers into smart objects to preserve quality when resizing. Right-click the layer, select 'Convert to Smart Object'.
- Adjustment Layers: Apply non-destructive edits. Go to 'Layer' > 'New Adjustment Layer', choose your adjustment, and it will affect all layers below.
- Layer Styles: Add effects such as shadows, glows, and strokes. Double-click the layer to open Layer Style options.
Pro Tip: Use keyboard shortcuts to speed up your workflow. For example, pressing ‘Ctrl + J’ duplicates your current layer.
Additionally, familiarize yourself with essential tools in Photoshop and Lightroom shortcuts to streamline your editing process.
When editing and enhancing several pictures, using a text box in Photoshop can add context and clarity.
Easily integrate text into your projects to provide important details.
Saving and Exporting Your Work
Writing about save and export image options in Photoshop and Lightroom sometimes seems mundane. Yet, trust me, mastering these options can save hours of work.
Saving and exporting properly will also ensure your documents look perfect across different mediums.
Best Practices for Saving Documents
When we finish editing an image, saving the work efficiently matters.
Here are some key points to consider:
- Always save your working file in an editable format like PSD. This lets you return anytime to make modifications without starting over.
- Before making substantial edits, save a version of the document with a unique name. For instance, use labels like “v1” or “final” to keep track.
- Create backups to avoid losing your hard-earned work due to computer errors.
- Avoid relying on Photoshop’s default settings alone. Tweak them according to your workflow needs.
- Understand that different projects may need different adjustments.
- Use auto-save to ensure you don’t lose progress. Checking “Enable Auto Save” under auto-save preferences verifies Photoshop saves your work at regular intervals.
Exporting Images for Different Uses
When it’s time to share your masterpiece, exporting optimally ensures your image shines across various platforms:
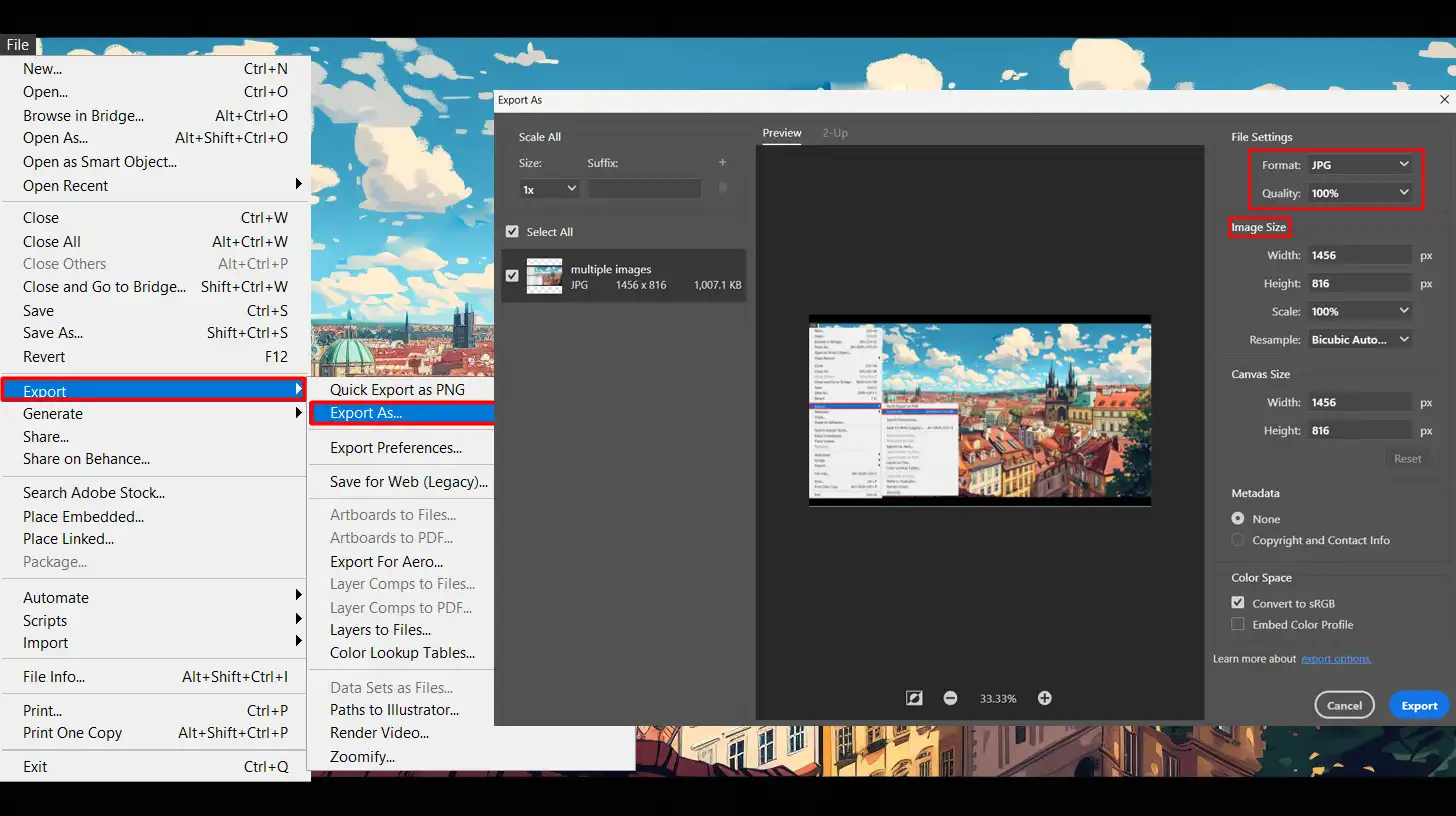
- If you plan to post to social media, export image in JPEG format with high quality settings. This strikes a balance between file size and image quality.
- For print, choose formats like TIFF or PSD to maintain top-tier image clarity.
- Use "Export As" function to customize your export settings. Adjust image size, resolution, and even file format according to where you'll use the picture. This allows you to control every aspect of how your image appears when viewed by others.
- Optimize your pictures before web uploads, this keeps page load times quick and ensures users see your work without delay.
- Crop and resize images as needed but avoid resizing more than once, if possible. Resizing repeatedly can degrade your image quality.
- Utilizing “Save for Web” option under “Export” offers an optimized setting for web-based images. This results in lighter, faster loading images on websites.
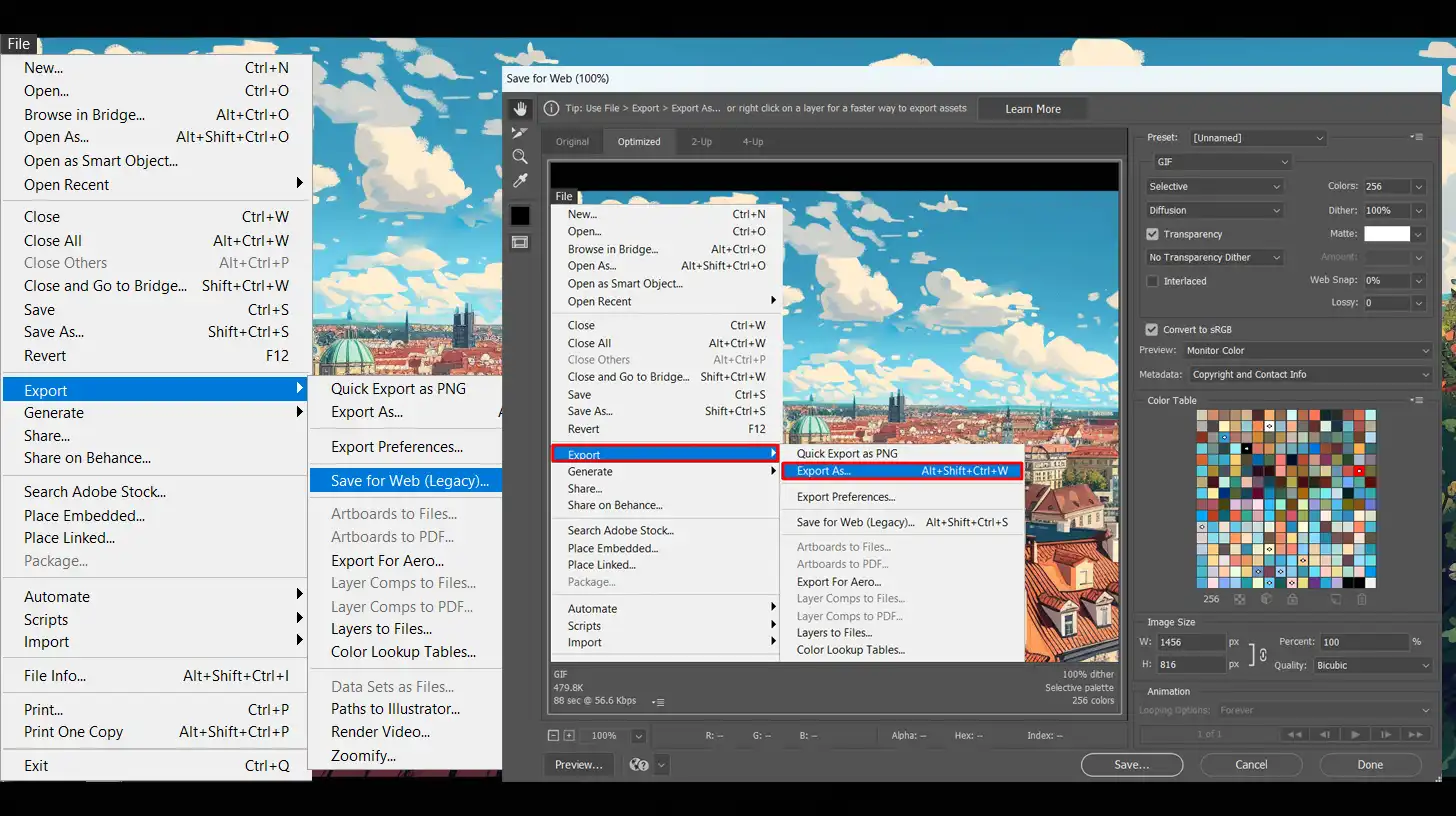
Pro Tip: When exporting for different uses, utilize presets to save time. Consistent and effective naming conventions make locating your documents easier.
Tips and Tricks for Working with Multiple Images
To streamline your workflow, build a clear figure of each image’s layout, use lines or guides to maintain alignment, delete any redundant layers, and log your adjustments.
Be sure to note any changes in your editing process to ensure consistency across all pictures.
| Feature | Layer Masks | Merge Layers | Smart Objects | Batch Processing | Keyboard Shortcuts |
|---|---|---|---|---|---|
| Description | Adjust individual parts of an image without affecting the whole | Combine multiple layers into one to reduce document size | Convert layers for non-destructive editing | Apply edits to multiple pictures at once | Speed up editing with common keystrokes |
| Benefit | Precise control over edits | Keeps workspace organized and efficient | Flexibility for future changes | Saves time on repetitive tasks | Enhances productivity |
| Use Case | Fine-tuning specific areas | Simplifying complex documents | Retaining editability | Editing similar images in bulk | Quick editing and adjustments |
Be sure to note any changes in your editing process to ensure consistency across all pictures.
Time-Saving Shortcuts
It can feel overwhelming managing many photos at once.
But, don’t worry, there are some time-saving shortcuts to make your workflow smoother.
- Use Layer Masks: Adjust individual parts of an image without affecting the entire picture.
- Merge Layers: Combine multiple layers into one to reduce document size and keep things organized.
- Smart Objects: Convert a layer to a Smart Object to make it non-destructive; you can always go back and make edits.
- Batch Processing: Lightroom allows you to apply edits to various photos at once, saving time. For more efficiency, learn Lightroom shortcuts to speed up your editing process.
- Keyboard Shortcuts: Use common keystrokes like Ctrl+C to copy and Ctrl+V to paste elements. Familiarize yourself with essential tools in Photoshop to enhance productivity.
Creative Ideas for Combining Images
Combining pictures can give your project a fresh look.
Here are some creative ideas:
- Panoramas: Stitch together several images to produce a wide-angle view.
- Collages: Merge different images into one grid or overlapping design. You can also learn how to make a collage in Photoshop for more intricate designs.
- Tiling: Arrange images side by side either vertically or horizontally to form a Tilework pattern.
- Layering: Place one image over another and adjust the opacity for a blended effect.
Pro Tip: Always save your work in layers. This gives you the flexibility to make changes without starting over.
Unlock creative ideas for combining images with the quick selection tool in Photoshop. This tool simplifies selecting parts of images, making it easier to blend elements seamlessly into your designs.
Frequently Asked Questions (FAQ)

How to Have Multiple Images in Photoshop?
Follow these steps to add multiple images:
- Open Photoshop and build a new project or open an existing project.
- To add images, go to File > Open and select the images you want to use. These will open in separate tabs.
- You can drag and drop these images into your main project window.
- Arrange the images on the canvas as needed by selecting and dragging them.
How Do I Tile Multiple Images in Photoshop?
Follow these steps to tile multiple images:
- Open all the images you want to tile in Photoshop.
- Go to Window > Arrange > Tile to view all images side by side.
- Choose each image and drag it or paste into one document using the Move Tool.
- Use the alignment tools to evenly space the images.
How Do You Overlay Multiple Pictures in Photoshop?
Follow these steps to overlay multiple pictures:
- Open the images you want to overlay in Photoshop.
- Drag each image into one Photoshop document, placing each on a separate layer.
- Adjust the opacity of the layers to create the overlay effect. This is done in the Layers Panel.
- Use blending modes to enhance the overlay effect by selecting a layer and choosing a blend mode from the drop-down menu in the Layers Panel.
How to Combine 3 Photos into One?
Follow these steps to combine three photos into one:
- Open all three photos in Photoshop.
- Drag each photo into a single document, each on a different layer.
- Place the photos as desired by moving and resizing them.
- Use the Eraser Tool or Layer Masks to blend the edges where the photos meet if necessary.
Conclusion
Working with multiple images in Photoshop can truly transform your creative projects. From blending different scenes to telling a visual story, using multiple images opens up so many possibilities.
I’ve found that combining elements from various photos not only saves time but also enhances the quality of the final design. It’s all about experimenting and finding what works best for your project.
For a deeper dive into Photoshop, check out my Photoshop Course. If you’re also interested in improving your Lightroom skills, my Lightroom Course might be just what you need.
And if you haven’t already, consider exploring the latest versions of Photoshop and Lightroom through Adobe’s official pages.
Happy editing!


